저번 포스팅에서는 리스트 뷰를 이용하여 친구 목록을 구성하였습니다. 이번 포스팅에서는 친구 목록에서 친구를 클릭했을 때의 이벤트 처리 작업을 진행해보도록 하겠습니다.
2. 아이템 클릭 이벤트 리스너 등록하기
① friend라는 패키지를 만들고, friend 패키지 하위로 UserDetailActivity를 생성한다.
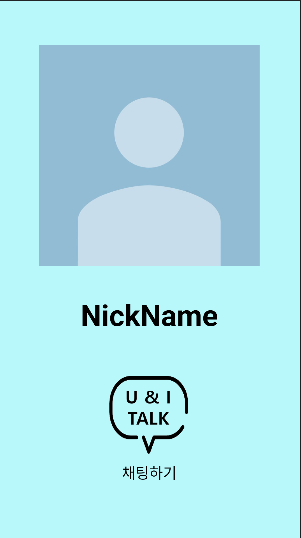
② activity_user_deatil.xml 파일에 아래의 내용을 입력한다.
<?xml version="1.0" encoding="utf-8"?>
<androidx.constraintlayout.widget.ConstraintLayout xmlns:android="http://schemas.android.com/apk/res/android"
    xmlns:app="http://schemas.android.com/apk/res-auto"
    xmlns:tools="http://schemas.android.com/tools"
    android:layout_width="match_parent"
    android:layout_height="match_parent"
    android:background="@color/skyBlue"
    tools:context=".friend.UserDetailActivity">

    <ImageView
        android:id="@+id/profileDetail"
        android:layout_width="300dp"
        android:layout_height="300dp"
        android:src="@drawable/profile"
        android:layout_marginTop="60dp"
        app:layout_constraintEnd_toEndOf="parent"
        app:layout_constraintStart_toStartOf="parent"
        app:layout_constraintTop_toTopOf="parent" />

    <TextView
        android:id="@+id/nickNameDetail"
        android:layout_width="match_parent"
        android:layout_height="wrap_content"
        android:layout_marginTop="400dp"
        android:text="NickName"
        android:textStyle="bold"
        android:textColor="#000000"
        android:textSize="40sp"
        android:gravity="center"
        app:layout_constraintEnd_toEndOf="parent"
        app:layout_constraintHorizontal_bias="0.0"
        app:layout_constraintStart_toStartOf="parent"
        app:layout_constraintTop_toTopOf="parent" />

    <ImageView
        android:id="@+id/startChat"
        android:layout_width="120dp"
        android:layout_height="120dp"
        android:layout_marginBottom="108dp"
        android:src="@drawable/splash"
        app:layout_constraintBottom_toBottomOf="parent"
        app:layout_constraintEnd_toEndOf="parent"
        app:layout_constraintHorizontal_bias="0.498"
        app:layout_constraintStart_toStartOf="parent" />

    <TextView
        android:layout_width="match_parent"
        android:layout_height="wrap_content"
        android:gravity="center"
        android:text="채팅하기"
        android:textColor="@color/black"
        android:textSize="20sp"
        android:layout_marginTop="3dp"
        app:layout_constraintEnd_toEndOf="parent"
        app:layout_constraintStart_toStartOf="parent"
        app:layout_constraintTop_toBottomOf="@+id/startChat" />

</androidx.constraintlayout.widget.ConstraintLayout>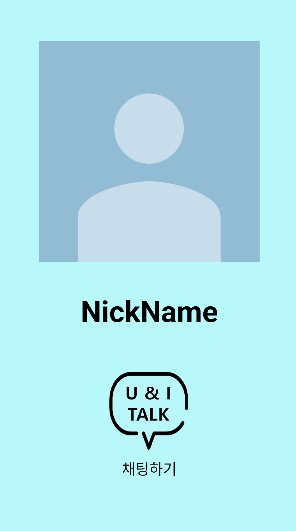
③ UserListFragment의 onCreateView 메서드를 아래와 같이 수정한다.
getAccessToken { accessToken ->
if (accessToken.isNotEmpty()) {
CoroutineScope(Dispatchers.IO).launch {
val response = getUsers(accessToken)
if (response.isSuccess) {
userProfileList = response.result
Log.d("UserProfileList", userProfileList.toString())
withContext(Dispatchers.Main) {
// UI 업데이트는 Main 스레드에서 수행
val adapter = ListViewAdapter(requireContext(), userProfileList ?: emptyList())
val listview = view.findViewById<ListView>(R.id.freindListView)
listview.adapter = adapter
adapter.notifyDataSetChanged()
Log.d("UserProfileList", userProfileList.toString())
listview.setOnItemClickListener { parent, view, position, id ->
val imgUrl = userProfileList!![position].imgUrl
val nickName = userProfileList!![position].nickName
val intent = Intent(requireActivity(), UserDetailActivity::class.java)
intent.putExtra("imgUrl", imgUrl)
intent.putExtra("nickName", nickName)
startActivity(intent)
}
}
} else {
userProfileList = emptyList() // 초기화 실패 시 빈 리스트로 설정
Log.d("UserListFragment", "데이터 불러오기 실패")
val message = response.message
Log.d("UserListFragment", message)
}
}
} else {
Log.e("UserListFragment", "Invalid Token")
}
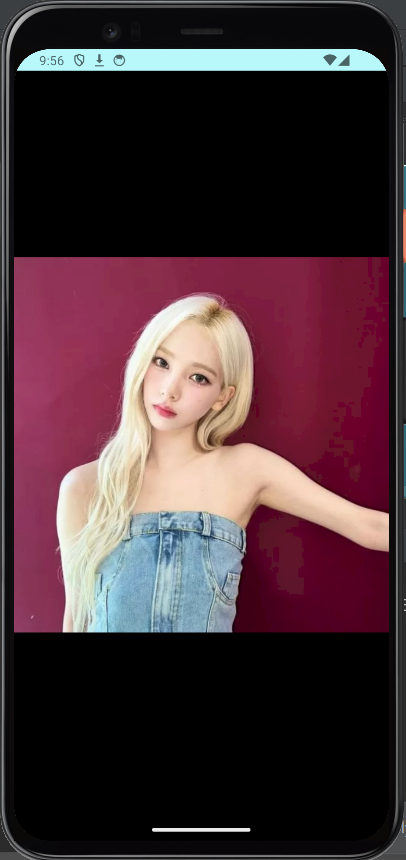
}④ freind 패키지 하위로, ProfileImageActivity를 추가한다.
⑤ activity_profile_image.xml 파일에 아래의 내용을 입력한다.
<?xml version="1.0" encoding="utf-8"?>
<androidx.constraintlayout.widget.ConstraintLayout
    xmlns:android="http://schemas.android.com/apk/res/android"
    xmlns:app="http://schemas.android.com/apk/res-auto"
    xmlns:tools="http://schemas.android.com/tools"
    android:layout_width="match_parent"
    android:layout_height="match_parent"
    android:background="@color/black"
    tools:context=".friend.ProfileImageActivity">

    <ImageView
    	android:id="@+id/profileImage"
        android:layout_width="match_parent"
        android:layout_height="wrap_content"
        android:src="@drawable/profile"
        app:layout_constraintBottom_toBottomOf="parent"
        app:layout_constraintEnd_toEndOf="parent"
        app:layout_constraintStart_toStartOf="parent"
        app:layout_constraintTop_toTopOf="parent" />

</androidx.constraintlayout.widget.ConstraintLayout>
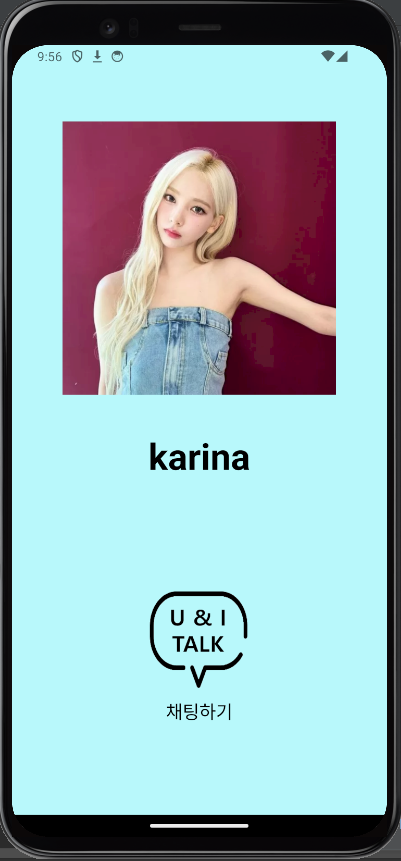
⑥ UserDetailActivity에 아래의 내용을 입력한다.
class UserDetailActivity : AppCompatActivity() {
    override fun onCreate(savedInstanceState: Bundle?) {
        super.onCreate(savedInstanceState)
        setContentView(R.layout.activity_user_detail)

        // Intent로부터 데이터를 가져옴
        val imgUrl = intent.getStringExtra("imgUrl")
        val nickName = intent.getStringExtra("nickName")

        val profileImageView = findViewById<ImageView>(R.id.profileDetail)
        val nickNameTextView = findViewById<TextView>(R.id.nickNameDetail)

        if(imgUrl != null) {
            Glide.with(this)
                .load(imgUrl)
                .into(profileImageView)
        }
        nickNameTextView.text = nickName

        profileImageView.setOnClickListener {
            val intent = Intent(this, ProfileImageActivity::class.java)
            intent.putExtra("imgUrl", imgUrl)
            startActivity(intent)
        }
    }
}
⑦ ProfileImageActivity에 아래의 내용을 입력한다.
class ProfileImageActivity : AppCompatActivity() {
    override fun onCreate(savedInstanceState: Bundle?) {
        super.onCreate(savedInstanceState)
        setContentView(R.layout.activity_profile_image)

        // Intent로부터 데이터를 가져옴
        val imgUrl = intent.getStringExtra("imgUrl")

        val profileImageView = findViewById<ImageView>(R.id.profileImage)
        if(imgUrl != null) {
            Glide.with(this)
                .load(imgUrl)
                .into(profileImageView)
        }
    }
}
이제 코드를 실행시켜보자. 친구 목록에서 친구를 클릭하면 친구의 정보가 화면에 나타나고, 친구의 프로필 이미지를 클릭하면 친구의 이미지를 크게 볼 수도 있다. 참고로, 친구 정보 창에 있는 U & I Talk 아이콘은 채팅방을 생성하는 것이므로, 채팅 기능 구현이 끝날 때 클릭 이벤트 리스너를 등록하기로 하자.
LG전자 VS SW R&D Lab 연구원 Chrome 입니다.