Freind 탭 - 친구 목록 구성하기
이번 포스팅에서는 하단 내비게이션 바에서 Friend 탭을 클릭했을 때 유저들의 정보가 List View의 형태로 나타나도록 만들어보겠습니다.
1. 리스트뷰 구성하기
1) 백엔드
① UserController의 아래의 API를 추가한다.
/**
 * 모든 유저의 닉네임과 프로필 사진 반환
 */
@GetMapping("list-up")
public BaseResponse<List<GetUserRes>> getUsers() {
    try {
        Long userId = jwtService.getUserIdx();
        return new BaseResponse<>(userService.getUsers(userId));
    } catch (BaseException exception) {
        return new BaseResponse<>(exception.getStatus());
    }
}
② UserService에 아래의 메서드를 추가한다.
/**
 * 모든 유저의 닉네임과 프로필 사진 반환
 */
public List<GetUserRes> getUsers(Long userId) {
    utilService.findByUserIdWithValidation(userId);
    List<User> users = userRepository.findUserByIdWithoutMe(userId);
    List<GetUserRes> getUserResList = users.stream()
            .map(user -> {
                String profileUrl = (user.getProfile() != null) ? user.getProfile().getProfileUrl() : null;
                return new GetUserRes(profileUrl, user.getNickName());
            })
            .sorted(Comparator.comparing(GetUserRes::getNickName))
            .collect(Collectors.toList());
    return getUserResList;
}
③ UserRepository에 아래의 쿼리문을 추가한다.
@Query("select u from User u where u.id != :id")
List<User> findUserByIdWithoutMe(@Param("id") Long id);
2) 프론트엔드
① listview_item.xml 파일을 layout 디렉토리 하위에 추가한다.
<?xml version="1.0" encoding="utf-8"?>
<LinearLayout
    xmlns:android="http://schemas.android.com/apk/res/android"
    android:background="@drawable/main_border"
    android:layout_width="match_parent"
    android:layout_height="match_parent">

    <ImageView
        android:id="@+id/listProfileArea"
        android:layout_width="80dp"
        android:layout_height="80dp"
        android:src="@drawable/profile"
        android:layout_marginVertical="10dp"
        android:layout_marginLeft="20dp"/>

    <TextView
        android:id="@+id/listNickNameArea"
        android:layout_width="wrap_content"
        android:layout_height="50dp"
        android:layout_marginTop="25dp"
        android:textColor="#000000"
        android:textSize="30sp"
        android:text="TextArea"
        android:layout_marginLeft="20dp"/>

</LinearLayout>
② 리스트뷰의 리스트에 Generics로 사용할 UserProfile data class를 dto 패키지 하위에 생성한다.
data class UserProfile (
    @SerializedName("imgUrl")
    val imgUrl : String,

    @SerializedName("nickName")
    val nickName : String
)
③ 디폴트 패키지 하위로, ListViewAdapter라는 클래스를 생성한다.
class ListViewAdapter(private val context: Context, private val dataList : List<UserProfile>) : BaseAdapter() {
override fun getCount(): Int {
return dataList.size
}
override fun getItem(position: Int): Any {
return dataList[position]
}
override fun getItemId(position: Int): Long {
return position.toLong()
}
override fun getView(position: Int, convertView: View?, parent: ViewGroup?): View {
var convertView = convertView
if(convertView == null) {
convertView = LayoutInflater.from(context).inflate(R.layout.listview_item, parent, false)
}
val listViewProfile = convertView?.findViewById<ImageView>(R.id.listProfileArea)
val listViewText = convertView?.findViewById<TextView>(R.id.listNickNameArea)
val imgUrl = dataList[position].imgUrl
if(imgUrl != null) {
val imgUri = Uri.parse(imgUrl)
Glide.with(context)
.load(imgUri)
.into(listViewProfile!!)
} else {
listViewProfile!!.setImageResource(R.drawable.profile)
}
listViewText!!.text=dataList[position].nickName
return convertView!!
}
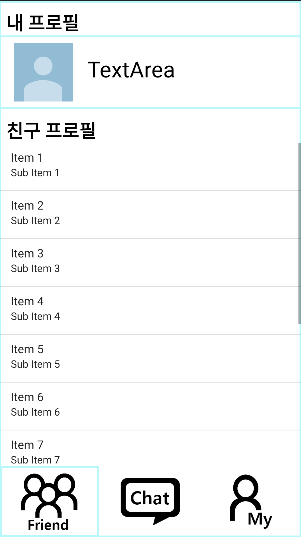
}④ fragment_user_list.xml 파일에 아래의 내용을 입력한다.
<?xml version="1.0" encoding="utf-8"?>
<LinearLayout
    xmlns:android="http://schemas.android.com/apk/res/android"
    xmlns:tools="http://schemas.android.com/tools"
    xmlns:app="http://schemas.android.com/apk/res-auto"
    android:layout_width="match_parent"
    android:layout_height="match_parent"
    android:background="@drawable/main_border"
    android:orientation="vertical"
    tools:context=".UserListFragment">

    <TextView
        android:layout_width="match_parent"
        android:layout_height="wrap_content"
        android:textColor="#000000"
        android:text="내 프로필"
        android:textStyle="bold"
        android:textSize="25sp"
        android:layout_marginTop="10dp"
        android:layout_marginLeft="10dp"/>

    <LinearLayout
        android:layout_width="match_parent"
        android:layout_height="wrap_content"
        android:layout_marginBottom="5dp"
        android:background="@drawable/main_border">

        <ImageView
            android:id="@+id/profileArea"
            android:layout_width="80dp"
            android:layout_height="80dp"
            android:src="@drawable/profile"
            android:layout_marginVertical="10dp"
            android:layout_marginLeft="20dp"/>

        <TextView
            android:id="@+id/nickNameArea"
            android:layout_width="wrap_content"
            android:layout_height="50dp"
            android:layout_marginTop="25dp"
            android:textSize="30sp"
            android:textColor="#000000"
            android:text="TextArea"
            android:layout_marginLeft="20dp"/>

    </LinearLayout>

    <TextView
        android:layout_width="match_parent"
        android:layout_height="wrap_content"
        android:text="친구 프로필"
        android:textColor="#000000"
        android:textStyle="bold"
        android:textSize="25sp"
        android:layout_marginTop="10dp"
        android:layout_marginLeft="10dp"/>

    <ListView
        android:id="@+id/freindListView"
        android:layout_width="match_parent"
        android:layout_height="0dp"
        android:layout_weight="1"
    />

    <androidx.constraintlayout.widget.ConstraintLayout
        android:layout_width="match_parent"
        android:layout_height="100dp"
        android:layout_gravity="bottom">

        <LinearLayout
            android:layout_width="match_parent"
            android:layout_height="100dp"
            app:layout_constraintBottom_toBottomOf="parent">

            <ImageView
                android:id="@+id/freind"
                android:layout_width="match_parent"
                android:layout_height="match_parent"
                android:background="@drawable/main_border"
                android:layout_margin="1dp"
                android:gravity="center"
                android:layout_weight="1"
                android:src="@drawable/friend" />
            <ImageView
                android:id="@+id/chat"
                android:layout_width="match_parent"
                android:layout_height="match_parent"
                android:layout_margin="1dp"
                android:gravity="center"
                android:layout_weight="1"
                android:src="@drawable/chat" />
            <ImageView
                android:id="@+id/mypage"
                android:layout_width="match_parent"
                android:layout_height="match_parent"
                android:layout_margin="1dp"
                android:gravity="center"
                android:layout_weight="1"
                android:src="@drawable/mypage" />

        </LinearLayout>

    </androidx.constraintlayout.widget.ConstraintLayout>

</LinearLayout>
⑤ UserApi 인터페이스에 아래의 API를 추가한다.
@GET("/users/list-up")
suspend fun getUsers(
    @Header("Authorization") accessToken : String
) : BaseResponse<List<UserProfile>>
⑥ UserListFragment 파일에 아래의 내용을 입력한다.
class UserListFragment : Fragment() {
// userProfileList를 nullable로 선언
private var userProfileList: List<UserProfile>? = null
override fun onCreateView(
inflater: LayoutInflater, container: ViewGroup?,
savedInstanceState: Bundle?
): View? {
// Inflate the layout for this fragment
val view = inflater.inflate(R.layout.fragment_user_list, container, false)
lateinit var nickname: String
val myProfile = view.findViewById<ImageView>(R.id.profileArea)
val myNickName = view.findViewById<TextView>(R.id.nickNameArea)
CoroutineScope(Dispatchers.IO).launch {
val response = getUserInfo(FirebaseAuthUtils.getUid())
if (response.isSuccess) {
nickname = response.result?.nickName.toString()
withContext(Dispatchers.Main) {
myNickName.text = nickname
}
if (response.result?.imgUrl != null) {
val profileUrl = response.result?.imgUrl
val profileUri = Uri.parse(profileUrl)
withContext(Dispatchers.Main) {
Glide.with(requireActivity())
.load(profileUri)
.into(myProfile)
}
}
} else {
Log.d("UserListFragment", "유저의 정보를 불러오지 못함")
}
}
// userProfileList 초기화는 API 응답 이후에 수행
getAccessToken { accessToken ->
if (accessToken.isNotEmpty()) {
CoroutineScope(Dispatchers.IO).launch {
val response = getUsers(accessToken)
if (response.isSuccess) {
userProfileList = response.result
Log.d("UserProfileList", userProfileList.toString())
withContext(Dispatchers.Main) {
// UI 업데이트는 Main 스레드에서 수행
val adapter = ListViewAdapter(requireContext(), userProfileList ?: emptyList())
val listview = view.findViewById<ListView>(R.id.freindListView)
listview.adapter = adapter
adapter.notifyDataSetChanged()
Log.d("UserProfileList", userProfileList.toString())
}
} else {
userProfileList = emptyList() // 초기화 실패 시 빈 리스트로 설정
Log.d("UserListFragment", "데이터 불러오기 실패")
val message = response.message
Log.d("UserListFragment", message)
}
}
} else {
Log.e("UserListFragment", "Invalid Token")
}
}
// 나머지 코드는 그대로 유지
val chat = view.findViewById<ImageView>(R.id.chat)
chat.setOnClickListener {
it.findNavController().navigate(R.id.action_userListFragment_to_chatListFragment)
}
val mypage = view.findViewById<ImageView>(R.id.mypage)
mypage.setOnClickListener {
it.findNavController().navigate(R.id.action_userListFragment_to_myPageFragment)
}
return view
}
private suspend fun getUserInfo(uid: String): BaseResponse<GetUserRes> {
return RetrofitInstance.myPageApi.getUserInfo(uid)
}
private suspend fun getUsers(accessToken: String): BaseResponse<List<UserProfile>> {
return RetrofitInstance.userApi.getUsers(accessToken)
}
private fun getAccessToken(callback: (String) -> Unit) {
val postListener = object : ValueEventListener {
override fun onDataChange(dataSnapshot: DataSnapshot) {
val data = dataSnapshot.getValue(com.chrome.chattingapp.authentication.UserInfo::class.java)
val accessToken = data?.accessToken ?: ""
callback(accessToken)
}
override fun onCancelled(databaseError: DatabaseError) {
Log.w("UserListFragment", "onCancelled", databaseError.toException())
}
}
FirebaseRef.userInfo.child(FirebaseAuthUtils.getUid()).addListenerForSingleValueEvent(postListener)
}
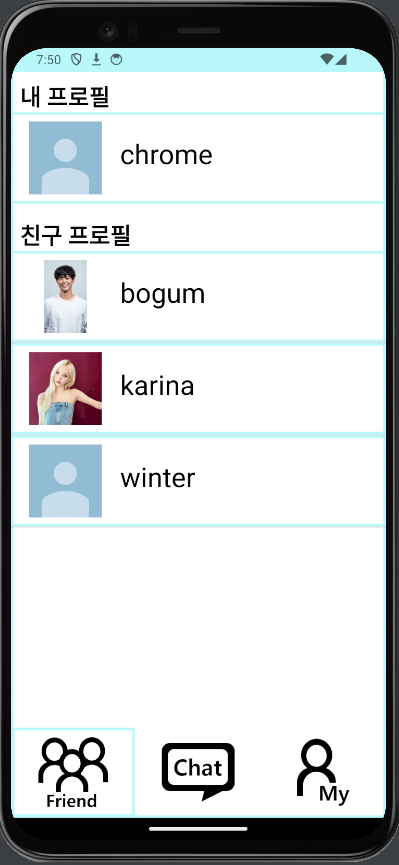
}코드를 실행시켜보자. 하단 NavBar에서 Friend 탭을 클릭하면, 아래와 같이 유저의 정보가 리스트 뷰로 나올 것이다.
※ 테두리 겹침이 신경 쓰이는 경우
아래의 리소스 파일을 이용해보자.
<?xml version="1.0" encoding="utf-8"?>
<layer-list xmlns:android="http://schemas.android.com/apk/res/android">

    <item>
        <shape android:shape="rectangle">
            <solid android:color="@color/skyBlue" />
        </shape>

    </item>

    <item android:bottom="3dp">

        <shape android:shape="rectangle">
            <solid android:color="#ffffff" />
        </shape>

    </item>

</layer-list>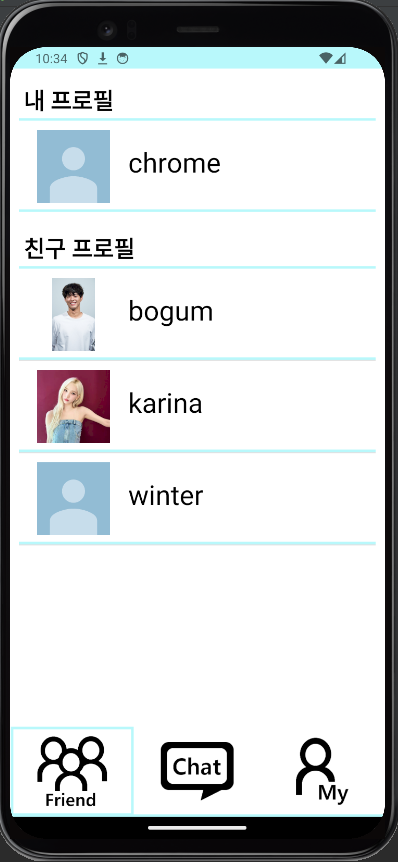

LG전자 VS SW R&D Lab 연구원 Chrome 입니다.