Flutter 앱에 구글 로그인 적용하기
1. dependencies 추가하기
- pubspec.yaml 파일 열어서 dependencies에 필요한 packages를 추가해준 후 Pub get.
- google_sign_in : https://pub.dev/packages/google_sign_in
- supabase_flutter : https://pub.dev/packages/supabase_flutter
// pubspec.yaml

dependencies:
  flutter:
    sdk: flutter

  cupertino_icons: ^1.0.6

  google_sign_in: ^6.2.1
  supabase_flutter: ^2.5.8
2. ios/Runner/Info.plist에 아래 코드 추가
// Info.plist
...
<key>CFBundleURLTypes</key>
<array>
<dict>
<key>CFBundleTypeRole</key>
<string>Editor</string>
<key>CFBundleURLSchemes</key>
<array>
<!-- TODO Replace this value: -->
<!-- Copied from GoogleService-Info.plist key REVERSED_CLIENT_ID -->
<string>com.googleusercontent.apps.IOS 클라이언트 아이디</string>
</array>
</dict>
</array>
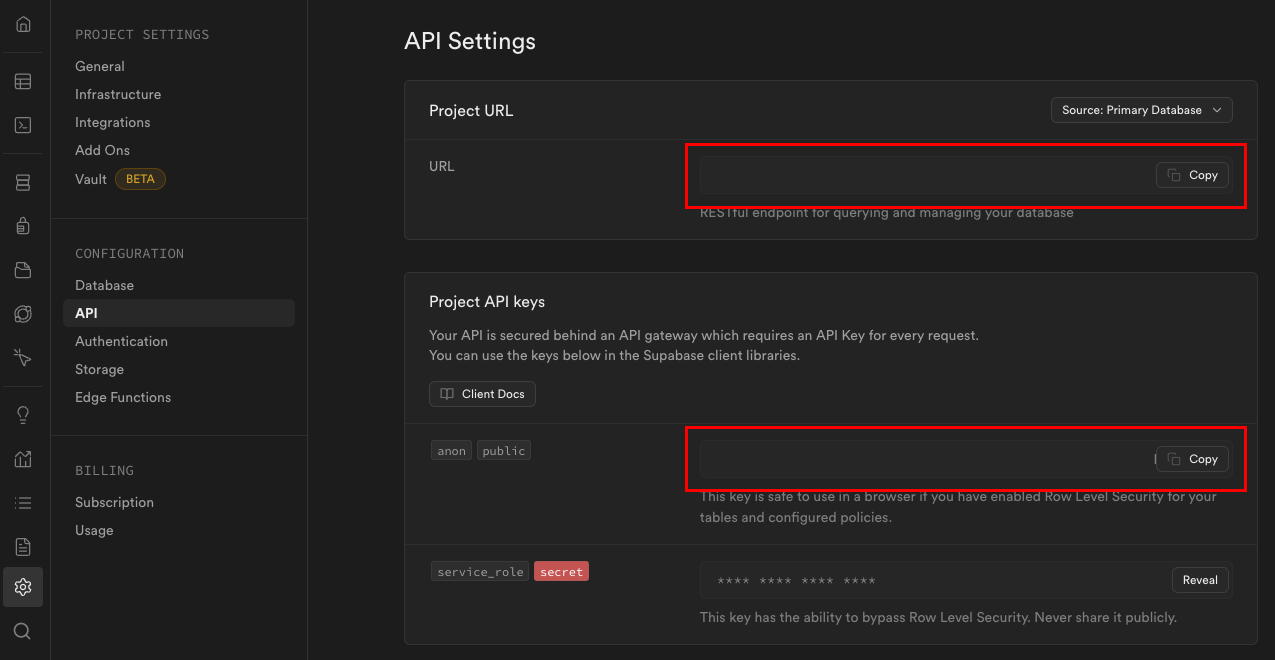
...3. main()에서 Supabase 초기화하기
void main() async {
  await Supabase.initialize(
    url: 'Supabase URL',
    anonKey: 'Supabase anonKey',
  );

  runApp(const MyApp());
}
4. 버튼 이벤트에 구글 로그인 실행코드 작성
- webClientId와 iosClientId에는 구글 클라우드 콘솔에서 생성한 웹 클라이언트와 IOS 클라이언트의 ID값을 복사해서 넣어주면 된다.
...

ElevatedButton(
  onPressed: () async {
	const webClientId = '';

	const iosClientId = '';

	final GoogleSignIn googleSignIn = GoogleSignIn(
        clientId: iosClientId,
		serverClientId: webClientId,
	);
	final googleUser = await googleSignIn.signIn();
	final googleAuth = await googleUser!.authentication;
	final accessToken = googleAuth.accessToken;
	final idToken = googleAuth.idToken;

	if (accessToken == null) {
		throw 'No Access Token found.';
	}
	if (idToken == null) {
		throw 'No ID Token found.';
	}

	await supabase.auth.signInWithIdToken(
		provider: OAuthProvider.google,
		idToken: idToken,
		accessToken: accessToken,
	);
  },
  child: const Text('구글 로그인'),
),

...
💡 로그아웃
supabase.auth.signOut();
버튼을 클릭했을 때 구글 로그인 창이 뜨고 문제없이 로그인에 성공하면 디버그창에 'access_token'이라는 엄청나게 긴 문자열이 나오고 Supabase의 Authentication로 들어가면 유저의 정보가 저장되어 있다. 그리고 아래 코드로 로그인한 유저의 정보에도 접근할 수 있다.
supabase.auth.currentUser.~~~전체코드
import 'package:flutter/material.dart';
import 'package:google_sign_in/google_sign_in.dart';
import 'package:supabase_flutter/supabase_flutter.dart';
void main() async {
WidgetsFlutterBinding.ensureInitialized();
await Supabase.initialize(
url: '본인의 Supabase URL',
anonKey: '본인의 Supabase anonKey',
);
runApp(const MyApp());
}
class MyApp extends StatelessWidget {
const MyApp({super.key});
Widget build(BuildContext context) {
return const MaterialApp(
debugShowCheckedModeBanner: false,
home: LoginScreen(),
);
}
}
class LoginScreen extends StatefulWidget {
const LoginScreen({super.key});
State<LoginScreen> createState() => _LoginScreenState();
}
class _LoginScreenState extends State<LoginScreen> {
final supabase = Supabase.instance.client;
String? _userId;
void initState() {
super.initState();
supabase.auth.onAuthStateChange.listen(
(data) {
setState(() {
_userId = data.session?.user.id;
});
},
);
}
Widget build(BuildContext context) {
print(supabase.auth.currentUser);
return Scaffold(
appBar: AppBar(
title: const Text('구글 로그인'),
elevation: 1.0,
shadowColor: Colors.grey,
),
body: SafeArea(
child: Center(
child: Column(
mainAxisAlignment: MainAxisAlignment.center,
children: [
Text(_userId ?? '로그인 되지 않음'),
const SizedBox(height: 10),
ElevatedButton(
onPressed: () async {
registered with Google Cloud.
const webClientId = '본인의 웹 클라이언트 ID';
const iosClientId = '본인의 IOS 클라이언트 ID';
final GoogleSignIn googleSignIn = GoogleSignIn(
clientId: iosClientId,
serverClientId: webClientId,
);
final googleUser = await googleSignIn.signIn();
final googleAuth = await googleUser!.authentication;
final accessToken = googleAuth.accessToken;
final idToken = googleAuth.idToken;
if (accessToken == null) {
throw 'No Access Token found.';
}
if (idToken == null) {
throw 'No ID Token found.';
}
await supabase.auth.signInWithIdToken(
provider: OAuthProvider.google,
idToken: idToken,
accessToken: accessToken,
);
},
child: const Text('구글 로그인'),
),
const SizedBox(height: 10),
ElevatedButton(
onPressed: () async {
await supabase.auth.signOut();
},
child: const Text('로그아웃'),
)
],
),
),
),
);
}
}마치며.
4개의 글을 통해 Supabase와 구글 api를 사용하여 구글 로그인을 구현하는 법 포스팅은 끝이났다.
구글 로그인을 넣으려고 할 때 Supabase가 정식 출시된지 얼마 되지 않아 레퍼런스가 많이 부족할까 걱정이 많았지만 공식문서에 정리가 잘 되어있었고 Supabase 공식 유튜브 채널에 영상도 올라와 있어서 나름 쉽게(?) 구현할 수 있었다.
사실 소셜 로그인을 처음 구현해보기도 하고 프론트엔드 지망이라 백엔드 쪽에 지식은 많이 부족해서 아직 메커니즘을 이해하지 못했으나... 지금은 로그인이 된다는 것에 만족하려고 한다...😂