프로젝트가 끝나고 설문조사 답변을 받아 기능을 추가해봤고 그 과정에서 생긴 문제를 작성해봤다.

서비스에 대해서 설문조사를 진행하였고, DM 페이지 관련해서 메시지를 여러줄로 받을 수 있으면 좋겠다는 요구사항을 전달받았다. DM 메시지를 입력하는 부분을 input태그로 구현하는 것이 일반적이라고 생각했는데 다른 분들의 서비스들을 보니 내 방식과 같이 매시지를 한줄로만 입력하여 엔터로 메시지를 보내거나 여러줄을 입력하고 엔터가 아닌 전송버튼을 클릭해서 메시지를 보내는 방식 두가지로 나뉘는듯 했다. 개인적으로 후자의 경우 채팅을 엔터로 보낼 수 없다는 점에서 불편하다 느껴서 내가 한 방식이 옳다고 생각하였지만 이번 기회에 사용자가 많이 이용하는 유명한 서비스의 채팅기능을 꼼꼼히 살펴보았다.
인스타그램, 카톡을 포함한 여러 채팅 기능의 경우 shift+enter로 줄바꿈을 하고 줄바꿈에 따라 input상자의 일정크기까지 늘어나고 이후에 크기가 더 늘어날 경우 스크롤이 생기는 방식을 사용하고 있었다. 위에서 언급한 두가지 방식을 합쳐놓은 느낌이어서 편리하다 생각했다.
그래서 나도 여러줄로 입력이 가능하면서 엔터로 메시지를 보내도록 기능을 수정해보기로 하였다.
기존 코드
import * as S from "./MessageInput.Styles"
import MessageProfile from "../../MessageGroupList/MessageProfile"
import { useEffect, useState } from "react"
import useSendMessage from "../../../hooks/useSendMessage"
import SendIcon from "@mui/icons-material/Send"
import { AUTH_API } from "@/apis/Api"
import { DM_PLACEHOLDER_MESSAGE } from "@/constants/placeholderMessage"

interface MessageInputProps {
  othersUserId: string
}

const MessageInput = ({ othersUserId }: MessageInputProps) => {
  const [sendingMessage, setSendingMessage] = useState("")
  const { AlertModalComponent, sendMessage } = useSendMessage()
  const [myProfileImg, setMyProfileImg] = useState("")

  const handleInputChange = (e: React.ChangeEvent<HTMLInputElement>) => {
    const { value } = e.target
    setSendingMessage(value)
  }

  const handleSubmit = (e: React.FormEvent<HTMLFormElement>) => {
    e.preventDefault()
    const messageSubmission = {
      message: sendingMessage,
      receiver: othersUserId,
    }
    sendMessage.mutate(messageSubmission)
    setSendingMessage("")
  }

  const getMyProfileImg = async () => {
    const { image } = await AUTH_API.get(`/auth-user`).then((res) => res.data)

    setMyProfileImg(image)
  }

  useEffect(() => {
    getMyProfileImg()
  }, [])

  return (
    <>
      {AlertModalComponent}
      <S.MessageInputLayout>
        <S.MessageInputForm onSubmit={handleSubmit}>
          <MessageProfile profileImg={myProfileImg} />
          <S.MessageInputItem
            placeholder={DM_PLACEHOLDER_MESSAGE.SEND_MESSAGE_INPUT}
            onChange={handleInputChange}
            value={sendingMessage}
          />
          <S.MessageSendButton>
            <SendIcon />
          </S.MessageSendButton>
        </S.MessageInputForm>
      </S.MessageInputLayout>
    </>
  )
}

export default MessageInputMessageInput컴포넌트는 말그대로 input을 담당하는 컴포넌트다. 여기서 input태그의 보낼 메시지 상태를 관리하고 제출관련한 로직도 담고 있다. 실제 입력이 이뤄지는 input 태그는 MessageInputItem컴포넌트이다.
textarea를 이용해 여러 줄 입력(엔터로 메시지 보내기 + shift+엔터로 줄바꿈)
지금은 input태그를 사용하고 있기 때문에 한 줄로만 입력이 가능했다. 따라서 우선 여러줄로 메시지를 입력하기 위해 textarea 태그를 이용하였다. 또한, 기존에 입력이나 전송에 관련한 로직을 컴포넌트 안에 두고 있었는데 추상화를 위해 훅으로 따로 관리하였다.
const MessageInput = () => {
  const { textValue, handleInputChange, handleSubmit, AlertModalComponent } = useTextArea()

  return (
    <>
      {AlertModalComponent}
      <S.MessageInputLayout>
        <S.MessageInputForm onSubmit={handleSubmit}>
          <MessageProfile profileImg={myProfileImg} />
          <S.MessageInputItem
            placeholder={DM_PLACEHOLDER_MESSAGE.SEND_MESSAGE_INPUT}
            onChange={handleInputChange}
            value={textValue}
          />
          <S.MessageSendButton>
            <SendIcon />
          </S.MessageSendButton>
        </S.MessageInputForm>
      </S.MessageInputLayout>
    </>
  )
}

export default MessageInput
// 훅
import { useState } from "react"
import useSendMessage from "./useSendMessage"
import { useParams } from "react-router-dom"
const useTextArea = () => {
const [textValue, setTextValue] = useState("")
const { AlertModalComponent, sendMessage } = useSendMessage()
const { userId: othersUserId } = useParams()
const handleInputChange = (
e: React.ChangeEvent<HTMLTextAreaElement>,
): void => {
const { value } = e.target
if (!value) {
return
}
setTextValue(value)
}
const handleSubmit = (e: React.FormEvent<HTMLFormElement>): void => {
e.preventDefault()
if (!othersUserId) {
return
}
const messageSubmission = {
message: textValue,
receiver: othersUserId,
}
sendMessage.mutate(messageSubmission)
setTextValue("")
}
return { textValue, handleInputChange, handleSubmit, AlertModalComponent }
}
export default useTextArea
당연히 예상한 결과지만 textarea로 바꿨기 때문에 더 이상 엔터로 메시지를 보낼 수 없다..!
엔터는 그냥 줄바꿈으로 인식되고, 전송은 오직 클릭버튼을 눌러야만 가능하다..
그래서 다른 여러 서비스에서 사용하는 것과 같이 shift+enter를 통해 줄바꿈, enter를 통해 전송을 하도록 구현했다.
type EventType =
  | React.KeyboardEvent<HTMLTextAreaElement>
  | React.FormEvent<HTMLFormElement>

const useTextArea = () => {

  const handleSubmit = (e: EventType): void => {
    e.preventDefault()
    if (!othersUserId) {
      return
    }

    const messageSubmission = {
      message: textValue,
      receiver: othersUserId,
    }

    setTextValue("")
    sendMessage.mutate(messageSubmission)
  }

  const handleEnter = (e: React.KeyboardEvent<HTMLTextAreaElement>) => {
    if (!othersUserId) {
      return
    }

    if (e.key === "Enter" && !e.shiftKey) {
      handleSubmit(e)
    }
  }

  return {
    textValue,
    handleInputChange,
    handleSubmit,
    AlertModalComponent,
    handleEnter,
  }
}

export default useTextArea
엔터를 감지하기위해 기존의 onChange이벤트 이외에 onKeyDown을 추가해서 오직 enter를 눌렀을때만 전송 이벤트를 호출하도록 하였다.
메시지가 두번 보내지는 문제
const handleEnter = (e: React.KeyboardEvent<HTMLTextAreaElement>) => {
    if (e.key === "Enter" && !e.shiftKey) {
      handleSubmit(e)
    }
  }
위와 같이 구현하니 enter와 shift+enter 이벤트를 구분할 수 있었지만keydown이벤트에서만 한글을 입력하고 제출 시 끝의 글자 하나가 중복돼서 보내지는 문제가 있었다. 구글링을 하니 유명한 문제였고 빠르게 해결할 수 있었다.

위 사진을 자세히 보면 글자 입력시 아래 파란색 밑줄이 생긴다. 이 경우 메시지를 보내게 되면 이벤트가 두번 호출되는 문제가 발생하는 것이다. 영어와 다르게 한글은 받침이 존재하기 때문에 글자가 조합 중인지 끝난 상태인지 파악하기 어렵기 때문에 발생하는 문제였다.
다행히, 키보드 이벤트의 isComposing 함수를 통해 입력된 문자가 조합 문자인지 아닌지를 검증할 수 있었다.
const handleEnter = (e: React.KeyboardEvent<HTMLTextAreaElement>) => {
    // 조합중일 경우 이벤트 막음
    if (e.nativeEvent.isComposing) {
      return
    }

    if (e.key === "Enter" && !e.shiftKey) {
      handleSubmit(e)
    }
  }
이제 문자가 조합중이지 않을 경우에만 메시지를 전송하므로 중복출력이 되지 않는다.
textarea의 높이가 자동 조절되지 않는 문제
현재는 shift+enter로 줄바꿈이 가능하지만 그에 맞게 textarea의 높이가 늘어나지 않아서 사용자가 현재 입력하고 있는 메시지들의 전체적인 내용을 확인할 수 없는 문제가 있었다. 제일 거슬리는 문제이고 해결하는데 오래걸릴 것 같은 문제였다. 실제로 다른 문제들보다 해결하는데에 시간을 많이 썼다.
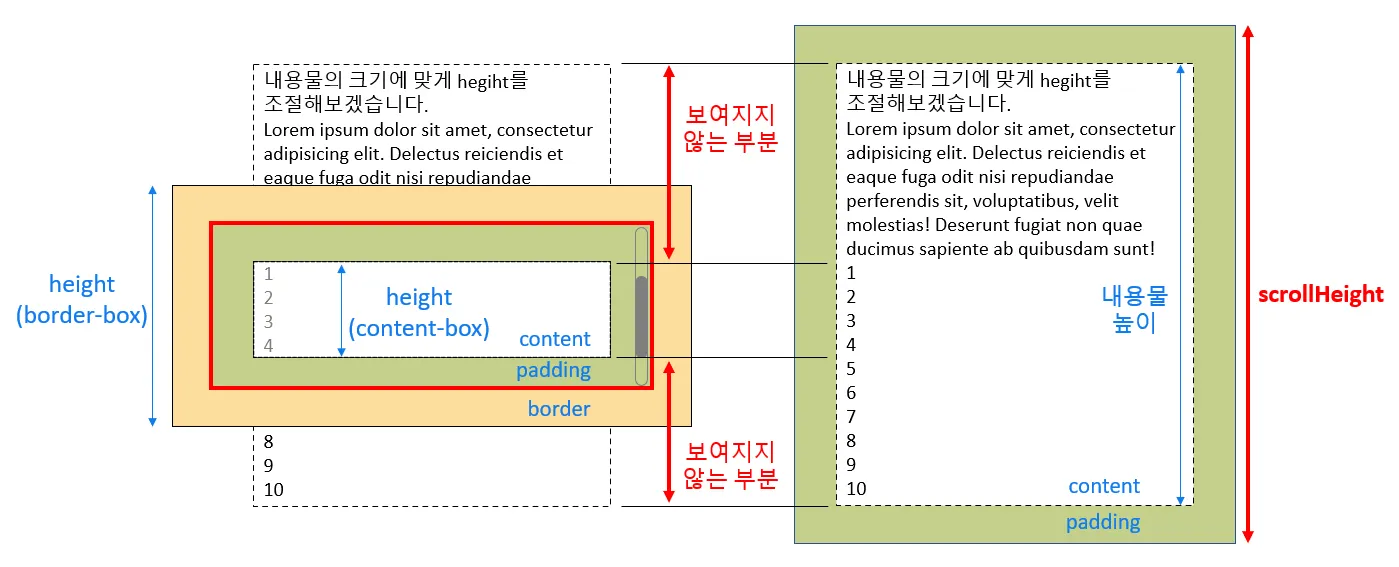
이 문제를 해결하기 위해선 scrollHeight개념을 완전히 이해해야한다.
컨텐츠가 보여지는 영역인 height 외에 보여지지 않는 부분까지 포함된 scrollHeight라는 속성이 존재했고 현재 아무리 줄바꿈을 많이해도 보여지지 않는 부분을 scrollHeight가 포함하고 있고 scrollHeight는 동적으로 변하지만 height는 고정되어있어서 초기에 스타일로 지정한 높이만큼만 보여지는 것이다.
따라서, 영역이 늘어남에 따라 height영역의 크기를 DOM 접근을 통해(ref) scrollHeight를 대입하면 문제를 해결할 수 있을 것 같다는 느낌을 받을 수 있다. 하지만, height가 내용물의 height보다 큰 경우가 존재한다. content는 내용물 높이와 1:1로 같은 것이 절대 아니고 비어있는 높이가 존재하기 때문이다. 결국 cotnent의 높이는 내용물 높이 + 비어있는 높이이고, scrollHeight는 내용물의 높이 + padding이 아닌 content + padding + 보여지지 않는 내용물의 높이로 계산해야한다.
이를 왜 고려해야 하냐면 줄바꿈을 여러번 하고 글자들을 다시 지울경우 비어있는 공간이 줄어들지 않는 문제가 발생하기 때문이다.
이를 고려한 최종 코드는 다음과 같다.
  const resize = () => {
    if (!textRef.current) {
      return
    }

    textRef.current.style.height = "0px"

    const scrollHeight = textRef.current.scrollHeight
    const style = window.getComputedStyle(textRef.current)
    const borderTop = parseInt(style.borderTop)
    const borderBottom = parseInt(style.borderBottom)

    textRef.current.style.height =
      scrollHeight + borderTop + borderBottom + "px"
  }

  const handleInputChange = (
    e: React.ChangeEvent<HTMLTextAreaElement>,
  ): void => {
    // 생략
    resize()
  }

  const handleSubmit = (e: EventType): void => {
    // 생략
    resize()
  }
}

export default useTextArea
우선, textarea의 속성을 계산하고 할당해야하므로 ref를 이용하였다. 그리고 핵심적인 resize함수의 로직은 다음과 같다. resize함수는 메시지를 매번 입력시 호출된다.
height를 0으로 설정scrollheight를 계산height에scrollHeight대입
핵심은 매번 height를 0으로 설정하는 것인데 이를 통해 줄바꿈을 해제할때 항상 빈공간의 높이를 고려하여 scrollHeight를 계산해줄 수 있다.
메시지를 보내고 높이가 초기화 되지 않는 문제
이제 메시지를 썼다 지웠다 하는 과정에서 textarea의 높이는 동적으로 잘 늘어나지만 늘어날때 리스트의 스크롤이 위로 올라가서 최신 메시지가 가려진다는 문제, 메시지를 전송했을 때에는 input부분의 높이가 원래대로 돌아오지 않는다는 문제가 있었다.
우선, 첫 번째 문제는 기존의 스크롤이 늘어난 만큼 스크롤을 아래로 내려주는 함수를 재활용하였다. 이를 위해서 textarea의 높이에 따라서 함수를 호출하려 했는데
기존에는 MessageInput외부에서 관리되고 있던 이 함수를 MessageInput에서 textRef가 변함에 따라 함수를 props로 넘겨서 호출하려 했다. 하지만 이후에 useEffect를 되도록 지양하기 위해서 상위의 MessageList에서 height를 state로 관리하고 resize마다 이 상태값을 업데이트 하도록하였다.
// MessageList.tsx

  const scrollToBottom = () => {
    if (scrollRef.current) {
      scrollRef.current.scrollTop = scrollRef.current.scrollHeight
    }
  }

  useEffect(() => {
    scrollToBottom()
  }, [MessageList, messageListHeight])
// 훅
  const resize = () => {
 // 생략
    if (scrollRef.current) {
      setMessageListHeight(scrollRef.current.clientHeight)
    }
  }
두번째 문제는 제출시마다 기존의 height로 설정하도록 수정하였다.
  const handleSubmit = (e: EventType): void => {
    // 생략

    // 제출 후 원레 높이로 재조정
    if (textRef.current) {
      textRef.current.style.height = "18px"
    }
  }
초기 렌더링시 스크롤 계산 함수가 두 번 호출 되는 문제

  const [messageListHeight, setMessageListHeight] = useState(0)

  const { userId: othersUserId } = useParams()
  const { data: MessageList } = useMessageList(othersUserId || "")
  const scrollRef = useRef<HTMLDivElement>(null)

  const scrollToBottom = () => {
    if (scrollRef.current) {
      scrollRef.current.scrollTop = scrollRef.current.scrollHeight
    }
  }

  useEffect(() => {
    scrollToBottom()
  }, [MessageList, messageListHeight])
리액트의 strict 모드의 경우는 렌더링을 두번한다. 하지만, 콘솔을 통해 확인해보니 렌더링이 두번 되고나서 1초 정도뒤에 다시 렌더링이 되는 것을 발견하였다. useEffect의 dependencgy를 확인해보니MessageList라는 서버에서 받는 데이터가 원인이라는 것을 알게 되었다.
그래서 서버데이터를 받는 useQuery 훅 내부를 살펴보니 문제의 원인을 단번에 알수 있었다.

훅 내부에서 refetch를 1초마다 보내고 있기 때문에 서버에서 받아오는 메시지 리스트의 데이터가 계속 갱신되고 있었고 똑같아 보여도 매번 새로 받아오는 서버 데이터이기 때문에 다른 데이터로 보고 useEffect내부의 함수가 실행되는 것이었다.
  useEffect(() => {
    scrollToBottom()
  }, [MessageList?.length, messageListHeight])
따라서, dependency를 배열 자체가 아닌 배열의 길이로 수정해서 해결할 수 있었다.
참고자료
https://oursmalljoy.com/js-textarea-auto-height-upon-typing/
https://doqtqu.tistory.com/344