
앞선 글에서 index.ejs 에 임의의 HTML 문자열을 넣었었다.
그러나 우리가 원하는 화면은 메인 화면에서 게시글의 목록이 보이는 것이다.
이번 포스팅에서는 메인 화면인 index.ejs 에 게시글 목록을 띄워보자.
1. 메인화면에 article 정보 넘겨보기
// server.js
app.get('/', (req,res) => {
       const articles = [{
        title: "Test Article",
        createdAt : Date.now(),
        description: 'Test descrtiption'
    },
    {
        title: "Test Article2",
        createdAt : Date.now(),
        description: 'Test descrtiption2'
    }]
    res.render("index", { articles: articles});
})
index.ejs에articles객체를 넘겨서 값을 렌더링한다.
<!-- index.ejs-->
<body>
    <h1><%= articles %></h1>
</body>
💡 ejs 파일 안에서의 변수, 혹은 코드 선언
<%= %>: 태그 안의 변수 값을 그대로 코드처럼 옮겨준다.
<% %>: 태그 안의 자바스크립트 코드를 그대로 코드처럼 실행시켜준다.
2. 부트스트랩을 통한 스타일링
<!-- index.ejs -->
<!DOCTYPE html>
<html lang="en">
<head>
    <meta charset="UTF-8">
    <meta http-equiv="X-UA-Compatible" content="IE=edge">
    <meta name="viewport" content="width=device-width, initial-scale=1.0">
    <link rel="stylesheet" href="https://maxcdn.bootstrapcdn.com/bootstrap/4.0.0/css/bootstrap.min.css" integrity="sha384-Gn5384xqQ1aoWXA+058RXPxPg6fy4IWvTNh0E263XmFcJlSAwiGgFAW/dAiS6JXm" crossorigin="anonymous">
    <title>Glog</title>
</head>
<body>
    <div class = "container">
        <h1 class = "mb-4">Glog Articles</h1>
        <a href = "/articles/new" class = "btn btn-success">New Article </a>
    </div>
</body>
</html>
💡 bootstrap의 링크를 stylesheet 로 삽입하면,
엘리먼트에 부트스트랩에서 정해준 클래스명을 쓰는 것만으로도 스타일을 적용할 수 있다.
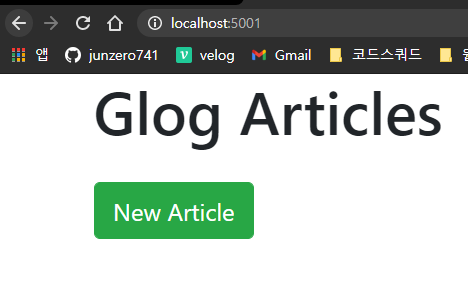 부트스트랩의 스타일이 적용된 메인화면.
3. 아티클 카드 만들기
메인 화면에 보이는 게시글마다 자신만의 div를 가져야 하므로,
index.ejs 에서 ejs 문법을 사용해 코드를 작성해보자.
<!--- index.ejs 의 body태그 내부 --->
<body>
    <div class = "container">
        <h1 class = "mb-4">Glog Articles</h1>
        <a href = "/articles/new" class = "btn btn-success">New Article </a>

        <% articles.forEach(article => { %>
            <div class = "card mt-4">
                <div class = "card body">
                    <h4 class="card-title"><%= article.title %></h4>
                    <div class = "card-subtitle text-muted mb-2">
                        <%= article.createdAt.toLocaleDateString() %>
                    </div>
                      <div class = "card text mb-2"><%= article.description %></div>
                </div>
            </div>
        <% }) %>
    </div>
</body>
변수로 받아온
article객체의 수 만큼div태그를 생성하고, 내부는 해당article객체의 속성들로 채운다.
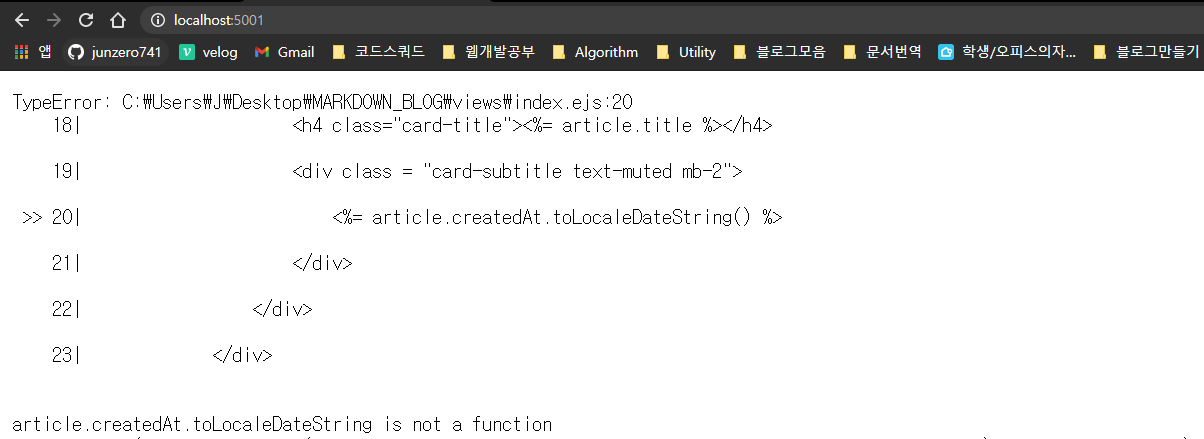
server.js 의 articles 배열의 원소 수 만큼 article이 생성되어야 하는데 버그가 생겼다.
4. 버그수정 : server.js 의 date 객체 수정
// server.js

app.get('/', (req,res) => {
    const articles = [{
        title: "Test Article",
        createdAt : new Date(),
        description: 'Test descrtiption'
    },
    {
        title: "Test Article2",
        createdAt : new Date(),
        description: 'Test descrtiption2'
    }]
    res.render("index", { articles: articles});
})
Date.now에는 위 3번에서 실행한toLocaleDateString()이 실행되지 않으므로,new Date()로 바꿔준다.
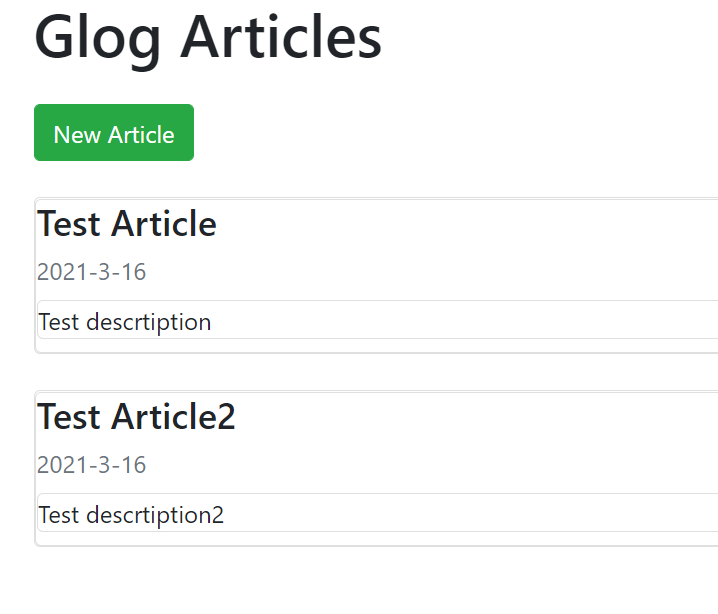
게시글의 title, createdAt, description이 성공적으로 렌더링되었다.
다음 글에서는 new Article 버튼을 실제로 동작하게 만들어보자.

3/21 완료! 👌
제이슨이 알려주셨는데 server.js에 res.render에 {articles: articles} 부분 key와 value가 같아서 축약표기법으로 {articles} 라고 쓸 수 있대요!! 👍