
이 글은 <Three.js와 친해져보자> 시리즈의 글이다.
Three.js의 기본적인 내용을 잘 모른다면, 아래의 글을 먼저 읽고 오는 것을 추천한다.
이 글에서는 Three.js의 Scene Graph 개념을 이해하는 것에 집중하며
자전과 공전을 코드로 구현해볼 것이다.
JS로 자전과 공전을 구현해볼 수 있다니 생각만해도 가슴이 뛴다...
가보자고!

🍞 목표
태양, 지구, 달의 자전과 공전을 구현하며 Scene Graph를 이해해보자.
🍞 Scene Graph란?
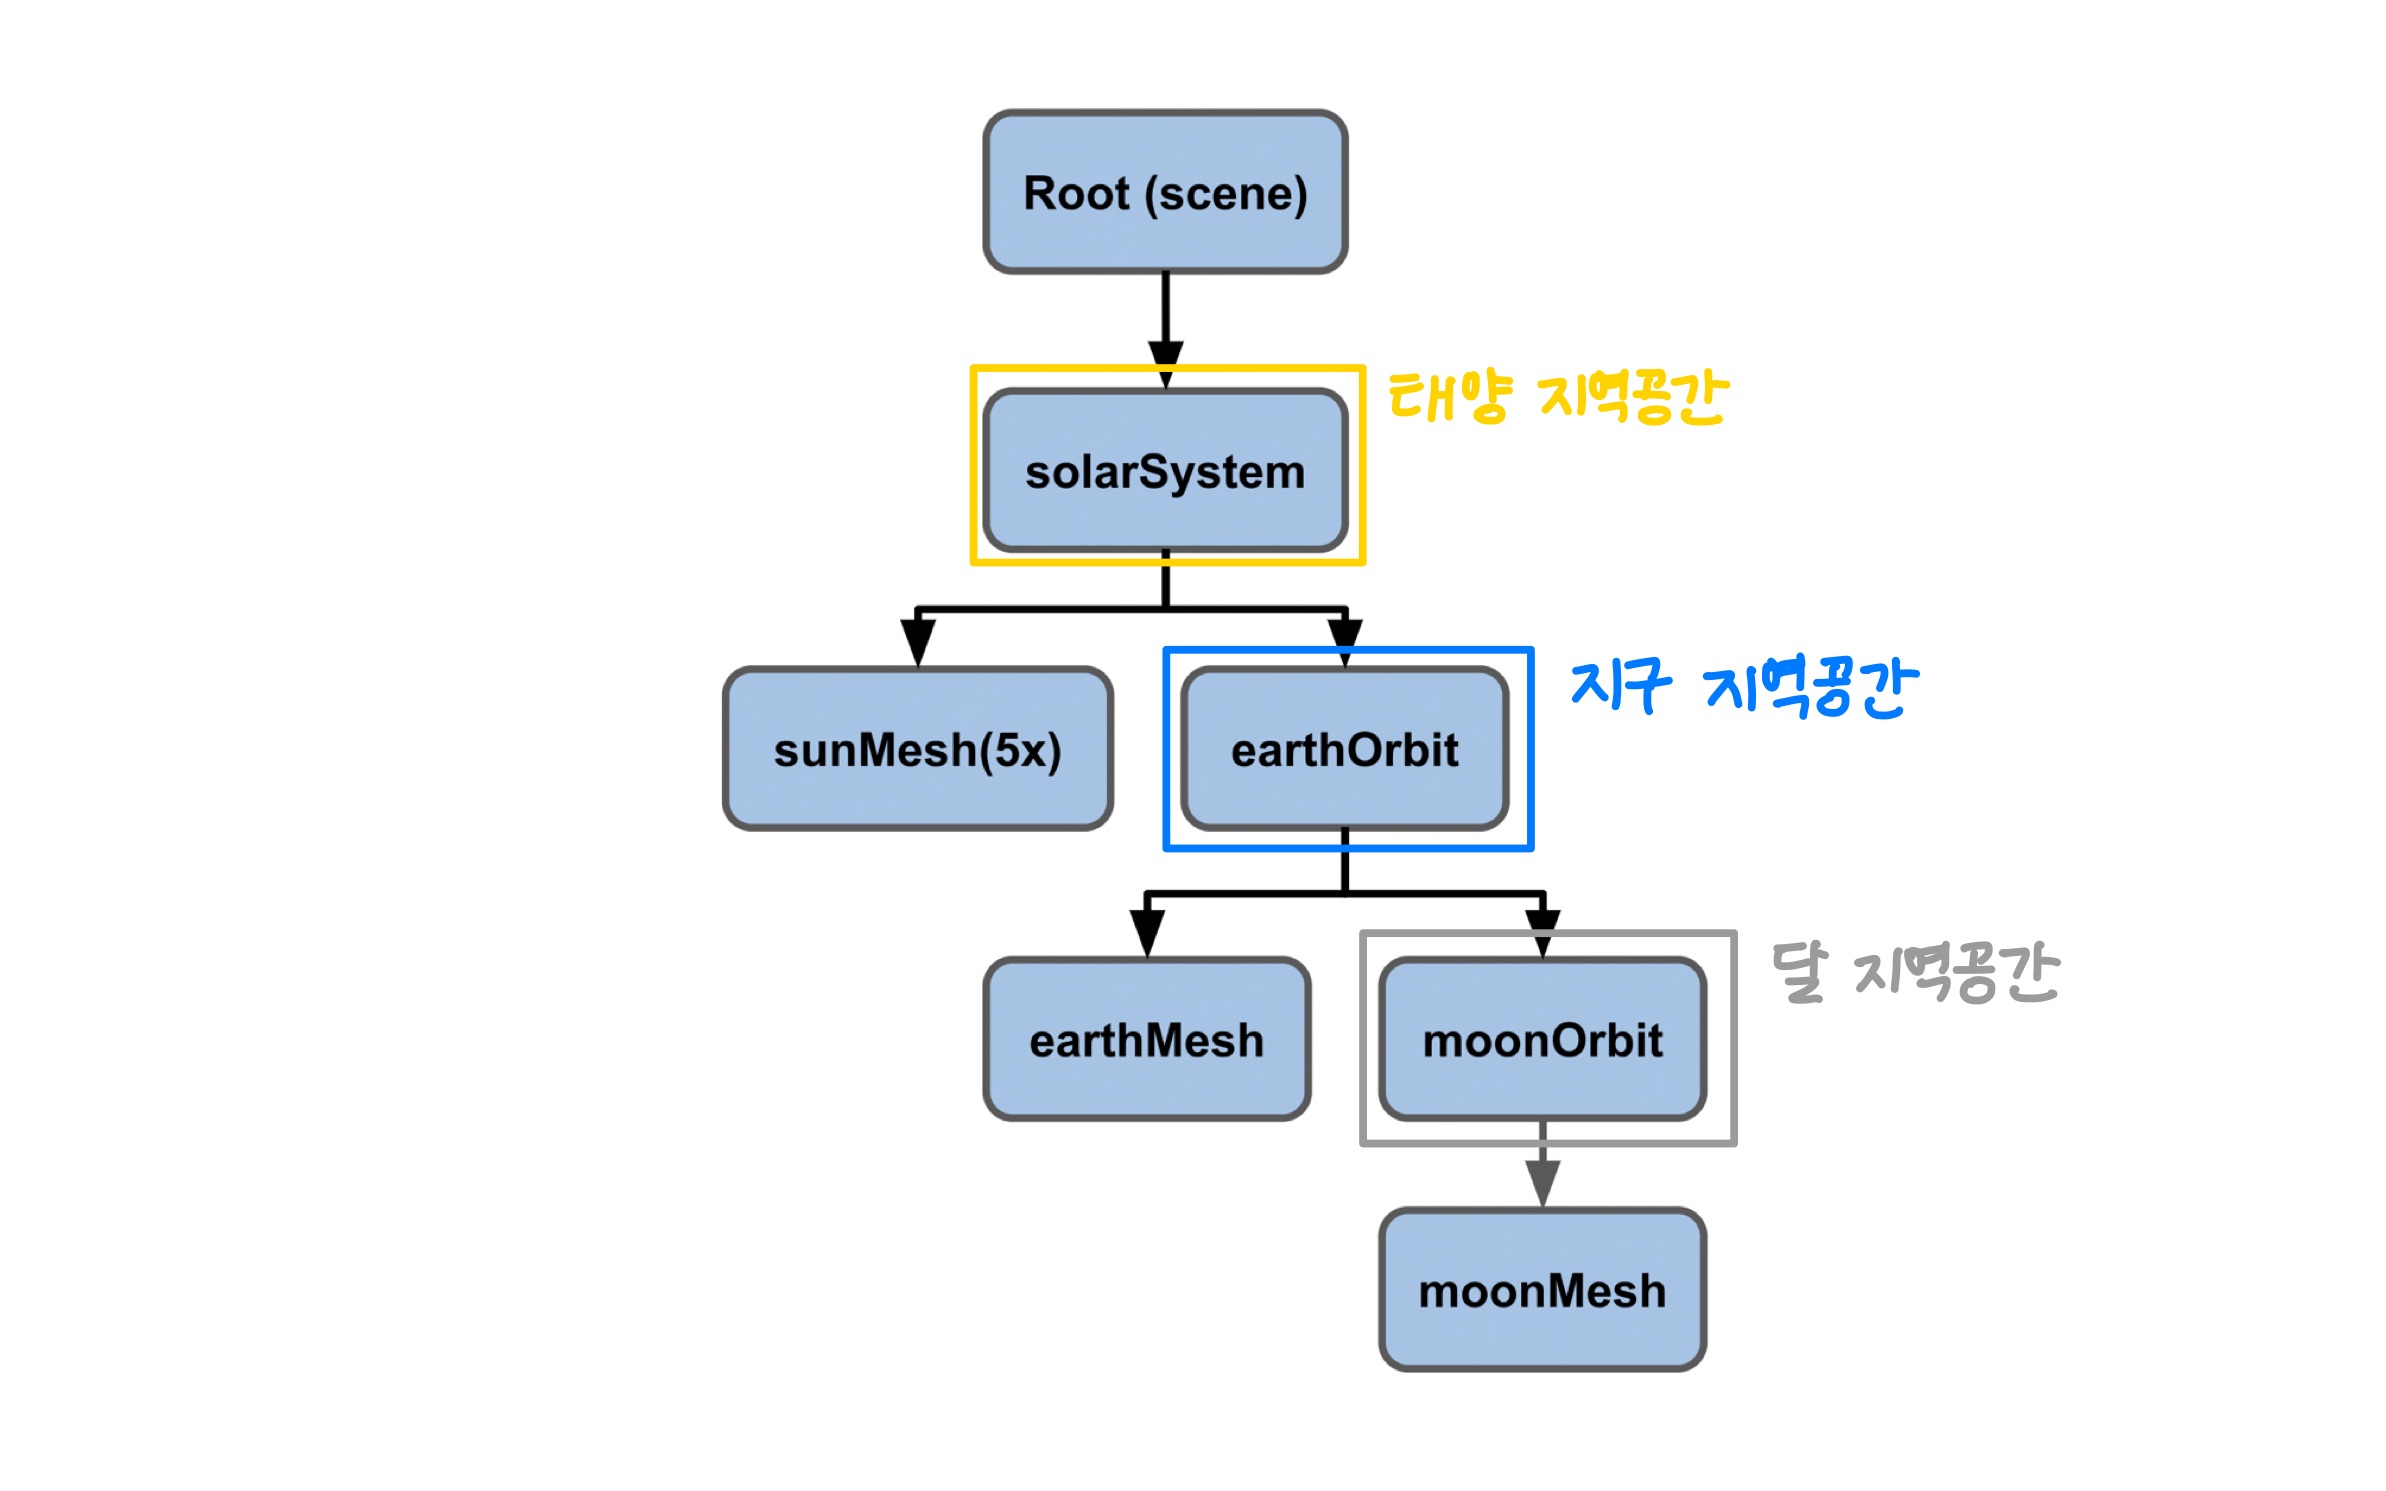
3D 엔진에서 Scene Graph란 요소의 계층 구조를 그림으로 나타낸 것이다.
여기서 각 요소는 각각의 지역 공간 (local space)를 가리킨다.

Root라는 지역 공간 안에 child1과 child2라는 지역 공간이 있다.
그리고 child1 공간 안에는 child1_1과 child1_2 공간이 있다.
아직 이해가 잘 안된다면..
이 그래프를 태양계에 적용해서 살펴보자.

달은 지구를 중심으로 공전하고, 지구는 태양을 중심으로 공전한다.
달은 지구의 지역 공간 안에서 공전하고, 지구는 태양의 지역 공간 안에서 공전한다.
 출처:
출처: 지역 공간을 하나의 덩어리라고 생각하면 편할 것 같다.
먼저 달이라는 하나의 덩어리가 있을 것이다.
그리고 공전하는 달과 지구가 하나의 덩어리가 될 것이다.
그리고 달 + 지구라는 하나의 덩어리와, 태양이 합쳐져서 하나의 덩어리가 된다.
빨간색이 태양의 지역 공간, 파란색이 지구의 지역 공간이 되는 셈이다.
🍞 자전하는 태양 만들기
그럼 이제 이 태양계를 Three.js로 구현해보자.
실행하기 쉽도록 하나의 html 파일 안에 코드를 모두 작성하겠다.
<!DOCTYPE html>
<html>
  <head>
    <meta charset="utf-8" />
    <meta
      name="viewport"
      content="width=device-width, initial-scale=1.0, user-scalable=yes"
    />
    <title>Three.js - Scenegraph - Sun</title>
    <style>
      html,
      body {
        height: 100%;
        margin: 0;
      }
      #c {
        width: 100%;
        height: 100%;
        display: block;
      }
    </style>
  </head>

  <body>
    <canvas id="c"></canvas>
  </body>

  <script type="module">
    import * as THREE from "https://threejs.org/build/three.module.js";

    const canvas = document.querySelector( '#c' );
	const renderer = new THREE.WebGLRenderer( { canvas } );
    renderer.setSize(window.innerWidth, window.innerHeight);

	const camera = new THREE.PerspectiveCamera(
      40, // fov
      window.innerWidth / window.innerHeight, // aspect
      0.1, // near
      1000 // far
    );

	const scene = new THREE.Scene();

    // 🍞 여기 메인 코드를 작성할 것이다.
    // 위의 코드가 잘 이해되지 않는다면 이전 글을 먼저 읽고 오자.
  </script>
</html>
이제부터는 위의 코드에서 🍞 이모티콘이 달린 부분에 들어갈 js 코드 위주로 설명하겠다.
먼저 카메라 설정을 변경하고, 빛을 넣어보자.
// 모두 X, Y, Z 좌표를 의미
camera.position.set( 0, 50, 0 );
camera.up.set( 0, 0, 1 );
camera.lookAt( 0, 0, 0 );
position 속성을 이용하여 카메라를 Y축 방향으로 50만큼 옮긴다.
이렇게 하면 중점에서 50만큼 위에 카메라가 설치된다.
그리고 up속성을 이용하여 카메라의 상단 방향을 설정한다.
Z축에 1을 설정하여, Z축 방향을 카메라의 상단으로 설정한다.
이렇게 하면 카메라가 위에서 아래를 내려다보는 각도가 된다.
마지막으로 lookAt 속성을 이용하여 카메라가 특정 좌표를 바라보도록 설정한다.
이 경우 X, Y, Z 좌표에 모두 0을 넣어 원점을 바라보도록 한다.
하지만 이렇게 설명해서는 이해가 잘 되지 않을 것이다.
아래의 그림을 보자.
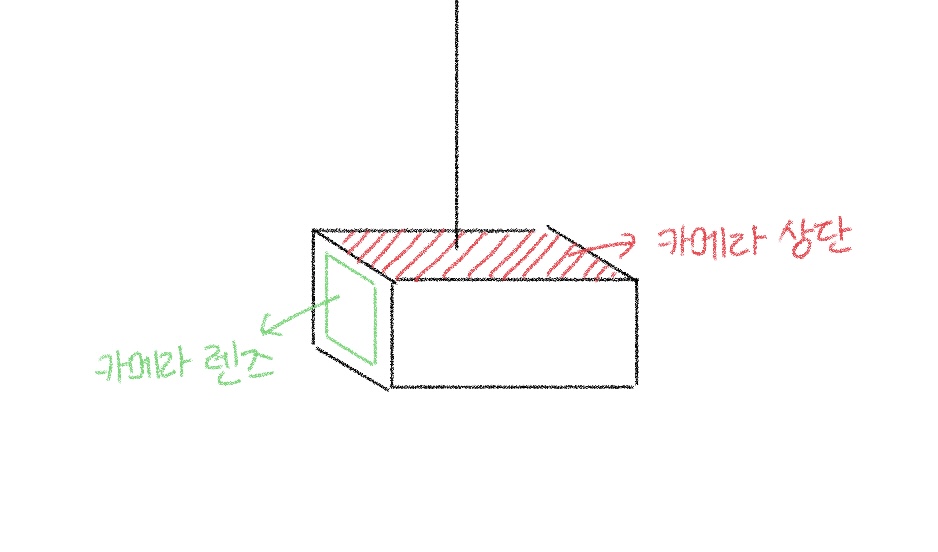
카메라를 그린 것이다.
빨간색 부분이 카메라의 상단이고, 초록색 부분이 카메라의 렌즈 부분이다.
그리고 camera.up.set을 통해 카메라의 상단을 설정한다는 것은, 마치 특정 위치에 카메라를 매달아놓는 것과 같다고 생각하면 된다.
z축을 상단으로 설정했다면, z축에 카메라의 끈을 매달아놓은 것과 같다.

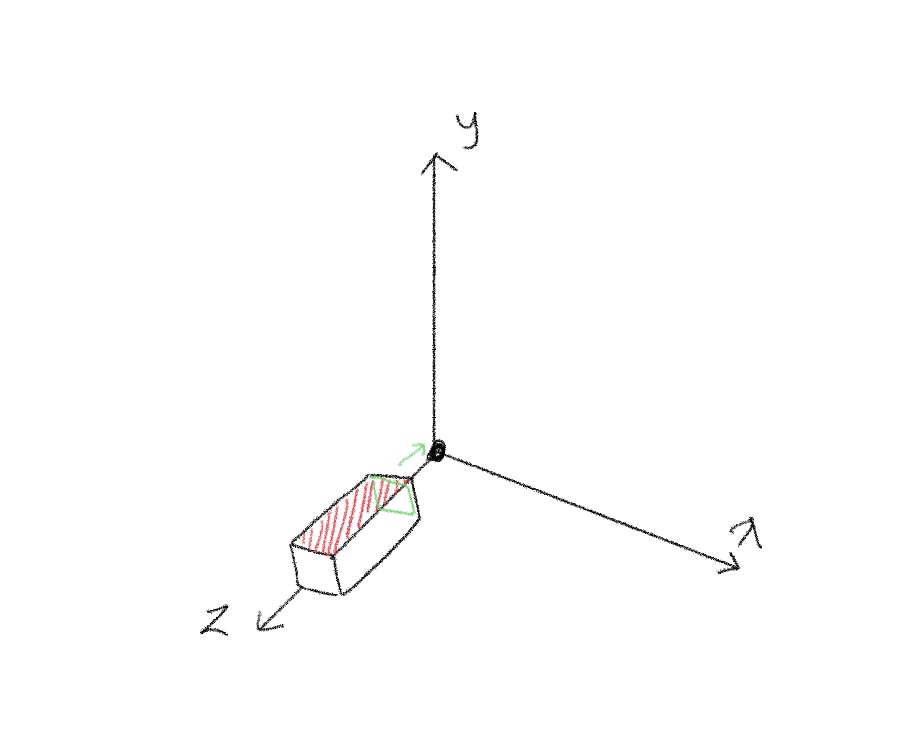
이것은 아래의 코드를 그림으로 그린 것이다.
camera.position.set( 0, 50, 0 );
camera.up.set( 0, 0, 1 );
camera.lookAt( 0, 0, 0 );
카메라는 원점에서부터 y축 쪽으로 50만큼 떨어져있다.
카메라의 상단은 z축을 향하고 있고, 렌즈는 (0, 0, 0)을 바라보고 있다.
이건 아래의 코드를 그림으로 그린 것이다.
camera.position.set( 0, 0, 50 );
camera.up.set( 0, 1, 0 );
camera.lookAt( 0, 0, 0 );
카메라는 원점에서부터 z축 쪽으로 50만큼 떨어져있다.
카메라의 상단은 y축을 향하고 있고, 렌즈는 (0, 0, 0)을 바라보고 있다.
이제 어느정도는 감이 잡혔을 것이다.
// PointLight는 한 지점에서 모든 방향으로 방출되는 빛
const light = new THREE.PointLight(
  0xFFFFFF, // color
  500 // intensity (강도)
);

scene.add( light );
그리고 scene 내에 빛을 추가하자.
강도가 500인 흰색 빛을 scene 가운데에 추가하는 코드이다.
이제 본격적으로 태양을 만들어보자.
// 회전값을 업데이트할 객체들
const objects = [];

// Geometry 하나를 생성하여 태양, 지구, 달에 재활용
// SphereGeometry는 구 형상을 생성하기 위한 클래스
const sphereGeometry = new THREE.SphereGeometry(
  1, // radius, 구 반지름
  6, // widthSegments, 수평 segment 수
  6 // heightSegments, 수직 segment 수
);
Geometry는 재사용이 가능하여, 여러 개의 Mesh가 하나의 Geometry를 동시에 참조할 수 있다.
그래서 여기서는 sphereGeometry 하나만 생성해놓고 태양, 지구, 달 모두에서 재사용하겠다.
widthSegments와 heightSegments 모두 6으로 설정하여 6분할된 구체로 만든다.
원으로 하면 조금 더 태양 느낌이 나겠지만, 자전 여부를 확인해야 하기 때문에 6분할로 구현했다.
// 태양 Material
// MeshPhongMaterial은 반사 하이라이트가 있는 반짝이는 표면을 위한 클래스
const sunMaterial = new THREE.MeshPhongMaterial(
  { emissive: 0xFFFF00 } // 물체가 방출하는 색상
);

// 태양 Mesh
// Mesh는 삼각형 폴리곤 기반 객체를 나타내는 클래스
const sunMesh = new THREE.Mesh(
  sphereGeometry, // Geometry
  sunMaterial // Material
);

// 태양의 크기는 sphereGeometry의 5배로 설정
// scale은 객체의 크기를 조정하는 속성
sunMesh.scale.set(
  5, // X축
  5, // Y축
  5 // Z축
);

// scene에 sunMesh 추가
scene.add( sunMesh );

objects.push( sunMesh );
그리고 MeshPhongMaterial을 이용해 생성한 sunMaterial과, 이전에 만들어둔 sphereGeometry로 sunMesh를 생성한다.
잠깐 다시 짚고 넘어가자면 Mesh는 Material로 하나의 Geometry를 그리는 객체이다.
MeshPhongMaterial에서 emissive 속성은 color 속성과는 다르다.
color는 물체가 어떤 색상의 빛을 반사하는지 결정한다.
emissive는 물체가 어떤 색상의 빛을 방출하는지 결정한다.
color는 빛의 영향을 받아 물체가 보이는 최종 색상에 영향을 미치고, emissive는 빛의 영향을 받지 않으며 물체가 항상 해당 색상의 빛을 방출한다.
예를 들어 빨간 사과는 빨간색 빛을 반사하고, 노란 별은 스스로 노란색 빛을 방출한다.
이렇게 말해도 이해가 잘 안될 수 있다...
간단하게, 스스로 빛나는 전구나 별같은 발광체는 빛을 방출한다고 생각하면 된다.
emissive와 color이야기는 여기서 마무리하고 다시 진행해보자.
태양을 만드는 중이니 다른 요소보다 더 커야 할 것이다.
scale 속성을 이용해 기존 sphereGeometry 크기의 5배로 키운다.
X축, Y축, Z축 모두 5배로 확대시킴으로써 기존 비율을 유지하며 크기만 5배로 키우는 것이다.
function render( time ) {
  time *= 0.001;

  objects.forEach( ( obj ) => {
    obj.rotation.y = time;
  } );

  renderer.render( scene, camera );
  requestAnimationFrame( render );
}

requestAnimationFrame( render );
그리고 render loop에서 objects 배열의 모든 객체를 회전시킨다.
render loop가 무엇인지 잘 모르겠다면 역시 이전 글을 읽어보고 오자.
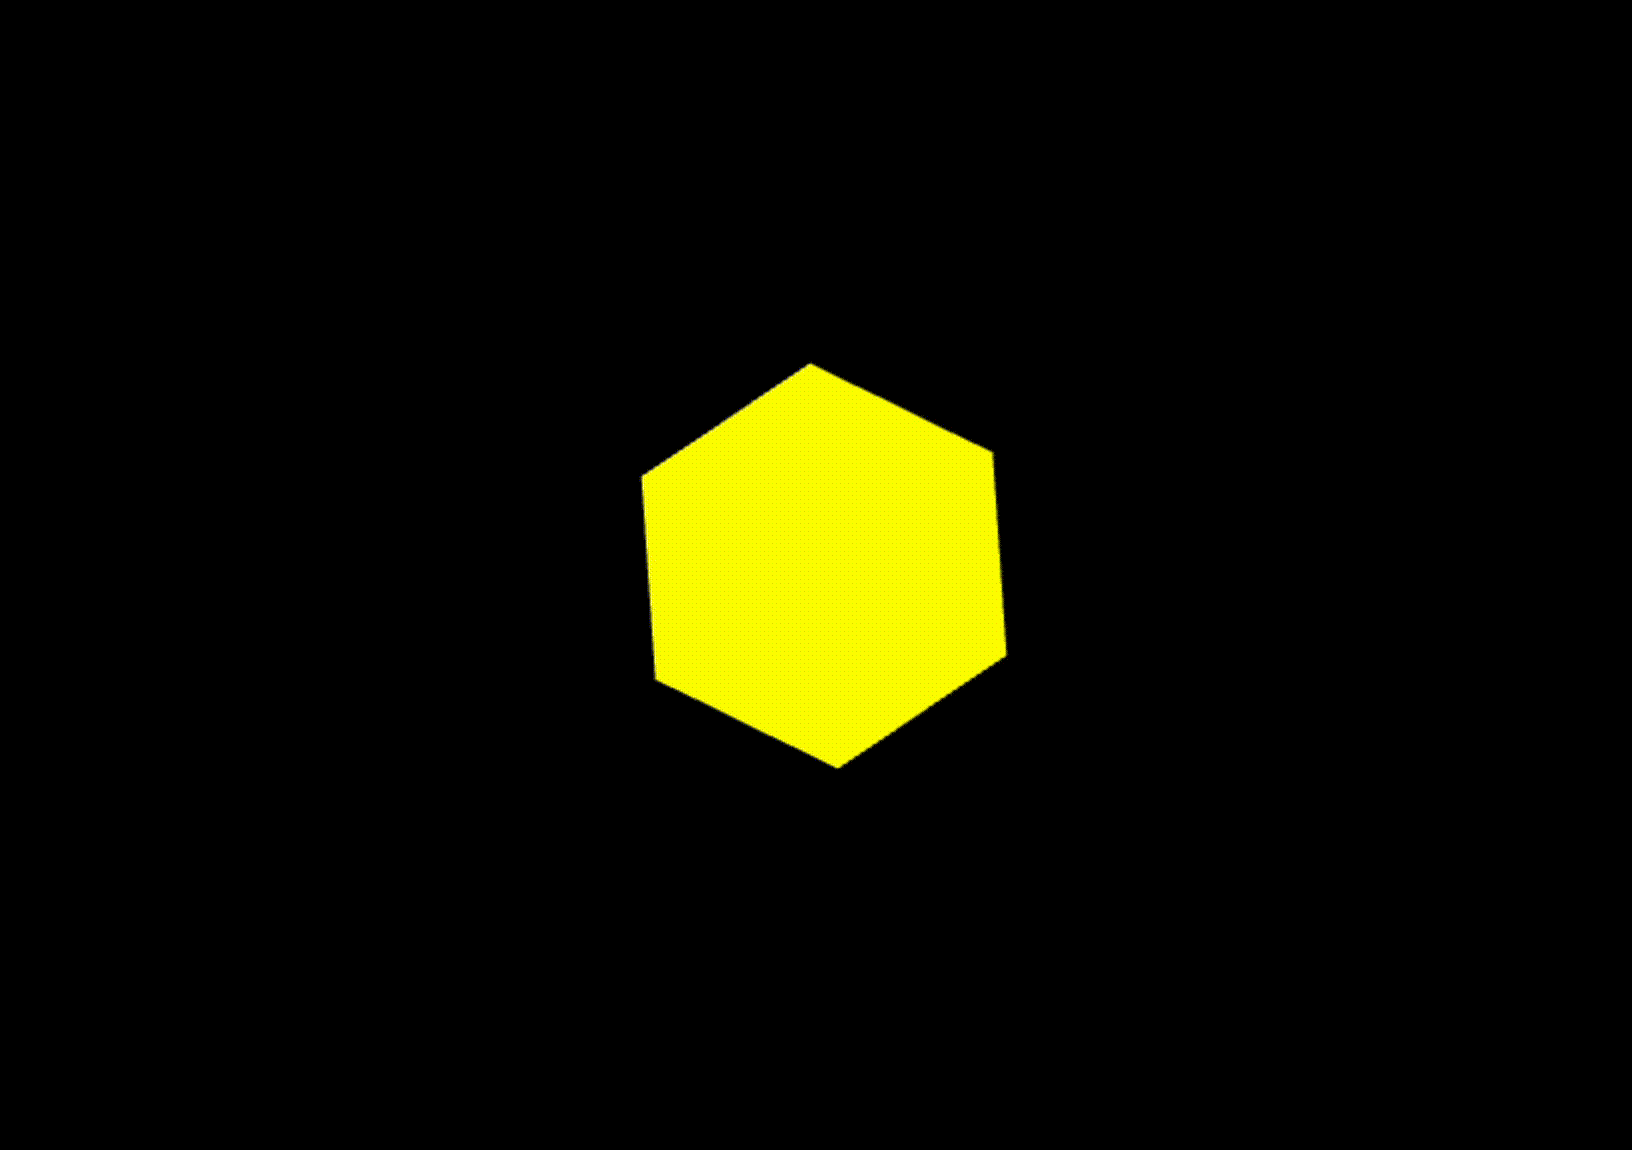
여기까지 하면 이렇게 자전하는 태양이 만들어진다.
gif로 변환했더니 화면이 좀 느려졌지만 실제로는 조금 더 빠르게 회전한다.
여기까지의 코드는 아래와 같다.
아래 코드에서는 인수들을 상수로 분리했다.
<!DOCTYPE html>
<html>
  <head>
    <meta charset="utf-8" />
    <meta
      name="viewport"
      content="width=device-width, initial-scale=1.0, user-scalable=yes"
    />
    <title>Three.js - Scenegraph - Sun</title>
    <style>
      html,
      body {
        height: 100%;
        margin: 0;
      }
      #c {
        width: 100%;
        height: 100%;
        display: block;
      }
    </style>
  </head>

  <body>
    <canvas id="c"></canvas>
  </body>

  <script type="module">
    import * as THREE from "https://threejs.org/build/three.module.js";

    const canvas = document.querySelector("#c");
    const renderer = new THREE.WebGLRenderer({ canvas });
    renderer.setSize(window.innerWidth, window.innerHeight);

    // Camera 생성
    const fov = 40;
    const aspect = window.innerWidth / window.innerHeight;
    const near = 0.1;
    const far = 1000;
    const camera = new THREE.PerspectiveCamera(fov, aspect, near, far);

    // Scene 생성
    const scene = new THREE.Scene();

    // Camera 설정
    camera.position.set(0, 50, 0);
    camera.up.set(0, 0, 1);
    camera.lookAt(0, 0, 0);

    // Light 생성
    {
      const color = 0xffffff;
      const intensity = 500;
      const light = new THREE.PointLight(color, intensity);
      scene.add(light);
    }

    const objects = [];

    // SphereGeometry 생성
    const radius = 1;
    const widthSegments = 6;
    const heightSegments = 6;
    const sphereGeometry = new THREE.SphereGeometry(
      radius,
      widthSegments,
      heightSegments
    );

    // SunMesh 생성
    const sunMaterial = new THREE.MeshPhongMaterial({ emissive: 0xffff00 });
    const sunMesh = new THREE.Mesh(sphereGeometry, sunMaterial);
    sunMesh.scale.set(5, 5, 5);

    scene.add(sunMesh);
    objects.push(sunMesh);

    // Render Loop
    function render(time) {
      time *= 0.001;

      objects.forEach((obj) => {
        obj.rotation.y = time;
      });

      renderer.render(scene, camera);
      requestAnimationFrame(render);
    }

    requestAnimationFrame(render);
  </script>
</html>
🍞 자전하는 지구 만들기
이제 지구를 추가해보자.
// 지구 Material 생성
const earthMaterial = new THREE.MeshPhongMaterial(
{color: 0x2233FF, emissive: 0x112244});
// 지구 Mesh 생성
const earthMesh = new THREE.Mesh(sphereGeometry, earthMaterial);
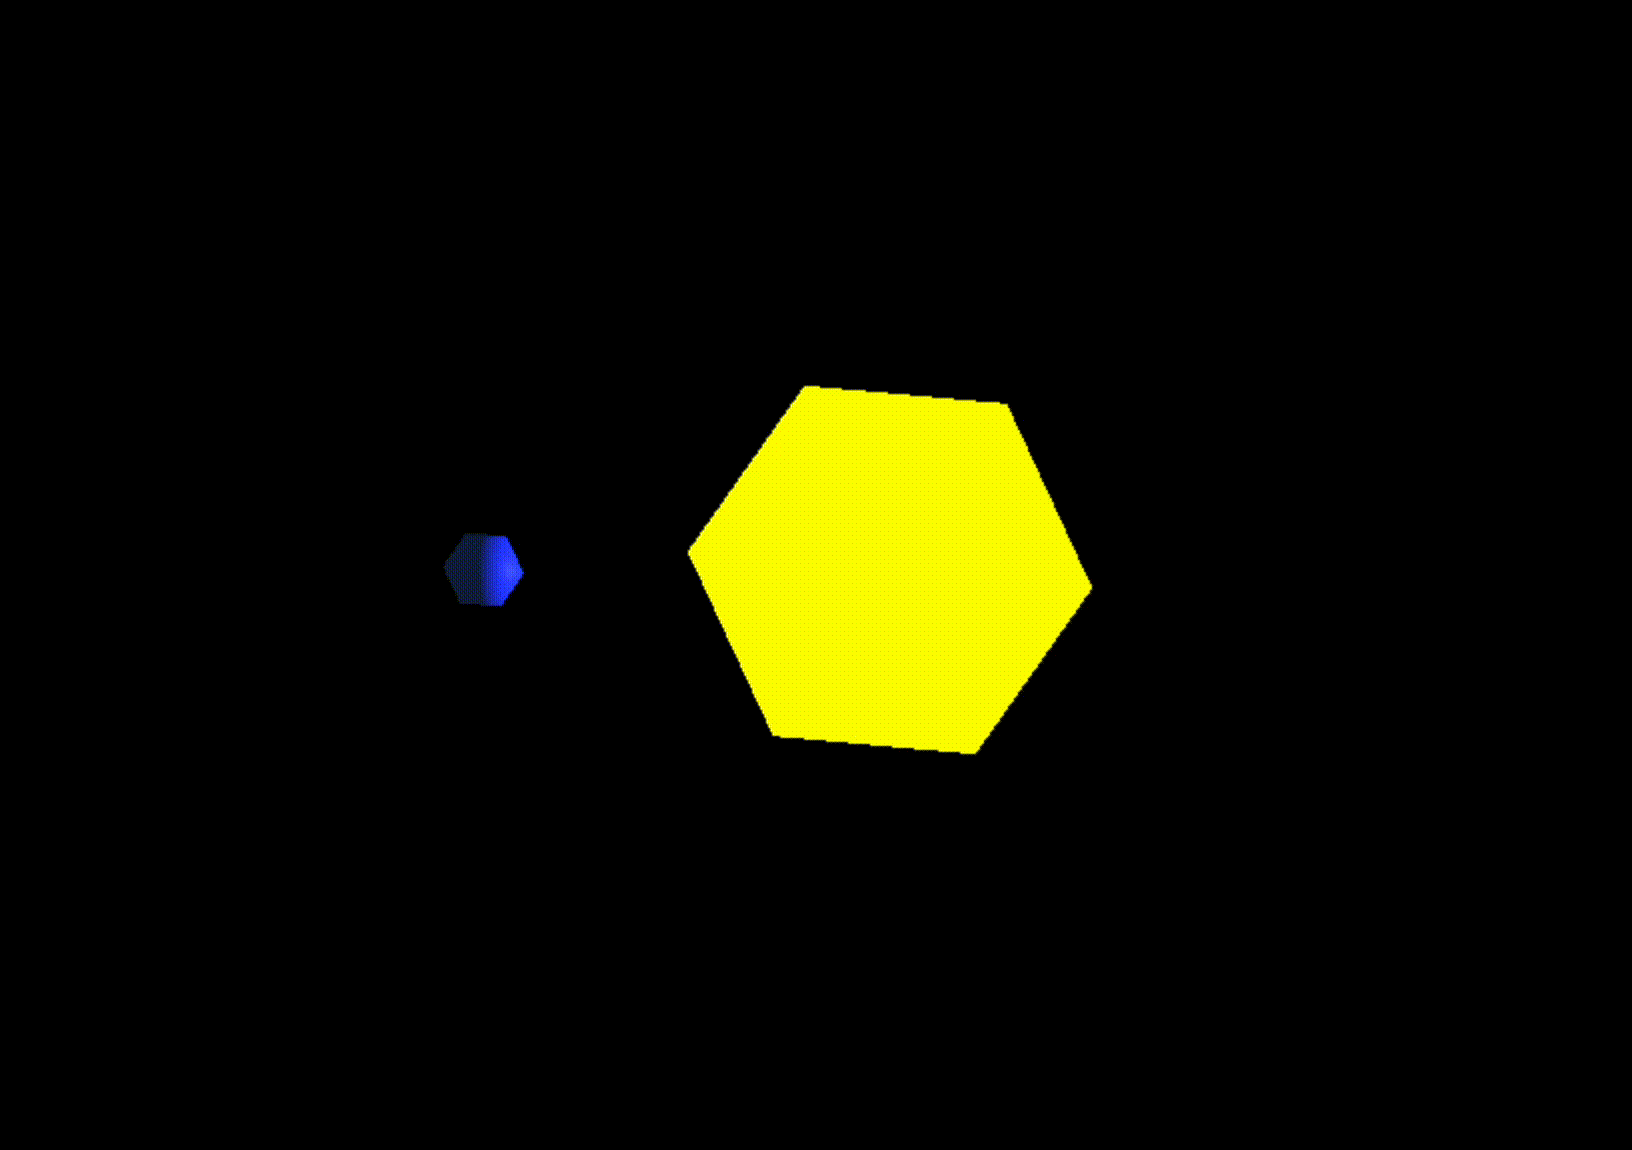
earthMesh.position.x = 10;
scene.add(earthMesh);
objects.push(earthMesh);지구는 실제로 발광하지는 않지만 더 잘 보이게 하기 위해 emissive 속성을 주었다.
태양과 마찬가지로 Material과 Mesh를 생성한다.
그리고 position 속성을 이용하여 태양의 10칸 옆에 위치하도록 설정한다.
지구를 scene에 추가하고 objects 배열에 넣고 난 후에는 아래와 같이 자전하는 지구가 생겨난다.
🍞 지구 공전시키기
이제 지구를 공전시켜보자.

여기서 scene.add(earthMesh); 대신 sunMesh.add(earthMesh)를 추가하면 태양의 지역공간 안에 지구가 들어가게 된다.
하지만 아까 sunMesh.scale.set(5, 5, 5)로 sunMesh '지역공간'을 5배로 키웠었다.
위에서 '3D 엔진에서 Scene Graph란 요소의 계층 구조를 그림으로 나타낸 것이다. 여기서 각 요소는 각각의 지역 공간 (local space)를 가리킨다.'라고 말했던 것이 기억나는지??
sunMesh의 크기를 키운 것은, sunMesh의 지역 공간을 키운 것이다.
이 상태로 sunMesh 내에 earthMesh를 넣게 되면 지구의 크기도 5배가 되고, 지구와 태양 사이 거리도 5배가 된다.
이를 해결하기 위해서는 일단 빈 Scene Graph 요소가 필요하다.
Object3D 클래스는 Mesh와 같이 지역 공간을 생성하지만, Material이나 Geometry가 없다는 특징이 있다.
그냥 공간만 만들어주는 것이다.
// 태양의 지역공간인 solarSystem 생성
const solarSystem = new THREE.Object3D();
scene.add(solarSystem);
objects.push(solarSystem);
이렇게 solarSystem을 만들고, scene에 추가한다.
// 수정된 코드
const sunMaterial = new THREE.MeshPhongMaterial({ emissive: 0xffff00 });
const sunMesh = new THREE.Mesh(sphereGeometry, sunMaterial);
sunMesh.scale.set(5, 5, 5);
solarSystem.add(sunMesh); // scene.add(sunMesh)에서 변경됨
objects.push(sunMesh);

const earthMaterial = new THREE.MeshPhongMaterial({
  color: 0x2233ff,
  emissive: 0x112244,
});
const earthMesh = new THREE.Mesh(sphereGeometry, earthMaterial);
earthMesh.position.x = 10;
solarSystem.add(earthMesh); // scene.add(earthMesh)에서 변경됨
objects.push(earthMesh);
그리고 코드를 수정하여 sunMesh와 earthMesh를 scene이 아닌 solarSystem에 추가한다.
태양을 중심으로 하는 태양의 지역공간이 solarSystem이 된다.
이제 Scene Graph는 다음과 같은 모양이 된다.

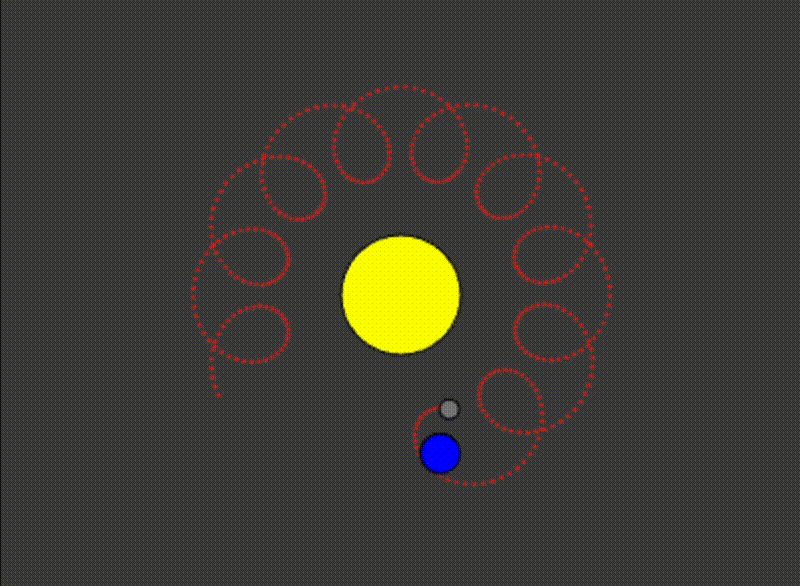
그리고 이렇게 지구가 공전하는 모습도 볼 수 있다.

여기서부터 이해가 잘 안될 수도 있지만 일단은 쭉 따라가보자.
태양과 지구처럼 같은 방식으로 달을 만들어보자.
🍞 자전하며 공전하는 달 만들기
// 지구의 지역공간인 earthOrbit 생성
const earthOrbit = new THREE.Object3D();

// earthOrbit은 태양으로부터 10 떨어짐
earthOrbit.position.x = 10;

// earthOrbit을 solarSystem에 추가
solarSystem.add(earthOrbit);
objects.push(earthOrbit);
지구를 중심으로 하는 지구의 지역공간을 earthOrbit이라는 이름으로 만들었다.
원래는 solarSystem 안에 태양 + 지구가 있었다면, 이제는
solarSystem 안에 태양 + ( 지구가 포함된 earthOrbit ) 이 들어갈 것이다.
그러므로 earthMesh.position.x = 10;를 삭제하고, earthOrbit.position.x = 10; 코드를 추가하여 earthOrbit이 태양으로부터 10만큼 떨어져있게 해야 한다.
그리고 solarSystem에 earthOrbit을 추가한다.
// 수정된 코드
const earthMaterial = new THREE.MeshPhongMaterial({color: 0x2233FF, emissive: 0x112244});
const earthMesh = new THREE.Mesh(sphereGeometry, earthMaterial);
earthOrbit.add(earthMesh); // solarSystem.add(earthMesh)에서 변경됨
objects.push(earthMesh);
지구를 solarSystem에서 제거하고 earthOrbit에 추가한다.
위의 코드에서 earthOrbit을 solarSystem에 넣었기 때문에,
solarSystem
🔽
earthOrbit
🔽
earthMesh
형태의 포함관계가 된다.
// 달의 지역공간인 moonOrbit 생성
const moonOrbit = new THREE.Object3D();

// moonOrbit은 지구로부터 2만큼 떨어짐
moonOrbit.position.x = 2;
earthOrbit.add(moonOrbit);

const moonMaterial = new THREE.MeshPhongMaterial({color: 0x888888, emissive: 0x222222});
const moonMesh = new THREE.Mesh(sphereGeometry, moonMaterial);

// moonMesh를 절반 크기로 설정
moonMesh.scale.set(.5, .5, .5);

// moonMesh를 moonOrbit에 추가
moonOrbit.add(moonMesh);
objects.push(moonMesh);
달의 지역공간은 같은 방식으로 moonOrbit이라는 이름으로 생성했다.
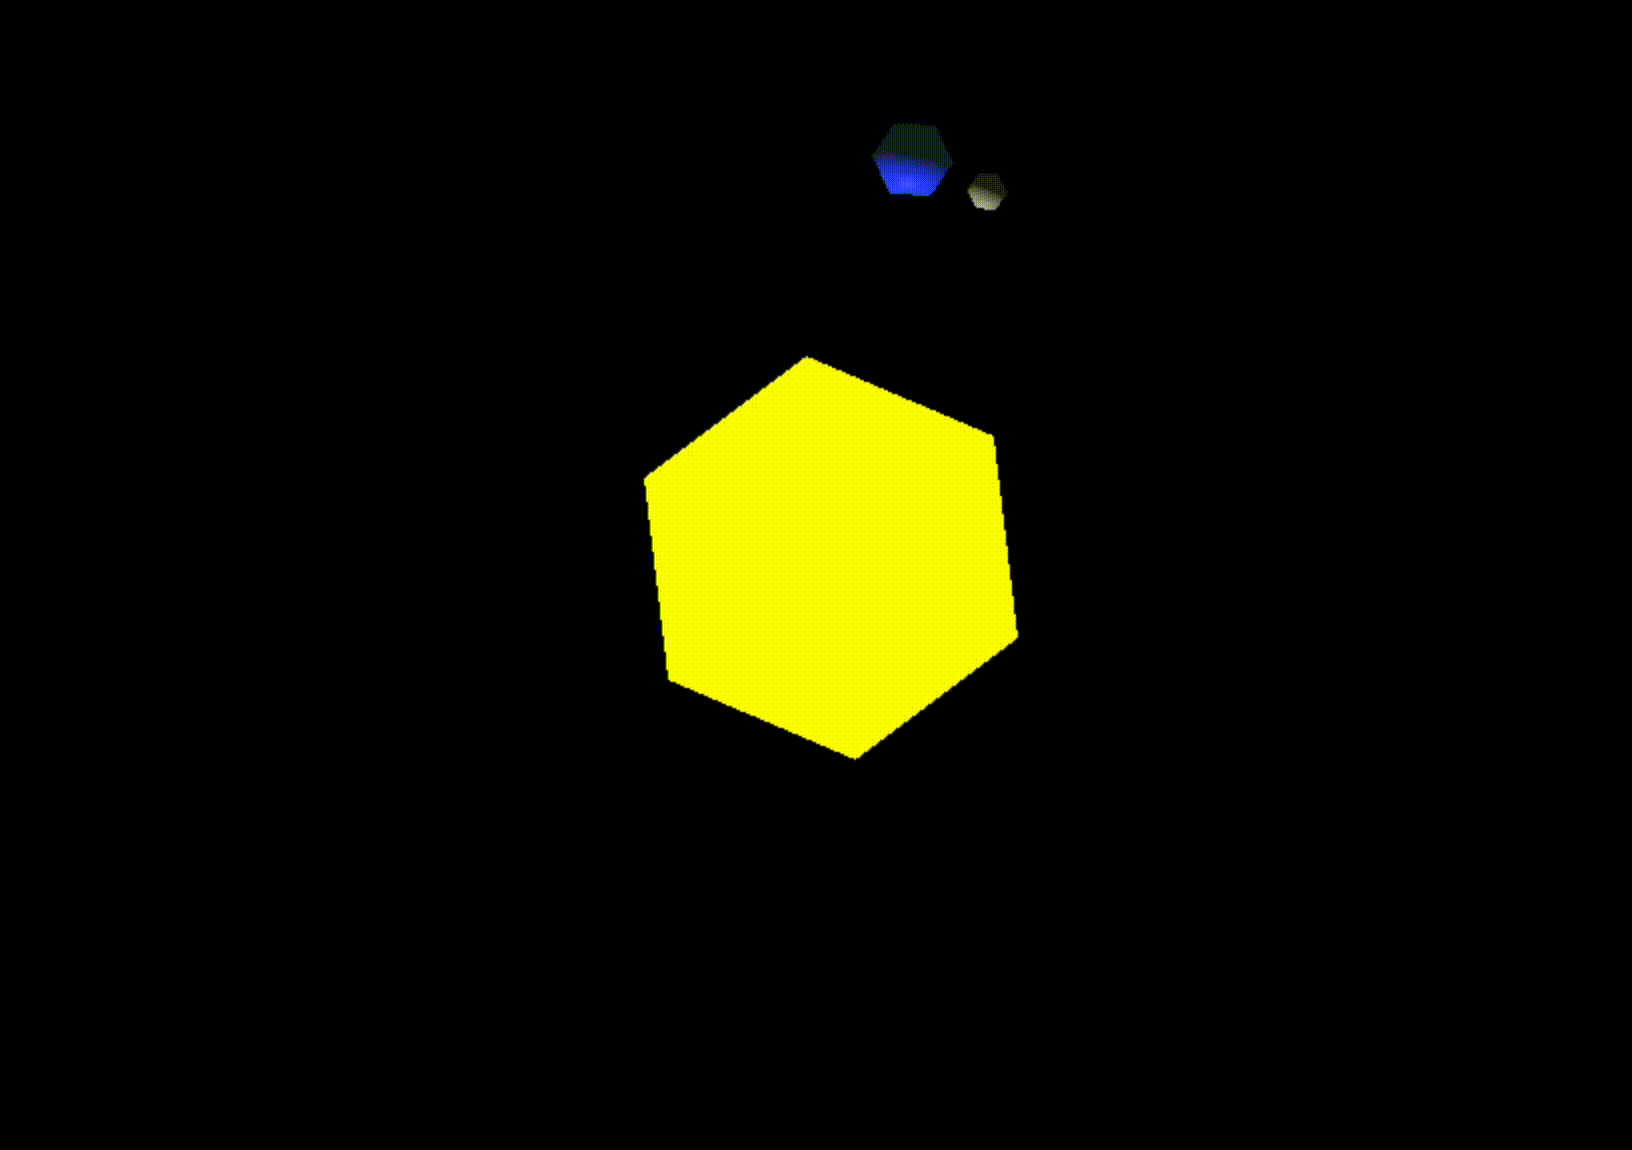
태양, 지구와 같은 방식으로 달도 생성한다.
달은 지구보다 작으므로 0.5배로 크기로 설정하고, moonOrbit에 추가한다.
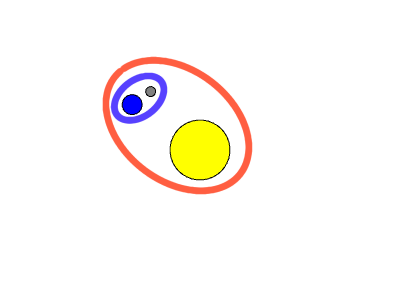
이제 Scene Graph를 정리하면 아래와 같다.
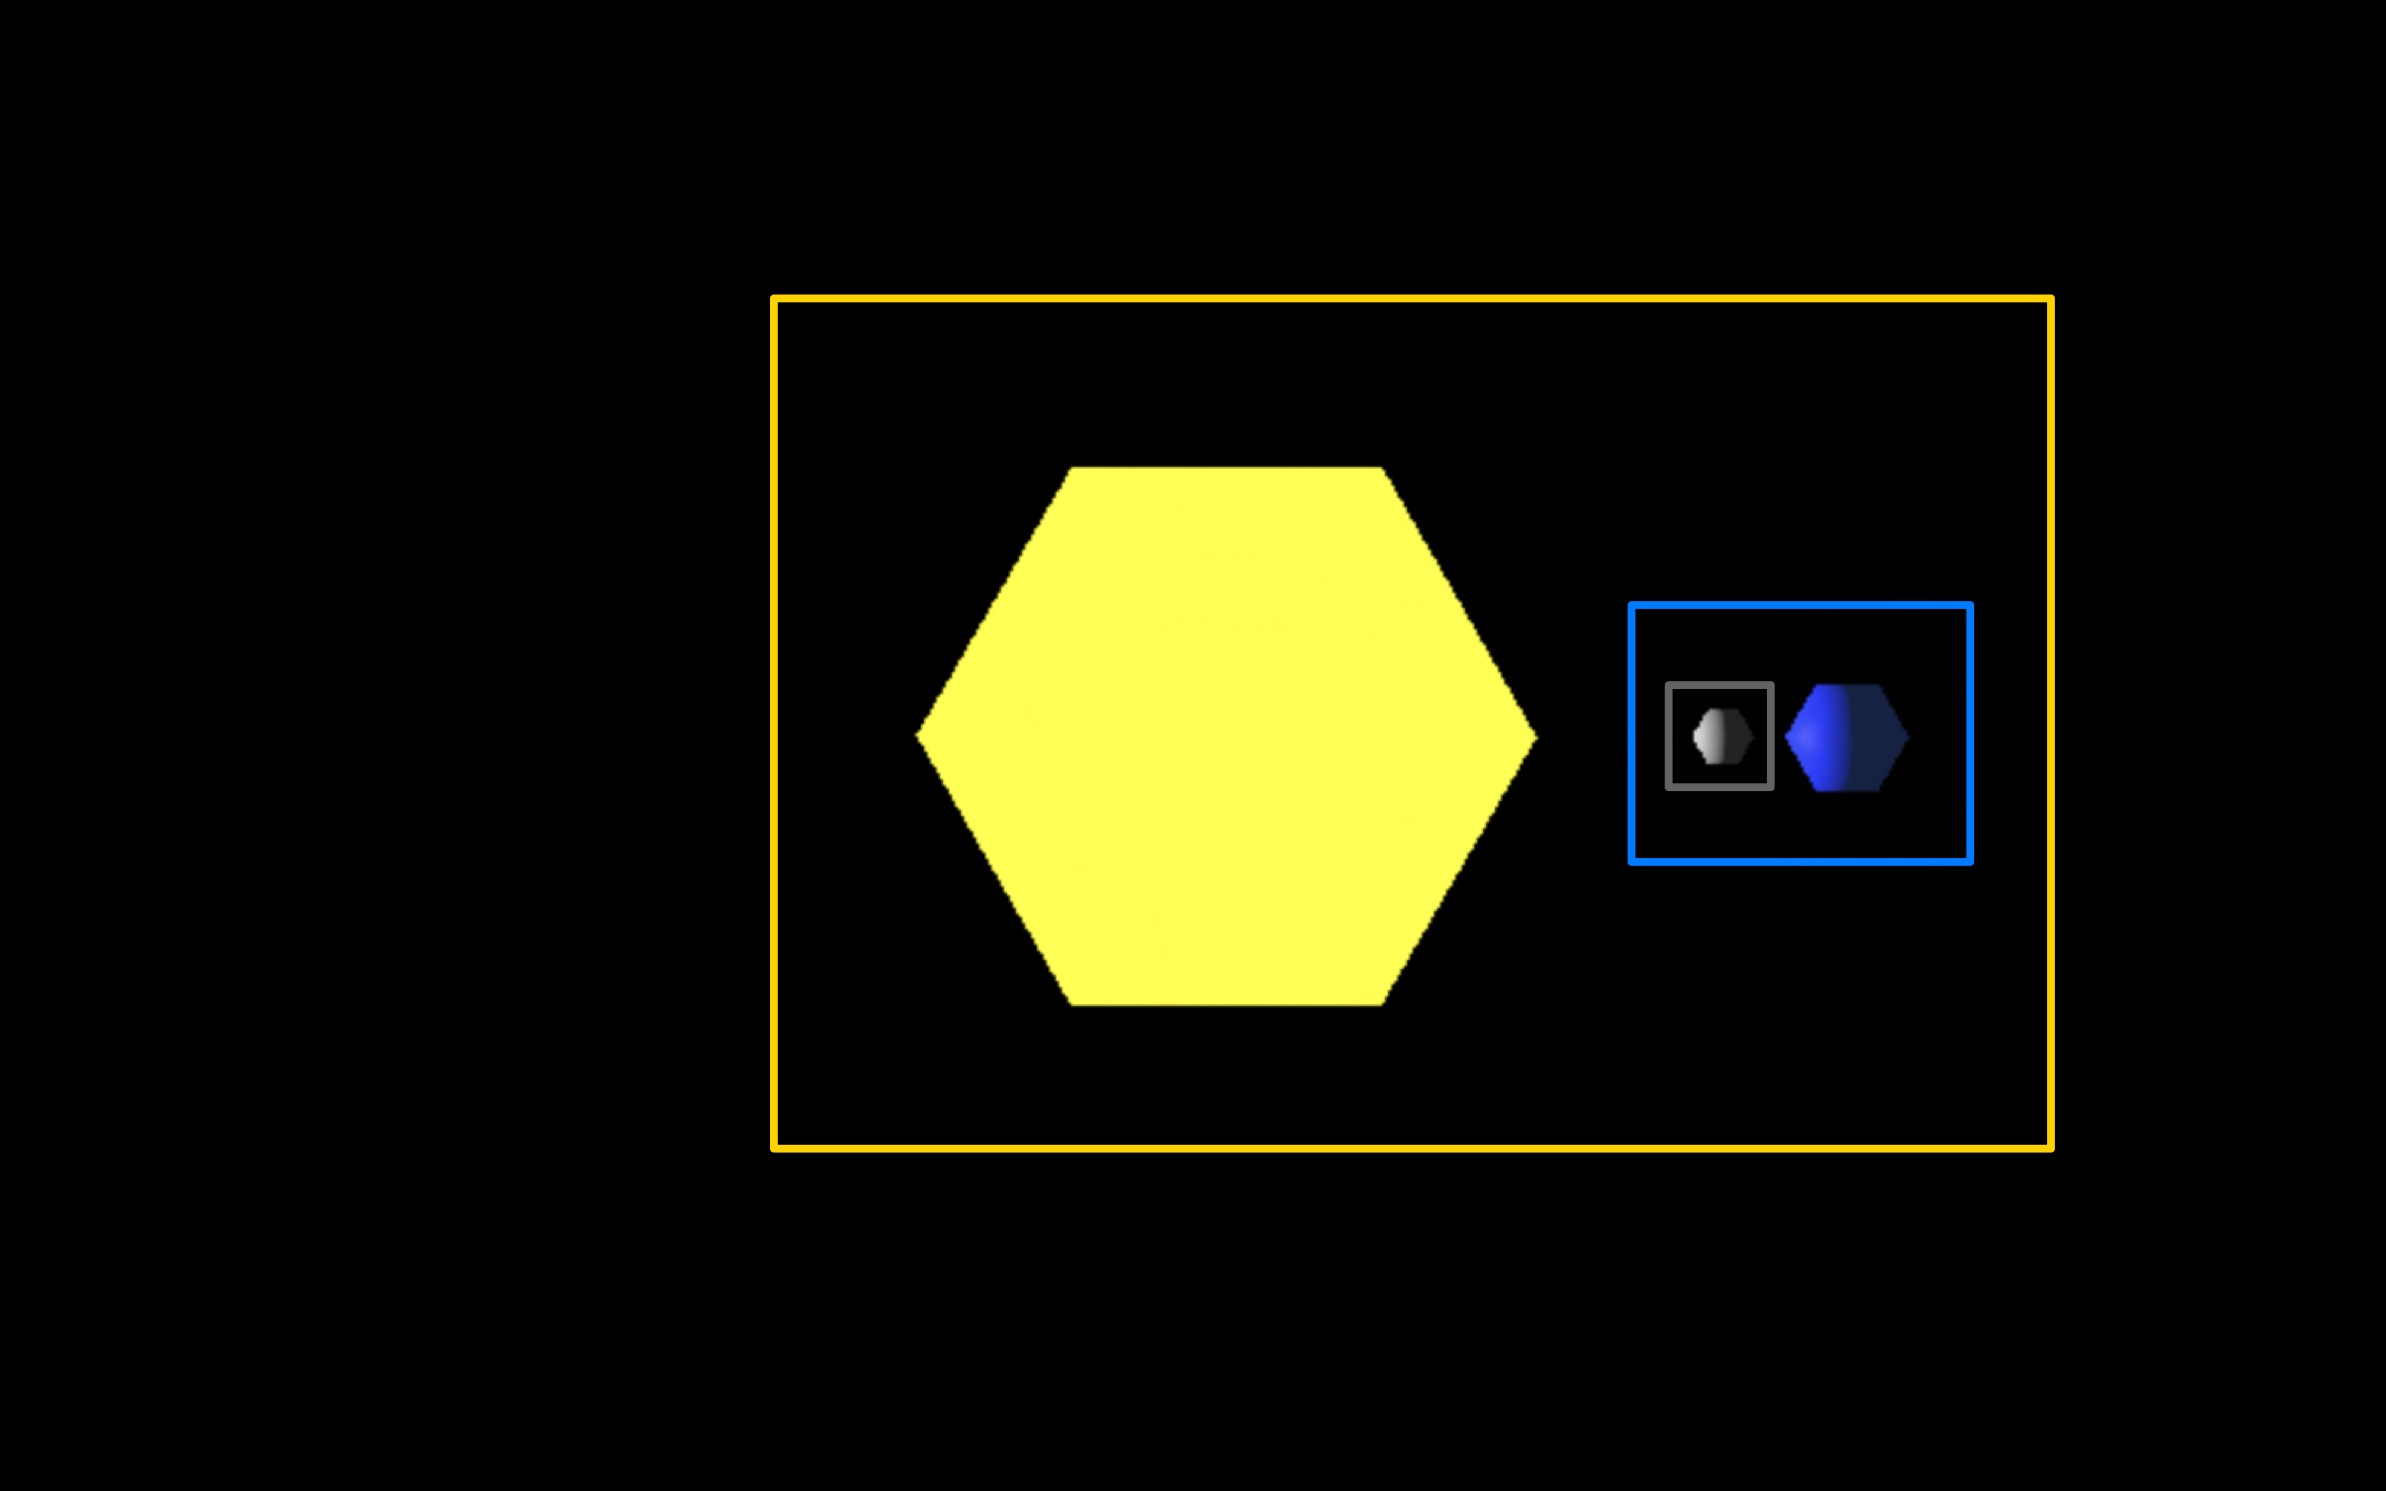
헷갈릴 수 있는 부분은, sunMesh의 지역공간이 solarSystem인게 아니다.
sunMesh는 그 자체로 지역공간을 가지고 있고, solarSystem 지역공간 내에 sunMesh 지역공간과 earthOrbit 지역공간이 있는 것이다.
여기서는 solarSystem이 태양과, 태양 주위를 공전하는 것들을 모두 포함하고 있기 때문에 태양 지역공간이라고 표현했다.
최종 코드를 실행시키면 다음과 같다.
<!DOCTYPE html>
<html>
  <head>
    <meta charset="utf-8" />
    <meta
      name="viewport"
      content="width=device-width, initial-scale=1.0, user-scalable=yes"
    />
    <title>Three.js - Scenegraph - Sun</title>
    <style>
      html,
      body {
        height: 100%;
        margin: 0;
      }
      #c {
        width: 100%;
        height: 100%;
        display: block;
      }
    </style>
  </head>

  <body>
    <canvas id="c"></canvas>
  </body>

  <script type="module">
    import * as THREE from "https://threejs.org/build/three.module.js";

    const canvas = document.querySelector("#c");
    const renderer = new THREE.WebGLRenderer({ canvas });
    renderer.setSize(window.innerWidth, window.innerHeight);

    // Camera 생성
    const fov = 40;
    const aspect = window.innerWidth / window.innerHeight;
    const near = 0.1;
    const far = 1000;
    const camera = new THREE.PerspectiveCamera(fov, aspect, near, far);

    // Scene 생성
    const scene = new THREE.Scene();

    // Camera 설정
    camera.position.set(0, 50, 0);
    camera.up.set(0, 0, 1);
    camera.lookAt(0, 0, 0);

    // Light 생성
    {
      const color = 0xffffff;
      const intensity = 500;
      const light = new THREE.PointLight(color, intensity);
      scene.add(light);
    }

    const objects = [];

    // SphereGeometry 생성
    const radius = 1;
    const widthSegments = 6;
    const heightSegments = 6;
    const sphereGeometry = new THREE.SphereGeometry(
      radius,
      widthSegments,
      heightSegments
    );

    // SolarSystem 생성
    const solarSystem = new THREE.Object3D();
    scene.add(solarSystem);
    objects.push(solarSystem);

    // SunMesh 생성
    const sunMaterial = new THREE.MeshPhongMaterial({ emissive: 0xffff00 });
    const sunMesh = new THREE.Mesh(sphereGeometry, sunMaterial);
    sunMesh.scale.set(5, 5, 5);
    solarSystem.add(sunMesh);
    objects.push(sunMesh);

    // EarthOrbit 생성
    const earthOrbit = new THREE.Object3D();
    earthOrbit.position.x = 10;
    solarSystem.add(earthOrbit);
    objects.push(earthOrbit);

    // EarthMesh 생성
    const earthMaterial = new THREE.MeshPhongMaterial({
      color: 0x2233ff,
      emissive: 0x112244,
    });
    const earthMesh = new THREE.Mesh(sphereGeometry, earthMaterial);
    earthOrbit.add(earthMesh);
    objects.push(earthMesh);

    // MoonOrbit 생성
    const moonOrbit = new THREE.Object3D();
    moonOrbit.position.x = 2;
    earthOrbit.add(moonOrbit);

    // MoonMesh 생성
    const moonMaterial = new THREE.MeshPhongMaterial({
      color: 0x888888,
      emissive: 0x222222,
    });
    const moonMesh = new THREE.Mesh(sphereGeometry, moonMaterial);
    moonMesh.scale.set(0.5, 0.5, 0.5);
    moonOrbit.add(moonMesh);
    objects.push(moonMesh);

    // Render Loop
    function render(time) {
      time *= 0.001;

      objects.forEach((obj) => {
        obj.rotation.y = time;
      });

      renderer.render(scene, camera);
      requestAnimationFrame(render);
    }

    requestAnimationFrame(render);
  </script>
</html>
얼핏 보면 굉장히 복잡한 코드같지만, 사실은 비슷한 형태가 반복되고 있다.
아직 잘 모르겠다면 Scene Graph 이미지를 보며 계층 구조를 이해하는데 집중해보자.
이 글을 읽으며 Scene Graph에 대해 감을 잡았다면 당신은 목표를 달성한 것이다!

참고로 썸네일은 기존 코드에서 조금 수정하여 만든 결과물이다.
- 카메라 위치 수정
- 태양 대신 도라에몽 이미지
- 도라에몽을 solarSystem이 아닌 scene에 추가, objects에는 추가하지 않음
- 지구, 달 색 변경
이 정도의 수정사항이 있다.
혹시나 궁금해하실 분들을 위해 코드를 첨부한다.
<!DOCTYPE html>
<html>
  <head>
    <meta charset="utf-8" />
    <meta
      name="viewport"
      content="width=device-width, initial-scale=1.0, user-scalable=yes"
    />
    <title>Doraemon Rotating</title>
    <style>
      html,
      body {
        height: 100%;
        margin: 0;
      }
      #c {
        width: 100%;
        height: 100%;
        display: block;
      }
    </style>
  </head>

  <body>
    <canvas id="c"></canvas>
  </body>

  <script type="module">
    import * as THREE from "https://threejs.org/build/three.module.js";

    const canvas = document.querySelector("#c");
    const renderer = new THREE.WebGLRenderer({ canvas });
    renderer.setSize(window.innerWidth, window.innerHeight);

    const fov = 40;
    const aspect = window.innerWidth / window.innerHeight;
    const near = 0.1;
    const far = 1000;
    const camera = new THREE.PerspectiveCamera(fov, aspect, near, far);

    const scene = new THREE.Scene();
    camera.position.set(50, 0, 100);
    camera.up.set(0, 1, 0);
    camera.lookAt(0, 0, 0);

    {
      const color = 0xffffff;
      const intensity = 500;
      const light = new THREE.PointLight(color, intensity);
      scene.add(light);
    }

    const objects = [];

    const radius = 1;
    const widthSegments = 6;
    const heightSegments = 6;
    const sphereGeometry = new THREE.SphereGeometry(
      radius,
      widthSegments,
      heightSegments
    );

    const solarSystem = new THREE.Object3D();
    scene.add(solarSystem);
    objects.push(solarSystem);

    // 추가된 부분
    const loader = new THREE.TextureLoader();
    loader.load(
      "도라에몽 얼굴 이미지 경로",
      function (texture) {
        const material = new THREE.MeshBasicMaterial({ map: texture });
        const geometry = new THREE.PlaneGeometry(5, 5);
        const doraemon = new THREE.Mesh(geometry, material);

        doraemon.scale.set(4, 4, 4);
        scene.add(doraemon);
      },
      function (xhr) {
        console.log((xhr.loaded / xhr.total) * 100 + "% loaded");
      },
      function (error) {
        console.log("An error happened", error);
      }
    );

    const earthOrbit = new THREE.Object3D();
    earthOrbit.position.x = 10;
    solarSystem.add(earthOrbit);
    objects.push(earthOrbit);

    const earthMaterial = new THREE.MeshPhongMaterial({
      // 수정된 부분
      color: 0x2751e3,
      emissive: 0x2751e3,
    });
    const earthMesh = new THREE.Mesh(sphereGeometry, earthMaterial);
    earthMesh.scale.set(2, 2, 2);
    earthOrbit.add(earthMesh);
    objects.push(earthMesh);

    const moonOrbit = new THREE.Object3D();
    moonOrbit.position.x = 4;
    earthOrbit.add(moonOrbit);

    const moonMaterial = new THREE.MeshPhongMaterial({
      // 수정된 부분
      color: 0xc5ceed,
      emissive: 0xc5ceed,
    });
    const moonMesh = new THREE.Mesh(sphereGeometry, moonMaterial);
    moonOrbit.add(moonMesh);
    objects.push(moonMesh);

    function render(time) {
      time *= 0.001;

      objects.forEach((obj) => {
        obj.rotation.y = time;
      });

      renderer.render(scene, camera);
      requestAnimationFrame(render);
    }

    requestAnimationFrame(render);
  </script>
</html>


재밌게 잘 읽었습니다. ^^