1. Transformer 기반 임베딩
한국어 임베딩을 위해서는 세가지 기법이 존재한다고 한다.
Sentence-Transformer, Word2Vec, Transformer 기반 임베딩
- Word2Vec
Word2Vec은 단어를 고차원 벡터로 변환하여 의미적 유사성을 측정하는 임베딩 기법임
단어 간의 문맥적 관계를 반영하여, 비슷한 의미를 가진 단어들이 유사한 벡터 값을 갖도록 학습함
from gensim.models import Word2Vec

# 샘플 한국어 문장 데이터
sentences = [
    "나는 오늘 책을 읽었다",
    "고양이가 야옹하고 울었다",
    "인공지능은 정말 흥미로운 주제다",
    "한국어 임베딩을 학습하는 중이다"
]

# Python 기본 split() 사용해 간단하게 토큰화
tokenized_sentences = [sentence.split() for sentence in sentences]

# Word2Vec 모델 학습
word2vec_model = Word2Vec(sentences=tokenized_sentences, vector_size=100, window=5, min_count=1, workers=4)

# 단어 '고양이'와 유사한 단어 찾기
similar_words = word2vec_model.wv.most_similar("고양이")
print(similar_words)
...근데 vocabulary이슈가 있었다.
즉, "나는"이라고 분리를 했을 경우 복합어이기 때문에 Workd2Vec이 단일어로 인식어를 하지 못했기때문에 KeyError를 발생시켰던 것이다.
해결방법
Mecab 설치
pip install mecab mecab-ko mecab-ko-dic

# mecavrc 을 위한 환경 변수 설정도 해줘야 함
export MECAVRC=본인경로
Mecab로 noun 분리
mecab = Mecab(dicpath='/opt/homebrew/opt/mecab-ko-dic/lib/mecab/dic/mecab-ko-dic')
tokenized_sentences = [mecab.nouns(sentence) for sentence in sentences]
Word2Vec의 most_similar
이름 그대로 most_similar이기 때문에 similar한 단어들만 골라냄 (아예 똑같은 단어는 제외하고 보여줌)
2. SentenceTransformer
- huggingface에 로그인이 되어 있어야 함
from sentence_transformers import SentenceTransformer

# 최신 Ko-Sentence-BERT 모델 로드
model = SentenceTransformer('paraphrase-multilingual-MiniLM-L12-v2')

# 샘플 문장들
sentences = [
    "나는 오늘 책을 읽었다.",
    "고양이가 야옹하고 울었다.",
    "인공지능은 흥미로운 주제다.",
    "한국어 임베딩을 학습하는 중이다."
]

# 문장 임베딩 생성
embeddings = model.encode(sentences)

# 첫 번째 문장 임베딩 확인
print(embeddings[0])- 해당 기법은 문장 간 의미적 유사성을 정확하게 파악하는 데 강점을 가지며, 한국어 문장 처리에 탁월한 성능을 보여줌
- 문장 간 유사성을 벡터로 표현함
3. KoBERT
from transformers import BertTokenizer, BertModel
import torch

# KLUE-BERT 모델과 토크나이저 로드
tokenizer = BertTokenizer.from_pretrained('klue/bert-base')
model = BertModel.from_pretrained('klue/bert-base')

# 입력 문장
sentence = "한국어 임베딩을 학습하고 있습니다."

# 토큰화 및 텐서 변환
inputs = tokenizer(sentence, return_tensors='pt')

# 임베딩 생성
with torch.no_grad():
    outputs = model(**inputs)

# 임베딩 벡터 추출 (평균값으로 계산)
embedding = outputs.last_hidden_state.mean(dim=1)
print(embedding)- 문장을 양방향으로 이해하며, 문장 전체의 의미를 깊이 반영함
실습
from sentence_transformers import SentenceTransformer
import numpy as np
from nltk.tokenize import sent_tokenize
from sklearn.metrics.pairwise import cosine_similarity

# 모델 불러오기
model = SentenceTransformer('sentence-transformers/xlm-r-100langs-bert-base-nli-stsb-mean-tokens')

# input.txt 파일 불러오기
with open('input.txt', 'r', encoding='utf-8') as file:
    document = file.read()

sentences = sent_tokenize(document)
# 전체 문서 임베딩
sentence_embeddings = model.encode(sentences)

# 특정 문장과 전체 document의 문장들과의 유사도 비교
cosine_sim = cosine_similarity(model.encode(sent_tokenize("오늘은 날씨가 그다지 밝지 않지만 예쁜 눈이 내리고 있어.")), sentence_embeddings[1:])
print(f"유사도: {cosine_sim}")
요약문을 만드는 방법
- 문장들간의 각각의 유사도 비교 후 유사한 문장을 뽑아냄
- 즉, 전체문단과 유사한 문장들끼리만 요약본을 만드는 단순한 구조임
# 문서 전체 임베딩 (문서의 대표 임베딩)
doc_embedding = model.encode([document])
# 문서의 임베딩과 각 문장 임베딩 간의 유사도 계산
cos_similarities = cosine_similarity(doc_embedding, sentence_embeddings)
# 유사도가 높은 문장 순으로 정렬 (유사도가 높은 문장 3개를 선택)
top_n = 2
top_sentence_indices = np.argsort(cos_similarities[0])[::-1][:top_n]
# 상위 문장들을 모아서 요약 생성
summary = ' '.join([sentences[idx] for idx in top_sentence_indices])
print("요약문:")
print(summary)
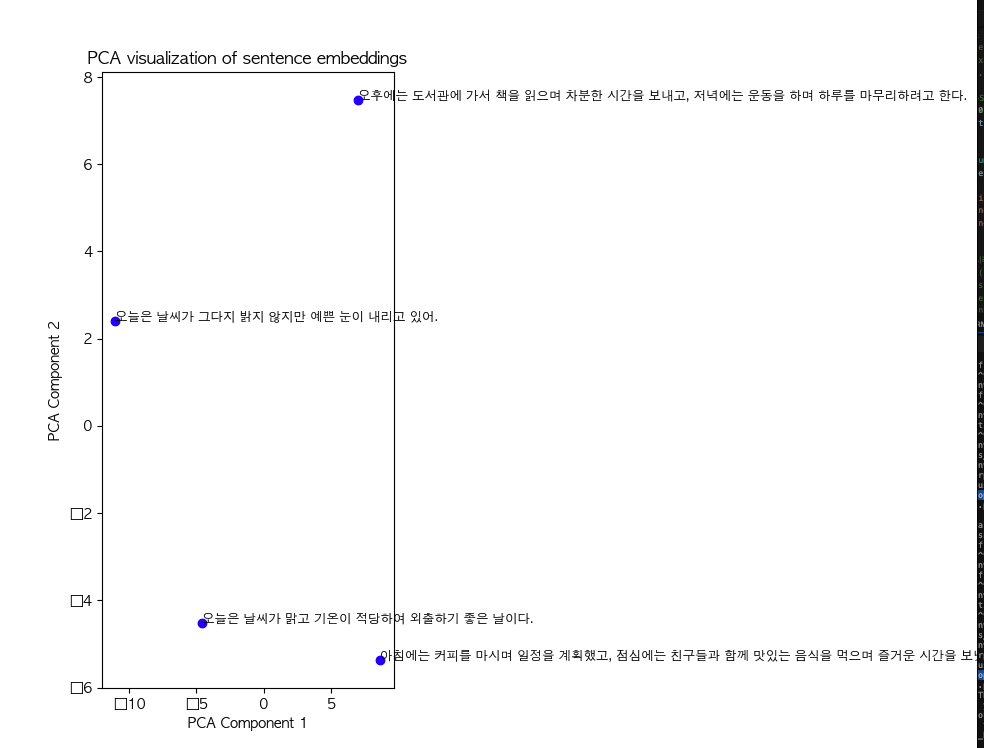
시각화
PCA는 데이터의 분산을 최대화하는 방향으로 축소하는 기법임, 즉, 가장 중요한 특성을 찾아 데이터의 차원을 축소하는 방식임
반면 t-SNE는 고차원 데이터에서 비선형적인 구조를 저차원에 잘 반영하도록 데이터를 압축함 (데이터 간의 지역적 구조를 보존하는 데 중점을 둠)
- PCA로 시각화
- 값이 높게 나온 문장이 주성분을 잘 반영한다고 할 수 있음
import matplotlib.pyplot as plt
from sklearn.decomposition import PCA
from sklearn.manifold import TSNE


import matplotlib.pyplot as plt
from sklearn.decomposition import PCA
from sklearn.manifold import TSNE
from matplotlib import font_manager, rc
# macOS에서 AppleGothic 폰트 설정
rc('font', family='AppleGothic')
# 1. PCA로 차원 축소
pca = PCA(n_components=2)
pca_result = pca.fit_transform(sentence_embeddings)

# 3. 시각화 (PCA 또는 t-SNE 결과)
plt.figure(figsize=(10, 8))
plt.scatter(pca_result[:, 0], pca_result[:, 1], color='blue', label="Sentences")

# 문장에 대한 라벨 추가
for i, sentence in enumerate(sentences):
    plt.annotate(sentence, (pca_result[i, 0], pca_result[i, 1]), fontsize=9)

plt.title("PCA visualization of sentence embeddings")
plt.xlabel("PCA Component 1")
plt.ylabel("PCA Component 2")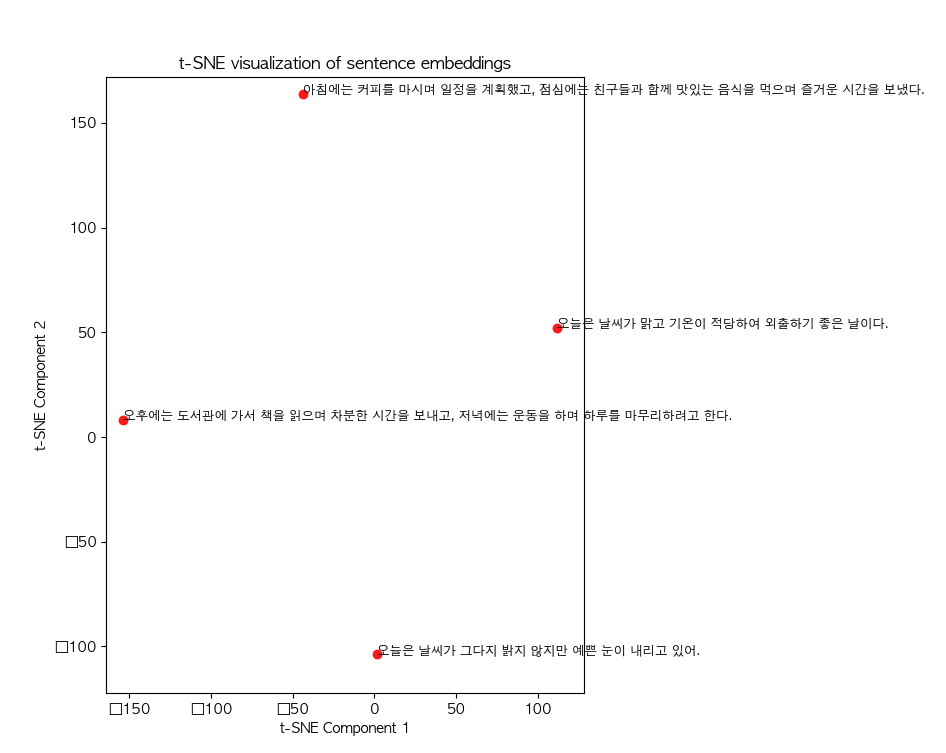
plt.show()- t-SNE로 차원 축소 후 시각화
- 가까운 위치일수록 의미적 유사도가 높다고 할 수 있음
import matplotlib.pyplot as plt
from sklearn.decomposition import PCA
from sklearn.manifold import TSNE


import matplotlib.pyplot as plt
from sklearn.decomposition import PCA
from sklearn.manifold import TSNE
from matplotlib import font_manager, rc
# macOS에서 AppleGothic 폰트 설정
rc('font', family='AppleGothic')

# 2. t-SNE로 차원 축소
num_samples = len(sentence_embeddings)
t_sne = TSNE(perplexity=min(3, num_samples - 1))
tsne_result = t_sne.fit_transform(sentence_embeddings)

# (선택적으로) t-SNE 시각화
plt.figure(figsize=(10, 8))
plt.scatter(tsne_result[:, 0], tsne_result[:, 1], color='red', label="Sentences")
for i, sentence in enumerate(sentences):
    plt.annotate(sentence, (tsne_result[i, 0], tsne_result[i, 1]), fontsize=9)
plt.title("t-SNE visualization of sentence embeddings")
plt.xlabel("t-SNE Component 1")
plt.ylabel("t-SNE Component 2")
plt.show()
Faiss로 유사도 찾는 방법
- 앞서서는 cosine_simiarity로 유사도를 찾았음
import faiss

# 문장 임베딩을 사용해 인덱스 생성
dimension = sentence_embeddings.shape[1]
index = faiss.IndexFlatL2(dimension)  # L2 거리 기반 인덱스

# 인덱스에 벡터 추가
index.add(np.array(sentence_embeddings))

query = "오늘은 눈이 내리고 있어"
query_vec = model.encode(query)

# 유사한 문장 1개 찾기
D, I = index.search(np.array([query_vec]), k=1)

# 결과 출력
for idx in I[0]:
    print(f"유사 문장: {sentences[idx]}")
유사도 점수도 같이 보고 싶다면?
# 유사도 점수와 함께 결과 출력
for idx, score in zip(I[0], D[0]):
    print(f"유사 문장: {sentences[idx]}, 유사도 점수: {score}")