빌드/실행하기
난 powershell이 편해서 이거로 했다 cmd도 상관없음
spring-boot프로젝트를 받으면 gradlew 파일이 생기는데 만약 없으면 지우고 다시받기!
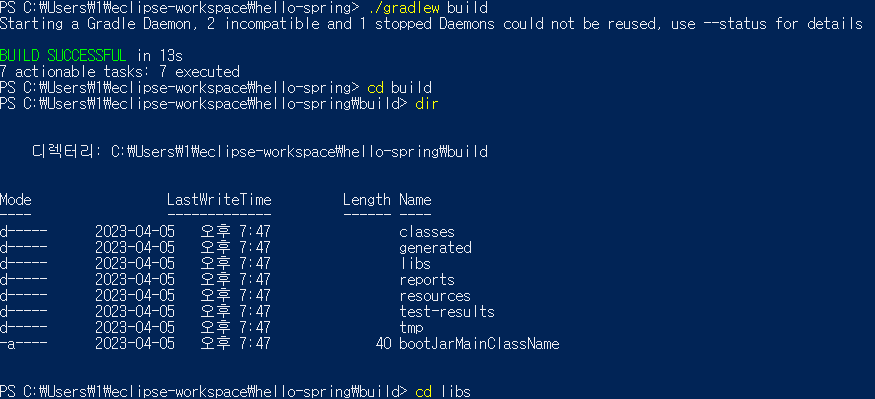
터미널에 boot프로젝트가 위치한곳으로 cd 이동하고
./gradlw build -> 다 받아지면 build로 이동 libs로 이동
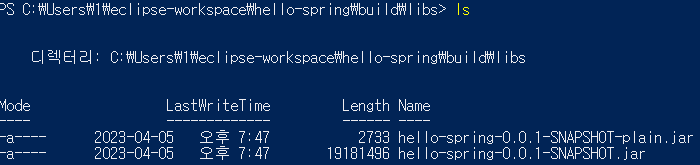
그리고 dir이나 ls를 해보면 .jar두개가 있는데 우리 목적은 -plain이 아니라 그밑의 .jar이다
(스프링 부트? 스프링? 2.5.0 버전부터 -plain이 생겼다고 한다 저건 나같은 초보가 쓸일 없어보이니 그냥 놔두자)
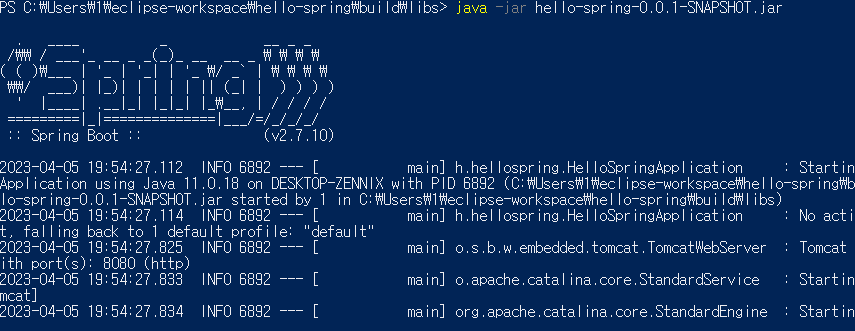
java -jar hello-spring-0.0.1-SNAPSHOT.jar 엔터
위처럼 뜨면 정상!
빌드/실행은 끝
스프링 웹개발 기초
정적 컨텐츠 - html같이 웹페이지를 그대로 사용자에게 보여주는 방식
MVC와 템플릿 엔진 - 요즘 가장 많이 사용하는 방식 서버에서 손을 좀 봐주고(?) 보여주는 방식
API - JSON을 이용해 데이터를 클라이언트(주로 안드로이드 ios)에게 전달하는 방식
정적 컨텐츠는 src/main/resources/static폴더안에 넣으면 된다.
MVC와 템플릿 엔진 맛보기
8080port를 Maven에서 사용중이라서
port 8080 is already use 에러가 떳다 -> application.properties에서
server.port = 8081 추가
Controller
@GetMapping("hello-mvc")
	public String helloMvc(@RequestParam(value = "name") String name, Model model) {
		model.addAttribute("content", name);
		return "hello-tamplates";
}@RequestParam를 지정해서 주소뒤에 name이라는 값을 가지게 한다 String name변수를 주고
Model을 불러온다
model.addAttribute("content", name); String name의 값을 Object name에 주고 그 값이 "content" 라는 이름이라고 알려준다
<html xmlns:th="http://www.thymeleaf.org">
<body>
<p th:text="'hello ' + ${content}">hello! empty</p>
</body>
</html>
깨알 특징 : thymeleaf는 절대경로로 웹상에 주소를 넣어주면 서버가 없어도 화면을 출력해준다
${content} -> model.addAttribute("content", name) key값에서 name을 가져와 값을 치환!
아직은 주소에 직접 타이핑을 해야하는거 같다
http://localhost:8081/hello-mvc?name=Spring-Boot!!!
hello-mvc == @GetMapping("hello-mvc")
? == Query String(맞나?)
name == @RequestParam(value = "name")
Spring-Boot!!! == ${content}
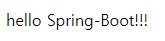
실행화면
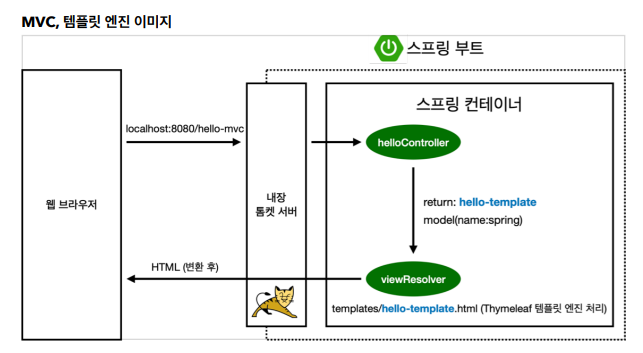
간단한 동작이미지