안녕하세요! 지속되는 Concurrency 시리즈입니다.
지금까지의 여정을 돌아보면:
- 1탄에서는 콜백 지옥과 에러 처리의 개선을 다뤘고
- 2탄에서는 스레드 폭발과 구조화된 동시성의 원리를 알아봤으며
- 3탄에서는 런타임 계약과 협동적 스레드 풀의 철학을 탐구했습니다
오늘은 WWDC21 내용을 바탕으로 async/await의 실제 사용법을 간단히 하려고 합니다..
예시: 썸네일 가져오기
Apple 엔지니어들이 보여준 예시는 우리가 흔히 마주치는 상황입니다. 서버에서 이미지를 다운로드하고 썸네일을 만드는 작업이죠.
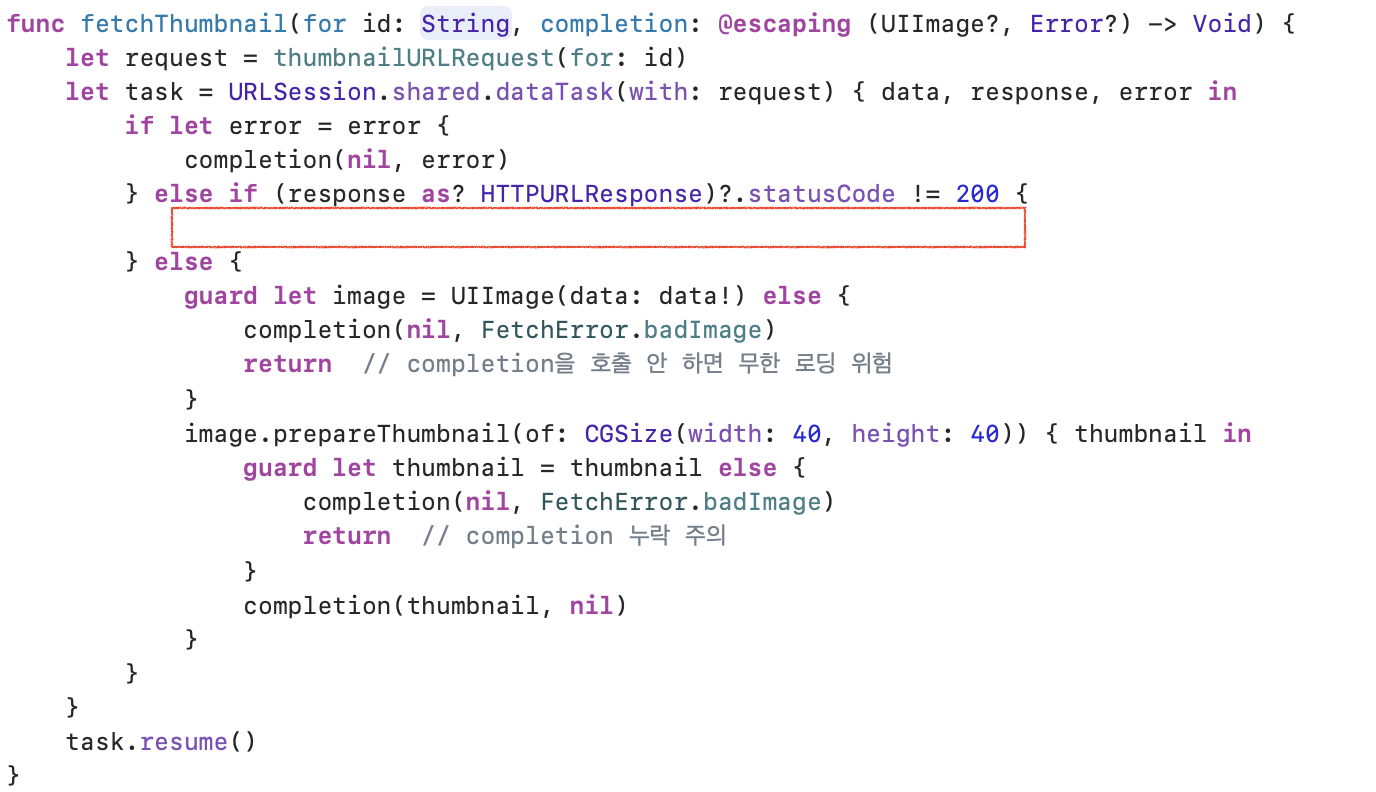
기존 방식 (Completion Handler)
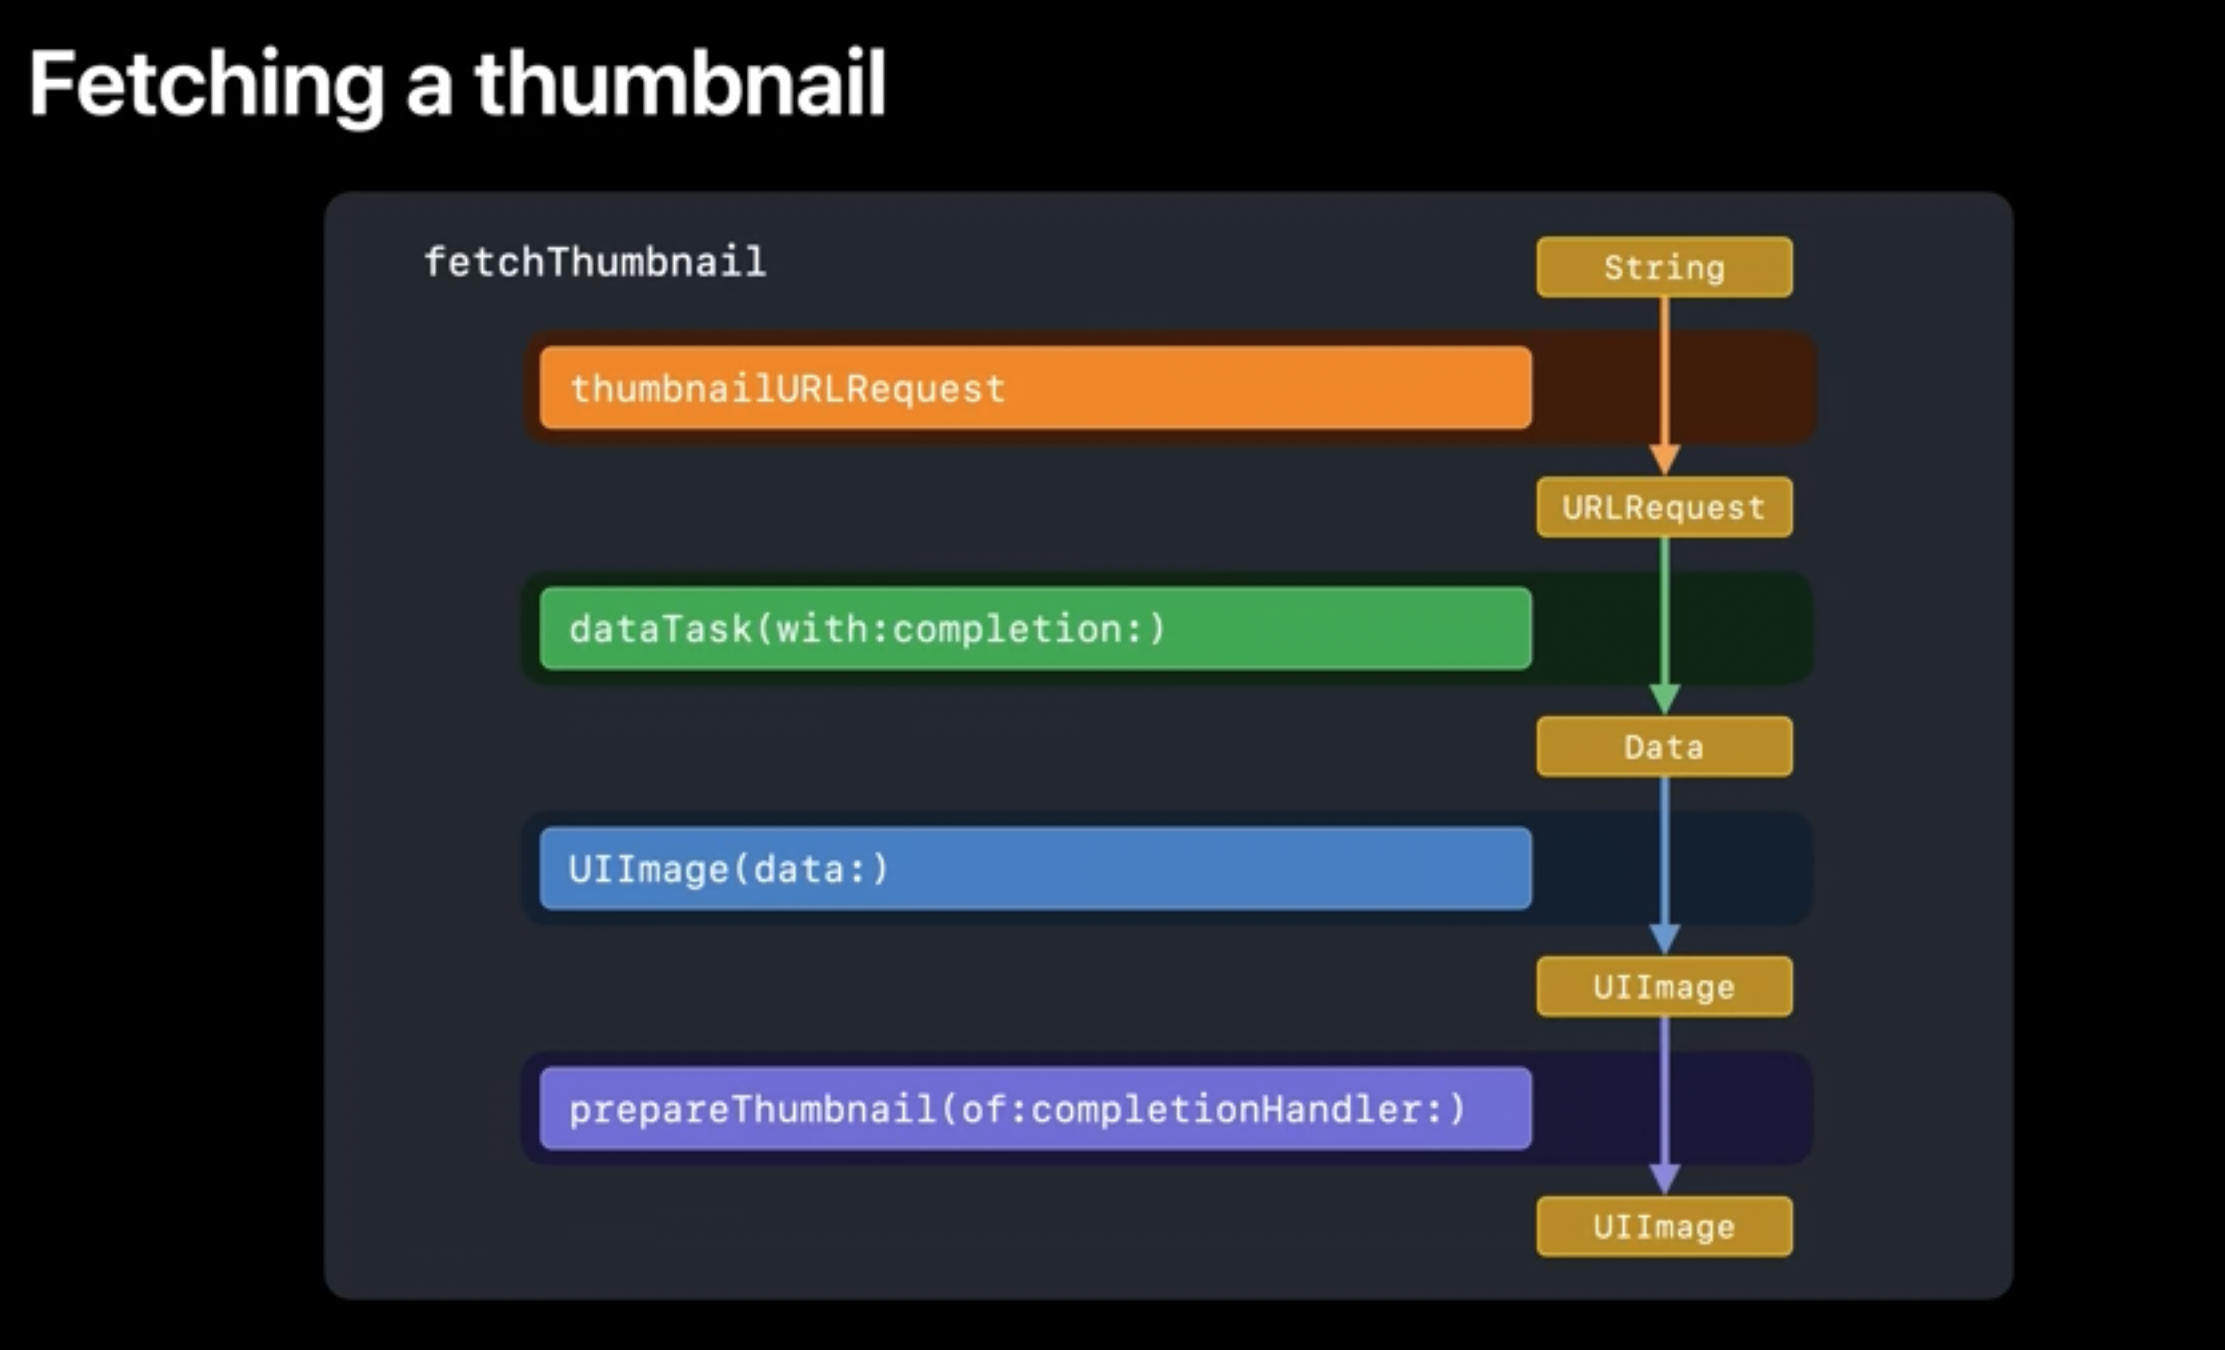
네트워크 통신(dataTask)과 이미지 처리(prepareThumbnail)라는 두 개의 비동기 작업이 연쇄적으로 일어나는 상황입니다.
// MARK: - 과거의 방식: 20줄의 복잡함
func fetchThumbnail(for id: String, completion: @escaping (UIImage?, Error?) -> Void) {
    let request = thumbnailURLRequest(for: id)
    let task = URLSession.shared.dataTask(with: request) { data, response, error in
        if let error = error {
            completion(nil, error)
        } else if (response as? HTTPURLResponse)?.statusCode != 200 {
            completion(nil, FetchError.badID)
        } else {
            guard let image = UIImage(data: data!) else {
                completion(nil, FetchError.badImage)
                return  // completion을 호출 안 하면 무한 로딩 위험
            }
            image.prepareThumbnail(of: CGSize(width: 40, height: 40)) { thumbnail in
                guard let thumbnail = thumbnail else {
                    completion(nil, FetchError.badImage)
                    return  // completion 누락 주의
                }
                completion(thumbnail, nil)
            }
        }
    }
    task.resume()
}
이 코드의 문제점들을 정리해보면:
- 함정 1-2:
guard문에서completion호출을 깜빡하면 무한 로딩 - 복잡성: 비동기 작업이 중첩되면서 코드가 오른쪽으로 계속 파고듦
- 컴파일러의 무력함: Swift가 completion 호출 누락을 잡아내지 못함
- 일반 함수였다면 return이 제대로 이루어지지 않는다면 컴파일러가 인지하고 경고를 주어 개발자가 실수하는 일을 줄이게 도와줍니다.
- 에러 처리의 분산: 각 콜백마다 따로따로 에러를 처리해야 함
"Swift에게 completion handler는 그저 클로저일 뿐입니다. 우리는 이 클로저가 항상 호출되기를 바라지만, Swift에는 이를 강제하는 방법이 없습니다."
아무런 에러를 방출하지 않는 것을 볼 수 있습니다.
async/await로 개선해볼까요
// MARK: - 새로운 방식: 6줄로 단순화
func fetchThumbnail(for id: String) async throws -> UIImage {
    let request = thumbnailURLRequest(for: id)
    let (data, response) = try await URLSession.shared.data(for: request)
    guard (response as? HTTPURLResponse)?.statusCode == 200 else { throw FetchError.badID }
    let maybeImage = UIImage(data: data)
    guard let thumbnail = await maybeImage?.thumbnail else { throw FetchError.badImage }
    return thumbnail
}
20줄이 6줄로 줄어들었고, 더 중요한 것은 에러 처리가 확실해져서 더 안전해졌다는 점입니다!

이제 Swift 컴파일러가 우리 편이 되어 값을 반환하지 않으면 반드시 오류를 던지도록 강제합니다. 무한 로딩은 일어나지 않겠죠.
프로퍼티도 async 가능
get 메서드 앞에 async를 붙여서 프로퍼티도 비동기로 만들 수 있어요:
// MARK: - async 프로퍼티로 더 자연스러운 코드 만들기
extension UIImage {
    var thumbnail: UIImage? {
        get async {
            let size = CGSize(width: 40, height: 40)
            return await self.byPreparingThumbnail(ofSize: size)
        }
    }
}
AsyncSequence로 for문 처리
여러 개의 썸네일을 순차적으로 처리해야 한다면? AsyncSequence를 사용하면 됩니다:
// MARK: - 여러 이미지를 순차적으로 처리하기
for await id in staticImageIDsURL.lines {
    let thumbnail = await fetchThumbnail(for: id)
    collage.add(thumbnail)
}
let result = await collage.draw()
suspend와 resume
지금까지 배운 이론들이 실제로 어떻게 작동하는지 확인해볼까요?
Continuation
await를 만나면 무슨 일이 일어날까요? 3탄에서 배운 Continuation이 드디어 등장합니다!
- Swift 런타임이 OS에게 "이 작업이 suspended 상태이고 thread가 free하다"고 알려줍니다
- OS 스케줄러가 알아서 작업의 순서와 스케줄을 관리하며 스레드를 효율적으로 사용합니다
- Continuation 객체에는 "어디서 멈췄는지, 어떤 데이터가 필요한지" 등의 정보가 담겨 있습니다
- 비동기 작업의 결과가 준비되면, 시스템이 일시 중지된 continuation을 찾아서 resume합니다
이는 한 단계 더 추상화된 접근법입니다.
GCD에서는 우리가 DispatchQueue를 이용해서
main queue인지 concurrent queue인지 결정하고,
동기인지 비동기인지 OS의 스레드 스케줄까지 관여했습니다.

다면, Swift Concurrency에서는 그런 저수준 관리를 런타임에게 맡기고 우리는 "무엇을" 할지에만 집중하면 됩니다.
마이그레이션: withCheckedContinuation
"그럼 우리 프로젝트에 있는 수많은 completion handler 코드들은 어떻게 하죠? 다 갈아엎어야 하나요?"
withCheckedContinuation을 사용하면 기존의 completion handler 기반 코드를 async/await로 변환할 수 있습니다.
실전 마이그레이션 예시
// MARK: - 기존의 completion handler 방식
func getPersistentPosts(completion: @escaping ([Post], Error?) -> Void) {
    do {
        let req = Post.fetchRequest()
        req.sortDescriptors = [NSSortDescriptor(key: "date", ascending: true)]
        let asyncRequest = NSAsynchronousFetchRequest<Post>(fetchRequest: req) { result in
            completion(result.finalResult ?? [], nil)
        }
        try self.managedObjectContext.execute(asyncRequest)
    } catch {
        completion([], error)
    }
}

// MARK: - async/await 방식으로 변환
func persistentPosts() async throws -> [Post] {
    typealias PostContinuation = CheckedContinuation<[Post], Error>
    return try await withCheckedThrowingContinuation { (continuation: PostContinuation) in
        self.getPersistentPosts { posts, error in
            if let error = error {
                continuation.resume(throwing: error)
            } else {
                continuation.resume(returning: posts)
            }
        }
    }
}
resume은 한 번만 호출
"resume은 모든 경로에서 정확히 한 번만 호출되어야 한다"
만약 이 규칙을 어기면:
- resume을 안 하면: 해당 await는 영원히 기다리며 메모리 누수 발생 😱
- resume을 두 번 하면: 런타임이 fatal error를 발생시켜 앱 크래시 💥

Delegate 패턴과의 조합
더 복잡한 시나리오를 보겠습니다. Delegate를 사용하는 경우에는 continuation을 저장해뒀다가 나중에 resume해야 합니다:
// MARK: - Delegate 패턴에서의 Continuation 관리
class ViewController: UIViewController {
    private var activeContinuation: CheckedContinuation<[Post], Error>?

    func sharedPostsFromPeer() async throws -> [Post] {
        try await withCheckedThrowingContinuation { continuation in
            self.activeContinuation = continuation
            self.peerManager.syncSharedPosts()
        }
    }
}

extension ViewController: PeerSyncDelegate {
    func peerManager(_ manager: PeerManager, received posts: [Post]) {
        self.activeContinuation?.resume(returning: posts)
        self.activeContinuation = nil // 중요: 중복 호출 방지
    }

    func peerManager(_ manager: PeerManager, hadError error: Error) {
        self.activeContinuation?.resume(throwing: error)
        self.activeContinuation = nil // 중요: 중복 호출 방지
    }
}
반드시 nil로 해제해줘야 하는 이유:
- Delegate 메서드가 여러 번 호출될 수 있기 때문
- 두 번째 resume 호출 시 앱이 크래시되는 것을 방지
SwiftUI와 XCTest 적용
SwiftUI에서 사용하기
onAppear는 sync 컨텍스트인데 async 함수를 호출해야 할 때는 Task를 사용합니다:
// MARK: - SwiftUI에서 async 함수 호출하기
struct ImageCell: View {
    let post: Post
    @StateObject private var viewModel = ImageViewModel()

    var body: some View {
        AsyncImage(url: viewModel.thumbnailURL) { image in
            image.resizable()
        } placeholder: {
            ProgressView()
        }
        .onAppear {
            Task {  // sync와 async 세계를 연결하는 다리
                do {
                    try await viewModel.fetchThumbnail(for: post.id)
                } catch {
                    print("썸네일 로딩 실패: \(error)")
                }
            }
        }
    }
}
XCTest
테스트도 훨씬 간단해졌습니다! XCTest가 async를 네이티브로 지원합니다:
// MARK: - async 테스트 작성하기
class ThumbnailTests: XCTestCase {
    func testFetchThumbnail() async throws {
        // Given
        let viewModel = ImageViewModel()

        // When
        let thumbnail = try await viewModel.fetchThumbnail(for: "test-id")

        // Then
        XCTAssertNotNil(thumbnail)
        XCTAssertEqual(thumbnail.size.width, 40)
    }
}
예전처럼 XCTestExpectation이나 waitForExpectations 같은 복잡한 코드는 이제 거의 쓰지 않게 되었습니다.
🔄 변화의 핵심을 정리하면
| 측면 | GCD의 세계 | Swift Concurrency의 세계 |
|---|---|---|
| 코드 스타일 | 콜백 지옥, 들여쓰기 폭발 | 직선적이고 읽기 쉬운 코드 |
| 에러 처리 | 각 콜백마다 개별 처리 | try-catch로 통합 관리 |
| 스레드 관리 | 개발자가 직접 큐 선택 | 런타임이 최적화해서 관리 |
| 메모리 효율성 | 스레드 폭발 위험 | 협동적 스레드 풀로 효율성 극대화 |
| 안전성 | 컴파일러가 놓치는 버그들 | Swift의 타입 시스템이 보장 |
📚 참고자료
- WWDC 2021: Meet async/await in Swift
