
웹소켓
웹소켓은 전이중 통신을 제공하기 때문에 실시간성을 보장해줄 수 있다.
- 실시간성을 보장하는 서비스 (게임, 채팅, 실시간 주식거래)에서 웹소켓을 사용할 수 있다.
웹소켓 vs HTTP
웹소켓이 아닌 HTTP를 이용하여 실시간성을 보장하는 듯하게 흉내낼 수 있다.
- HTTP의 실시간성 보장 기법에는 Polling, Long Polling, Streaming이 있다.
실시간성 측면에서 웹소켓과 HTTP의 가장 큰 차이는 수립된 connection을 활용하는 방식이다.
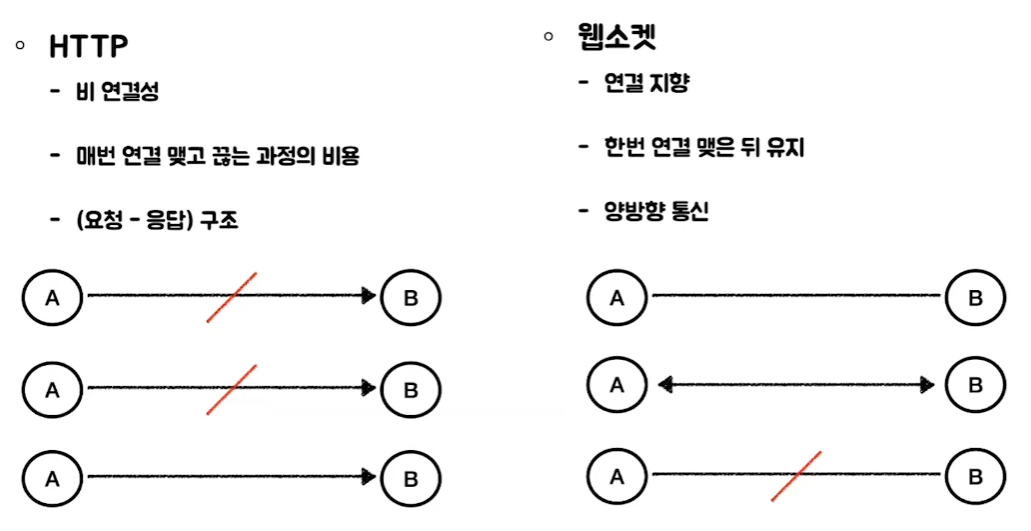
- HTTP
- 클라이언트와 연결을 맺고 끊는다. (비연결성)
- 3way, 4way handshake로 연결을 맺고 끊어야 한다.
- 웹소켓
- 한번 연결을 맺고 나면, 그 연결을 계속 유지한다.
- 연결을 맺는 과정에서 발생하는 비용을 줄일 수 있다
또 다른 차이점은 통신을 하는 방식에 있다.

- HTTP
- 요청과 응답이 하나의 쌍을 이루는 구조로 통신한다
- 원하는 리소스에 대해 서버쪽에 요청을 해야한다
- ex) 탁구
- 웹소켓
- 연결이 계속 유지되므로, 요청없이 상대가 보낸 메시지를 계속 듣고 있기만 하면 된다.
- ex) 전화연결
보내야 하는 데이터의 양에서도 차이가 있다.
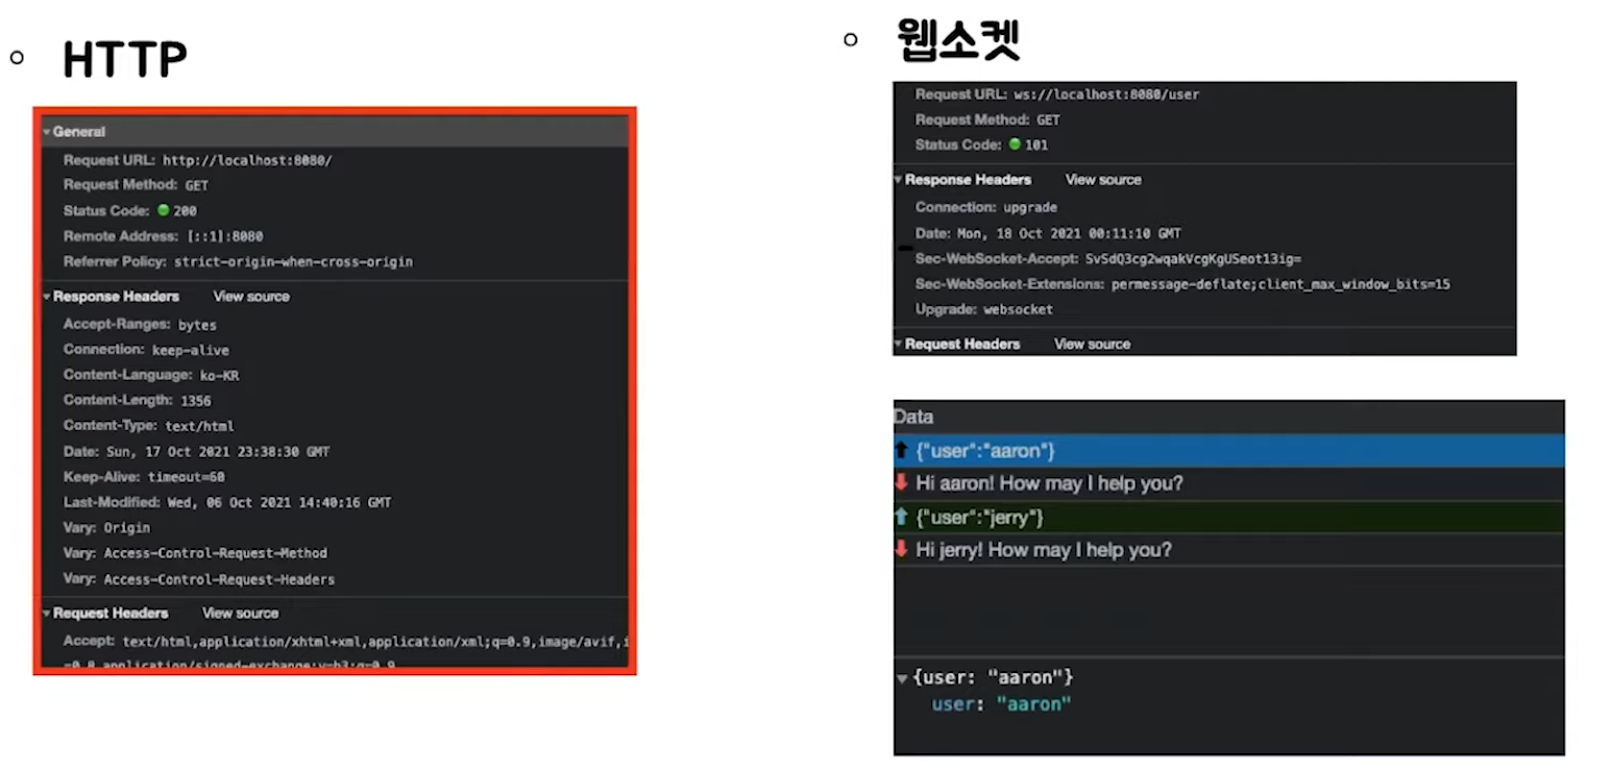
-
HTTP
- 매 요청시 마다 많은 정보를 만들어 서버에 보낸다
- 응답시에도 마찬가지이다.
- 실시간성을 요하는 서비스(요청고 응답이 많은 서비스)에 부담이 되는 구조이다.
-
웹소켓
- 최초의 handshake 과정에서는 HTTP 프로토콜을 이용하기 떄문에 위와 유사한 양의 데이터를 주고 받는다
- 하지만 한번 연결이 수립되면, 간단한 데이터만 오고 간다. (HTTP보다 통신 비용이 저렴)
웹소켓은 또한 많은 브라우저에서 사용할 수 있다.
(can i use)
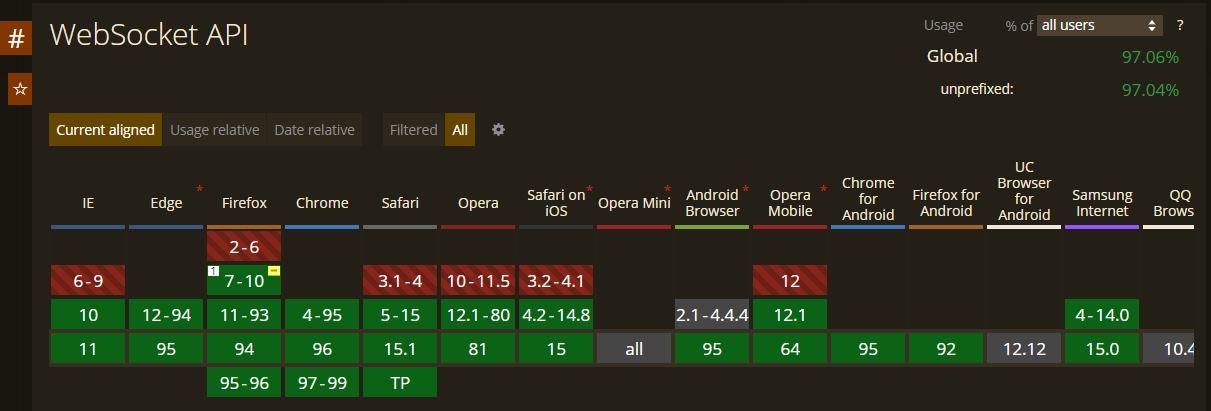
- 초록색으로 색칠된 부분은 웹소켓을 사용할 수 있다는 의미이다.
- 빨간색으로 색칠된 부분(IE, 파이어폭스, 사파리 구버전)에서는 아직 지원하지 않는다. -> 사용 환경에 따라 웹소켓 지원여부가 다르면 문제가 발생한다.
웹소켓을 지원하지 않는 환경에서 SockJS, socket.io 라이브러리를 사용하면 된다.
- Spring은 SockJS를 지원한다.
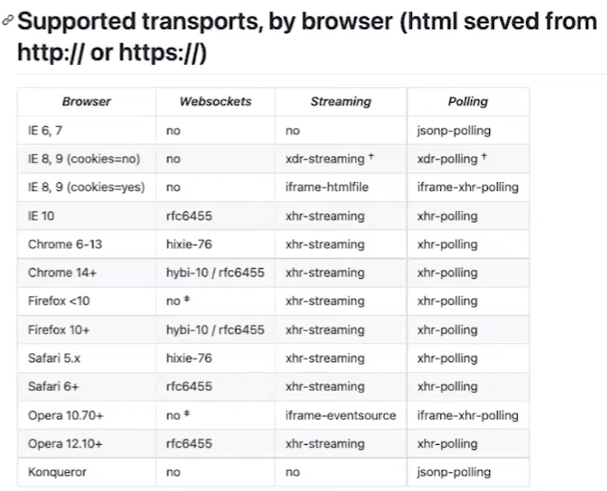
- SockJS, socket.io 라이브러리를 사용하면, 웹소켓을 지원하지 않는 브라우저에서 웹소켓을 사용하는 것과 같은 비슷한 기능을 제공해준다.
- 스프링은 SockJS를 제공한다.
- 웹소켓을 지원하는 브라우저는 웹소켓 기술을 사용한다.
- 지원하지 않는다면 HTTP의 Streaming을 사용하고, 그것도 지원하지 않는다면 Polling을 사용한다.
Spring에서의 웹소켓
스프링에서 웹소켓 적용하기
package com.websocket;

import org.springframework.context.annotation.Configuration;
import org.springframework.web.socket.config.annotation.EnableWebSocket;
import org.springframework.web.socket.config.annotation.WebSocketConfigurer;
import org.springframework.web.socket.config.annotation.WebSocketHandlerRegistry;

@Configuration
@EnableWebSocket
public class WebSocketConfig implements WebSocketConfigurer {
    @Override
    public void registerWebSocketHandlers(WebSocketHandlerRegistry registry) {
        registry.addHandler(new SocketTextHandler(), "/user")
                .setAllowedOrigins("*")
                .withSockJS();
    }
}
-
웹소켓에 대한 Configuration 클래스를 만들고
WebSocketConfigurer 인터페이스 구현하고,
@EnableWebSocket 어노테이션을 달아준다. -
스프링에서 웹소켓을 사용하기 위해서 클라이언트가 보내는 통신을 처리할 핸들러가 필요하다
-> 직접 구현한 웹소켓 핸들러 (SocketTextHandler)를 웹소켓이 연결될 때, Handshake할 주소 (/user)와 함께addHandler메소드의 인자로 넣어준다. -
setAllowedOrigins("*")으로 Cors 설정을 할 수 있다.- 스프링에서 웹소켓을 사용할 때, same-origin만 허용하는 것이 기본정책이다.
-
withSockJS()으로 SockJS 라이브러리를 사용하도록 설정할 수 있다.- 웹소켓을 지원하지 않는 브라우저 환경에서도 비슷한 경험을 할 수 있는 기능을 제공해준다.
package com.websocket;

import org.json.JSONObject;
import org.springframework.web.socket.CloseStatus;
import org.springframework.web.socket.TextMessage;
import org.springframework.web.socket.WebSocketSession;
import org.springframework.web.socket.handler.TextWebSocketHandler;

import java.util.Set;
import java.util.concurrent.ConcurrentHashMap;

public class SocketTextHandler extends TextWebSocketHandler {

    private final Set<WebSocketSession> sessions = ConcurrentHashMap.newKeySet();

    @Override
    public void afterConnectionEstablished(WebSocketSession session) throws Exception {
        sessions.add(session);
    }

    @Override
    protected void handleTextMessage(WebSocketSession session, TextMessage message) throws Exception {
        String payload = message.getPayload();
        JSONObject jsonObject = new JSONObject(payload);
        for (WebSocketSession s : sessions) {
            s.sendMessage(new TextMessage("Hi " + jsonObject.getString("user") + "!"));
        }
    }

    @Override
    public void afterConnectionClosed(WebSocketSession session, CloseStatus status) throws Exception {
        sessions.remove(session);
    }
}
-
간단한 웹소켓 핸들러이다.
-
웹소켓 프로토콜은 기본적으로 Text, Binary 타입을 지원한다.
-> 필요에 따라TextWebSocketHandler,BinaryWebSocketHandler를 상속하여 구현해주면 된다. -
WebSocketSession파라미터는 웹소켓이 연결될 때 생기는 연결정보를 담고 있는 객체이다.
-> Handler에서는 웹소켓 통신에 대한 처리를 위해, 웹소켓 세션들을 컬랙션에 담아 관리하는 경우가 많다- 웹소켓 커넥션이 맺어지는 경우 (
afterConnectionEstablished) ->sessions.add(session); - 커넥션이 끊어지면 (
afterConnectionClosed) ->sessions.remove(session);
- 웹소켓 커넥션이 맺어지는 경우 (
-
웹소켓 세션을 통해, 연결된 모든 클라이언트들에게 메시지를 보낼 수 있다.
STOMP & Spring-Messaging
스프링부트에서 WebSocket 의존성을 받아오면 Spring Messaging이 같이 달려온다.
그럼 Spring Messaging은 무엇일까?
그전에 STOMP 프로토콜에 대해서 이해해야 한다.
-
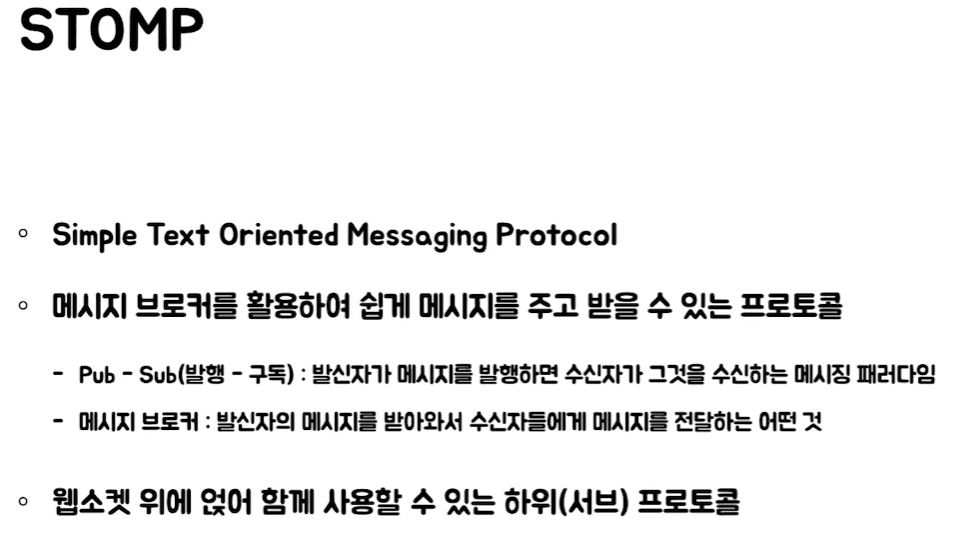
STOMP는 간단한 텍스트 기반 메시징 프로토콜이다.
->메시지 브로커라는 것을 활용하여pub/sub방식으로 클라이언트와 서버가 쉽게 메시지를 주고 받을 수 있도록하는 프로토콜이다. -
pub/sub은 일종의 메시지 패러다임이다.- 발신자가 어떠한 범주(예를 들어 경로)로 메시지를 발행하면
이 범주를 구독하고 있는 수신자들이 해당 메시지를 받아볼 수 있는 방식이다.
- 발신자가 어떠한 범주(예를 들어 경로)로 메시지를 발행하면
-
메시지 브로커는 발신자가 보낸 메시지들을 받아서 수신자들에게 전달해주는 것이다.
STOMP 프로토콜은 웹소켓만을 위해 만들어진 프로토콜이 아니다.
- 중요한 점은 웹소켓과 같이 몇몇 양방향 통신 프로토콜에서 STOMP를 함께 사용할 수 있다는 것이다.
- Spring은 웹소켓 위에 STOMP 프로토콜을 얹어 사용하는 방법을 지원해준다.
그럼 굳이 웹소켓위에 STOMP를 얹어서 사용하는 이유가 무엇일까?
- 웹소켓은 Text, Binary 타입의 메시지를 양방향으로 주고받을 수 있는 프로토콜이다. 하지만 메시지를 주고 받는 형식이 따로 정해진 것이 없다.
-> 웹소켓만 사용하는 프로젝트가 커지면, 주고 받는 메시지에 대한 형식이 중요하게 된다.
-> 정의된 메시지 형식대로 파싱하는 로직 또한 따로 구현해야한다.
-> STOMP를 사용하면 메시지 형식에 대한 고민과 파싱 로직을 위한 코드 구현이 필요없어진다.
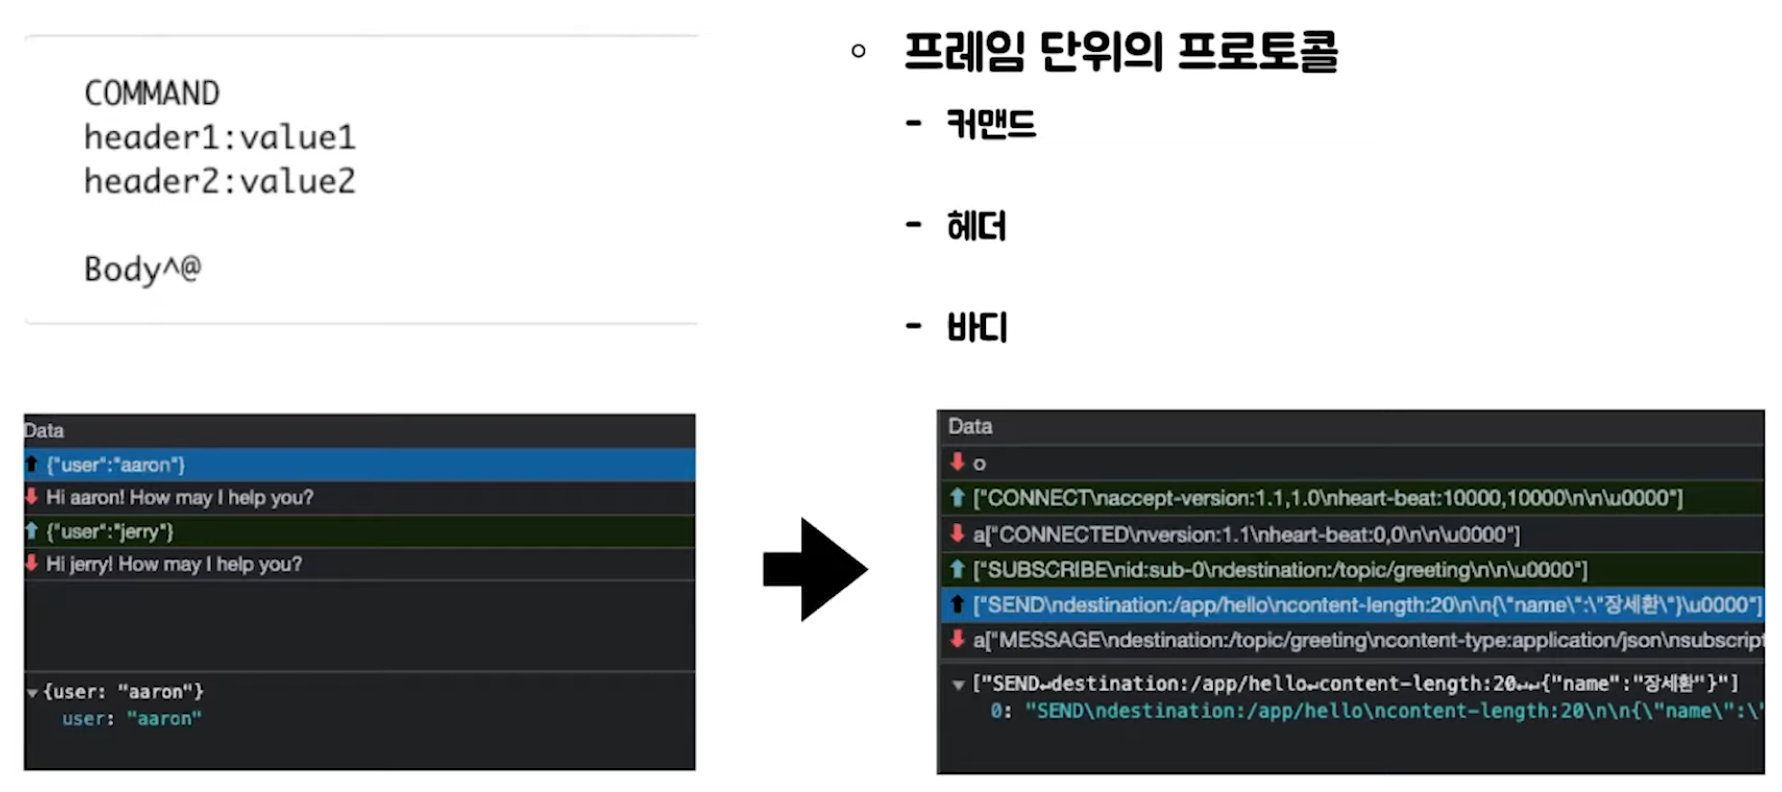
- STOMP는 커맨드, 헤더, 바디로 이루어진 프레임 단위를 정의해두었기 때문이다
- 웹소켓만 사용할 때(왼쪽) 오고 가는 데이터는 오직 날것의 메시지 뿐이다.
- STOMP를 사용할 때(오른쪽)는 커맨드, 헤더, 바디의 형태로 데이터가 오고간다.
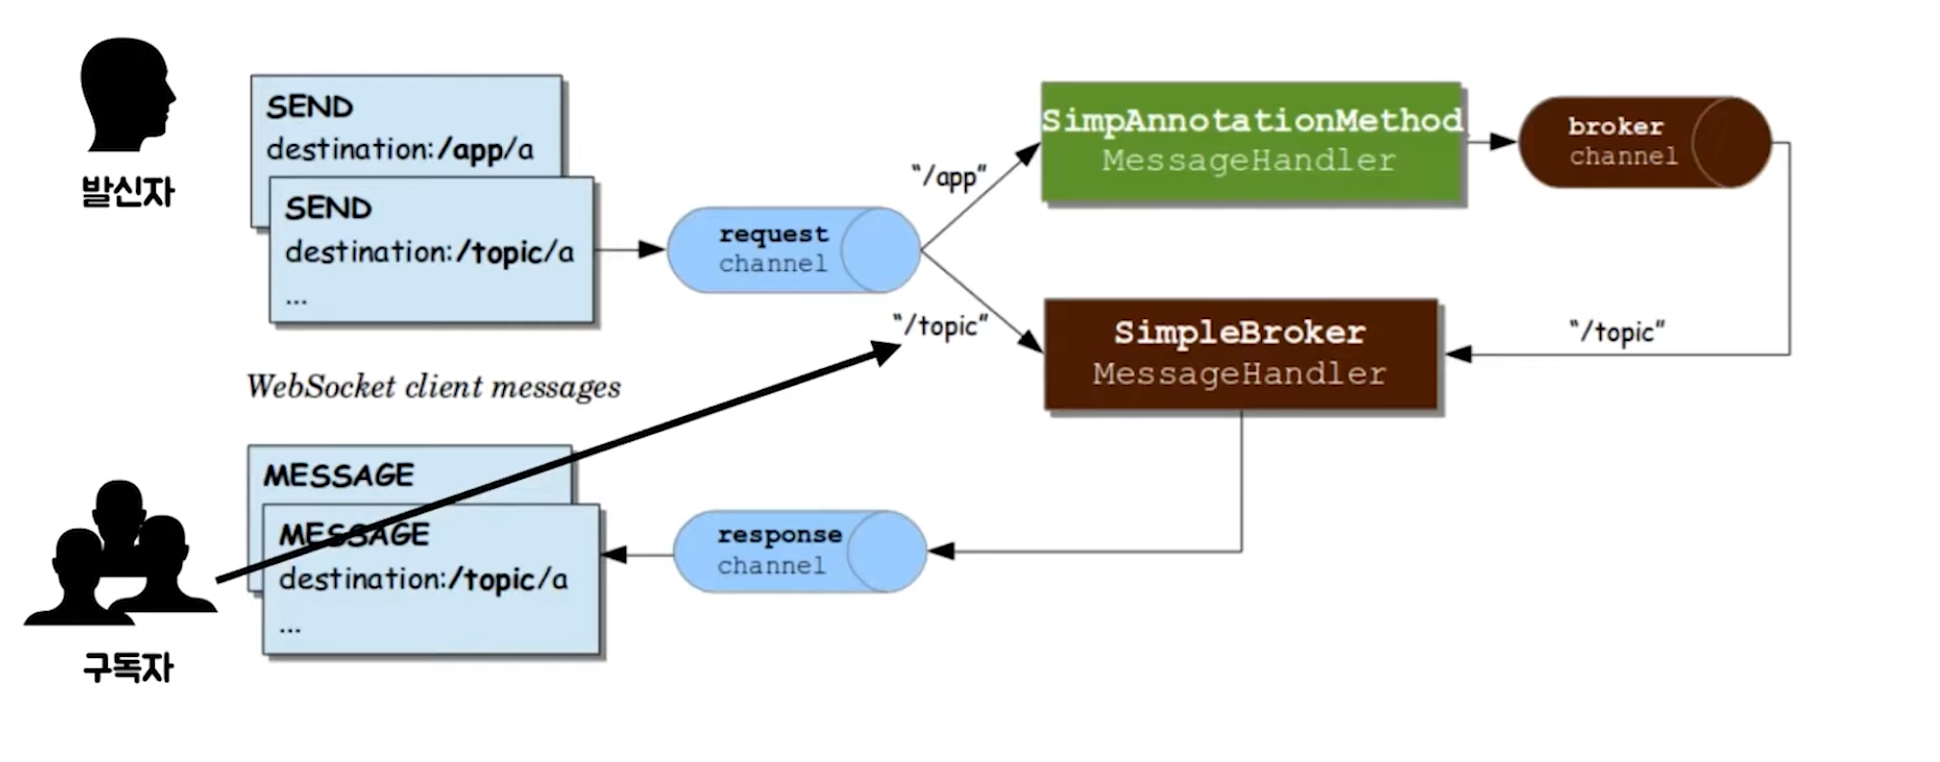
스프링이 STOMP 프로토콜을 사용하고 있을 떄의 동작 흐름에 대해 살펴보자
-
메시지를 보내려는 발신자, 메시지를 받으려는 구독자가 있다.
구독자는/topic이라는 경로를 구독하고 있다. -
발신자는
/topic을 destination 헤더로 넣어 메시지를메시지 브로커를 통해 구독자들에게 곧바로 송신할 수 있다 -
또는 서버 내에서 어떤 가공처리가 필요하다면
/app경로로 메시지를 송신할 수 있다.
-> 서버가 가공처리가 끝난 데이터를/topic이라는 경로를 담아메시지 브로커에게 전달하면
->메시지 브로커는 전달받은 메시지를/topic을 구독하는 구독자들에게 최종적으로 전달한다.
Spring에서 웹소켓과 함께 STOMP 프로토콜을 사용해보자
package com.websocket;

import org.springframework.context.annotation.Configuration;
import org.springframework.messaging.simp.config.MessageBrokerRegistry;
import org.springframework.web.socket.config.annotation.EnableWebSocketMessageBroker;
import org.springframework.web.socket.config.annotation.StompEndpointRegistry;
import org.springframework.web.socket.config.annotation.WebSocketMessageBrokerConfigurer;

@Configuration
@EnableWebSocketMessageBroker
public class WebSocketBrokerConfig implements WebSocketMessageBrokerConfigurer {

    @Override
    public void configureMessageBroker(MessageBrokerRegistry registry) {
        registry.enableSimpleBroker("/queue","/topic");
        registry.setApplicationDestinationPrefixes("/app");
    }

    @Override
    public void registerStompEndpoints(StompEndpointRegistry registry) {
        registry.addEndpoint("/gs-guide-websocket")
                .withSockJS();
    }
}
-
@EnableWebSocketMessageBroker어노테이션을 달고
WebSocketMessageBrokerConfigurer인터페이스를 구현해준다. -
configureMessageBroker메소드는 STOMP에서 사용하는 메시지 브로커를 설정하는 메소드이다.enableSimpleBroker: 내장 메시지 브로커를 사용하기 위한 메소드이다.
파라미터로 지정한 prefix(/queue또는/topic)가 붙은 메시지를 발행할 경우, 메시지 브로커가 이를 처리하게 된다./queueprefix는 메시지가 1대1로 송신될 때,
/topicprefix는 메시지가 1대다로 브로드캐스팅될 때 사용하는게 컨밴션이다.
setApplicationDestinationPrefixes: 메시지 핸들러로 라우팅되는 prefix(/app)를 파라미터로 지정할 수 있다.
-> 메시지 가공 처리가 필요한 경우, 가공 핸들러로 메시지를 라우팅 되도록하는 설정이다.
-
registerStompEndpoints메소드는 웹소켓 configuration의 addHandler 메소드와 유사하다.
->addEndpoint메소드의 파라미터로 들어가는/gs-guide-websocket는 처음 웹소켓 Handshake를 위한 경로이다.
-> cors,SockJS 설정 또한 할 수 있다.- 다른점은
addEndpoint에 핸들러를 하나하나 추가해줄 필요가 없다.
-> STOMP를 사용하면, 웹소켓만 사용할 때와 다르게 하나의 연결주소마다 핸들러 클래스를 따로 구현할 필요없이 Controller 방식으로 간편하게 사용할 수 있다. (STOMP의 장점)
- 다른점은
package com.websocket;

import org.springframework.messaging.handler.annotation.MessageMapping;
import org.springframework.messaging.handler.annotation.SendTo;
import org.springframework.stereotype.Controller;
import org.springframework.web.util.HtmlUtils;

@Controller
public class GreetingController {

    @MessageMapping("/hello")
    @SendTo("/topic/greeting")
    public Greeting greeting(HelloMessage message) throws Exception {
        Thread.sleep(1000);
        return new Greeting("Hello" + HtmlUtils.htmlEscape(message.getName()));
    }
}-
가공 핸들러는 이와 같이 구현한다.
-
STOMP를 사용하면 따로 인터페이스를 상속받을 필요없이
@Controller어노테이션을 사용할 수 있다. -
@MessageMapping어노테이션은@RequestMapping과 비슷한 역할을 한다
-> HTTP 요청의 경로에 맞는 핸들러에게 처리를 위임하듯,
STOMP 웹소켓 통신을 통해 메시지가 들어오면 메시지의 destination 헤더와 @MessageMapping에 설정된 경로가 일치한 핸들러를 찾아 해당 핸들러가 이를 처리한다.
-> WebSocketBrokerConfig에서 설정한/appprefix와 합쳐진/app/hello라는 destination 헤더를 가진 메시지들이@MessageMapping("/hello")가 붙은 핸들러를 거치게 된다. -
@SendTo어노테이션은 핸들러에서 처리를 마친 후 결과 메시지를 설정한 경로(/topic/greeting)로 보내준다.
-> 앞에/topic이 붙었으니 SimpleBroker로 전달된다.
Spring속 STOMP 프로토콜의 장점
-
하위 프로토콜, 컨벤션을 따로 정의할 필요 없다.
-> STOMP가 프레임 단위로 정의해준다. -
연결 주소마다 새로운 Handler를 구현하고 설정해줄 필요 없다.
->@Controller어노테이션을 사용하면 된다. -
외부 Messaging Queue (Kafka, RabbitMQ, ...)를 사용할 수 있다.
-> Spring이 기본적으로 제공하는 내장 메시지 브로커가 아닌 외부 메시지 큐를 연동해서 사용할 수 있다. -
Spring Security를 사용할 수 있다.
-> 오고 가는 메시지에 대한 보안설정을 할 수 있다.

덕분에 좋은 내용 잘 보고 갑니다.
정말 감사합니다.