Multus를 사용한 Macvlan 구성
업무가 바빠 오랜만에 글을 작성하네요! 시간 날때마다 다시 꾸준하게 포스팅을 하려고 합니다. 자 그럼... 본론으로 돌아와서 Multus는 Pod에 멀티 네트워크를 추가할 수 있는 CNI 플러그인이고, Macvlan은 Pod가 독립된 네트워크 인터페이스를 가지도록 설정합니다.이번에는 Kubernetes 환경에서 Multus를 사용해 Macvlan을 구성하여 Pod에 네트워크 인터페이스의 IP를 할당하는 방법을 알아보려고 합니다.
사전 준비 사항
1. 테스트를 위한 서버 1대 추가 구성 (Kubernetes를 단일 노드로 구성한 경우)
Macvlan은 기본적으로 자신의 부모 네트워크 인터페이스와의 통신이 불가능하게 설계되어 있습니다. 예를 들어 Macvlan이 할당된 Pod를 생성하고 Pod가 생성된 Node의 IP로 ping을 보내면 응답하지 않습니다.(참고 내용) 그렇기 때문에, 동일한 네트워크 망에 테스트를 위한 서버를 한대를 추가 구성합니다.
Kubernetes를 여러 대의 Node로 구성하였다면 Pod가 할당된 Node를 제외한 다른 Node에서 ping을 보낼 수 있으므로, 이 부분은 넘어가시면 됩니다.
2. Kubernetes 환경 구성
해당 가이드를 참고하여 Kubernetes 환경을 구축해주세요. (해당 Macvlan 가이드는 OS를 구분하지 않고 적용되는 가이드입니다.)
3. 노드의 promiscuous mode on
sudo ip link set <Main Network Interface> promisc on사용중인 네트워크 인터페이스의 promiscuous mode를 활성화합니다. 해당 모드를 활성화하면 네트워크 인터페이스가 자신에게 주소화되지 않은 패킷도 수신할 수 있습니다.
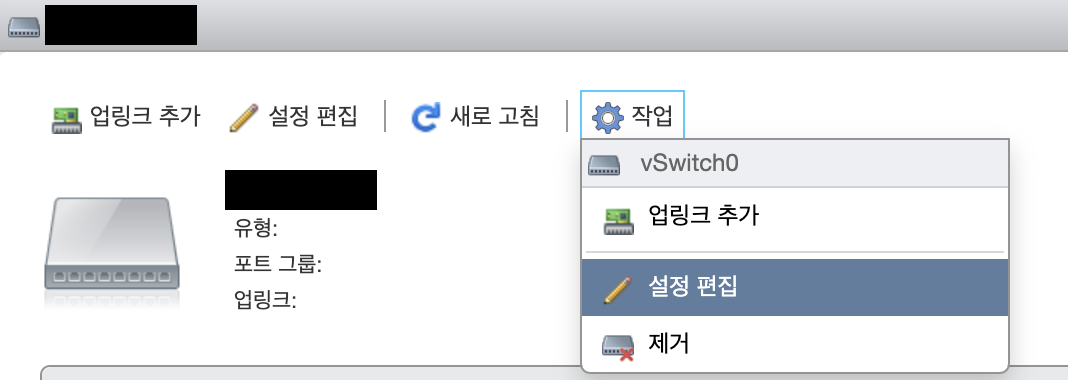
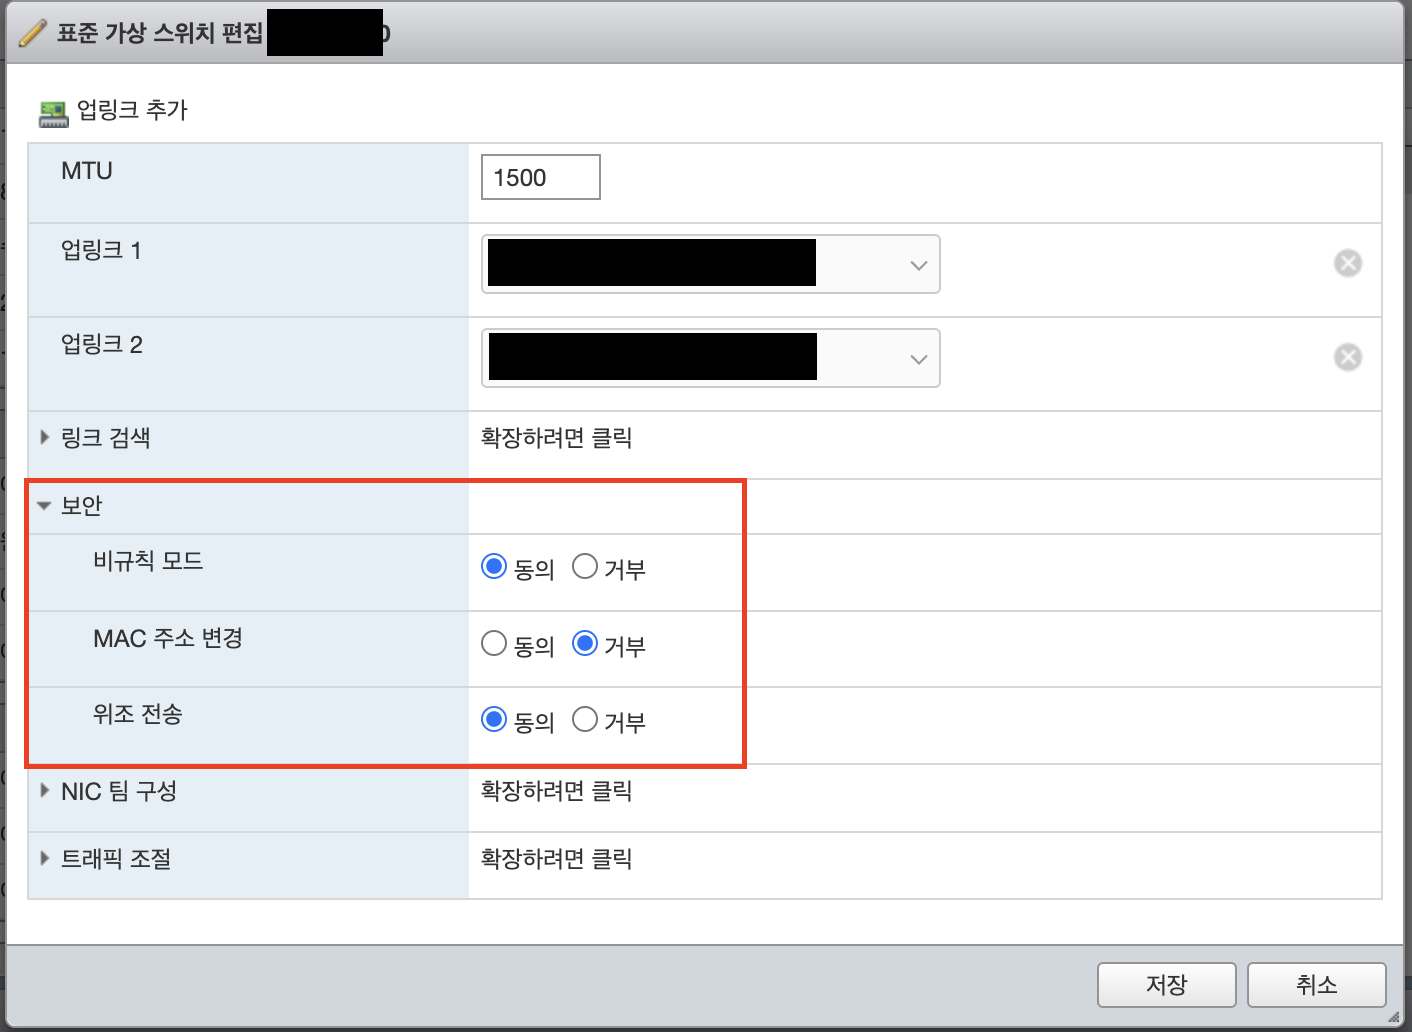
스위치를 사용중인 VMware 환경인 경우에는 promiscuous mode를 활성화하기 위해서 추가 설정이 필요합니다. 아래 사진을 확인하여 설정해주세요.
스위치 확인

설정 편집 클릭
보안 설정 수정
Multus 설치
1. yaml 파일 가져오기
git clone https://github.com/k8snetworkplumbingwg/multus-cni.gitmultus를 배포하기 위한 Git Repository를 가져옵니다.
2. Multus 배포
kubectl apply -f ./multus-cni/deployments/multus-daemonset-thick.yml기본으로 제공해주는 yaml 파일을 사용하여 Multus를 배포합니다. 필요 시, yaml 파일을 수정하여 배포합니다.
3. 상태 확인
kubectl get pod -n kube-systemMultus가 정상적으로 배포되었는지 확인합니다.
NAME                                  READY   STATUS    RESTARTS      AGE
kube-multus-ds-5mc5b                  1/1     Running   0             54s
kube-multus-ds-zfv2x                  1/1     Running   0             54s
정상적으로 배포되었음을 확인할 수 있습니다.
Macvlan 구성
1. Network Attachment Definition 파일 생성
vi macvlan.yamlMacvlan.yaml
---
apiVersion: "k8s.cni.cncf.io/v1"
kind: NetworkAttachmentDefinition
metadata:
  name: vlan-gweowe
spec:
  config: |-
    {
      "cniVersion": "0.3.1",
      "name": "vlan-gweowe",
      "plugins": [
        {
          "type": "macvlan",
          "master": "<Main Network Interface>",
          "mode": "bridge",
          "promisc": true,
          "capabilities": {
            "ips": true
          },
          "gateway": "10.0.0.1",
          "ipam": {
            "type": "host-local",
            "subnet": "10.0.0.0/16",
            "rangeStart": "10.0.0.1",
            "rangeEnd": "10.0.0.10"
          }
        }
      ]
    }
---
Macvlan을 생성하기 위해 Network Attachment Definition를 만들기 위한 yaml 파일을 작성합니다. 해당 파일은 예시이므로,
및 IP 정보는 실제 사용하고 계신 인터페이스의 IP를 지정하셔야 합니다.2. Network Attachment Definition 배포
kubectl apply -f ./macvlan.yaml생성한 yaml 파일을 배포합니다.
3. 배포상태 확인
kubectl get network-attachment-definitionsOutput :
vlan-gweowe 16sNetwork Attachment Definition이 제대로 배포되었는지 확인합니다.
Macvlan을 할당한 Pod 배포
1. Deployment 파일 생성
nginx.yaml
---
apiVersion: apps/v1
kind: Deployment
metadata:
  name: nginx
  labels:
    app: nginx
spec:
  selector:
    matchLabels:
      app: nginx
  replicas: 1
  template:
    metadata:
      annotations:
        k8s.v1.cni.cncf.io/networks: vlan-gweowe
      labels:
        app: nginx
    spec:
      containers:
      - name: nginx
        image: nginx:latest
        securityContext:
          readOnlyRootFilesystem: false
---annotations에서 k8s.v1.cni.cncf.io/networks을 사용하여 생성한 macvlan을 할당할 수 있습니다. 테스트를 위해 Nginx 이미지를 사용합니다.
2. Deployment 배포
kubectl apply -f ./nginx.yaml생성한 yaml 파일을 배포합니다.
3. 배포상태 확인
kubectl describe pod <Pod Name>Output :
# ..............................생략..............................

Annotations:      k8s.v1.cni.cncf.io/network-status:

# ..............................생략..............................

                    {
                        "name": "default/vlan-gweowe",
                        "interface": "net1",
                        "ips": [
                            "10.0.0.1"
                        ],
                        "mac": "d6:98:fd:51:39:bc",
                        "dns": {}
                    }]
                  k8s.v1.cni.cncf.io/networks: vlan-gweowe
Status:           Running

# ..............................생략..............................annotations에서 k8s.v1.cni.cncf.io/network-status 부분이 제대로 할당되었는지 확인합니다. 제 예시에서는 10.0.0.1라는 IP를 가지고 Pod가 생성되었습니다.
4. 네트워크 테스트
curl http://10.0.0.1:80Output :
<!DOCTYPE html>
<html>
<head>
<title>Welcome to nginx!</title>
<style>
html { color-scheme: light dark; }
body { width: 35em; margin: 0 auto;
font-family: Tahoma, Verdana, Arial, sans-serif; }
</style>
</head>
<body>
<h1>Welcome to nginx!</h1>
<p>If you see this page, the nginx web server is successfully installed and
working. Further configuration is required.</p>

<p>For online documentation and support please refer to
<a href="http://nginx.org/">nginx.org</a>.<br/>
Commercial support is available at
<a href="http://nginx.com/">nginx.com</a>.</p>

<p><em>Thank you for using nginx.</em></p>
</body>
</html>
생성한 Macvlan으로 제대로 통신이 되는 것을 확인할 수 있습니다. 만약 네트워크 테스트가 제대로 되지 않는다면 사전 준비 사항을 확인해보시면 좋을 것 같습니다.