
🐣 JPA 소개
웹 애플리케이션에서 관계형 DB는 빠질 수 없는 요소
객체를 관계형 데이터베이스에서 관리하는 것이 무엇보다 중요
실무에서 JPA
실무에서 JPA를 사용하지 못하는 큰 이유는 높은 러닝 커브
높은 러닝 커브 - 학습하기 어렵고 숙달하기까지 많은 시간과 노력이 필요한 것!
JPA를 잘 쓰려면 객체지향 프로그래밍과 관계형 데이터베이스를 둘 다 이해 해야함
JPA와 관련해서 내용들이 워낙 많으니 구글링해서 알아보는 것을 추천한다
요구사항 분석
- 게시판 기능(CRUD)
- 게시글 조회
- 게시글 등록
- 게시글 수정
- 게시글 삭제
- 회원 기능
- 구글 / 네이버 로그인
- 로그인한 사용자 글 작성 권한
- 본인 작성 글에 대한 권한 관리
🐣 프로젝트에 Spring Data Jpa 적용하기
build.gradle안에
implementation 'org.springframework.boot:spring-boot-starter-data-jpa'
implementation 'com.h2database:h2' 추가하자
spring-boot-starter-data-jpa
- 스프링 부트용 Spring Data Jpa 추상화 라이브러리
- 스프링 부트 버전에 맞춰 자동으로 JPA관련 라이브러리들의 버전을 관리 해줌
h2
- 인메모리 관계형 데이터베이스(RDBMS)
- 별도의 설치가 필요 X, 프로젝트 의존성으로만 관리가 가능
- 메모리에서 실행되기 때문에 애플리케이션을 재시작할 때마다 초기화된다는 점을 이용하여 테스트 용도로 많이 사용
- domain/posts
package com.example.domain.posts;

import jakarta.persistence.*;
import lombok.Builder;
import lombok.Getter;
import lombok.NoArgsConstructor;

@Getter
@NoArgsConstructor
@Entity
public class Posts {
    @Id @GeneratedValue(strategy = GenerationType.IDENTITY)
    private Long id;

    @Column(length = 500, nullable = false)
    private String title;

    @Column(columnDefinition = "TEXT", nullable = false)
    private String content;

    private String author;

    @Builder
    public Posts(String title, String content, String author) {
        this.title = title;
        this.content = content;
        this.author = author;
    }
}- JPA 어노테이션
@Entity
- 테이블과 링크될 클래스임을 나타냄
- 기본값으로 클래스의 카멜케이스 이름을 언더스코어 네이밍으로 테이블 이름을 매칭
@Id
- 해당 테이블의 PK(기본키) 필드를 나타냄
@GeneratedValue
- PK의 생성 규칙을 나타냄
- 스프링 부트 2.0에서
GenerationType.IDENTITY옵션을 추가해야만AUTO_INCREMENT(열에 자동으로 고유한 값을 생성) 사용 가능 / 스프링 부트 3.X 버전에서도 동일
@Column
- 테이블의 칼럼을 나타내며 굳이 선언하지 않아도 해당 클래스의 필드는 모두 칼럼
- 사용하는 이유는 추가로 변경이 필요한 옵션이 있으면 사용
- 문자열의 경우 VARCHAR(255)가 기본값인데, 사이즈를 500으로 늘리고 싶거나 타입을 TEXT로 변경하고 싶을 때 사용
- Lombok 어노테이션
@NoArgsConstructor
- 기본 생성자 자동 추가
@Getter
- 클래스 내 모든 필드의 Getter 메소드를 자동 생성
@Builder
- 생성자 상단에 선언 시 생성자에 포함된 필드만 빌더에 포함
package com.example.domain.posts;

import org.springframework.data.jpa.repository.JpaRepository;

public interface PostsRepository extends JpaRepository<Posts, Long> {
}
인터페이스를 생성 한 후, JpaRepository<Entity 클래스, PK 타입>를 상속하면 기본적인 CRUD 메소드가 자동으로 생성
@Repository어노테이션 추가할 필요도 없음
Entity 클래스와 기본 Entity Repository는 함께 위치해야 함 왜?
둘은 아주 밀접한 관계, Entity 클랫는 기본 Repository 없이는 제대로 역할을 하지 못함
🐣 Spring Data Jpa 테스트 코드 작성
package com.example.domain.posts;
import org.junit.jupiter.api.AfterEach;
import org.junit.jupiter.api.Test;
import org.springframework.beans.factory.annotation.Autowired;
import org.springframework.boot.test.context.SpringBootTest;
import java.util.List;
import static org.assertj.core.api.Assertions.assertThat;
@SpringBootTest
class PostsRepositoryTest {
@Autowired PostsRepository postsRepository;
@AfterEach
public void cleanup() {
postsRepository.deleteAll();
}
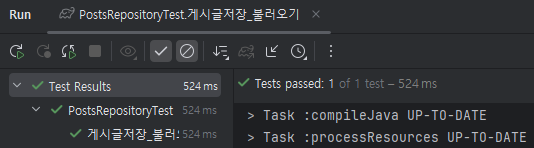
@Test
public void 게시글저장_불러오기() {
//given
String title = "테스트 게시글";
String content = "테스트 본문";
postsRepository.save(Posts.builder()
.title(title)
.content(content)
.author("jojoldu@gmail.com")
.build());
//when
List<Posts> postsList = postsRepository.findAll();
//then
Posts posts = postsList.get(0);
assertThat(posts.getTitle()).isEqualTo(title);
assertThat(posts.getContent()).isEqualTo(content);
}
}스프링 부트 3.x 버전을 보통 사용하고 있을거다. 책에선
@Ater어노테이션을 사용했지만
스프링 부트 3.x 버전은 기본적으로 Junit5를 사용하기 때문에 Junit4의@Ater를@AfterEach로 바꿔주자!
그러면 오류 없이 잘 해결되는 것을 볼 수 있다
@AfterEach
@After(JUnit4) →@AfterEach(JUnit5)- 단위 테스트가 끝날때마다 수행
postsRepository.save
- 테이블 posts에 insert/update 쿼리를 실행
- id 값이 있다면 update를 없다면 insert 쿼리가 실행
@SpringBootTest
- H2 데이터베이스를 자동으로 실행
쿼리 로그 확인
- application.properties에
spring.jpa.show-sql=true입력


create table 쿼리를 보면 id bigint generated by dafault as identity 옵션을 생성이 되는 것을 볼 수 있다. 왜냐? H2의 쿼리 문법이 적용되었기 때문이다
책에 나온대로 spring.jpa.properties.hibernate.dialect=org.hibernate.dialect.MySQL5InnoDBDialect 추가해보았지만,, 아주 엄청난 오류들이 발생하게 되었다..
Caused by: org.h2.jdbc.JdbcSQLSyntaxErrorException: Table "POSTS" not found; SQL statement: insert into posts (created_date, modified_date, author, content, title) values (?, ?, ?, ?, ?) [42102-200]
posts 테이블이 없다는 에러가 나면서 테스트가 실패했다. 하지만 내가 겪는 오류는 남들도 한 번쯤은 겪어봤다는 사실 구글링하러가보자
https://dev-ing.tistory.com/11 (이 사이트에서 알려준대로 시도를 했더니 테스트는 성공 하지만 여전히 id bigint generated by dafault as identity는 나온다..
일단 넘어가고 다음에 다시 시도해보자
🐣 등록/수정/조회 API 만들기
API를 만들기 위해 총 3개의 클래스가 필요
- Request 데이터를 받을 Dto
- API 요청을 받을 Controller
- 트랜잭션, 도메인 기능 간의 순서를 보장하는 Service
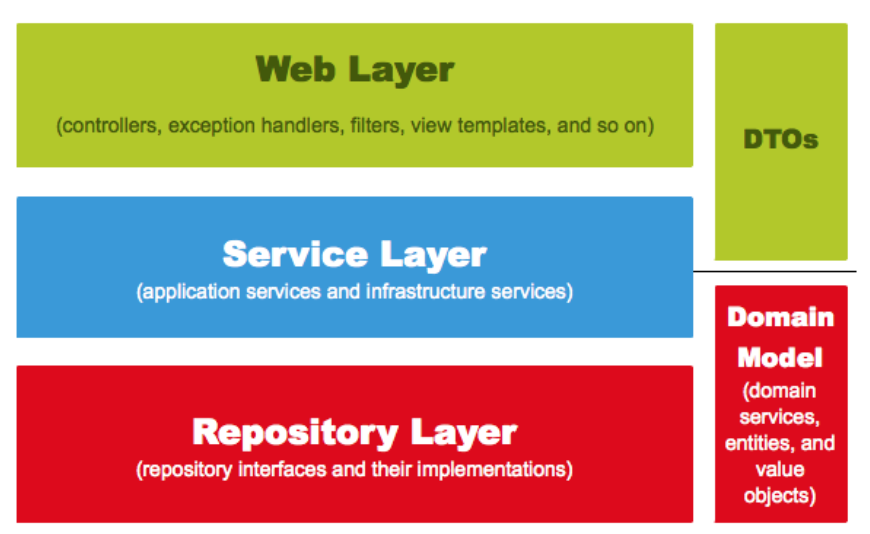
- Web Layer
- 흔히 사용하는 컨트롤러와 JSP 등의 뷰 템플릿 영역
- 외부 요청과 응답에 대한 전반적인 영역
- Service Layer
@Service에 사용되는 서비스 영역- 일반적으로 Controller 와 Dao의 중간 영역에서 사용
@Transactional이 사용되어야 하는 영역
- Repository Layer
- Database와 같이 데이터 저장소에 접근하는 영역
- Dtos
- Dto(Data Transfer Object)는 계층 간에 데이터 교환을 위한 객체 / Dtos는 이들의 영역을 얘기
- Domain Model
@Entity가 사용된 영역 = 도메인 모델- 다만, 무조건 데이터베이스의 테이블과 관계가 있어야만 하는 것은 아님
CRUD 기능 생성 - 등록
package com.example.web;

import com.example.service.posts.PostsService;
import com.example.web.dto.PostsSaveRequestDto;
import lombok.RequiredArgsConstructor;
import org.springframework.web.bind.annotation.PostMapping;
import org.springframework.web.bind.annotation.RequestBody;
import org.springframework.web.bind.annotation.RestController;

@RequiredArgsConstructor
@RestController
public class PostsApiController {

    private final PostsService postsService;

    @PostMapping("/api/v1/posts")
    public Long save(@RequestBody PostsSaveRequestDto requestDto) {
        return postsService.save(requestDto);
    }
}
package com.example.service.posts;
import com.example.domain.posts.PostsRepository;
import com.example.web.dto.PostsSaveRequestDto;
import lombok.RequiredArgsConstructor;
import org.springframework.stereotype.Service;
import org.springframework.transaction.annotation.Transactional;
@RequiredArgsConstructor
@Service
public class PostsService {
private final PostsRepository postsRepository;
@Transactional
public Long save(PostsSaveRequestDto requestDto) {
return postsRepository.save(requestDto.toEntity()).getId();
}
}스프링에선 Bean을 주입받는 방식 - 3가지
1. @Autowired
2. Setter
3. 생성자 - 가장 권장하는 방식(@RequiredArgsConstructor)
이유는 스프링 핵심 원리 - 기본편 여기서 보는것으로 하자
package com.example.web.dto;

import com.example.domain.posts.Posts;
import lombok.Builder;
import lombok.Getter;
import lombok.NoArgsConstructor;

@Getter
@NoArgsConstructor
public class PostsSaveRequestDto {

    private String title;
    private String content;
    private String author;

    @Builder
    public PostsSaveRequestDto(String title, String content, String author) {
        this.title = title;
        this.content = content;
        this.author = author;
    }

    public Posts toEntity() {
        return Posts.builder()
                .title(title)
                .content(content)
                .author(author)
                .build();
    }
}
Dto 클래스는 Entity와 거의 유사해서 왜 Entity와 분리하는지 의문이 생길 수 있다
Entity 클래스를 Request/Response 클래스로 사용해서는 절대 안된다
Entity 클래스는 데이터베이스와 맞닿은 핵심 클래스이므로 테이블과 연결된 Entity 클래스를 변경하는 것은 여러 클래스에서 영향을 끼지게 된다
CRUD 테스트 작성 - 등록
package com.example.web;

import com.example.domain.posts.Posts;
import com.example.domain.posts.PostsRepository;
import com.example.web.dto.PostsSaveRequestDto;
import org.junit.jupiter.api.AfterEach;
import org.junit.jupiter.api.Test;
import org.springframework.beans.factory.annotation.Autowired;
import org.springframework.boot.test.context.SpringBootTest;
import org.springframework.boot.test.web.client.TestRestTemplate;
import org.springframework.boot.test.web.server.LocalServerPort;
import org.springframework.http.HttpStatus;
import org.springframework.http.ResponseEntity;

import java.util.List;

import static org.assertj.core.api.Assertions.assertThat;

@SpringBootTest(webEnvironment = SpringBootTest.WebEnvironment.RANDOM_PORT)
class PostsApiControllerTest {

    @LocalServerPort
    private int port;

    @Autowired private TestRestTemplate restTemplate;
    @Autowired private PostsRepository postsRepository;

    @AfterEach
    public void tearDown() throws Exception {
        postsRepository.deleteAll();
    }

    @Test
    public void Posts_등록된다() throws Exception {
        //given
        String title = "title";
        String content = "content";
        PostsSaveRequestDto requestDto = PostsSaveRequestDto.builder()
                .title(title)
                .content(content)
                .author("author")
                .build();

        String url = "http://localhost:" + port + "/api/v1/posts";

        //when
        ResponseEntity<Long> responseEntity = restTemplate.postForEntity(url, requestDto, Long.class);

        //then
        assertThat(responseEntity.getStatusCode()).isEqualTo(HttpStatus.OK);
        assertThat(responseEntity.getBody()).isGreaterThan(0L);

        List<Posts> all = postsRepository.findAll();
        assertThat(all.get(0).getTitle()).isEqualTo(title);
        assertThat(all.get(0).getContent()).isEqualTo(content);
    }

}
@WebMvcTest를 사용하지 않은 이유?
@WebMvcTest경우 JPA 기능이 작동하지 않기 때문에- 현재 처럼 JPA 기능까지 한 번에 테스트 할 경우에는
@SpringBootTest사용!!

CRUD 기능 생성 - 수정/조회
//PostsApiController.java

@PutMapping("/api/v1/posts/{id}")
    public Long update(@PathVariable Long id, @RequestBody PostsUpdateRequestDto requestDto) {
        return postsService.update(id, requestDto);
    }

    @GetMapping("/api/v1/posts/{id}")
    public PostsResponseDto findById(@PathVariable Long id) {
        return postsService.findById(id);
    }
//PostsResponseDto.java
package com.example.web.dto;
import com.example.domain.posts.Posts;
import lombok.Getter;
@Getter
public class PostsResponseDto {
private Long id;
private String title;
private String content;
private String author;
public PostsResponseDto(Posts entity) {
this.id = entity.getId();
this.title = entity.getTitle();
this.content = entity.getContent();
this.author = entity.getAuthor();
}
}
PostsResponseDto는 Entity의 필드 중 일부만 사용하므로 생성자로 Entity를 받아 필드에 값을 넣는다
//PostsUpdateRequestDto.java

package com.example.web.dto;

import lombok.Builder;
import lombok.Getter;
import lombok.NoArgsConstructor;

@Getter
@NoArgsConstructor
public class PostsUpdateRequestDto {

    private String title;
    private String content;

    @Builder
    public PostsUpdateRequestDto(String title, String content) {
        this.title = title;
        this.content = content;
    }
}
//Posts.java
public void update(String title, String content) {
this.title = title;
this.content = content;
}//PostsService.java
@Transactional
public Long update(Long id, PostsUpdateRequestDto requestDto) {
Posts posts = postsRepository.findById(id).orElseThrow(
() -> new IllegalArgumentException("해당 게시글이 없습니다. id=" + id));
posts.update(requestDto.getTitle(), requestDto.getContent());
return id;
}
public PostsResponseDto findById(Long id) {
Posts entity = postsRepository.findById(id).orElseThrow(
() -> new IllegalArgumentException("해당 게시글이 없습니다. id=" + id));
return new PostsResponseDto(entity);
}update 기능에서 데이터베이스에 쿼리를 날리는 부분이 없다 → JPA의 영속성 컨텍스트 때문!
영속성 컨텍스트란?
- 엔티티를 영구 저장하는 환경
- JPA의 핵심 내용은 엔티티가 영속성 컨텍스트에 포함되어 있냐 아니냐로 갈림
더티 체킹(Dirty checking)
- JPA의 엔티티 메니저(Entity Manager)가 활성화된 상태로 트랜잭션 안에서 데이터베이스에서 데이터를 가져오면 영속성 컨텍스트가 유지된 상태
이 상태에서 해당 데이터의 값을 변경하면 트랜잭션이 끝나는 시점에 해당 테이블에 변경분을 반영
💡 Entity 객체의 값만 변경하면 별도로 Update 쿼리를 날릴 필요가 없음
CRUD 테스트 작성 - 수정
@Test
    public void Posts_수정된다() throws Exception {
        //given
        Posts savedPosts = postsRepository.save(Posts.builder()
                .title("title")
                .content("content")
                .author("author")
                .build());

        Long updateId = savedPosts.getId();
        String expectedTitle = "title2";
        String expectedContent = "content2";

        PostsUpdateRequestDto requestDto = PostsUpdateRequestDto.builder()
                .title(expectedTitle)
                .content(expectedContent)
                .build();

        String url = "http://localhost:" + port + "/api/v1/posts/" + updateId;

        HttpEntity<PostsUpdateRequestDto> requestEntity = new HttpEntity<>(requestDto);

        //when
        ResponseEntity<Long> responseEntity = restTemplate.exchange(url, HttpMethod.PUT, requestEntity, Long.class);

        //then
        assertThat(responseEntity.getStatusCode()).isEqualTo(HttpStatus.OK);
        assertThat(responseEntity.getBody()).isGreaterThan(0L);

        List<Posts> all = postsRepository.findAll();
        assertThat(all.get(0).getTitle()).isEqualTo(expectedTitle);
        assertThat(all.get(0).getContent()).isEqualTo(expectedContent);
    }
잘 실행되는 것을 볼 수 있다
CRUD - 조회
조회 기능은 실제로 톰캣을 실행!!!
-
application.properties에
spring.h2.console.enabled=true추가! -
Application Main 메서드 실행
-
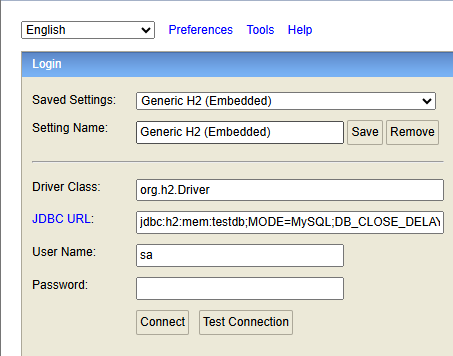
localhost:8080/h2-console접속 후
application.properties에 설정해놓은 JDBC URL 주소를 입력후 들어가면
-
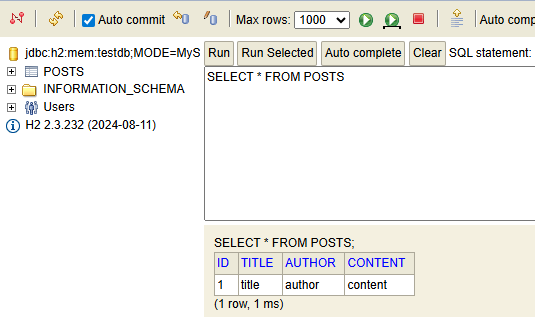
Posts 테이블 초회
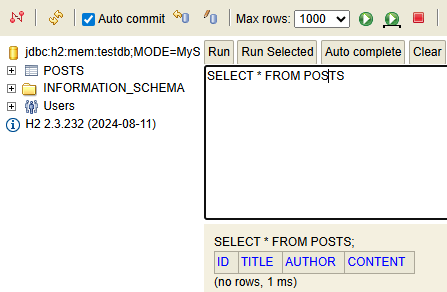
-
INSERT into posts(title, author, content) values ('title', 'author', 'content');데이터 삽입 후 다시 테이블 조회
-
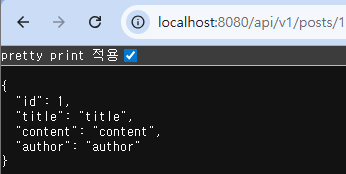
API를 요청해서 데이터 확인
🐣 JPA Auditing으로 생성시간/수정시간 자동화하기
LocalDate 사용
package com.example.domain;

import jakarta.persistence.EntityListeners;
import jakarta.persistence.MappedSuperclass;
import lombok.Getter;
import org.springframework.data.annotation.CreatedDate;
import org.springframework.data.annotation.LastModifiedDate;
import org.springframework.data.jpa.domain.support.AuditingEntityListener;

import java.time.LocalDateTime;

@Getter
@MappedSuperclass
@EntityListeners(AuditingEntityListener.class)
public class BaseTimeEntity {

    @CreatedDate
    private LocalDateTime createdDate;

    @LastModifiedDate
    private LocalDateTime modifiedDate;
}
모든 Entity의 상위 클래스가 되어 Entity들의 createdDate, modifiedDate를 자동으로 관리하는 역할
@MappedSuperclass
- JPA Entity 클래스들이 BaseTimeEntity을 상속할 경우 필드들(createdDate, modifiedDate)도 칼럼으로 인식
@EntityListeners(AuditingEntityListener.class)
- BaseTimeEntity 클래스에 Auditing 기능을 포함
@CreatedDate
- Entity가 생성되어 저장될 때 시간이 자동 저장
LastModifiedDate
- 조회한 Entity의 값을 변경할 때 시간이 자동 저장
Posts 클래스 수정
public class Posts extends BaseTimeEntityPosts 클래스가 BaseTimeEntity를 상속받도록 변경
Application 클래스에 어노테이션 추가
@EnableJpaAuditing //JPA Auditing 활성화JPA Auditing 테스트 코드 작성하기
@Test
    public void BaseTimeEntity_등록() {
        //give
        LocalDateTime now = LocalDateTime.of(2019,6,4,0,0,0);
        postsRepository.save(Posts.builder()
                .title("title")
                .content("content")
                .author("author")
                .build());

        //when
        List<Posts> postsList = postsRepository.findAll();

        //then
        Posts posts = postsList.get(0);
        System.out.println(">>>>>>>>> createdDate=" + posts.getCreatedDate() + ", modifiedDate=" + posts.getModifiedDate());

        assertThat(posts.getCreatedDate()).isAfter(now);
        assertThat(posts.getModifiedDate()).isAfter(now);
    }
잘나온다~