서울대학교 개발동아리 와플스튜디오에서, 작년의 동아리원들이 만든 서비스인 '스누인턴'을 클론코딩하는 과제를 몇 주간 진행했다.
- 로그인 / 회원가입 구현 및 내비게이션 바에 인증 상태 반영
- react-router-dom의 url parameter을 이용한 query로 서버에서 모집공고 가져오기 및 필터링, 정렬 기능 구현.
- 마이페이지 내에서 프로필 등록 여부에 따른 조건부 렌더링, 프로필 작성 및 수정 기능 구현.
이 과정에서 배운 것들이 많아서 이후 다른 과목의 팀 프로젝트에서도 배운 내용을 유용하게 활용할 수 있었다.
axios를 이용한 API Client
이전 '천개의 레시피' 클론코딩에서는 사용해야 하는 api 함수들이 한정적이라서, 따로 라이브러리를 사용하지 않았다.
이번에는 조금 더 체계성을 갖추기 위해, 따로 src/api/index.ts 에 axios를 이용한 apiClient를 만들어두었다.
import axios from 'axios';

const apiClient = axios.create({
  baseURL: 'https://api-internhasha.wafflestudio.com',
  // withCredentials: true, // refresh_token 첨부
});
// 인증 토큰 필요 X인 endpoint들
const publicPaths = [
  '/api/auth/user', //회원가입
  '/api/auth/user/session', //로그인
];

// interceptor(API 요청을 intercept하는 아이) : 인증이 필요한 endpoint들에 인증 토큰 자동 부여
apiClient.interceptors.request.use(
  (config) => {
    const isPublicPath =
      config.url &&
      publicPaths.includes(config.url) &&
      config.method === 'post';

    if (!isPublicPath) {
      const token = localStorage.getItem('authToken');

      if (token) {
        config.headers.Authorization = `Bearer ${token}`;
      }
    }

    return config;
  },
  (error) => {
    return Promise.reject(error);
  }
);

export default apiClient;-
client :
axios.create로axiosinstance를 만들어 두고(apiClient), 다른 파일에서 api요청을 보내야 할때import apiClient하여 간편하게 클라이언트를 활용하여 api를 쓸 수 있다. -
interceptor: header 관리- 모든 api call을 'intercept'하는 아이로, 위에서는 모든 api 요청 헤더에 인증 토큰인
authToken을 넣는 역할을 하고 있다. - 위 코드에서는
publicPathsarray에 로그인, 회원가입의 인증 토큰이 필요하지 않은 endpoint들을 넣어 두어, 해당 요청들에 한해서 토큰을 넣지 않게 설정되어 있다.
- 모든 api call을 'intercept'하는 아이로, 위에서는 모든 api 요청 헤더에 인증 토큰인
-
request : 다른 파일에서 api요청을 보낼 때
apiClient.{HTTPmethod}('endpoint', {body});와 같은 형식으로 간편하게 활용할 수 있다.
-
response : axios를 이용한 api call에서 응답을 받을 경우, axios client가 자동적으로
Content-typeheader을 확인한 후 json 형식일 경우response.json()을 내부적으로 수행한 뒤에 json object를 반환해준다.
➡️ 즉, api 요청 결과 json object를 단순하게response.data로 접근할 수 있다.-
공식 문서의 response schema :
{ // `data` is the response that was provided by the server data: {}, // `status` is the HTTP status code from the server response status: 200, // `statusText` is the HTTP status message from the server response // As of HTTP/2 status text is blank or unsupported. // (HTTP/2 RFC: https://www.rfc-editor.org/rfc/rfc7540#section-8.1.2.4) statusText: 'OK', // `headers` the HTTP headers that the server responded with // All header names are lower cased and can be accessed using the bracket notation. // Example: `response.headers['content-type']` headers: {}, // `config` is the config that was provided to `axios` for the request config: {}, // `request` is the request that generated this response // It is the last ClientRequest instance in node.js (in redirects) // and an XMLHttpRequest instance in the browser request: {} } -
사용 예시 :
axios.get('/user/12345') .then(function (response) { console.log(response.data); console.log(response.status); console.log(response.statusText); console.log(response.headers); console.log(response.config); }); -
axios 에러 핸들링 :
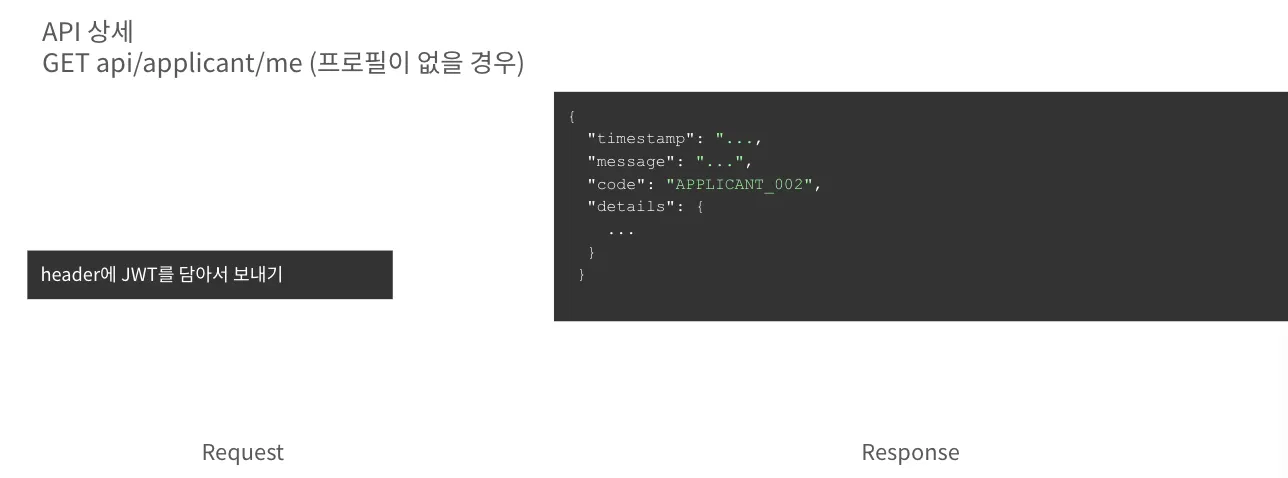
구현 과정 중 custom error code를 감지하고, 이에 따라 다른 handling을 하는 로직을 구현해야 했다. 유저의 프로필이 없을 때 반환되는 APPLICANT_002와 같은 에러 코드를 어떻게 확인할 수 있을지가 애매하여 조금 헤맸다.
만약 해당 API를 쏘았을 때 상세 에러코드가 “
APPLICANT_002”인 경우,
아직 프로필이 등록되지 않은 상태입니다.
-
axios 공식 문서 상 사용법 :
Error객체의.responseproperty 안, 즉error.response에data,status,headers등의 error에 대한 부가 정보가 존재한다.axios.get('/user/12345') .catch(function (error) { if (error.response) { // The request was made and the server responded with a status code // that falls out of the range of 2xx console.log(error.response.data); console.log(error.response.status); console.log(error.response.headers); } else if (error.request) { // The request was made but no response was received // `error.request` is an instance of XMLHttpRequest in the browser and an instance of // http.ClientRequest in node.js console.log(error.request); } else { // Something happened in setting up the request that triggered an Error console.log('Error', error.message); } console.log(error.config); }); ``` -
활용 코드 :
-
try-catchblock에서try의 안에서는response.data로 응답 json string을 받아오고,
catch(error)의 안에서는error.response.message,error.response.status등을 이용하여 에러를 표시하는 등 에러 핸들링을 한다. -
이때 서버에서 명시한 에러 code는
error.response.data안에 있기 때문에({ "code":"APPLICANT_002", "message": "Applicant not found" }와 같은 형식), typescript에게 error.response.data 안에code속성이 있다고 이야기해주는 type assertion 을 활용한다.// MyPage.tsx import { isAxiosError } from 'axios'; ... catch (e) { if (isAxiosError(e) && e.response) { const status = e.response.status; const data = e.response.data as { code?:string }; const code = data?.code; if (code==='APPLICANT_002') { setProfile(null); return; } console.error('API error', status, code, e.response.data); } else { console.error('Unknown Error', e); }
-
api 만으로도 분량이 길어져서 다음 글에서 본격적으로 context를 활용한 전역 변수 활용을 다룰 생각이다.
글을 올릴 때마다 내 글 밑에 있는 더욱 심화된 주제를 다루는 다른 글들이 추천으로 보여서 의기소침해지지만...
아무도 읽지 않아도 내가 다시 읽으면 된다! ^ . ^
다른 달팽이들은 신경쓰지말자