Next.js에서 Shadcn/ui, zod, RHF 를 사용하여 회원가입을 구현하여 보았다.
Shadcn/ui
Shadcn/ui는 Radix UI 및 Tailwind CSS를 사용하여 구축된 재사용 가능한 컴포넌트이다.
컴포넌트 라이브러리가 아닌 재사용 가능한 컴포넌트의 모음이다.
우리는 우선 Next.js와 TailwindCSS를 사용 할 것이다.
설치
npx shadcn-ui@latest init아래와 같은 설정이 나온다. 사용하고싶은 설정을 선택해주면 된다.
Would you like to use TypeScript (recommended)? no / yes
Which style would you like to use? › Default
Which color would you like to use as base color? › Slate
Where is your global CSS file? › › app/globals.css
Do you want to use CSS variables for colors? › no / yes
Where is your tailwind.config.js located? › tailwind.config.js
Configure the import alias for components: › @/components
Configure the import alias for utils: › @/lib/utils
Are you using React Server Components? › no / yes
사용방법
만약 Shadcn/ui에서 Button 컴포넌트를 사용하고 싶다면 추가해주면 된다.
npx shadcn-ui@latest add button
import { Button } from "@/components/ui/button"

export default function Home() {
  return (
    <div>
      <Button>Click me</Button>
    </div>
  )
}
zod
zod는 Typescript를 우선하는 스키마 선언 및 유효성 검사 라이브러리이다.
zod 사용 이유
zod가 필요한 이유는 TypeScript의 한계 때문이다.
TypeScript는 컴파일 시점에서의 타입에러만 잡아낼 수 있고 런타임 단계에서의 타입 에러는 잡아낼 수 없다. 왜냐하면 런타임 단계에서 작동되는 것은 JavaScript이기 때문이다.
TypeScript는 number 타입만 입력받도록 강제하는 것은 가능하다.
하지만 원하는 문자열이나 원하는 숫자 범위를 강제하거나 number타입의 정수/실수 구분은 불가능하다.
이러한 TypeScript의 한계 때문에 zod라이브러리를 사용한다.
설치
npm i zod
yarn add zod
사용방법
import z from 'zod';

const schema = z.object({
  name: z.string(),
  age: z.number().min(10),
});
zod에서 z를 불러오고 z.object()를 통해 스키마를 정의할 수 있다.
인자로 객체를 넘겨주고 키와 타입을 정의한다.
import { z } from "zod";

const User = z.object({
  username: z.string(),
});

User.parse({ username: "Ludwig" });

// extract the inferred type
type User = z.infer<typeof User>;
// { username: string }
다음은 zod 공식문서에서 보여주는 예제이다
z.* 메서드의 반환값에는 .parse 메서드가 들어가있음을 알 수 있다.
또한 z.infer<typeof schema> 의 형태로 타입을 받아올 수 있다.
zod + react-hook-form
zod 는 react-hook-form 과 같이 사용가능하다.
같이 사용하기위해서는 resolver가 필요하다.
npm i react-hook-form zod @hookform/resolverstype RegisterInput = z.infer<typeof registerSchema>;
const form = useForm<RegisterInput>({
resolver: zodResolver(registerSchema),
defaultValues: {
phone: "",
email: "",
role: "",
username: "",
password: "",
confirmPassword: "",
},
});@hookform/resolvers/zod 경로에서 zodResolver 를 import해준다.
이 zodResolver 가 리액트훅폼과 zod를 통합시키는 역할을 수행한다.
zod 를 이용하여 스키마를 정의한 뒤 useForm 의 인자객체에
resolver 키값으로 zodResolver(정의해둔스키마) 의 호출값을 넘겨주면 끝이다.
react-hook-form
react-hook-form 은 폼 관련 라이브러리로, 복잡한 폼을 간단하게 처리하고 상태를 용이하게 해주는 라이브러리이다.
React Hook을 기반으로 하여 여러 기능과 유연성을 제공한다.
우리는 shadcn/ui와 같이 사용하기 위해서는 우선 제어컴포넌트와 비제어컴포넌트에 대해서 알아야 한다.
제어컴포넌트
제어 컴포넌트(controlled component) 는 React에서 상태(state)를 통해 관리되는 컴포넌트를 의미한다. 이 경우, 컴포넌트의 상태(state)를 업데이트하고, 이를 컴포넌트의 값으로 설정하여 관리한다. 주로 onChange 이벤트 핸들러를 통해 상태 업데이트를 처리하고, 컴포넌트의 값은 상태(state)로부터 설정된다.
이 방식은 폼 요소의 상태를 React의 state로 관리하는 방식이다. 폼 요소의 값이 state에 의해 제어되므로, 폼 요소의 값을 변경하려면 state를 업데이트해야 한다. 이 경우, 폼 요소의 값이 항상 React의 state와 동기화되어 있다. 제어 컴포넌트의 장점은 React의 상태(state)를 사용하여 폼 요소의 값을 제어하므로, 사용자 입력에 따라 리액트 애플리케이션의 다른 부분과 상호작용할 수 있다는 점입니다. 또한, 폼의 유효성 검사, 제출 처리 등의 작업을 쉽게 구현할 수 있다.
비제어컴포넌트
반면에 비제어 컴포넌트(uncontrolled component) 는 DOM에서 직접 값을 가져오거나 설정하는 방식을 의미한다. 이 경우, 상태(state)를 사용하지 않고, ref를 통해 직접 DOM 요소에 접근하여 값을 가져오거나 설정한다. 주로 defaultValue나 defaultChecked를 사용하여 초기 값을 설정하고, ref를 통해 직접 값을 가져오거나 설정한다.
React Hook Form은 이 접근 방식을 채택하여, 폼 요소의 값을 직접 관리하고 유효성 검사 등의 기능을 제공한다.
shadcn/ui + zod + react-hook-form
react-hook-form 은 우선 비제어컴포넌트를 사용하는 라이브러리이다.
shadcn/ui 는 공식문서에 예제가 나온대로 react-hook-form과 같이 사용하려면 control을 사용해야 하므로 내 생각엔 제어컴포넌트라 생각된다.
"use client"

import { zodResolver } from "@hookform/resolvers/zod"
import { useForm } from "react-hook-form"
import { z } from "zod"

import { Button } from "@/components/ui/button"
import {
  Form,
  FormControl,
  FormDescription,
  FormField,
  FormItem,
  FormLabel,
  FormMessage,
} from "@/components/ui/form"
import { Input } from "@/components/ui/input"

const formSchema = z.object({
  username: z.string().min(2, {
    message: "Username must be at least 2 characters.",
  }),
})

const form = useForm<z.infer<typeof formSchema>>({
    resolver: zodResolver(formSchema),
    defaultValues: {
      username: "",
    },
  })

function onSubmit(values: z.infer<typeof formSchema>) {
    // Do something with the form values.
    // ✅ This will be type-safe and validated.
    console.log(values)
  }
}

export function ProfileForm() {
  // ...

  return (
    <Form {...form}>
      <form onSubmit={form.handleSubmit(onSubmit)} className="space-y-8">
        <FormField
          control={form.control}
          name="username"
          render={({ field }) => (
            <FormItem>
              <FormLabel>Username</FormLabel>
              <FormControl>
                <Input placeholder="shadcn" {...field} />
              </FormControl>
              <FormDescription>
                This is your public display name.
              </FormDescription>
              <FormMessage />
            </FormItem>
          )}
        />
        <Button type="submit">Submit</Button>
      </form>
    </Form>
  )
}
위 예시코드는 shadcn/ui의 공식문서에 react-hook-form과 사용했을때의 예시코드이다.
예시코드로 사용방법을 알아보았으니, 이제 구현해보자.
구현
validators.ts
// validators.ts
import { z } from "zod";

const passwordRegex =
  /^(?=.*[a-zA-Z])(?=.*\d)(?=.*[@$!%*?&])[A-Za-z\d@$!%*?&]{8,}$/;

const phoneRegex = /^010\d{8}$/;

export const registerSchema = z.object({
  email: z.string().email({ message: "올바른 이메일을 입력해주세요." }),
  phone: z
    .string()
    .min(11, "연락처는 11자리여야 합니다.")
    .max(11, "연락처는 11자리여야 합니다.")
    .refine(
      (value) => phoneRegex.test(value),
      "010으로 시작하는 11자리 숫자를 입력해주세요",
    ),
  username: z
    .string()
    .min(2, { message: "이름은 2글자 이상이어야 합니다." })
    .max(100, { message: "이름은 100글자 이하이어야 합니다." }),
  role: z.string().min(2, { message: "역할을 선택해주세요." }),
  password: z
    .string()
    .min(6, "비밀번호는 최소 6자리 이상이어야 합니다.")
    .max(100, "비밀번호는 100자리 이하이어야 합니다.")
    .refine(
      (value) => passwordRegex.test(value),
      "비밀번호는 최소 6자리 이상, 영문, 숫자, 특수문자를 포함해야 합니다.",
    ),
  confirmPassword: z
    .string()
    .min(6, "비밀번호는 최소 6자리 이상이어야 합니다.")
    .max(100, "비밀번호는 100자리 이하이어야 합니다.")
    .refine(
      (value) => passwordRegex.test(value),
      "비밀번호는 최소 6자리 이상, 영문, 숫자, 특수문자를 포함해야 합니다.",
    ),
});
우리는 유효성 검사를 진행할 것이므로 유효성 검사와 관련된 코드를 작성한다.
refine
zod 의 refine 메서드는 특정 조건에 따라 데이터를 검증할 때 사용된다.
refine 은 두개의 인자를 받는다.
첫번째는 유효성 검사, 두번째는 옵션을 전달하지만 여기서는 메세지를 전달해주었다.
index.ts
// index.ts
import {
Card,
CardContent,
CardDescription,
CardHeader,
CardTitle,
} from "@/components/ui/card";
import { Button } from "@/components/ui/button";
import {
Form,
FormControl,
FormField,
FormItem,
FormLabel,
FormMessage,
} from "@/components/ui/form";
import {
Select,
SelectContent,
SelectItem,
SelectTrigger,
SelectValue,
} from "@/components/ui/select";
import { useToast } from "@/components/ui/use-toast";
import { motion } from "framer-motion";
import { Input } from "@/components/ui/input";
import { cn } from "@/lib/utils";
import { useForm } from "react-hook-form";
import { zodResolver } from "@hookform/resolvers/zod";
import { registerSchema } from "@/validators/auth";
import { z } from "zod";
import { useState } from "react";
import { ArrowRight } from "lucide-react";
type RegisterInput = z.infer<typeof registerSchema>;
export default function Home() {
const [step, setStep] = useState<number>(0);
const { toast } = useToast();
const form = useForm<RegisterInput>({
resolver: zodResolver(registerSchema),
defaultValues: {
phone: "",
email: "",
role: "",
username: "",
password: "",
confirmPassword: "",
},
});
// log the form data whenever it changes
console.log(form.watch());
function onSubmit(data: RegisterInput) {
const { password, confirmPassword } = data;
if (password !== confirmPassword) {
toast({
title: "비밀번호가 일치하지 않습니다.",
variant: "destructive",
duration: 1000,
});
return;
}
alert(JSON.stringify(data, null, 4));
}
return (
<div className="absolute -translate-x-1/2 -translate-y-1/2 top-1/2 left-1/2">
<Card className={cn("w-[380px]")}>
<CardHeader>
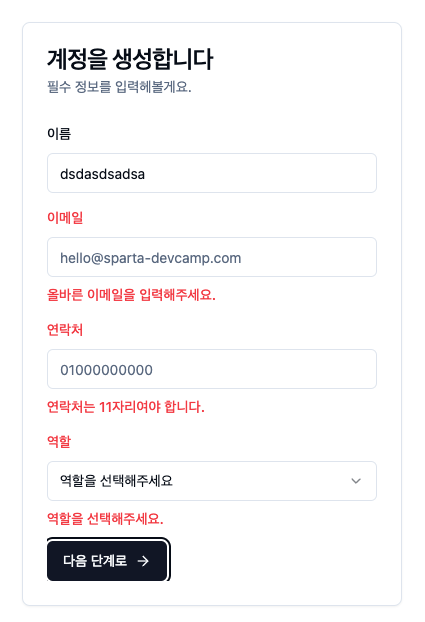
<CardTitle>계정을 생성합니다</CardTitle>
<CardDescription>필수 정보를 입력헤볼게요.</CardDescription>
</CardHeader>
<CardContent>
<Form {...form}>
<form
onSubmit={form.handleSubmit(onSubmit)}
className="relative space-y-3 overflow-x-hidden"
>
<motion.div
className={cn("space-y-3")}
animate={{ translateX: `${step * -100}%` }}
transition={{ ease: "easeInOut" }}
>
<FormField
control={form.control}
name="username"
render={({ field }) => (
<FormItem>
<FormLabel>이름</FormLabel>
<FormControl>
<Input placeholder="홍길동" {...field} />
</FormControl>
<FormMessage />
</FormItem>
)}
/>
<FormField
control={form.control}
name="email"
render={({ field }) => (
<FormItem>
<FormLabel>이메일</FormLabel>
<FormControl>
<Input
placeholder="hello@sparta-devcamp.com"
{...field}
/>
</FormControl>
<FormMessage />
</FormItem>
)}
/>
<FormField
control={form.control}
name="phone"
render={({ field }) => (
<FormItem>
<FormLabel>연락처</FormLabel>
<FormControl>
<Input placeholder="01000000000" {...field} />
</FormControl>
<FormMessage />
</FormItem>
)}
/>
<FormField
control={form.control}
name="role"
render={({ field }) => (
<FormItem>
<FormLabel>역할</FormLabel>
<Select
onValueChange={field.onChange}
defaultValue={field.value}
>
<FormControl>
<SelectTrigger>
<SelectValue placeholder="역할을 선택해주세요" />
</SelectTrigger>
</FormControl>
<SelectContent>
<SelectItem value="admin">관리자</SelectItem>
<SelectItem value="user">일반사용자</SelectItem>
</SelectContent>
</Select>
<FormMessage />
</FormItem>
)}
/>
</motion.div>
<motion.div
className={cn("space-y-3 absolute top-0 left-0 right-0")}
animate={{ translateX: `${(1 - step) * 100}%` }}
style={{ translateX: `${(1 - step) * 100}%` }}
transition={{
ease: "easeInOut",
}}
>
<FormField
control={form.control}
name="password"
render={({ field }) => (
<FormItem>
<FormLabel>비밀번호</FormLabel>
<FormControl>
<Input type={"password"} {...field} />
</FormControl>
<FormMessage />
</FormItem>
)}
/>
<FormField
control={form.control}
name="confirmPassword"
render={({ field }) => (
<FormItem>
<FormLabel>비밀번호 확인</FormLabel>
<FormControl>
<Input type={"password"} {...field} />
</FormControl>
<FormMessage />
</FormItem>
)}
/>
</motion.div>
<div className={"flex gap-2"}>
<Button className={cn({ hidden: step === 0 })} type="submit">
계정 등록하기
</Button>
<Button
type="button"
className={cn({ hidden: step === 1 })}
onClick={() => {
form.trigger(["phone", "email", "username", "role"]);
const phoneState = form.getFieldState("phone");
const emailState = form.getFieldState("email");
const usernameState = form.getFieldState("username");
const roleState = form.getFieldState("role");
if (!phoneState.isDirty || phoneState.invalid) return;
if (!emailState.isDirty || emailState.invalid) return;
if (!usernameState.isDirty || usernameState.invalid) return;
if (!roleState.isDirty || roleState.invalid) return;
setStep(1);
}}
>
다음 단계로
<ArrowRight className="w-4 h-4 ml-2" />
</Button>
<Button
type="button"
variant={"ghost"}
className={cn({ hidden: step === 0 })}
onClick={() => {
setStep(0);
}}
>
이전 단계로
</Button>
</div>
</form>
</Form>
</CardContent>
</Card>
</div>
);
}