
1. Spring cloud config
스프링 부트 프로젝트에서 설정 파일은 application.yml(application.properies)에서 관리한다.
msa 에서 여러 서비스들마다 각각 application.yml 파일 들을 관리하려면 번거롭다.
또한 변경사항이 생기면 설정 파일을 수정하고 서버를 재기동 해야하는 문제도 발생한다.
⚙️ 특징
- spring cloud config서버는 분산 시스템에서 설정 정보를 제공해주는 중앙 서버이다. 즉 설정파일들을 모아놓고 각 클라이언트에 맞는 설정 파일들을 제공한다.
- 재배포 하지 않고 동적으로 설정 파일들을 변경할 수 있다.
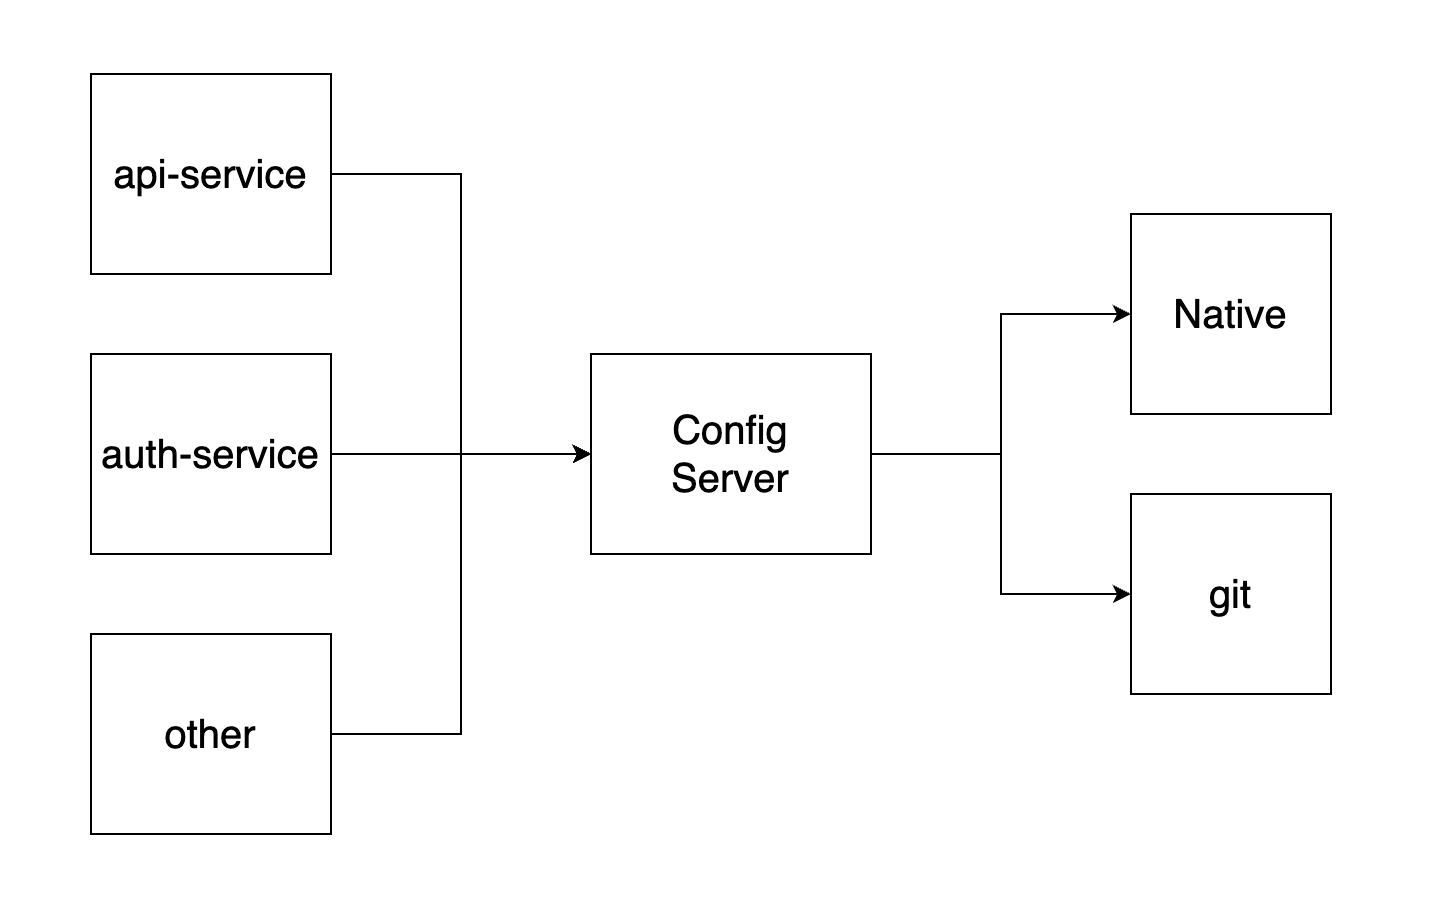
- 여러 서비스들을 config server에서 설정 파일을 조회 해간다.
- config server는 로컬 파일, 또는 git저장소에 저장된 설정 파일을 관리한다.
⚙️ 설정 파일 우선 순위
- Config Server의 설정파일이 프로젝트의 설정파일 보다 우선순위가 높다.
- 구체적인 설정 파일이 우선순위가 높다.
ex) 프로젝트의 이름은
api-service, 환경은(profile)dev라고 가정해보자.
- 프로젝트 내의 application.yml
- Config Server의 application.yml
- 프로젝트 내의 application-dev.yml
- Config Server의 application-dev.yml
- Config Server의 api-service.yml
- Config Server의 api-service-dev.yml
2. config 서버 생성
⚙️ 의존성
- springboot 2.7.8
dependencies {
    implementation 'org.springframework.cloud:spring-cloud-config-server'
}
🔍 spring cloud 를 이용하므로 dependencyManagement 포함
ext {
    set('springCloudVersion', "2021.0.5")
}
dependencyManagement {
    imports {
        mavenBom "org.springframework.cloud:spring-cloud-dependencies:${springCloudVersion}"
    }
}
⚙️ 활성화
@EnableConfigServer 어노테이션을 사용하여 활성화 시킨다.
@EnableConfigServer
@SpringBootApplication
public class ConfigApplication {

    public static void main(String[] args) {
        SpringApplication.run(ConfigApplication.class, args);
    }

}
⚙️ 설정 - 로컬 설정 파일을 사용
- 여러가지 상황을 테스트 해보자
🧨 설정 파일 생성
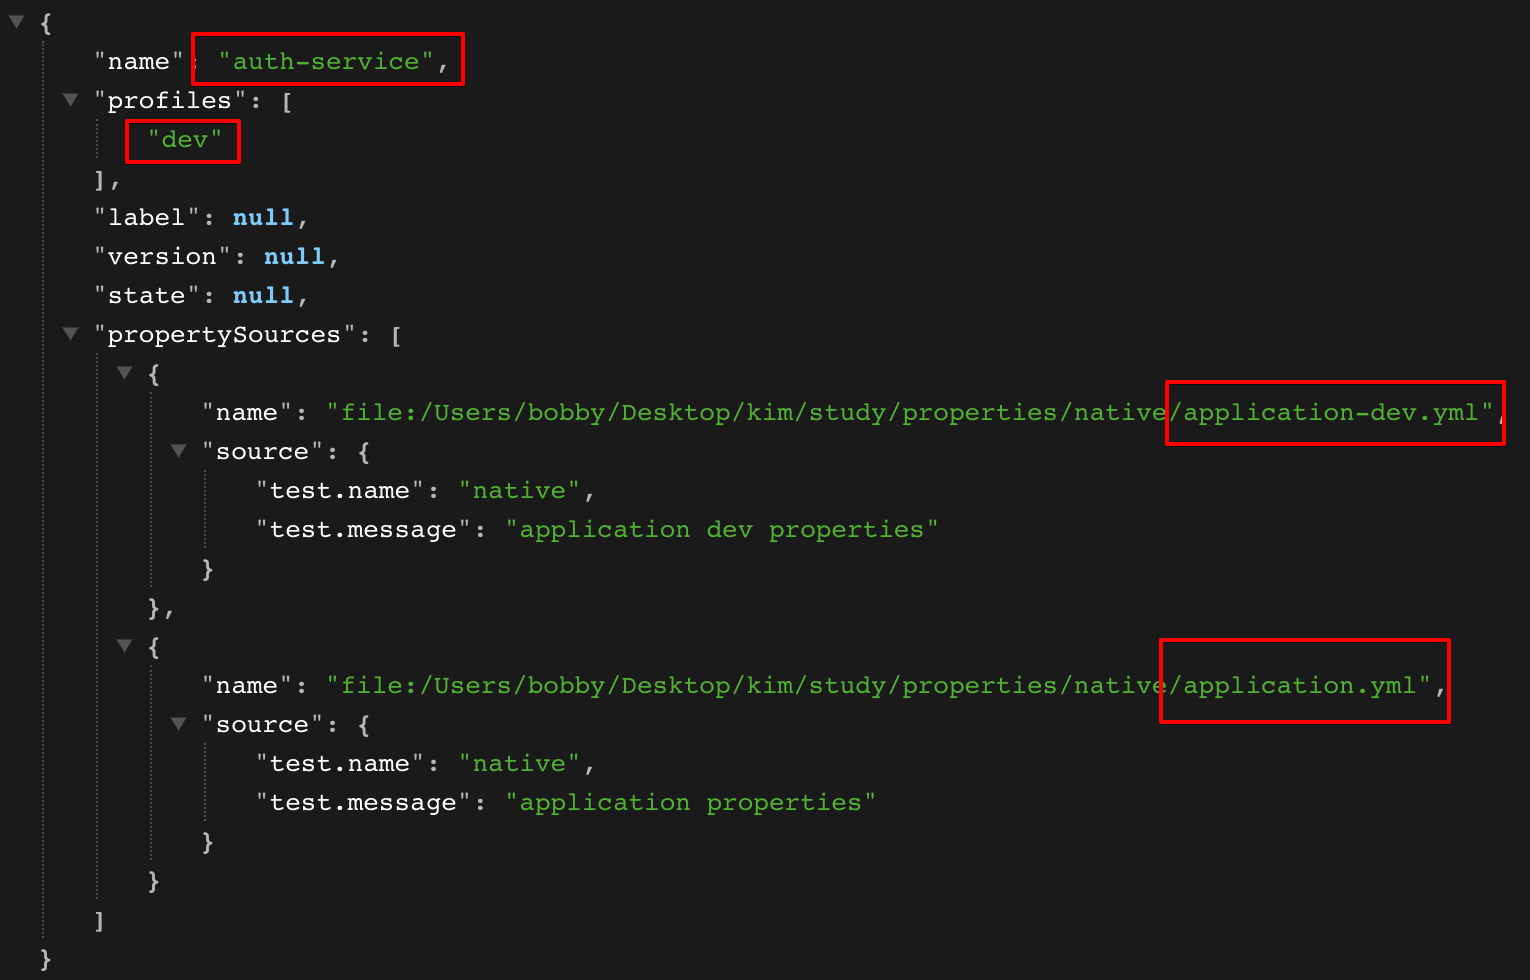
application.yml
- 모든 application name, 모든 profile에 동작
test:
  name: native
  message: application properties
application-dev.yml
- 모든 application name, dev profile에 동작
test:
name: native
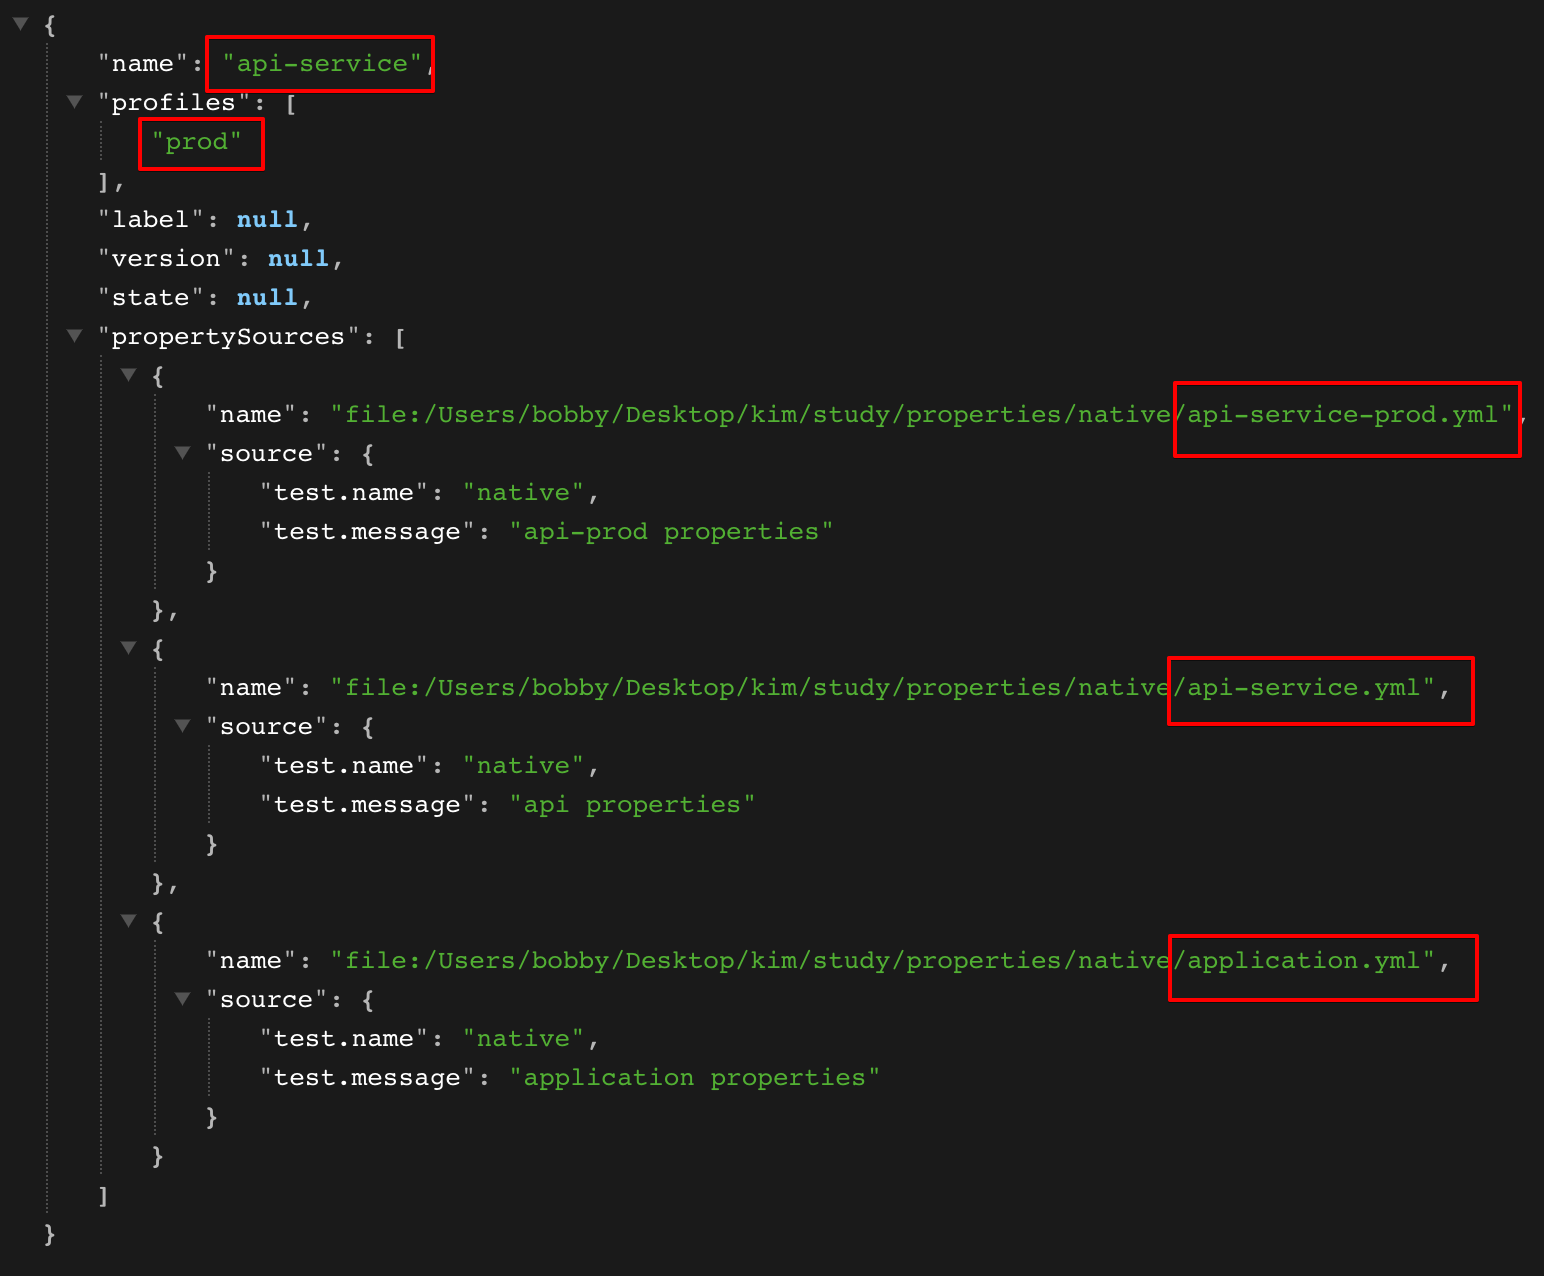
message: application dev propertiesapi-service.yml
- api-service, 모든 profile에 동작
test:
  name: native
  message: api properties
api-service-dev.yml
- api-service, dev profile에 동작
test:
  name: native
  message: api-dev properties
api-service-prod.yml
- api-service, prod profile에 동작
test:
  name: native
  message: api-prod properties
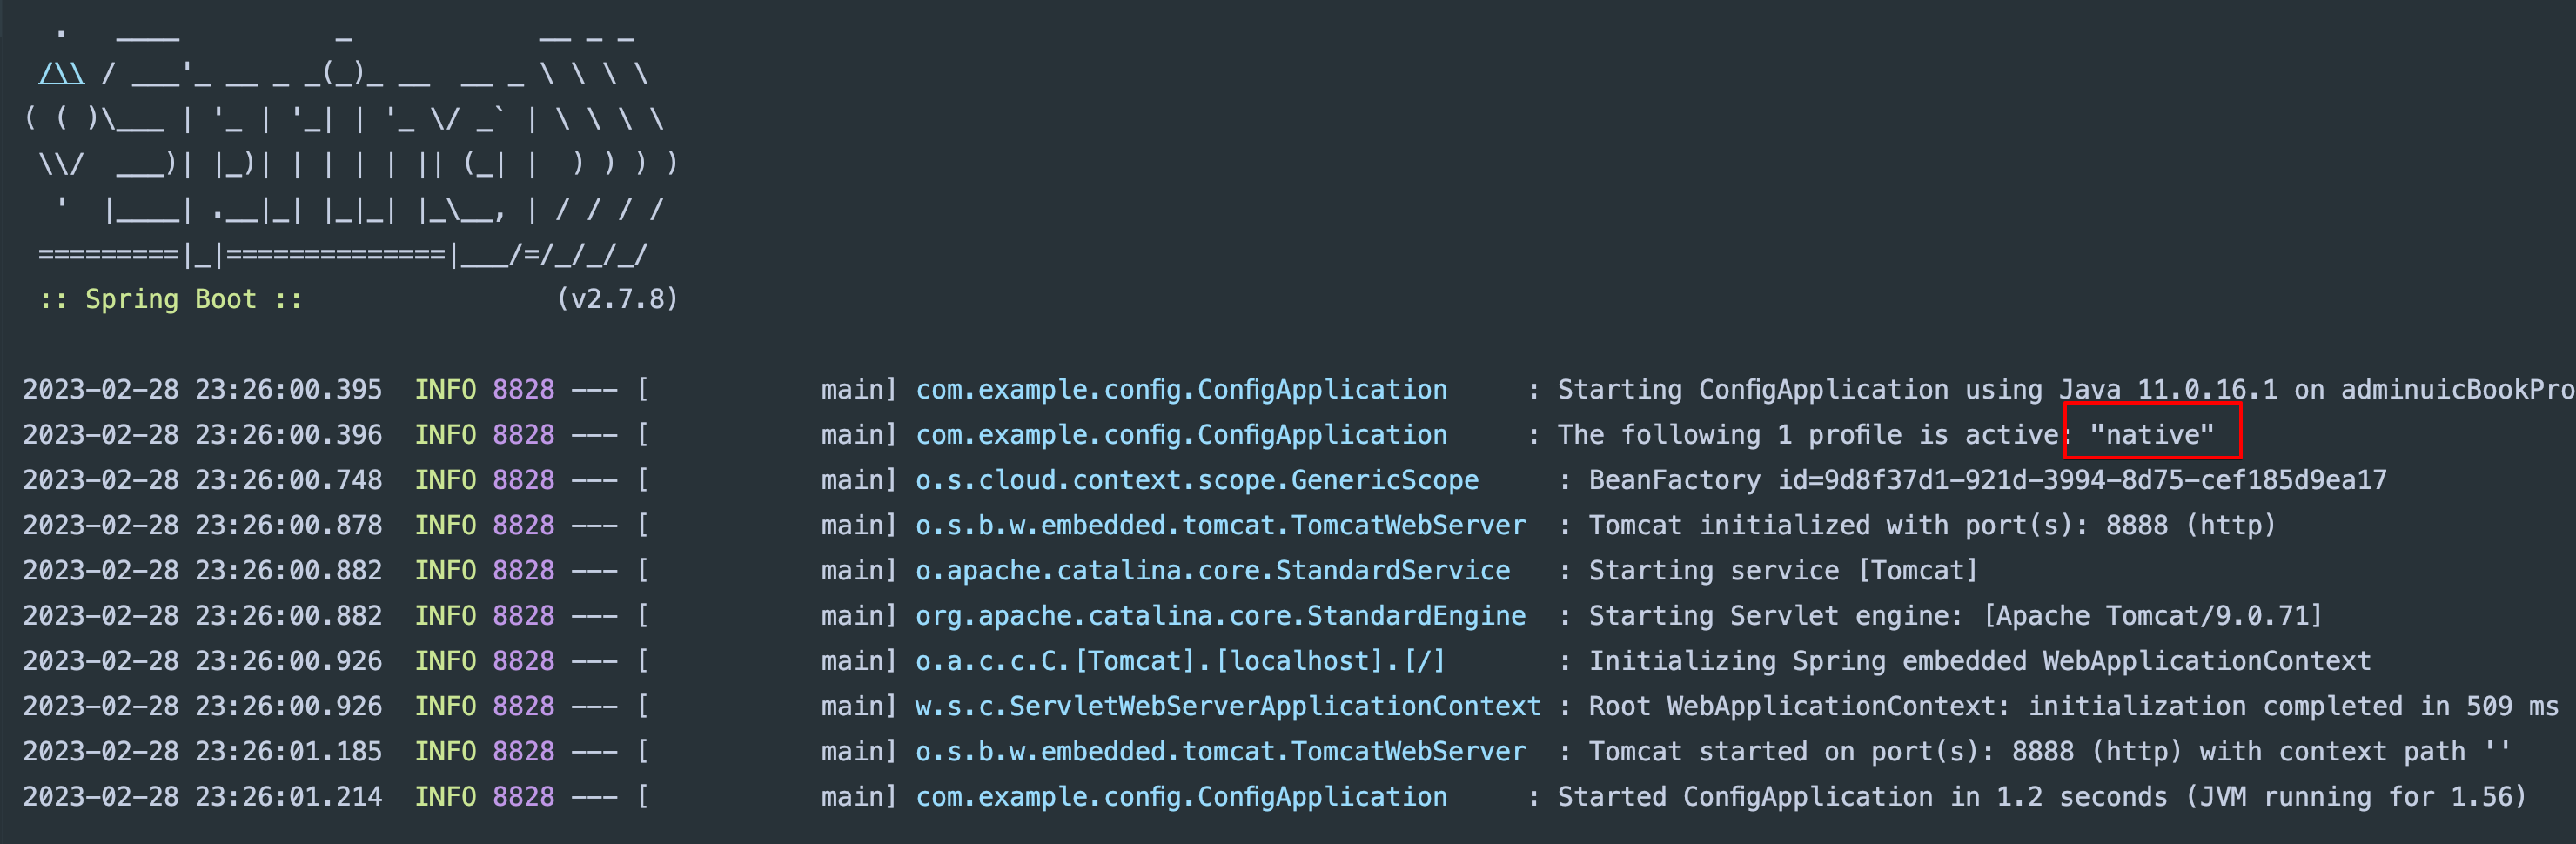
🧨 application.yml 설정 확인
기본적으로 git저장소를 사용하기 때문에 로컬 파일을 사용하기 위해서 profile을 native를 사용한다.
  profiles:
    active: native
application.yml
server:
  port: 8888

spring:
  application:
    name: config-server

  profiles:
    active: native

  cloud:
    config:
      server:
        native:
          search-locations: file://${user.home}/Desktop/kim/study/properties/native
- 실행
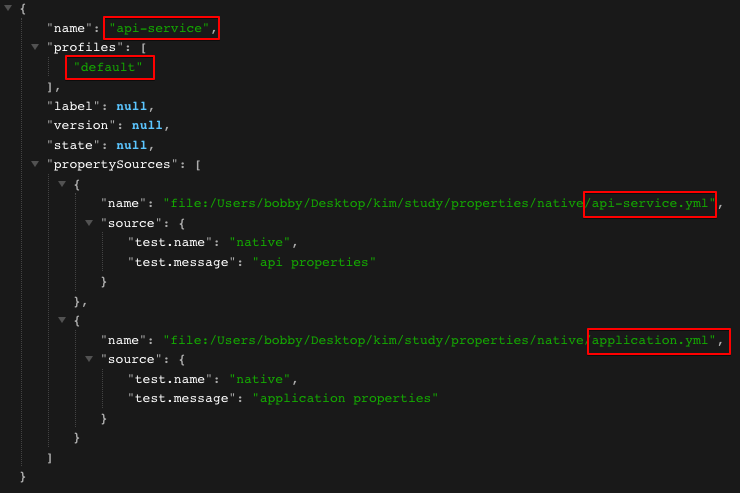
🧨 테스트
- api-service 의 default profile
GET http://localhost:8888/api-service/default
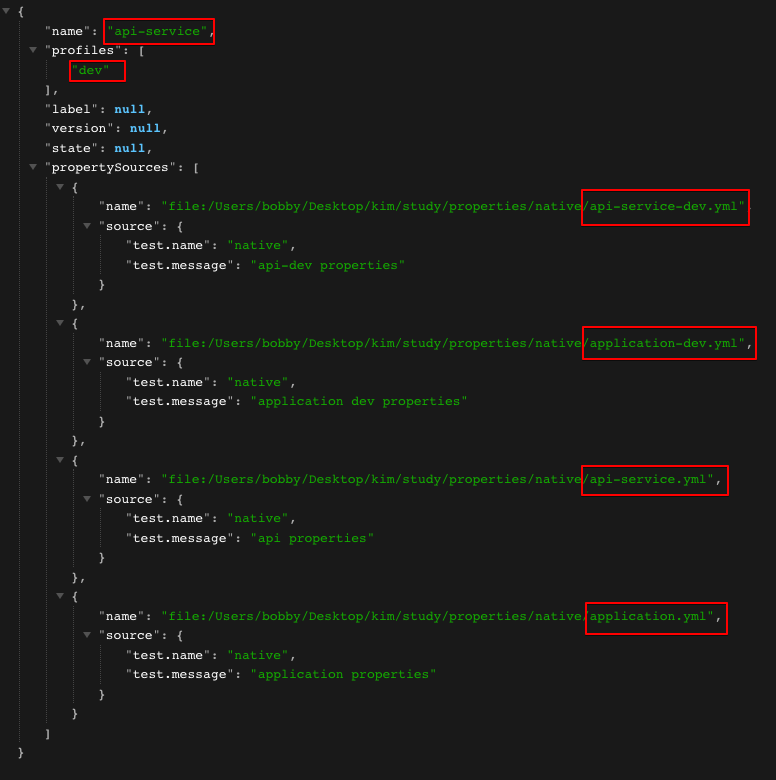
- api-service 의 dev profile
GET http://localhost:8888/api-service/dev
- api-service 의 prod profile
GET http://localhost:8888/api-service/prod
- auth-service 의 dev profile
GET http://localhost:8888/auth-service/dev
⚙️ 설정 - 로컬 Git 사용
- 로컬 파일을 사용하는 것과 다른점은 commit을 해야 적용된다.
🧨 application.yml 설정 확인
application.yml
server:
  port: 8888

spring:
  application:
    name: config-server

  cloud:
    config:
      server:
        git:
          uri: file://${user.home}/Desktop/kim/study/properties/git
⚙️ 설정 - public Github 사용
🧨 설정 파일 생성
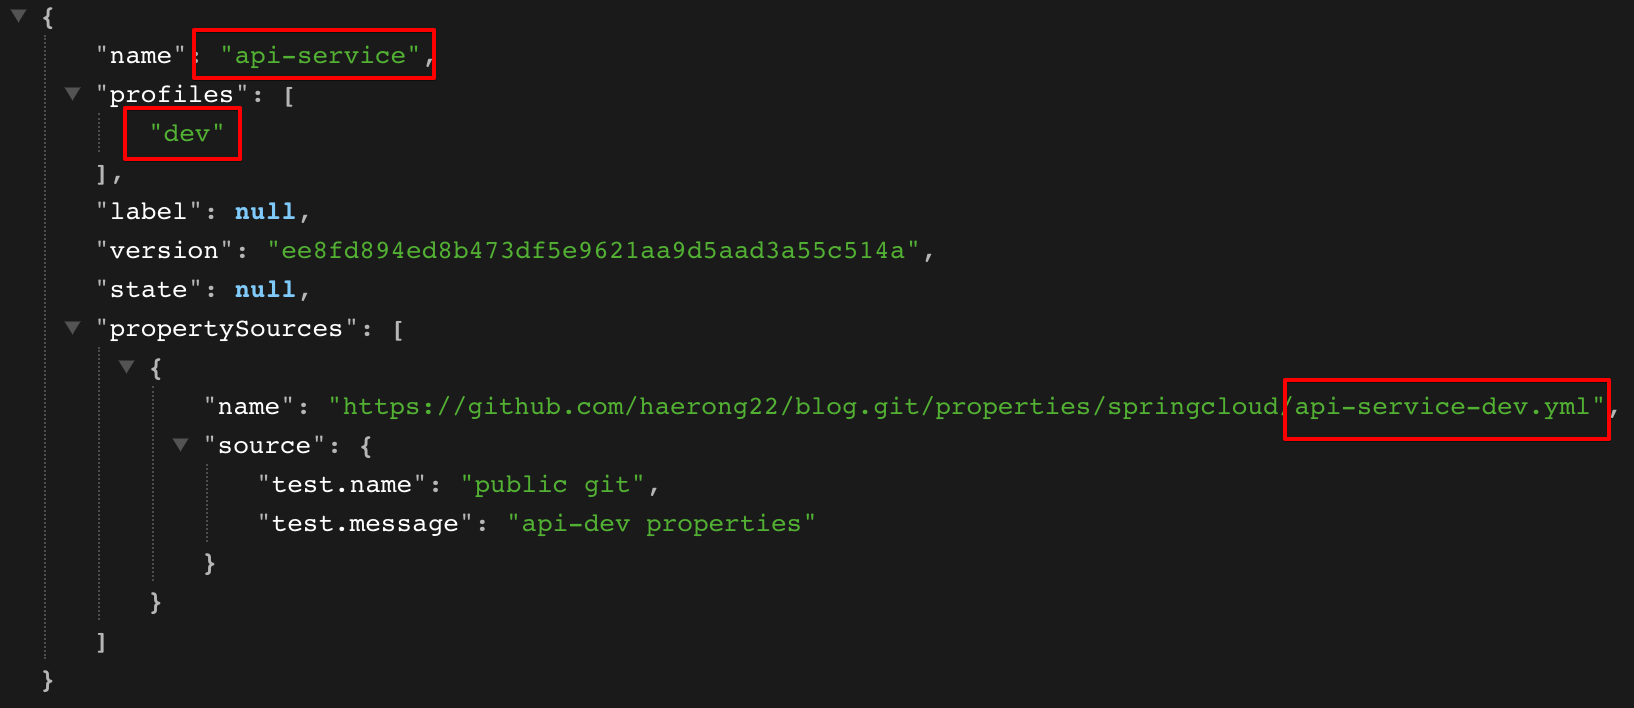
api-service-dev.yml
test:
  name: public git
  message: api-dev properties
api-service-prod.yml
test:
  name: public git
  message: api-prod properties
auth-service-dev.yml
test:
  name: public git
  message: auth-dev properties
auth-service-dev.yml
test:
  name: public git
  message: auth-dev properties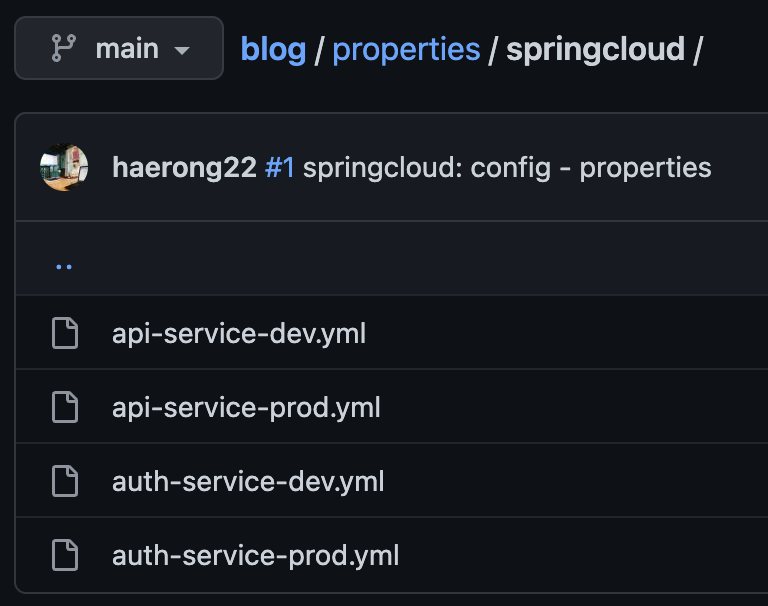
🧨 application.yml 설정 확인
| 옵션 | 설명 |
|---|---|
| search-paths | 설정 파일이 들어있는 path |
| default-label | git저장소의 브랜치명 |
application.yml
server:
  port: 8888

spring:
  application:
    name: config-server

  cloud:
    config:
      server:
        git:
          uri: https://github.com/haerong22/blog.git
          search-paths: properties/springcloud #Github 하위 path
          default-label: main
🧨 테스트
-
api-service 의 dev profile
GET http://localhost:8888/api-service/dev
-
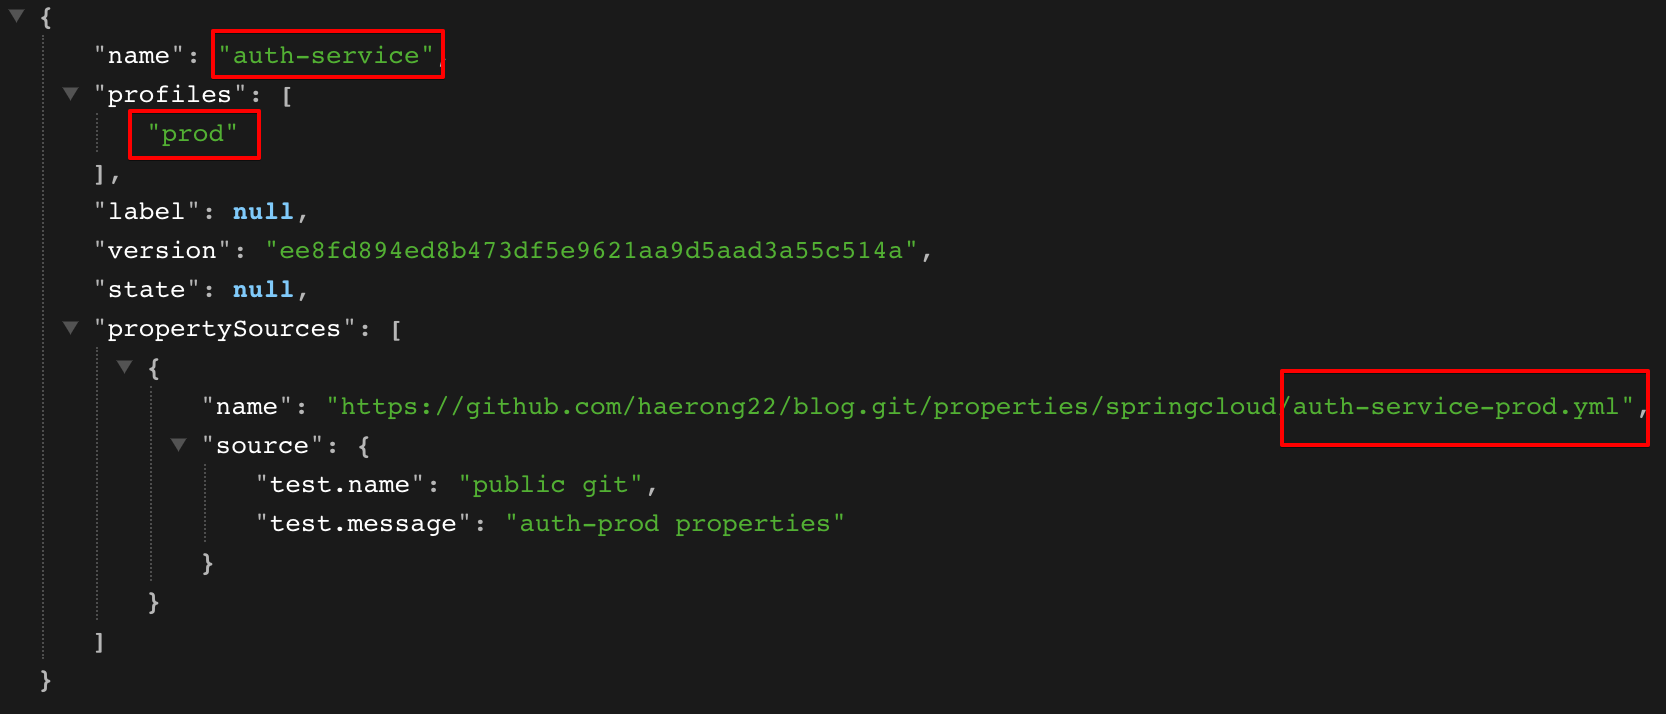
auth-service 의 prod profile
GET http://localhost:8888/auth-service/prod
🎈 default-lable 이 main 브랜치 이므로 생략할 경우 main 브랜치에서 설정 파일을 찾는다. 브랜치를 지정하려면 다음과 같다.
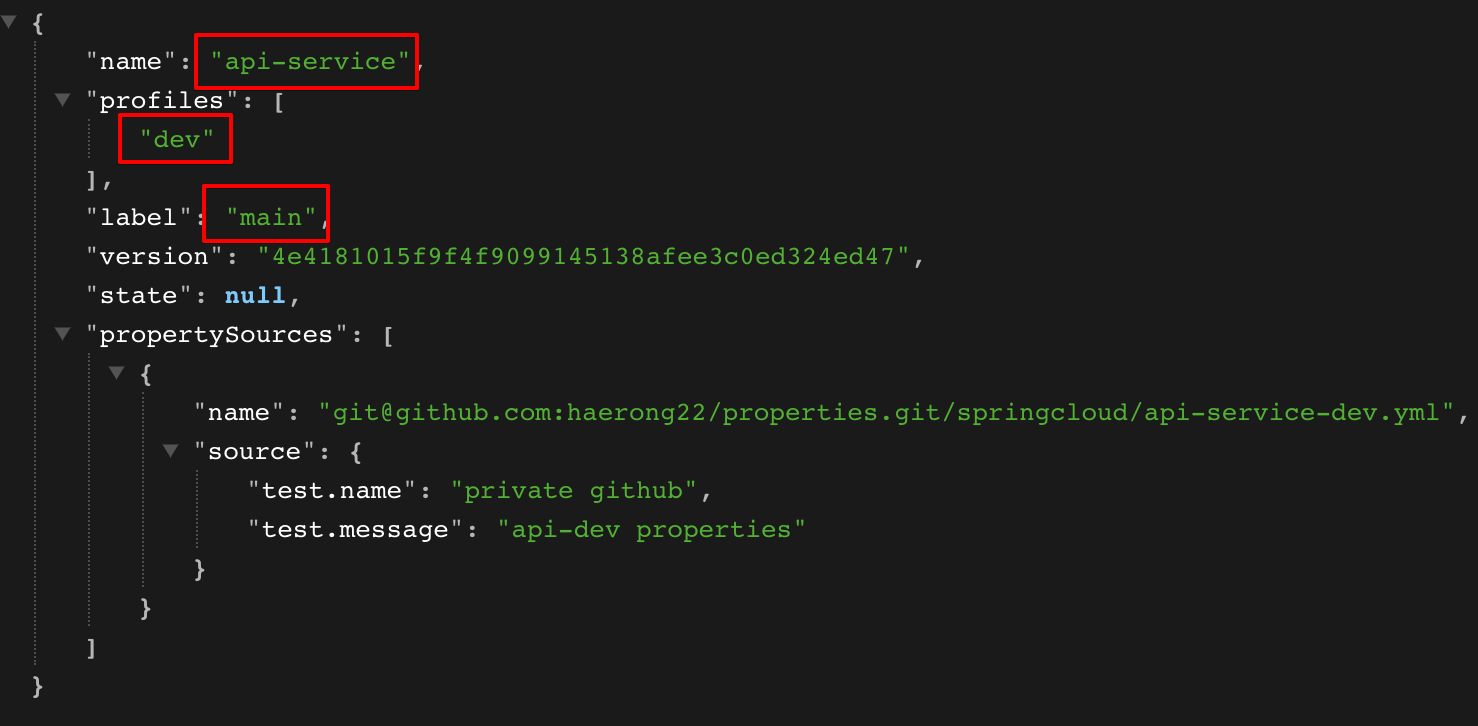
- main 브랜치의 api-service 의 dev profile
GET http://localhost:8888/api-service/dev/main
⚙️ 설정 - private Github 사용
🧨 설정 파일 생성
api-service-dev.yml
test:
  name: private git
  message: api-dev properties
api-service-prod.yml
test:
  name: private git
  message: api-prod properties
auth-service-dev.yml
test:
  name: private git
  message: auth-dev properties
auth-service-dev.yml
test:
  name: private git
  message: auth-dev properties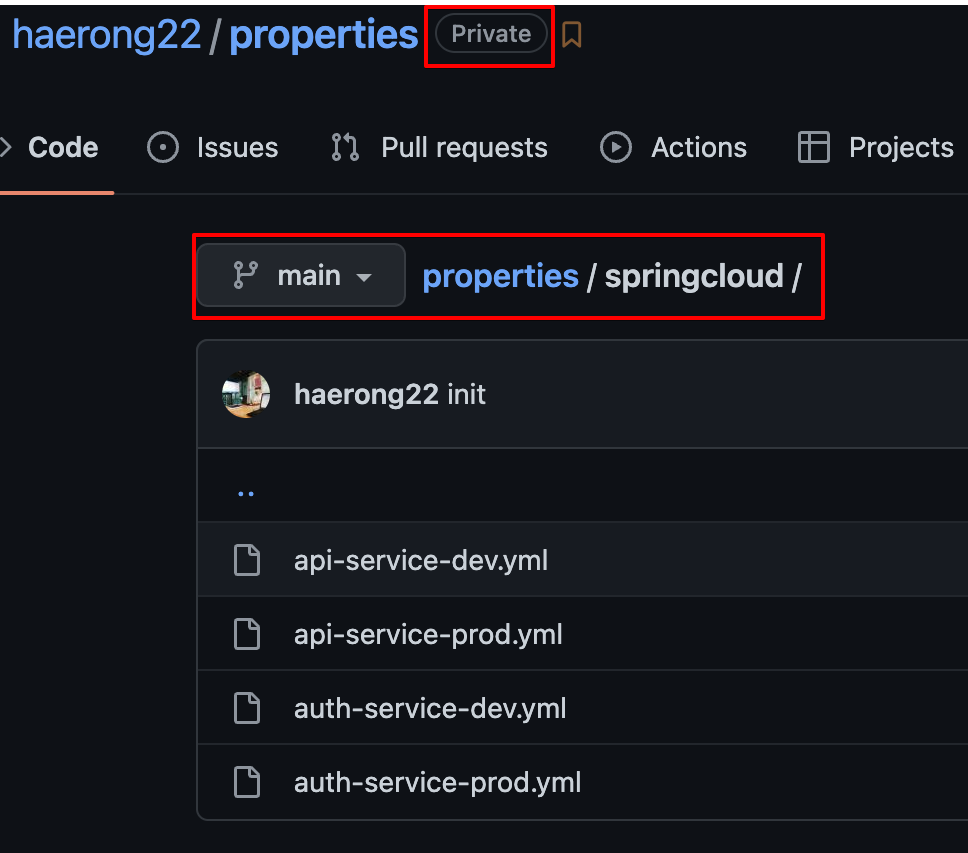
🧨 application.yml 설정 확인
| 옵션 | 설명 |
|---|---|
| search-paths | 설정 파일이 들어있는 path |
| default-label | git저장소의 브랜치명 |
application.yml
- username/password 이용
server:
  port: 8888

spring:
  application:
    name: config-server

  cloud:
    config:
      server:
        git:
          uri: https://github.com/haerong22/properties.git
          search-paths: springcloud
          default-label: main
          username: <github-id>
          password: <github-accessToken>
🧨 테스트
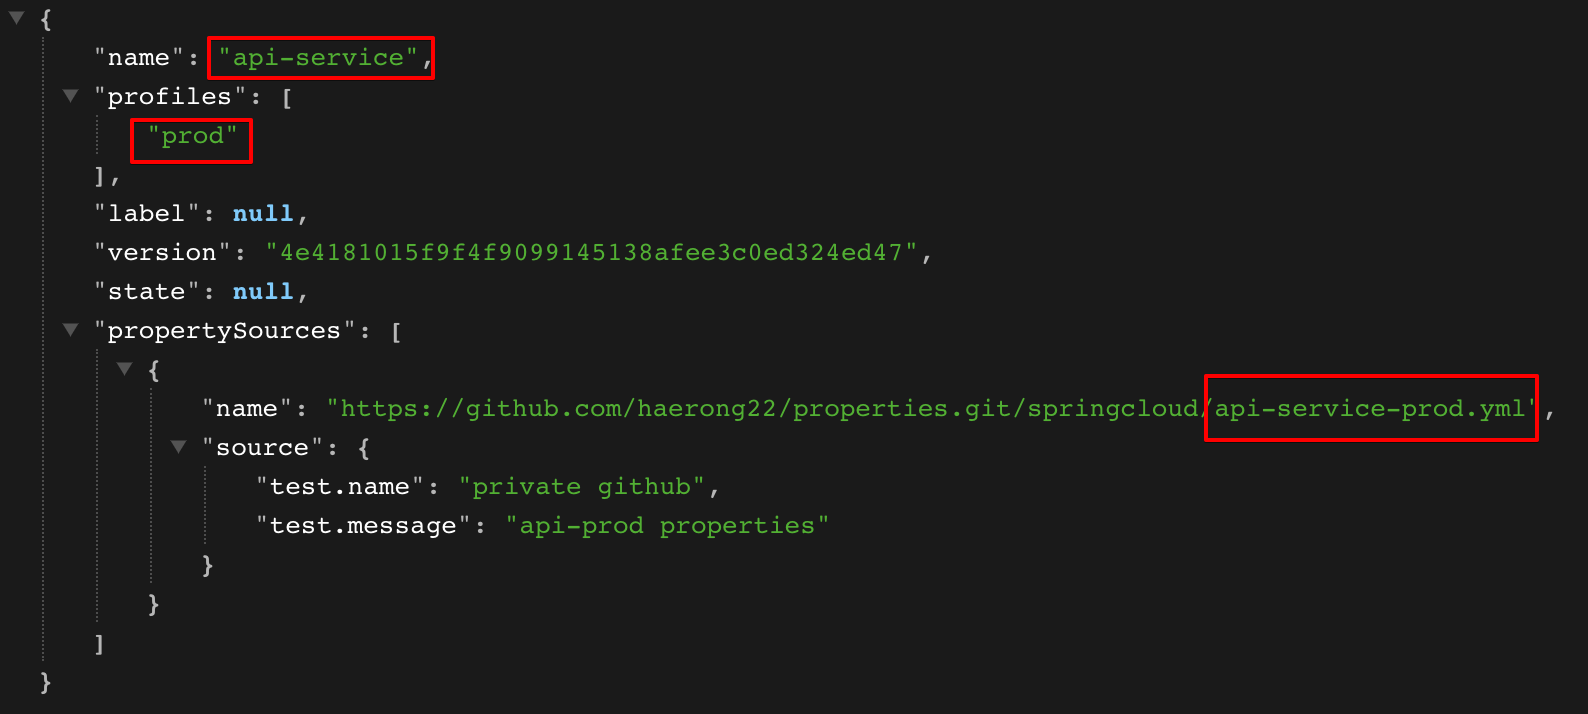
- api-service 의 prod profile
GET http://localhost:8888/api-service/prod
- ssh 이용
🔑 ssh 접속에 사용할 키 생성
ssh-keygen -t ed25519 -C "your_email@example.com"private/public 키가 생성된다.
- 기본 생성 위치는
~/.ssh디렉토리 하위에 있다.
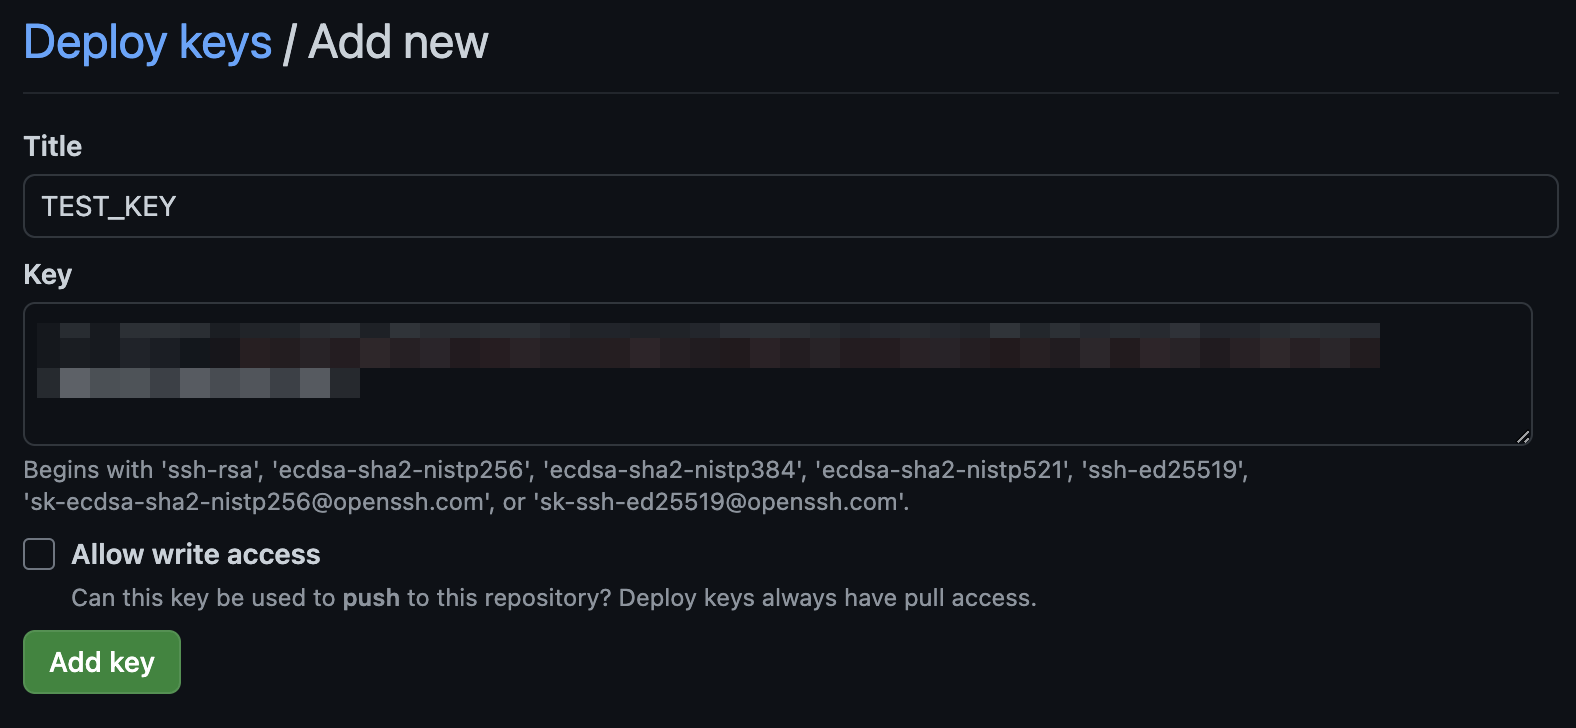
🔑 github 저장소에 ssh키 등록하기
- github repository > settings > deploy keys > add deploy key
cat id_ed25519.pub

| 설정 | 설명 |
|---|---|
| ignore-local-ssh-settings | true : private-key옵션을 사용하여 접근 |
| private-key | 생성한 private 키 |
| strict-host-key-checking | host-key 체크여부 |
| host-key | github의 public key(strict-host-key-checking옵션을 true로 할 경우 반드시 필요한데 생략 가능) |
| host-key-algorithm | 호스트키 알고리즘 |
server:
  port: 8888

spring:
  application:
    name: config-server

  cloud:
    config:
      server:
        git:
          uri: git@github.com:haerong22/properties.git
          search-paths: springcloud
          default-label: main
          ignore-local-ssh-settings: true
          strict-host-key-checking: true
          private-key: |
            -----BEGIN OPENSSH PRIVATE KEY-----

            ...

            -----END OPENSSH PRIVATE KEY-----
📌 host key 에러가 발생한 경우
- spring cloud config server에서는 기본적으로 실행할 때 hostkey를 등록한다. (
~/.ssh/known_hosts파일)- 따라서
strict-host-key-checking:true인 경우host-key옵션을 생략할 수 있다.하지만 host key 에러가 발생한 경우
strict-host-key-checking옵션을false로 하거나 다음 옵션을 추가한다.strict-host-key-checking: true host-key: AAAAC3NzaC1lZDI1NTE5AAAAIOMqqnkVzrm0SdG6UOoqKLsabgH5C9okWi0dh2l9GKJl host-key-algorithm: ssh-ed25519🔑 호스트 키 조회
ssh-keyscan github.com
- 해당 알고리즘에 맞는 키를 옵션에 넣어주면 된다.
🧨 테스트
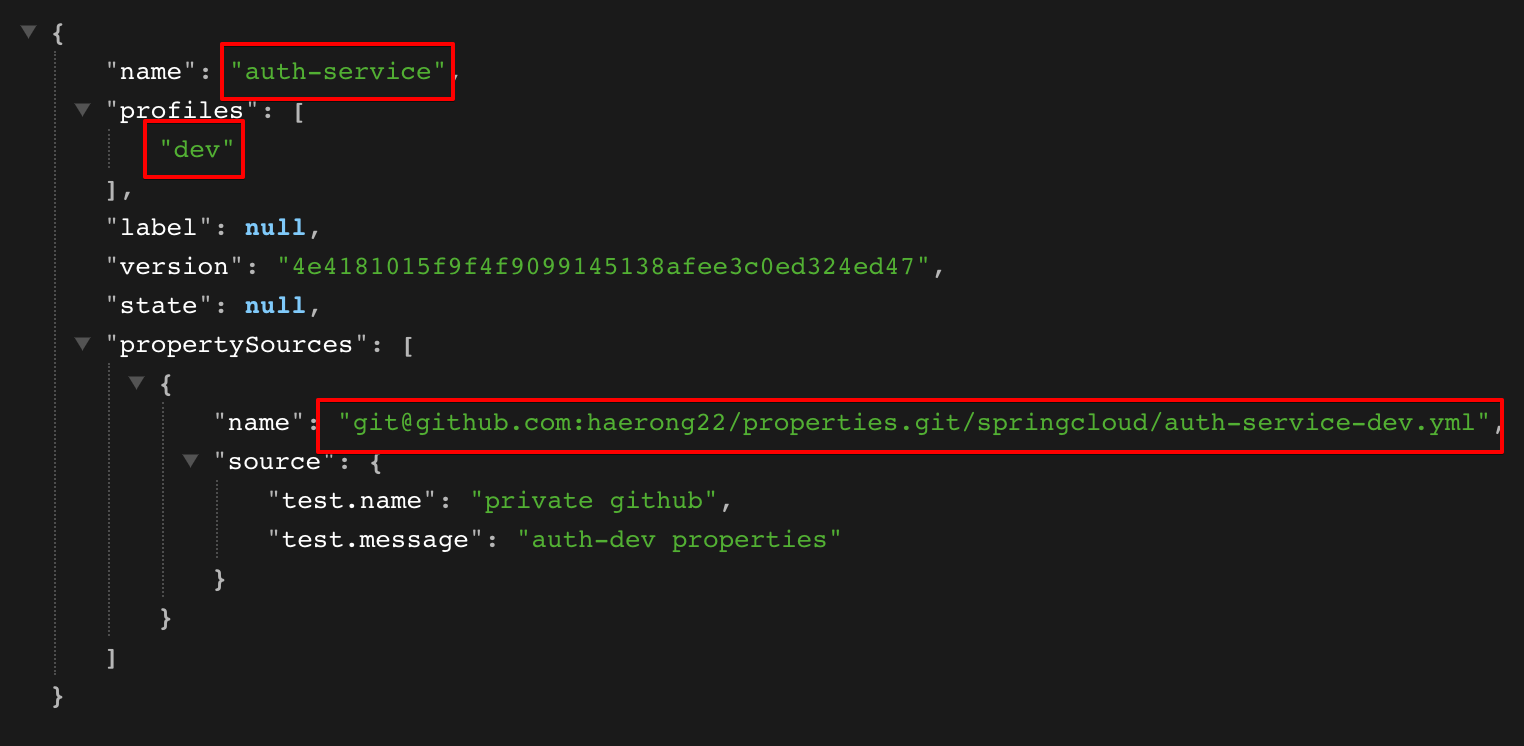
- api-service 의 prod profile
GET http://localhost:8888/auth-service/dev

4. config 클라이언트 사용
⚙️ 의존성 추가
- 설정파일 동적 변경을 위한 actuator
implementation 'org.springframework.cloud:spring-cloud-config-client'
implementation 'org.springframework.boot:spring-boot-starter-actuator'
⚙️ 설정
actuatorrefresh옵션 활성화
spring:
  application:
    name: api-service # 애플리케이션 이름
  config:
    import: configserver:http://localhost:8888 # config 서버 url

management:
  endpoints:
    web:
      exposure:
        include: health, refresh
🧨 설정파일 바인딩할 클래스
- test 로 시작하는 하위 프로퍼티 바인딩
@RefreshScope어노테이션을 통해 actuator의 refresh를 적용할 수 있다.
AppInfo
@Data
@ConfigurationProperties(prefix = "test")
@RefreshScope
@Component
public class AppInfo {

    private String name;
    private String message;
}
⚙️ 컨트롤러
@Slf4j
@RestController
@RequiredArgsConstructor
public class AppController {

    private final AppInfo appInfo;

    @GetMapping("/health_check")
    public String healthCheck() {
        log.info("AppInfo: {}", appInfo);
        return "Api Service is available!";
    }
}
⚙️ 실행
- profile을 dev로 실행
- config 서버에서 api-service, dev로 설정파일을 조회

GET http://localhost:49780/health_check
- 정상적으로 바인딩 되었다.

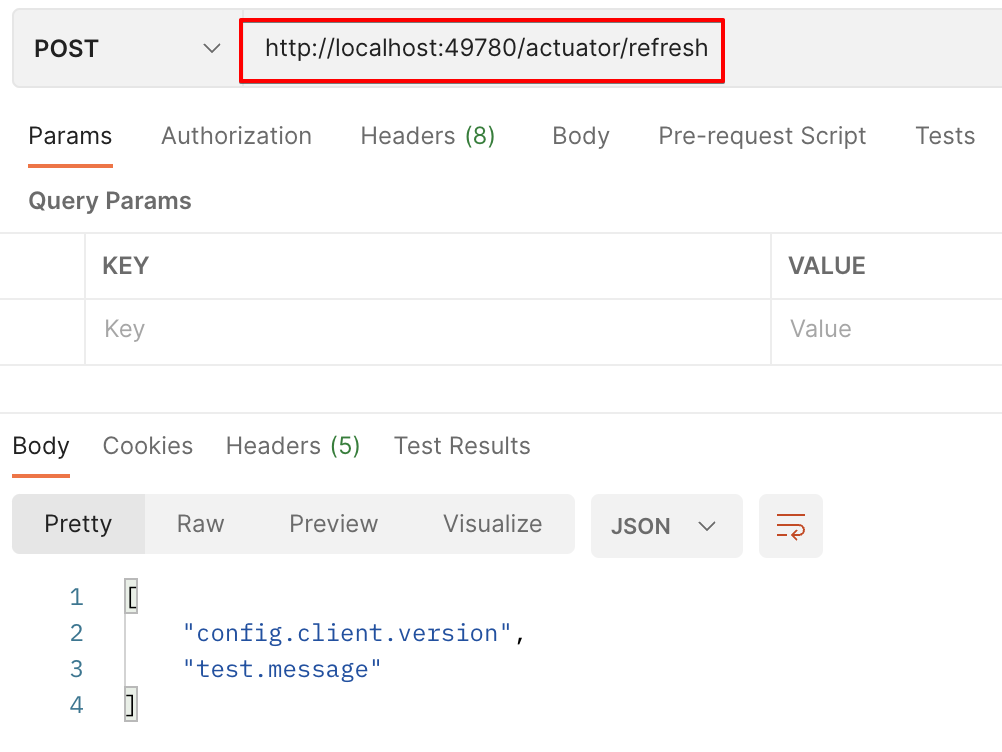
⚙️ 설정파일 변경 후 적용
- 파일 변경 후 커밋

POST http://localhost:49780/actuator/refresh
- 변경 사항 리턴
GET http://localhost:49780/health_check
- 설정 파일이 변경 되었다.

코드

만약에 CI/CD를 할 때에는 application.yml 관리를 어떻게 하나요? 그냥 외부 포트로 Config Server에 접속하기에는 비보안적이지 않나요..?