Spring Security - 1. 설정, 인가, 로그인, 회원가입.
개발자 유미님 영상을 참고하면서 공부한 시리즈임.
1. 프로젝트.
- JDK 17.
- Spring Boot 3.4.1
- Dependencies
- Lombok
- Spring Web
- Mustache
- Spring Security
- Spring Data JPA
- MySQL Driver
2. 간단한 테스트.
@Controller
public class MainController {
    @GetMapping("/")
    public String mainPage() {
        return "main";
    }
}
resources/templates/main.mustache
<!doctype html>
<html lang="en">
<head>
    <meta charset="UTF-8">
    <meta name="viewport"
          content="width=device-width, user-scalable=no, initial-scale=1.0, maximum-scale=1.0, minimum-scale=1.0">
    <meta http-equiv="X-UA-Compatible" content="ie=edge">
    <title>Main Page</title>
</head>
<body>
Main Page.
</body>
</html>
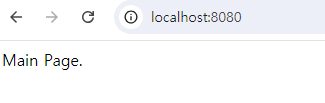
- 서버를 실행시키고
localhost:8080에 접속해보면 시큐리티로 인해 막혀있음.- 시큐리티 의존성을 추가했기 때문.
- Security Config, 즉 시큐리티 설정 파일을 따로 안 만들어놔서 시큐리티 자동 설정으로 인해 모든 경로로 접속이 차단되어 있음.
- 초기 아이디
user와 아래 콘솔창에 뜬 비밀번호를 이용하면 로그인 가능.

3. 인가. (Authorization)
- 요청이 들어오면 컨트롤러에 도달하기 전에 필테에서 스프링 시큐리티가 검증을 함.
- 해당 요청의 접근이 누구에게나 다 열려 있는 지.
- 로그인, 즉 인증된 사용자인지.
- 특정 권한(ROLE)이 있는 지.
@Configuration
@EnableWebSecurity
public class SecurityConfig {

    @Bean
    public SecurityFilterChain filterChain(HttpSecurity httpSecurity) throws Exception {
        // throws Exception 적는 이유 : authorizeHttpRequests, build가 예외를 던지고 있음.
        httpSecurity
                .authorizeHttpRequests((authorize) -> authorize
                        .requestMatchers("/", "/login").permitAll()
                        .requestMatchers("/admin").hasRole("ADMIN")
                        .requestMatchers("/my/**").hasAnyRole("ADMIN", "USER")
                        .anyRequest().authenticated()
                );

        return httpSecurity.build();
    }
}SecurityFilterChain이라는인터페이스가 반환타입.- 메서드의 매개변수로는
HttpSecurity객체를 받음. - return값은 매개변수로 받은 HttpSecurity 객체를 빌더타입으로 반환함.
.anyRequest().authenticated()- 위에 적힌 URL을 제외한 나머지 요청은 전부 인증이 필요하다는 의미.
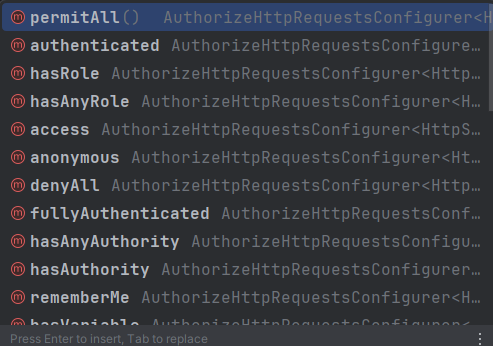
- permitAll
- 모든 사용자 허용.
- authenticated
- 인증된 사용자만 허용.
- hasRole
- 해당 권한을 가진 사용자만 허용.
- hasAnyRole
- 복수개의 권한을 설정할 수 있음.
- denyAll
- 모든 사용자 접근 불가능.
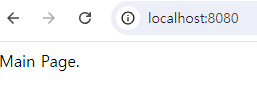
- 이제 Main Page는 로그인 없이도 접근 가능.
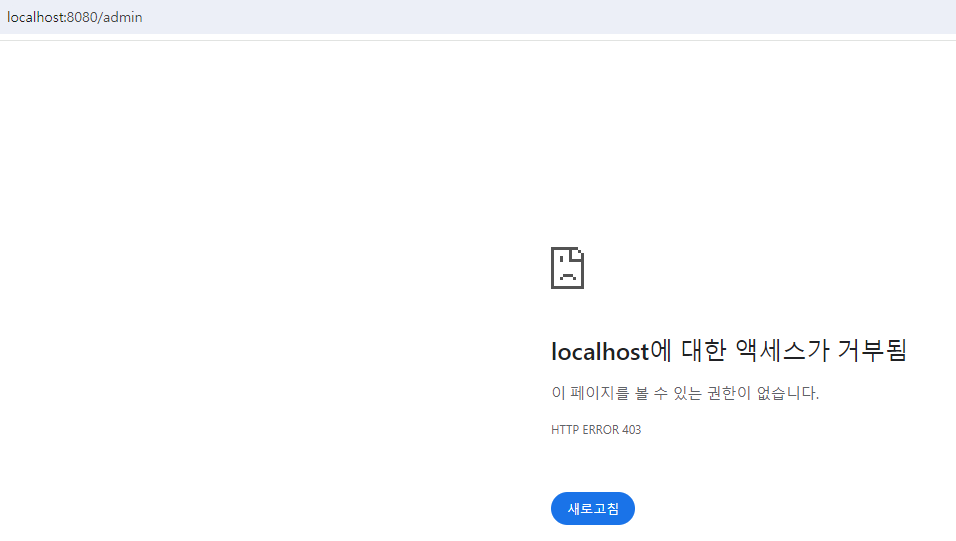
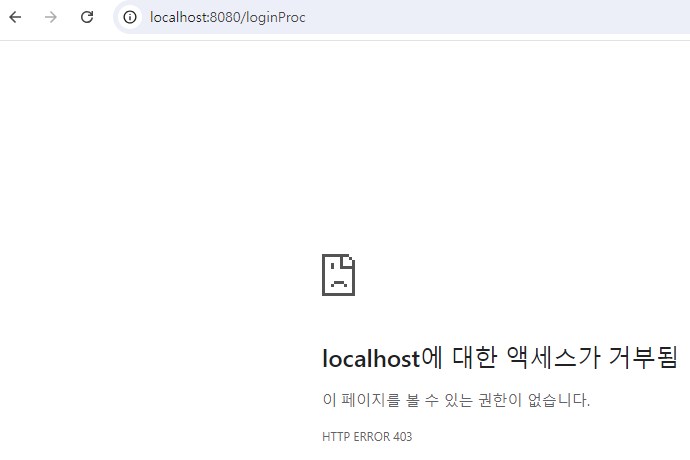
- /admin의 경우 403 에러 발생.
4. 로그인.
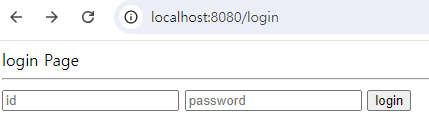
login.mustache 로그인 페이지.
<html>
<head>
    <meta charset="UTF-8">
    <meta name="viewport"
          content="width=device-width, user-scalable=no, initial-scale=1.0, maximum-scale=1.0, minimum-scale=1.0">
    <meta http-equiv="X-UA-Compatible" content="ie=edge">
    <title>Document</title>
</head>
<body>
login Page
<hr>
<form action="/loginProc" method="post" name="loginForm">
    <input id="username" type="text" name="username" placeholder="id"/>
    <input id="password" type="password" name="password" placeholder="password"/>
    <input type="submit" value="login"/>
</form>
</body>
</html><input>태그로username,password를 받고submit을 보냄.POST방식으로/loginProc로 전송됨.
- 위 요청을 받아줄
컨트롤러가 필요함.
@Controller
public class LoginController {
    @GetMapping("/login")
    public String loginPage() {
        return "login";
    }
}
- 여기서
login버튼을 클릭하면 아래와 같이 URL이/loginProc로 요청을 보냄.
public class SecurityConfig {

    @Bean
    public SecurityFilterChain filterChain(HttpSecurity httpSecurity) throws Exception {
        // throws Exception 적는 이유 : authorizeHttpRequests, build가 예외를 던지고 있음.
        httpSecurity
                .csrf((csrf) -> csrf.disable()
                )
                .authorizeHttpRequests((authorize) -> authorize
                        .requestMatchers("/", "/login").permitAll()
                        .requestMatchers("/admin").hasRole("ADMIN")
                        .requestMatchers("/my/**").hasAnyRole("ADMIN", "USER")
                        .anyRequest().authenticated()
                )
                .formLogin((formLogin) -> formLogin
                        .loginPage("/login").loginProcessingUrl("/loginProc").permitAll()
                );

        return httpSecurity.build();
    }
}- 추가된 코드
.csrf((csrf) -> csrf.disable()
		...
.formLogin((formLogin) -> formLogin
                      .loginPage("/login").loginProcessingUrl("/loginProc").permitAll()
.csrf((csrf) -> csrf.disable()- 스프링 시큐리티에는 CSRF방지 설정이 자동으로 되어 있음.
그래서 클라이언트쪽에서 요청을 보낼 때 CSRF 토큰도 함께 보내줘야됨. - 실 서비스 용도가 아니기 때문에 CSRF 설정을 꺼줌.
- 스프링 시큐리티에는 CSRF방지 설정이 자동으로 되어 있음.
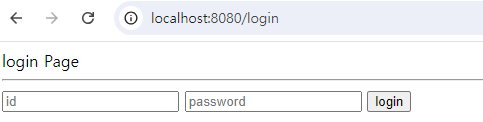
loginPage를 설정함으로써/adminURL 같이 특정 권한이 필요한 페이지에 접근하려고 할 경우 자동으로/login로 리다이렉트 시킴.loginProcessingUrl("/loginProc")- 사용자가 로그인 폼에 데이터를 입력하고 전송하면
/loginProc로 요청이 보내지는데 이걸 스프링 시큐리티가 받아서 권한 처리, 인증 처리를 진행함.
- 사용자가 로그인 폼에 데이터를 입력하고 전송하면

- 여기서
ADMIN권한이 필요한/admin을 입력한 후 엔터를 눌러서 URL 요청을 보내면 아래와 같이/login페이지로 리다이렉트 됨.
5. 비밀번호.
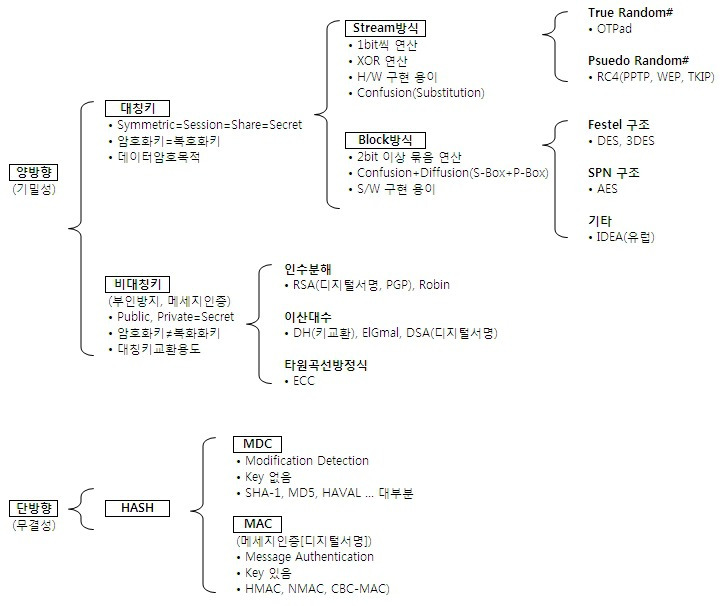
- 단방향
- 암호화만 가능.
- 양방향
- 대칭키.(비공개키)
- 암호화, 복호화에 사용하는 키가 같음.
- 비대칭키.(공개키)
- 암호화, 복호화에 사용하는 키가 서로 다름.
- 암호화, 복호화 가능.
- 대칭키.(비공개키)
-
스프링 시큐리티는 사용자 인증, 즉 로그인을 하면 비밀번호에 대해 단방향 해시 암호화를 진행한 뒤 저장되어 있는 비밀번호와 대조함.
- 그래서 회원가입 로직을 수행할 때 비밀번호에 대해서 암호화를 진행해야 함.
-
스프링 시큐리티는 암호화를 위해
BCryptPasswordEncoder를 제공하고 있음.- 시큐리티 설정파일에
빈등록을 해서 사용함.
- 시큐리티 설정파일에
@Configuration
@EnableWebSecurity
public class SecurityConfig {
    @Bean
    public BCryptPasswordEncoder bCryptPasswordEncoder() {
        return new BCryptPasswordEncoder();
    }

    @Bean
    public SecurityFilterChain filterChain(HttpSecurity httpSecurity) throws Exception {
        // throws Exception 적는 이유 : authorizeHttpRequests, build가 예외를 던지고 있음.
        httpSecurity
                // CSRF 비활성화.
                .csrf((csrf) -> csrf.disable()
                )
                .authorizeHttpRequests((authorize) -> authorize
                        .requestMatchers("/", "/login").permitAll()
                        .requestMatchers("/admin").hasRole("ADMIN")
                        .requestMatchers("/my/**").hasAnyRole("ADMIN", "USER")
                        .anyRequest().authenticated()
                )
                // 권한이 필요한 URL 요청 시 /login으로 리다이렉트 시킴.
                .formLogin((formLogin) -> formLogin
                        .loginPage("/login").loginProcessingUrl("/loginProc").permitAll()
                );
        return httpSecurity.build();
    }
}
추가된 코드.
	@Bean
    public BCryptPasswordEncoder bCryptPasswordEncoder() {
        return new BCryptPasswordEncoder();
    }
5-1. PasswordEncoder
package org.springframework.security.crypto.password;

public interface PasswordEncoder {
    String encode(CharSequence rawPassword);

    boolean matches(CharSequence rawPassword, String encodedPassword);

    default boolean upgradeEncoding(String encodedPassword) {
        return false;
    }
}
5-2. BCryptPasswordEncoder
public class BCryptPasswordEncoder implements PasswordEncoder {
    private Pattern BCRYPT_PATTERN;
    private final Log logger;
    private final int strength;
    private final BCryptVersion version;
    private final SecureRandom random;

    public BCryptPasswordEncoder() {
        this(-1);
    }

    public BCryptPasswordEncoder(int strength) {
        this(strength, (SecureRandom)null);
    }

    public BCryptPasswordEncoder(BCryptVersion version) {
        this(version, (SecureRandom)null);
    }

    public BCryptPasswordEncoder(BCryptVersion version, SecureRandom random) {
        this(version, -1, random);
    }

    public BCryptPasswordEncoder(int strength, SecureRandom random) {
        this(BCryptPasswordEncoder.BCryptVersion.$2A, strength, random);
    }

    public BCryptPasswordEncoder(BCryptVersion version, int strength) {
        this(version, strength, (SecureRandom)null);
    }

    public BCryptPasswordEncoder(BCryptVersion version, int strength, SecureRandom random) {
        this.BCRYPT_PATTERN = Pattern.compile("\\A\\$2(a|y|b)?\\$(\\d\\d)\\$[./0-9A-Za-z]{53}");
        this.logger = LogFactory.getLog(this.getClass());
        if (strength == -1 || strength >= 4 && strength <= 31) {
            this.version = version;
            this.strength = strength == -1 ? 10 : strength;
            this.random = random;
        } else {
            throw new IllegalArgumentException("Bad strength");
        }
    }

    public String encode(CharSequence rawPassword) {
        if (rawPassword == null) {
            throw new IllegalArgumentException("rawPassword cannot be null");
        } else {
            String salt = this.getSalt();
            return BCrypt.hashpw(rawPassword.toString(), salt);
        }
    }

    private String getSalt() {
        return this.random != null ? BCrypt.gensalt(this.version.getVersion(), this.strength, this.random) : BCrypt.gensalt(this.version.getVersion(), this.strength);
    }

    public boolean matches(CharSequence rawPassword, String encodedPassword) {
        if (rawPassword == null) {
            throw new IllegalArgumentException("rawPassword cannot be null");
        } else if (encodedPassword != null && encodedPassword.length() != 0) {
            if (!this.BCRYPT_PATTERN.matcher(encodedPassword).matches()) {
                this.logger.warn("Encoded password does not look like BCrypt");
                return false;
            } else {
                return BCrypt.checkpw(rawPassword.toString(), encodedPassword);
            }
        } else {
            this.logger.warn("Empty encoded password");
            return false;
        }
    }

    public boolean upgradeEncoding(String encodedPassword) {
        if (encodedPassword != null && encodedPassword.length() != 0) {
            Matcher matcher = this.BCRYPT_PATTERN.matcher(encodedPassword);
            if (!matcher.matches()) {
                throw new IllegalArgumentException("Encoded password does not look like BCrypt: " + encodedPassword);
            } else {
                int strength = Integer.parseInt(matcher.group(2));
                return strength < this.strength;
            }
        } else {
            this.logger.warn("Empty encoded password");
            return false;
        }
    }

    public static enum BCryptVersion {
        $2A("$2a"),
        $2Y("$2y"),
        $2B("$2b");

        private final String version;

        private BCryptVersion(String version) {
            this.version = version;
        }

        public String getVersion() {
            return this.version;
        }
    }
}
6. MySQL DB 연결.
- build.gradle에 의존성을 추가하고, application.properties(또는 yml)에 아래의 코드를 작성하면됨.
spring.datasource.driver-class-name=com.mysql.cj.jdbc.Driver
spring.datasource.url=jdbc:mysql://(IP):(Port)/(DB)?characterEncoding=UTF-8&serverTimezone=Asia/Seoul

spring.datasource.username=(username)
spring.datasource.password=(password)

# JPA 쿼리문 확인 가능
spring.jpa.show-sql=true
spring.jpa.hibernate.ddl-auto=update
# JPA Hibernate 콘솔 출력문 가독성 좋게해줌.
spring.jpa.properties.hibernate.format_sql=true
7. 회원가입.
/join요청을 처리할 컨트롤러.- 해당 메서드는 회원가입 페이지를 반환해줌.
@Controller
public class JoinController {
    @GetMapping("/join")
    public String joinPage() {
        return "join";
    }
}- 회원가입 페이지.
- 데이터를 입력한 후 전송하면
/joinProc라는 URL을 POST방식으로 요청함.
- 데이터를 입력한 후 전송하면
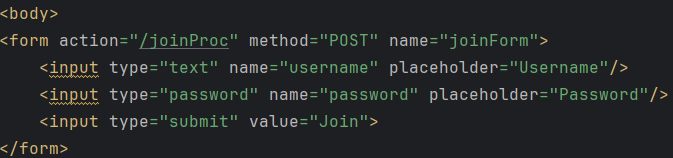
join.mustache
<html>
<head>
    <meta charset="UTF-8">
    <meta name="viewport"
          content="width=device-width, user-scalable=no, initial-scale=1.0, maximum-scale=1.0, minimum-scale=1.0">
    <meta http-equiv="X-UA-Compatible" content="ie=edge">
    <title>Join Page</title>
</head>
<body>
<form action="/joinProc" method="POST" name="joinForm">
    <input type="text" name="username" placeholder="Username"/>
    <input type="password" name="password" placeholder="Password"/>
    <input type="submit" value="Join">
</form>
</body>
</html>- 회원가입 요청을 처리할 컨트롤러.
- 회원가입 요청(
form 데이터)을POST방식으로 보내기 때문에@PostMapping으로 처리.
- 회원가입 요청(
    @PostMapping("/joinProc")
    public String joinProcess() {

                	....

        return "redirect:/login";
}- 위 메서드의 매개변수로 사용할 DTO가 필요함.
- 회원가입이 정상적으로 처리 됐다면 로그인 페이지로 리다이렉트 시킴.
7-1. DTO.
- 회원가입의 폼 데이터를 받을 클래스.
- JoinDTO 클래스의 경우 2가지 값만 받으면 됨.
username,password
- JoinDTO 클래스의 경우 2가지 값만 받으면 됨.
JoinDTO
@Getter
@Setter
public class JoinDTo {
    private String username;
    private String password;
}
JoinController
    @PostMapping("/joinProc")
    public String joinProcess() {

        return "redirect:/login";
    }
7-2 Service.
JoinService
@Service
public class JoinService {
    public void JoinProcess(JoinDTo joinDTo) {

                ....

    }
}
JoinController
@PostMapping("/joinProc")
public String joinProcess(JoinDTo joinDTo) {
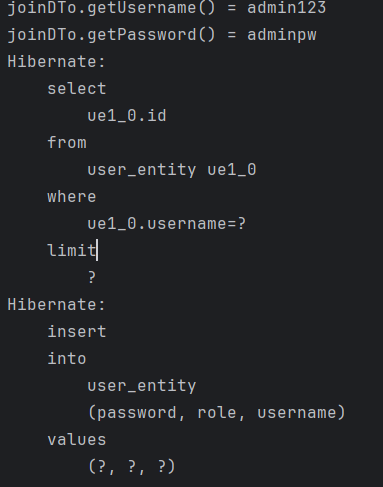
System.out.println("joinDTo.getUsername() = " + joinDTo.getUsername());
System.out.println("joinDTo.getPassword() = " + joinDTo.getPassword());
joinService.JoinProcess(joinDTo);
return "redirect:/login";
}7-3. Entity, Repository.
UserEntity
@Entity
@Getter
@Setter
public class UserEntity {
    @Id
    @GeneratedValue(strategy = GenerationType.IDENTITY)
    private int id;

    private String username;
    private String password;
    private String role;
}
UserRepository
public interface UserRepository extends JpaRepository<UserEntity, Integer> {
}
7-4. Service 코드 보충.
JoinService
    public void JoinProcess(JoinDTo joinDTo) {
        UserEntity userEntity = new UserEntity();
        userEntity.setUsername(joinDTo.getUsername());
        userEntity.setPassword(bCryptPasswordEncoder.encode(joinDTo.getPassword()));
        userEntity.setRole("ROLE_USER");
        userRepository.save(userEntity);
}- 권한을 나타내는
role의 경우 사용자가 회원가입할 때 선택할 수 없으므로 현재는 서버 로직에서 수동으로 등록. - 비밀번호의 경우
BCryptPasswordEncoder의encode를 통해 해쉬 암호화를 해서 저장함.
7-5. 시큐리티 설정 수정.
- 회원가입을 위한
/join,/joinProcURL을 로그인 하지 않은 사용자, 즉 모든 사용자가 접근할 수 있도록 해야됨.
SecurityConfig
    @Bean
    public SecurityFilterChain filterChain(HttpSecurity httpSecurity) throws Exception {
        // throws Exception 적는 이유 : authorizeHttpRequests, build가 예외를 던지고 있음.
        httpSecurity
                // CSRF 비활성화.
                .csrf((csrf) -> csrf.disable()
                )
                .authorizeHttpRequests((authorize) -> authorize
                        .requestMatchers("/", "/login", "/join", "/loginProc", "/joinProc").permitAll()
                        .requestMatchers("/admin").hasRole("ADMIN")
                        .requestMatchers("/my/**").hasAnyRole("ADMIN", "USER")
                        .anyRequest().authenticated()
                )
                // 권한이 필요한 URL 요청 시 /login으로 리다이렉트 시킴.
                .formLogin((formLogin) -> formLogin
                        .loginPage("/login").loginProcessingUrl("/loginProc").permitAll()
                );
        return httpSecurity.build();
}- 만약
/join만 추가하고/joinProc는 추가하지 않았을 경우.- 회원가입 페이지는 나타나지만, DB에 저장이 안 되는 건 물론이고 서버에 도달하지도 못함.
(Controller에 도착하지도 못함.)
- 회원가입 페이지는 나타나지만, DB에 저장이 안 되는 건 물론이고 서버에 도달하지도 못함.
7-6. 테스트.
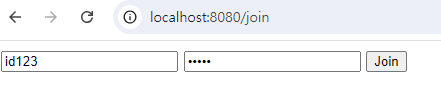
- 회원가입.
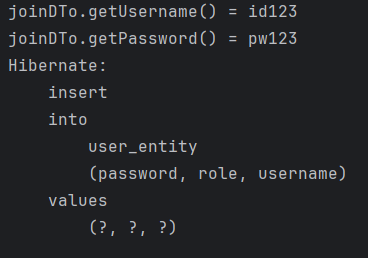
- 콘솔 출력문.

- DB에 저장된 데이터.
8. 회원 중복 방지.
public class UserEntity {
    @Id
    @GeneratedValue(strategy = GenerationType.IDENTITY)
    private int id;

    @Column(unique = true)
    private String username;

	...
}- username 속성으로
unique를 줘서 중복된 값이 들어오지 못하도록 함.
UserRepository
public interface UserRepository extends JpaRepository<UserEntity, Integer> {
    boolean existsByUsername(String username);
}- Repository에
username을 매개변수로 갖는boolean 타입의 메서드 추가.
public void JoinProcess(JoinDTo joinDTo) {
        if (userRepository.existsByUsername(joinDTo.getUsername())) {
            return;
        }
        UserEntity userEntity = new UserEntity();
        userEntity.setUsername(joinDTo.getUsername());
        userEntity.setPassword(bCryptPasswordEncoder.encode(joinDTo.getPassword()));
        userEntity.setRole("ROLE_USER");
        userRepository.save(userEntity);
}service에 있는joinProcess 메서드에if문을 추가해서 회원 중복을 방지함.
9. 로그인 검증.
- 데이터베이스에 저장된 유저 정보를 로그인 데이터로 들어온 정보와 비교 및 검증하기 위해서는 스프링 시큐리티에서 제공하는
UserDetails,UserDetailsService를 구현해줘야함.
9-1. UserDetailsService 구현.
package org.springframework.security.core.userdetails;

public interface UserDetailsService {
    UserDetails loadUserByUsername(String username) throws UsernameNotFoundException;
}
@Service
@RequiredArgsConstructor
public class CustomUserDetailsService implements UserDetailsService {
private final UserRepository userRepository;
@Override
public UserDetails loadUserByUsername(String username) throws UsernameNotFoundException {
UserEntity userEntity = userRepository.findByUsername(username);
System.out.println("loadUserByUsername");
if (userEntity != null) {
return new CustomUserDetails(userEntity);
}
return null;
}
}- 의존성 주입(DI)을 통해
UserRepository를 주입 받음. loadUserByUsername 메서드의 구현부는 매개변수로 받은username을 이용해서 데이터베이스에 저장되어 있던 데이터와 검증하는 로직을 작성하면 됨.- 로그인 요청이 들어오면 스프링 시큐리티가 해당 메서드를 호출하면서 매개변수 값을 넣어줌.
- return값으로
new CustomUserDetails(userEntity);를 리턴.
UserDetailsService는UserDetails객체를 반환하는 인터페이스.loadUserByUsername(String username)메서드를 구현해야하며 사용자 이름(username)을 기반으로 UserDetails를 생성함.- 사용자 인증이 필요할 때, Spring Security는 이 메서드를 호출하여 사용자 정보를 가져옴.
9-2. UserDetails 구현.
public class CustomUserDetails implements UserDetails {

    private UserEntity userEntity;
    public CustomUserDetails(UserEntity userEntity) {
        this.userEntity = userEntity;
    }

    @Override
    public Collection<? extends GrantedAuthority> getAuthorities() {
        Collection<GrantedAuthority> collection = new ArrayList<>();
        collection.add(new GrantedAuthority() {
            @Override
            public String getAuthority() {
                return userEntity.getRole();
            };
        });
        return collection;
    }

    @Override
    public String getPassword() {
        return userEntity.getPassword();
    }

    @Override
    public String getUsername() {
        return userEntity.getUsername();
    }

    @Override
    public boolean isAccountNonExpired() {
        return true;
    }

    @Override
    public boolean isAccountNonLocked() {
        return true;
    }

    @Override
    public boolean isCredentialsNonExpired() {
        return true;
    }

    @Override
    public boolean isEnabled() {
        return true;
    }
}-
return new CustomUserDetails(userEntity);를 생성하기 위한 생성자 추가.- 생성자의 매개변수로 들어온 객체의 값을 주입받기 위한 필드 추가.
private UserEntity userEntity;
- 즉 생성자로 받은 값을 필드에 주입해서 필드(userEntity)를 초기화 시킬 수 있음.
- 생성자의 매개변수로 들어온 객체의 값을 주입받기 위한 필드 추가.
-
getAuthorities 메서드는 유저의 권한을 리턴하는 메서드. -
UserDetails는 Spring Security에서 사용자 정보를 담는 인터페이스.- 사용자의 이름, 비밀번호, 활성화 여부, 계정 잠금 여부, 권한(역할) 정보 등을 메서드를 통해 확인할 수 있음.
getAuthorities()메서드는 사용자가 가진 권한 목록을 반환함.
9-3. 테스트.
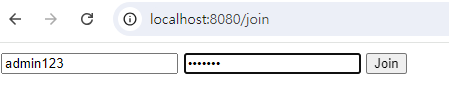
ADMIN권한을 가지는 유저 생성.
- 콘솔 출력문.

- DB에 정상적으로 저장완료.

- 로그인 시 콘솔 출력문.
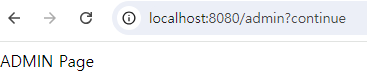
/adminURL 접속시 위와 같이 정상적으로 접속됨.

Every cloud has a silver lining.ㅤㅤㅤㅤㅤㅤㅤㅤㅤhttps://blog.naver.com/ha_jju_