Spring Security - 2. 세션, CSRF 설정, 인메모리, Http Basic, 계층 권한.
1. 세션 사용자 정보.
- 현재의 문제점.
- 로그인을 한 상태인지, 하지 않은 상태인지 구분을 못함.
- 또한 로그인을 했다면 사용자는 누구인지 등을 알 수가 없음.
- 로그인을 하고나서 누가 로그인을 했는 지, 어떤 권한을 가지고 있는 지를 확인하는 세션정보를 확인해도록 함.
- 서버 세션에 저장되어 있는 유저의 Authentication값은 브라우저가 들고오는 쿠키의
JSESSIONID값에 매핑되어 사용자에게 배정되는 쓰레드 SecurityContext에 배정되게 됨.- 즉 JSESSIONID가 키값이라 볼 수 있음.
- JSESSIONID 쿠키.
- 사용자가 웹 애플리케이션에 로그인을 하면 서버는 세션을 생성하고 JSESSIONID라는 이름의 쿠키를 사용자 브라우저에 반환함.
- 해당 쿠키는 세션 ID를 저장하며, 클라이언트와 서버 간의 지속적인 세션을 유지하는 데 사용됨.
- JSESSIONID는 클라이언트와 서버 사이에서 세션을 식별하는 키로 사용됨.
- 세션과 SecurityContext.
- 스프링 시큐리티는 사용자가 인증되면 Authentication 객체를 SecurityContext에 저장함.
- SecurityContext는 HttpSession에 저장되며, 이는 JSESSIONID에 의해 식별됨.
- SecurityContext는 세션에 저장되고 세션은 JSESSIONID로 식별함.
- 쓰레드와 SecurityContext.
- 사용자의 요청이 서버로 들어오면 JSESSIONID를 통해 서버는 해당 요청과 연결된 세션을 식별함.
- 세션에서 SecurityContext를 가져와 현재 요청을 처리하는 쓰레드의 보안 컨텍스트에 설정.
- 현재 쓰레드에서 SecurityContextHolder.getContext()를 통해 현재 사용자의 Authentication 정보를 액세스할 수 있음.
- 각 요청마다 서버는 JSESSIONID를 통해 세션을 확인하고, 해당 세션의 SecurityContext를 현재 쓰레드에 할당함.
- 서버 세션에 저장되어 있는 유저의 Authentication값은 브라우저가 들고오는 쿠키의
@Controller
public class MainController {
@GetMapping("/")
public String mainPage(Model model) {
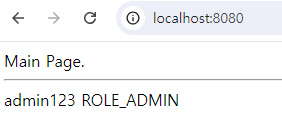
String id = SecurityContextHolder.getContext().getAuthentication().getName();
Authentication authentication = SecurityContextHolder.getContext().getAuthentication();
Collection<? extends GrantedAuthority> authorities = authentication.getAuthorities();
Iterator<? extends GrantedAuthority> iter = authorities.iterator();
GrantedAuthority auth = iter.next();
String role = auth.getAuthority();
model.addAttribute("id", id);
model.addAttribute("role", role);
return "main";
}
}-
SecurityContextHolder.getContext().getAuthentication().getName();- 현재 사용자의 ID(또는 이름)을 얻어올 수 있음.
-
SecurityContextHolder.getContext().getAuthentication();- SecurityContextHolder를 통해 Authentication 객체를 가져옴.
- Authentication 객체에는 현재 인증된 사용자의 세부 정보가 들어있음.
-
authentication.getAuthorities();- 사용자가 가진 권한 목록을 반환함.
-
과정.
- 사용자가 로그인 시도.
- 사용자가 로그인을 하면 Spring Security는 사용자 이름과 비밀번호를 기반으로 인증을 시도함.
- UserDetailsService 호출.
- Spring Security는 UserDetailsService의 loadUserByUsername() 메서드를 호출해서 사용자 정보를 가져옴.
- UserDetails 반환.
- UserDetailsService는 UserDetails 객체를 반환함.
- 해당 객체에는 사용자 이름, 비밀번호, 권한 정보 등이 포함되어 있음.
- Authentication 객체 생성.
- 반환된 UserDetails 객체를 기반으로 Authentication 객체가 생성됨.
- Authentication 객체의 getAuthorities() 메서드는 UserDetails에서 제공된 권한 정보를 반환함.
- 사용자가 로그인 시도.

- 로그인 전 화면.
- 로그인 후.
2. 세션 설정.
- 사용자가 로그인을 수행한 뒤 사용자 정보는 SecurityContextHolder에 의해서 서버 세션에서 관리됨.
- 세션에 관해 세션의 소멸 시간, 아이디당 세션 생성 개수 등을 설정.
- 세션 소멸 시간 설정.
- application 설정을 통해 세션 타임아웃 설정해서 로그인 이후 세션이 유지되고 소멸하는 시간을 설정할 수 있음.
- 세션 소멸 시점은 서버에 마지막 특정 요청을 수행한 뒤 설정한 시간 만큼 유지됨. (기본 시간 1800초)
application.properties
# 단위 : '초'
server.servlet.session.timeout=1800

# 단위 : '분' (끝에 m을 붙이면 됨.)
server.servlet.session.timeout=90m- 동일한 아이디로 다중 로그인을 진행할 경우에 대한 설정 방법은 세션을 통제하는 식으로 진행함.
@Bean
public SecurityFilterChain filterChain(HttpSecurity http) {
    http
        .sessionManagement(session -> session
            .maximumSessions(1)
            .maxSessionsPreventsLogin(true)
        );
    return http.build();
}- sessionManagement()
- 해당 메서드는 세션 관리를 설정하는 부분.
- maximumSessions(int maximumSessions)
- 한 사용자가 동시에 가질 수 있는 최대 세션 수를 설정하는 메서드.
- 즉 하나의 아이디에 대한 다중 로그인 허용 개수.
- maximumSessions(1)로 설정하면 한 명의 사용자는 하나의 세션만 유지할 수 있음.
- 해당 설정은 사용자가 동일한 계정으로 여러 로그인을 진행해서 생기는 여러 세션을 방지하고, 하나의 세션만 활성화되도록 제한.
- 한 사용자가 동시에 가질 수 있는 최대 세션 수를 설정하는 메서드.
- maxSessionsPreventsLogin(boolean maxSessionsPreventsLogin)
- 사용자가 이미 설정한 최대 세션 수에 도달했을 때 새로운 로그인 시도를 방지하는 설정.
- true로 설정할 경우.
- 사용자가 이미 최대 세션 수(이 예시에서는 1)에 도달한 경우 새로운 로그인은 거부되고, 기존 세션만 유지됨.
즉, 동시 로그인을 방지하고, 이미 활성화된 세션만 유지하도록 함.
- 사용자가 이미 최대 세션 수(이 예시에서는 1)에 도달한 경우 새로운 로그인은 거부되고, 기존 세션만 유지됨.
- false로 설정할 경우.
- 기존 세션이 삭제되고 새로운 로그인으로 만들어진 세션을 유지.
- 세션 고정 공격 보호
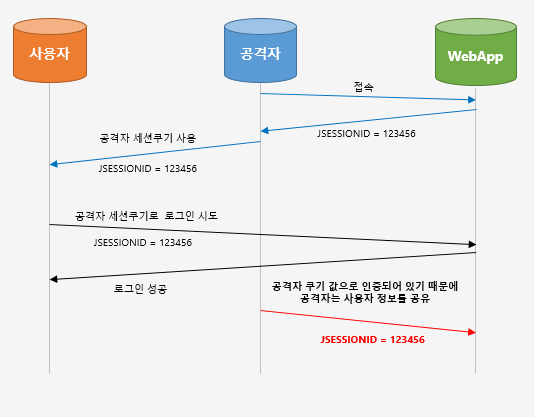
Ex- 공격자는 서버에 접속해서 하나의 JSESSIONID 쿠키 값을 얻음.
- 이후 공격자의 JSESSIONID를 XSS와 같은 공격을 통해 사용자의 브라우저에 심어둠.
- 사용자는 해커의 JSESSIOND가 브라우저에 심어진 채로 서버에 접속한다면 공격자의 세션이 로딩됨.
- 만약 사용자가 로그인을 한다면 해커의 JSESSIONID에 대한 세션에 인증이됨.
- 이후로 공격자가 서버에 접근하면 해당 사용자의 로그인 정보로 활동할 수 있음.
- 세션 고정 공격을 보호하기 위해서 로그인 성공시 세션 설정 방법은 sessionManagement() 메서드의 sessionFixation() 메서드를 통해서 설정할 수 있음.
- sessionManagement().sessionFixation().none()
- 로그인 시 세션 정보 변경 안함.
- sessionManagement().sessionFixation().newSession()
- 로그인 시 세션 새로 생성.
- sessionManagement().sessionFixation().changeSessionId()
- 로그인 시 동일한 세션에 대해 세션의 값은 그대로 유지되지만 ID만 변경.
@Bean
public SecurityFilterChain filterChain(HttpSecurity http) {
    http
        .sessionManagement((session) -> session
            .sessionFixation((sessionFixation) -> sessionFixation
                .newSession()
            )
        );
    return http.build();
}
3. CSRF 설정.
- CSRF(Cross-Site Request Forgery)
- 요청을 위조해서 사용자가 원하지 않는 요청을 서버측으로 강제로 보내는 방식
- 개발 환경에서는 시큐리티 설정을 통해 CSRF 설정을 disable로 할 수는 있어도 배포 환경에서는 CSRF 공격 방지를 위해 csrf disable 설정을 제거하고 추가적인 설정을 진행해야 함.
- CSRF를 방지할 수 있는 시스템을 구축하지 않은 상태에서 CSRF를 disable해버리면 클라이언트가 동작하지 않음.
- 스프링 시큐리티에서 CSRF의 기본값은 enable임.
- 스프링 시큐리티는 CSRF Filter를 통해 POST, PUT, DELETE 요청에 대해서 CSRF 토큰 검증을 진행함.
OST 요청에서 설정 방법.(mustache 기준)
<form action="/login" method="post" name="loginForm">
    <input type="text" name="username" placeholder="아이디"/>
    <input type="password" name="password" placeholder="비밀번호"/>
    <input type="hidden" name="_csrf" value="{{_csrf.token}}"/>
    <input type="submit" value="로그인"/>
</form>- 로그인 요청을 할 때 서버쪽서 받은 CSRF토큰을 로그인 요청과 함께 보내줘야됨.
히든 속성,<input>태그를 넣음.value="{{_csrf.token}}"- 서버측에서 받은 토큰.
ajax와 같이 비동기 상태 요청시
- HTML
<head>구획에 아래 요소 추가
<meta name="_csrf" content="{{_csrf.token}}"/>
<meta name="_csrf_header" content="{{_csrf.headerName}}"/>-
ajax 요청시 위의 content 값을 가져온 후 함께 요청
-
XMLHttpRequest 요청시 setRequestHeader를 통해
_csrf,_csrf_header Key에 대한 토큰 값 넣어 요청.
- 로그아웃.
- CSRF 설정시 POST 요청으로 로그아웃을 진행해야됨.
.logout() // 로그아웃 설정
    .logoutUrl("/logout") // 기본 로그아웃 URL
    .logoutSuccessUrl("/") // 로그아웃 성공 후 리다이렉트 URL
    .invalidateHttpSession(true) // 세션 무효화
    .deleteCookies("JSESSIONID");
- 하지만 아래 방식을 통해 GET 방식으로도 진행할 수 있음.
- CSRF 설정시 POST 요청으로 로그아웃을 진행해야됨.
@Bean
public SecurityFilterChain securityFilterChain(HttpSecurity http) throws Exception{

    http
            .logout((auth) -> auth.logoutUrl("/logout")
                    .logoutSuccessUrl("/"));

    return http.build();
}
@Controller
public class logoutController {
@GetMapping("/logout")
public String logout(HttpServletRequest request, HttpServletResponse response) throws Exception {
Authentication authentication = SecurityContextHolder.getContext().getAuthentication();
if(authentication != null) {
new SecurityContextLogoutHandler().logout(request, response, authentication);
}
return "redirect:/";
}
}spring.mustache.servlet.expose-request-attributes=true- application.properties에 위 코드를 작성하면 CSRF를 disable한 상황에서도 정상적으로 웹 서버를 구동할 수 있음.
- Mustache 템플릿에서 HttpServletRequest의 속성에 직접 접근할 수 있도록 허용하는 Spring Boot 설정.
※앱에서 사용하는 API 서버의 경우 보통 세션을 STATELESS로 관리하기 때문에 스프링 시큐리티 csrf enable 설정을 진행하지 않아도 됨.
4. In Memory 유저 정보 저장.
- 토이 프로젝트를 진행하거나 스프링 시큐리티로 로그인 환경을 구축하는 게 필요하지만 소수의 회원 정보만 있으면 돼서 데이터베이스라는 자원을 투자하기 힘든 경우는 회원가입 없는 InMemory 방식으로 유저를 저장.
- 소수의 유저를 저장할 좋은 방법.
- InMemoryUserDetailsManager 클래스를 통해 유저를 등록함.
@Configuration
@EnableWebSecurity
public class SecurityConfig {


					.....


	@Bean
    public UserDetailsService userDetailsService() {

        UserDetails user1 = User.builder()
                .username("userA")
                .password(bCryptPasswordEncoder().encode("user1"))
                .roles("USER")
                .build();

        UserDetails user2 = User.builder()
                .username("userB")
                .password(bCryptPasswordEncoder().encode("user2"))
                .roles("ADMIN")
                .build();

        return new InMemoryUserDetailsManager(user1, user2);
    }
}
5. Http Basic 인증 방식.
- Http Basic 인증 방식은 아이디와 비밀번호를 Base64 방식으로 인코딩한 뒤 HTTP 인증 헤더에 넣어서 서버측으로 요청을 보내는 방식.
@Bean
    public SecurityFilterChain filterChain(HttpSecurity httpSecurity) throws Exception {
        // throws Exception 적는 이유 : authorizeHttpRequests, build가 예외를 던지고 있음.
        httpSecurity

                		.....

                .formLogin((formLogin) -> formLogin
                        .loginPage("/login").loginProcessingUrl("/loginProc").permitAll()
                );
        return httpSecurity.build();
    }
↓ 수정된 코드
@Bean
    public SecurityFilterChain filterChain(HttpSecurity httpSecurity) throws Exception {
        // throws Exception 적는 이유 : authorizeHttpRequests, build가 예외를 던지고 있음.
        httpSecurity

                		.....

                .httpBasic(Customizer.withDefaults());
        return httpSecurity.build();
    }
/admin에 접근 시.
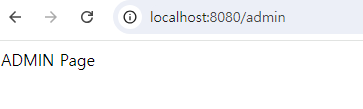
- 인증이 완료되면 admin페이지가 뜸.
6. 계층 권한. (RoleHierarchy)
- 권한 A, B, C가 존재하고 권한의 계층은
A < B < C라고 설정하고 싶을 경우 RoleHierarchy를 이용하면 됨.
기존 코드.
@Bean
    public SecurityFilterChain filterChain(HttpSecurity httpSecurity) throws Exception {
        // throws Exception 적는 이유 : authorizeHttpRequests, build가 예외를 던지고 있음.
        httpSecurity
                // CSRF 비활성화.
                .csrf((csrf) -> csrf.disable()
                )
                .authorizeHttpRequests((authorize) -> authorize
                        .requestMatchers("/login").permitAll()
                    	.requestMatchers("/").hasAnyRole("A", "B", "C")
                    	.requestMatchers("/manager").hasAnyRole("B", "C")
                    	.requestMatchers("/admin").hasAnyRole("C")
                )
                // 권한이 필요한 URL 요청 시 /login으로 리다이렉트 시킴.
                .httpBasic(Customizer.withDefaults());

        return httpSecurity.build();
}- RoleHierarchy를 통해 권한을 계층적으로 분리.
@Bean
public RoleHierarchy roleHierarchy() {

    RoleHierarchyImpl hierarchy = new RoleHierarchyImpl();

    hierarchy.setHierarchy("ROLE_C > ROLE_B\n" +
            			   "ROLE_B > ROLE_A");

    return hierarchy;
}- setHierarchy 메서드는 개행 문자를 기준으로 각 권한을 분리하여 내부적으로 계층 구조를 설정함.
수정된 코드.
    @Bean
    public SecurityFilterChain filterChain(HttpSecurity httpSecurity) throws Exception {
        // throws Exception 적는 이유 : authorizeHttpRequests, build가 예외를 던지고 있음.
        httpSecurity
                // CSRF 비활성화.
                .csrf((csrf) -> csrf.disable()
                )
                .authorizeHttpRequests((authorize) -> authorize
                        .requestMatchers("/login").permitAll()
                    	.requestMatchers("/").hasAnyRole("A")
                    	.requestMatchers("/manager").hasAnyRole("B")
                    	.requestMatchers("/admin").hasAnyRole("C")
                    	.anyRequest().authenticated()
                )
                // 권한이 필요한 URL 요청 시 /login으로 리다이렉트 시킴.
                .httpBasic(Customizer.withDefaults());

        return httpSecurity.build();
    }
6-1. Deprecated. (6.3부터)
- 변경된 RoleHierarchyImpl() 방식 사용.
- fromHierarchy 메소드 활용.
@Bean
public RoleHierarchy roleHierarchy() {

    return RoleHierarchyImpl.fromHierarchy(
    		 """
             ROLE_C > ROLE_B
             ROLE_B > ROLE_A
             """
            );
}- 메소드 형식.
- 명시적으로 접두사 작성.
@Bean
public RoleHierarchy roleHierarchy() {

    return RoleHierarchyImpl.withRolePrefix("접두사_")
            .role("C").implies("B")
            .role("B").implies("A")
            .build();
}- 메소드 형식.
- 자동으로 ROLE_ 접두사 붙임.
@Bean
public RoleHierarchy roleHierarchy() {

    return RoleHierarchyImpl.withDefaultRolePrefix()
            .role("C").implies("B")
            .role("B").implies("A")
            .build();
}
Every cloud has a silver lining.ㅤㅤㅤㅤㅤㅤㅤㅤㅤhttps://blog.naver.com/ha_jju_