1. 수정 과정.
- 작성한 글을 수정하려면 일단 해당 글을 불러와서 수정할 수 있는 입력 상태로 만들어야 함.
- 그 후 수정을 완료하고 등록하면 DB에 반영돼서 수정이 완료됨.
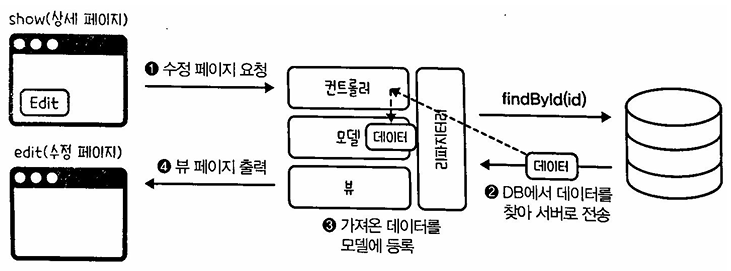
수정을 위해 기존 데이터를 불러오는 과정
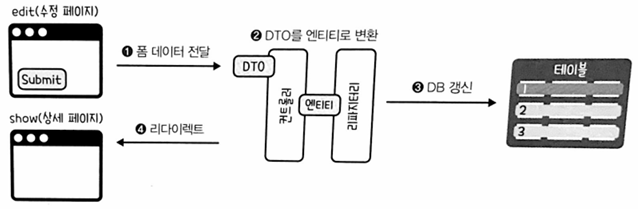
수정된 데이터가 DB로 업데이트 되는 과정
2. 수정 페이지.
- 우선
글 상세 페이지에 아래의 코드를 추가해서수정 버튼을 만들어줌.
<a href="/articles/{{article.id}}/edit" class="btn btn-success">수정</a>Ex1번 글을 수정할 경우/articles/1/edit, 2번 글을 수정할 경우/articles/2/edit이 됨.href속성 값의URL을 보면id가article의 속성이라서{{article.id}}로 표시했음.- 일반적으로
{{#article}} {{/article}}과 같이 사용 범위를 지정한 경우{{id}}로 사용하면 되지만, 지정하지 않았을 경우.을 사용해서{{article.id}}형식으로 표시해야 됨.
- 일반적으로
2-1. 수정 컨트롤러.
@GetMapping("/articles/{id}/edit")
public String edit(@PathVariable Long id, Model model) {
    Article articleEntity = articleRepository.findById(id).orElse(null);
    model.addAttribute("article", articleEntity);
    return "articles/edit";
}@GetMapping("/articles/{id}/edit")글 상세 페이지파일에서/articles/{{article.id}}/edit이 주소로 연결 요청을 했으므로 형식을 맞춰서 작성해줬음.
@PathVariable Long id@GetMapping의 URL에 있는{id}변수를매개변수로 받아옴.
articleRepository.findById(id).orElse(null);id를 통해서 데이터를 찾아오고, 만약 데이터가 없다면null을 반환.
Model model모델을 사용하기 위해서 매개변수로model객체를 받아옴.
model.addAttribute("article", articleEntity);- DB에서 데이터를 가져왔으니
뷰 페이지에서 해당 데이터를 사용할 수 있도록모델에 데이터를 등록함. article이름으로articleEntity을 등록.
- DB에서 데이터를 가져왔으니
return "articles/edit";뷰 페이지설정.
2-2. 수정 폼.
수정 폼의 경우 글을 작성하는입력 폼과 유사함.입력 페이지의 코드를 약간 변형해서 사용.
<a href="/articles/{{article.id}}" class="btn btn-warning">뒤로가기</a>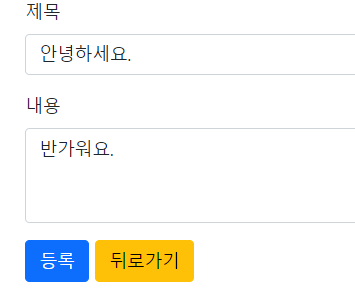
- 먼저
수정 페이지에뒤로가기버튼을 생성해줌.모델에article을 등록해놨기 때문에article에점(.)을 찍어서article.id라고 써주면 해당id값을 추출해서 URL로 사용할 수 있음.
<label class="form-label">제목</label>
<input type="text" class="form-control" name="title" value="{{title}}">
<label class="form-label">내용</label>
<textarea class="form-control" rows="3" name="content">{{content}}</textarea>
수정 페이지에 제목, 내용이 보일 수 있도록
<input>태그의value="{{article.title}}"속성 추가,
<textarea>태그의콘텐트 영역에{{article.content}}추가.<input>태그로 생성한 입력 요소의초깃값은value속성으로 정의하지만,<textarea>태그로 생성한 여러 줄의 입력 요소는콘텐트 영역에초깃값을 정의함.
        <label class="form-label">제목</label>
        <input type="text" class="form-control" name="title" value="{{article.title}}">

        <label class="form-label">내용</label>
        <textarea class="form-control" rows="3" name="content">{{article.content}}</textarea>

<a href="/articles/{{article.id}}" class="btn btn-warning">뒤로가기</a>- 현재의 코드는 3곳에
article.이 중복되어 있음.- 범위를 지정해서 해결가능.
{{#article}}
<form...>
<!-- 코드 생략 -->
        <label class="form-label">제목</label>
        <input type="text" class="form-control" name="title" value="{{title}}">
<!-- 코드 생략 -->
        <label class="form-label">내용</label>
        <textarea class="form-control" rows="3" name="content">{{content}}</textarea>
<!-- 코드 생략 -->
    <a href="/articles/{{id}}" class="btn btn-warning">뒤로가기</a>
</form>
{{/article}}
<form> ~ </form>태그 위, 아래에{{#article}} {{/article}}을 적어줌으로써 사용 범위를 지정했음.
3. 수정 데이터를 DB에 갱신.
- 수정한 데이터를
DB에 반영한 후 결과를 볼 수 있게상세 페이지로리다이렉트하기.
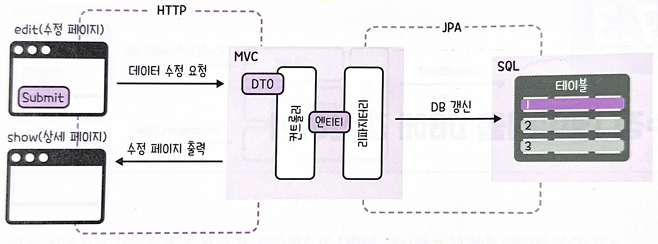
3-1. 클라이언트와 서버간 처리 흐름.
클라이언트와서버간 처리 흐름을 크게 4가지기술로 나누면.MVC(Model-View-Controller)- 서버 역할을 분담해 처리하는 기법.
JPA(Java Persisitence API)- 서버와 DB간 소통에 관여하는 기술.
SQL(Structured Query Language)- DB 데이터를 관리하는 언어.
HTTP(HyperText Transfer Protocol)- 데이터를 주고 받기 위한 통신 규약.
3-2. HTTP 메서드.
클라이언트와서버간에 데이터를 전송할 때는 다양한 통신 규악, 즉프로토콜(protocol)을 따름.프로토콜(protocol)은 컴퓨터 간에 원활하게통신하기 위해사용하는 전 세계 표준임.- 기기 간에 각종 신호 처리 방법, 오류 처리, 암호, 인증 방식 등을 규정하고 있어서 이를 따라야만 오류가 발생하거나 지연되는 일이 없이 원활하게 통신할 수 있음.
프로토콜종류는 다양함.- 파일 전송을 위한
FTP(File Transfer Protocol) - 이메일 전송을 위한
SMTP(Simple Mail Transfer Protocol)등 기기와 목적에 따라 구분해서 사용.
- 파일 전송을 위한
HTTP(HyperText Transfer Protocol)는 그중에서웹 서비스에 사용하는프로토콜.클라이언트의 다양한요청을메서드를 통해서버로 보내는 역할.- 대표적인 메서드로는
POST,GET,PATCH(PUT),DELETE가 있음.POST: 데이터생성요청.GET: 데이터조회요청.PATCH(PUT): 데이터수정요청.DELETE: 데이터삭제요청.- 간단히
CRUD(Create Read Update Delete)라고 함. - 이러한
CRUD는 SQL문으로 적용할 수 있고HTTP의 메서드에도 그대로 적용됨.
- 간단히
3-3. 수정 페이지 변경.
수정 페이지코드에서 눈여겨봐야할 부분은<form>태그의action과method속성임.action속성은폼 데이터를 어디로 보낼지URL을 지정하고,method속성은 어떻게 보낼 지 방식을 지정함.
<form class="container" action="/articles/update" method="post">action속성 값으로 수정한폼 데이터를"/articles/update"로 보내고,method속성 값은"post"
- 데이터 수정 요청을 보내야하는데 왜
PATCH가 아닌POST를 사용할까?- 그 이유는
<form>태그가 옛날에 많들어진 규격이라PATCH메서드를 지원하지 않기 때문. <form>태그는GET,POST메서드만 지원함.PATCH메서드를 지정할 수 있는 다른 방법이 있긴 하지만POST메서드로 데이터를 수정하기로.
- 그 이유는
수정 폼에서서버로 보낼 데이터가 하나 더 있음.id가 몇 번인지 알려줘야x번 article을 수정할 수 있음.<input>태그를 만들어서value={{id}}속성을 추가.id는 화면에 표시할 필요가 없으니type="hidden"속성을 추가해서 보이지 않게 처리.
<form class="container" action="/articles/update" method="post">
<input name="id" type="hidden", value="{{id}}">- 이렇게 하면
수정 폼으로제목(title),내용(content), 히든 속성인아이디(id)를서버에 전송할 수 있음.
3-4. 수정 데이터 받기.
@PostMapping("/articles/update")
    public String update(ArticleForm form) {
        Article articleEntity = form.toEntity();
        Article target = articleRepository.findById(articleEntity.getId()).orElse(null);
        if (target != null) {
            articleRepository.save(articleEntity);
        }
        return "redirect:/articles/" + articleEntity.getId();
}@PostMapping("/articles/update")- 데이터 수정 요청을 처리하는 메서드이므로
@PatchMapping()을 사용해야 하지만, 앞서POST방식으로 요청을 받았기 때문에PostMapping()으로 처리. ()안에수정 폼의action속성에서 작성한"/articles/update"그대로 작성.
- 데이터 수정 요청을 처리하는 메서드이므로
public String update(ArticleForm form)- 해당 메서드는
클라이언트의 데이터 수정 요청을 수행함. 수정 폼에서 전송한 데이터는DTO로 받음.- 따라서
매개변수로DTO받아오기.
- 해당 메서드는
Article articleEntity = form.toEntity();DTO->Entity변환.
articleRepository.findById(articleEntity.getId()).orElse(null);articleEntity.getId()을 통해서DB에서 기존 데이터를 가져옴.
if (target != null)- 기존 데이터가 있다면
save()메서드를 호출해서articleEntity에 저장된 내용을DB에 갱신시킴.
- 기존 데이터가 있다면
return "redirect:/articles/" + articleEntity.getId();수정 페이지에서"/articles/update"요청을 보냄 ->서버에서 DB 데이터 업데이트 ->글 상세 페이지로 리다이렉트 해줌.- 즉,
redirect:/articles/{id}
4. 참고하기

Every cloud has a silver lining.ㅤㅤㅤㅤㅤㅤㅤㅤㅤhttps://blog.naver.com/ha_jju_