진행중인 개인프로젝트가 마무리 되면서
API문서화를 함께 진행해보려고 한다.
Swagger는 예전에 한두번 사용해본 적 있었는데,
설정이 간단한 만큼 Production 코드에 지나치게
Swagger관련된 코드가 들어가게 되어서 개인적으로는 좋아하는 라이브러리는 아니다.
이번에는 프로젝트에 RestDocs를 적용하면서
삽질하는 과정을 함께 공유하며 정리해볼 생각이다.
설정
기본적인 설정은 아래블로그를 참고했다. 정리가 아주 잘 되어있다.
https://velog.io/@chaerim1001/Spring-Rest-Docs-%EC%82%AC%EC%9A%A9%ED%95%98%EA%B8%B0-AsciiDoc-%EB%AC%B8%EB%B2%95
build.gradle
plugins {
    id "org.asciidoctor.jvm.convert" version "3.3.2"  // (1)
}

configurations {
    asciidoctorExt // (2)
}

dependencies {
    asciidoctorExt 'org.springframework.restdocs:spring-restdocs-asciidoctor' // (3)
    testImplementation 'org.springframework.restdocs:spring-restdocs-mockmvc' // (4)
}

ext {
    snippetsDir = file('build/generated-snippets') // (5)
}

tasks.named('test') {
    useJUnitPlatform()
    outputs.dir snippetsDir // (6)
}

asciidoctor {
    configurations 'asciidoctorExt' // (7)
    baseDirFollowsSourceFile() // (8)
    inputs.dir snippetsDir // (9)
    dependsOn test // (10)
}

asciidoctor.doFirst {
    delete file('src/main/resources/static/docs')  // (11)
}

task copyDocument(type: Copy) { // (12)
    dependsOn asciidoctor
    from file("build/docs/asciidoc")
    into file("src/main/resources/static/docs")
}

build {
    dependsOn copyDocument // (13)
}
RESTDocs는 테스트코드를 기반으로 성공한 테스트에 한해서
문서화가 이루어지므로 아래와 같이 테스트코드를 작성해본다.
테스트코드의 기본 세팅은
https://docs.spring.io/spring-restdocs/docs/current/reference/htmlsingle/
#Generating Documentation Snippets 부분을 참고하여 작성하였다.
CourseControllerDocTest
import org.junit.jupiter.api.BeforeEach;
import org.junit.jupiter.api.DisplayName;
import org.junit.jupiter.api.Test;
import org.junit.jupiter.api.extension.ExtendWith;
import org.springframework.boot.test.context.SpringBootTest;
import org.springframework.http.MediaType;
import org.springframework.restdocs.RestDocumentationContextProvider;
import org.springframework.restdocs.RestDocumentationExtension;
import org.springframework.test.web.servlet.MockMvc;
import org.springframework.test.web.servlet.setup.MockMvcBuilders;
import org.springframework.web.context.WebApplicationContext;

import static org.springframework.restdocs.mockmvc.MockMvcRestDocumentation.document;
import static org.springframework.restdocs.mockmvc.MockMvcRestDocumentation.documentationConfiguration;
import static org.springframework.test.web.servlet.request.MockMvcRequestBuilders.get;
import static org.springframework.test.web.servlet.result.MockMvcResultMatchers.status;

/**
 * CourseController - 문서화작업을 위한 테스트 클래스
 * 테스트 성공시 asciidoc에 추가됨
 */
@SpringBootTest
@ExtendWith(RestDocumentationExtension.class)
@DisplayName("[RESTDocs] CourseControllerDocTest")
public class CourseControllerDocTest {

    private MockMvc mockMvc;

    @BeforeEach
    //RESTDoc에 알맞는 설정을 MockMvc에 추가
    void setUp(WebApplicationContext webApplicationContext, RestDocumentationContextProvider restDocumentation) {
        this.mockMvc = MockMvcBuilders.webAppContextSetup(webApplicationContext)
                .apply(documentationConfiguration(restDocumentation))
                .build();
    }

    @Test
    @DisplayName("restDoc 설정테스트")
    void DocTest() throws Exception{
        //given
        //nothing

        // when&then
        this.mockMvc.perform(get("/").accept(MediaType.APPLICATION_JSON))
                // 문서에는 isOk()였으나 rootPath를 따로 만들지 않았으므로 is4xxClientError로 변경
                .andExpect(status().is4xxClientError())
                .andDo(document("index"));
    }
}
* static import가 가끔 원하는대로 동작하지 않아서
편의를 위해 사용하는 import구문까지 전부 복사했다.
테스트가 성공하면
build 하위 패키지에
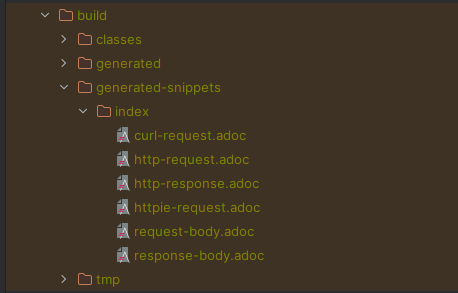
위와 같은 asciidoc 파일이 생성된다.
일단 설정은 생각보다 쉽게 적용된것 같다.
테스트코드 작성
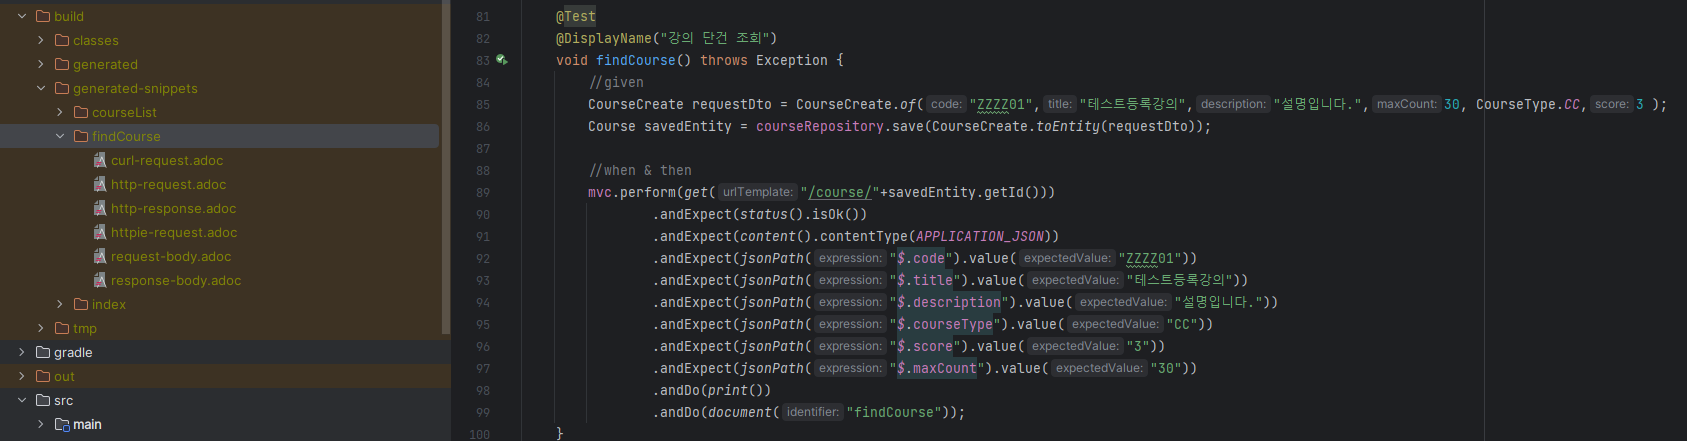
강의 단건 조회에 대해서 테스트를 작성하였고,
테스트가 성공했다.
테스트코드의 마지막에 document("findCourse") 라는 코드로 인해
테스트가 성공함에 따라서 generated-snippets 하위 패키지에
findCourse라는 패키지가 생성되었고, adoc 파일이 생성되었음이 확인된다.
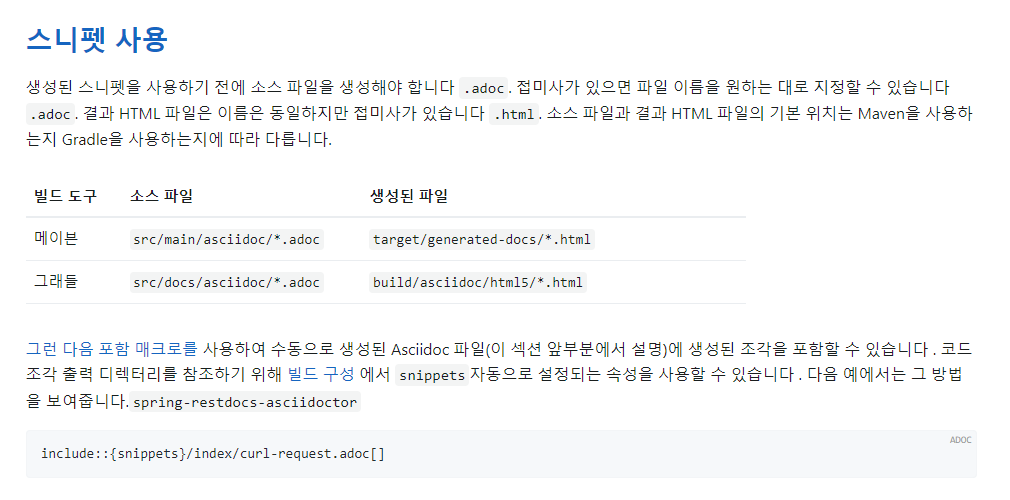
하지만
asciidoc 파일만으로는 부족하다
해당 .adoc 파일은 빌드된 결과물일 뿐이고,
우리는 해당 결과를 html로 변환을 하여
html파일과 함꼐 빌드되어서 다른사람들과 공유하기를 원한다.
현재 진행중인 프로젝트는 gradle로 되어있으므로
1. src/docs/asciidoc 패키지를 생성 한 후
2. .adoc 파일을 생성
3. include::{snipeets}/index/curl-request.adoc[] 이라는 코드를 한줄 추가해준다.
옆에 뭔가 예쁘게 뜬다!
이쯤되면 버전이 안맞고 알 수 없는 이유로 삽질을 해야하는데
생각보다 일이 매우 잘 풀리고 있다!!
빌드하고 결과 확인하기
.adoc 파일을 까지는 성공적으로 만들어졌다.
build시점에 html파일로 변환이 잘 되는지 확인할 차례이다.
build.gradle
asciidoctor.doFirst {
    delete file('src/main/resources/static/docs')  // (11)
}

task copyDocument(type: Copy) { // (12)
    dependsOn asciidoctor
    from file("build/docs/asciidoc")
    into file("src/main/resources/static/docs")
}
build.gradle에 설정한 경로에 html파일이 생성되기를 기대하며
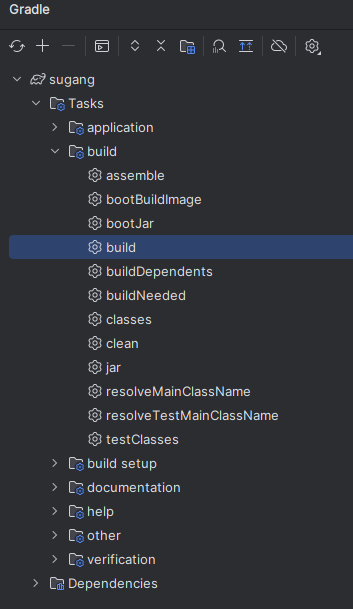
grdle 메뉴에서 build를 누른다.
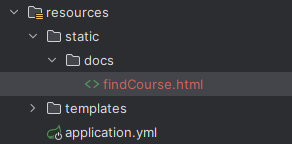
원하는 경로에 html파일이 생성된 모습!
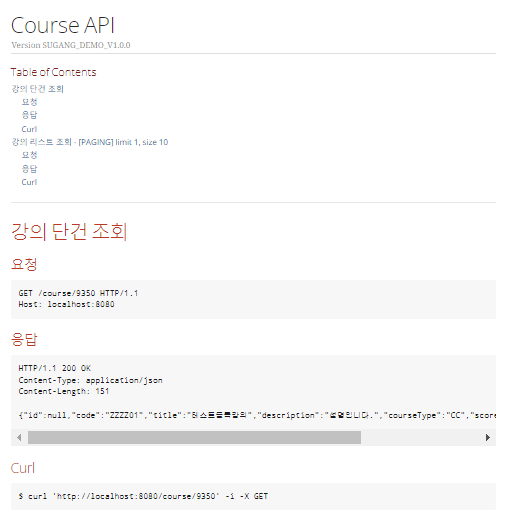
서버를 띄우고 해당 html 문서의 url을 입력한다.
http://localhost:8080/docs/findCourse.html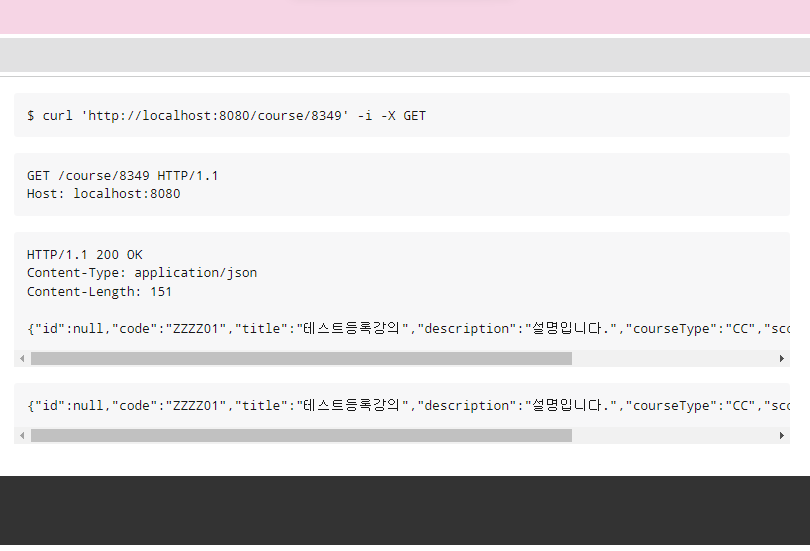
예쁘게 나오는 모습!
참고로 아래 footer처럼 생긴 까만줄에는
build.gradle에서 설정한 버전정보와
LastUpdated 일시가 기록되어있다.(그리니치 천문대 시간 + 09:00 형태의 Format이다.)
사실 이정도까지만 해도 뭐 충분하다고 생각할 수도 있다.
이왕 개인프로젝트에서 제대로 한번 가지고 놀아보자 라는 마음으로 접근하고 있기 때문에,
그리고 마침 괜찮은 레퍼런스가 있기 때문에
조금 더 재밌게 놀아보려고 한다.
이왕 쓰는거 좀 이쁘게, 멋있게 써보자
backend 개발자이고 JSON 데이터만 있으면 뭐든 한다지만,
그래도 너무 허전하다
또한 호돌맨님의 말씀을 빌려 말하자면 "간지가 안난다."
특히 요청값이 URI가 localhost인 경우,
'개발을 잘 못하나?'라는 오해를 살 수도 있다.
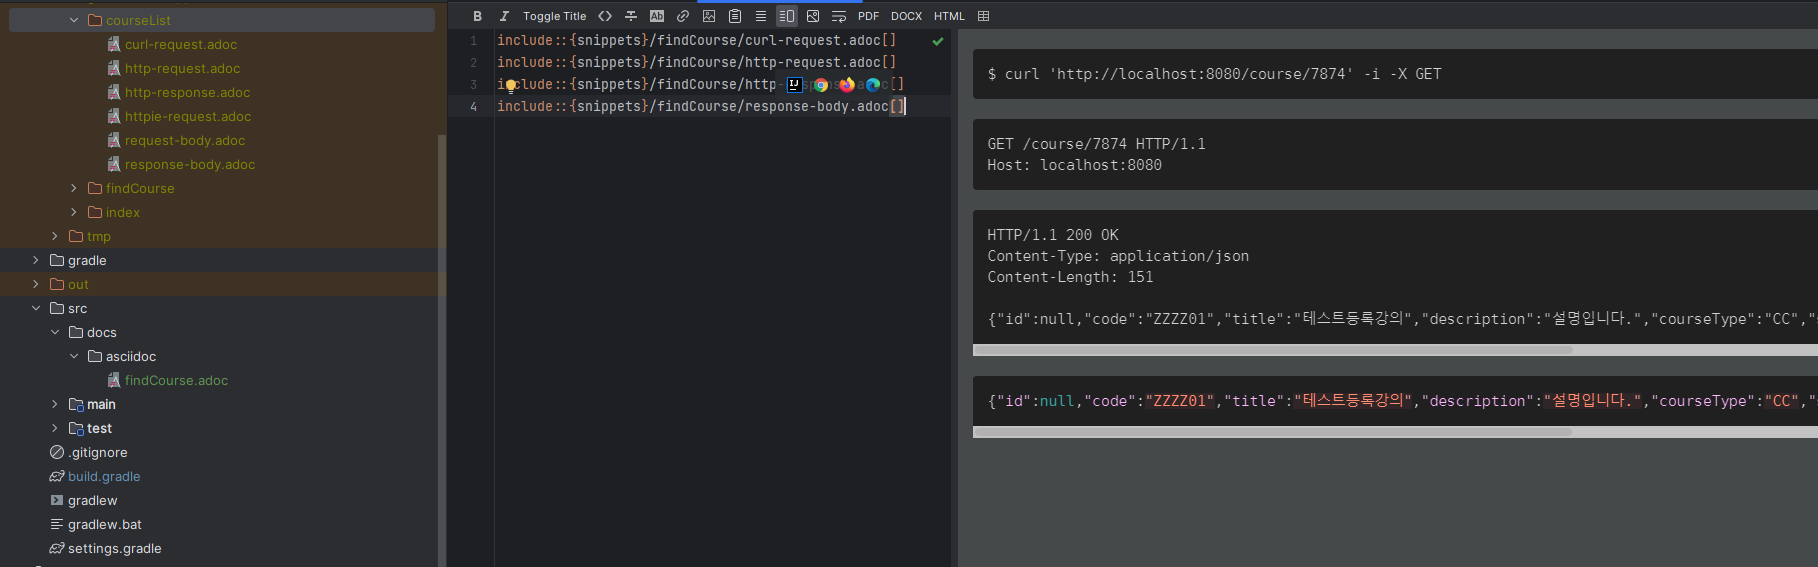
우선 기존의 asciidoc 파일을 아래처럼 바꾼다.
* '='는 asciidoc의 문법으로 글자를 목차별로 큰 글씨로 만들어주는 역할을 수행하고
* :toc:는 해당 목차를 리스트로 뿌려주는 역할을 수행한다.
= Course API
:toc:

== 강의 단건 조회

=== 요청

include::{snippets}/findCourse/http-request.adoc[]

=== 응답

include::{snippets}/findCourse/http-response.adoc[]

=== Curl

include::{snippets}/findCourse/curl-request.adoc[]
또한
asciidoc을 생성할 테스트 코드에
@AutoConfigureRestDocs 어노테이션을 추가해준다.
해당 어노테이션을 통해 uriSchme, port, domain명 등을 지정해 줄 수 있다.
@SpringBootTest
@ExtendWith(RestDocumentationExtension.class)
@AutoConfigureRestDocs(uriScheme = "https", uriHost = "api.hanaSugang.com", uriPort = 443) // 추가
@DisplayName("[RESTDocs] CourseControllerDocTest")
public class CourseControllerDocTest {
	// 생략

}
테스트코드를 실행하고 다시한번 빌드하고 결과를 확인한다.
제법 그럴싸해졌다.
하지만 여전히 dns는 localhost이고,
port며 scheme등이 변하지 않았다.
원인는 테스트코드의 mock객체를 초기화해주는 시점에 있었다.
처음 RestDocs 테스트코드를 작성 할 때 SpringIO의 restDocs 문서를 참고하였는데
이때
@BeforeEach
    //RESTDoc에 알맞는 설정을 MockMvc에 추가
    void setUp(WebApplicationContext webApplicationContext, RestDocumentationContextProvider restDocumentation) {
        this.mockMvc = MockMvcBuilders.webAppContextSetup(webApplicationContext)
                .apply(documentationConfiguration(restDocumentation))
                .build();
    }
해당 코드가 어떠한 말썽을 일으키는것 처럼 보인다.
@SpringBootTest
@ExtendWith(RestDocumentationExtension.class)
@AutoConfigureMockMvc //추가
@AutoConfigureRestDocs(uriScheme = "https", uriHost = "api.hanaSugang.com", uriPort = 443)
@DisplayName("[RESTDocs] CourseControllerDocTest")
public class CourseControllerDocTest {

    @Autowired //추가
    private MockMvc mvc;
    @Autowired
    private MemberRepository memberRepository;
    @Autowired
    private CourseRepository courseRepository;
    @Autowired
    private CourseCountRepository courseCountRepository;

    @BeforeEach
    void before() {
        memberRepository.deleteAll();
        courseRepository.deleteAll();
        courseCountRepository.flushAll();
    }
}
다음과 같이 MockMvc를 @Autowired와 @AutoConfigureMockMvc 어노테이션을 통해 주입해주고
@BeforeEach에 있던 MockMvc 생성자 코드를 삭제하였다.
테스트를 성공시키고
build를 해준다음
서버를 다시한번 띄워준 후 html 파일을 다시한번 살펴보자
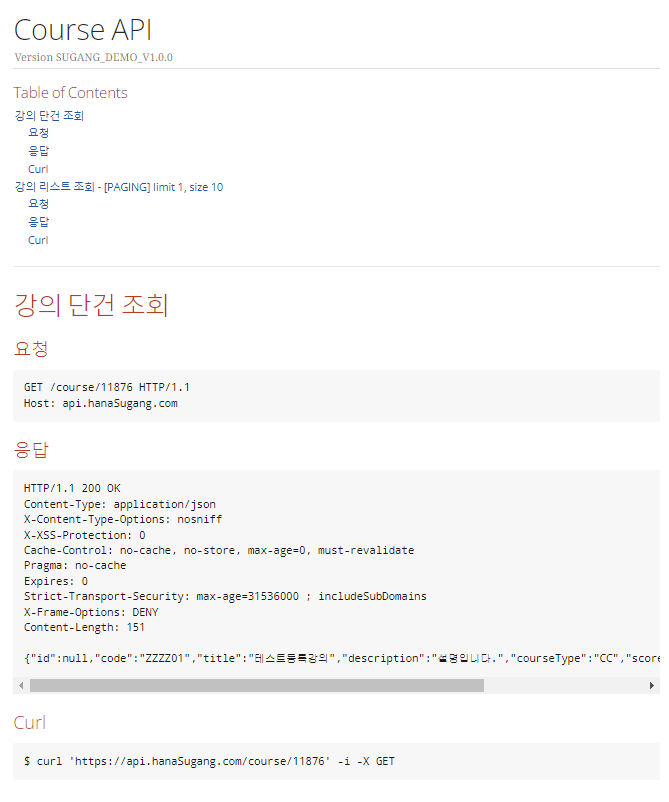
URL정보가 변한것을 확인할 수 있다!
조금만 더 나아가서
JSON형태의 응답값을 조금만 더 알기쉽게 변경해본다.
테스트코드에서 문서화 추가작업
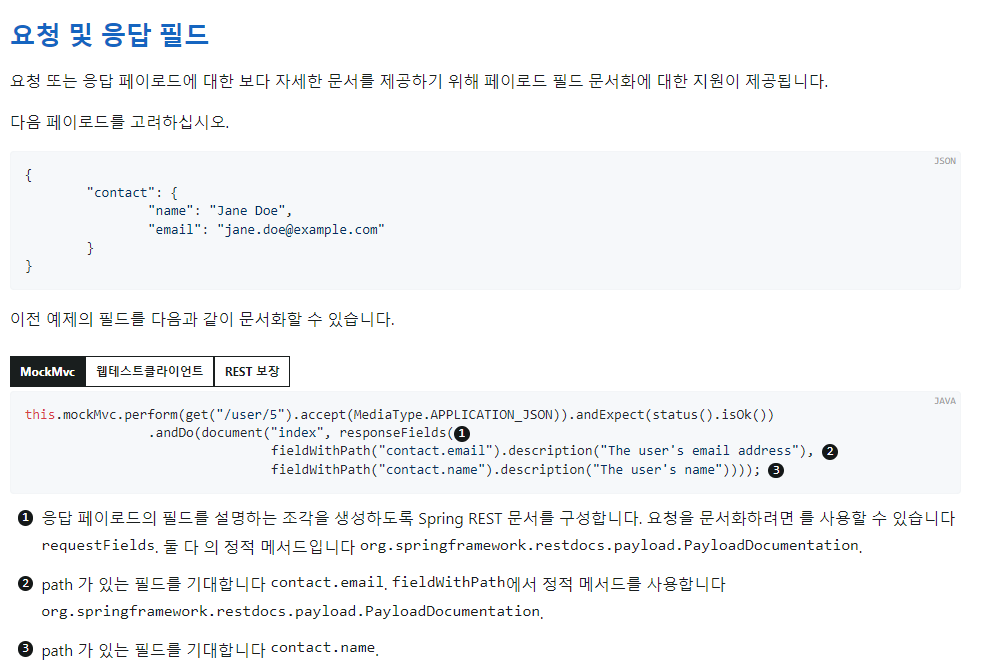
위 문서를 참고하여 테스트코스를 더 구체화 시켜본다.
@Test
@DisplayName("강의 단건 조회")
void findCourse() throws Exception {
    //given
    CourseCreate requestDto = CourseCreate.of("ZZZZ01","테스트등록강의","설명입니다.",30, CourseType.CC,3 );
    Course savedEntity = courseRepository.save(CourseCreate.toEntity(requestDto));
    //when & then
    mvc.perform(RestDocumentationRequestBuilders.get("/course/{id}", savedEntity.getId()))
            .andExpect(status().isOk())
            .andExpect(content().contentType(APPLICATION_JSON))
            .andExpect(jsonPath("$.code").value("ZZZZ01"))
            .andExpect(jsonPath("$.title").value("테스트등록강의"))
            .andExpect(jsonPath("$.description").value("설명입니다."))
            .andExpect(jsonPath("$.courseType").value("CC"))
            .andExpect(jsonPath("$.score").value("3"))
            .andExpect(jsonPath("$.maxCount").value("30"))
            .andDo(print())
            //RESTDocs 필드 추가
            .andDo(document("findCourse",
                    RequestDocumentation.pathParameters(
                            RequestDocumentation.parameterWithName("id").description("강의 Id")
                    ),
                    PayloadDocumentation.responseFields(
                            //모든 jsonBody내용을 입력해야 테스트가 통과됨
                            PayloadDocumentation.fieldWithPath("id").description("강의Id"),
                            PayloadDocumentation.fieldWithPath("code").description("강의코드"),
                            PayloadDocumentation.fieldWithPath("title").description("강의명"),
                            PayloadDocumentation.fieldWithPath("description").description("강의설명"),
                            PayloadDocumentation.fieldWithPath("courseType").description("교양/전공타입"),
                            PayloadDocumentation.fieldWithPath("score").description("학점"),
                            PayloadDocumentation.fieldWithPath("currentCount").description("현재수강인원"),
                            PayloadDocumentation.fieldWithPath("maxCount").description("최대수강인원")
                    )
            ));
}
주의할점은 responseFields에는 모든 응답 데이터가 들어가 있어야 테스트가 성공한다.
테스트코드의 품질을 높히고 정확한 문서화를 위해 선택한 RESTDocs의 전략이 아닌가 싶다.
테스트코드에 성공하면
이전에 없던 asciidoc 파일들이 생성된다.(path-parameters.adoc, response-fields.adoc 등)

해당 파일들을 src/docs 하위에 있는 asciidoc 파일에 include 시켜준다.
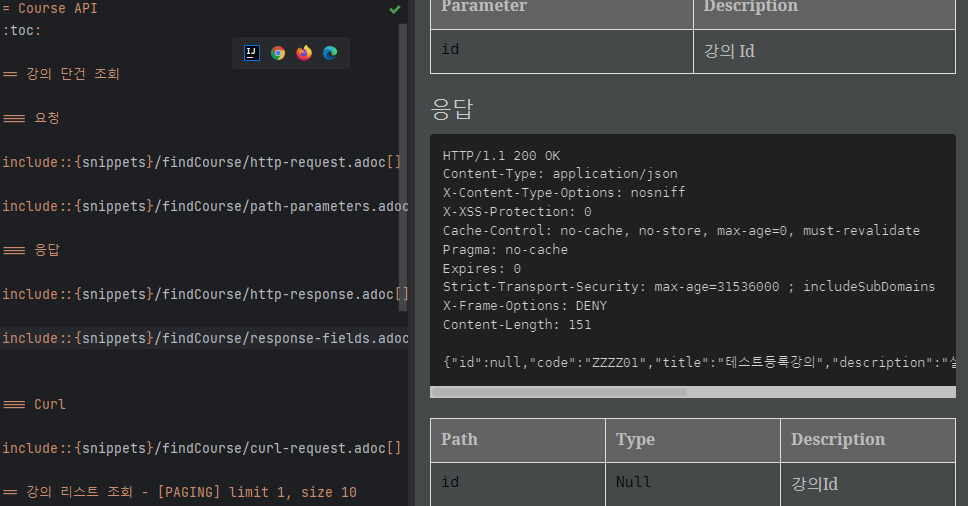
다시한번 테스트케이스를 성공시키고,
빌드 후 서버를 재실행 시켜본다.

RESTApi문서가 훨씬 다채로워졌다!
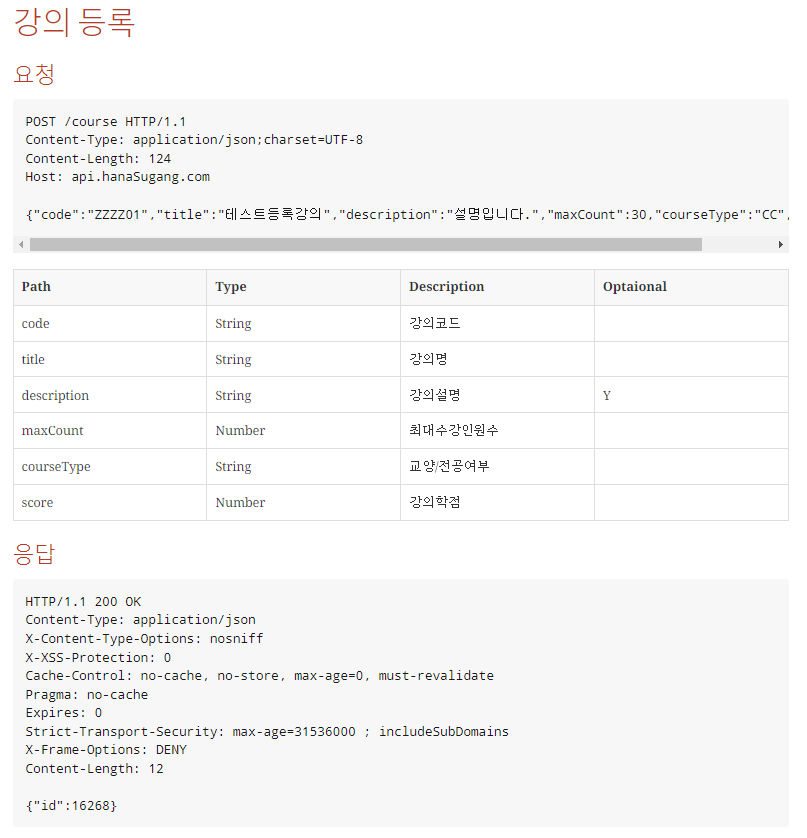
마지막으로 한가지만 더
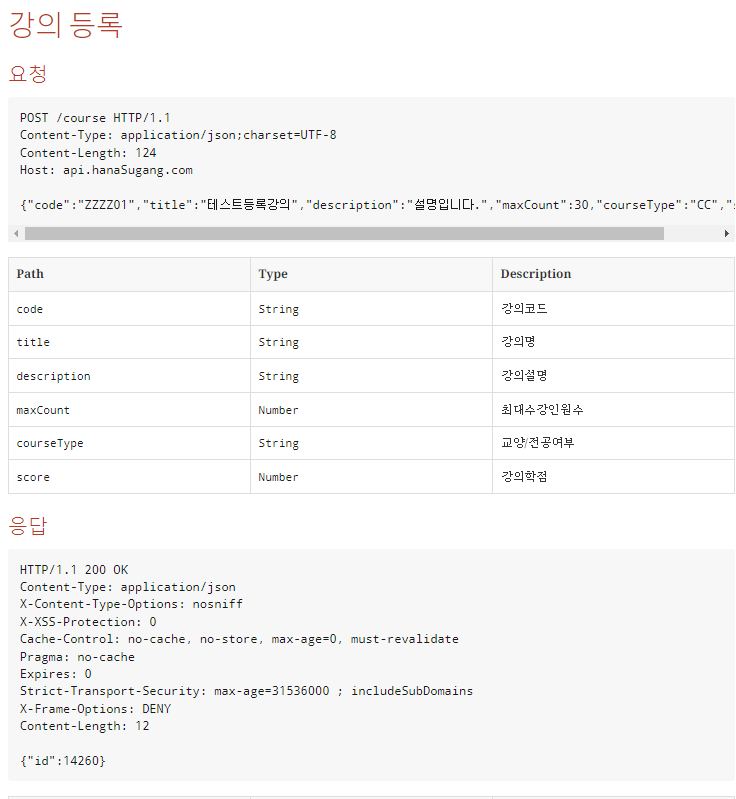
강의등록에 대한 API문서이다.
requestBody의 정보를 충분히 표현하고 있지만
현재 api스펙상 title(강의명)은 필수값인데 비해,
description(강의설명) 필드는 필수입력값이 아니다.
이를 표현해주고 싶다.
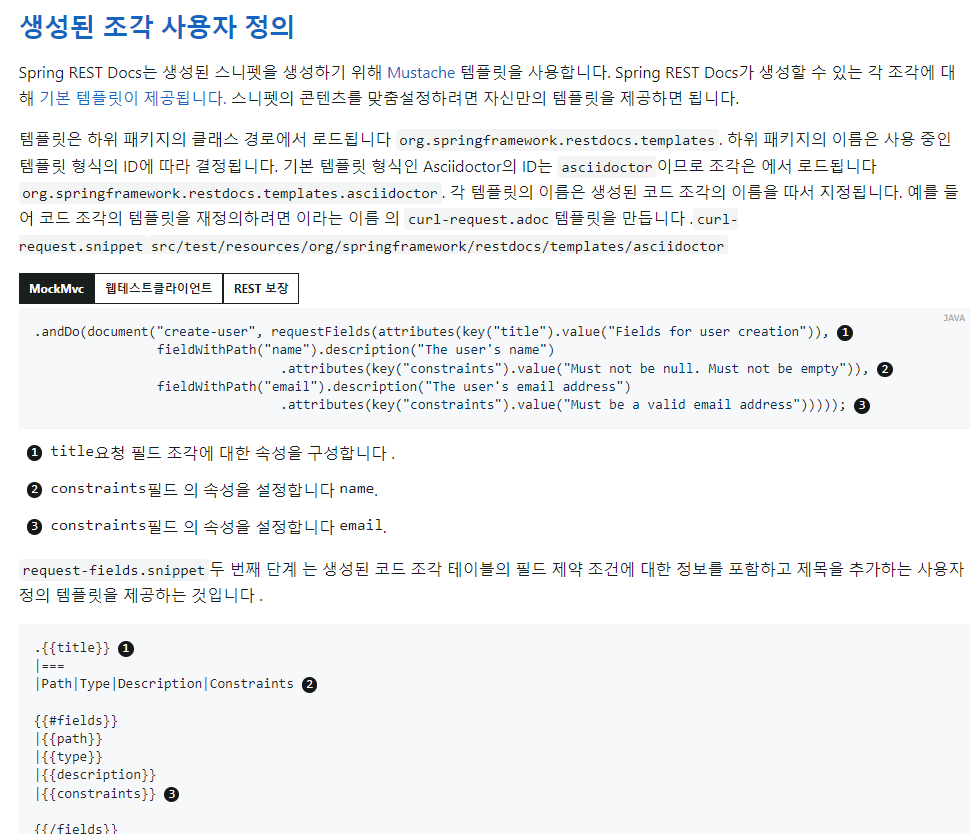
- src/test/resources 하위에 저 긴 경로명의 패키지를
- request-fields.snippet 파일을 만든다.
- 예제를 참고하여 작성해준다.
request-fidels.snippet
|===
    |Path|Type|Description|Optaional|Constraint

{{#fields}}
    |{{path}}
    |{{type}}
    |{{description}}
    |{{#optional}}Y{{/optional}}
    |{{#constraint}}{{.}}{{/constraint}}

{{/fields}}
|===
대충 기존에는 명세에는 Path | Type | Description 세가지 항목을 보여주었는데
Optional항목을 추가,
필드값으로 {#optional} value가 true 인경우에만 Y로 출력하게 설정,
{#constraint} 값이 존재하면 출력하고 아니면 공백으로 나오게 설정하였다.
CourseControllerDocTest
@Test
@DisplayName("강의 등록")
void saveCourse() throws Exception {
    //given
    CourseCreate requestDto = CourseCreate.of("ZZZZ01","테스트등록강의","설명입니다.",30, CourseType.CC,3 );
    String json = objectMapper.writeValueAsString(requestDto);
    //when
    mvc.perform(RestDocumentationRequestBuilders.post("/course")
                    .contentType(APPLICATION_JSON)
                    .content(json)
            )
            .andExpect(status().isOk())
            .andDo(document("createCourse",
                    requestFields(
                            fieldWithPath("code").description("강의코드"),
                            fieldWithPath("title").description("강의명"),
                            //optinal 필드추가 - start
                            fieldWithPath("description").description("강의설명").optional(),
                            //optinal 필드추가 - end
                            fieldWithPath("maxCount").description("최대수강인원수"),
                            //커스텀필드추가 - start
                            fieldWithPath("courseType").description("교양/전공여부").attributes(Attributes.key("constraint").value("전공 : CC / 교양 : GC")),
                            //커스텀필드추가 - end
                            fieldWithPath("score").description("강의학점")
                    ),
                    responseFields(
                            fieldWithPath("id").description("강의Id")
                    )
            ));
    //then
}
테스트 -> 빌드 -> 서버재실행 후 결과를 확인한다.
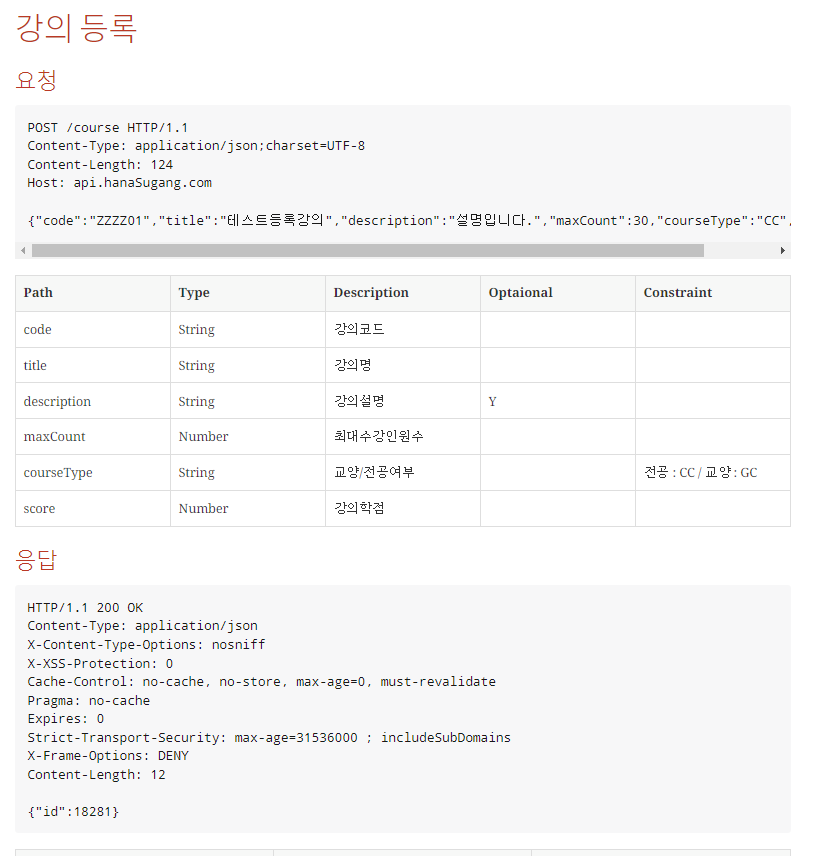
요청 body에 원하는 필드가 추가된 것을 확인할 수 있다.
적용후기
사실 설정이 어렵고 꼬이는 일이 많이 발생할 것 같아서 걱정이 되었지만
외외로 별 문제없이 성공적으로 적용에 성공했다.
기술을 도입하기 전 혼자서 잘 할 수 있을까?라는 걱정이 있었지만,
초보개발자가 작성한 테스트코드가 생각보단 탄탄했는지
기존에 성공하는 테스트코드를 불러와서 요청필드,응답필드를 추가해주는것 외에는
추가적인 테스트코드 작성이 많지는 않았다.
나아가 테스트코드를 기반으로 애플리케이션이 구성된 곳이라면 굳이 RESTDocs를 선택하지 않을 이유가 없어보였다.
처음 설정이 복잡하다고 느껴서 긴장했지만,
의외로 구글링 + 공식문서와 함께 차근차근 진행해보니 큰 문제없이 프로젝트에 적용할 수 있었고
문서화 작업이 굉장히 편리하고 빨랐다.
오히려 api를 따로 문서화 하기위해 Notion등의 다른 플랫폼을 사용해서 일일히 작성하거나,
swagger코드를 직접 입력해주면서 Production코드를 더럽히면서(?) 문서화 시키지 않고
이미 성공된 테스트케이스를 가지고 RESTDoc 스타일에 맞게 테스트코드를
거의 복사붙여넣기 하는것만으로 문서화가 완료되었으며
특히 요청,응답필드가 한개라도 비어있을 경우 테스트코드에 실패를 내어버리면서
API문서의 신뢰성을 높히는 전략이 너무나도 마음에 들었다.
그러나 난 아직 주니어, 초보개발자..
테크리더가 Swagger를 쓰자하면 따라가야 할 것이고...
혹시나 의견을 피력할 기회가 있다면
다른 팀원의 기분을 상하게 하지않고 왜 RESTDocs가 좋은지 어필할 수 있는 능력이 필요할 것 같다.
또한 아직까지는 경험이 많지 않기 때문에 내가 모르는 측면서에 Swagger가 훨씬 편리하고 좋은 경우도 많을 것이며,
'무조건 이게 좋은데요!?'라며 의견을 밀기보단, 좀 더 듣는자세에서
열린마음으로 다른기술들을 접하며 더 성장하는 마음가짐이 중요할 것이다.
항상 배우는 마음으로 개발에 임하고싶다.