[프로젝트1] 5. RestApi를 이용한 글작성, 수정, 삭제 구현

목표
1. RestController에 요청을 보내 게시글을 작성, 수정, 삭제할 수 있다.
2. api에 맞춰 front view를 구현한다.
1. 게시글 작성
BoardForm
@Getter
@NoArgsConstructor
public class BoardForm {

    private String user;
    private String password;
    private String contents;
    private String title;

    @Builder
    public BoardForm(String user, String password, String contents, String title){
        this.user = user;
        this.password = password;
        this.contents = contents;
        this.title = title;
    }

    public BoardEntity convertBoardEntity(){
        return BoardEntity.builder()
                .user(this.user)
                .password(this.password)
                .contents(this.contents)
                .title(this.title)
                .build();
    }
}
com/freeboard01/api/board 하위에 BoardForm 클래스를 생성한다.
Client에서 Server로 보내는 데이터는 ObjectMapper에 의해 BoardForm 인스턴스로 들어온다.
JSONParser인 Jackson이 Client에서 JsonString형식으로 전달한 데이터를 자동으로 파싱하여 인스턴스화 한다. 이 때 기본 생성자와 Getter를 이용하기 때문에 @Getter, @NoArgsConstructor 어노테이션은 필수이다!!⭐️
@Builder는 테스트 코드에서 사용하기 위해 생성하였으며, convertBoardEntity 메소드를 이용하여 form으로 들어온 데이터를 Entity로 변경해준다.
각 레이어간 주고 받는 데이터 오브젝트를 별개로 생성하였다.
물론 현재까지 생성한 BoardDto, BoardForm, BoardEntity를 모두 BoardEntity로 통일하여 사용해도 구현에 큰 문제는 없다.
하지만 이를 분리함으로써 뷰 레이어까지 Transaction이 유지되고, persistence context에 의해 뷰 레이어에서 데이터가 변경되는 것을 차단한다. 또한, 실제로 DataBase에 저장되는 값은 항상 순수한 값으로 유지되게하고, BoardDto와 BoardForm은 DB와의 종속성을 최소화하여 데이터를 가공하고 모을 수 있도록한다.
BoardService
    public BoardEntity post(BoardEntity entity){
        return boardRepository.save(entity);
    }
BoardApiController
    @PostMapping
    public ResponseEntity<BoardDto> post(@RequestBody BoardForm form){
        BoardEntity savedEntity = boardService.post(form.convertBoardEntity());
        return ResponseEntity.ok(BoardDto.of(savedEntity));
}@RequestBody를 이용해 JsonParser가 자동으로 수행되도록한다.
JpaRepository의 save 메소드는 엔티티를 저장하고 저장된 값을 그대로 리턴해준다. 따라서 이를 savedEntity로 반환받고 있으며 응답값으로 BoardDto로 변환하여 보내준다.
BoardApiControllerTest
    @Test
    public void saveTest() throws Exception {
        BoardForm boardForm = BoardForm.builder().user("사용자 아이디").title("제목을 입력하세요").contents("내용입니다.").password("1234").build();
        ObjectMapper objectMapper = new ObjectMapper();

        mvc.perform(post("/api/boards")
                        .contentType(MediaType.APPLICATION_JSON_VALUE)
                        .content(objectMapper.writeValueAsString(boardForm)))
                .andExpect(status().isOk())
                .andExpect(content().json("{'contents':'"+boardForm.getContents()+"'}"));;
    }
api 요청을 통해 데이터가 저장되는지 확인하는 테스트이다.
MediaType.APPLICATION_JSON_VALUE : 요청의 헤더 contentType의 값이다. 이는 "application/json"와 동일하다.
objectMapper.writeValueAsString(boardForm) : BoardForm 객체를 실제 클라이언트에서 데이터를 전송하듯 JSON 형태로 전달하기위해 사용한다.
content().json() : Json 응답값에 해당하는 String데이터가 포함되어있는지 확인한다.
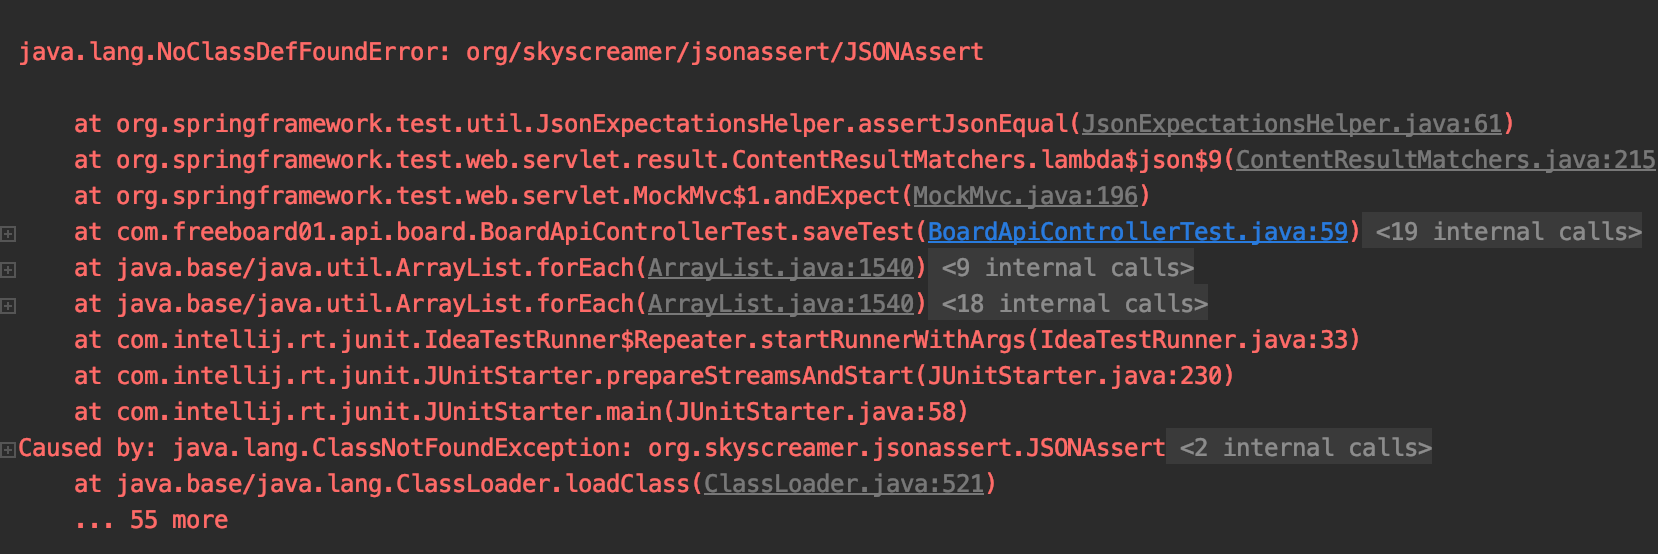
java.lang.NoClassDefFoundError
이 상태로 Test를 수행하면 아마 다음과 같은 에러가 뜰 것이다.
 JSONAssert라는 클래스를 찾을 수 없다는 에러이므로 build.gradle에 다음 종속성을 추가해주자.
// https://mvnrepository.com/artifact/org.skyscreamer/jsonassert
    testCompile group: 'org.skyscreamer', name: 'jsonassert', version: '1.5.0'
2. 게시글 수정
applicationContext.xml
dirty checking not working
dirty checking은 영속성 컨텍스트 내에서 관리되고 있는 Entity가 변경될 경우, transaction 종료와 함께 update 쿼리를 자동으로 날려주기 위한 자동 감지 기능이다. 이는 hibernate가 자체적으로 가지고 있는 기능이며 따라서 JpaRepository에는 update 메소드가 존재하지 않는다.
이전에 Spring Boot로 개발 했을 때, dirty checking이 되지 않았던 경험이 있는데 또 같은 문제에 맞닥 뜨렸다 ^^;
포스트맨을 이용하여 게시글을 수정하는 api를 요청했는데, DB 변경이 없었다. (당연히 update 쿼리가 날라가지않음)
test code를 작성해 강제로 flush()를 수행하니 update 쿼리가 날라갔으나, BoardService에서는 flush()를 호출해도 데이터가 변하지 않는 것을 보고 디버깅을 시도하였다.

 로그를 확인해보니,
 boardRepository.findById를 호출하는 순간 첫번째 트랜잭션이 시작되면서 EntityManager가 열리고 바로 다음행으로 넘어가면서 트랜잭션 종료와 함께, EntityManager가 클로징되는 것을 확인할 수 있었다. (위 이미지의 붉은색 박스 부분)
그 다음 boardRepository.flush를 호출하자 새로운 트랜잭션과 EntityManager로 시작되었다. (위 이미지의 노란색 박스 부분)
즉, BoardService에 달아둔 @Transactional 어노테이션이 작동하지 않고 있는 것으로 예상되었다.
검색해보니 applicationContext.xml에 <tx:annotation-driven />을 선언해주어야만 @Transactional 어노테이션이 제대로 작동함을 알게되었다.
<tx:annotation-driven />을 추가한 applicationContext 설정 파일은 다음과 같다.
<?xml version="1.0" encoding="UTF-8"?>
<beans xmlns="http://www.springframework.org/schema/beans"
xmlns:xsi="http://www.w3.org/2001/XMLSchema-instance"
xmlns:jpa="http://www.springframework.org/schema/data/jpa"
xmlns:context="http://www.springframework.org/schema/context"
xmlns:tx="http://www.springframework.org/schema/tx"
xsi:schemaLocation="http://www.springframework.org/schema/beans http://www.springframework.org/schema/beans/spring-beans.xsd
http://www.springframework.org/schema/data/jpa
http://www.springframework.org/schema/data/jpa/spring-jpa-1.8.xsd
http://www.springframework.org/schema/context
http://www.springframework.org/schema/context/spring-context.xsd
http://www.springframework.org/schema/tx
http://www.springframework.org/schema/tx/spring-tx.xsd">
<bean id="entityManagerFactory" class="org.springframework.orm.jpa.LocalContainerEntityManagerFactoryBean">
<property name="dataSource" ref="dataSource" />
<property name="packagesToScan" value="com.freeboard01.domain" />
<property name="jpaVendorAdapter">
<bean class="org.springframework.orm.jpa.vendor.HibernateJpaVendorAdapter" />
</property>
<property name="jpaProperties">
<props>
<prop key="hibernate.hbm2ddl.auto">update</prop>
<prop key="hibernate.dialect">org.hibernate.dialect.MySQL5Dialect</prop>
<prop key="format_sql">true</prop>
<prop key="hibernate.connection.autocommit">true</prop>
</props>
</property>
</bean>
<bean id="dataSource" class="org.springframework.jdbc.datasource.DriverManagerDataSource">
<property name="driverClassName" value="com.mysql.cj.jdbc.Driver"/>
<property name="url" value="jdbc:mysql://127.0.0.1:3306/free_board?serverTimezone=UTC&useSSL=false"/>
<property name="username" value="robin"/>
<property name="password" value="robin549866pass!"/>
</bean>
<bean id="transactionManager" class="org.springframework.orm.jpa.JpaTransactionManager">
<property name="entityManagerFactory" ref="entityManagerFactory" />
</bean>
<jpa:repositories base-package="com.freeboard01.domain" />
<tx:annotation-driven />
<context:component-scan base-package="com.freeboard01.domain">
<context:include-filter type="annotation" expression="org.springframework.stereotype.Repository" />
<context:include-filter type="annotation" expression="org.springframework.stereotype.Service" />
<context:include-filter type="annotation" expression="org.springframework.stereotype.Component" />
<context:exclude-filter type="annotation" expression="org.springframework.stereotype.Controller"/>
</context:component-scan>
</beans>BoardEntity
Dirty checking을 사용할 것이기 때문에, 데이터를 새로 저장하거나 삭제하는 작업은 필요없다. 즉 수정할 데이터를 불러와서 전체데이터를 모두 변경해주면 되는 것이다.
따라서 BoardEntity에 다음과 같은 메소드를 추가한다. 파라미터로 변경된 값(newBoard)을 받고 id를 제외한 모든 값을 대치해준다.
     public BoardEntity update(BoardEntity newBoard){
        this.user = newBoard.getUser();
        this.password = newBoard.getPassword();
        this.contents = newBoard.getContents();
        this.title = newBoard.getTitle();
        return this;
    }
BoardController
RestController에서는 변경할 Entity의 고유 id를 @PathVariable로 받는다.
변경될 데이터도 저장할 때와 똑같이 BoardForm의 형태로 들어오므로 convertBoardEntity를 이용해 BoardEntity로 변경한 뒤 서비스 레이어에 전달한다.
    @PutMapping("/{id}")
    public ResponseEntity<Boolean> update(@RequestBody BoardForm form, @PathVariable long id){
        return ResponseEntity.ok(boardService.update(form.convertBoardEntity(), id));
    }
BoardService
서비스 레이어에 들어오면서 Transaction이 시작되고, 동시에 해당하는 영속성 컨텍스트를 관리할 Entity Manager가 열린다.
변경할 Entity의 id를 이용해 Database에서 이를 가져온다.
이 때 prevEntity는 영속성 컨텍스트에 들어가게되며, Entity Manager에 의해 관리받는다.
    public Boolean update(BoardEntity newBoard, long id) {
        BoardEntity prevEntity = boardRepository.findById(id).get();
        if(prevEntity.getPassword().equals(newBoard.getPassword())){
            prevEntity.update(newBoard);
            return true;
        }
        return false;
    }
위에서 만들어둔 update 메소드를 이용해 새로운 값으로 완전히 엔티티가 대체되고 this 를 반환하며 서비스 레이어를 나가는 순간 Transaction이 종료된다. 따라서 자동으로 변경이 감지되고 update 쿼리가 실제 Database에 던저진다.
로그인을 구현하지 않았으므로 우선은 newBoard에 포함된 password를 이용해서 글 수정 권한을 판단한다.(실제로 이런식으로 짜면 큰일난다..;;😅)
Test code
필자는 테스트 코드를 총 3개 작성하였다. 이 테스트 결과를 눈으로 확인하고 싶으면 테스트 클래스 상단에 반드시 @Rollback(value = false)를 선언해야한다. 그렇지 않으면 트랜잭션 종료와 동시에 dirty checking으로 update쿼리가 날라가는 것과 rollback이 수행되는 것이 중첩돼 쿼리나 변경된 데이터를 확인 할 수가 없다.
/* BoardApiControllerTest 클래스 */
    @Test
    @DisplayName("올바른 패스워드를 입력한 경우 데이터 수정이 가능하다.")
    public void updateTest() throws Exception {
        BoardEntity entity = boardRepository.findAll().get(0);
        BoardForm updateForm = BoardForm.builder().user("사용자 아이디").title("제목을 입력하세요").contents("수정된 데이터입니다 ^^*").password(entity.getPassword()).build();
        ObjectMapper objectMapper = new ObjectMapper();

        mvc.perform(put("/api/boards/"+entity.getId())
                .contentType(MediaType.APPLICATION_JSON_VALUE)
                .content(objectMapper.writeValueAsString(updateForm)))
                .andExpect(status().isOk())
                .andExpect(content().string("true"));
    }


/* boardRepositoryIntegrationTest 클래스 */
    @Test
    public void updateTest(){
        BoardEntity saveEntity = BoardEntity.builder().user("유저").title("제목입니다^^*").contents("오늘은 날씨가 좋네요").password("123!@#").build();
        sut.save(saveEntity);

        String updateContents = "수정된 데이터입니다.";
        saveEntity.setContents(updateContents);
        BoardEntity updatedEntity = sut.findById(saveEntity.getId()).get();
        assertThat(updatedEntity.getContents(), equalTo(updateContents));
    }


/* BoardServiceIntegrationTest 클래스 */
   @Test
    public void update() {
        BoardEntity saveEntity = BoardEntity.builder().user("유저").title("제목입니다^^*").contents("오늘은 날씨가 좋네요").password("123!@#").build();
        BoardEntity updatedEntity = BoardEntity.builder().user("유저").title("수정 후 제목입니다^^*").contents("수정후 내용이에요~ 날씨가 좋네요").password("123!@#").build();

        sut.post(saveEntity);
        sut.update(updatedEntity, saveEntity.getId());

        assertThat(saveEntity.getContents(), equalTo(updatedEntity.getContents()));
        assertThat(saveEntity.getTitle(), equalTo(updatedEntity.getTitle()));
    }
위와 같이 transaction이 종료되기 직전에 update 쿼리가 수행됨을 알 수 있다.
3. 게시글 삭제
삭제와 관련된 비즈니스 로직은 간단하므로 코드만 나열하도록 하겠다.
현재 단계에서는 구체적인 Exception이나, Validation 처리를 하지 않고 있기 때문에 삭제를 요청한 유저가 입력한 비밀번호 값과 데이터 베이스에 들어있는 비밀번호 값이 일치하면 데이터를 삭제하고 true를 반환, 일치하지 않으면 false를 반환한다.
BoardApiController
    @DeleteMapping("/{id}")
    public ResponseEntity<Boolean> delete(@PathVariable long id, @RequestParam String password){
        return ResponseEntity.ok(boardService.delete(id, password));
    }
BoardService
    public boolean delete(long id, String password) {
        BoardEntity entity = boardRepository.findById(id).get();
        if(entity.getPassword().equals(password)){
            boardRepository.deleteById(id);
            return true;
        }
        return false;
    }
BoardApiControllerTest
    @Test
    @DisplayName("잘못된 패스워드를 입력한 경우 데이터는 삭제되지 않고 false를 반환한다.")
    public void deleteTest1() throws Exception {
        BoardEntity entity = boardRepository.findAll().get(0);

        mvc.perform(delete("/api/boards/"+entity.getId()+"?password=wrongPass"))
                .andExpect(status().isOk())
                .andExpect(content().string("false"));
    }

    @Test
    @DisplayName("올바른 패스워드를 입력한 경우 데이터를 삭제하고 true를 반환한다.")
    public void deleteTest2() throws Exception {
        BoardEntity entity = boardRepository.findAll().get(0);

        mvc.perform(delete("/api/boards/"+entity.getId()+"?password="+entity.getPassword()))
                .andExpect(status().isOk())
                .andExpect(content().string("true"));
    }
BoardServiceUnitTest
@ExtendWith({MockitoExtension.class, SpringExtension.class})
@ContextConfiguration(locations = {"file:src/main/webapp/WEB-INF/applicationContext.xml"})
public class BoardServiceUnitTest {

    @InjectMocks
    private BoardService sut;

    @Mock
    private BoardRepository mockBoardRepo;

    @Test
    public void delete1() {
        final Long ID = 999L;

        BoardEntity entity = BoardEntity.builder().password("1234").user("user").contents("contents").title("title").build();
        entity.setId(ID);

        given(mockBoardRepo.findById(anyLong())).willReturn(Optional.of(entity));

        sut.delete(ID, "wrongPassword");
        verify(mockBoardRepo, never()).deleteById(anyLong());
    }

    @Test
    public void delete2() {
        final Long ID = 999L;
        final String PASSWORD = "myPass";
        BoardEntity entity = BoardEntity.builder().password(PASSWORD).user("user").contents("contents").title("title").build();
        entity.setId(ID);

        given(mockBoardRepo.findById(anyLong())).willReturn(Optional.of(entity));
        doNothing().when(mockBoardRepo).deleteById(anyLong());

        sut.delete(ID, PASSWORD);
        verify(mockBoardRepo, times(1)).deleteById(anyLong());
    }

}
Mock을 사용하기 위해서 @ExtendWith에 MockitoExtension.class를 추가한다. 단, SpringExtension이 없으면 에러가 발생하므로 두 가지 모두 선언하도록 한다.
UnnecessareStubbingException
ref. https://www.baeldung.com/mockito-unnecessary-stubbing-exception
 delete1() 테스트에 원래
 doNothing().when(mockBoardRepo).deleteById(anyLong()); 함수가 있었는데 이 함수가 사용되지 않음. 즉, 쓸데없는 stubbing이라며 에러뜨는 것이다.
해당 에러가 뜨면 언급된 line을 지워주도록 하자.
4. front view 수정
layout/layout.hbs
<!DOCTYPE html>
<html>
<head>
    <meta http-equiv="Content-Type" content="text/html; charset=UTF-8">
    <script src="https://ajax.googleapis.com/ajax/libs/jquery/3.4.1/jquery.min.js"></script>

    <link rel="stylesheet" href="https://maxcdn.bootstrapcdn.com/bootstrap/4.0.0/css/bootstrap.min.css" integrity="sha384-Gn5384xqQ1aoWXA+058RXPxPg6fy4IWvTNh0E263XmFcJlSAwiGgFAW/dAiS6JXm" crossorigin="anonymous">
    <script src="https://cdn.jsdelivr.net/npm/popper.js@1.16.0/dist/umd/popper.min.js" integrity="sha384-Q6E9RHvbIyZFJoft+2mJbHaEWldlvI9IOYy5n3zV9zzTtmI3UksdQRVvoxMfooAo" crossorigin="anonymous"></script>
    <script src="https://stackpath.bootstrapcdn.com/bootstrap/4.4.1/js/bootstrap.min.js" integrity="sha384-wfSDF2E50Y2D1uUdj0O3uMBJnjuUD4Ih7YwaYd1iqfktj0Uod8GCExl3Og8ifwB6" crossorigin="anonymous"></script>


    <script src="https://cdn.jsdelivr.net/npm/handlebars@latest/dist/handlebars.js"></script>
    <!-- Load just-handlebar-helpers -->
    <script src="https://unpkg.com/just-handlebars-helpers@1.0.16/dist/h.min.js"></script>
    <script type="text/javascript"> // Register just-handlebars-helpers with handlebars
        H.registerHelpers(Handlebars);
    </script>
    {{#block "header"}}{{/block}}
</head>
<body>
<div>
    <div class="m-5">
        {{#block "contents"}}{{/block}}
    </div>
</div>
{{#block "js"}}{{/block}}
</body>
</html>
bootstrap이 지원하는 Modal을 사용하기 위해 링크를 추가하고, jQuery를 최상단으로 올렸다. (bootstrap은 jquery 기반으로 만들어져있으므로 jquery가 상단에 정의되어 있어야한다.)
template/modal.hbs
<script id="writeModal" type="text/x-handlebars-template">
<div class="modal fade" id="boardModal" tabindex="-1" role="dialog" aria-labelledby="exampleModalLabel" aria-hidden="true">
<div class="modal-dialog" role="document">
<div class="modal-content">
<div class="modal-header">
<h5 class="modal-title" id="exampleModalLabel">New message</h5>
<button type="button" class="close" data-dismiss="modal" aria-label="Close">
<span aria-hidden="true">×</span>
</button>
</div>
<div class="modal-body">
<form>
<div class="form-group">
<label for="recipient-name" class="col-form-label">Writer:</label>
<input type="text" class="form-control" id="user" required>
</div>
<div class="form-group">
<label for="message-text" class="col-form-label">Title:</label>
<textarea class="form-control" id="title" required></textarea>
</div>
<div class="form-group">
<label for="message-text" class="col-form-label">Contents:</label>
<textarea class="form-control" id="contents" required></textarea>
</div>
<div class="form-group">
<label for="recipient-name" class="col-form-label">Password:</label>
<input type="password" class="form-control" id="password" required>
</div>
</form>
</div>
<div class="modal-footer">
<button type="button" class="btn btn-secondary" data-dismiss="modal" id="closeBtn">Close</button>
<button type="button" class="btn btn-primary" id="saveBtn">Write</button>
<button type="button" class="btn btn-primary" id="deleteBtn">Delete</button>
</div>
</div>
</div>
</div>
</script>최소한의 값만 넣을 수 있는 모달을 템플릿화 하였다.
board.hbs
{{#partial "header"}}
    <title>Main Page</title>
{{/partial}}

<!--body-->
{{#partial "contents"}}
    <h1>이곳은 게시판입니다.</h1>
    <div id="tableSpace"></div>
    <div id="pageMarkerSpace"></div>
    <div id="writeModalSpace"></div>
    <button type="button" class="btn btn-primary" data-toggle="modal" data-target="#boardModal">글쓰기</button>
    <button onclick='location.href="/freeboard01"' class='btn btn-primary'>메인으로 이동하기</button>
{{/partial}}
<!--body-->

<!--js-->
{{#partial "js"}}
    {{> template/table}}
    {{> template/pageMarker}}
    {{> template/modal}}
    <script>
        let nowBoardList = new Object();
        let nowBoardIndex = 0;
        const WRITE = "Write";
        const MODIFY = "Modify";

        window.onload = () => {
            apiRequest(attachBoard);
            var template = Handlebars.compile($("#writeModal").html());
            $("#writeModalSpace").html(template());
            $("#writeModal").find('#deleteBtn').css('display', 'none');
        }

        var apiRequest = (callback = null, page = 1) => {
            const SIZE = 10;
            $.ajax({
                method : 'GET',
                url : 'api/boards?page='+page+"&size="+SIZE
            }).done(function (response) {
                nowBoardList = response.contents;
                if(typeof callback != 'undefined'){
                    callback(response);
                }
            })
        }

        var attachBoard = (response) => {
            if(typeof response != 'undefined') {
                var template = Handlebars.compile($("#tableList").html());
                $("#tableSpace").html(template(response));
                var template = Handlebars.compile($("#pageMarker").html());
                $("#pageMarkerSpace").html(template(response));
            }
        }

        var pageConvert = (page) => {
            apiRequest(attachBoard, page);
        }

        var fetchDetails = (index) => {
            nowBoardIndex = index;
            setModalData(index);
            setModifyModal();
            $('#boardModal').modal("show");
        }

        var setModalData = (index) => {
            var $modal = $('#boardModal');
            $modal.find('#user').val(nowBoardList[index].user);
            $modal.find('#title').val(nowBoardList[index].title);
            $modal.find('#contents').val(nowBoardList[index].contents);
            $modal.find('#password').val("");
        }

        var setModifyModal = () => {
            var $modal = $('#boardModal');
            $modal.find('#saveBtn').text(MODIFY);
            $modal.find('#user').attr('disabled', true);
            $modal.find('#deleteBtn').css('display', 'block');
        }

        var resetModalData = () => {
            var $modal = $('#boardModal');
            $modal.find('#user').val("");
            $modal.find('#title').val("");
            $modal.find('#contents').val("");
            $modal.find('#password').val("");
        }

        var setNewWriteModal = () => {
            var $modal = $('#boardModal');
            $modal.find('#saveBtn').text(WRITE);
            $modal.find('#user').attr('disabled', false);
            $modal.find('#deleteBtn').css('display', 'none');
        }

        var setBoardForm = () => {
            var BoardForm = new Object();
            var $modal = $('#boardModal');
            BoardForm.user = $modal.find('#user').val();
            BoardForm.title = $modal.find('#title').val();
            BoardForm.contents = $modal.find('#contents').val();
            BoardForm.password = $modal.find('#password').val();
            return BoardForm;
        }

        $(document).on('show.bs.modal', '#boardModal', function (event) { // 모달 열릴 때 이벤트

        })

        $(document).on('hidden.bs.modal', '#boardModal', function () { // 모달 닫힐 때 이벤트
            resetModalData();
            setNewWriteModal();
        })

        $(document).on('click', '#deleteBtn', function() {
            var password = $('#boardModal').find('#password').val();
            $.ajax({
                method : 'DELETE',
                url : 'api/boards/'+nowBoardList[nowBoardIndex].id+'?password='+password
            }).done(function (response) {
                if(typeof response != 'undefined'){
                    if(response == false) {
                        alert(" 비밀 번호가 틀렸습니다. ");
                    } else {
                        $('#boardModal').modal("hide"); //닫기
                    }
                }
            })
        })

        $(document).on('click', '#saveBtn', function() {
            var BoardForm = setBoardForm();
            var method, url;
            if($('#saveBtn').text() === WRITE){
                method = 'POST';
                url = 'api/boards';
            }else{
                method = 'PUT';
                url = 'api/boards/'+nowBoardList[nowBoardIndex].id;
            }

            $.ajax({
                method : method,
                url : url,
                contentType: 'application/json',
                data : JSON.stringify(BoardForm)
            }).done(function (response) {
                if(typeof response != 'undefined'){
                    if(response == false){
                        alert(" 비밀 번호가 틀렸습니다. ");
                    }else {
                        $('#boardModal').modal("hide"); //닫기
                    }
                }
            })
        })

    </script>
    {{#block "helper"}}{{/block}}
{{/partial}}
<!--js-->
{{> static/helper/helper}}
{{> layout/layout}}
프론트는 적당히 기능하고 알아 볼 수 있을 정도로 한거라 딱히 설명할 부분은 없다.
추후에 ajax 요청은 유틸로 빼서 정의할 생각이다.
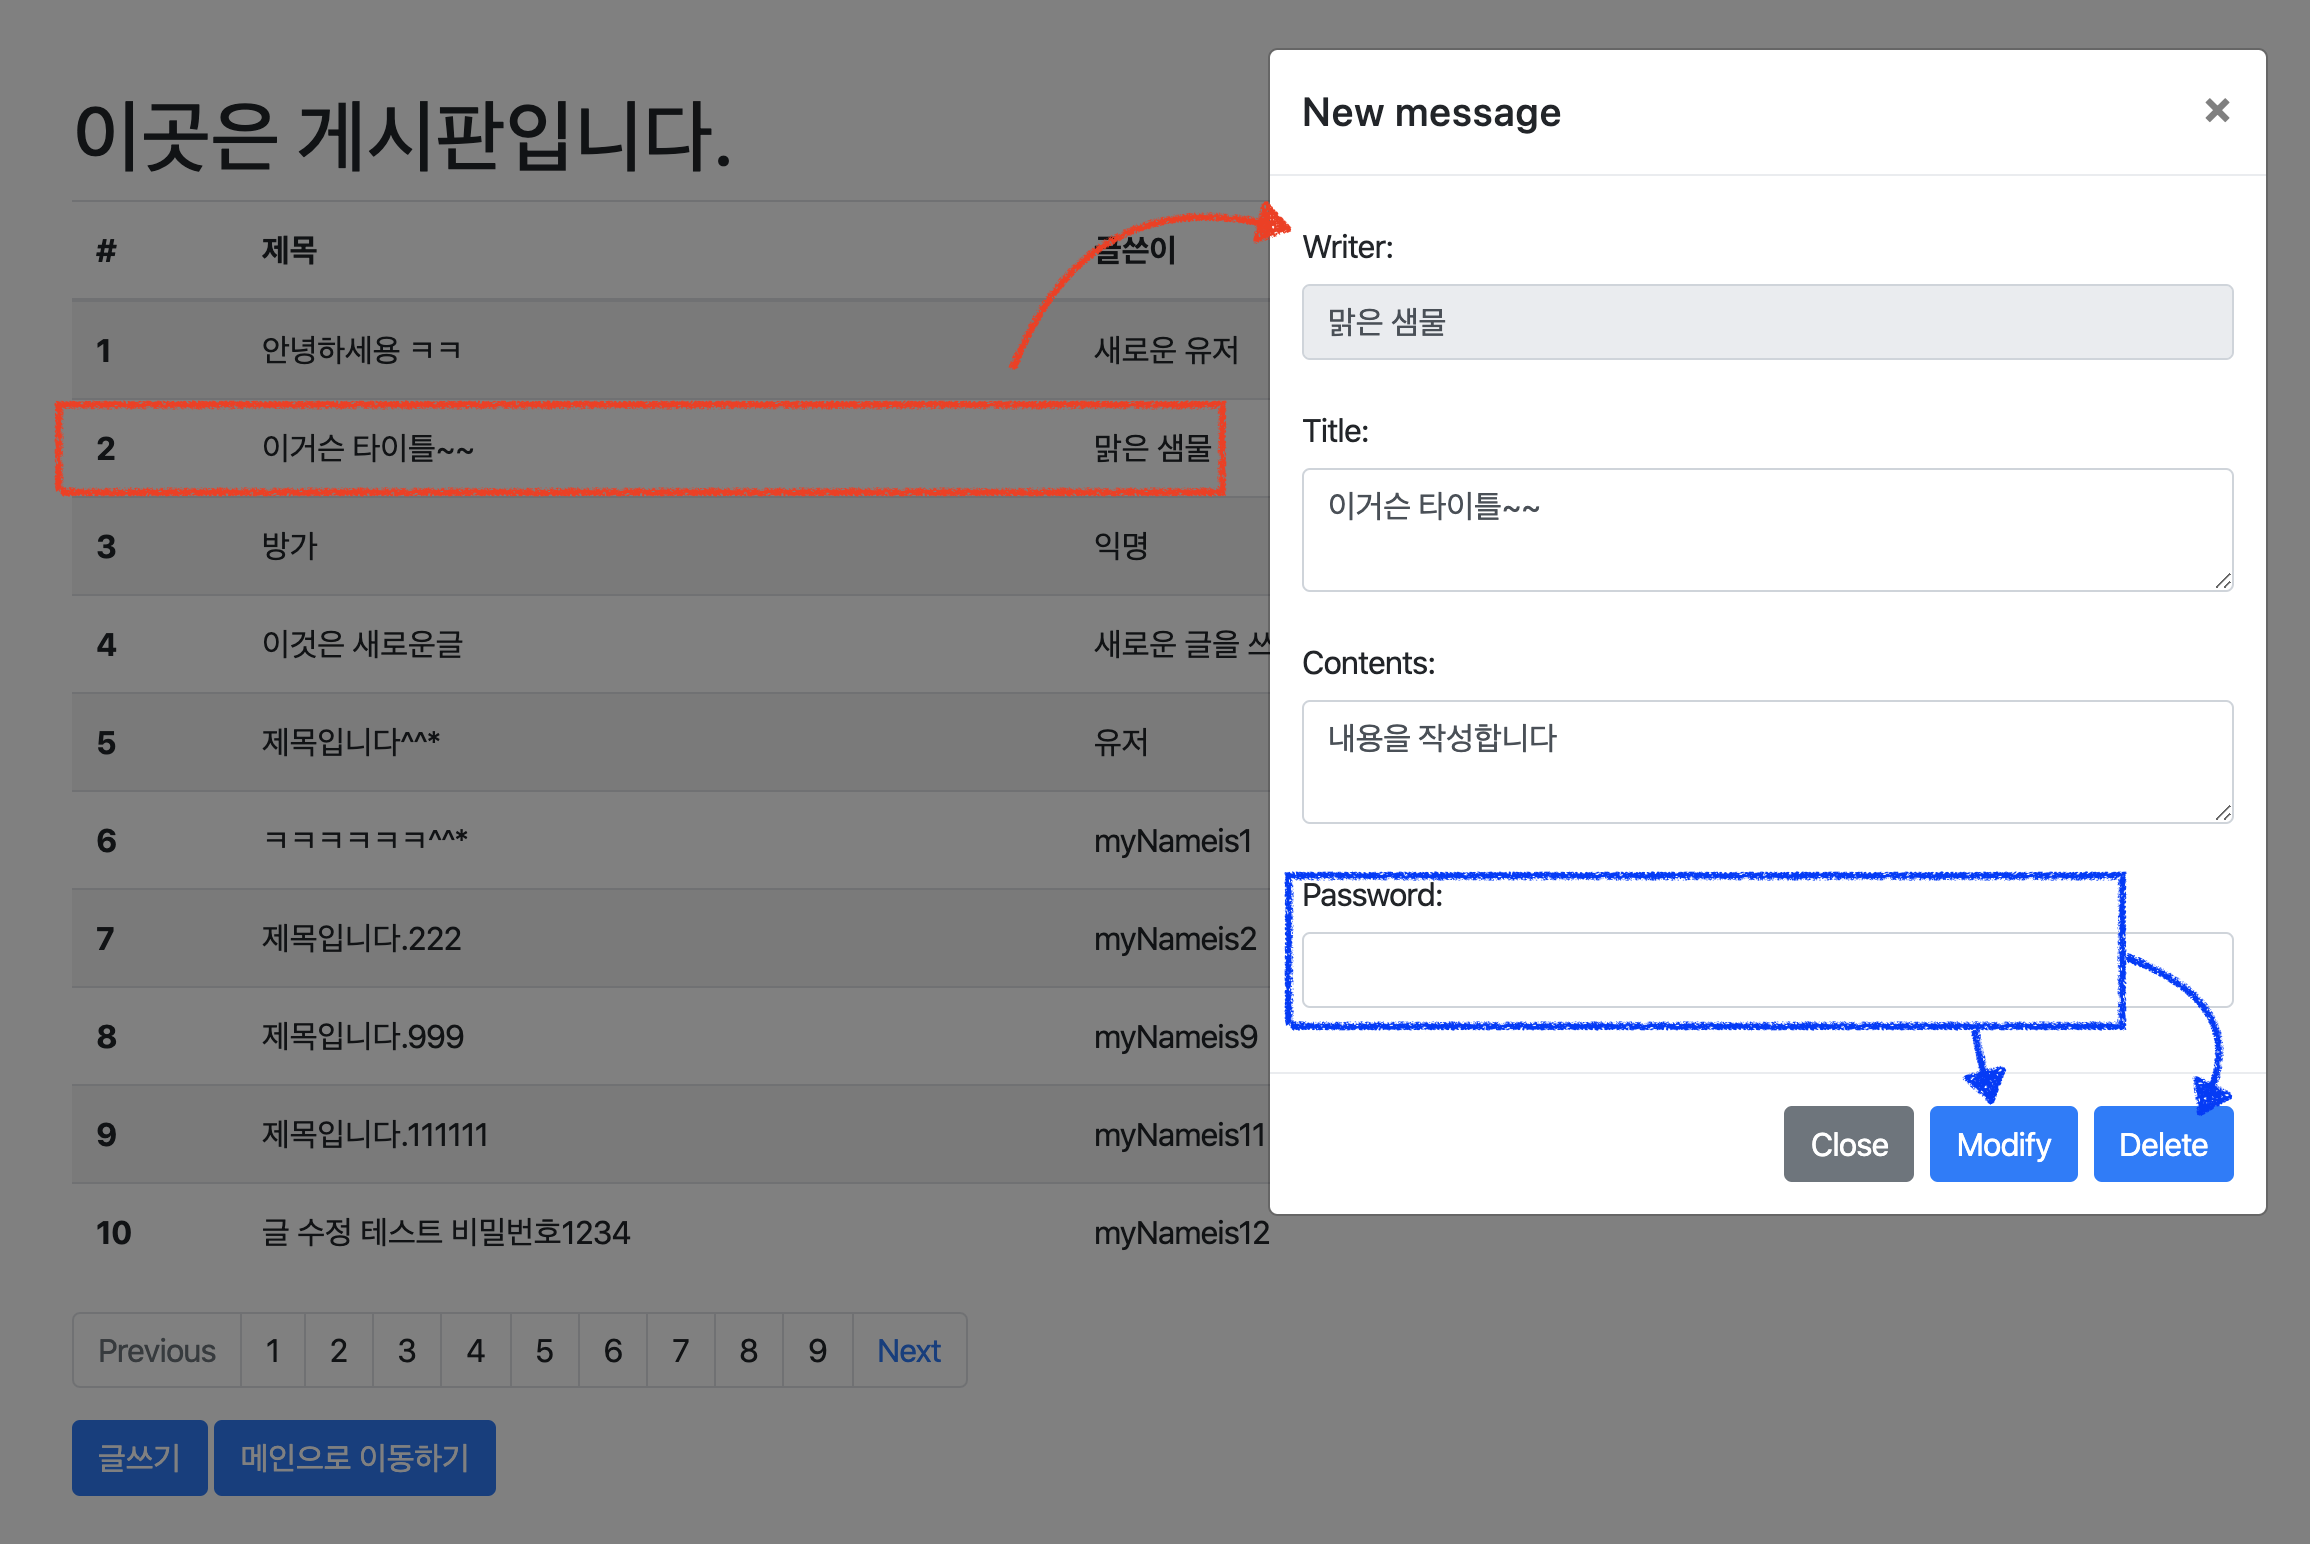
🙆🏻 이제 톰캣을 띄우고 접속해보자
 좌측하단의 글쓰기 버튼을 클릭하면 새로운 글을 작성할 수 있다. 또한 리스팅된 데이터를 클릭하면 내용이 채워진 모달이 뜨고, 올바른 패스워드를 입력한 뒤 수정/삭제 버튼을 누르면 작업이 수행된다. (새로고침 해야지 변경 내용을 볼 수 있다.)

포스트 잘 보고 있습니다. 다만 프론트엔드에서 게시판의 리스트 속 내용 클릭시, detail 내용을 보려면 template/table.hbs에 onclick부분 추가해야하는 부분이 포스트 내용에는 빠져있네요