lanchain - model
1. LangChain에서 말하는 “모델”이 뭐냐?
먼저 용어 정리부터 하겠습니다.
- LLM(Language Model) = 인간처럼 텍스트를 이해하고 만들어 내는 AI
- LangChain의 “모델” = 이런 LLM을 통합된 인터페이스로 감싼 것
LangChain 모델은 단순히 텍스트 생성만 하는 게 아니라, 보통 아래 기능들을 함께 지원합니다. ([LangChain Docs][1])
- 툴 호출(tool calling)
DB 조회, 웹 검색, 코드 실행 같은 외부 함수를 불러서 그 결과를 답변에 활용 - 구조화된 출력(structured output)
“JSON 형태로만 답해”, “이 스키마에 맞춰서 답해”처럼 형식을 강제 - 멀티모달(multimodal)
텍스트뿐 아니라 이미지·오디오·비디오 등도 입출력 - 추론(reasoning)
복잡한 문제를 여러 단계로 나눠서 생각한 뒤, 그 과정을 노출할 수도 있음
그리고 이 모델이 바로 에이전트의 “두뇌” 역할을 합니다.
에이전트는 “어떤 툴을 쓸까? 언제 멈출까?” 같은 결정을 모델의 출력에 따라 내립니다. ([LangChain Docs][1])
2. 전체 그림: 모델·에이전트·툴 관계 시각화
간단히 흐름을 그림으로 보면 아래 느낌입니다.
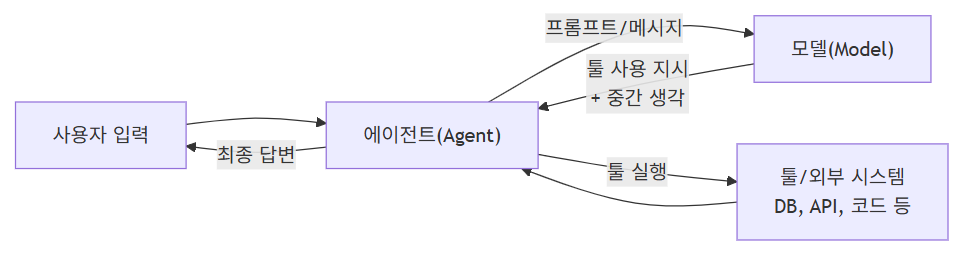
여기서 오늘 이야기의 주인공은 가운데 있는 Model(M) 입니다.
에이전트 없이도, 이 모델만 직접 호출해서 쓸 수 있습니다.
3. 모델은 두 가지 방식으로 쓴다
문서에서는 모델 사용 방식을 크게 두 가지로 나눕니다. ([LangChain Docs][1])
-
에이전트와 함께 사용
- LangGraph/LangChain 에이전트 내부에서, 모델이 “생각 + 툴 호출 + 최종 답변”을 담당
-
단독으로 사용(standalone)
- 그냥
model.invoke("질문")이런 식으로 바로 호출해서
텍스트 생성, 분류, 추출 같은 일을 수행
- 그냥
LangChain의 인터페이스는 에이전트 안에서 쓸 때나, 단독으로 쓸 때나 거의 동일해서
“간단한 스크립트 → 복잡한 에이전트”로 점진적으로 확장하기 좋게 설계되어 있습니다. ([LangChain Docs][1])
4. 모델 초기화: init_chat_model 한 방으로 시작하기
가장 쉽게 시작하는 방법은 init_chat_model 함수를 사용하는 것입니다. ([LangChain Docs][1])
지원하는 대표 프로바이더 예시:
- OpenAI
- Anthropic
- Azure OpenAI
- Google Gemini
- AWS Bedrock 등등 ([LangChain Docs][1])
4-1. 예시: OpenAI GPT-4.1 연결하기
import os
from langchain.chat_models import init_chat_model

os.environ["OPENAI_API_KEY"] = "sk-..."  # 실제 키로 교체

# 모델 초기화
model = init_chat_model("gpt-4.1")

# 한 줄 질문
response = model.invoke("Why do parrots talk?")
print(response)
여기서 init_chat_model("gpt-4.1") 이 한 줄이
- 어떤 프로바이더(여기선 OpenAI)를 쓸지,
- 어떤 모델 이름을 쓸지
를 한 번에 지정해 줍니다. ([LangChain Docs][1])
5. 모델의 핵심 메서드 3가지: invoke, stream, batch
LangChain 문서에서는 모델의 핵심 메서드를 이렇게 정리합니다. ([LangChain Docs][1])
| 메서드 | 용도 | 언제 쓰면 좋은지 |
|---|---|---|
invoke | 한 번 질문 → 한 번 완성된 답변 | 간단한 호출, API 서버 백엔드, 테스트 |
stream | 토큰이 생성되는 동안 “조각조각” 받기 | 챗 UI에서 실시간으로 글자 나오는 느낌 줄 때 |
batch | 여러 입력을 한 번에 병렬 처리 | 대량 오프라인 작업(요약 수백 개, 분류 수천 개 등) |
5-1. invoke: 가장 기본적인 호출
response = model.invoke("Why do parrots have colorful feathers?")
print(response.text) # AIMessage의 text만 보기- 입력: 문자열 또는 “메시지 리스트”
- 출력:
AIMessage(역할/텍스트/메타데이터를 포함한 객체) ([LangChain Docs][1])
5-2. 대화 히스토리(메시지 리스트)로 호출하기
문서에서는 두 가지 형식을 보여줍니다. ([LangChain Docs][1])
- 딕셔너리 형식
conversation = [
    {"role": "system", "content": "You are a helpful assistant that translates English to French."},
    {"role": "user", "content": "Translate: I love programming."},
    {"role": "assistant", "content": "J'adore la programmation."},
    {"role": "user", "content": "Translate: I love building applications."}
]

response = model.invoke(conversation)
print(response)- Message 객체 형식
from langchain_core.messages import HumanMessage, AIMessage, SystemMessage

conversation = [
    SystemMessage("You are a helpful assistant that translates English to French."),
    HumanMessage("Translate: I love programming."),
    AIMessage("J'adore la programmation."),
    HumanMessage("Translate: I love building applications.")
]

response = model.invoke(conversation)
print(response)
둘 다 결국 역할(role) + 내용(content) 을 명시해서
“지금 어떤 대화 상황인지”를 모델에 알려주는 방식입니다. ([LangChain Docs][2])
6. stream: 답변을 조금씩 흘려 받기
stream() 은 토큰이 생성되는 대로 조각(chunk) 을 계속 보내 줍니다.
문서 예시와 비슷하게 쓰면: ([LangChain Docs][1])
for chunk in model.stream("Why do parrots have colorful feathers?"):
print(chunk.text, end="|", flush=True)invoke()→ 한 번에 완성된AIMessagestream()→ 여러 개의AIMessageChunk를 순서대로 받음 ([LangChain Docs][1])
이 chunk들을 더해서 하나의 메시지로 만드는 것도 가능합니다.
full = None  # None 또는 AIMessageChunk
for chunk in model.stream("What color is the sky?"):
    full = chunk if full is None else full + chunk
    print(full.text)  # 점점 길어지는 문장

print(full.content_blocks)
# [{"type": "text", "text": "The sky is typically blue..."}]
이렇게 모아서 만든 full은 invoke() 로 받은 AIMessage 처럼
그냥 대화 히스토리에 추가해서 다시 모델에게 넘길 수 있습니다. ([LangChain Docs][1])
7. batch: 여러 요청을 한 번에 보내기
여러 질문을 병렬로 처리하고 싶을 때 batch() 를 사용합니다. ([LangChain Docs][1])
responses = model.batch([
    "Why do parrots have colorful feathers?",
    "How do airplanes fly?",
    "What is quantum computing?"
])

for r in responses:
print(r.text)- LangChain 내부에서 여러 API 호출을 동시에 보내서 속도를 높여 줌
- 모델/프로바이더에서 제공하는 “서버 배치 API”와는 별개이며,
클라이언트(파이썬 코드) 레벨의 배칭입니다. ([LangChain Docs][1])
대량 처리 시에는 max_concurrency 로 동시 호출 수를 조절할 수도 있습니다. ([LangChain Docs][1])
8. 모델 파라미터: temperature, max_tokens 등
init_chat_model() 에서 다양한 파라미터를 같이 넘길 수 있습니다. ([LangChain Docs][1])
대표적인 것만 정리하면:
| 파라미터 | 역할 |
|---|---|
model | 사용할 모델 이름 (예: "gpt-4.1", "claude-sonnet-4-5-20250929") |
api_key | 프로바이더 인증 키 (보통 환경변수에 저장) |
temperature | 창의성/랜덤성 조절 (높을수록 다양, 낮을수록 일정한 답) |
timeout | 한 요청에서 기다릴 최대 시간(초) |
max_tokens | 응답 길이 제한 (토큰 개수 기준) |
max_retries | 네트워크 오류/레이트 리밋 발생 시 재시도 횟수 |
문서 예시는 이런 식입니다. ([LangChain Docs][1])
model = init_chat_model(
    "claude-sonnet-4-5-20250929",
    temperature=0.7,
    timeout=30,
    max_tokens=1000,
)
각 프로바이더별로 여기서 더 많은 추가 옵션이 있습니다
(예: OpenAI의 use_responses_api, logprobs, prompt_cache_key 등). ([LangChain Docs][1])
9. 툴 호출(tool calling) 흐름 시각화
문서의 예시는 get_weather 라는 간단한 툴을 만들어 모델에 바인딩하는 코드입니다. ([LangChain Docs][1])
9-1. 기본 예시 코드 (단순 버전)
from langchain.tools import tool
@tool
def get_weather(location: str) -> str:
"""Get the weather at a location."""
return f"It's sunny in {location}."
model_with_tools = model.bind_tools([get_weather])
response = model_with_tools.invoke("What's the weather like in Boston?")
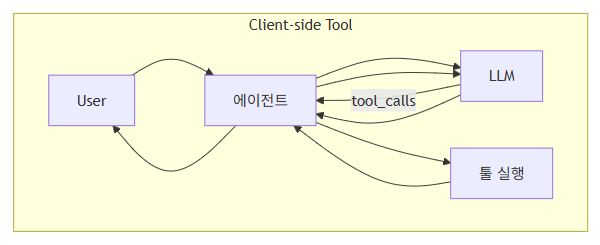
print(response.tool_calls) # 모델이 어떤 툴을 어떻게 호출하라고 했는지9-2. 툴 실행 루프 흐름 그림
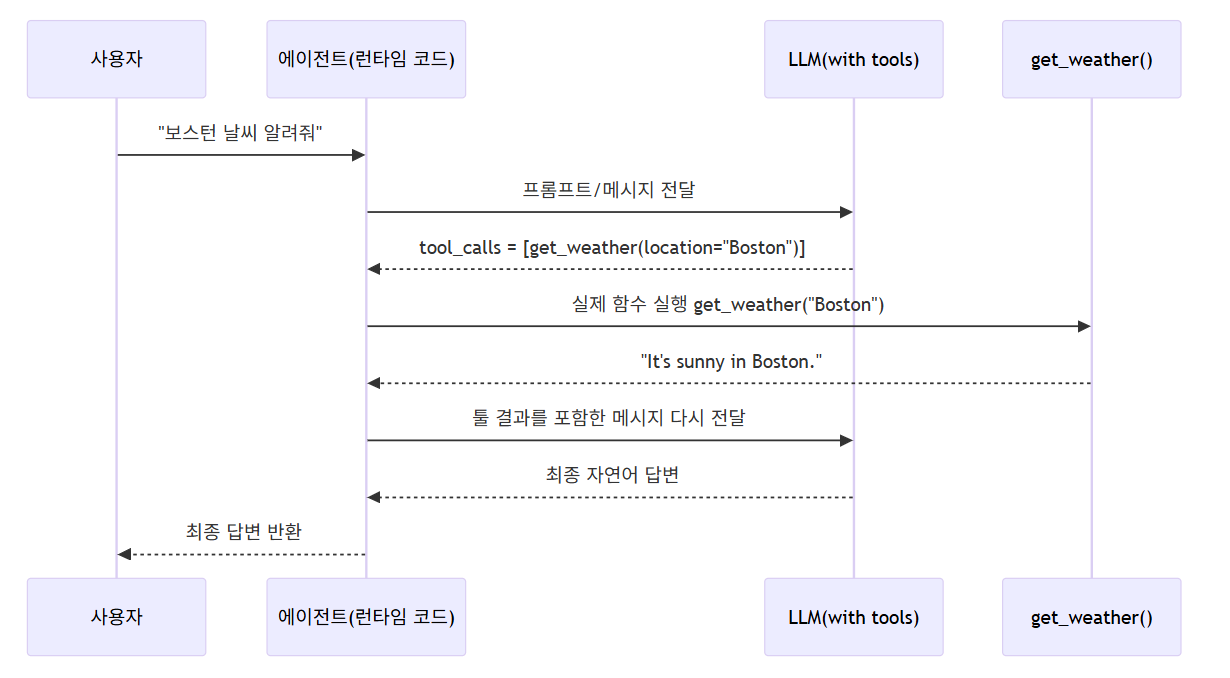
실제 코드에서는:
model.bind_tools([get_weather])로 툴을 모델에 바인딩invoke()결과에서tool_calls를 확인- 직접 툴을 실행해서 결과를 메시지로 붙여 다시
invoke() - 최종 답변을 받는 구조입니다. ([LangChain Docs][1])
에이전트를 쓰면 이 루프를 LangChain이 대신 돌려 줍니다.
10. 구조화된 출력(Structured Output)
“모델이 아무 말이나 하지 말고, 내가 정한 스키마대로만 답해 줘” 라고 강제하는 기능입니다.
문서에서 소개하는 대표적인 스키마 방식: ([LangChain Docs][1])
Pydantic모델TypedDictJSON Schema
10-1. Pydantic 예시
from pydantic import BaseModel, Field

class Movie(BaseModel):
    """A movie with details."""
    title: str = Field(..., description="The title of the movie")
    year: int = Field(..., description="The year the movie was released")
    director: str = Field(..., description="The director of the movie")
    rating: float = Field(..., description="The movie's rating out of 10")

model_with_structure = model.with_structured_output(Movie)
response = model_with_structure.invoke("Provide details about the movie Inception")
print(response)
# Movie(title="Inception", year=2010, director="Christopher Nolan", rating=8.8)
이 경우 response 는 그냥 텍스트가 아니라 검증된 Pydantic 객체가 됩니다. ([LangChain Docs][1])
또한 include_raw=True 로 원본 AIMessage + 파싱된 결과를 같이 돌려 받는 것도 가능합니다. ([LangChain Docs][1])
11. 고급 주제들 한 줄씩 맛보기
문서 뒤쪽에는 꽤 많은 고급 기능이 정리되어 있습니다. ([LangChain Docs][1])
각 항목을 아주 요약하면:
-
멀티모달(Multimodal)
- 텍스트 + 이미지/오디오/비디오를 함께 처리하고, 결과로 이미지 등을 돌려줄 수 있음
- 결과는
content_blocks에 “type: image” 같은 블록으로 들어감
-
Reasoning(추론 노출)
- 중간 추론 과정을
reasoning타입 블록으로 스트리밍해서 볼 수 있는 모델들 - “얼마나 열심히 생각할지”를 파라미터로 조절 가능한 모델도 존재
- 중간 추론 과정을
-
로컬 모델(Local models)
- Ollama 등으로 로컬 LLM을 돌리면서 LangChain으로 호출 가능
- 개인정보 보호, 비용 절감, 커스텀 모델 활용 등에 유용
-
프롬프트 캐싱(Prompt caching)
- 같은 프롬프트를 반복해서 쓸 때, 캐시를 써서 비용/레이턴시 절감
- 암묵적/명시적 캐싱 모두 지원 (OpenAI, Gemini, Bedrock 등)
-
서버 사이드 툴 사용(Server-side tool use)
- OpenAI 같은 프로바이더가 서버 쪽에서 툴 루프까지 돌려 주는 기능
- 응답의
content_blocks를 읽어 보면, 어떤 서버 툴이 어떻게 실행됐는지 알 수 있음
-
Rate limiting
InMemoryRateLimiter로 초당 요청 수를 제한해서 레이트 리밋 에러를 줄임
-
Base URL / Proxy
- OpenAI 호환 API나 프록시 서버를 쓰고 싶을 때
base_url,openai_proxy등의 옵션으로 설정
- OpenAI 호환 API나 프록시 서버를 쓰고 싶을 때
-
Log probabilities
logprobs=True로 토큰별 로그 확률을 받아서 “모델이 얼마나 확신하는지” 분석
-
Token usage
AIMessage의usage_metadata로 토큰 사용량을 추적하고,
콜백(UsageMetadataCallbackHandler) 으로 여러 모델들의 토큰 사용량 집계
-
Invocation config (
RunnableConfig)run_name,tags,metadata,callbacks,max_concurrency,recursion_limit등
실행 단위별로 세밀하게 설정해서 모니터링/디버깅/리소스 제한 가능
-
Configurable models
configurable_fields를 써서 “런타임에 모델 종류를 바꿔끼는” 구조- 같은 코드에서
config={"configurable": {"model": "gpt-5-nano"}}처럼 바꿔 실행
이 부분들은 “프로덕션에서 여러 모델, 여러 파이프라인을 운영할 때” 힘을 발휘하는 기능들입니다. ([LangChain Docs][1])
12. 정리
-
모델은 에이전트의 두뇌이고,
단독으로도, 에이전트 안에서도 동일한 인터페이스로 사용할 수 있다. -
시작은 아주 간단하다
init_chat_model("모델이름")invoke,stream,batch이 세 가지 메서드만 먼저 익히면 된다.
-
그 다음으로
- 메시지 형식(역할/내용)
- 툴 호출, 구조화된 출력
-
마지막으로
- 멀티모달, reasoning, 로컬 모델, 캐싱, 레이트 리밋, 프록시, 로그프로브, 토큰 사용량, config 등
프로덕션/대규모 환경에서 필요한 고급 기능들을 이해하면 된다.
- 멀티모달, reasoning, 로컬 모델, 캐싱, 레이트 리밋, 프록시, 로그프로브, 토큰 사용량, config 등
고급 주제 상세
- Multimodal
- Reasoning
- Local models
- Prompt caching
- Server-side tool use
- Rate limiting
- Base URL / Proxy
- Log probabilities
- Token usage
- Invocation config
- Configurable models
각 항목을 “기초 개념 → 코드 예시 → 간단 시각화/마인드셋” 순서로 풀어볼게요.
1. Multimodal: 텍스트만이 아니라 이미지·오디오까지
1-1. 개념
- Multimodal 모델 = 텍스트 + 이미지/오디오/비디오 같은 다양한 형태의 데이터를 처리/생성할 수 있는 모델
- LangChain에서는 이런 데이터를 content blocks 라는 표준 형태로 주고받습니다. ([LangChain Docs][1])
입력도, 출력도 content_blocks 안에 들어간다고 생각하면 편합니다.
from langchain.chat_models import init_chat_model

model = init_chat_model("gpt-4.1")  # 멀티모달 지원 가정

response = model.invoke("Create a picture of a cat")
print(response.content_blocks)
# [
#   {"type": "text", "text": "Here's a picture of a cat"},
#   {"type": "image", "base64": "...", "mime_type": "image/jpeg"},
# ]
위처럼 type: "image" 블록이 나오면, 클라이언트(UI)에서 실제 이미지로 렌더링할 수 있습니다. ([LangChain Docs][1])
1-2. 시각적 흐름
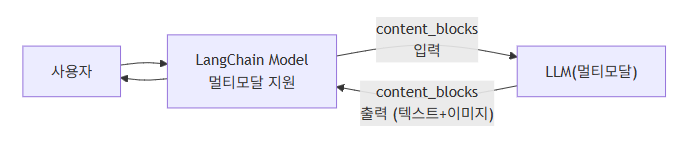
- LangChain은 provider마다 포맷이 달라도
content_blocks로 통일해서 다루도록 도와줍니다. ([LangChain Docs][1])
2. Reasoning: “생각 과정”을 토큰으로 받아 보기
2-1. 개념
새로운 모델들(예: 일부 OpenAI/Anthropic 모델)은 중간 추론 과정을 별도 블록으로 뽑아낼 수 있습니다. ([LangChain Docs][1])
content_blocks안에{"type": "reasoning", ...}같은 블록이 들어옴- 스트리밍하면서 이 블록만 골라서 출력하면,
“모델이 어떻게 생각하고 있는지”를 모니터링할 수 있음
2-2. 코드 예시
for chunk in model.stream("Why do parrots have colorful feathers?"):
    reasoning_steps = [r for r in chunk.content_blocks
                       if r["type"] == "reasoning"]
    # reasoning 블록이 있으면 그걸, 없으면 일반 텍스트 출력
    print(reasoning_steps if reasoning_steps else chunk.text)
특정 모델은 reasoning 강도(예: "low", "high" 또는 토큰 budget)를 파라미터로 받기도 합니다. ([LangChain Docs][1])
2-3. 시각적 생각 구조
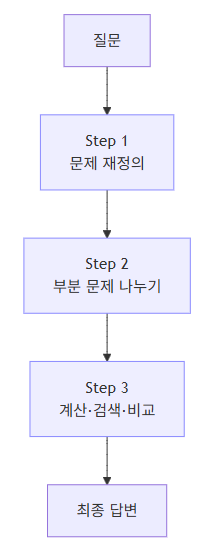
Reasoning 기능은 이 S1~S3 과정 자체를 텍스트로 스트리밍해 준다고 보면 됩니다.
3. Local models: 내 PC/GPU에서 모델 돌리기
3-1. 개념
-
클라우드 API 대신 로컬에서 LLM을 돌리고 싶을 때 사용하는 옵션
-
장점:
- 개인정보 유출 걱정 줄이기
- 비용 절감
- 직접 fine-tune한 모델 붙이기 쉬움
-
LangChain 문서에서는 Ollama 를 대표 예로 소개합니다. ([LangChain Docs][1])
3-2. 예시 (개념용)
from langchain.chat_models import init_chat_model

# Ollama 같은 OpenAI 호환 서버를 띄워놓았다고 가정
model = init_chat_model(
    model="llama3",
    model_provider="openai",
    base_url="http://localhost:11434/v1",
    api_key="not-needed-or-dummy",
)

print(model.invoke("로컬에서 도는 거야?").text)
여기서 핵심은:
base_url로 로컬 서버 주소를 넘겨주는 것- 나머지는 일반 OpenAI 스타일과 거의 동일
4. Prompt caching: 같은 프롬프트면 다시 안 계산하게
4-1. 개념
프롬프트가 길 때(예: 50k 토큰짜리 지침 문서) 매번 전부 계산하면
- 느리고
- 비쌉니다.
그래서 프롬프트 캐싱을 지원하는 provider들이 많습니다. ([LangChain Docs][1])
종류:
-
Implicit
- “같은 입력이면 내부에서 자동으로 캐시 활용”
- 예: OpenAI, Gemini 일부 모델
-
Explicit
- “여기부터 여기까지는 캐시 키를 이걸로 써” 라고 직접 지정
- LangChain에서는
prompt_cache_key등으로 사용 (ChatOpenAI 등) ([LangChain Docs][1])
4-2. 사용 패턴(아이디어)
system/developer지침처럼 항상 동일한 긴 부분은
캐시에 태우고- 매번 바뀌는 건
user메시지 정도만 남기기
응답의 usage metadata 안에 “캐시 사용 여부”가 기록되기 때문에,
나중에 “얼마나 캐시가 먹혔는지” 모니터링 가능. ([LangChain Docs][1])
5. Server-side tool use: 모델 서버가 툴까지 다 돌려 버리는 모드
5-1. 개념
기본 tool-calling은 이렇게 동작했죠:
- 모델이
tool_calls를 내보내고 - 우리의 에이전트 코드가 직접 툴을 실행하고
- 결과를 다시 모델에 넣음
Server-side tool use 는,
“이 루프를 클라우드 모델 제공자 쪽에서 한 번에 돌려버리는 기능” 입니다. ([LangChain Docs][1])
5-2. 코드 예시
from langchain.chat_models import init_chat_model

model = init_chat_model("gpt-4.1-mini")

tool = {"type": "web_search"}   # provider가 미리 정의한 server tool
model_with_tools = model.bind_tools([tool])

response = model_with_tools.invoke(
    "What was a positive news story from today?"
)
print(response.content_blocks)
예상되는 content_blocks 예시: ([LangChain Docs][1])
[
  {"type": "server_tool_call",
   "name": "web_search",
   "args": {"query": "positive news stories today", "type": "search"},
   "id": "ws_abc123"},
  {"type": "server_tool_result",
   "tool_call_id": "ws_abc123",
   "status": "success"},
  {"type": "text",
   "text": "Here are some positive news stories from today...",
   "annotations": [
      {"type": "citation", "title": "article title", "url": "..."}
   ]
  }
]
우리는 별도의 ToolMessage를 보낼 필요가 없습니다.
한 번의 invoke() 안에서 검색 → 분석 → 답변까지 끝난 상태로 와요. ([LangChain Docs][1])
5-3. 비교 시각화

6. Rate limiting: 요청 속도 제어
6-1. 개념
- 대부분의 API는 초당 요청 수 제한이 있습니다.
- 너무 빨리 때리면
rate limit exceeded에러가 나죠. - LangChain은
InMemoryRateLimiter같은 도구로 요청 속도 자체를 제한할 수 있습니다. ([LangChain Docs][1])
6-2. 예시 코드
from langchain.chat_models import init_chat_model
from langchain_core.rate_limiters import InMemoryRateLimiter

rate_limiter = InMemoryRateLimiter(
    requests_per_second=0.1,   # 초당 0.1회 = 10초에 1번
    check_every_n_seconds=0.1, # 0.1초마다 "지금 보내도 되나" 체크
    max_bucket_size=10,        # 버스트 허용량
)

model = init_chat_model(
    model="gpt-5",
    model_provider="openai",
    rate_limiter=rate_limiter,
)
이 RateLimiter는 “시간당 요청 개수”만 관리하고,
“토큰 양(길이)”까지는 제한해 주지 않는다는 점에 주의. ([LangChain Docs][1])
7. Base URL / Proxy: 다른 서버·프록시로 보내기
7-1. Base URL
많은 업체들이 OpenAI 호환 API를 제공합니다.
예: Together, vLLM 서버 등. ([LangChain Docs][1])
이때 init_chat_model 에서:
model = init_chat_model(
    model="MODEL_NAME",
    model_provider="openai",
    base_url="https://my-openai-compatible-endpoint/v1",
    api_key="YOUR_API_KEY",
)- “OpenAI 스타일 프로토콜인데, 주소만 다르다” 라고 생각하면 됩니다.
7-2. Proxy 설정
사내망에서만 나갈 수 있도록 HTTP 프록시를 써야 할 때:
from langchain_openai import ChatOpenAI

model = ChatOpenAI(
    model="gpt-4o",
    openai_proxy="http://proxy.example.com:8080",
)
프록시 지원 여부, 설정 방식은 provider마다 조금씩 다르니
각 provider 문서를 확인해야 합니다. ([LangChain Docs][1])
8. Log probabilities: “이 토큰을 얼마나 확신했는가”
8-1. 개념
- 토큰 단위 로그 확률(log probability) 을 돌려주는 기능
- “이 단어를 선택한 확신 정도”를 알고 싶을 때 활용
- 이상탐지, 불확실성 기반 재질문, 앙상블 등에 사용할 수 있음 ([LangChain Docs][1])
8-2. 코드 예시
from langchain.chat_models import init_chat_model

model = init_chat_model(
    model="gpt-4o",
    model_provider="openai",
).bind(logprobs=True)

response = model.invoke("Why do parrots talk?")
print(response.response_metadata["logprobs"])
response_metadata["logprobs"] 안에
토큰별 확률 정보가 provider 형식으로 들어 있습니다. ([LangChain Docs][1])
9. Token usage: 토큰 사용량 모니터링
9-1. 개념
- 대부분의 provider가 응답에 토큰 사용량(입력/출력/총합) 을 포함시켜 줍니다. ([LangChain Docs][1])
- LangChain에서는 이 정보가
AIMessage.usage_metadata안에 들어있고, - 여러 모델/호출의 사용량을 콜백으로 모아서 볼 수도 있습니다.
9-2. 콜백으로 집계 예시
from langchain.chat_models import init_chat_model
from langchain_core.callbacks import UsageMetadataCallbackHandler

model_1 = init_chat_model(model="gpt-4o-mini")
model_2 = init_chat_model(model="claude-haiku-4-5-20251001")

callback = UsageMetadataCallbackHandler()

_ = model_1.invoke("Hello", config={"callbacks": [callback]})
_ = model_2.invoke("Hello", config={"callbacks": [callback]})

print(callback.usage_metadata)
usage_metadata 안에는 모델별로 input/output/total 토큰 수,
reasoning 토큰, cache 사용량 등 다양한 정보가 들어갑니다. ([LangChain Docs][1])
운영 관점에서:
- “이 서비스가 하루에 토큰을 얼마나 쓰고 있냐”
- “어떤 모델이 제일 비싸냐”
같은 질문에 답할 수 있게 해 줍니다.
10. Invocation config: 실행 단위에 대한 메타 설정
10-1. 개념
model.invoke(input, config=...) 의 config 파라미터에
RunnableConfig 딕셔너리를 넘겨서,
- 로그/트레이싱 이름
- 태그
- 메타데이터
- 콜백
- 병렬도, 재귀 제한 등
을 실행 시점에 컨트롤할 수 있습니다. ([LangChain Docs][1])
10-2. 예시
response = model.invoke(
    "Tell me a joke",
    config={
        "run_name": "joke_generation",
        "tags": ["humor", "demo"],
        "metadata": {"user_id": "123"},
        "callbacks": [my_callback_handler],
    },
)
대표 속성들: ([LangChain Docs][1])
| 키 | 의미 |
|---|---|
run_name | 이 호출에 붙는 이름 (로그/트레이스에서 보임) |
tags | 하위 호출까지 상속되는 레이블 |
metadata | 임의의 key-value, 역시 상속됨 |
max_concurrency | batch() 호출 시 최대 병렬 개수 |
callbacks | 이벤트 모니터링용 핸들러 리스트 |
recursion_limit | 체인/에이전트가 재귀적으로 도는 깊이 제한 |
특히 LangSmith로 트레이싱할 때 run_name, tags, metadata 를 잘 써두면
디버깅이 훨씬 편해집니다. ([LangChain Docs][1])
11. Configurable models: “코드는 그대로, 모델만 설정으로 갈아끼우기”
11-1. 개념
- 코드에서
init_chat_model("gpt-4o")를 박아두면,
나중에 모델을 바꾸려면 코드를 수정해야 합니다. - Configurable model은 실행 시점에
config로 모델/파라미터를 바꿔끼는 방식. ([LangChain Docs][1])
11-2. 아주 기본 예시
from langchain.chat_models import init_chat_model

configurable_model = init_chat_model(temperature=0)

configurable_model.invoke(
    "what's your name",
    config={"configurable": {"model": "gpt-5-nano"}},
)

configurable_model.invoke(
    "what's your name",
    config={"configurable": {"model": "claude-sonnet-4-5-20250929"}},
)- 코드(파이프라인)는 그대로 두고
config={"configurable": {...}}값만 바꿔서
다른 provider의 모델을 테스트할 수 있습니다. ([LangChain Docs][1])
11-3. configurable_fields + prefix
여러 모델이 섞여 있을 때, 각 모델별로 설정 키를 분리하고 싶다면: ([LangChain Docs][1])
first_model = init_chat_model(
    model="gpt-4.1-mini",
    temperature=0,
    configurable_fields=("model", "model_provider", "temperature", "max_tokens"),
    config_prefix="first",   # 이 모델과 관련된 configurable 키에 prefix
)

first_model.invoke("what's your name")   # 기본 설정 사용

first_model.invoke(
    "what's your name",
    config={
      "configurable": {
        "first_model": "claude-sonnet-4-5-20250929",
        "first_temperature": 0.5,
        "first_max_tokens": 100,
      }
    },
)
이 구조를 쓰면:
- 같은 체인 안에 여러 모델이 있어도
first_*,second_*처럼 이름으로 구분하면서 설정을 바꿀 수 있습니다.
11-4. 에이전트/툴과 같이 쓰기
configurable model에도 bind_tools, with_structured_output 등을 그대로 쓸 수 있습니다.
즉,
- “툴/프롬프트/체인은 그대로 유지”
- “모델만 설정에서 갈아 끼우기”
라는 패턴을 쉽게 만들 수 있습니다. ([LangChain Docs][1])
마무리: Advanced topics를 한 줄씩 요약하면
- Multimodal: 텍스트 + 이미지/오디오를 한 번에 처리
- Reasoning: 모델의 “생각 과정”을 스트리밍으로 들여다보기
- Local models: 로컬/Ollama 같은 환경에서 LLM 사용
- Prompt caching: 긴 반복 프롬프트의 비용·지연 줄이기
- Server-side tool use: 툴 호출 루프를 provider 쪽에서 한 번에 처리
- Rate limiting: API 호출 속도 제어
- Base URL / Proxy: 다른 서버나 프록시 뒤에서 모델 호출
- Log probabilities: 토큰별 확신도 분석
- Token usage: 비용/토큰 사용량 추적
- Invocation config: 실행 단위에 대한 메타데이터·콜백·병렬 설정
- Configurable models: 코드 수정 없이 설정으로 모델 교체