- 이 글은 express + node.js로 간단하게라도 서버구축 경험이 있는 사람을 대상으로 작성한 글입니다.
- typescript로 개발 환경을 구축하였습니다. Javascript도 typescript 관련 모듈을 제외하고는 거의 동일합니다.
🏃♀️ 바쁜 현대인들을 위한 요약
필요한 모듈만 확인하고 공식문서를 통해 직접 활용해보실 분들은 아래 내용만 확인해주세요!
서버 구축 : @type/express
DB 구축 : DynamoDB | AWS-SDK 사용
결론 : typescript를 사용하여 서버를 구축하기위해서는 기존 모듈의 typscript 버전을 설치해야한다. 그외 타입 설정들은 npm 공식문서들을 참고한다.
⚙️사용했던 모듈들
- 버전은 상황에 따라 더 최신버전을 쓰거나 더 낮은 버전을 사용할 수 있습니다.
- dependecy와 devdependency는 각자 필요에 따라 변경하여 사용할 수 있습니다.
"dependencies": {
    "@aws-sdk/types": "^3.1.0",
    "@types/cors": "^2.8.9",
    "@types/morgan": "^1.9.2",
    "@types/uuid": "^8.3.0",
    "aws-sdk": "^2.824.0",
    "cors": "^2.8.5",
    "express": "^4.17.1",
    "express-session": "^1.17.1",
    "morgan": "^1.10.0",
    "ts-node": "^9.1.1",
    "typescript": "^4.1.3",
    "uuid": "^3.3.2"
  },
  "devDependencies": {
    "@types/express": "^4.17.9",
    "@types/express-session": "^1.17.3",
    "@types/node": "^14.14.20",
    "@types/prettier": "^2.1.6",
    "@typescript-eslint/eslint-plugin": "^4.12.0",
    "@typescript-eslint/parser": "^4.12.0",
    "eslint": "^7.17.0",
    "eslint-config-prettier": "^7.1.0",
    "eslint-plugin-prettier": "^3.3.1",
    "nodemon": "^2.0.7",
    "prettier": "^2.2.1"
모듈에 대한 추가 설명
ts-node: typscript가 파싱되어 돌아갈 node 환경aws-sdk: aws 기능을 node.js에서 사용하기 위한 모듈@aws-sdk/types: aws-sdk의 typescript 버전@types/express: express의 typescript 버전nodemon:node 파일명을 하지 않아도 서버를 저장하는대로 계속 켜주는 모듈uuid: 고유하고 랜덤한 id를 생성하는 모듈. DB의 id 설정할 때 유용.
DB를 구축하기 앞서, 해당 내용을 확인하고 콘솔로도 찍어보기 위한 서버 구축부터 시작해보았습니다.
서버는 node.js를 사용하는 사람이라면 익숙한 express를 사용하였습니다.
💡Typescript + express.js로 서버 셋팅하기
Typescript에 대한 간단 설명
아시는 분들은 빠르게 패스!
typescript는 타입 설정이 자유로운 javascript의 한계를 보완하고자 만들어진 정적 타입의 언어입니다.
정적 타입의 언어라는 것은 타입을 설정해주면 해당 타입으로만 작성해야한다는 것입니다.
let target = ''
let number = 123
console.log(typeof number) // 'number'

let result = target + 123
console.log(result, typeof result)//'123', 'string'
javascript에서는 위와 같은 경우를 자유롭게 만들수 있어 장점도 있지만 협업할 때는 팀원이 쓴 코드의 타입을 놓치게 되는 단점들도 있습니다. 자세한 설명은 다른 글에서 추가로 해보겠습니다.
이 글에서 중요한 것은 typescript가 실행되는 방식이
typescript -> 컴파일 -> javascript로 이뤄진다는 것입니다.
왜냐하면 typescript는/node_modules/를 직접 컴파일 하지 않도록 되어있기 때문입니다. (출처)
Typescript는 별도의 모듈들이 필요하다
그렇기 때문에 typescript를 사용하기 위해서는 별도의 모듈들이 필요합니다.
eslint, prettier, express 모두요!
typescript: 당연히 typescript는 설치하고ts-node: typscript가 파싱되어 돌아갈 node 환경@types/node: Node.js에 대한 유형 정의가 담긴 모듈. ts-node가 있더라도 이 모듈이 없으면 에러가 납니다.@types/express@types/express-session@types/prettier"@typescript-eslint/eslint-plugin@typescript-eslint/parser
최소한 위의 모듈들의 설치하면 nodemone을 사용하더라도 아래와 같이 ts파일 자체를 읽도록 해도 돌아갑니다. 왜나하면 자동적으로 js파일로 컴파일되어 컴파일된 파일도 돌아가기 때문입니다.
"scripts": {
    "test": "echo \"Error: no test specified\" && exit 1",
    "start": "nodemon src/app.ts",
    "dev": "nodemon dist/app.ts"
  },
Req, Res 타입 지정하기
typescript는 string, number, boolean 같은 단순한 타입들은 직접 선언만 하면 알아먹지만 array나 object 같은 경우에는 해당 내용물에 어떤 타입들이 들어가는지도 선언해주어야 합니다.
//types/types.ts
export interface BaseInput {
title: string
account: string
gsi_month: string
gsi_date: string
contents: any[]
total_supply_price: number
total_VAT: number
total_number: number
}

export interface ComposeInput extends BaseInput {}
이런 식으로 object 안에 들어갈 내용을 설정해준 다음 아래와 같이 사용할 수 있습니다. 단순히 object로만 선언하게 되면 새로 선언한 변수의 키들이 '해당 타입에는 ~키 속성이 없습니다'라는 오류를 뱉게 됩니다.
let composeInput: {} as ComposeInput
composeInput[
'title'
] = `주문번호 : ${paid.pur_code}, ${firstItme.type}_${firstItme.category}_${firstItme.device} 외 ${itmesNumber}건, 구매자 : ${account}`
composeInput['account'] = account
composeInput['gsi_month'] = monthId
composeInput['gsi_date'] = dateId
composeInput['contents'] = resultInput

composeInput['total_supply_price'] = totalSupplyPrice
composeInput['total_VAT'] = totalVAT
composeInput['total_number'] = totalNumber //원자재 개수가 더 나을 것 같음.
console.log('composeInput :>>', composeInput)
req, res, err, status도 각각 타입이 있기 때문에 설정해주어야 합니다. 해당 타입은 다행이 @type/express 를 깔면서 내장되어 있기 때문에 타입에 맞게 호출하기면 하면 됩니다.
저의 경우는 최대한 내용을 기능에 맞게 분리하고 최상단 파일인 app.ts에는 이를 불러오기만 하였습니다.
폴더는 express 설정을 담아두는 loaders와 환경변수 설정을 해두는 config 폴더에서 관리하였습니다. config 폴더에는 서버 환경변수 외에 AWS key 등을 연결해 둘 예정입니다.
폴더 트리의 예시├── app.ts
├── config
│ ├── app.ts
│ ├── aws.ts
│ ├── index.ts
│ └── session.ts
├── errors
│ └── index.ts
├── loaders
│ ├── express.ts
│ └── index.ts
├── middleware
│ ├── errors.ts
│ └── index.ts
├── routes
│ ├── index.ts
│ └── v1
│ ├── index.ts
│ └── item
│ ├── addItem.ts
│ ├── getItem.ts
│ ├── index.ts
│ └── paidItem.ts
├── service
│ ├── index.ts
│ └── item
│ ├── addItem.ts
│ ├── getItem.ts
│ ├── index.ts
│ └── paidItem.ts
├── types
│ └── types.ts
└── utils
└── utilsFunc.tsapp.ts
//app.ts
import express, { Application } from 'express'
import { PORT } from './config'
import loaders from './loaders' //express 설정은 여기서

async function startServer() {
  const app: Application = express()
  await loaders(app)
  app.listen(PORT, () => {
    console.log(`server listening on ${PORT}`)
  })
}

startServer()
express 설정은 loaders라는 폴더를 만들어서 따로 관리하였습니다.
loaders/express.ts
//loaders/express.ts
  import express, { Application, NextFunction, Request, Response } from 'express'
  import cors from 'cors'
  import morgan from 'morgan'

  import routes from '../routes'
  import { NotFound } from '../errors'
  import { IN_PROD } from '../config'
  //여기서 production 버전으로 나가는지, dev 버전으로 나가는지 설정
  //포트도 설정해줍니다.

  export default ({ app }: { app: Application }) => {
    app.use(express.json())

    if (!IN_PROD) {
      app.use(morgan('dev'))
    }
    app.use(cors({ origin: true, credentials: true }))

    app.use('/api', routes)

    app.use((_: Request, __: Response, next: NextFunction) => {
      next(new NotFound())
    })
    //필수 파라미터이지만 사용하지 않을 때는 언더바(_)로 표현

    app.use((err: any, _: Request, res: Response, __: NextFunction) => {
      if (!err.status) {
        console.error(err.stack)
      }
      res.status(err.status || 500).send({
        message: err.message || 'Internal Server Error',
      })
    })
  }
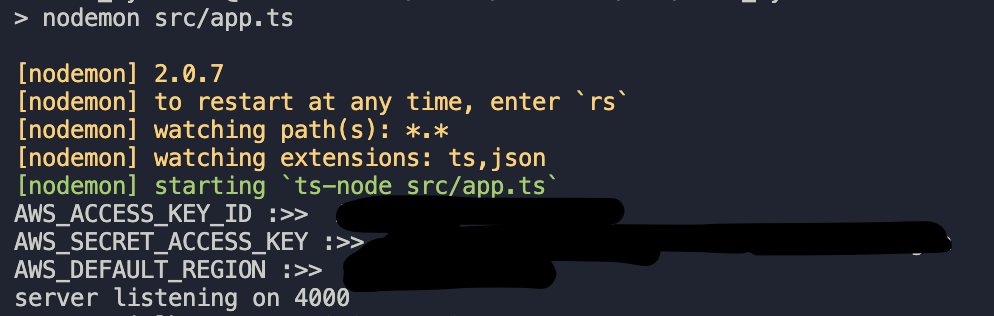
이렇게 연결을 하면 app.ts에서 작성한
console.log(`server listening on ${PORT}`)콘솔이 찍히는 것을 확인할 수 있습니다.
저의 경우는 4000 포트로 설정했기 때문에 아래와 같이 나옵니다.
다음 글에서는 이 환경에서 DynamoDB를 연결하는 방법을 작성해보도록 하겠습니다.