이 글은 MLOps for MLE를 공부하고 정리한 내용입니다.
데이터 생성
이번에는 data_insertion_loop.py 파일을 생성하고, 저번 글에서 작성한 data_insertion.py를 참고해서 계속 데이터를 자동으로 추가하는 코드를 작성한다.
import time

def generate_data(db_connect, df):
    while True:
        insert_data(db_connect, df.sample(1).squeeze())
        time.sleep(1)
코드를 살펴보면 1개 행의 랜덤 데이터를 반복해서 삽입하는 코드이다. 다만, time.sleep(1)을 통해 한 번 진행될 때마다 1초씩 멈추도록 해, DB에 부하가 생기지 않도록 한다.
이 코드를 data_insertion.py과 합쳐서 data_insertion_loop.py로 만들어본다.
# data_insertion_loop.py
import time

import pandas as pd
import psycopg2
from sklearn.datasets import load_iris


def get_data():
    X, y = load_iris(return_X_y=True, as_frame=True)
    df = pd.concat([X, y], axis="columns")
    rename_rule = {
        "sepal length (cm)": "sepal_length",
        "sepal width (cm)": "sepal_width",
        "petal length (cm)": "petal_length",
        "petal width (cm)": "petal_width",
    }
    df = df.rename(columns=rename_rule)
    return df


def insert_data(db_connect, data):
    insert_row_query = f"""
    INSERT INTO iris_data
        (timestamp, sepal_length, sepal_width, petal_length, petal_width, target)
        VALUES (
            NOW(),
            {data.sepal_length},
            {data.sepal_width},
            {data.petal_length},
            {data.petal_width},
            {data.target}
        );
    """
    print(insert_row_query)
    with db_connect.cursor() as cur:
        cur.execute(insert_row_query)
        db_connect.commit()


def generate_data(db_connect, df):
    while True:
        insert_data(db_connect, df.sample(1).squeeze())
        time.sleep(1)


if __name__ == "__main__":
    db_connect = psycopg2.connect(
        user="root",
        password="1234",
        host="localhost",
        port=5432,
        database="mydatabase",
    )
    df = get_data()
    generate_data(db_connect, df)
바로 만든 코드를 실행해본다.
python data_insertion_loop.py다른 터미널에서 psql로 DB에 접속해 확인해 본다.
$ set PGPASSWORD=1234
$ psql -h localhost -p 5432 -U root -d mydatabase
$ mydatabase=# select * from iris_data;
id | timestamp | sepal_length | sepal_width | petal_length | petal_width | target
----+----------------------------+--------------+-------------+--------------+-------------+--------
4 | 2025-02-01 06:54:43.783947 | 6.4 | 3.2 | 5.3 | 2.3 | 2
5 | 2025-02-01 06:54:44.792236 | 6 | 2.7 | 5.1 | 1.6 | 1
6 | 2025-02-01 06:54:45.797738 | 7.7 | 2.8 | 6.7 | 2 | 2
7 | 2025-02-01 06:54:46.821174 | 6.6 | 2.9 | 4.6 | 1.3 | 1
8 | 2025-02-01 06:54:47.841624 | 7.6 | 3 | 6.6 | 2.1 | 2
(8 rows)iris_data 테이블에 데이터가 계속 추가되는 것을 확인할 수 있다.
지금까지의 데이터 삽입을 바탕으로 데이터 제너레이터를 만들어보자.
data_generator.py에 다음 코드를 붙여넣는다.
# data_generator.py
import time
from argparse import ArgumentParser

import pandas as pd
import psycopg2
from sklearn.datasets import load_iris


def get_data():
    X, y = load_iris(return_X_y=True, as_frame=True)
    df = pd.concat([X, y], axis="columns")
    rename_rule = {
        "sepal length (cm)": "sepal_length",
        "sepal width (cm)": "sepal_width",
        "petal length (cm)": "petal_length",
        "petal width (cm)": "petal_width",
    }
    df = df.rename(columns=rename_rule)
    return df


def create_table(db_connect):
    create_table_query = """
    CREATE TABLE IF NOT EXISTS iris_data (
        id SERIAL PRIMARY KEY,
        timestamp timestamp,
        sepal_length float8,
        sepal_width float8,
        petal_length float8,
        petal_width float8,
        target int
    );"""
    print(create_table_query)
    with db_connect.cursor() as cur:
        cur.execute(create_table_query)
        db_connect.commit()


def insert_data(db_connect, data):
    insert_row_query = f"""
    INSERT INTO iris_data
        (timestamp, sepal_length, sepal_width, petal_length, petal_width, target)
        VALUES (
            NOW(),
            {data.sepal_length},
            {data.sepal_width},
            {data.petal_length},
            {data.petal_width},
            {data.target}
        );
    """
    print(insert_row_query)
    with db_connect.cursor() as cur:
        cur.execute(insert_row_query)
        db_connect.commit()


def generate_data(db_connect, df):
    while True:
        insert_data(db_connect, df.sample(1).squeeze())
        time.sleep(1)


if __name__ == "__main__":
    parser = ArgumentParser()
    parser.add_argument("--db-host", dest="db_host", type=str, default="localhost")
    args = parser.parse_args()

    db_connect = psycopg2.connect(
        user="root",
        password="1234",
        host=args.db_host,
        port=5432,
        database="mydatabase",
    )
    create_table(db_connect)
    df = get_data()
    generate_data(db_connect, df)
Dockerfile 을 이용한 컨테이너 생성
그럼 이제 Dockerfile을 생성하여 위에서 작성한 스크립트를 실행할 수 있는 이미지로 바꿔보자.
FROM amd64/python:3.9-slim

RUN apt-get update && apt-get install -y \
    postgresql-client \
    && rm -rf /var/lib/apt/lists/*

WORKDIR /usr/app

RUN pip install -U pip &&\
    pip install scikit-learn pandas psycopg2-binary

COPY data_generator.py data_generator.py

ENTRYPOINT ["python", "data_generator.py", "--db-host"]
# Change CMD to solve host finding error
CMD ["localhost"]
- FROM: 이미지를 만들 때 base가 되는 이미지
- RUN: 이미지를 만들 때 실행할 코드
- WORKDIR: 작업 directory를 지정
- COPY: 파일이나 폴더를 이미지에 복사
- ENTRYPOINT: 컨테이너가 실행될 때 시작할 프로세스
- CMD: 컨테이너가 실행될 때 ENTRYPOINT 에 전달할 argument
이제 작성한 도커 파일을 이용해 이미지를 빌드해본다.
$ docker build -t data-generator .data-generator라는 이름으로 이미지가 생성된 것을 확인할 수 있다.
$ docker image lsREPOSITORY TAG IMAGE ID CREATED SIZE
data-generator latest be001e3f1ef2 35 seconds ago 936MB
postgres 14.0 db927beee892 3 years ago 537MB빌드가 완료되었으면 이미지를 실행한다.
$ docker run data-generatorTraceback (most recent call last):
File "/usr/app/data_generator.py", line 70, in <module>
db_connect = psycopg2.connect(
File "/usr/local/lib/python3.9/site-packages/psycopg2/__init__.py", line 122, in connect
conn = _connect(dsn, connection_factory=connection_factory, **kwasync)
psycopg2.OperationalError: connection to server at "localhost" (::1), port 5432 failed: Connection refused
Is the server running on that host and accepting TCP/IP connections?
connection to server at "localhost" (127.0.0.1), port 5432 failed: Connection refused
Is the server running on that host and accepting TCP/IP connections?그런데 결과는 에러 메세지가 나오게 된다.
localhost:5432가 응답하지 않고 있다는 에러가 나온다.
로컬에서 스크립트를 실행하면 정상적으로 실행이 되는데, 왜 data-generator를 실행시키는 컨테이너에서는 접근할 수 없다고 나올까?
Docker Network
로컬에서는 어떻게 DB 컨테이너에 접근이 가능했을까?
이전에 DB 컨테이너를 띄울 때 사용한 명령어를 다시 보자.
$ docker run -d \
    ...
  -p 5432:5432 \
postgres:14.05432:5432의 의미는 DB 컨테이너의 5432포트를 localhost의 5432포트로 연결하라는 뜻이다.
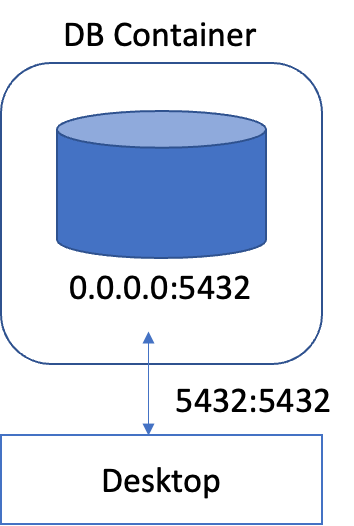
이처럼 포트의 연결이 있었기에 접속이 가능했다.
Data Generator 컨테이너의 경우를 다시 보자.
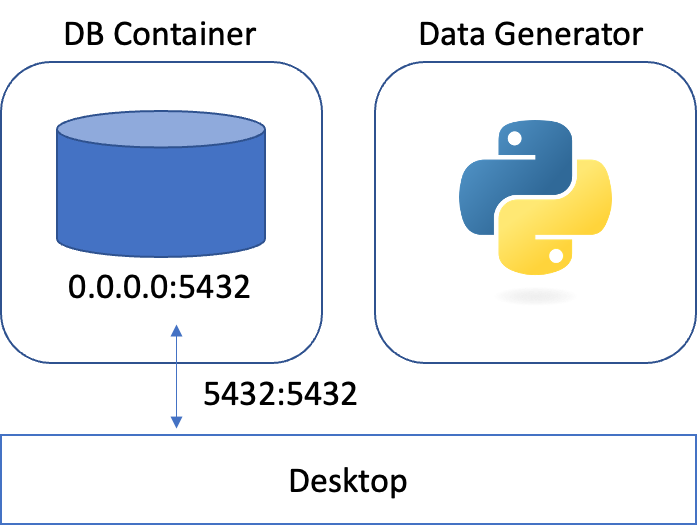
Data Generator 컨테이너 입장에서는 연결해주지 않았기 때문에, localhost:5432는 아무것도 열려있지 않은 비어있는 포트이다.
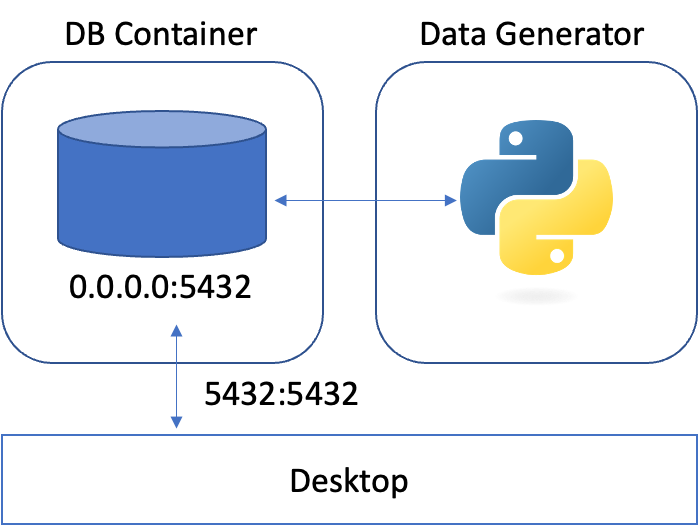
이 그림처럼 두 컨테이너 간에 통신할 수 있도록 연결해 주어야 한다.
네트워크 연결
컨테이너 간 통신할 수 있는 네트워크를 생성한다.
$ docker network create my-network그 다음엔 실행 중인 DB 컨테이너를 생성된 네트워크에 연결한다.
$ docker network connect my-network postgres-server이제 다시 data-generator 이미지를 이용하여 data-generator 라는 이름의 컨테이너를 실행한다.
$ docker run -d \
  --name data-generator \
  --network "my-network" \
  data-generator "postgres-server"
network 옵션에 생성한 네트워크 이름을 넣어주면 된다.
컨테이너를 시작할 때 이미지 이름 뒤에 입력된 값으로 도커 파일의 CMD가 수정되며 컨테이너 간의 통신이 열리게 된다.
data-generator.py가 이전에 작성한 코드와 다른 부분이 있었다.
parser = ArgumentParser()
parser.add_argument("--db-host", dest="db_host", type=str, default="localhost")
args = parser.parse_args()
이 부분이었는데, 이 코드는 바로 지금의 경우를 위한 것이라고 생각하면 된다.
다시 데이터가 계속 삽입되고 있는지 확인해보자.
$ mydatabase=# select * from iris_data; id | timestamp | sepal_length | sepal_width | petal_length | petal_width | target
-----+----------------------------+--------------+-------------+--------------+-------------+--------
1 | 2025-01-16 07:20:51.776736 | 6.9 | 3.1 | 5.4 | 2.1 | 2
2 | 2025-02-01 06:54:41.747637 | 5.2 | 2.7 | 3.9 | 1.4 | 1
3 | 2025-02-01 06:54:42.761149 | 4.9 | 3.1 | 1.5 | 0.1 | 0
4 | 2025-02-01 06:54:43.783947 | 6.4 | 3.2 | 5.3 | 2.3 | 2
5 | 2025-02-01 06:54:44.792236 | 6 | 2.7 | 5.1 | 1.6 | 1
6 | 2025-02-01 06:54:45.797738 | 7.7 | 2.8 | 6.7 | 2 | 2데이터가 계속해서 추가되고 있는 것을 확인할 수 있다.
다만, network를 생성하여 연결하는 방법은 불편함이 있다.
- 통신을 위해서 컨테이너의 이름을 알아야 한다.
- 컨테이너가 예상하지 못한 이유로 종료될 경우, 다시 실행하기 위해서는 종료된 컨테이너를 삭제해야 한다.
- 컨테이너가 실행되는 순서를 보장할 수 없다.