✅ 요소 노드 프로퍼티
HTML
<!DOCTYPE html>
<html lang="en">

<head>
  <meta charset="UTF-8">
  <meta http-equiv="X-UA-Compatible" content="IE=edge">
  <meta name="viewport" content="width=device-width, initial-scale=1.0">
  <title>JS with Codeit</title>
</head>

<body>
  <div id="content">
    <h2 id="title-1">Cat-1</h2>
    <ul id="list-1">
      <li>Ragdoll</li>
      <li>British Shorthair</li>
      <li>Scottish Fold</li>
      <li>Bengal</li>
      <li>Siamese</li>
      <li>Maine Coon</li>
      <li>American Shorthair</li>
      <li>Russian Blue</li>
    </ul>
    <h2 id="title-2">Cat-2</h2>
    <ul id="list-2">
      <li>Sphynx</li>
      <li>Munchkin</li>
      <li>Persian</li>
      <li>Norwegian Forset</li>
      <li>Turkish Angora</li>
      <li>Bombay</li>
      <li>Selkirk Rex</li>
      <li>Munchkin</li>
    </ul>
  </div>
  <script src="index.js"></script>
</body>

</html>
기본 화면

☑️ textContent
const myTag = document.querySelector("#list-1");

//textContent
console.log(myTag.textContent);
myTag.textContent = "<h2>title2</h2>"
해당 태그 안에 있는 텍스트 노드의 값을 수정하는데 사용
☑️ outerHTML
//outerHTML
console.log(myTag.outerHTML);
myTag.outerHTML += `<ul>
                      <li>Grand Canient</li>
                    </ul>`;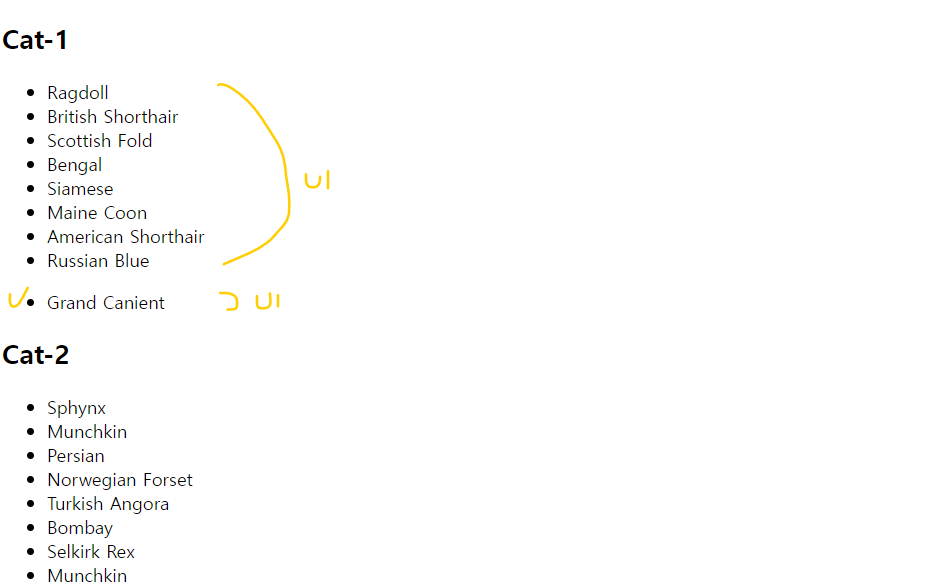
해당 태그를 수정(=)하거나, 형제 노드로서 추가할때 사용(+=)
☑️ innerHTML
console.log(myTag.innerHTML);
myTag.innerHTML += `<li>Grand Canient</li>`;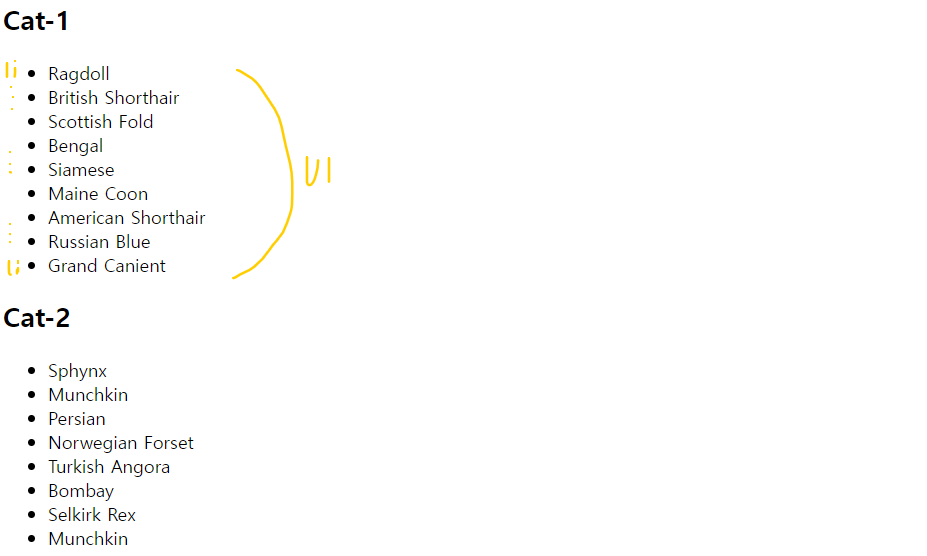
해당 태그의 자식 노드로 추가(+=)하거나, 자식 노드의 값을 전부 변경(=)할 때 사용
✅ 요소 노드 추가하기
HTML
<!DOCTYPE html>
<html lang="ko">
<head>
  <meta charset="UTF-8">
  <title>JS with Codeit</title>
</head>
<body>
  <div>
	<h1>내일 할 일</h1>
		<ol id="tomorrow">
			<li>자바스크립트 공부</li>
			<li>뮤지컬 공연 예매</li>
			<li>유튜브 시청</li>
		</ol>
  </div>
  <script src="index.js"></script>
</body>
</html>
☑️ ID값 가져오기
const tomorrow = document.querySelector('#tomorrow');
☑️ 요소 노드 만들기
const first = document.createElement('li');
☑️ 요소 노드 텍스트 넣기
first.textContent = '처음';
☑️ 요소 노드 추가하기
tomorrow.prepend(first);
리스트 안에 처음 추가 (prepend)
const tomorrow = document.querySelector('#tomorrow');
const first = document.createElement('li');
first.textContent = '처음';
tomorrow.prepend(first);
리스트 안에 마지막 추가 (append)
const last = document.createElement('li');
last.textContent = '마지막';
tomorrow.append(last);
리스트 안에 이전 추가 (before)
const prev = document.createElement('p');
prev.textContent = '이전';
tomorrow.before(prev);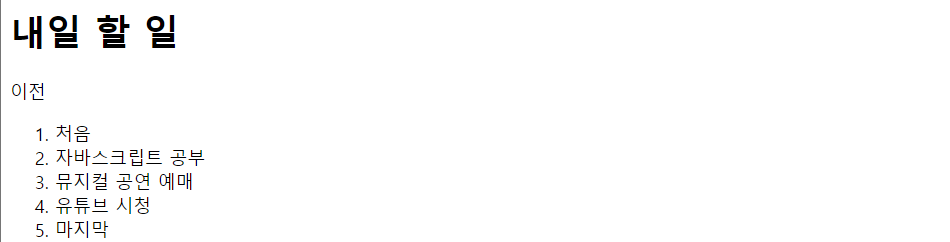
리스트 안에 다음 추가 (after)
const next = document.createElement('p');
next.textContent = '다음';
tomorrow.after(next);
✅ 요소 노드 삭제 및 이동하기
HTML
<!DOCTYPE html>
<html lang="ko">
<head>
  <meta charset="UTF-8">
  <title>JS with Codeit</title>
</head>
<body>
  <div>
    <h1>오늘 할 일</h1>
		<ol id="today">
			<li>자바스크립트 공부</li>
			<li>고양이 화장실 청소</li>
			<li>고양이 장난감 쇼핑</li>
		</ol>
		<h1>내일 할 일</h1>
		<ol id="tomorrow">
			<li>자바스크립트 공부</li>
			<li>뮤지컬 공연 예매</li>
			<li>유튜브 시청</li>
		</ol>
  </div>
  <script src="index.js"></script>
</body>
</html>
☑️ 노드 삭제하기
내일 할 일 리스트 전부 제거
// 변수로 가져오기
const today = document.querySelector('#today');
const tomorrow = document.querySelector('#tomorrow');

// 노드 삭제하기
tomorrow.remove();
오늘 할 일 마지막 리스트 제거
// 변수로 가져오기
const today = document.querySelector('#today');
const tomorrow = document.querySelector('#tomorrow');

// 노드 삭제하기
today.children[2].remove();
☑️ 노드 이동하기
오늘 할 일 마지막 리스트에 내일 할 일 인덱스2의 리스트를 이동하기
// 변수로 가져오기
const today = document.querySelector('#today');
const tomorrow = document.querySelector('#tomorrow');

// 노드 삭제하기
today.append(tomorrow.children[2]);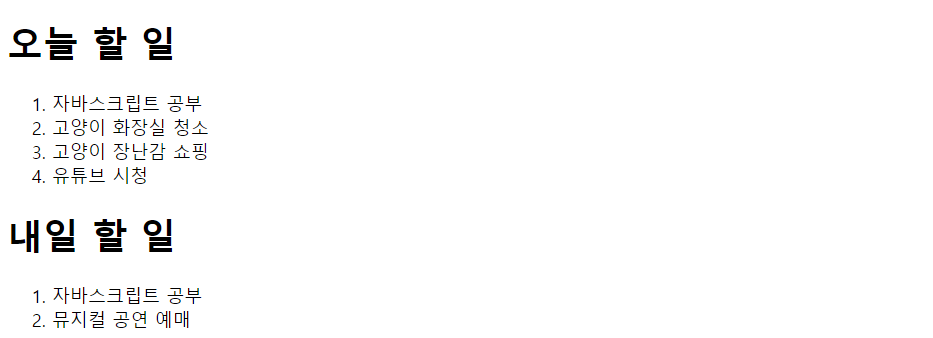
내일 할 일 리스트 중 인덱스2의 자리를 오늘 할 일 인덱스1 리스트가 이동하도록 하기
// 변수로 가져오기
const today = document.querySelector('#today');
const tomorrow = document.querySelector('#tomorrow');

// 노드 삭제하기
tomorrow.children[1].after(today.children[1]);

or

tomorrow.children[2].before(today.children[1]);

or

tomorrow.lastElementChild.before(today.children[1]);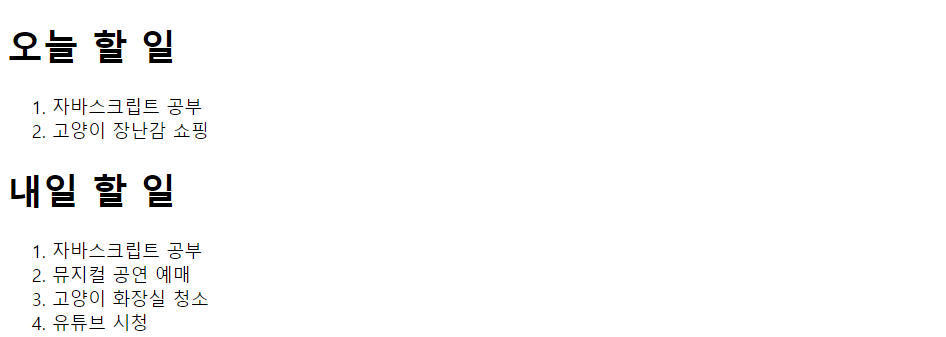
✅ 실습과제


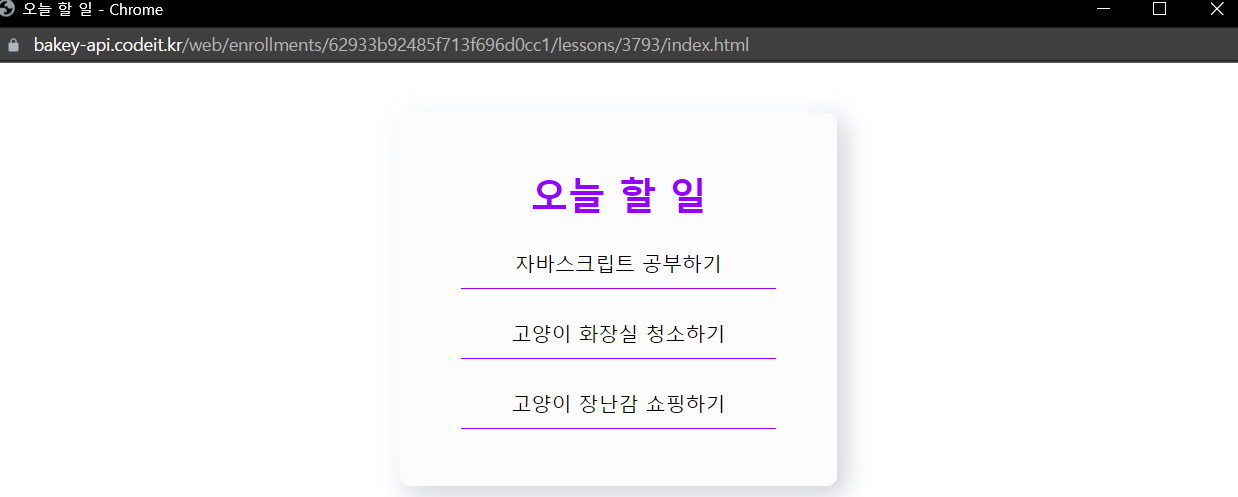
<!DOCTYPE html>
<html lang="ko">
<head>
  <meta charset="UTF-8">
  <title>오늘 할 일</title>
  <link rel="stylesheet" href="style.css">
</head>
<body>
  <div class="main">
    <h2 class="title">오늘 할 일</h2>
    <ul id="to-do-list"></ul>
  </div>
  <script src="index.js"></script>
</body>
</html>
body {
margin: 0;
padding: 0;
display: flex;
align-items: center;
justify-content: center;
}
.main {
width: 350px;
margin: 40px;
padding: 30px 0;
background-color: #fcfcfc;
box-shadow: -5px -5px 20px #FFFFFF, 5px 5px 20px #BABECC;
border-radius: 8px;
text-align: center;
}
.title {
margin: 15px auto;
font-size: 30px;
font-weight: 600;
color: #9600ff;
}
#to-do-list {
width: 280px;
margin: 0 auto 15px;
padding: 0;
list-style: none;
}
#to-do-list li {
display: flex;
align-items: center;
justify-content: center;
width: 90%;
height: 40px;
margin: 8px auto 15px;
border-bottom: 1px solid #9600ff;
}const toDoList = document.querySelector('#to-do-list');
function addNewTodo(text) {
// 여기에 코드를 작성해 주세요.
const addTodo = document.createElement("li");
addTodo.textContent = text;
toDoList.append(addTodo);
}
// 테스트 코드
addNewTodo('자바스크립트 공부하기');
addNewTodo('고양이 화장실 청소하기');
addNewTodo('고양이 장난감 쇼핑하기');결과물

필요하다면 공부하는 개발자, 한승준