Airflow는 데이터 파이프라인 구축 및 인프라 유지보수 등 다양한 환경에서 활용됩니다. OS, DB에 설정된 배치잡 또는 스케줄러을 AirFlow로 전환 하는 과정에 대한 경험을 공유합니다.
Tip. 일괄 처리(=batch)란 최종 사용자의 개입 없이 또는 실행을 스케줄링할 수 있는 작업의 실행을 의미한다. 컴퓨터 프로그램 흐름에 따라 순차적으로 자료를 처리하는 방식이다. 위키백과
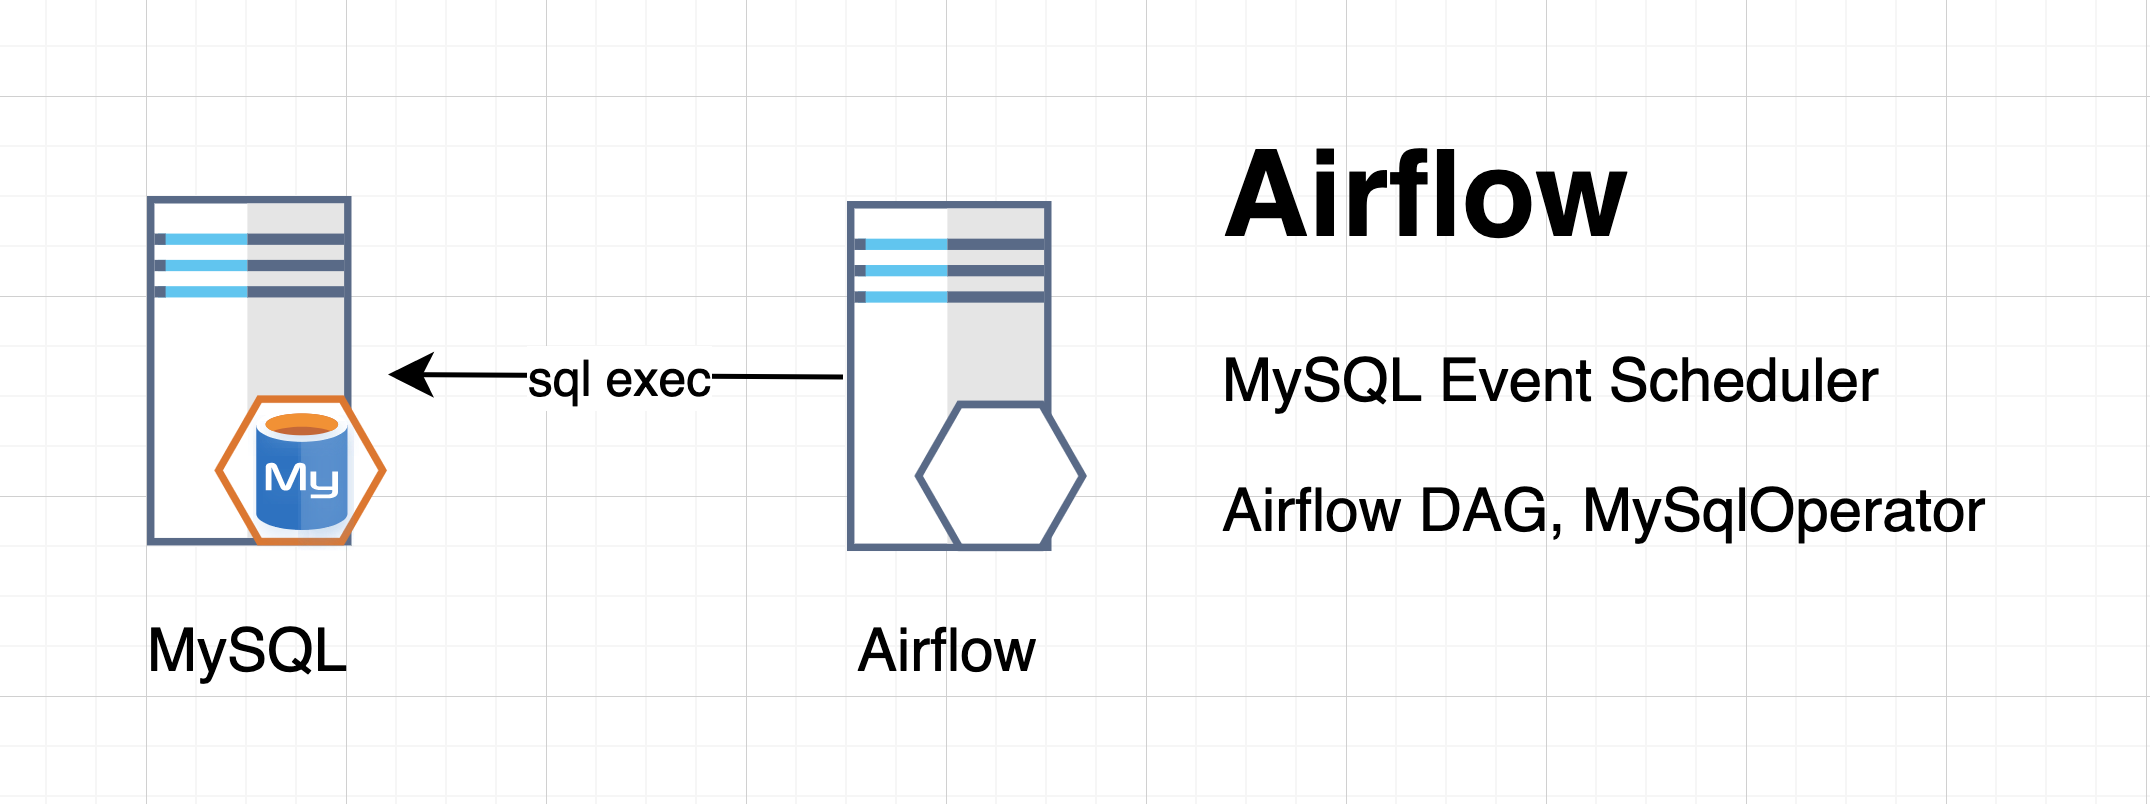
목표
MySQL의 Event Scheduler를 AirFlow로 전환합니다.
TL;DR
- Docke-composer를 실행합니다. (docker-compose up)
- Airflow, Connection을 생성합니다. (Mysql Connection)
- Airflow, DAG을 생성합니다. (MySQL Operators)
Getting Started
실습 환경은 아래와 같습니다.
Docker : 20.10.2
Docker Compose : 1.27.4, build 40524192
Python : 3.9.0
Airflow : 2.0.1
MySQL : 8.0.23
File Directory with Docker-Compose
Docker-Compose로 Airflow와 MySQL을 아래와 같이 구성 합니다.
airflow-mysql
├── docker-compose.yaml
├── airflow
│   ├──plugins
│   ├──dags
│   │   ├── example_mysql.py
│   │   └── hello_world.py
│   ├──sql
│   │   └── example_mysql.sql
│   ├──logs
├── mysql-01
│   ├── conf
│   │   └── my.cnf
│   ├── data
│ └── logdocker-compose.yaml
"docker-compose.yaml"를 살펴봅니다.
version: '3'
x-airflow-common:
  &airflow-common
  image: ${AIRFLOW_IMAGE_NAME:-apache/airflow:2.0.1}
  environment:
    &airflow-common-env
    AIRFLOW__CORE__EXECUTOR: CeleryExecutor
    AIRFLOW__CORE__SQL_ALCHEMY_CONN: postgresql+psycopg2://airflow:airflow@postgres/airflow
    AIRFLOW__CELERY__RESULT_BACKEND: db+postgresql://airflow:airflow@postgres/airflow
    AIRFLOW__CELERY__BROKER_URL: redis://:@redis:6379/0
    AIRFLOW__CORE__FERNET_KEY: ''
    AIRFLOW__CORE__DAGS_ARE_PAUSED_AT_CREATION: 'true'
    AIRFLOW__CORE__LOAD_EXAMPLES: 'true'
    AIRFLOW__WEBSERVER__WORKERS: 1
  volumes:
    - ./dags:/opt/airflow/dags
    - ./logs:/opt/airflow/logs
    - ./plugins:/opt/airflow/plugins
  user: "${AIRFLOW_UID:-50000}:${AIRFLOW_GID:-50000}"
  depends_on:
    redis:
      condition: service_healthy
    postgres:
      condition: service_healthy

services:
  postgres:
    image: postgres:13
    environment:
      POSTGRES_USER: airflow
      POSTGRES_PASSWORD: airflow
      POSTGRES_DB: airflow
    volumes:
      - postgres-db-volume:/var/lib/postgresql/data
    healthcheck:
      test: ["CMD", "pg_isready", "-U", "airflow"]
      interval: 5s
      retries: 5
    restart: always

  redis:
    image: redis:latest
    ports:
      - 6379:6379
    healthcheck:
      test: ["CMD", "redis-cli", "ping"]
      interval: 5s
      timeout: 30s
      retries: 50
    restart: always

  airflow-webserver:
    <<: *airflow-common
    command: webserver
    ports:
      - 8080:8080
    healthcheck:
      test: ["CMD", "curl", "--fail", "http://localhost:8080/health"]
      interval: 10s
      timeout: 10s
      retries: 5
    restart: always

  airflow-scheduler:
    <<: *airflow-common
    command: scheduler
    restart: always

  airflow-worker:
    <<: *airflow-common
    command: celery worker
    restart: always

  airflow-init:
    <<: *airflow-common
    command: version
    environment:
      <<: *airflow-common-env
      _AIRFLOW_DB_UPGRADE: 'true'
      _AIRFLOW_WWW_USER_CREATE: 'true'
      _AIRFLOW_WWW_USER_USERNAME: ${_AIRFLOW_WWW_USER_USERNAME:-airflow}
      _AIRFLOW_WWW_USER_PASSWORD: ${_AIRFLOW_WWW_USER_PASSWORD:-airflow}

  flower:
    <<: *airflow-common
    command: celery flower
    ports:
      - 5555:5555
    healthcheck:
      test: ["CMD", "curl", "--fail", "http://localhost:5555/"]
      interval: 10s
      timeout: 10s
      retries: 5
    restart: always

  mysql-01:
    container_name: mysql-01
    hostname: mysql-01
    image: mysql:8.0.23
    command: mysqld --default-authentication-plugin=mysql_native_password --character-set-server=utf8mb4 --collation-server=utf8mb4_unicode_ci
    environment:
      MYSQL_ROOT_PASSWORD: root
    ports:
      - '3306:3306'
    volumes:
      - "${PWD}/mysql-01/data:/var/lib/mysql"
      - "${PWD}/mysql-01/log:/var/log/mysql"
      - "${PWD}/mysql-01/conf/my.cnf:/etc/mysql/conf.d/my.cnf"

volumes:
  postgres-db-volume:
Tip. Docker의 메모리 할당량을 초과하여 사용할 경우 서비스 기동이 되지 않습니다. 메모리 사용량을 확인 후 조정합니다.
Airflow Providers, Example DAGs
Airflow에서 다양한 Providers Packages를 지원하고 있습니다. RDBMS에 해당하는 MySQL, PostgreSQL, SQLServer, Oracle 그리고 ODBC도 지원하고 있어 DB 연결 후 Query 및 Batch Job을 실행할수 있습니다. 그 외에도 NoSQL인 MongDB, REDIS, 그래프DB인 Neo4j 등 다양한 환경을 제공하고 있습니다. (2021-03-04 update)

Example DAGs - MySQL
Airflow에서 Connections을 생성하고 DAG을 생성하도록 합니다.
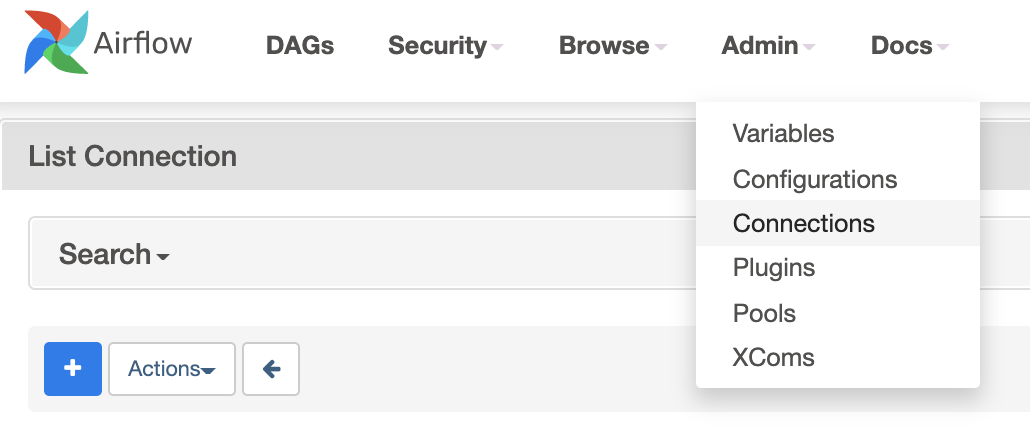
A. Connections 생성하기
AirFlow에서 MySQL연결을 위한 Connections을 생성합니다.
Admin > Connections을 선택합니다.
Conn_id, Conn_type, Host, Login, Password, Port를 입력 합니다. Conn_id의 경우 DAQ에서 해당 Connection을 불러올때 사용되는 이름입니다.
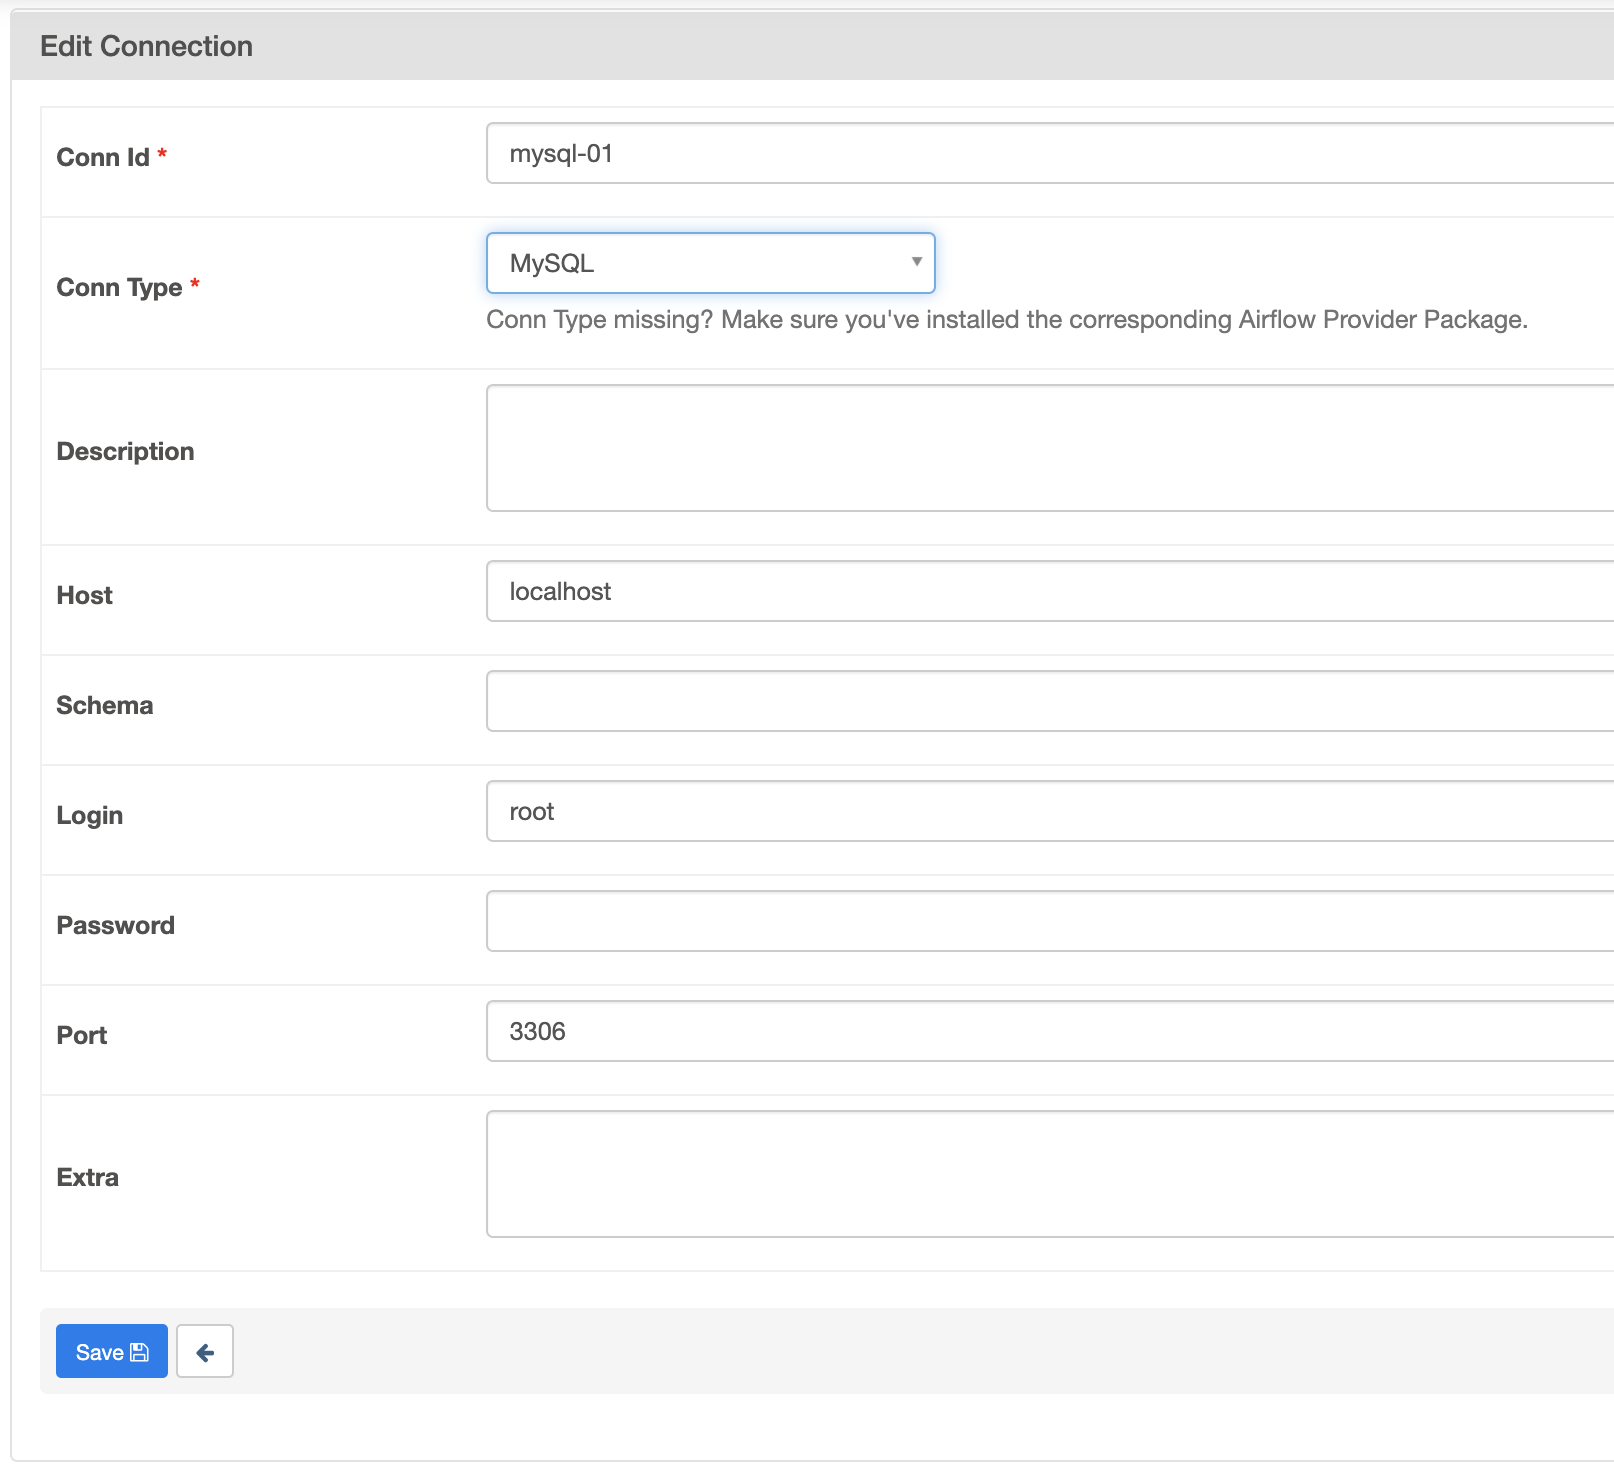
Tip. Airflow 서버와 MySQL 서버간 3306 포트가 열려있는지 체크 합니다. (ex. tcping localhost 3306)
B. DAG 생성
MySQL 예제 DAG를 생성 합니다. 아래 dags 하위에 "example_mysql.py"를 생성합니다.
airflow-mysql
├── airflow
│   ├──dags
│   │   ├── example_mysql.py
"example_mysql.py"의 내용에 대해 살펴보겠습니다.
example_mysql.py
MySQL의 Event Scheduler의 내용인 "DROP TABLE table_name;" 구문을 DAG으로 전환합니다. DAG 파이썬 코드에 Query를 직접 구현한 경우와 .sql 파일로 외부로 Query를 저장한 형태 입니다. .sql 파일로 구현할 경우 이후 Query 변경이 필요할 경우 해당 파일만 변경하면 되기에 운영에 이점이 있습니다.
from airflow import DAG
from airflow.providers.mysql.operators.mysql import MySqlOperator
from airflow.utils.dates import days_ago

default_args = {
    'owner': 'airflow',
}

dag = DAG(
    'example_mysql',
    default_args=default_args,
    start_date=days_ago(2),
    tags=['example'],
)

# [START howto_operator_mysql]

drop_table_mysql_task = MySqlOperator(
    task_id='create_table_mysql', mysql_conn_id='mysql_conn_id', sql=r"""DROP TABLE table_name;""", dag=dag
)

# [END howto_operator_mysql]

# [START howto_operator_mysql_external_file]

mysql_task = MySqlOperator(
    task_id='create_table_mysql_external_file',
    mysql_conn_id='mysql_conn_id',
    sql='/scripts/drop_table.sql',
    dag=dag,
)

# [END howto_operator_mysql_external_file]

drop_table_mysql_task >> mysql_task
DAGs에 "example_mysql" 이름의 DAG이 생성됩니다.

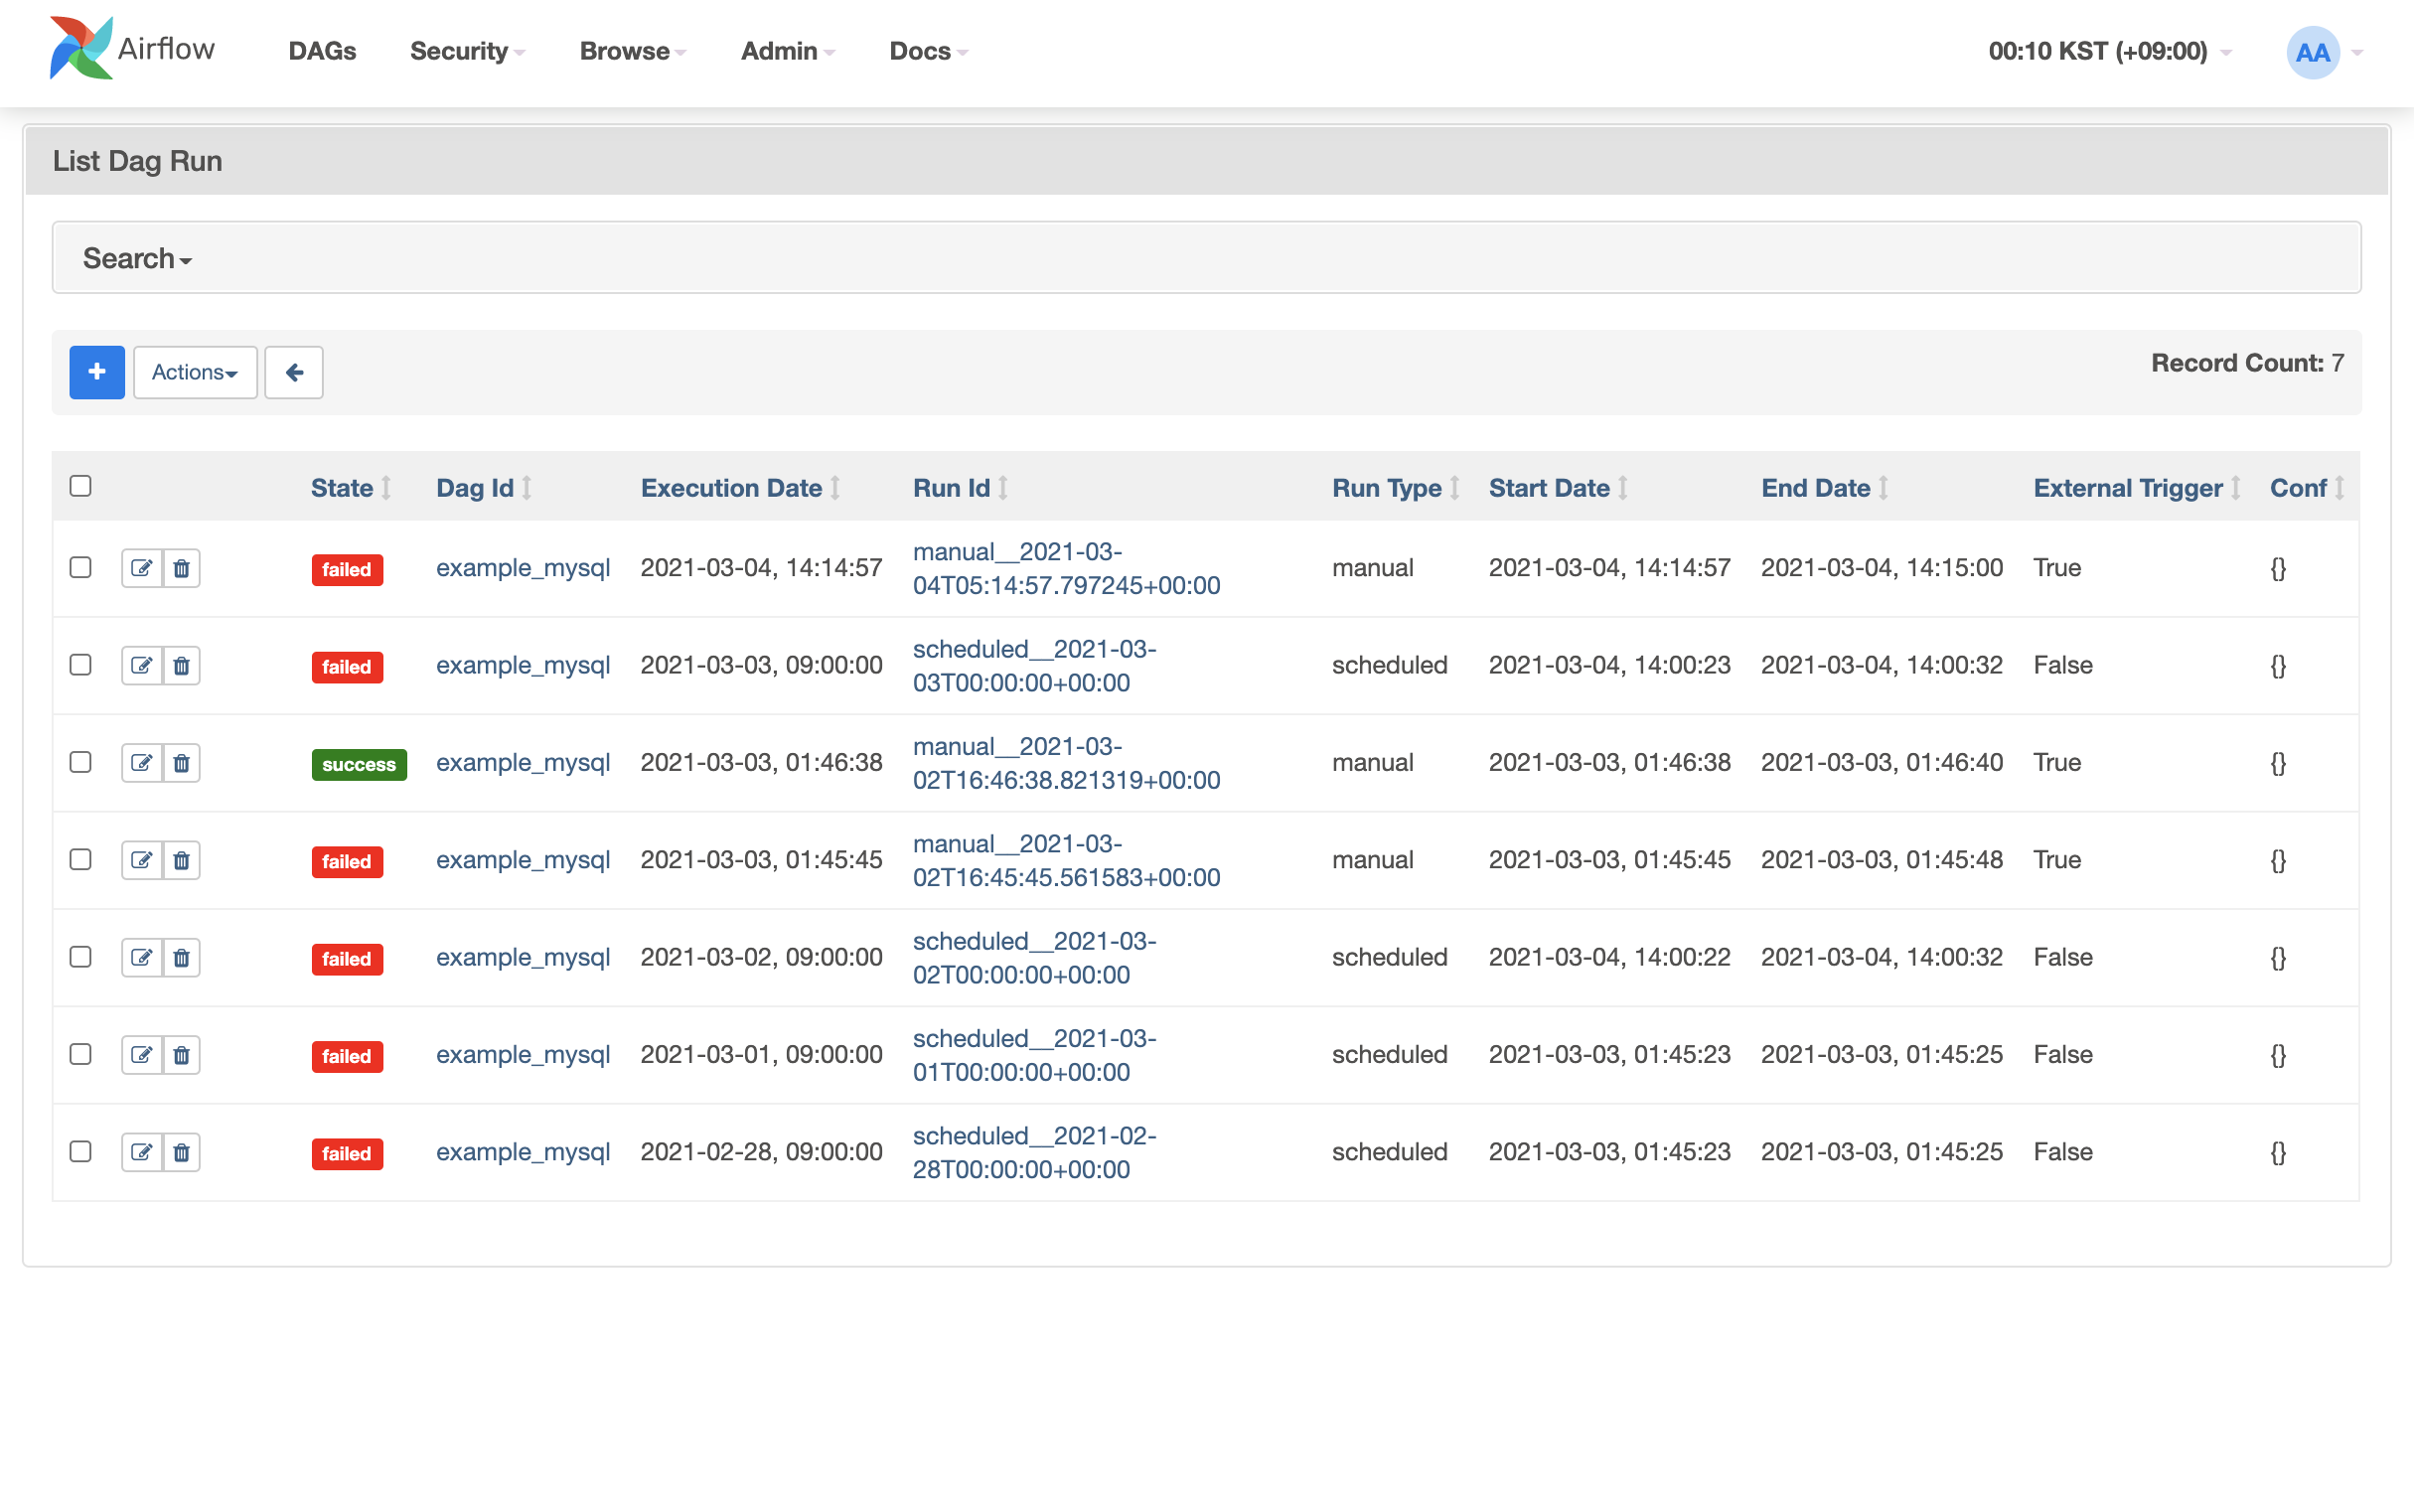
Runs 항목에서는 DAG의 실행 상태에 대해 확인할수 있습니다. "example_mysql" 이 1번 성공, 6번 실패된 부분을 확인할수 있습니다. Schedule에서 설정된 반복 일정에 대해 확인 가능하며 Actions에서는 재실행도 가능 합니다.
Schedule을 선택하면 해당 DAG의 실행 이력에 대해 한눈에 확인할수 있습니다.

C. DAG 상세내용
"example_mysql" DAG을 선택 후 Code Tab을 선택합니다. DAG Code를 UI로도 확인 가능합니다.
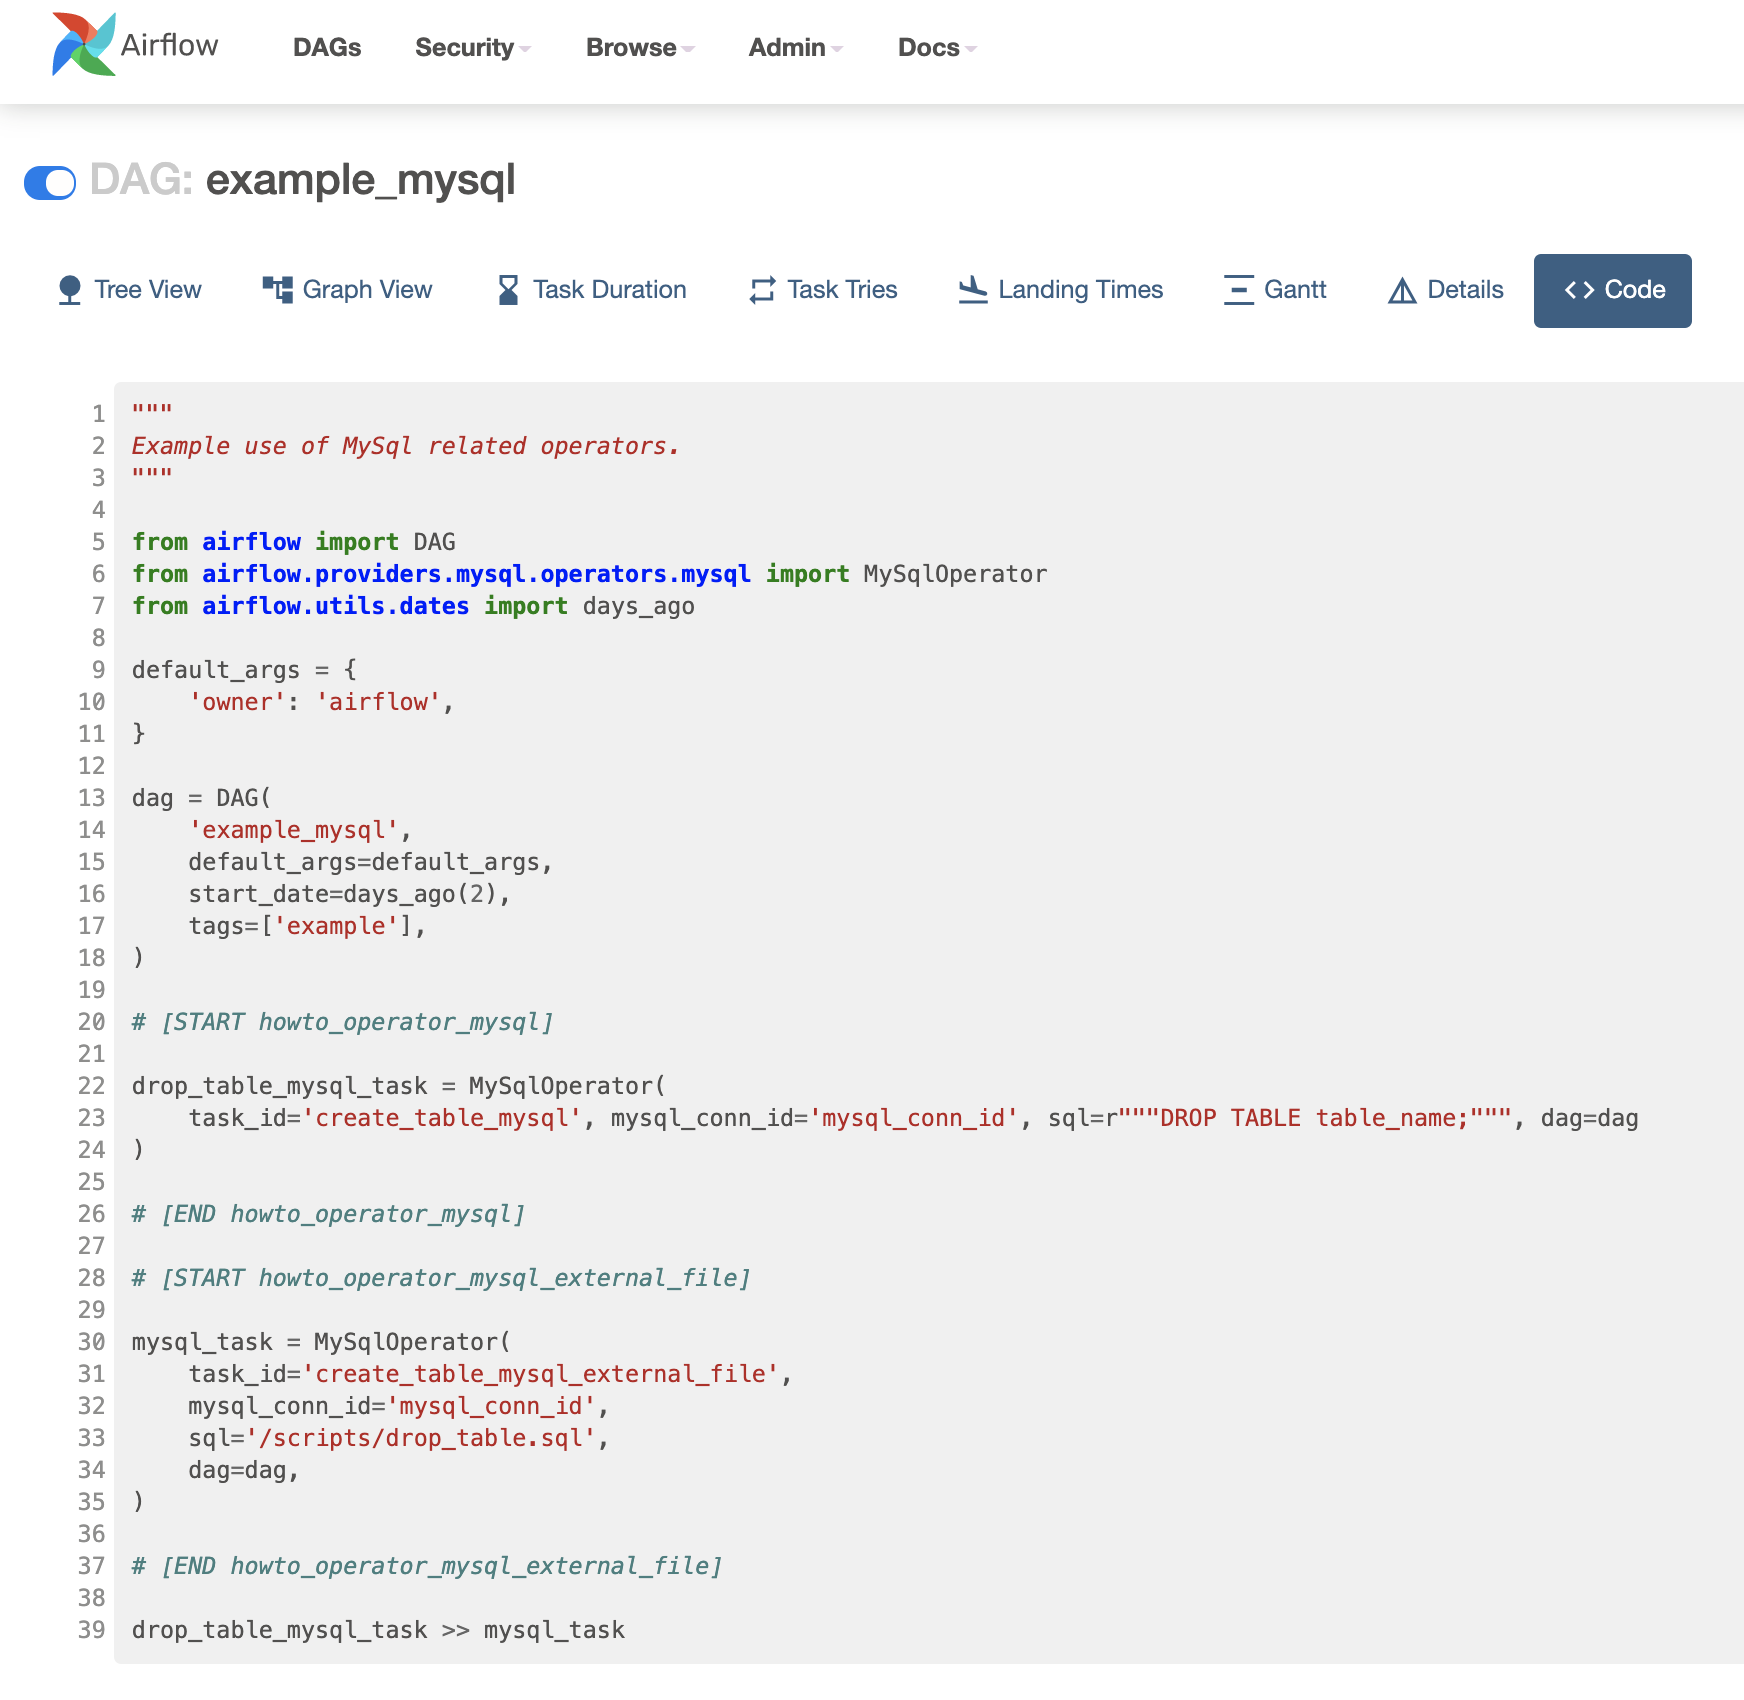
그외 아래 TAB에서는 해당 DAG의 Task를 시각화 하고 각 Task의 처리소요시간 및 로그 등을 상세히 살펴볼수 있습니다.
- Tree View
- Graph View
- Task Duration
- Task Tries
- Landing Times
- Gantt
- Details
- Code
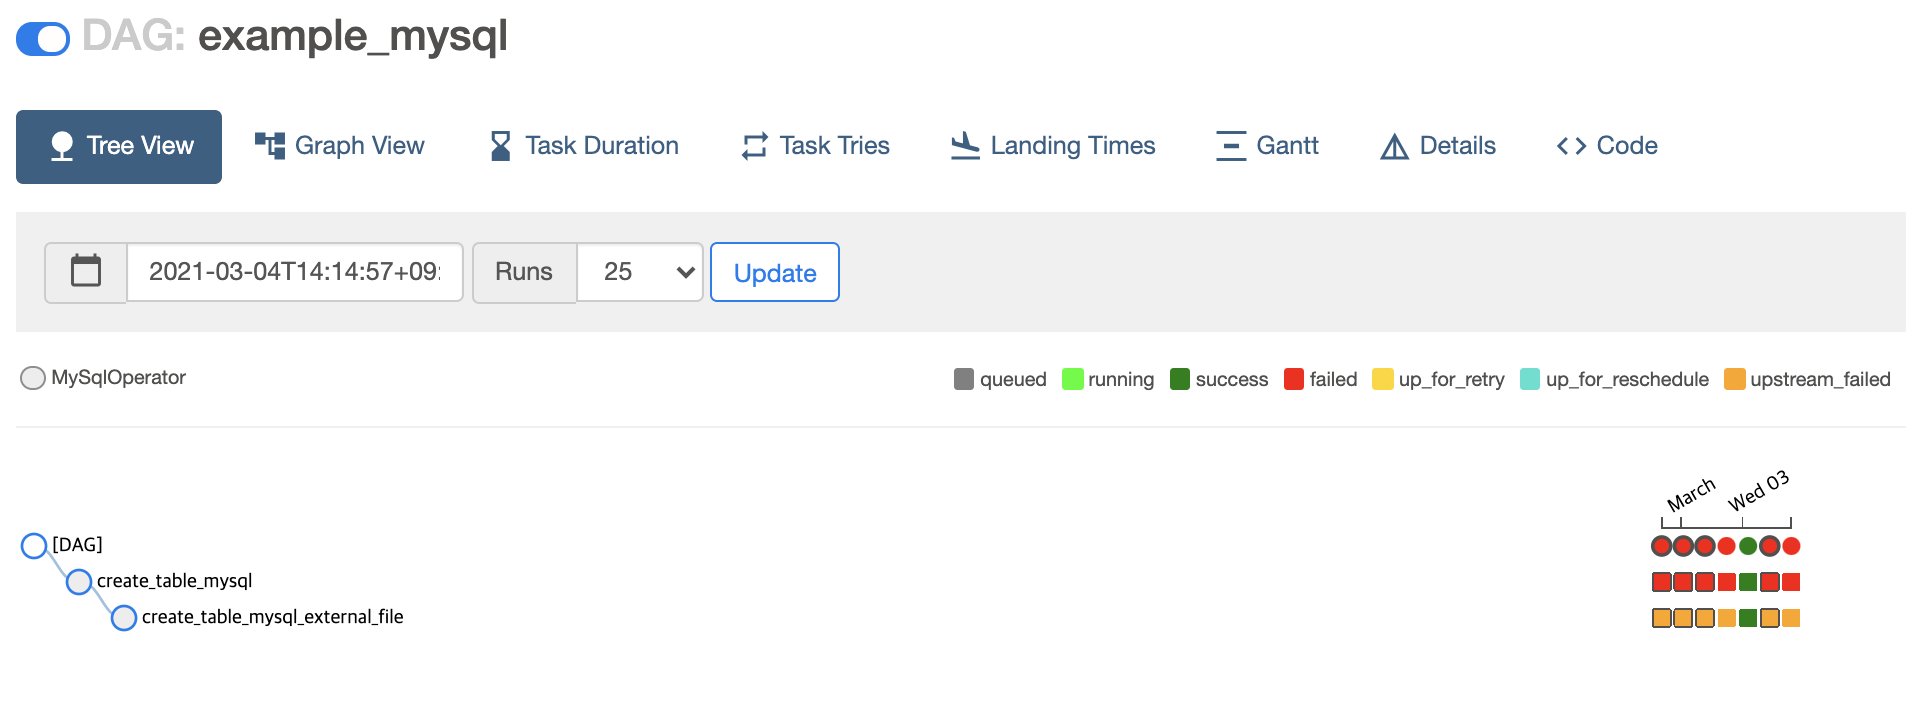
아래는 Tree View입니다. DAG의 Task가 시각화 되어있으며 Task별 실행 성공과 실패 등의 여부를 한눈에 확인할수 있습니다.
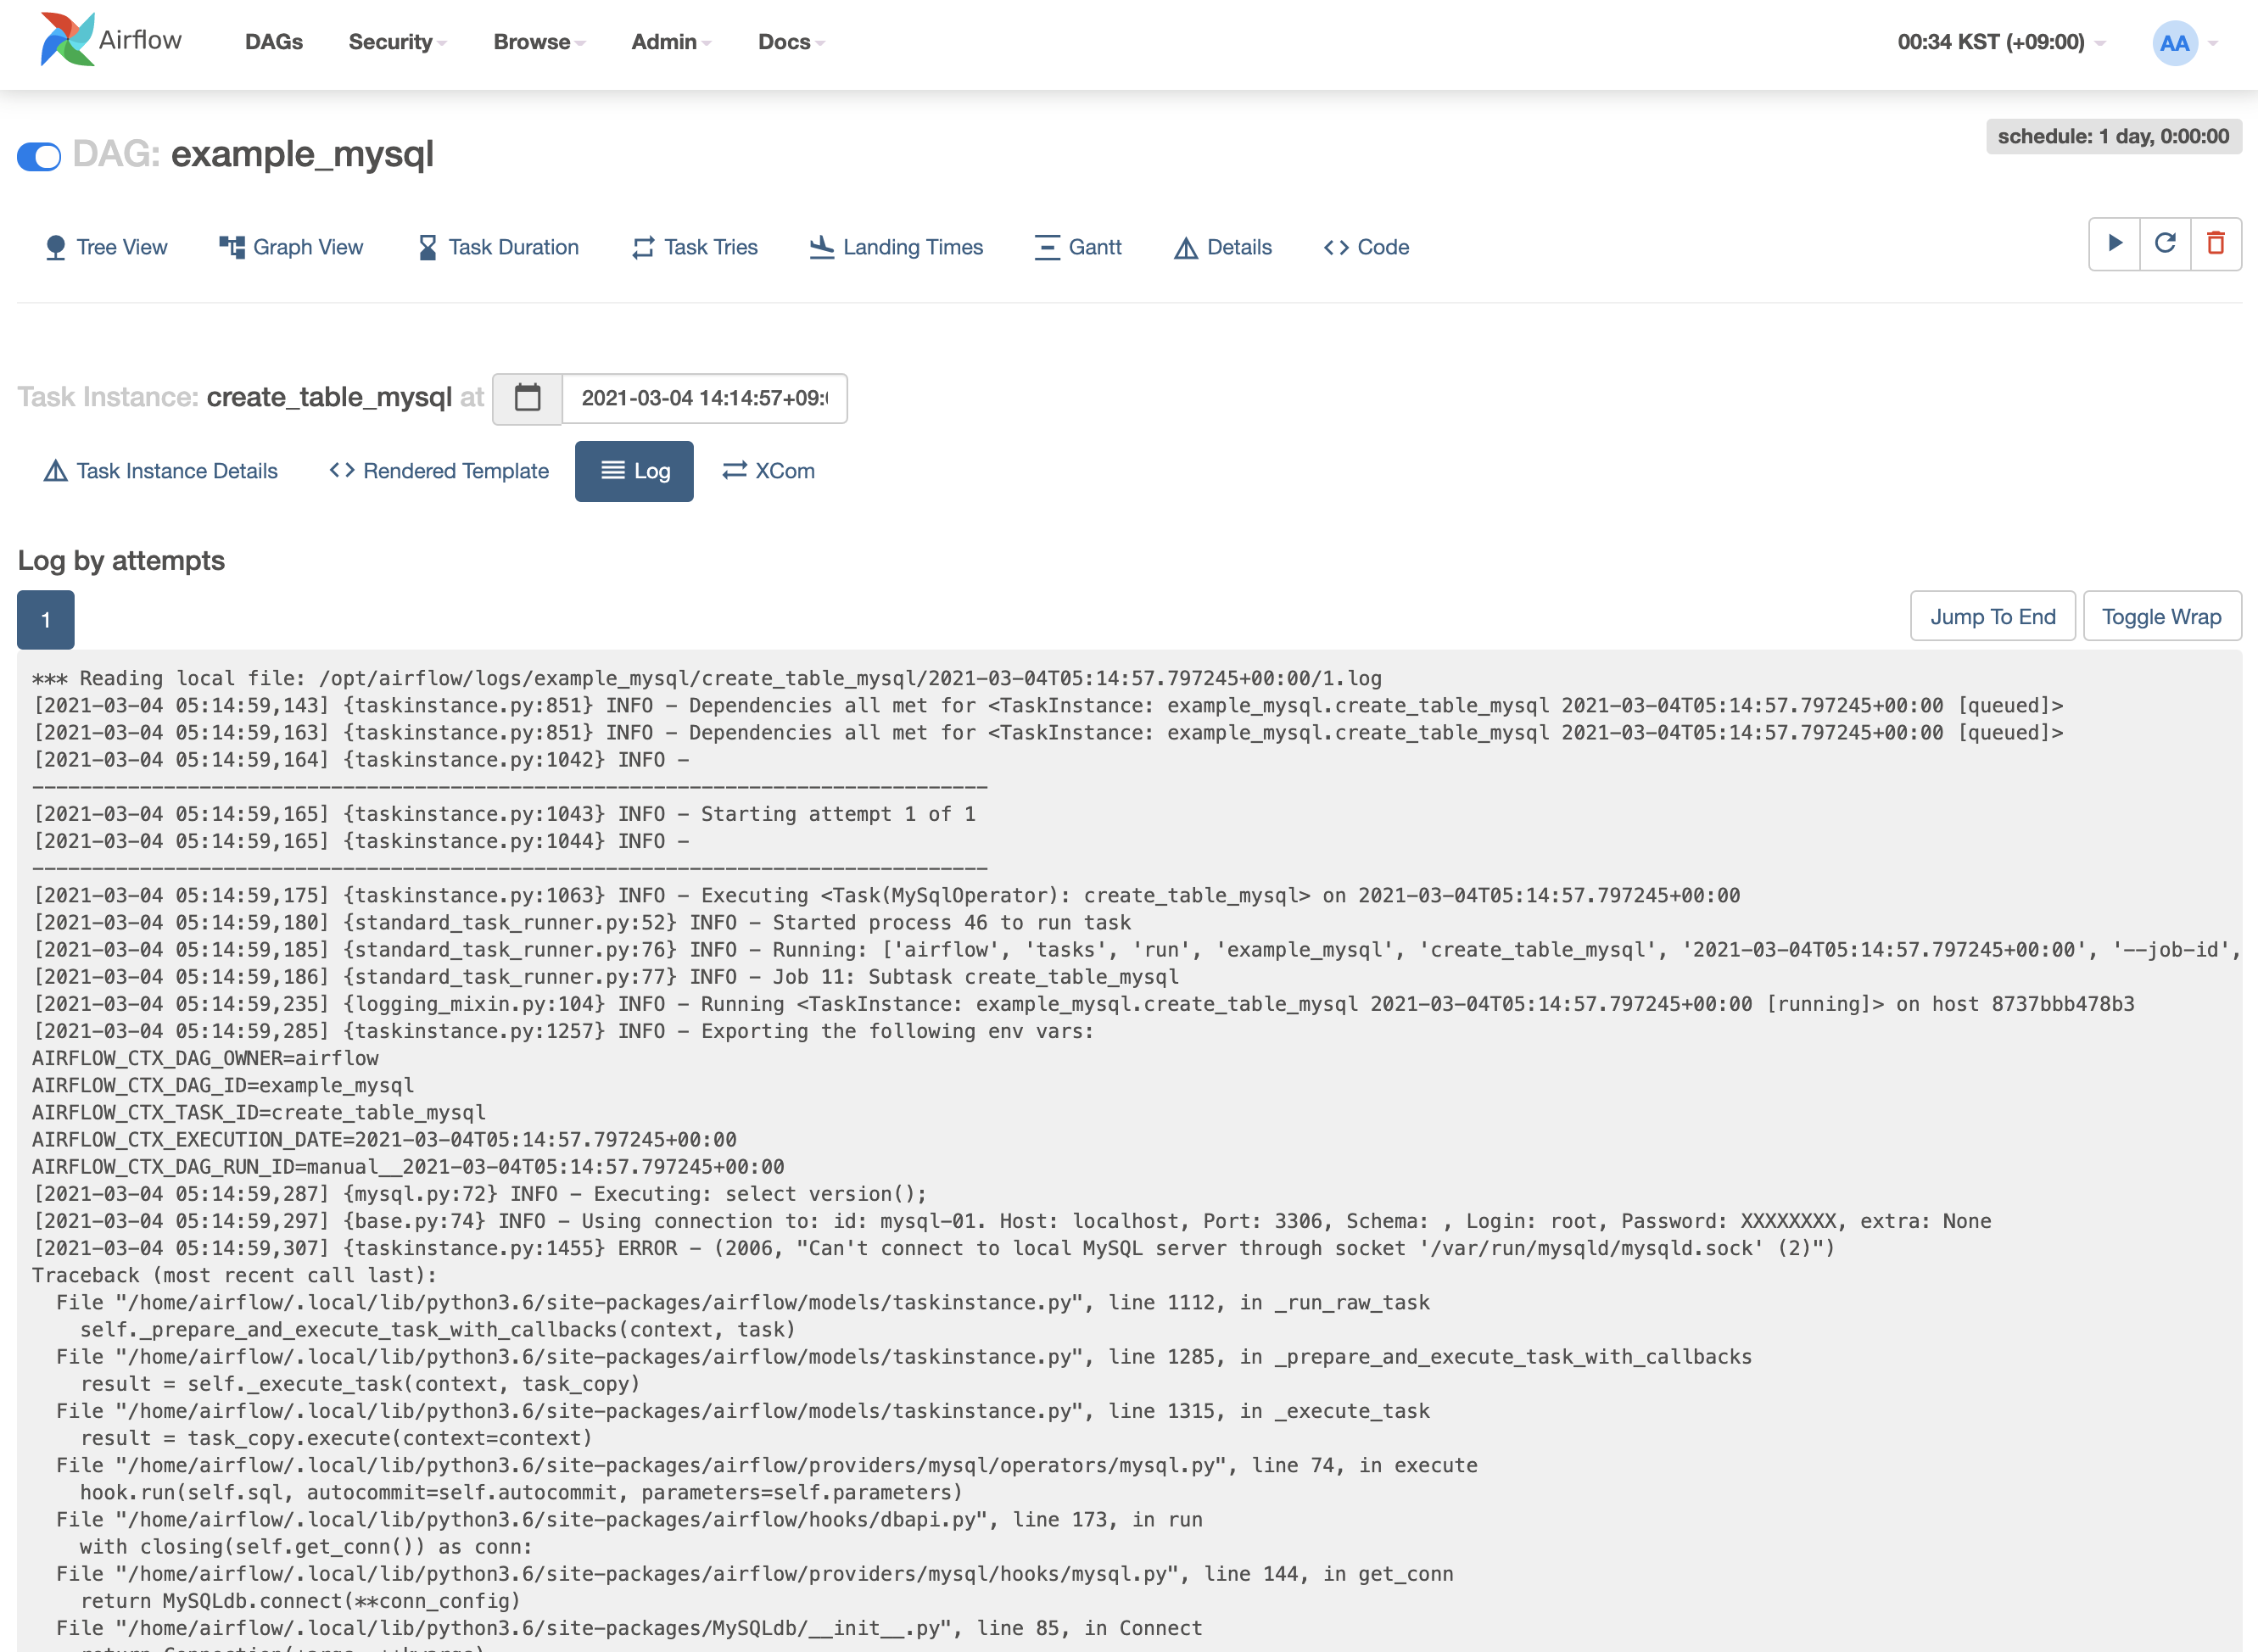
DAG의 Task별 로그를 아래와 같이 확인할 수 있습니다. 로그를 통해 문제의 원인을 분석할수 있습니다.
이후 운영하면서 경험한 부분을 지속적으로 업데이트 하겠습니다.
github 에서 모든 코드를 확인할수 있습니다.