번거로운 회원가입 절차없이 버튼 클릭 하나만으로 서비스를 이용할 수 있는 소셜 로그인은 사용자 유입에 도움이 된다.
하지만 iOS 앱은 카카오, 구글 로그인과 같은 소셜 로그인을 추가하려면 애플 로그인이 구현되어있어야 앱스토어 심사에서 리젝을 면할 수 있다.
문서의 불친절함
카카오나 구글에서 주는 친절하고 자세한 가이드 라인과 달리 애플의 문서는 이해하는데 시간이 걸렸다.
계속 보다보니 오히려 설명이 없어서 더 신비로워 보이는 것 같기도하고... 뇌이징된걸까..🤯
애플 로그인을 구현해보자
인증 플로우
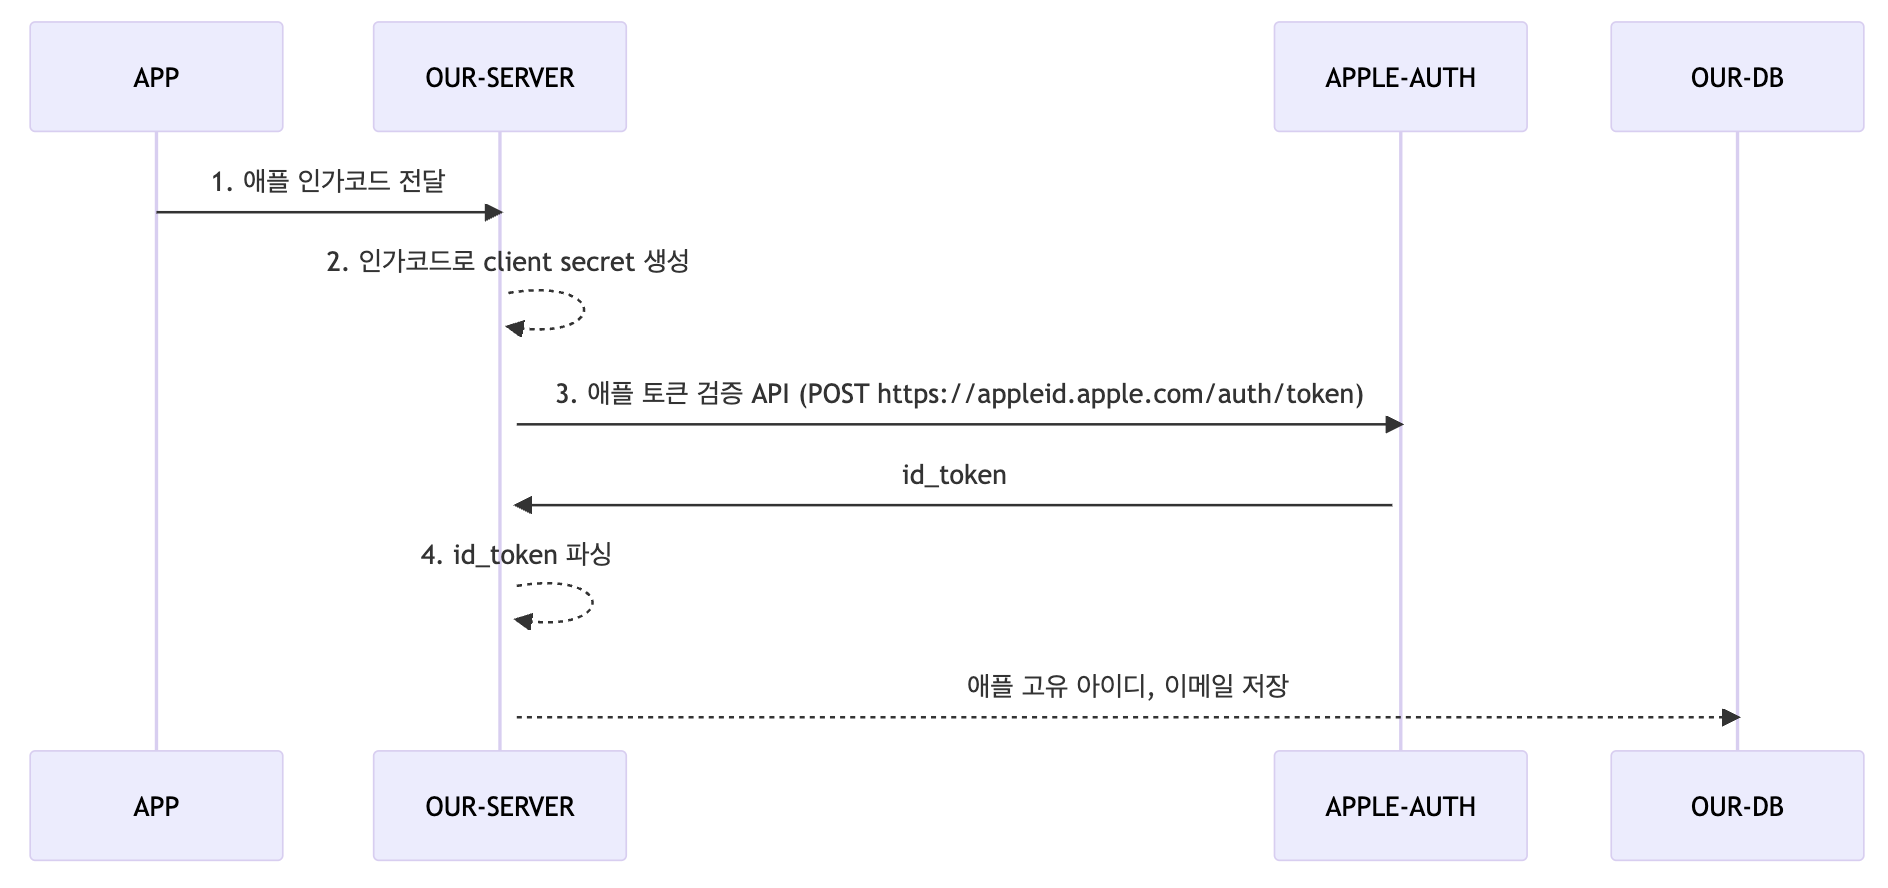
- 앱에서 애플 인가코드를 전달한다.
- 이 인가코드로 client secret 을 생성한다.
- 생성한 client secret 과 애플 설정 관련 정보(team_id) 과 함께 애플 토큰 검증 API 를 호출한다.
- 애플에서 access_token 과 id_token 을 반환한다.
- access_token 이 아닌 id_token 이 jwt 형식이므로 해당 토큰을 파싱한다.
위 플로우를 코드로 풀어보자면
yml 에 설정해야하는 정보
애플 developer 에서 기본적인 설정은 필요하다.
social-login:
  provider:
    apple:
      grant-type: authorization_code
      client-id: YOUR_APPLE_CLIENT_ID
      key-id: YOUR_APPLE_KEY_ID
      team-id: YOUR_APPLE_TEAM_ID
      audience: https://appleid.apple.com
      private-key: YOUR_APPLE_P8_KEY (-----BEGIN PRIVATE KEY-----, -----END PRIVATE KEY----- 를 제외한 key 문자열을 띄어쓰기 없이 넣어야 합니다)
1. 앱에서 인가코드를 전달받는 부분은 보통 API 요청을 통해 전달받을테니 이부분은 생략한다. 응답이 잘 가는지 봐야하니 테스트 코드로 대체한다.
@SpringBootTest
@ActiveProfiles("default")
public class AppleAuthClientTest {

    @Autowired
    GetMemberInfoService getMemberInfoService;

    @Test
    void getToken() {
        String authorizationCode = "클라이언트로 부터 받은 애플 인가코드";

        var source = getMemberInfoService.get(authorizationCode);
    }
}
2. pem file, 애플 developer 에서 설정한 값으로 client secret 을 생성한다.
   public AppleIdTokenPayload get(String authorizationCode) {

        String idToken = appleAuthClient.getIdToken(
            appleProperties.getClientId(),
            generateClientSecret(),
            appleProperties.getGrantType(),
            authorizationCode
        ).getIdToken();

        return TokenDecoder.decodePayload(idToken, AppleIdTokenPayload.class);
    }

    private String generateClientSecret() {

        LocalDateTime expiration = LocalDateTime.now().plusMinutes(5);

        return Jwts.builder()
            .setHeaderParam(JwsHeader.KEY_ID, appleProperties.getKeyId())
            .setIssuer(appleProperties.getTeamId())
            .setAudience(appleProperties.getAudience())
            .setSubject(appleProperties.getClientId())
            .setExpiration(Date.from(expiration.atZone(ZoneId.systemDefault()).toInstant()))
            .setIssuedAt(new Date())
            .signWith(getPrivateKey(), SignatureAlgorithm.ES256)
            .compact();
    }

    private PrivateKey getPrivateKey() {

        Security.addProvider(new org.bouncycastle.jce.provider.BouncyCastleProvider());
        JcaPEMKeyConverter converter = new JcaPEMKeyConverter().setProvider("BC");

        try {
            byte[] privateKeyBytes = Base64.getDecoder().decode(appleProperties.getPrivateKey());

            PrivateKeyInfo privateKeyInfo = PrivateKeyInfo.getInstance(privateKeyBytes);
            return converter.getPrivateKey(privateKeyInfo);
        } catch (Exception e) {
            throw new RuntimeException("Error converting private key from String", e);
        }
    }
3. 생성한 client secret 과 애플 설정 관련 정보(team_id) 과 함께 애플 토큰 검증 API 를 호출한다.
@Component
@FeignClient(
    name = "apple-auth",
    url = "${client.apple-auth.url}",
    configuration = AppleFeignClientConfiguration.class
)
public interface AppleAuthClient {

    @PostMapping("/auth/token")
    AppleSocialTokenInfoResponse getIdToken(
        @RequestParam("client_id") String clientId,
        @RequestParam("client_secret") String clientSecret,
        @RequestParam("grant_type") String grantType,
        @RequestParam("code") String code
    );
}
{
"access_token": "....",
"token_type": "Bearer",
"expires_in": 3600,
"refresh_token": "....",
"id_token": "...."
}4. 정상적인 인가코드라면 애플에서 access_token 과 id_token 을 반환한다.
   public AppleIdTokenPayload get(String authorizationCode) {

        String idToken = appleAuthClient.getIdToken(
            appleProperties.getClientId(),
            generateClientSecret(),
            appleProperties.getGrantType(),
            authorizationCode
        ).getIdToken();

        return TokenDecoder.decodePayload(idToken, AppleIdTokenPayload.class);
    }
idToken payload 를 파싱하면 아래와 같은 필드가 나오는데, 서비스에서 필요한 sub, email 을 파싱하여 우리 서비스 DB 에 저장하여 사용자가 재로그인 시에 바로 로그인 플로우를 탈 수 있도록 구현한다.
{
  "iss": "appleid.apple.com",
  "aud": "[앱ID 또는 서비스ID]",
  "exp": "토큰만료시간",
  "iat": "토큰생성시간",
  "sub": "애플 사용자 식별값",
  "nonce": "자바스크립트에서 설정한 nonce값",
  "c_hash": "[값]",
  "email": "[이메일]",
  "email_verified": "true",
  "is_private_email": "true",
  "auth_time": "[값]",
  "nonce_supported": true
}
정리
- 애플 로그인은 영어 문서와 레퍼런스가 없어서 구현하는데 허들이 있었다.
- client_secret 구현하는데 힘들었다.
- 우리의 서비스는 회원가입시 이메일이 필수값이라 id_token 에서 파싱해서 사용했지만, 애플의 고유 아이디만 필요하다면 다른 인증 플로우도 고려해볼 수 있다.
🍎 애플 로그인 구현한 코드는 여기

기록을 통한 성장을
13개의 댓글


2024년 7월 2일
진짜 너무 감사합니다. 도움 됐습니다 정말로. 그리고 궁금한점이 있어서
1. yml에 작성하는 설정들(team-id, key-id 등등) 이거는 프론트단의 설정과 맞춰야하는거죠?
2. yml에 있는 private-key의 값이 p8 파일에 있는 값을 말하는건가요?
1개의 답글
2024년 9월 24일
정말 감사합니다!
궁금한 부분이 있습니다!
- 앱이 존재하지 않으면 테스트가 불가능한게 맞나요?
- 앱에서 소셜 로그인을 하여 받은 토큰을 스프링 서버 API를 사용하여 검증하고 회원 가입 및 로그인처리를 시키는게 맞나요?
이러한 경우 IOS에서 SDK를 사용한 소셜 로그인을 구현한 경우인가요?
1개의 답글
인가 코드와 client_secret은 관련이 없어 보이는데 "2. 이 인가코드로 client secret 을 생성한다" 라고 한 이유가 있을까요? 인가코드와 client_secret은 토큰을 받아오기 위한 필수 요소일 뿐이지 인가 코드가 client_secret을 만드는 데 필요한 요소는 아니지 않나요?