스토리보드로 만들었던 앱을 이번에는 programmatic UI를 이용해서 연습해봤다
잊지말고 추가해야하는 것
- view.addSubview()
- addTarget(self, action: #selector(), for: .touchUpInside)
- translatesAutoresizingMaskIntoConstraints = false
SceneDelegate
class SceneDelegate: UIResponder, UIWindowSceneDelegate {

    var window: UIWindow?

    func scene(_ scene: UIScene, willConnectTo session: UISceneSession, options connectionOptions: UIScene.ConnectionOptions) {

        guard let windowScene = (scene as? UIWindowScene) else { return }
        window = UIWindow(frame: windowScene.coordinateSpace.bounds)
        window?.windowScene = windowScene
        window?.rootViewController = CardSelectionVC()
        window?.makeKeyAndVisible()
    }
CardSelectionVC
import UIKit
class CardSelectionVC: UIViewController {
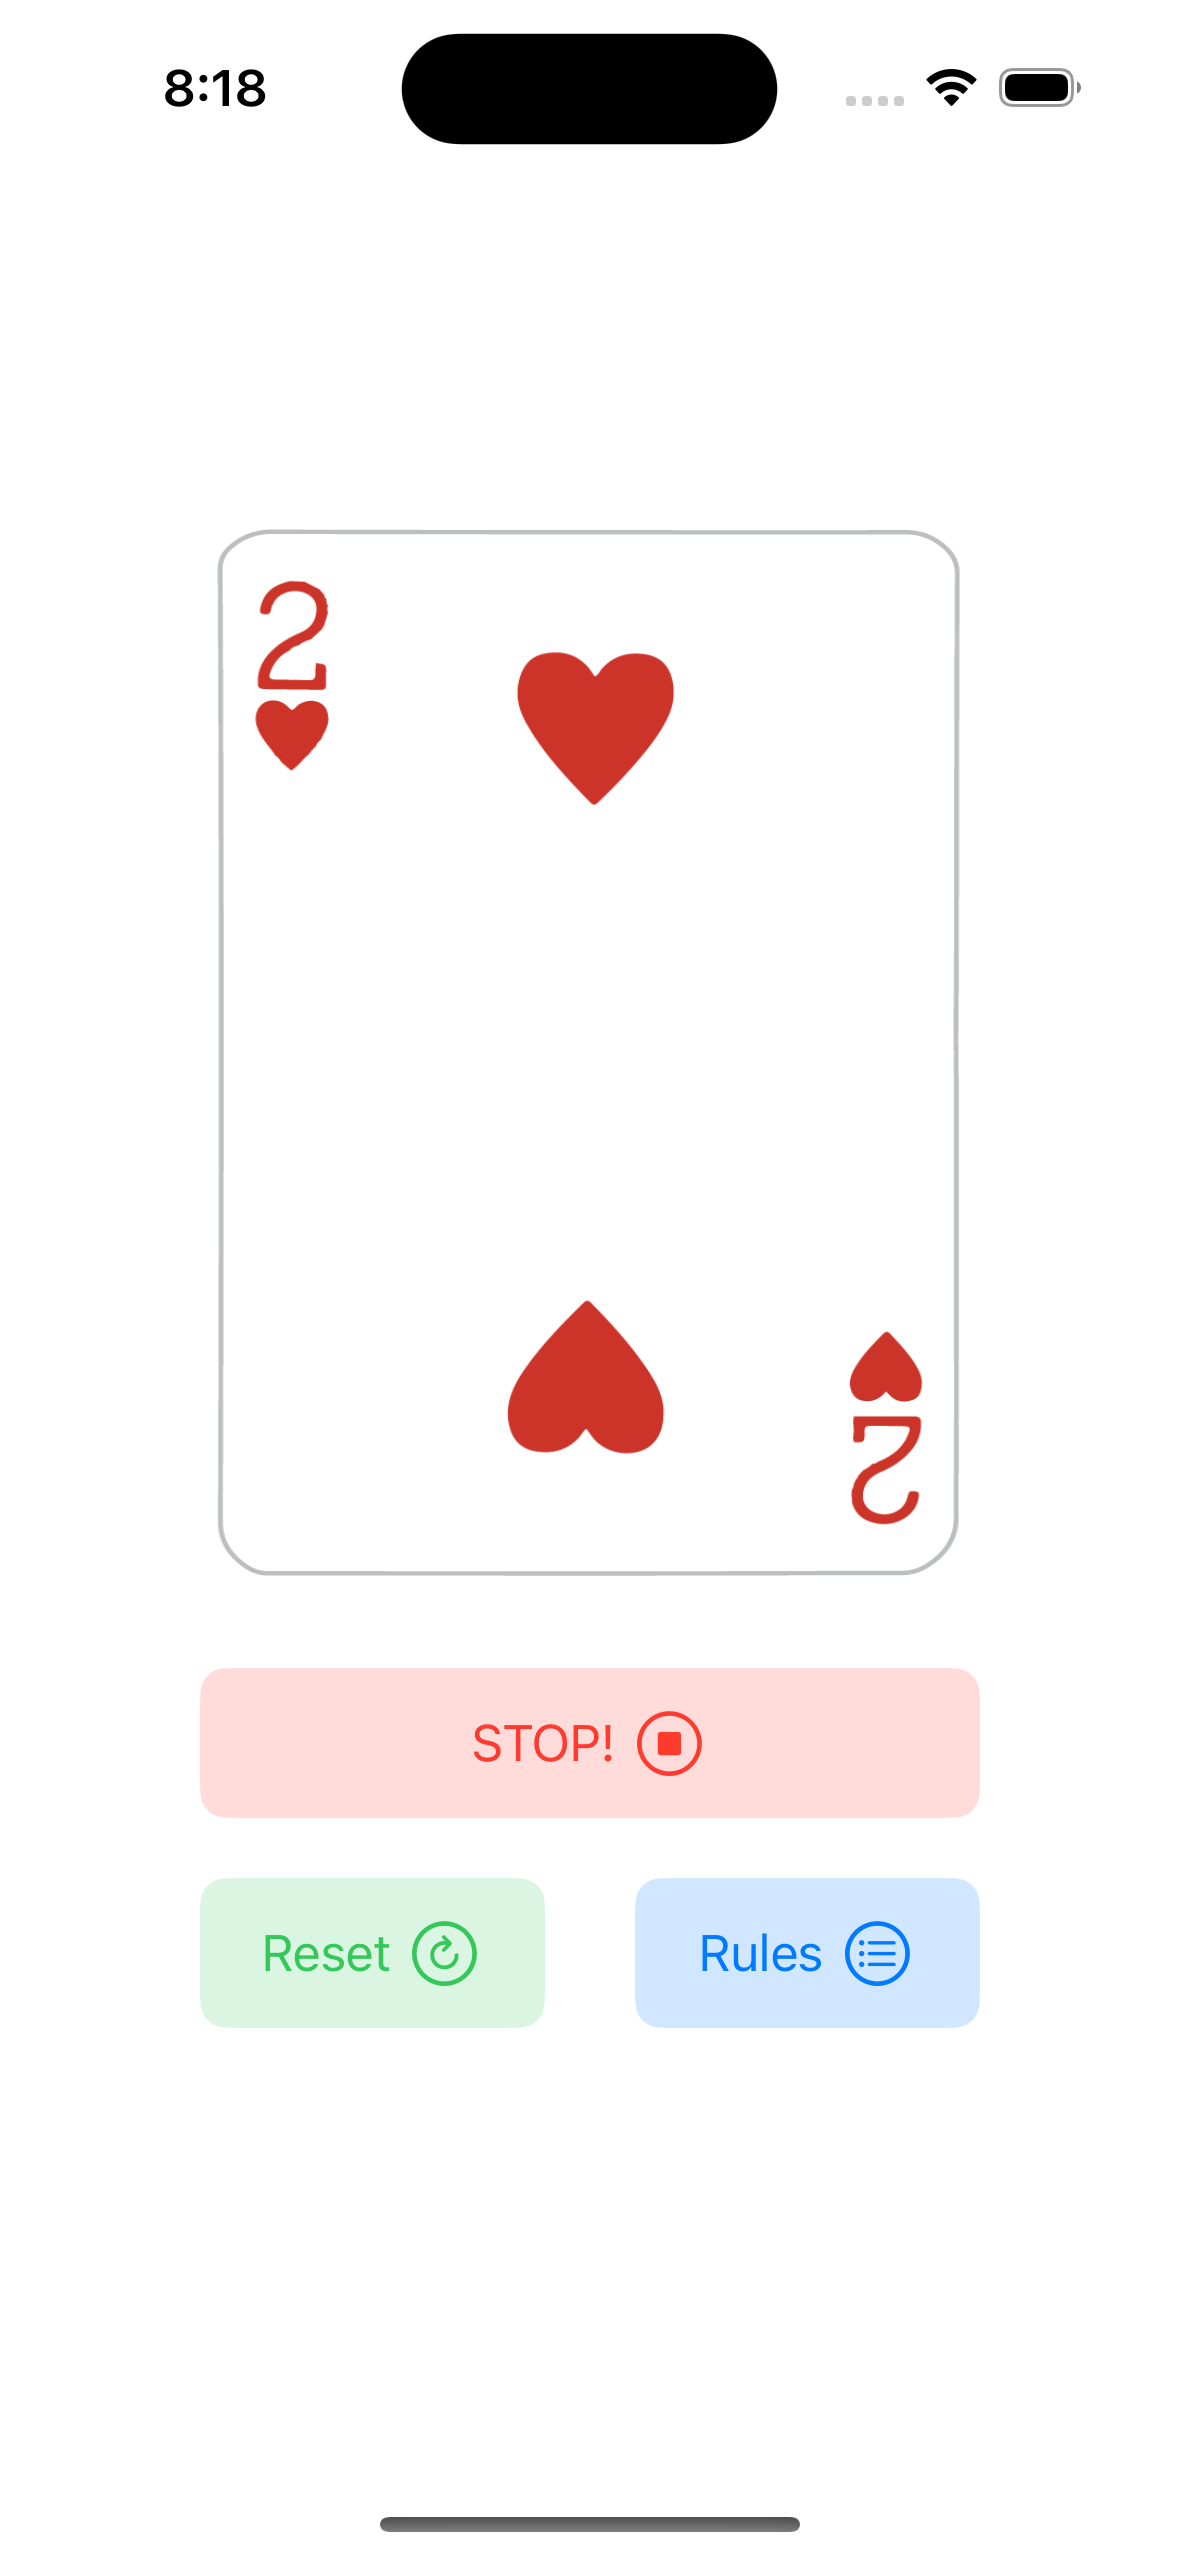
let cardImageView = UIImageView()
let stopButton = CWButton(color: .systemRed, title: "STOP!", systemImageName: "stop.circle")
let resetButton = CWButton(color: .systemGreen, title: "Reset", systemImageName: "arrow.clockwise.circle")
let rulesButton = CWButton(color: .systemBlue, title: "Rules", systemImageName: "list.bullet.circle")
var cards: [UIImage] = CardDeck.allValues
var timer: Timer!
override func viewDidLoad() {
super.viewDidLoad()
view.backgroundColor = .systemBackground
congifureUI()
startTimer()
}
// logic and func
func startTimer() {
timer = Timer.scheduledTimer(timeInterval: 0.1, target: self, selector: #selector(showRandomCard), userInfo: nil, repeats: true)
}
@objc func stopTimer() {
timer.invalidate()
}
@objc func resetTimer() {
stopTimer()
startTimer()
}
@objc func showRandomCard() {
cardImageView.image = cards.randomElement()
}
// configurations
func congifureUI() {
// the order matters
configureCardImageView()
configureStopButton()
configureResetButton()
configureRulesButton()
}
func configureCardImageView() {
view.addSubview(cardImageView) // if you dont add it to the view, youre not gonna see it
cardImageView.translatesAutoresizingMaskIntoConstraints = false
cardImageView.image = UIImage(named: "AS") // add image
// constraints
// rule of thumb: (usually) 4 constraints for each view
NSLayoutConstraint.activate([
cardImageView.widthAnchor.constraint(equalToConstant: 250),
cardImageView.heightAnchor.constraint(equalToConstant: 350),
cardImageView.centerXAnchor.constraint(equalTo: view.centerXAnchor),
// centre it in the view horizontally
cardImageView.centerYAnchor.constraint(equalTo: view.centerYAnchor, constant: -75)
])
}
func configureStopButton() {
view.addSubview(stopButton)
// add action
stopButton.addTarget(self, action: #selector(stopTimer), for: .touchUpInside)
// constraints
NSLayoutConstraint.activate([
stopButton.widthAnchor.constraint(equalToConstant: 260),
stopButton.heightAnchor.constraint(equalToConstant: 50),
stopButton.centerXAnchor.constraint(equalTo: view.centerXAnchor),
stopButton.topAnchor.constraint(equalTo: cardImageView.bottomAnchor, constant: 30)
// pinning it to the bottom of the cardImageView
])
}
func configureResetButton() {
view.addSubview(resetButton)
// add action
resetButton.addTarget(self, action: #selector(resetTimer), for: .touchUpInside)
NSLayoutConstraint.activate([
resetButton.widthAnchor.constraint(equalToConstant: 115),
resetButton.heightAnchor.constraint(equalToConstant: 50),
resetButton.leadingAnchor.constraint(equalTo: stopButton.leadingAnchor),
resetButton.topAnchor.constraint(equalTo: stopButton.bottomAnchor, constant: 20)
])
}
func configureRulesButton() {
view.addSubview(rulesButton)
// add target -> add actions to the button
rulesButton.addTarget(self, action: #selector(presentRulesVC), for: .touchUpInside)
// now the rules button has a target. so when we tap our rules button,
// it's gonna fire off presentRulesVC and present the RulesVC modally
NSLayoutConstraint.activate([
rulesButton.widthAnchor.constraint(equalToConstant: 115),
rulesButton.heightAnchor.constraint(equalToConstant: 50),
rulesButton.trailingAnchor.constraint(equalTo: stopButton.trailingAnchor),
rulesButton.topAnchor.constraint(equalTo: stopButton.bottomAnchor, constant: 20)
])
}
@objc func presentRulesVC() {
// presents the RulesVC -> presnetation style is modal
// c.f. if we were in a navigation controller, we use "push" instead of "present"
// -> navigationController.pushViewController(<#T##viewController: UIViewController##UIViewController#>, animated: <#T##Bool#>)
present(RulesVC(), animated: true)
}
}
RulesVC
import UIKit
class RulesVC: UIViewController {
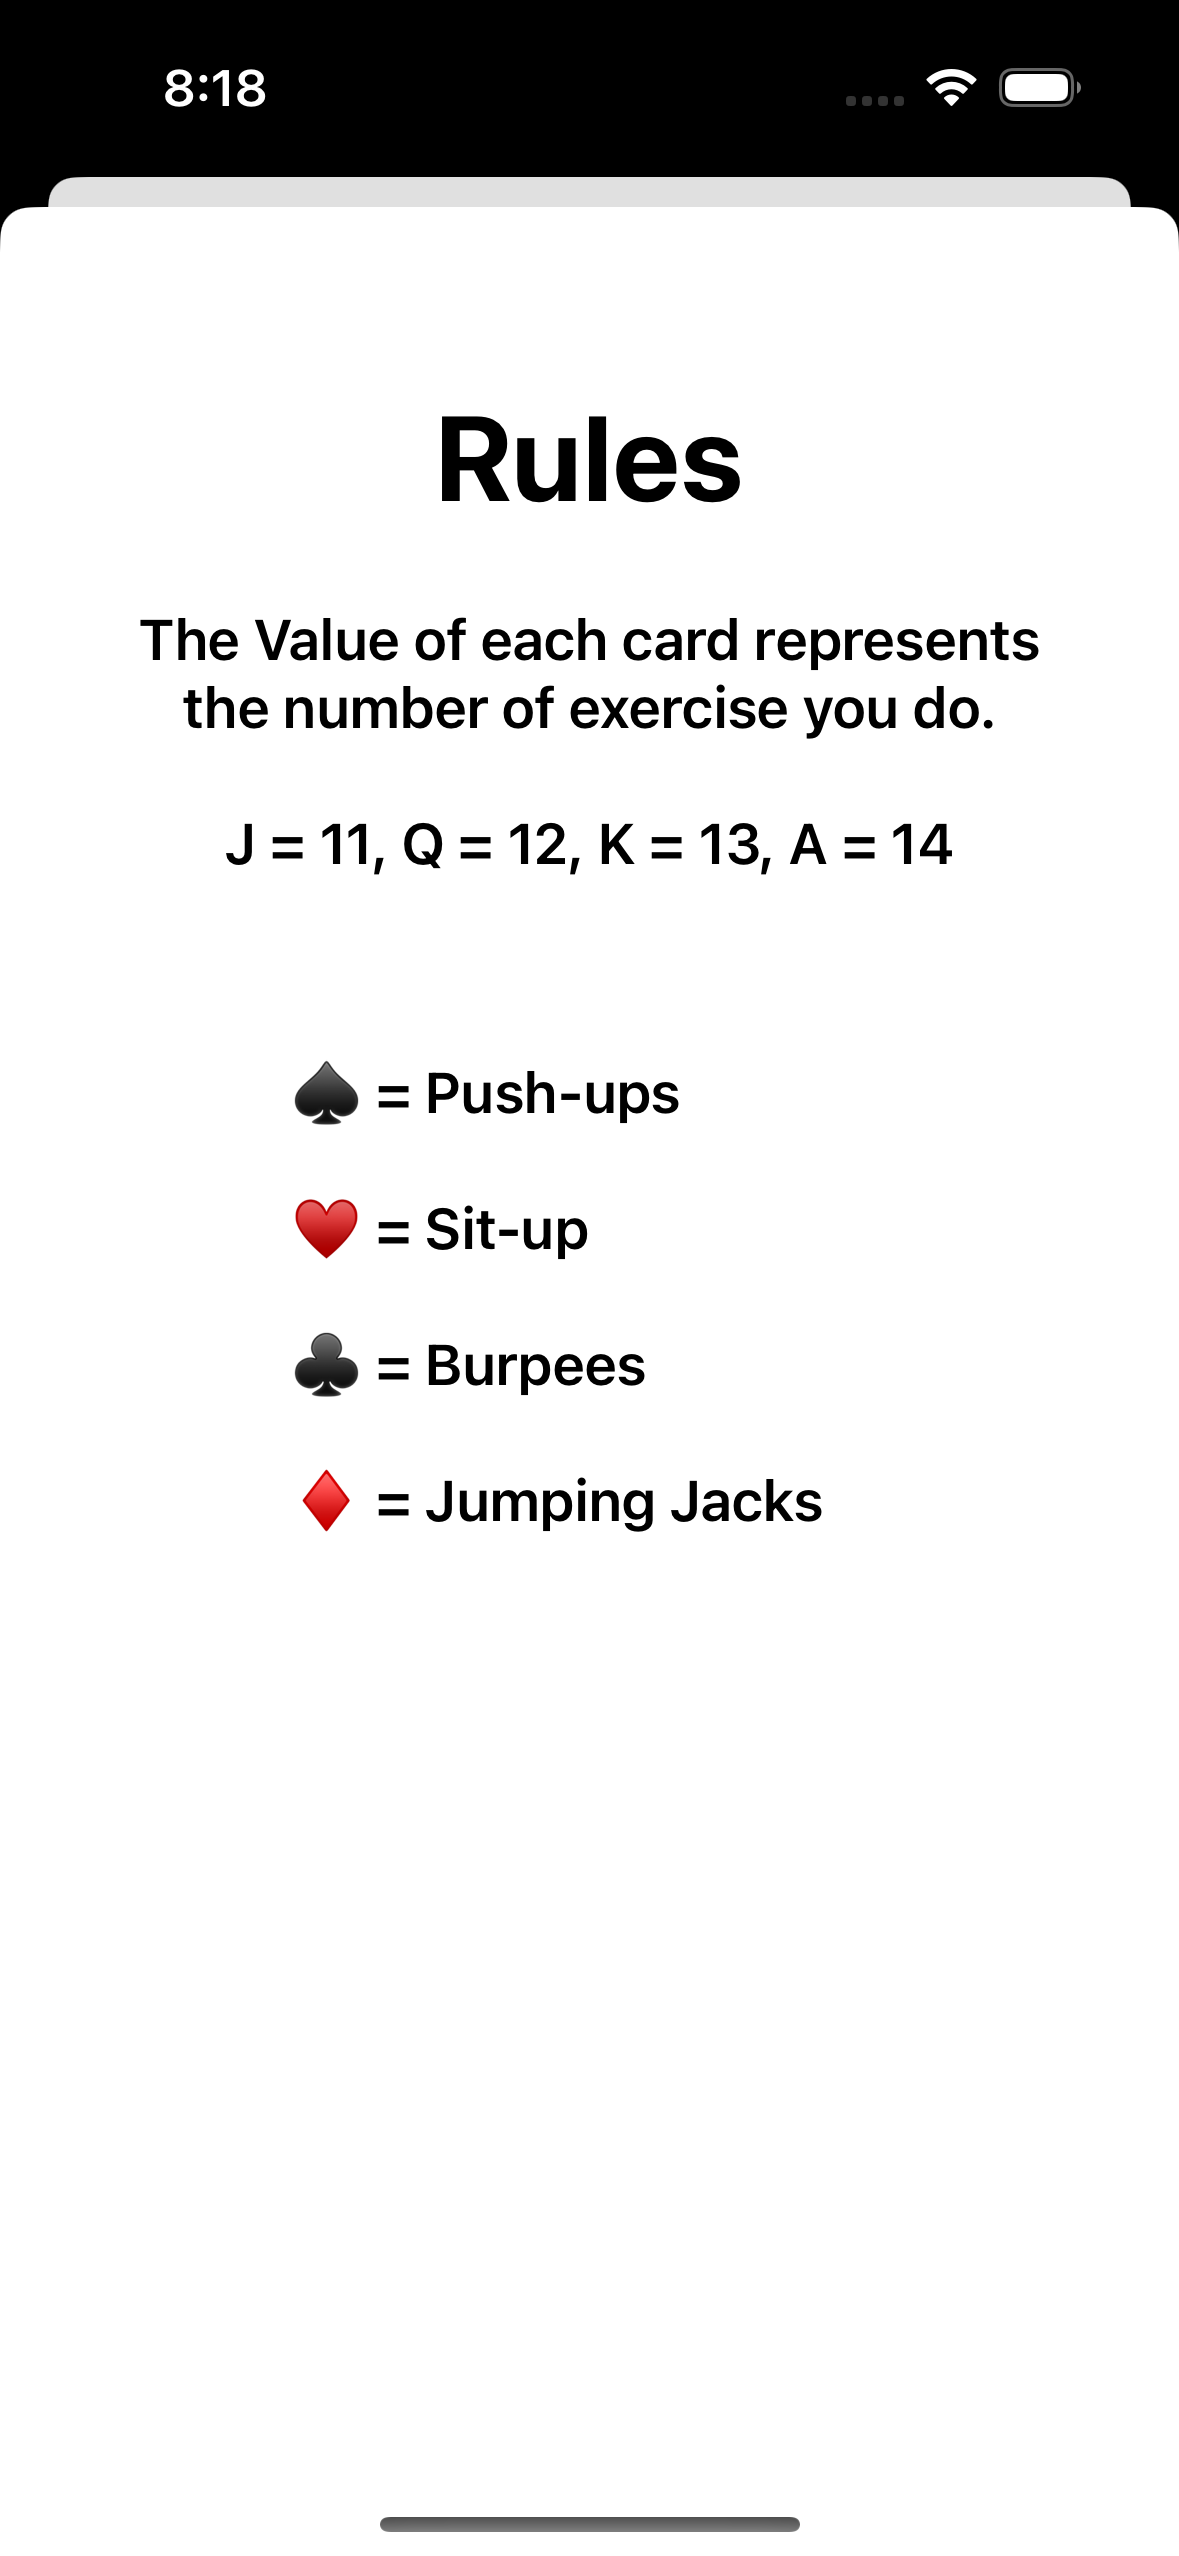
let titleLabel = UILabel()
let rulesLabel = UILabel()
let exerciseLabel = UILabel()
override func viewDidLoad() {
super.viewDidLoad()
view.backgroundColor = .systemBackground
configureTitleLabel()
configureRulesLabel()
configureExerciseLabel()
}
func configureTitleLabel() {
view.addSubview(titleLabel)
titleLabel.translatesAutoresizingMaskIntoConstraints = false
titleLabel.text = "Rules"
titleLabel.font = .systemFont(ofSize: 40, weight: .bold)
titleLabel.textAlignment = .center
// constraints
NSLayoutConstraint.activate([
titleLabel.topAnchor.constraint(equalTo: view.safeAreaLayoutGuide.topAnchor, constant: 60),
titleLabel.leadingAnchor.constraint(equalTo: view.leadingAnchor, constant: 30),
titleLabel.trailingAnchor.constraint(equalTo: view.trailingAnchor, constant: -30)
// trailing and bottom are negative
// label does intrinsic content size, we don't have to give it a height.
])
}
func configureRulesLabel() {
view.addSubview(rulesLabel)
rulesLabel.translatesAutoresizingMaskIntoConstraints = false
rulesLabel.text = "The Value of each card represents the number of exercise you do. \n\nJ = 11, Q = 12, K = 13, A = 14"
rulesLabel.font = .systemFont(ofSize: 19, weight: .semibold)
rulesLabel.textAlignment = .center
rulesLabel.lineBreakMode = .byWordWrapping // wrap the words
rulesLabel.numberOfLines = 0 // unlimited number of lines. default is 1 line
NSLayoutConstraint.activate([
rulesLabel.topAnchor.constraint(equalTo: titleLabel.bottomAnchor, constant: 25),
rulesLabel.leadingAnchor.constraint(equalTo: view.leadingAnchor, constant: 30),
rulesLabel.trailingAnchor.constraint(equalTo: view.trailingAnchor, constant: -30)
])
}
func configureExerciseLabel() {
view.addSubview(exerciseLabel)
exerciseLabel.translatesAutoresizingMaskIntoConstraints = false
exerciseLabel.text = "♠️ = Push-ups\n\n♥️ = Sit-up\n\n♣️ = Burpees\n\n♦️ = Jumping Jacks"
exerciseLabel.font = .systemFont(ofSize: 19, weight: .semibold)
exerciseLabel.numberOfLines = 0
NSLayoutConstraint.activate([
exerciseLabel.topAnchor.constraint(equalTo: rulesLabel.bottomAnchor, constant: 60),
exerciseLabel.widthAnchor.constraint(equalToConstant: 200),
exerciseLabel.centerXAnchor.constraint(equalTo: view.centerXAnchor)
])
}
}
CWButton
import UIKit

class CWButton: UIButton {

    //initializer
    // overrides the UIButton init
    // why do we override this init method? -> cuz we wanna add our own custom configurations
    // so whenever we initialize a CWButton, we gonna get all the normal UIButton initialization. -> that's why we call super
    // then by overriding it, in the subclass, we add our own custom configurations
    override init(frame: CGRect) {
        super.init(frame: frame)
    }

    required init?(coder: NSCoder) {
        fatalError("init(coder:) has not been implemented")
    }

    // create a custom initializer
    // anytime we do an initializer, we wanna call the super
    init(color: UIColor, title: String, systemImageName: String) {
        super.init(frame: .zero) // since we gonna use auto layout so we set it to zero

        // button style
        // configuration 을 이용하면 애플에서 제공하는 default 버튼 스타일을 사용할 수 있다.
        configuration = .tinted()
        configuration?.title = title
        configuration?.baseForegroundColor = color
        configuration?.baseBackgroundColor = color
        configuration?.cornerStyle = .medium

        // systemname -> SF Symbols
        configuration?.image = UIImage(systemName: systemImageName)
        configuration?.imagePadding = 5
        configuration?.imagePlacement = .trailing

        translatesAutoresizingMaskIntoConstraints = false
    }
}
Card 이미지 데이터모델은 어제한 것과 동일함