
iOS 앱 개발자가 되면 좋은점
- 개발 처우가 좋다. (개발직군 연봉 타직군 대비 1.5배)
- iOS 개발자는 희소
- 개발자 수요가 높다
공부 운영
- 코딩 많이 해봐야된다. (습관처럼)
- 코딩 친구 찾자 (학습공동체 만들기)
- 강의 1000번 듣기 x 코딩 10줄 o
- 나만의 앱
- 1차 초단순 앱
- 1차 초단순 앱 응용
- 나를 위한 앱..
Xcode 구성
- ToolBar : 코드를 실행하고 멈추고 화면 분할을 도와주는 등 기능을 확인 가능
- Navigator Area : project 구조 , 파일 구조
- Editor Area : 실제 코드 작성 , UI를 구성하는 공간
- Utility Area : 코딩이나 스토리보드 통해서 나오는 UI 구성할때 인터페이스, 오버젝트 속성 등을 보여주는 정도
ViewController 역할
- 스크린 하나를 관리함
- 디자인이 보이는 View 파트와 그 뷰와 연결되 있는 코드가 구성되 있는 코드 파트
도전 과제 - 성공
-
버튼 추가
-
버튼 클릭시, 새로운 알럿 띄우기
스토리보드에서 할일
-
새로운 버튼 추가 하기
-
뷰컨트롤러에 버튼 액션 연결하기
코드에서 할일
-
메소드 새로 추가하기
UIKit - UIComperenct를 만들 때 필요한 것들을 찾아 쓸 수 있도록 만들어 놓은 큰 공구함
앱 동작방식
- 앱은 오브젝트로 구성
- 오브젝트끼리 서로 메시지 보냄
- 앱은 이벤트에 의해 프로세스 동작함
오브젝트
- 데이터
- 메소드
String Variable 이해하기
- 스트링 String : 각각 문자들의 나열
- 스트링 인터폴레이션 String interpolation 문자열 보간
Local / Instance
- local : 지역적으로 쓰이는 변수
- instance : 전반적으로 쓰이는 변수
Closure
- 사용자의 코드 안에서 전달되어 사용할 수 있는 로직을 가진 중괄호 {} 로 구분된 코드의 블럭
- 일급 객체의 역할을 할 수 있다
일급 객체는 전달 인자로 보낼 수 있고, 변수/상수 등으로 저장하거나 전달할 수 있다. 또한 함수의 반환값이 될 수도 있다. - 참조 타입
- 함수는 이름이 있는 클로저
- 반환타입 생략 가능
- 인자 이름 생략 가능 : 인자 값을 축약해 사용가능
- 연산자 메소드 : 연산자만 남길 수 있다.
- 후행클로저 : 괄호 생략 가능
표현방식
{(인자들) -> 반환타입 in 로직 구현}#Inline Closure 예시
le reverseNames = names.sorted(by: {(s1:String, s2:String) -> Bool in return s1>s2})스위프트
- 플레이그라운드
- 코멘트 (주석)
- 튜플
- Boolean
- Scope (범위)
스위프트 Flow Control
Flow Control
코드의 동작의 흐름을 주로 조절할 때 사용
코드를 건너뛰는 상황 or 반복적으로 코드 돌릴때
예)
- if else : 조건 만족할 경우 , 만족하지 않을 경우 따로 적용
- While loop / For loop / Switch statement
# 조건 > 코드수행 > 조건 > 코드수행
print("--- While")
var i = 0
while i < 10 {
	print(i)
    i+=1
}

# 코드수행 > 조건 > 코드수행 > 조건
print("---Repeat")
i = 0
repeat{
	print(i)
    i+=1
} while i< 10

# 반복적으로 코드 수행
print("----for loop")
# 10 포함 됨
let closedRange = 0...10
# 10 포함 안됨
let halfClosedRange = - ..<10

var sum =0
for i in closedRange {
	print("-----> \(i)")
    sum += i
}
print("----> total sum : \(sum)")

#근간이 되는 놈들이 모아져 있는 곳
import Foundation

# 사인 그레프
var sinValue: CGFloat = 0
for i in closedRange {
	sinValue = sin(CGFloat.pi/4 * CGFloat(i))
}

let name = "Jason"
# 쓰지않는 변수를 대체로 _ 이것을 사용
for _ in closedRange {
	print("---> name \(name)")
}

for i in closedRange{
	if i % 2 == 0 {
    	print("----> 짝수 : \(i)")
    }
}

for i in closedRange where i%2==0 {
	print("----> 짝수 : \(i)")
}

for i in closedRange {
	if i == 3 {
    	continue
    }
    print("---->\(i)")
}

for i in closedRange where i!=3 {
	print("----> 3아닌 숫자 : \(i)")
}

# 이중 중첩은 효율성이 떨어지기때문에 가급적 x
for i in closedRange {
	for j in closedRange {
    	print("gugudun -> \(i) *\(j) = \(i*j)")
	}
}
Switch
let num = 10

switch num {
case 0 :
	print("---> 0입니다. " )
case 0...10 :
	print("---> 0 10 사이 입니다. " )
case 10 :
	print("---> 10입니다. " )
default :
	print("----> 나머지입니다.")
}
let pet = "bird"
case "dog","cat","bird" :
print("---> 집동물이네요? ")
default :
print("---> 잘 모르겠습니다. " )
}
let num = 5
switch num {
case _ where num%2==0 :
print("--->짝수")
default :
print("--->홀수")
}
let coordinate = (x:10, y:10)
switch coordinate{
case (0,0):
print("---> 원점 이네요")
case (_,0):
print("---> x축 이네요")
case (0,_):
print("---> y축 이네요")
default :
print("---> 좌표 어딘가")
}
let coordinate = (x:10, y:10)
switch coordinate{
case (0,0):
print("---> 원점 이네요")
case (let x,0):
print("---> x축 이네요,x:\(x)")
case (0,let y):
print("---> y축 이네요,y:\(y)")
case (let x, let y) where x ==y :
print("---> x,y와 같음 = \(x),\(y)")
case (let x, let y) :
print("---> 좌표 어딘가 x,y = \(x),\(y)")
}
스위프트 Function and Optional
method는 object에 속해서 기능을 수행하는 반면에
function은 독립적으로 호출이 가능
- object.methodName() Method
- functionName() Function
Function
import UIKit

func printName(){
	print("---> My name is Jason")
}
printName()

# param 1개 ( 파라미트 1개)
# 숫자를 받아서 10을 곱해서 출력한다.
func printMultipleOfTen(value : Int) {
	print("\(value) * 10 = \(value *10) ")
}
printMultipleOfTen(value : 5)

# param 2개
# 물건값과 갯수를 받아서 전체 금액을 출력하는 함수

func printTotalPrice(price: Int, count: Int) {
	print("Total Price : \(price * count)")
}

printTotalPrice(price:1500, count:5)


func printTotalPrice(가격 price: Int,갯수 count: Int) {
	print("Total Price : \(price * count)")
}

printTotalPrice(가격:1500, 갯수:5)


#### price를 default로 하고 싶을 때

func printTotalPriceWithDefaultValue(price: Int = 1500, count: Int) {
	print("Total Price : \(price * count)")
}

printTotalPriceWithDefaultValue(count : 5)
printTotalPriceWithDefaultValue(count : 10)
printTotalPriceWithDefaultValue(count : 7)
printTotalPriceWithDefaultValue(count : 1)
# price의 가격을 바꾸고 싶으면 이렇게 사용
printTotalPriceWithDefaultValue(price : 2000, count : 1)

####

func totalPrice(price: Int, count : Int) -> Int {
	let totalPrice = price * count
    return totalPrice
}

let calculatedPrice = totalPrice(price:10000, count : 77)
calculatedPrice
# 도전 문제
import UIKit
# 성,이름을 받아서 fullname을 출력하는 함수 만들기
func FullName(frist : String, name : String){
let fullname = frist+name
print(fullname)
}
FullName(frist:"이", name:"하연")
func printFullName(fristName : String, lastName : String){
print("fullname is \(fristName)\(lastName)")
}
printFullName(firstName:"하연",lastName:"이")
# 1번에서 만든 함수인데, 파라미터 이름을 제거하고 fullname 출력하는 함수 만들기
func FullName(_ frist : String, _ name : String){
print("fullname is \(frist)\(name)")
}
FullName("이","하연")
# 성,이름을 받아서 fullname을 return하는 함수 만들기
func FullName(frist : String, name : String) -> String {
return "\(frist) \(name)"
}
let fullname =FullName(frist : "이", name:"하연")
fullname
- 같은 이름의 함수여도 다르게 구현해야 하는 경우 -> 오버로드 ( 같은이름 다른행동 )
func printTotalPrice(price: Int, count : Int){
	print(" Total Price : \(price * count) ")
}
func printTotalPrice(price: Double, count : Double){
	print(" Total Price : \(price * count) ")
}
func printTotalPrice(가격: Int, 개수 : Int){
	print(" 총 가격은 : \(가격 * 개수) ")
}- 파라미터로 들어온 변수를 함수에서 직접 변경하고 싶을 경우
파라미터로 들어온 변수를 변경하고 싶을 경우에 in-out 키워드 사용 (copy in , copy out)
var value = 3
func incrementAndPrint(_ value : inout Int){
	value += 1
    print(value)
}

incrementAndPrint(&value)- 함수의 인자(파라미터)로 함수를 넘기는 경우
fun add ( _a : Int, _b : Int) -> Int {
	return a+b
}

fun subtract( _a : Int , _b : Int ) -> Int {
	return a-b
}

# 함수자체를 변수로 할당
var function = add
function(4,2)

function = subtract
function(4,2)

func printResult(_ function: (Int,Int)->Int, _a:Int,_b:Int){
	let result = function(a,b)
    print(result)
}

printResult(add,10,5)
printResult(subtract,10,5)
Optional
존재하지 않음 : nil
import UIKit

var carName : String? = "Tesla"
var penilName : String?
penilName = nil
penilName = "signal"


// 과제1: 여러분이 최애하는 영화배우의 이름을 담는 변수를 작성해주세요 ( 타입 String?)
var actorName : String?= nil
actorName = "전지현"

// 과제2: let num = Int("10") -> 타입은 뭘까요?
타입 : Int

let num = Int("10hi")
타입 : nil
고급 기능 4가지
Forced unwrapping
- 억지로 박스를 까보기
Optional binding(if let)
- 부드럽게 박스를 까보자1
Optional binding(guard)
- 부드럽게 박스를 까보자2
Nil coalescing
- 박스를 까봤더니, 값이 없으면 디폴트 값을 줘보자
var carName : String?
carName = nil
carName = "땡크"
결과 : Optional("땡크")
이유 : 박스 안에 value가 있는 형태
내가 원하는 거 : 박스 안의 value만 추출 하고 싶음
 -> print(carName!)
if let unwrappedCarName = carName {
	print(unwrappedCarName)
}else{
	print("Car Name 없다")
}- 파싱((syntactic) parsing)은 일련의 문자열을 의미있는 토큰(token)으로 분해하고 이들로 이루어진 파스 트리(parse tree)를 만드는 과정
func printParsedInt(from : String) {
	if let paredInt = Int(from) {
    	print(paredInt)
        //if else ... 계속 하게 되면
        // Cyclomatic Complexity 됨
    } else{
    	print("Int로 컨버팅 안된다")
    }
}

//printParsedInt(from : "100") // if
printParsedInt(from: "헬로우 마이네미이즈") // else
- 미리 guard로 잡는거 , 이 방법은 Cyclomatic Complexity 를 줄이는 방법
func printParsedInt(from : Stinrg){
	guard let parsedInt = Int(from) else{
    	print("Int로 컨버팅 안된다" )
        return
    }
    print(parsedInt)
}

printParsedInt(from: "헬로우 마이네미이즈")- 디폴트
let myCarName: String = carName ?? "모델 S" -> 이 경우는 값이 없으니 디폴트 값인 모델 S로 나옴
carName = "모델 3"
let myCarName: String = carName ?? "모델 S"
-> 이 경우는 있으니까 모델 3으로 나옴
도전 과제
- 최애 음식이름을 담는 변수를 작성하시고 ( String?),
- 옵셔널 바인딩을 이용해서 값을 확인해보기
- 닉네임을 받아서 출력하는 함수 만들기, 조건 입력 파라미터는 String?
let favoriteFood : String? = "한우"

if let foodName = favoriteFood {
	print(foodName)
else{
	print("좋아하는 음식 없음")
}

func printNicName(name: Stinrg?){
	guard let nickName = name else{
    	print("nickname 만들어 보자")
        return
    }
    print(nickName)
}
//printNicName(name: "하연닉네임")
printNicName(name: nil)
6강. Collection
- Array
- Dictionary
- Set
- Closure
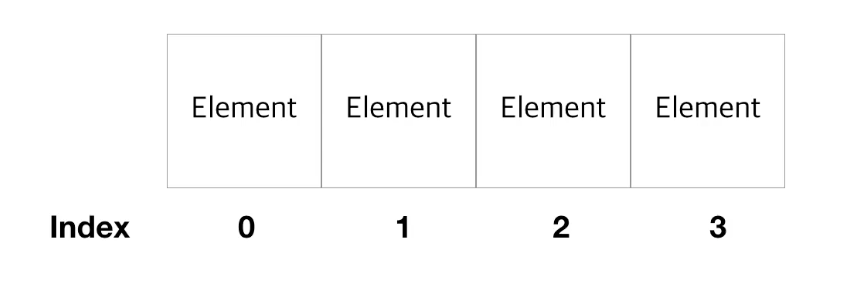
Array
- 스위프트에서 여러개의 변수를 관리해주는 통 같은 역할
- array는 각 통에 담는 element를 순서에 따라 담을 수 있게 해줌
Rule 규칙!
1. 통에 담을 때에는 같은 타입으로 담아야 함
2. element 들은 순서가 있음
When 언제?
1. 순서가 있는 아이템
2. 아이템의 순서를 알면 유용할 때
import UIKit

// var evenNumbers: [Int] = [] // 통에 아무것도 없을 경우
var evenNumbers : [Int] = [2,4,6,8]
// var evenNumbers : Array<Int> = [2,4,6,8] // 이렇게 써도 됨

evenNumbers.append(10)
evenNumbers += [12.14.16]

evenNumbers.append(contentsOf : [18,20])

let isEmpty = evenNumbers.isEmpty // type : Boolean

evenNumbers.count // 통 안의 갯수

print(evenNumbers.first)
// 이게 Optional(2)로 나옴
// 이유는 아래에서 설명

evenNumbers = []
let firstItem = evenNumbers.first // 타입 확인하면 Int? 로 나옴
// 그래서 first 값이 있을 수도 없을 수도 있으므로 옵셔널

if let firstElement = evenNumbers.first {
	print("---> first item is : \(firstElement)")
}

// 대소 비교가 가능한 경우 -> 이 경우도 있을수도 없을수도 있으므로 옵셔널
evenNumbers.min()
evenNumbers.max()

var firstItem = evenNumbers[0]
var secondItem = evenNumbers[1]
var tenthIten = evenNumbers[9]

let firstThree = evenNumbers[0...2] // 결과 : [2,4,6]

evenNumbers.contains(3) // false
evenNumbers.contains(4) // true

evenNumbers.insert(0,at: 0) // 0번째에 0삽입

evenNumbers.removeAll() // 모두 삭제
evenNumbers = [] // 모두 삭제

evenNumbers.remove(at:0) // 0번째 삭제
evenNumbers[0] = -2  // 0번째 원소를 -2로 변경

evenNumbers[0...2] = [-2,0,2] // 0~2번째 원소를 차례대로 -2,0,2로 변경

evenNumbers.swapAt(0,9) // 0번째와 9번째 원소들이 서로 swap

for num in evenNumbers {
	print(num)
}

for (index,num) in evenNumbers.enumerated(){
	print("idx: \(index), value : \(num) ")
}


// dropFirst는 본체에 영향을 주지 않고 제거하여 나머지 리턴(반환)
let firstThreeRemoved = evenNumbers.dropFirst(3) // 앞에서 3개를 제거한 후 리턴

let lastRemoved = evenNumbers.dropLast() // 뒤에꺼 제거한 후 리턴

// 앞에 3개만 가져오기
let firstThree = evenNumbers.prefix(3)
// 뒤에 3개만 가져오기
let lastThree = evenNumbers.suffix(3)
- let을 사용하면 변경 안됨 그래서 이때 append를 사용할꺼므로 var 사용
- element.first 첫번째 원소
- element.last 마지막 원소
Dictionary
- 통 종류 중 하나
- array와 다르게 순서가 없음
- key와 value가 하나의 짝으로 이루어짐
- key는 유일해야 함
- 의미 단위로 찾을 때 유용함
- dictionary는 의미(key) 단위로 찾을 때 / array는 순서 단위로 찾을 때
import UIKit

// var scoreDic : Dictionary<String,Int> = ["Jason":80,"Jay":95, "Jake":90]
var scoreDic : [String : Int] = ["Jason":80,"Jay":95, "Jake":90]

if let score = scoreDic["Jason"] {
	score
} else {
	// ... score 없음
}
scoreDic["Jay"]
scoreDic["Jerry"]

//scoreDic = [:] // 빈 깡통
scoreDic.isEmpty // 빈 깡통
scoreDic.count // 개수

// 기존 사용자 업데이트
scoreDic["Jason"] = 99

// 사용자 추가
scoreDic["Jack"] = 100

// 사용자 제거
scoreDic["Jack"] = nil

// For Loop
for (name,score) in scoreDic {
	print("\(name), \(score)")
}

// key 출력하는 순서는 고정되지 않음 -> 딕셔너리는 순서 고정 x
for key in scoreDic.keys {
	print(key)
}

// 1. 이름, 직업, 도시에 대해서 본인의 딕셔너리 만들기
var myDic : [String :String] = ["이름":"하연", "직업":"학생","도시":"안산"]

// 2. 여기서 도시를 부산으로 업데이트 하기

myDic["도시"] = "부산"

// 3. 딕셔너리를 받아서 이름과 도시 프린트하는 함수 만들기

fucn printDic(dic: [String:String]){
	if let name = dic["이름"] , let city = dic["도시"]{
    	print(name,city)
    }
    else{
    	print("--> Cannot find")
    }
}

printDic(dic : myDic)
Set
- 유일한 값을 가진 타입
- 순서가 없음
- 중복이 없는 유니크한 아이템들을 관리 할 때
import UIKit

var someArray : Array<Int> = [1,2,3,1]
// [1,2,3,1]
var someSet : Set<Int> = [1,2,3,1]
// [1,2,3]

someSet.isEmpty
someSet.count

someSet.contains(4) //boolean : false

someSet.insert(5)

someSet.remove(1)
Closure
- 이름이 없는 메소드
import UIKit

var multiplyClosure : (Int, Int) -> In ={ (a:Int,b:Int)->Int in
	return a * b
}

// 위에 꺼를 줄일 수 잇음
var multiplyClosure : (Int, Int) -> In ={ $0 * $1 }

// 하지만 너무 줄이면 의미를 모르므로 아래가 가장 적당
var multiplyClosure : (Int, Int) -> In ={ a * b in
	return a * b
}

var addClosure:(Int,Int) -> Int = {a,b in
	return a+b
}

let result = multiplyClosure(4,2)

func operateTwoNum(a:Int,b:Int,operation : (Int,Int)->Int) -> Int {
	let result = operation(a,b)
    return result
}

operateTwoNum(a:4,b:2,operation:multiplyClosure)
operateTwoNum(a:4,b:2,operation:addClosure)
operateTwoNum(a:4,b:2){ a,b in
	return a/b
}
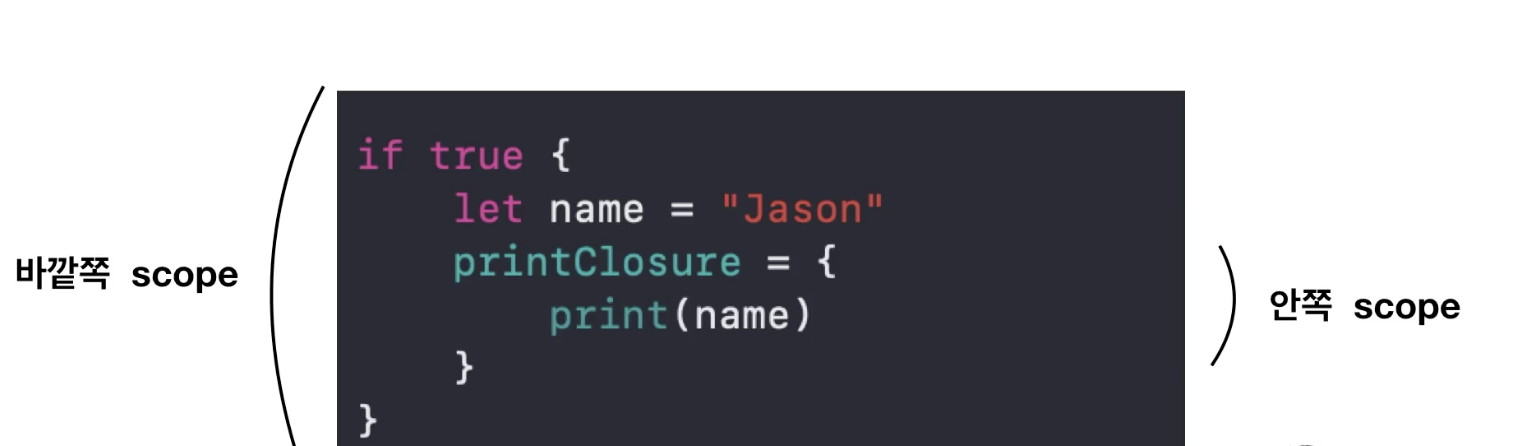
- closure가 살아있는 한 잡힌 변수는 scope에 벗어나도 사용 가능
let voidClosure : () -> void = {
	print("iOS 개발자 짱, 클로저 사랑해")
}

voidClosure()

// Capturing Values


var count = 0
let incrementer = {
	// count가 밖에 있는데 참조되서 사용됨
	count += 1
}

incrementer()
incrementer()
incrementer()
incrementer()

count- 아주 정확히는 함수는 Closure의 한가지 타입
- Closure는 크게 3가지 타입이 있음
- Global 함수
- Nested 함수
- Closure Expressions
swift 공식 사이트 : docs.swift.org
- 이름이 없고 주변의 값들을 캡쳐할 수 있는 가벼운 문법을 가진 클로저 타입이다.
- 함수처럼 기능을 수행하는 코드블록
- 함수와 다르게 이름이 없다.
- 함수와 공통점, 차이점이 있다.
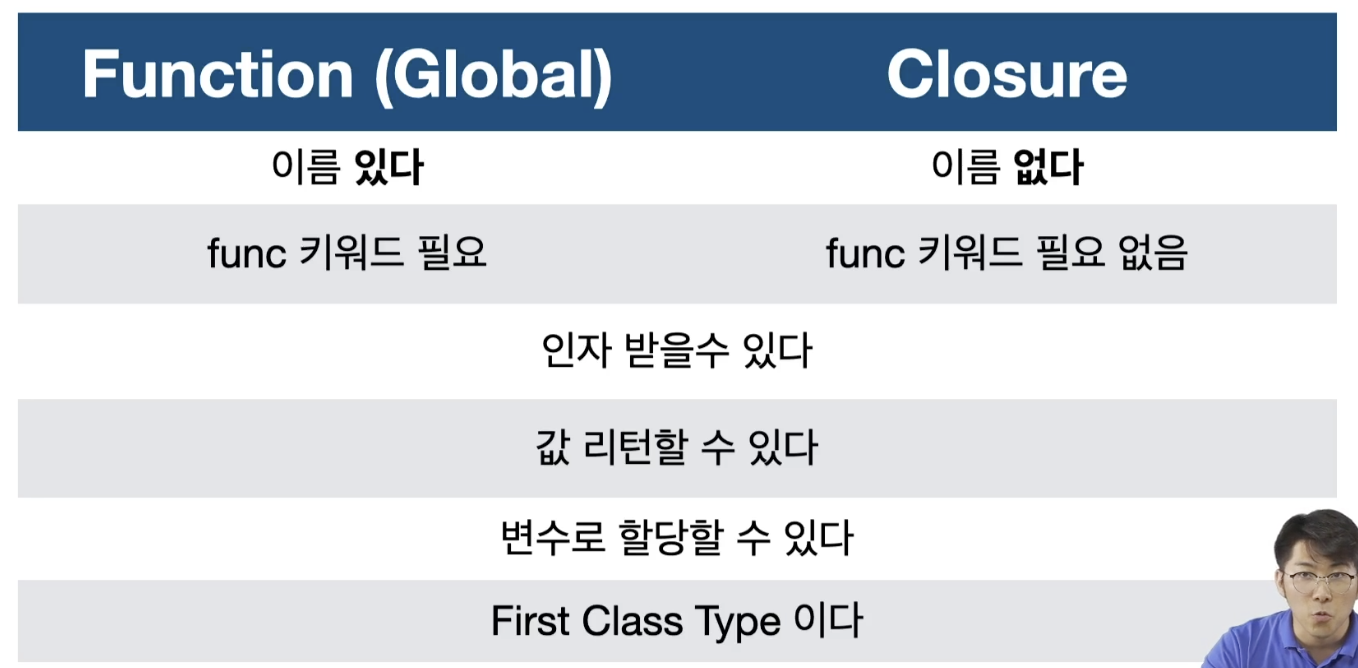
- First Class Type ?
- 변수에 할당할 수 있다
- 인자로 받을 수 있다.
- 리턴 할 수 있다.
- Closure 실무에서 자주 쓰이는 거
- Completion block
: 어떤 task가 완료가 되었을때 Closure가 수행되면서 자주 쓰임- 앱에서 네트워크 통해서 데이터를 받아옴
- 이때 뭔가 비동기적으로 언제 끝날지 모르는 일의 경우에는 해당 일이 끝나고 뭔가 수행을 해야할 때 Closure 수행
- Higher Order Functions (고계함수)
: input을 함수로 받을 수 잇는 유형의 함수- 함수인데 인자를 함수로 받을 수 있는 거
- Completion block
7강 구조
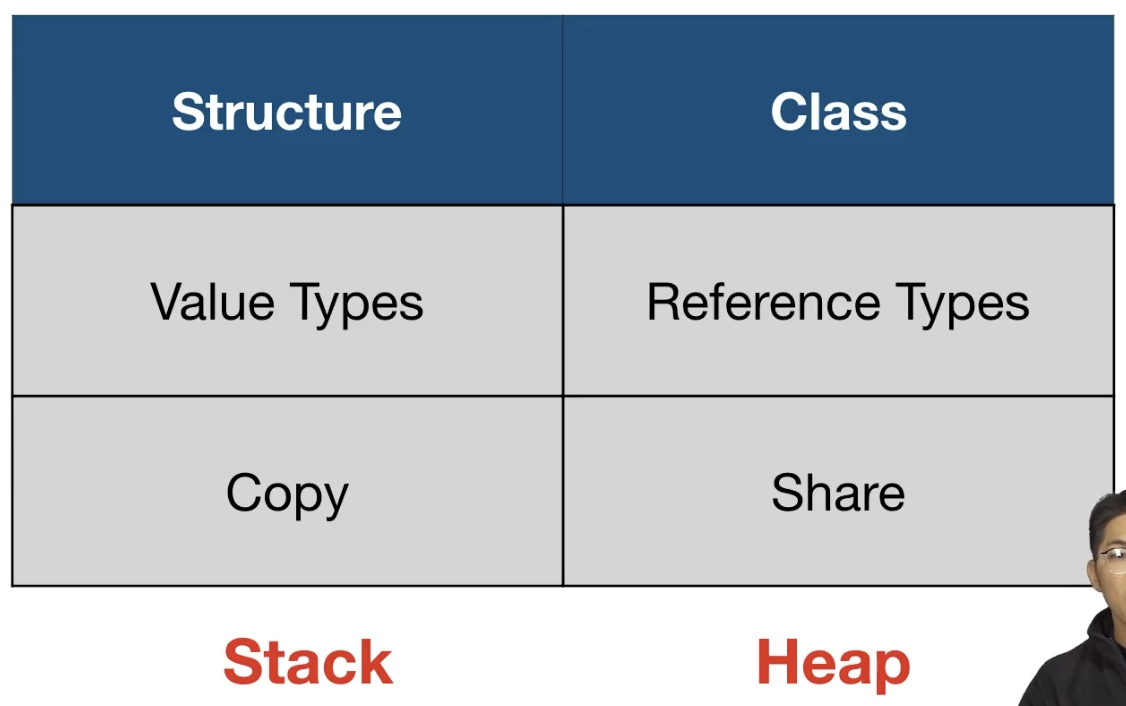
Structure
-
협업을 할 때 관계있는 것끼리 묶어서 표현하여 "가독성"이 높아지며 "재사용성" 높아짐
-
관계가 있는 것들을 묶어서 표현
-
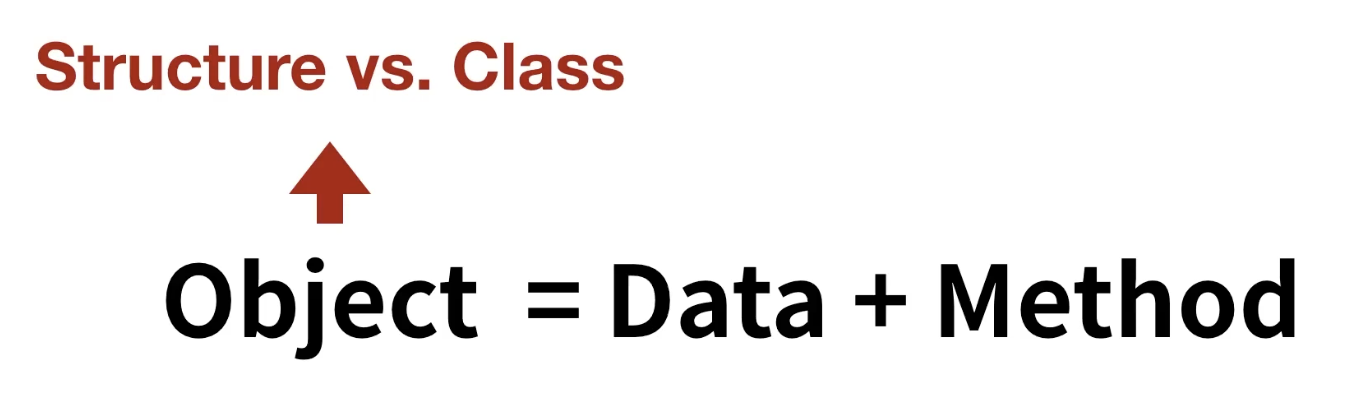
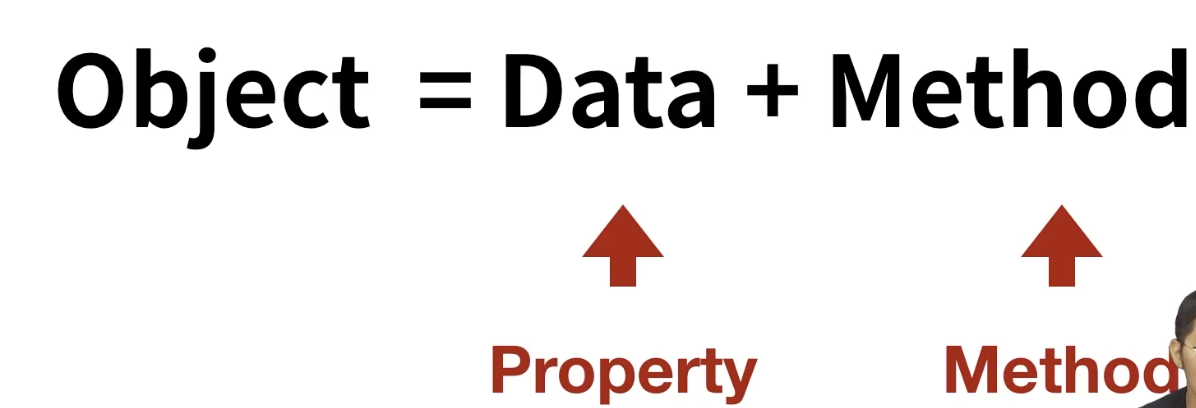
Object = Data + Method
-
Object -> Structure vs Class 동작이 다름 <- 메모리 공간 차이가 있음
-
-
-
구조체 실습
// 문제 : 가장 가까운 편의점 찾기
// 맨처음 시작시 ... 코드
// 현재 스토어 위치들
let store1 = (x:3,y:5,name:"gs")
let store2 = (x:4,y:6,name:"seven")
let store3 = (x:1,y:7,name:"cu")

// 거리 구하는 함수
func distance(current: (x:Int,y:Int), target: (x:Int,y:Int) -> Double {
	// 피타고라스..
    let distanceX = Double(target.x - current.x)
    let distanceY = Double(target.y - current.y)
    let distance = sqrt(distanceX*distanceX + distanceY*distanceY)
    return distance
}

// 가장 가까운 스토어 구해서 프린트하는 함수
func printClosestStore(currentLocation(x: Int, y: Int), store: [(x:Int,y:Int,name:String)]) {
	var closestStoreName = ""
    var closestStoreDistance = Double.infinity

    for store in stores {
    	let distanceToStore = distance(current: currentLocation, target:(x:store.x, y:store.y))
        closestStoreDistance = min(distanceToStore, closeStoreDistance)
        if closestStoreDistance == distanceToStore {
        	closestStoreName = store.name
        }
    }
    print("Closest store : \(closestStoreName)")
}
// Stores Array 세팅, 현재 내 위치 세팅
let myLocation = ( x:2, y:2 )
let stores = [store1, store2, store3]


// printClosestStore 함수이용해서 현재 가장 가까운 스토어 출력하기
printClosestStore(currentLocation: myLocation, stores: stores)

// Improve Code
// - make Location struct
// - make Store struct
// 문제 : 가장 가까운 편의점 찾기
// 맨처음 시작시 ... 코드

struct Location {
	let x: Int
    let y: Int
}


// 현재 스토어 위치들
let store1 = (loc: Location(x:3,y:5),name:"gs")
let store2 = (loc: Location(x:4,y:6),name:"seven")
let store3 = (loc: Location(x:1,y:7),name:"cu")

// 거리 구하는 함수
func distance(current: Location, target: Location ) -> Double {
	// 피타고라스..
    let distanceX = Double(target.x - current.x)
    let distanceY = Double(target.y - current.y)
    let distance = sqrt(distanceX*distanceX + distanceY*distanceY)
    return distance
}

// 가장 가까운 스토어 구해서 프린트하는 함수
func printClosestStore(currentLocation : Location, store: [(loc:Location,name:String)]) {
	var closestStoreName = ""
    var closestStoreDistance = Double.infinity

    for store in stores {
    	let distanceToStore = distance(current: currentLocation, target:store.loc)
        closestStoreDistance = min(distanceToStore, closeStoreDistance)
        if closestStoreDistance == distanceToStore {
        	closestStoreName = store.name
        }
    }
    print("Closest store : \(closestStoreName)")
}
// Stores Array 세팅, 현재 내 위치 세팅
let myLocation = Location( x:2, y:2 )
let stores = [store1, store2, store3]


// printClosestStore 함수이용해서 현재 가장 가까운 스토어 출력하기
printClosestStore(currentLocation: myLocation, stores: stores)

// Improve Code
// - make Location struct
// - make Store struct
// 문제 : 가장 가까운 편의점 찾기
// 맨처음 시작시 ... 코드


// 거리 구하는 함수
func distance(current: Location, target: Location ) -> Double {
	// 피타고라스..
    let distanceX = Double(target.x - current.x)
    let distanceY = Double(target.y - current.y)
    let distance = sqrt(distanceX*distanceX + distanceY*distanceY)
    return distance
}

struct Location {
	let x: Int
    let y: Int
}

struct Store {
	let loc : Location
    let name : String
    let deliveryRange = 2.0

    func isDeliverable(userLoc : Location) -> Bool {
    	let distanceToStore = distance(current : userLoc, target : loc)
        return distanceToStore < deliveryRange
    }
}


// 현재 스토어 위치들
let store1 = Store(loc: Location(x:3,y:5),name:"gs")
let store2 = Store(loc: Location(x:4,y:6),name:"seven")
let store3 = Store(loc: Location(x:1,y:7),name:"cu")


// 가장 가까운 스토어 구해서 프린트하는 함수
func printClosestStore(currentLocation : Location, store: [Store]) {
	var closestStoreName = ""
    var closestStoreDistance = Double.infinity
    var isDeliverable = false

    for store in stores {
    	let distanceToStore = distance(current: currentLocation, target:store.loc)
        closestStoreDistance = min(distanceToStore, closeStoreDistance)
        if closestStoreDistance == distanceToStore {
        	closestStoreName = store.name
            isDeliverable = store.isDeliverable(userLoc: currentLocation)
        }
    }
    print("Closest store : \(closestStoreName)")
}
// Stores Array 세팅, 현재 내 위치 세팅
let myLocation = Location( x:2, y:2 )
let stores = [store1, store2, store3]


// printClosestStore 함수이용해서 현재 가장 가까운 스토어 출력하기
printClosestStore(currentLocation: myLocation, stores: stores)

// Improve Code
// - make Location struct
// - make Store struct
Struct vs Class
class PersonClass {
var name : String
var age : Int
init(name : String, age: Int){
self.name = name
self.age = age
}
}
struct PersonStruct {
var name : String
var age : Int
init(name : String, age: Int){
self.name = name
self.age = age
}
}
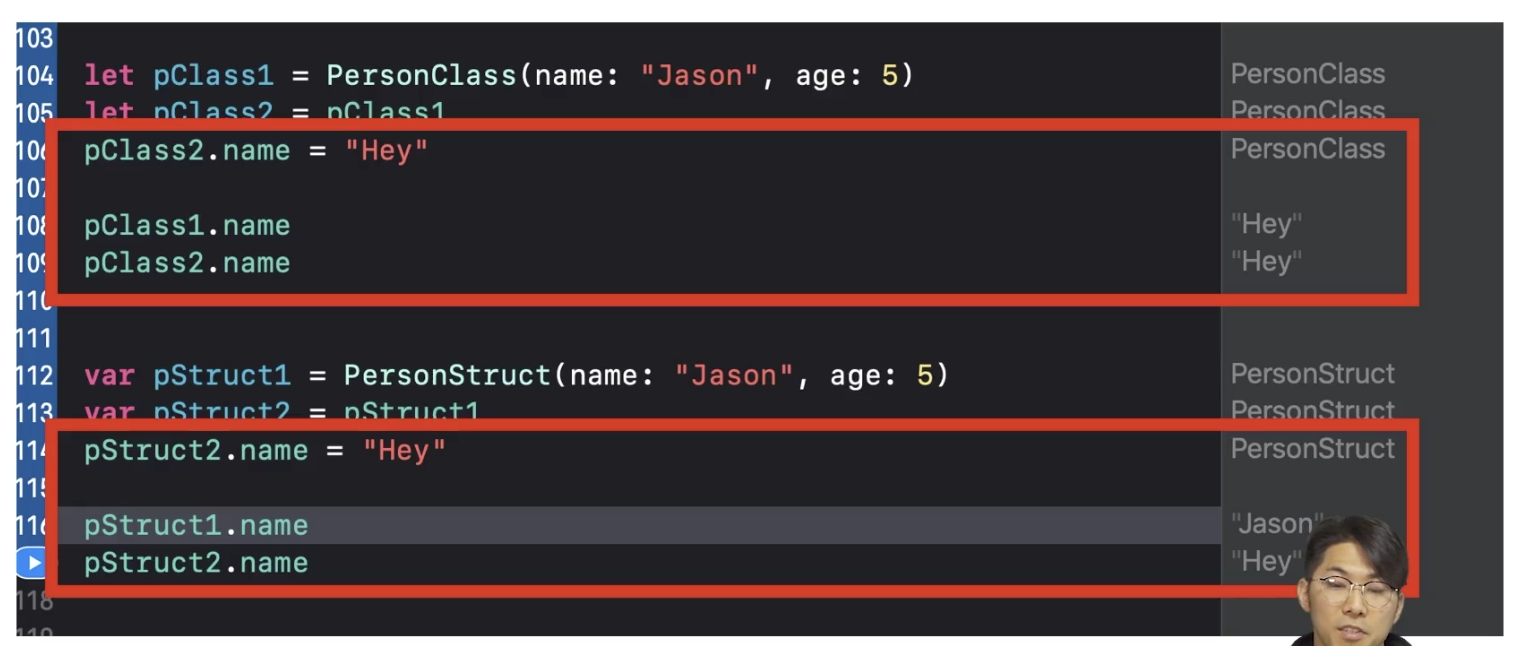
### 동작 차이
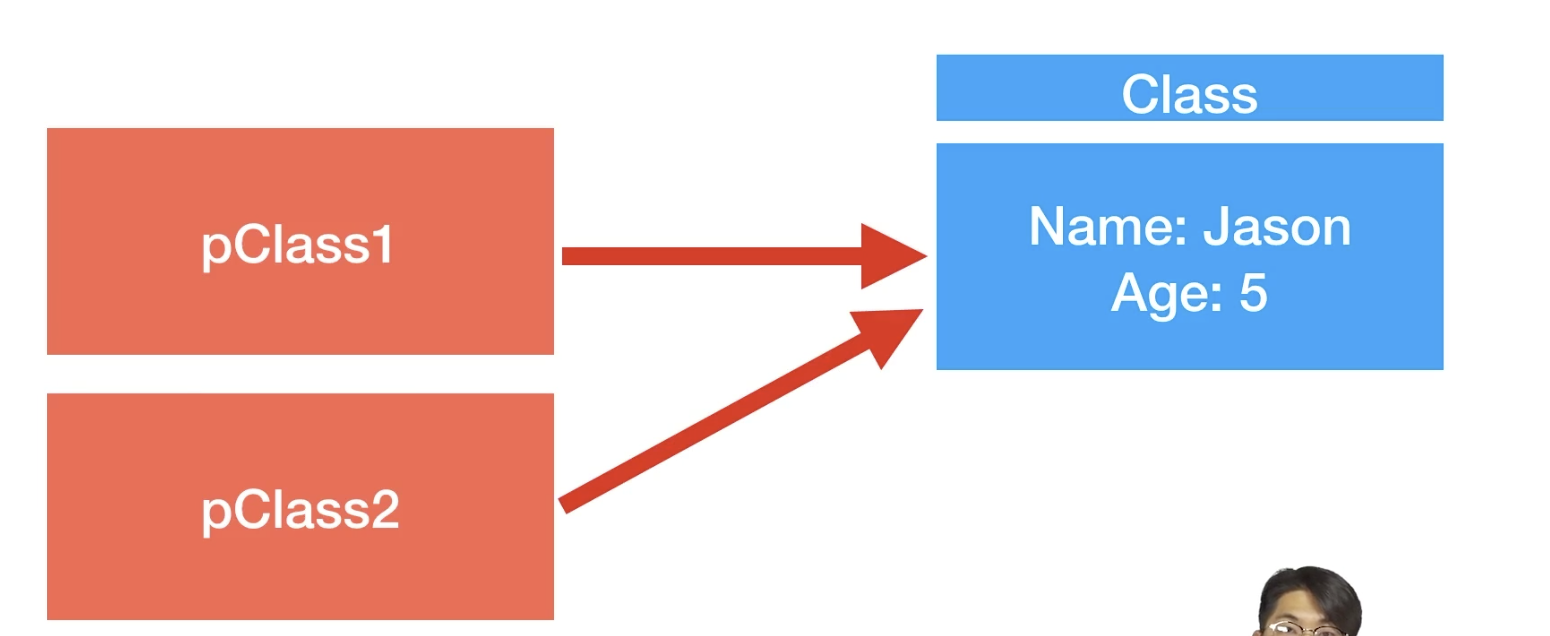
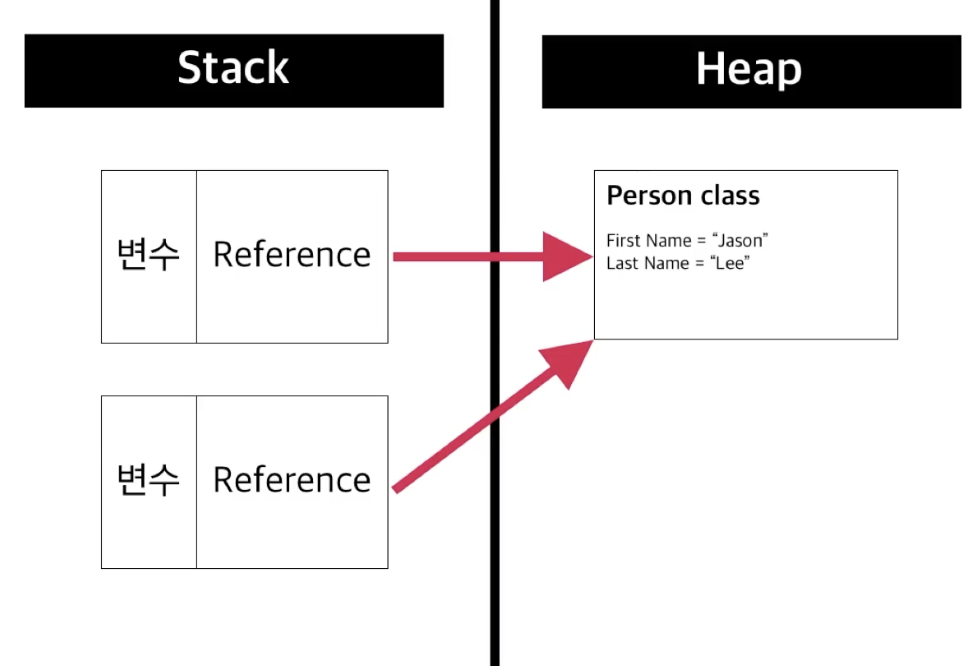
## pClass1이랑 pClass2랑 같은 인스턴스를 가리키니까 둘 다 이름이 변경
let pClass1 = PersonClass(name:"Jason",age:5)
let pClass2 = pClass1
pClass2.name = "Hey"
pClass1.name // Hey
pClass2.name // Hey
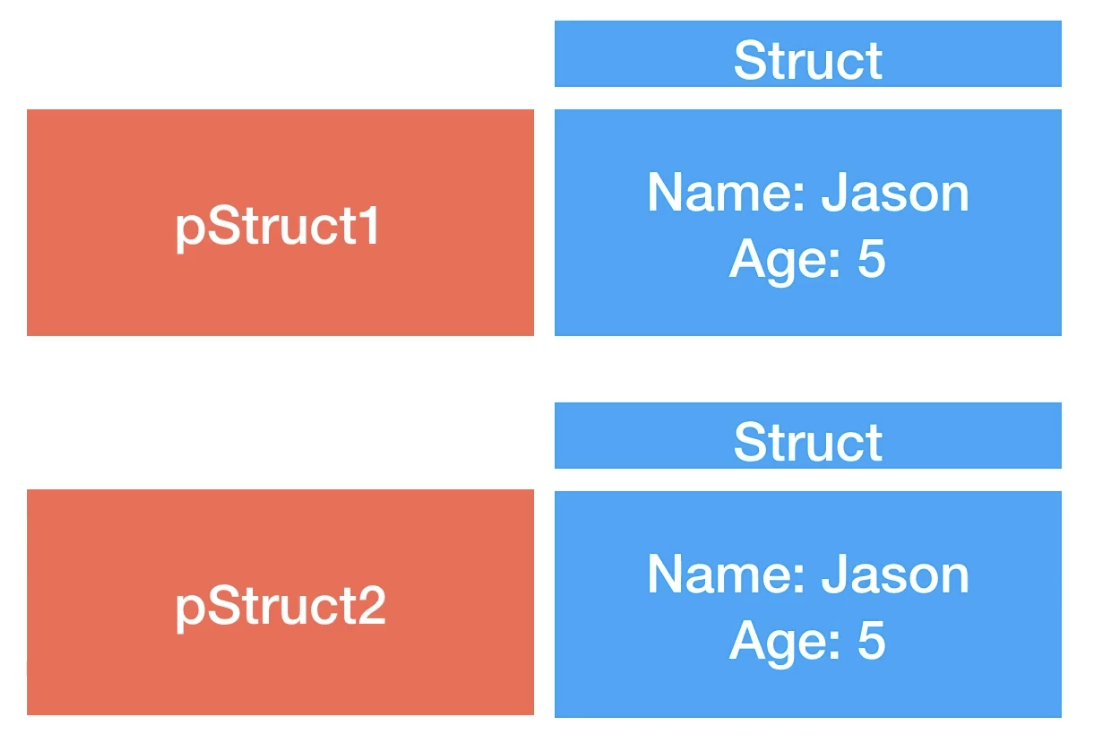
## pStruct1, pStruct2는 서로 남남이기 때문에 2만 바뀌고 1은 그대로
ver pStruct1 = PersonStruct(name:"Jason",age:5)
ver pStruct2 = pStruct1
pStruct2.name = "Hey"
pStruct1.name // Jason
pStruct2.name // Hey
구조체 도전과제
struct Lecture{
	let name : String
    let instructor: String
    let numOfStudent : Int
}

func printLectureName(from instructor : String, lecture: [Lecture]){
	var lectureName = ""

    for lecture in lectures {
    	if instructor == lecture.instructor {
        	lectureName = lecture.name
        }
    }
    // Closer 람다식
    //let lectureName = lectures.first{(lec)-> Bool in retrun lec.instructor == instructor
    //}?.name


    print(" 아 그 강사님 강의는요 : \(lectureName)")
}

let lec1 = Lecture(name : "iOS Basic", instructor : "Jason", numOfStudent : 5)
let lec2 = Lecture(name : "iOS Advanced", instructor : "Jack", numOfStudent : 5)
let lec3 = Lecture(name : "iOS Pro", instructor : "Jim", numOfStudent : 5)
let lectures = [lec1, lec2, lec3]

printLectureName(from: "Jack",lectures: lectures)
Protocol 프로토콜
- 프로토콜 = 규약 = 지켜야할 약속
Properties 속성 프로퍼티 = Object의 data
- 오브젝트를 관리하는 것들 중 1인 Data와 관련된 놈들 알아보자
- 프로퍼티 2가지
- Stored Property ; 우리가 지금까지 봤던 어떤 값을 저장해서 가지고 있는 것
- 객체 안에 있는 값들을 저장하는 역할을 함
- didSet : Stored에서만 가능 / 육안 업적을 눈으로 관찰 할 수 있다.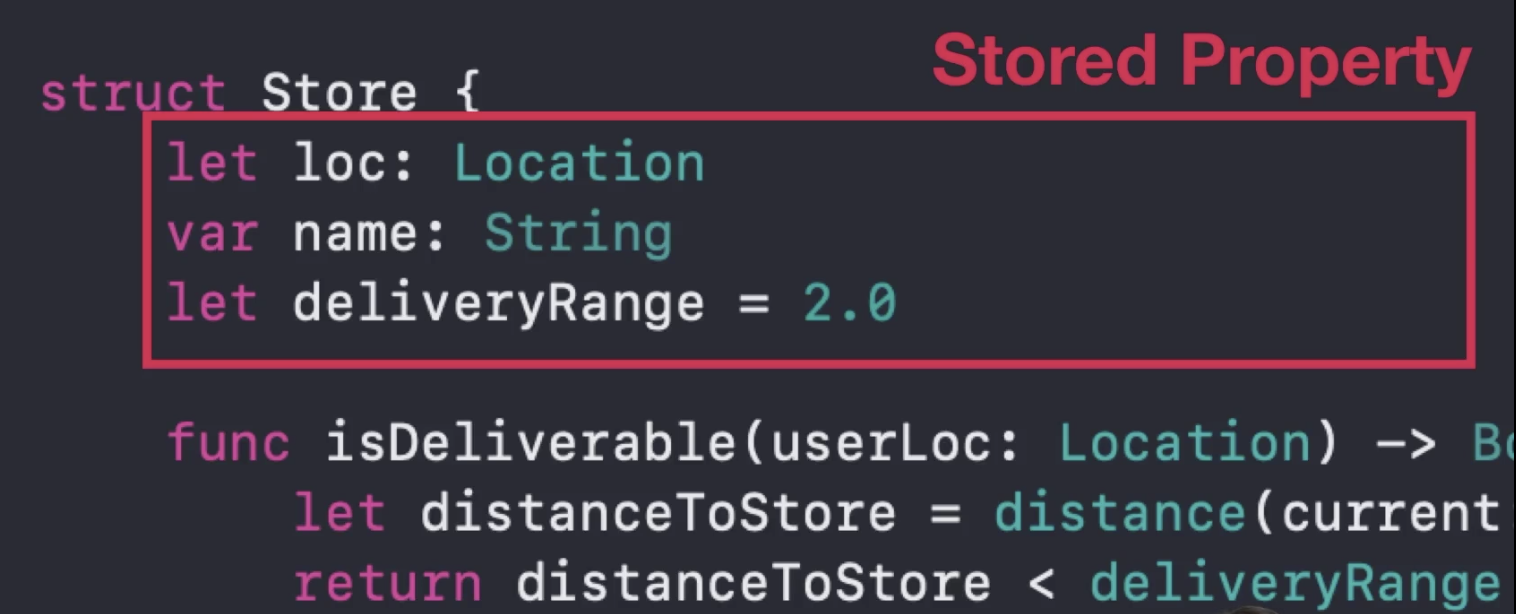
- Computed Property : 어떤 값을 따로 저장하지 않고 저장된 정보를 이용해서 재가공 혹 저장 혹은
- 매번 접근할 때마다 다시 계산이 되어 저장된 값이 변경되어 새로운 저장값을 이용하여 다시 사용
- var 키워드만 가능
- with Only -> 어떠한 값을 생성할 수 없음 -> 직접 할당하거나 업데이트 할 수 없음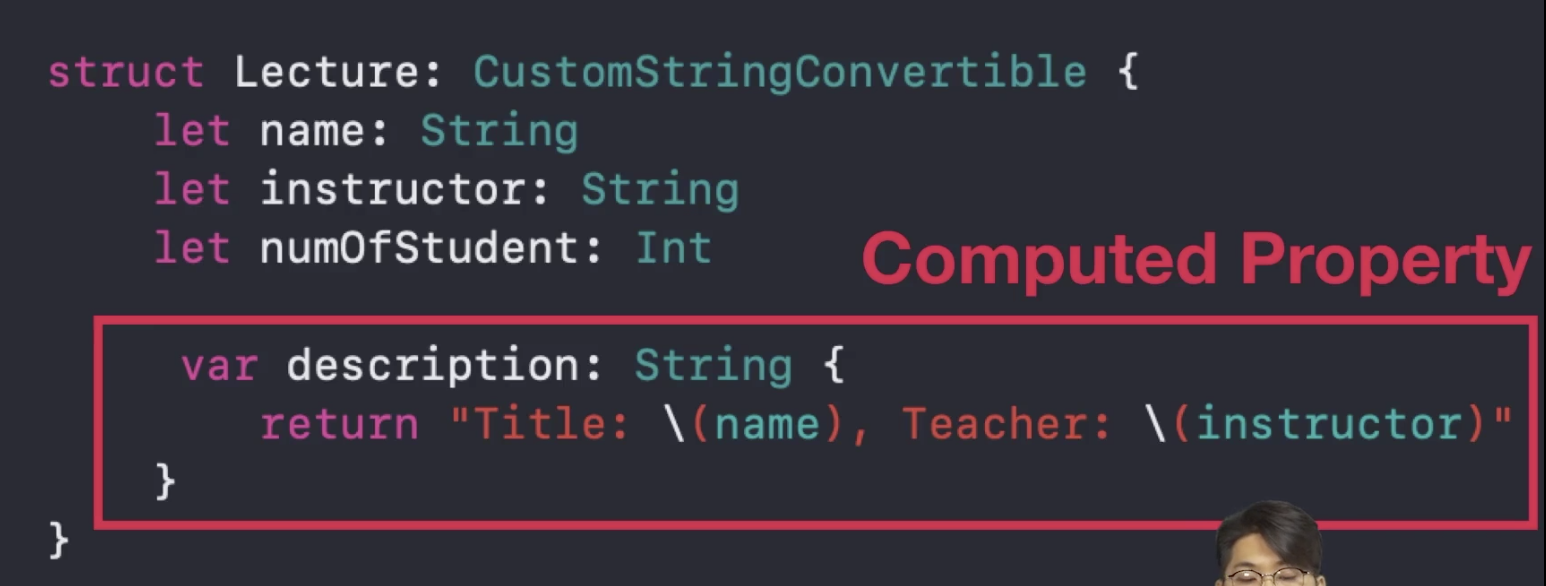
- Type Property : 인스턴스와 상관없게 만들 수 있음
- 생성된 인스턴스와 상관없이 struct의 타입자체의 속성을 정하고 싶을 때 사용 할 수 있는 거
- 타입 자체에 속한 프로퍼티를 쓸 경우엔 static 키워드를 이용하여 타입 프로퍼티를 만들 수 있음
- 생성된 인스턴스와 상관없이 struct의 타입자체의 속성을 정하고 싶을 때 사용 할 수 있는 거
- lazy property : 인스턴스가 생성될 때 해당 프로퍼티가 접근될 때 그제서야 코드가 실행되는 것
- lazy 키워드 + 코드블록 + 코드블록실행
- lazy .... = {}()
- 왜 쓰냐? 엔지리어닝 측면에서 옵티마이징(최적화)하기 위해서 사용
- lazy 키워드 + 코드블록 + 코드블록실행
- Computed Property : 어떤 값을 따로 저장하지 않고 저장된 정보를 이용해서 재가공 혹 저장 혹은
프로퍼티 실습
struct Person{
	var firstName : String {

    	// 이러한 observation 같은 경우에는 값이 셋팅이 나서 observation 할 수도 있고 값 셋팅 직전에 할 수도 있음 -> 근데 이건 didSet이 아니라 willset을 이용하여 가능
		// willSet이 먼저 , didSet이 다음

        willSet {
        	print("willSet : \(firstName) ---> \(newValue)")
        }
    	didSet {
        	print("didSet : \(oldValue) ---> \(firstName)")
        }
    }
    var lastName : String

    # lazy property
    lazy var isPopular : Bool = {
    	if fullName == "Jay Park" {
        	return true
        }
        else{
        	retrun false
        }
    }()


    # 이건 Computed Property 예시 : 기존에 있던 firstNmae이랑 lastName 의 조합으로 fullName이 탄생
	# 실제로 어떤 값을 저장하지 않고 있는 값 가지고 그냥 가져다가 새로 조합해서 어떠한 값을 넘겨주는 것
    var fullName : String {
    	# firstName이랑 lastName처럼 관계가 형성이 되 있는 경우 셋팅 하면 좋지
    	# get{}set{} 는 둘의 관계를 셋팅 가능하게 하는 것을 도와줌
        get {
        	return "\(firstName) \(lastName)"
        }
        set {
        	// newValue "Jay Park"

            if let firstName = newValue.components(seperatedBy : " ").first{
            	self.firstName = firstName
            }

            if let lastName = newValue.components(seperatedBy: " ").last {
            	self.lastName = lastName
            }
        }
    }
    // 타입 프로퍼티
    static let isAlien : Bool = false
}

# 이것들은 인스턴스를 만든 거
var person  = Person(firstName: "Jason", lastName: "Lee")

person.firstName  // Jason
person.lastName   // Lee

person.firstName = "Jim"
person.lastName = "Kim"

person.firstName  // Jim
person.lastName   // Kim

person.fullName   // "Jim Kim"
person.fullName = " Jay Park"
person.firstName  // Jay
person.lastName   // Park
# 여기까지 인스턴스 만든 거

# 이건 인스턴스가 아니라 타입자체에 있는 프로퍼티
# 인스턴스와 상관없음
Person.isAllen

person.isPopuler  // True
프로퍼티 실습2 - 응용
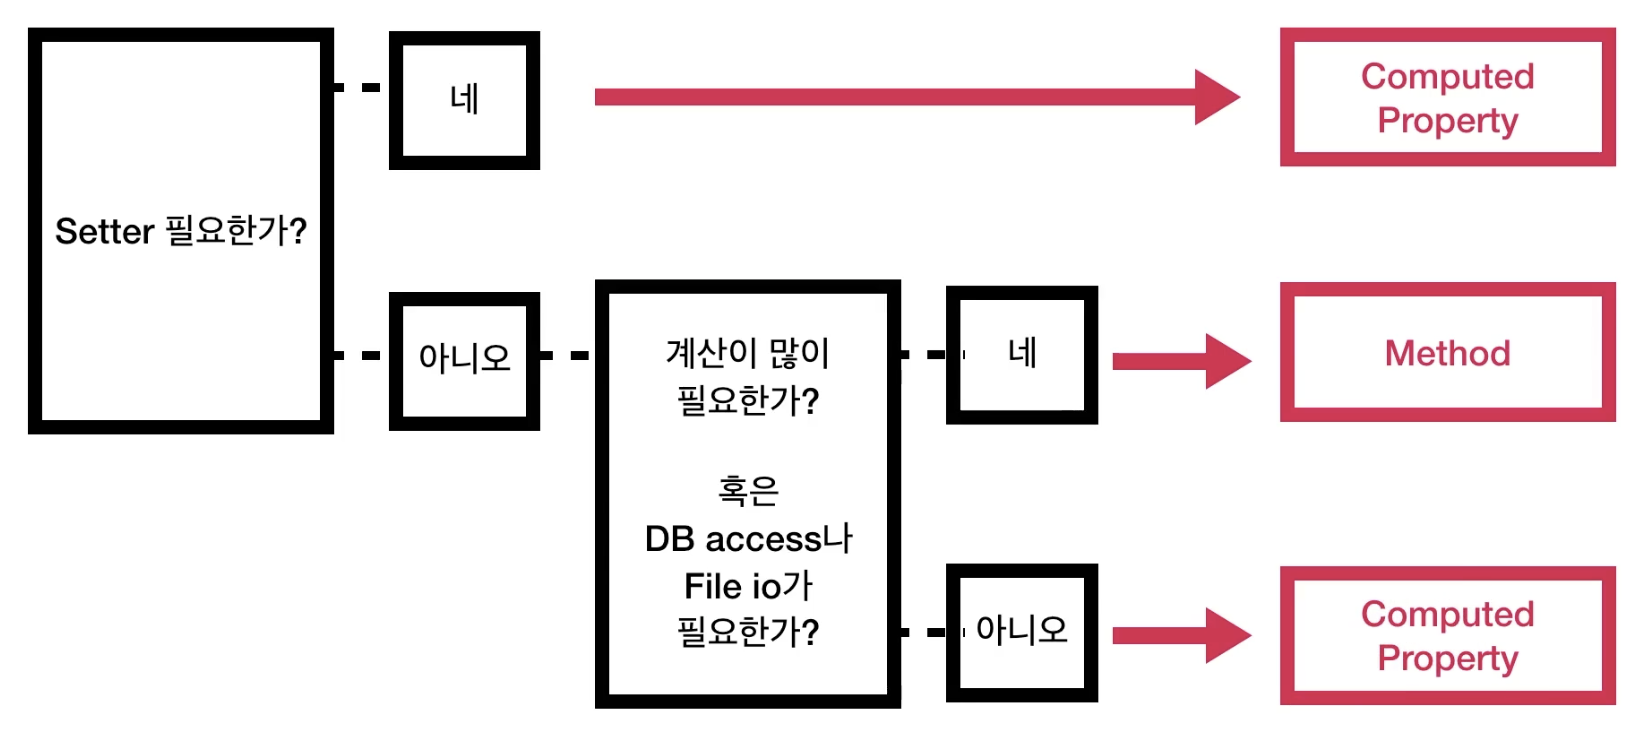
Property vs Method
-
어차피 결과를 똑같음
-
Property : 호출시 (저장된) 값을 하나 반환
-
Method : 호출시 어떤 작업을 한다
-
근데 만약에 Method가 그냥 값을 리턴하는 작업을 한다면요?
struct Person{
	var firstName : String {
        willSet {
        	print("willSet : \(firstName) ---> \(newValue)")
        }
    	didSet {
        	print("didSet : \(oldValue) ---> \(firstName)")
        }
    }
    var lastName : String

    # lazy property
    lazy var isPopular : Bool = {
    	# 프로퍼티일 경우
    	if fullName == "Jay Park" {
        # 메소드일 경우
        // if fullName() == "Jay Park" {
        	return true
        }
        else{
        	retrun false
        }
    }()


    // 실습 1의 computed property보다 간략하게
    // property일 경우
   	var fullName : String {
       	return "\(firstName) \(lastName)"
    }

    // Method fullName()
    func fullName() -> String{
    	return "\(firstName) \(lastName)"
    }


    // 타입 프로퍼티
    static let isAlien : Bool = false
}

# 이것들은 인스턴스를 만든 거
var person  = Person(firstName: "Jason", lastName: "Lee")


# property의 경우
person.fullName

# method의 경우
person.fullName()
Method
- func과 method 차이는 인스턴스에 귀속되서 사용할 수 있는 녀석들
- func과 마찬가지로 "기능을 수행하는 코드블록"
- func과 다르게 struct나 class 안에서 수행
구조체에 메소드를 추가하는 방법
스스로에 있는 stored property의 값을 변경시키는 경우엔 mutating 사용
타입 메소드
extension
- 내가 만든 struct가 아닌 남이 만든 struct의 경우 내 입맛에 따라 좀 추가하고 싶을 경우 extension 메소드 사용
import UIKit

struct Lecture{
	var title : String
    var maxStudents: Int = 10
    var numOfRegistered: Int = 0
}

var lec = Lecture(title: " iOS Basic")

func remainSeats(of lec: Lecture) -> Int {
    let remainSeats = lec.maxStudents - lec.numOfRegistered
    return remainSeats
}

remainSeats(of:lec)- 위의 함수를 따로 분리할 필요없이 구조체 안에 넣어도 될 듯해서 한 거
import UIKit

struct Lecture{
	var title : String
    var maxStudents: Int = 10
    var numOfRegistered: Int = 0

    func remainSeats() -> Int {
    	let remainSeats = maxStudents - numOfRegistered
        return remainSeats
    }

    // 구조체 안에서 수정이 이루어져있으므로 mutating 선언
    mutating func register(){
    	// 등록된 학생수 증가시키기
        numOfRegistered += 1
    }

    // 타입 프로퍼티
    static let target: String = "Anybody want to learn something"
    // 타입 메소드
    static func 소속학원이름() -> String{
    	return "패캠"
    }

}

var lec = Lecture(title: " iOS Basic")

lec.remainSeats() // 10

lec.register()

lec.remainSeats() // 9

Lecture.target
Lecture.소속학원이름()

struct Math{
	static func abs(value: Int) -> Int {
    	if value > 0 {
        	return value
        }else{
        	return -value
        }
    }
}

Math.abs(value: -20)

// 확장을 시킨다.
// Math에서 추가적으로 이런 타입들을 사용하고 싶을 때
// 제곱, 반값
extension Math{
	static func sqaure(value: Int) -> Int {
    	return value * value
    }

    static func half(value: Int) -> Int {
    	return value / 2
    }
}

Math.square(value : 5)
Math.half(value : 20)

var value: Int = 3

# Int 같은 경우는 개발자가 만들어 놓은 거기 때문에 함부로 건들지 못하고 extension을 이용하면 가능?
# 내가 원하는 기능들을 추가해서 수행가능
extension Int {
	func square() -> Int {
    	return self * self
    }

    func half() -> Int {
    	return self/2
    }
}

value.sqaure()  // 9
value.half()  // 1
mutating 란 : 구조체의 매서드가 구조체 내부에서 데이터 수정 할떄는 Mutating키워드를 선언 해주어야함
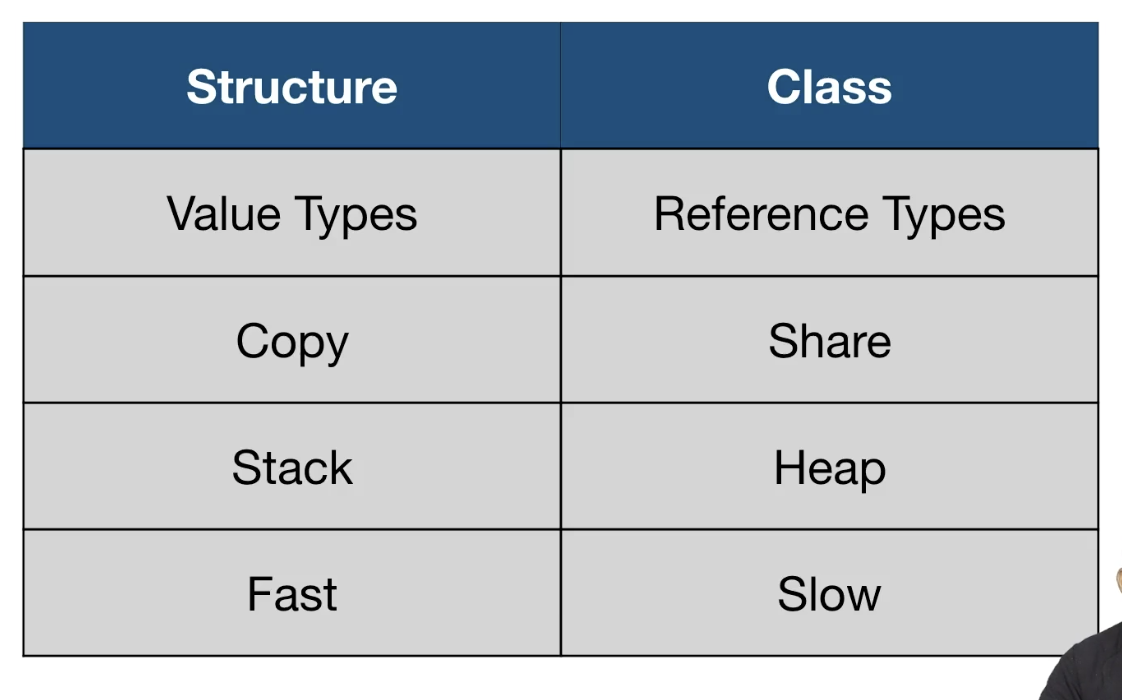
8강 Class
- reference 타입 : 가리킴 -> Heap공간에 생성 => Class
- value 타입 : 실제 가지고 있음 -> stack공간에 생성 => Structer
- RAM 공간
둘 다 프로그램 실행을 위한 메모리 공간
- Stack -> Fast,시스템에서 당장 실행하거나, 타이트하게 컨트롤 및 관리하기때문에 효율적으로 빨라
- Heap -> Slow, 시스템에서 Class와 같은 reference type의 경우에 사용, 큰 메모리 툴 가지고 있어서 시스템에서 동적으로 메모리 할당 요청 가능함, 대신 기본적으로 stack처럼 자동으로 제거하지 않기때문에 개발자가 신경써야함, 근데 개발자가 신경안쓰게 xcode에서 도와주고는 있음,
02. 클래스 실습
struct PersonStruct{
	var firstName : String
    var lastName : String

    var fullName: String{
    	return "\(firstName) \(lastName)"
    }

    mutating func uppercaseName(){
    	firstName = firstName.uppercased()
        lastName = lastName.uppercased()
    }
}

# 위 구조체를 클래스로 변경
Class PersonClass{
	var firstName : String
    var lastName : String

    # class 객체를 생성할 때 사용되는 생성함수 init
    init(firstName : String, lastName : String){
    	self.firstName = firstName
        self.lastName = lastName
    }

    var fullName: String{
    	return "\(firstName) \(lastName)"
    }

    // mutating은 class에서 사용하지 않음
    func uppercaseName(){
    	firstName = firstName.uppercased()
        lastName = lastName.uppercased()
    }
}

var personStruct1 = PersonStruct(firstName: "Jason", lastName : "Lee")
var personStruct2 = personStruct1

var personClass1 = PersonClass(firstName: "Jason", lastName : "Lee")
var personClass2 = personClass1

personStruct2.firstName = "Jay"
personStruct1.firstName   // Jason
personStruct2.firstName   // Jay

personClass2.firstName = "Jay"
personClass1.firstName    // Jay
personClass2.firstName    // Jay

personClass2 = PersonClass(firstName:"Bob", lastName:"Lee")
personClass1.firstName    // Jay
personClass2.firstName    // Bob

personClass1 = personClass2
personClass1.firstName    // Bob
personClass2.firstName    // Bob
03. 언제 클래스 혹은 스트럭트를 써야할까
-
Struct vs Class 언제 무엇을 쓸까?
- Struct 사용시
- 1. 두 object를 "같다, 다르다"로 비교해야 하는 경우
- 2. Copy 된 객체들이 독릭적인 상태를 가져야 하는 경우
- 3. 코드에서 오브젝트의 데이터를 여러 스레드 걸쳐 사용할 경우 안전함- Class 사용시
- 두 object의 인스턴스 자체가 같음을 확인해야 할 때
- 하나의 객체가 필요하고, 여러 대상에 의해 접근되고 변경이 필요한 경우
- Class 사용시
-
왠만한 object는 struct로 쓰자 -> 그러다 나중에 class로 바꿀 필요성이 있는 게 생기면 바꾸기
-
swift는 struct 좋아해
-
stackoverflow보단 공식문서 보자
# 1	번
let point1 = Point(x:3,y:5)
let point2 = Point(x:3,y:5)

# 2 번
var myMac = Mac(owner:"Jason")
var yourMac = myMac
yourMac.owner = "Jay"

myMac.owner
yourMac.owner
04 상속개념 코드로 바로 배우기
struct Grade{
	var letter: Character
    var points : Double
    var points : Double
}

class Person {
	var firstName : String
    var lastName : String

    init(firstName:String,lastName:String){
    	self.firstName = firstName
        self.lastName = lastName
    }

    func printMyName(){
    	print("My name is \(firstName) \(lastName)")
    }
}

## 학생은 사람이다 ( o ) -> 명제 성립시 상속
## 사람은 학생이다 ( x )
class Student : Person {
	var grades : [Grade] = []
}

# 인스턴스 추가
let jay = Person(firstName: " Jay", lastName : "Lee")
let jason = Student(firstName : "Jasson", lastName: "Lee")

jay.firstName
jason.firstName

jay.printMyName()
jason.printMyName()

let math = Grade(letter:"B",points:8.5,credits:3)
let history = Grade(letter:"A",points:10.0,credits:3)
jason.grades.append(contentsOf:math)
jason.grades.append(contentsOf:history)
// jay.grades  jay는 사람이지만 학생이 아니므로 접근 불가능

jason.grades.count // 2
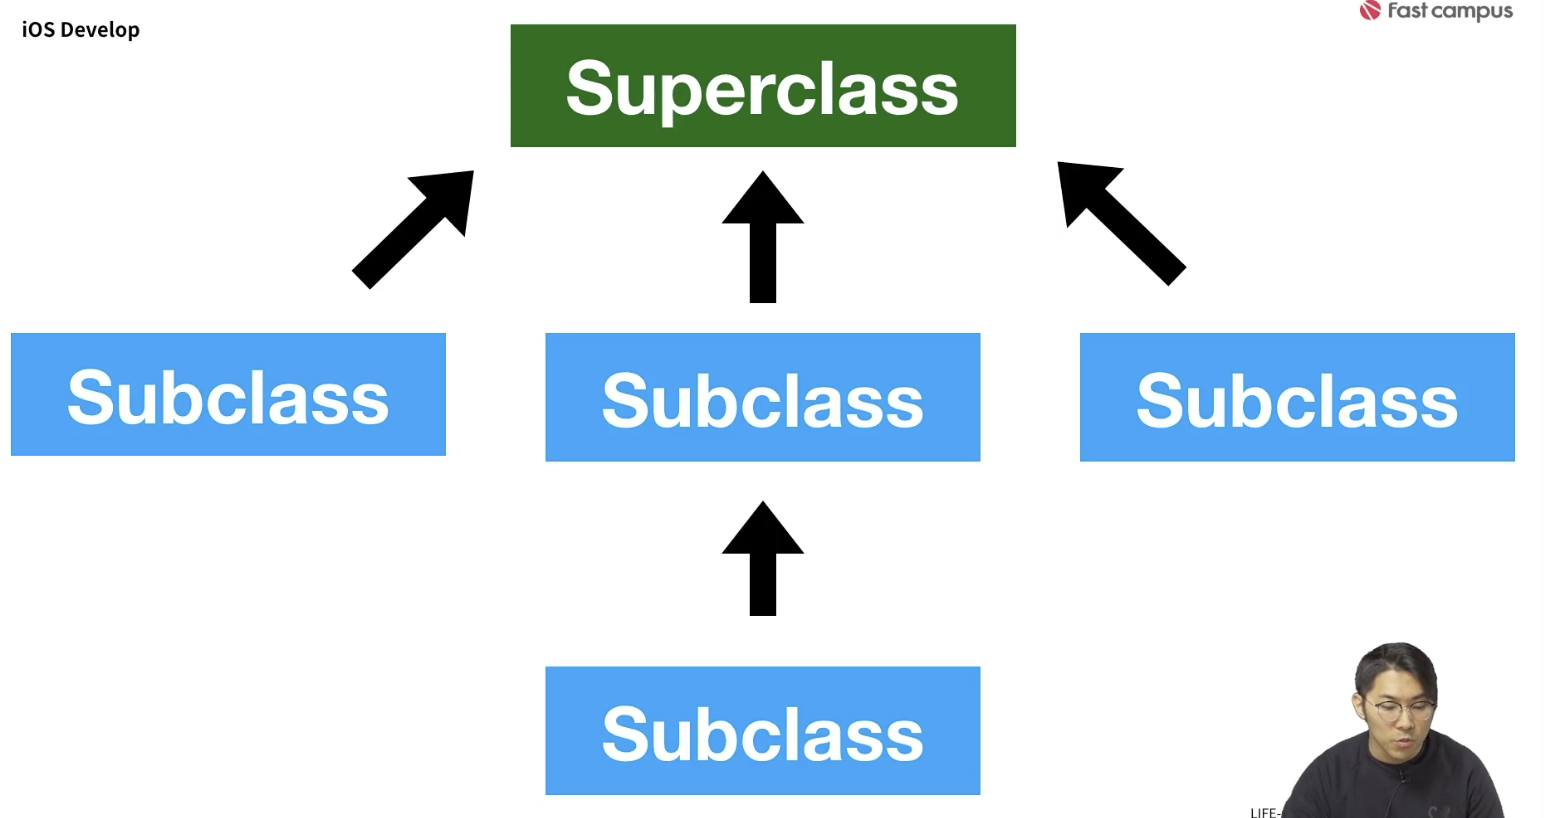
05. 상속의 규칙과 실습
Person : Super Class (Parent Class)
Student : SubClass ( Child Class )
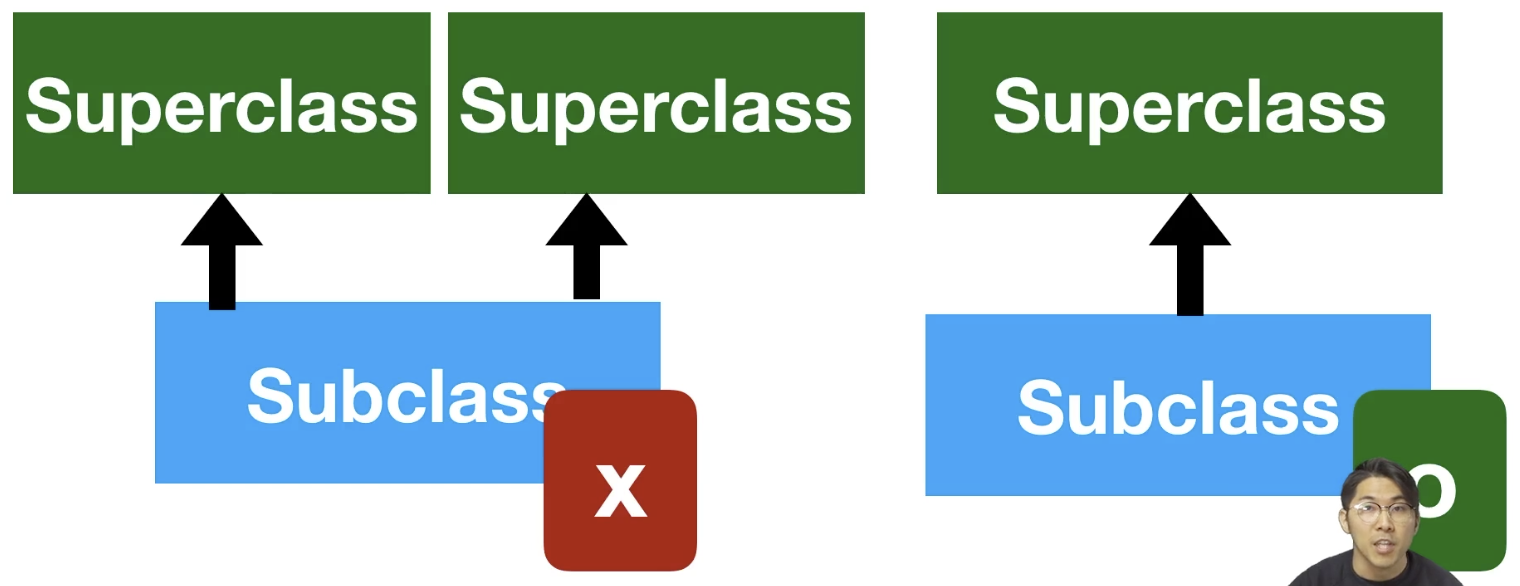
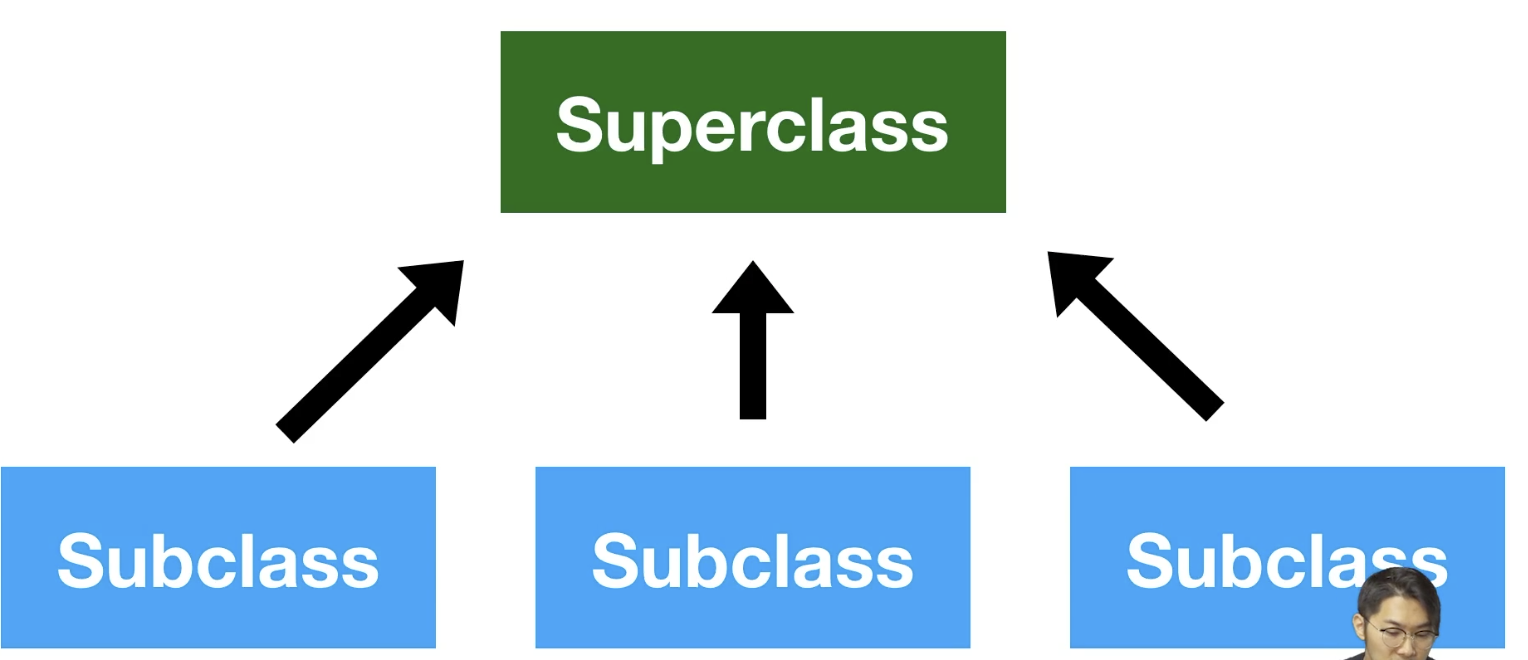
- 상속의 규칙
- *
- 자식은 한개의 superclass만 상속 받음
- 부모는 여러 자식들을 가질 수 잇음
- 상속의 깊이는 상관이 없음
struct Grade{
	var letter: Character
    var points : Double
    var points : Double
}

class Person {
	var firstName : String
    var lastName : String

    init(firstName:String,lastName:String){
    	self.firstName = firstName
        self.lastName = lastName
    }

    func printMyName(){
    	print("My name is \(firstName) \(lastName)")
    }
}

## 학생은 사람이다 ( o ) -> 명제 성립시 상속
## 사람은 학생이다 ( x )
class Student : Person {
	var grades : [Grade] = []
}

# 인스턴스 추가
let jay = Person(firstName: " Jay", lastName : "Lee")
let jason = Student(firstName : "Jasson", lastName: "Lee")

jay.firstName
jason.firstName

jay.printMyName()
jason.printMyName()

let math = Grade(letter:"B",points:8.5,credits:3)
let history = Grade(letter:"A",points:10.0,credits:3)
jason.grades.append(contentsOf:math)
jason.grades.append(contentsOf:history)
// jay.grades  jay는 사람이지만 학생이 아니므로 접근 불가능

jason.grades.count // 2

// 학생인데 운동선수
class StudentAthelete : Student {
	var minimunTrainingTime : Int = 2
    var trainedTime : Int = 0

    func train(){
    	trainedTime +=1
    }
}

// 운동선수인데 축구선수
class FootballPlayer : StudentAthelete {
	var footballTeam = "FC Swift"

    override func train(){
    	trainedTime += 2
    }
}

// Person > Student > Athelete > Football Player

var athelete1 = StudentAthelete(firstName : "Yuna" ,lastName : "Kim")
var athelete2 = FootballPlayer(firstName : "Heung" ,lastName : "Son")

athelete1.firstName
athelete2.firstName

athelete1.grades.append(math)
athelete2.grades.append(math)

athelete1.minimumTrainingTime
athelete2.minimumTrainingTime

//athelete1.footballTeam
athelete2.footballTeam

athelete1.train()
athelete1.trainedTime

athelete2.train()
athelete2.trainedTime

athelete1 = athelete2 as StudentAthelete
athelete1.train()
athelete1.trainedTime

if let son = athelete1 as? FootballPlayer{
	print("---> team : \(son.footballTeam)")
}
06. 상속은 언제 하면 좋을까?
- 중복된 코드를 제거하는 장점
- 상속이 잦아져 깊이가 깊어질 경우에 복잡해짐 -> 유지 보수 어려워짐
- single responsibility 단일 책임
- 각 클래스는 한 개의 고려 사항만 있으면 된다. ( 한개만 취급 )
- type safety 타입이 분명해야 할 때
- 클래스를 지워야 할 때 상속을 고려해 볼 수 있다.
- 부모 혹은 다른 자식 클래스와 구분을 명확하게 해야 하는 상황
- Shared Base Classes 다자녀가 있다.
- 기본 동작이 다양하게 구현해야할 경우
- ex ) 학습하다 : 운동선수(운동지식을 학습한다), 미술전공(미술지식을 학습한다)
- Extensibility 확장성이 필요한 경우
- ex ) 캔 : 맥주캔, 콜라캔 .. 등으로 다양하게 확장가능
- Identity 정체를 파악하기 위해서
- 어떤 클래스인가 어떤 객체인가를 알아볼 때 객체 자체의 정체성을 파악하기 위해서
07. 생성자 이해하기 1
- 상속된 자식 클래스가 새로운 형태로 생성자를 만들 수 있음
struct Grade{
	var letter: Character
    var points : Double
    var points : Double
}

class Person {
	var firstName : String
    var lastName : String

    init(firstName:String,lastName:String){
    	self.firstName = firstName
        self.lastName = lastName
    }

    func printMyName(){
    	print("My name is \(firstName) \(lastName)")
    }
}

class Student : Person {
	var grades : [Grade] = []
}

// 학생인데 운동선수
class StudentAthelete : Student {
	var minimunTrainingTime : Int = 2
    var trainedTime : Int = 0
    var sports: [String]

    init(firstName: String, lastName:String, sports:[String]){
    	self.sports = sports
        super.init(firstName:firstName,lastName:lastName)
    }

    func train(){
    	trainedTime +=1
    }
}

// 운동선수인데 축구선수
class FootballPlayer : StudentAthelete {
	var footballTeam = "FC Swift"

    override func train(){
    	trainedTime += 2
    }
}

let student1 = Student(firstName:"Jason",lastName:"Lee")
let student2 = StudentAthlete(firstName:"Jay",lastName:"Lee",sports:["Football"])
06. 생성자 이해하기 2
Initalization
- 인스턴스를 생성 시점에 모든 stored property는 값을 세팅해줘야함
Inheritance ( 상속 )
-
상속된 자식 클래스의 경우에도 ( 부모클래스도 마찬가지 ) 생성 시점에는 자신이 가지고 있는 property 뿐만 아니라 부모 클래스가 가지고 있는 property도 값을 세팅해줘야한다.
-
세팅 순서 : SubClass -> SuperClass
-
2-phase Initialization : 클래스 생성시 2가지 단계
- Phase1 : 모든 stored property는 이니셜라이즈 되어야 한다.
: 자식 클래스의 property부터 이니셜라이즈 되어야 함
- StudentAthlete(super.init(...),self.sports=...) -> Student -> Person
- Phase1에서 중요한 것은 phase1이 끝나기 전에는 어떤 property나 메소드를 사용 불가능- Phase2 :
- Person -> Student -> StudentAthlete(self.train())
- 이니셜라이즈 안에서도 property를 세팅을 다 하고나서 메소드를 쓸 수 있음
- Person -> Student -> StudentAthlete(self.train())
- Phase2 :
struct Grade{
	var letter: Character
    var points : Double
    var points : Double
}

class Person {
	var firstName : String
    var lastName : String

    init(firstName:String,lastName:String){
    	self.firstName = firstName
        self.lastName = lastName
    }

    func printMyName(){
    	print("My name is \(firstName) \(lastName)")
    }
}

class Student : Person {
	var grades : [Grade] = []

    override init(firstName : String, lastName : String){
    	super.init(firstName: firstName, lastName: lastName)
    }

    // 전학생의 경우 그냥 student 받으면 되잖아 -> convenience init
    convenience init(student: Student){
    	self.init(firstName:student.firstName, lastName:student.lastName)
    }
}

// 학생인데 운동선수
class StudentAthelete : Student {
	var minimunTrainingTime : Int = 2
    var trainedTime : Int = 0
    var sports: [String]

    init(firstName: String, lastName:String, sports:[String]){

    	# Phase 1
    	self.sports = sports
        super.init(firstName:firstName,lastName:lastName)

        # Phase 2
        self.train()
    }

    # convenience 이니셜라이저
    convenience init(name: String){
    	self.init(firstName : name , lastName: "",sports: [])
    }

    func train(){
    	trainedTime +=1
    }
}

// 운동선수인데 축구선수
class FootballPlayer : StudentAthelete {
	var footballTeam = "FC Swift"

    override func train(){
    	trainedTime += 2
    }
}

let student1 = Student(firstName:"Jason",lastName:"Lee")
// 서울 학생이 부산으로 전학갈때 그냥 그때의 정보를 넘겨주는 과정
let student1_1 = Student(student:student1)
let student2 = StudentAthlete(firstName:"Jay",lastName:"Lee",sports:["Football"])
# student2 처럼 파라미터가 너무 많아서 싫어! ( 이니셜라이저가 너무 커지는 경우 ) -> 간편하게 할 수 있음 -> convenience 이니셜라이저
let student3 = StudentAthlete(name:"Mike")
06. 생성자 이해하기 3
- designated initialization (DI)(지정) vs convenience initialization (CI)(간편)
- DI 는 자신의 부모의 DI를 호출해야함
- CI 는 같은 클래스의 이니셜라이저를 꼭 하나 호출해야함
- CI 는 궁극적으로는 DI를 호출해야 함
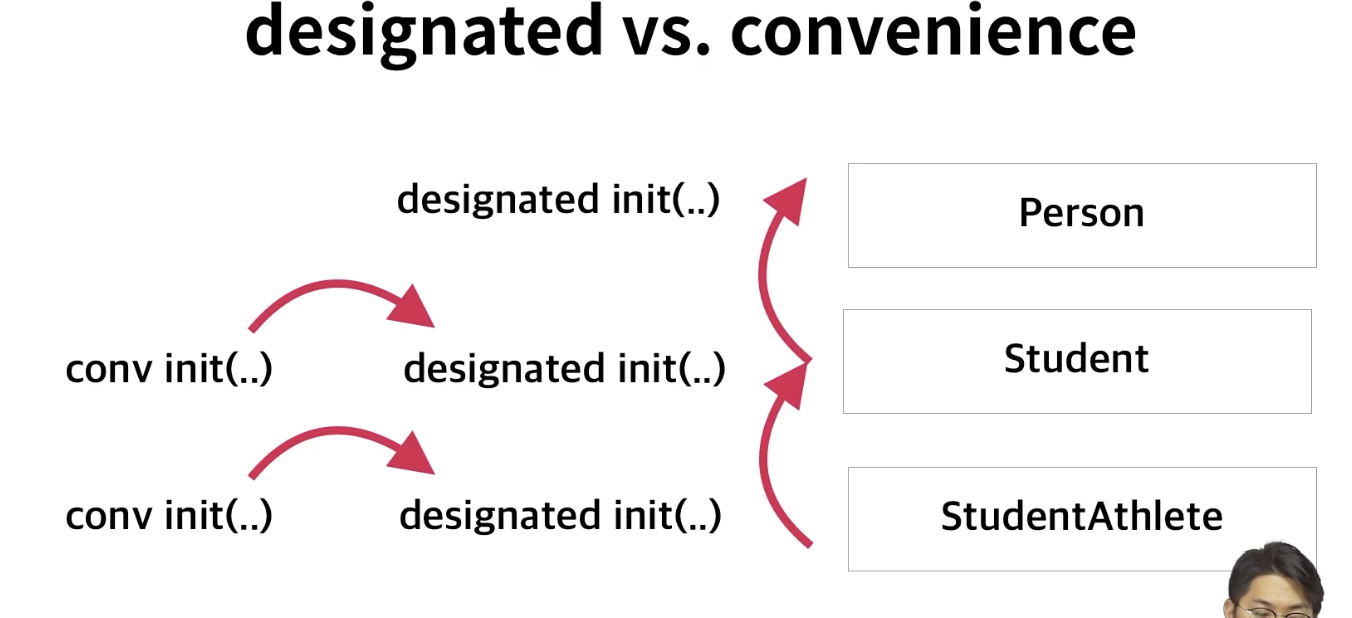
- 정리
: 클래스 안에는 여러가지 이니셜라이저가 있는데 크게 주 이니셜라이저 ( DI ), 부 이니셜라이저 ( CI ) 로 구성되있다. 이때 CI는 다른 이니셜라이저를 호출하게 되어 있다. 최종적으로 CI 는 DI를 궁극에는 불러야 한다.
10강 MVVM 디자인 패턴
01. 디자인패턴 기초 개념다지기 1
- 디자인 패턴은 코딩을 잘 짜기 위한 패턴
- 목표
- 기술 부채 최소화 ( 기술 부채 -> 뷰컨트롤러 영향 큼 )
- 재사용 및 지속 가능
- 코드 구조에 대한 전략
- 클린 아키텍처- 디자인 패턴
02. 디자인패턴 기초 개념다지기 2
MVC ( Model - View - Controller ) : 옛날에 주로 사용
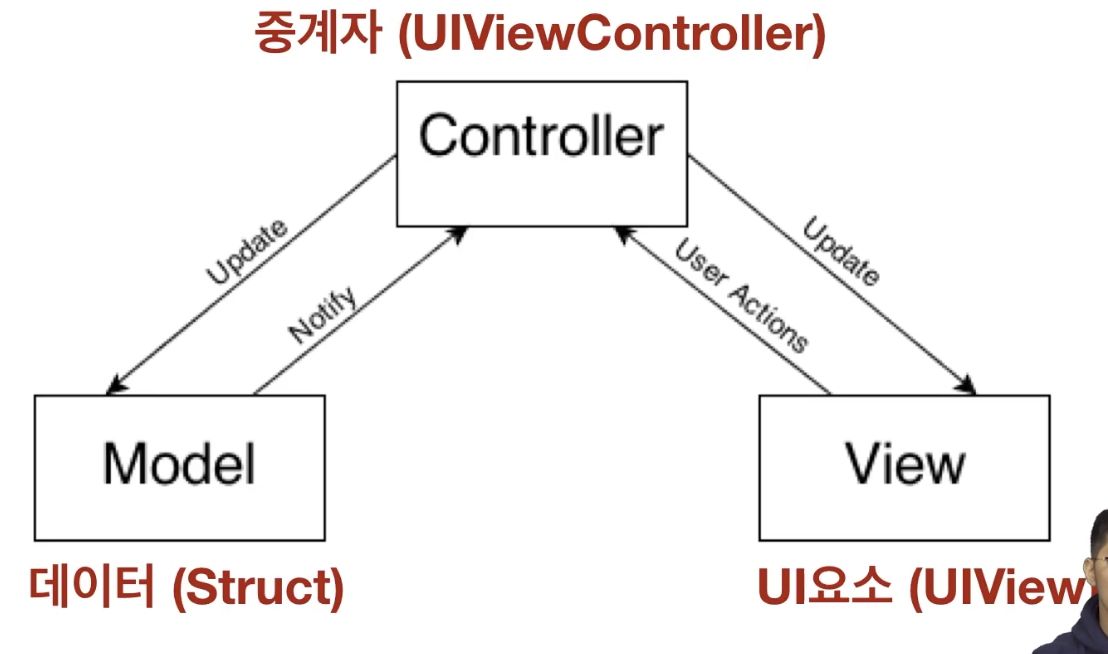
- Model : 앱 내에서 사용하는 데이터 ( 보통 struct type으로 표현, 아주 가끔 class로 표현 )
- View : 화면에 보여지는 UI요소를 나타냄 ( UIView )
- Controller : 뷰와 모델의 중계자 , UIViewController
-> Massive View Controller
중계자에서 해야할 일이 너무 많아질 경우가 발생 ( 뷰컨트롤러의 코드가 많아짐 )
결과적으로는 기술 부채가 발생하는 일이 초래
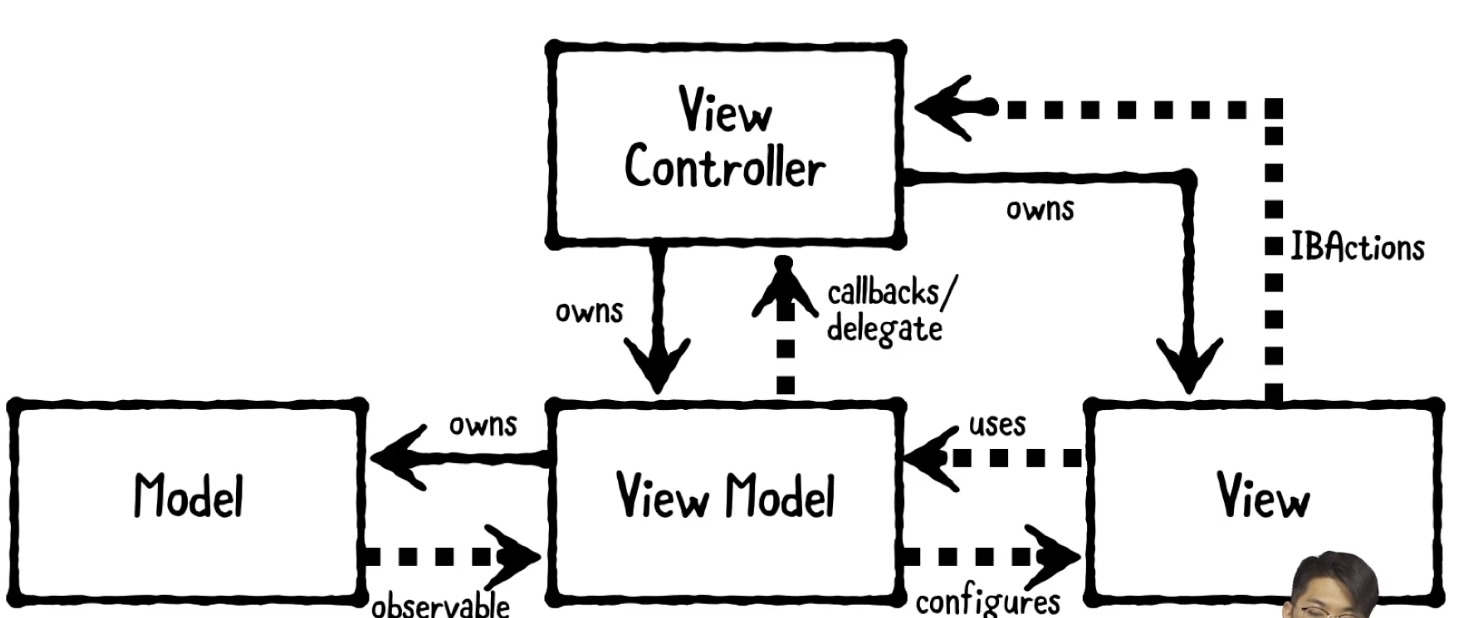
MVVM ( Model - View - ViewModel ) : 지금 주로 권장
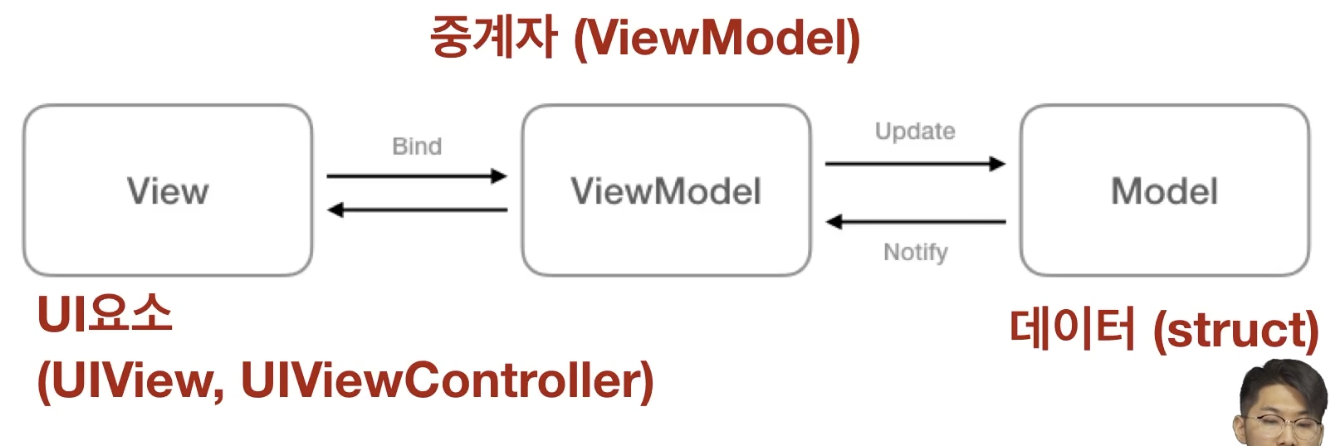
- Model : 앱 내에서 사용하는 " 데이터 ( struct type) "
- View 레이어: 화면에 보여지는 녀석들을 의미 ( UI 요소 ) ( UIView )( UIViewController -> 이건 MVC 와 다른 점 )
- ViewModel : 중계자 , 모델의 내용을 뷰에서 사용할 수 있게 전환시켜주는 역할
MVC vs MVVM
MVC와 MVVM의 차이점
: MVVM이 MVC와 다른점은
- 뷰컨트롤러가 모델에 직접 접근이 불가능
- 뷰컨트롤러가 뷰모델이란 클래스를 새로 가지게 됨
- MVC 패턴에서는 컨트롤러 레이어가 있었는데 MVVM에서는 뷰 레이어가 있음
MVVM이 개선하려 했던 점
- 뷰컨트롤러이 오지라핑 못하게 하는 거 -> 이거를 많이 축소시키는 작업
- 대신에 많은 일을 뷰 모델로 위임했기 때문에 역할이 축소되었고 할 일이 명확해짐
- 할 일이 명확해 질 수록 클래스 사용이 용이하고 유지 보수에 적은 비용이 듬
MVVM 실제 구현
MVVM 실전
코드 리뷰 -> 코드 수정 -> 리팩터링
- 리팩터링 : 코드를 수정하는 과정 ( 하는 이유 : 기술 부채를 줄이고 재사용 가능하게 하면서 유지보수 비용을 적게하기 위함 )
- 리팩터링 할 때 중요한 원칙 -> 중복제거( 이래야 기술 부채가 줄어짐 )-> 단일 책임 찾기
- 30400 rule 잘 지키기