1. 테이블 뷰
-
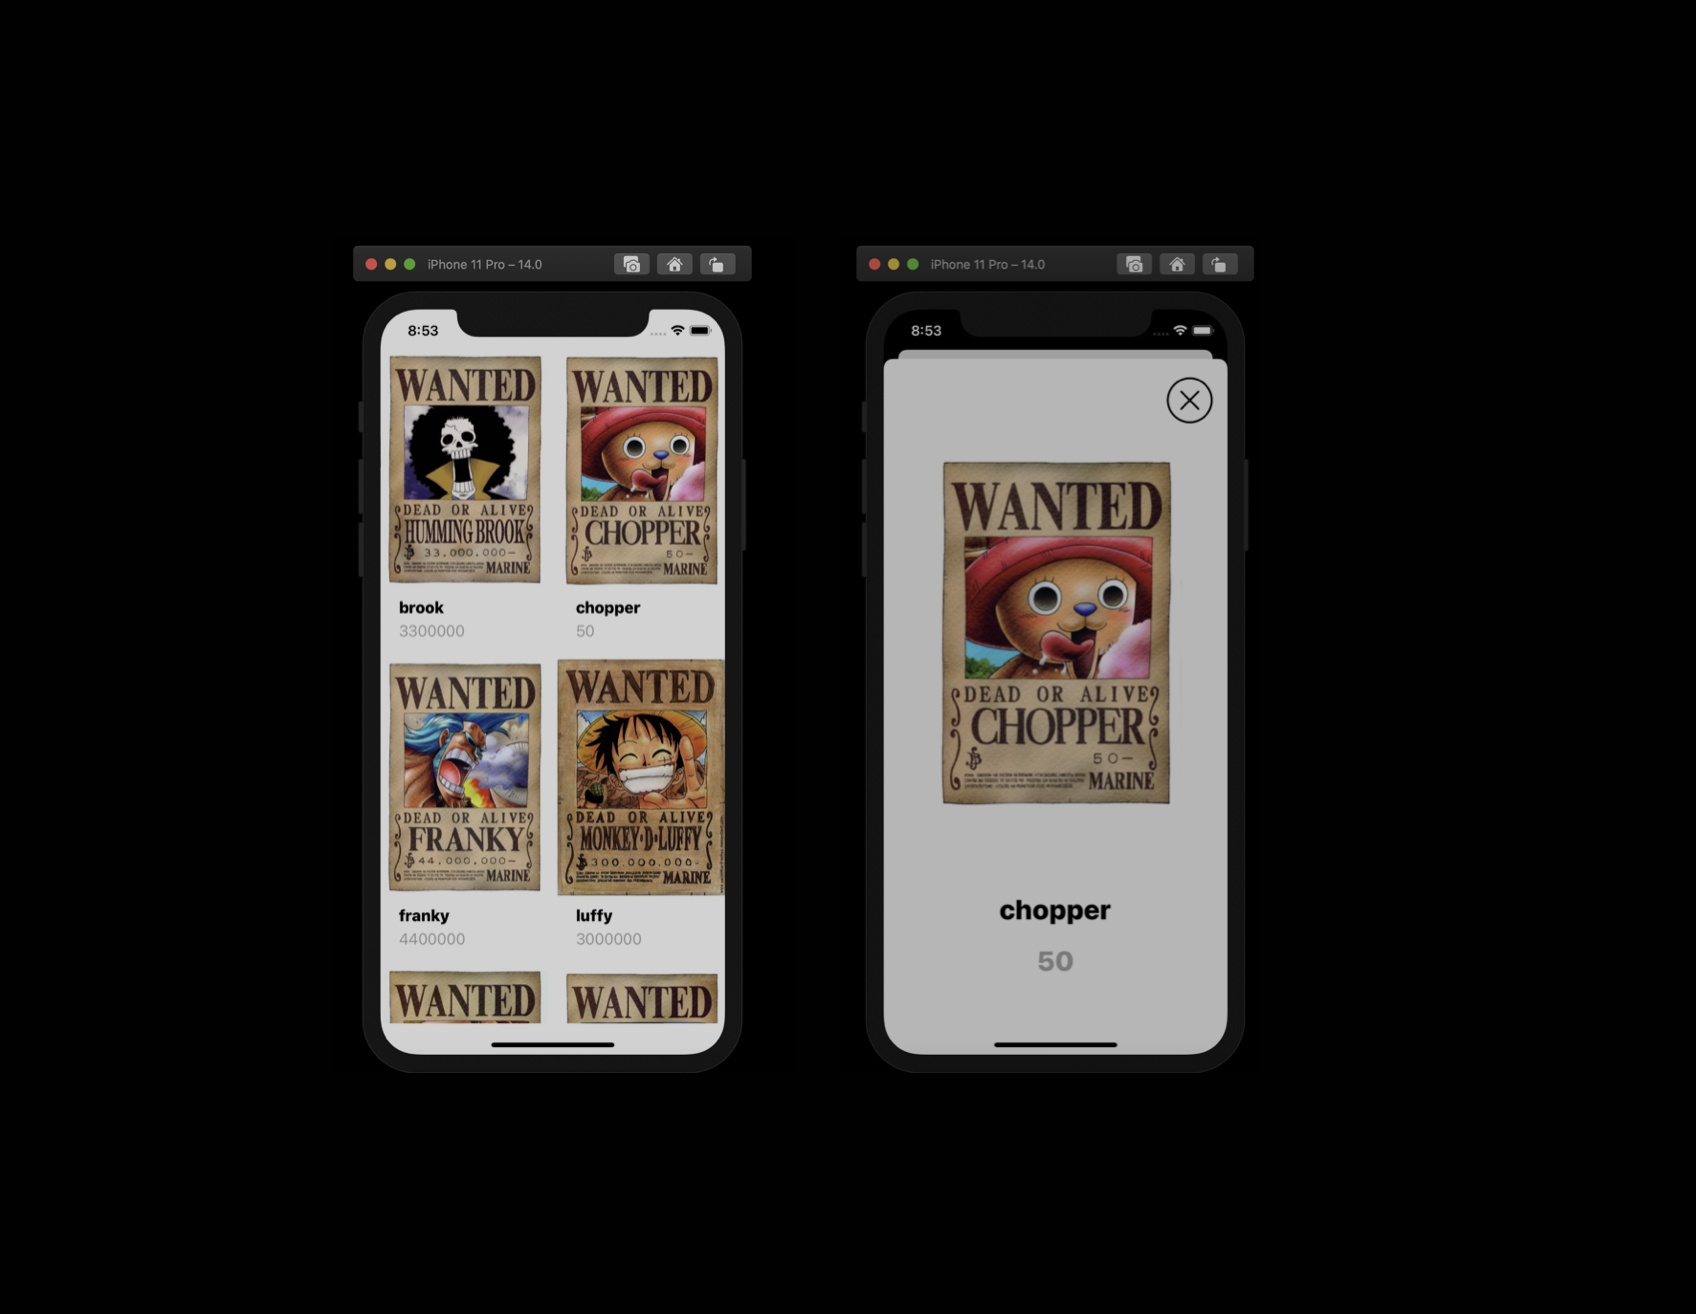
UITableView : iOS 앱 개발에서 여러 아이템을 나열해서 리스트 형태로 보여줄 때 사용
- colum 한개
- 데이터들을 여러 행에 걸쳐서 표현
- 각 데이터들은 "테이블 뷰 셀"에 의해서 표현
- Recycle cell : 화면에서 보여주는 개수는 한계 때문
-
Protocol : 어떤 서비스를 이용하기 위해서 해야할 일들의 목록
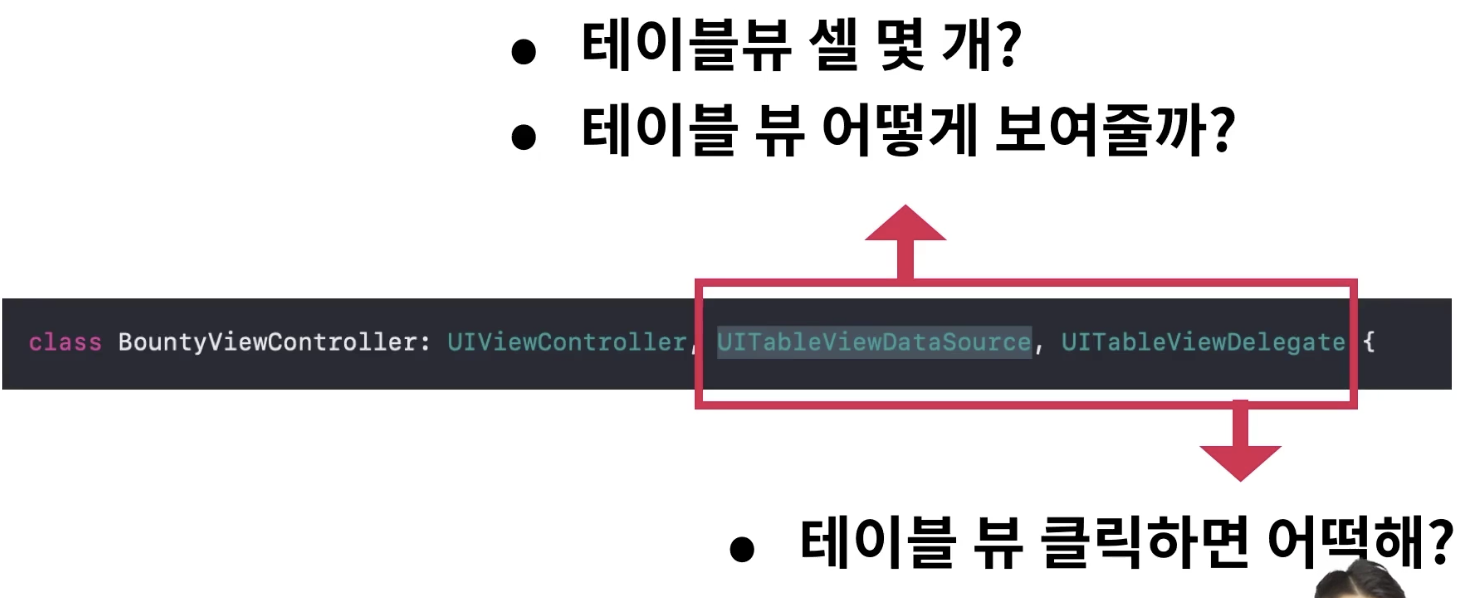
1.1 ) 테이블뷰 서비스를 쓰기 위해 해야 할 일
- 테이블뷰 셀 몇개?
- 테이블 뷰 어떻게 보여줄가?
- 테이블 뷰 클릭하면 어떡해?
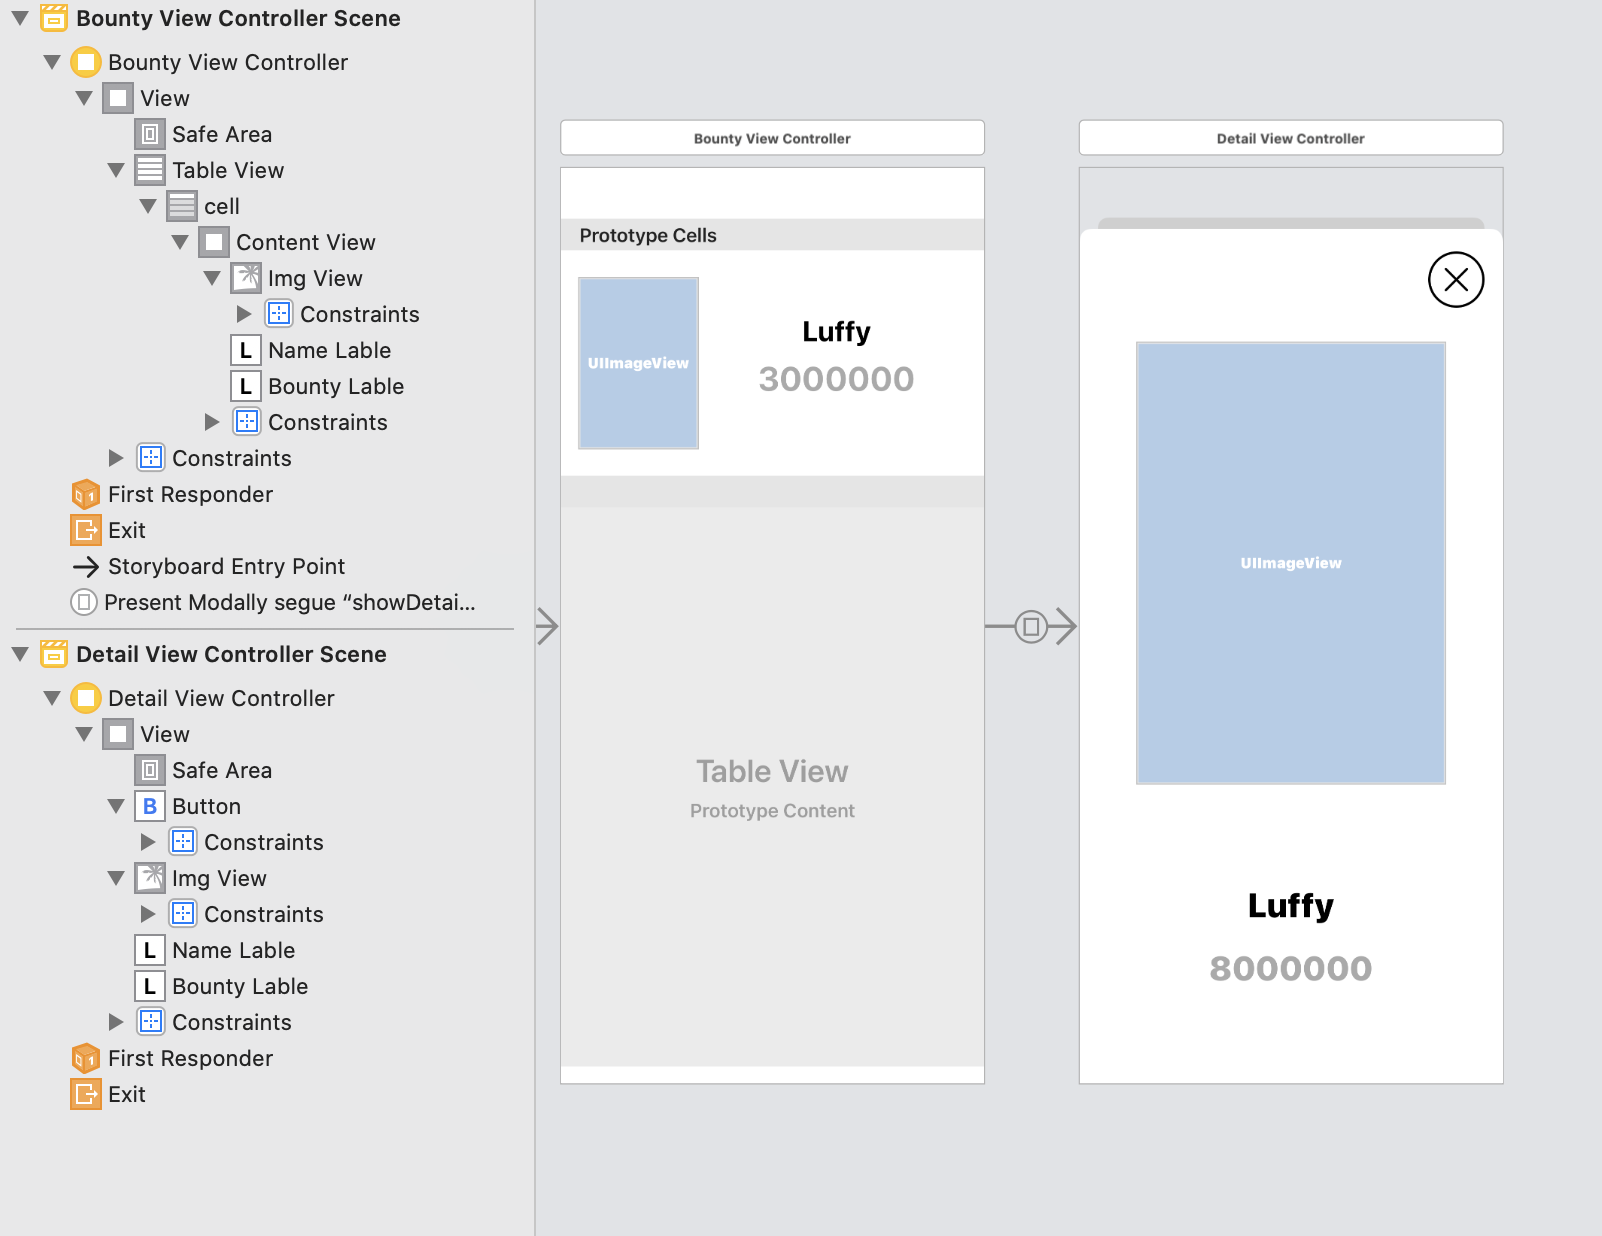
2. custom 테이블뷰 셀 만들기
3. viewController model로 띄우기
4. 데이터 넘기기
- segue로 연결된 두 뷰컨트롤러 간의 전환시 데이터를 넘기는 방법
5. 코드 회고
- 회고 : 스스로에 대한 배움, 성장
- AppDelegate.swift
//
//  AppDelegate.swift
//  BountyList
//
//  Created by 이하연 on 2020/10/27.
//

import UIKit

@main
class AppDelegate: UIResponder, UIApplicationDelegate {


    func application(_ application: UIApplication, didFinishLaunchingWithOptions launchOptions: [UIApplication.LaunchOptionsKey: Any]?) -> Bool {
        // Override point for customization after application launch.
        return true
    }

    // MARK: UISceneSession Lifecycle

    func application(_ application: UIApplication, configurationForConnecting connectingSceneSession: UISceneSession, options: UIScene.ConnectionOptions) -> UISceneConfiguration {
        // Called when a new scene session is being created.
        // Use this method to select a configuration to create the new scene with.
        return UISceneConfiguration(name: "Default Configuration", sessionRole: connectingSceneSession.role)
    }

    func application(_ application: UIApplication, didDiscardSceneSessions sceneSessions: Set<UISceneSession>) {
        // Called when the user discards a scene session.
        // If any sessions were discarded while the application was not running, this will be called shortly after application:didFinishLaunchingWithOptions.
        // Use this method to release any resources that were specific to the discarded scenes, as they will not return.
    }


}
- SceneDelegate.swift
//
//  SceneDelegate.swift
//  BountyList
//
//  Created by 이하연 on 2020/10/27.
//

import UIKit

class SceneDelegate: UIResponder, UIWindowSceneDelegate {

    var window: UIWindow?


    func scene(_ scene: UIScene, willConnectTo session: UISceneSession, options connectionOptions: UIScene.ConnectionOptions) {
        // Use this method to optionally configure and attach the UIWindow `window` to the provided UIWindowScene `scene`.
        // If using a storyboard, the `window` property will automatically be initialized and attached to the scene.
        // This delegate does not imply the connecting scene or session are new (see `application:configurationForConnectingSceneSession` instead).
        guard let _ = (scene as? UIWindowScene) else { return }
    }

    func sceneDidDisconnect(_ scene: UIScene) {
        // Called as the scene is being released by the system.
        // This occurs shortly after the scene enters the background, or when its session is discarded.
        // Release any resources associated with this scene that can be re-created the next time the scene connects.
        // The scene may re-connect later, as its session was not necessarily discarded (see `application:didDiscardSceneSessions` instead).
    }

    func sceneDidBecomeActive(_ scene: UIScene) {
        // Called when the scene has moved from an inactive state to an active state.
        // Use this method to restart any tasks that were paused (or not yet started) when the scene was inactive.
    }

    func sceneWillResignActive(_ scene: UIScene) {
        // Called when the scene will move from an active state to an inactive state.
        // This may occur due to temporary interruptions (ex. an incoming phone call).
    }

    func sceneWillEnterForeground(_ scene: UIScene) {
        // Called as the scene transitions from the background to the foreground.
        // Use this method to undo the changes made on entering the background.
    }

    func sceneDidEnterBackground(_ scene: UIScene) {
        // Called as the scene transitions from the foreground to the background.
        // Use this method to save data, release shared resources, and store enough scene-specific state information
        // to restore the scene back to its current state.
    }


}
- BountyViewController.swift
//
// BountyViewController.swift
// BountyList
//
// Created by 이하연 on 2020/10/27.
//
import UIKit
class BountyViewController: UIViewController,UITableViewDataSource, UITableViewDelegate {
//MVVM
//
//Model
//- BountyInfo
//> BountyInfo 만들자
//
//View
//- ListCell
//> ListCell 필요한 정보를 ViewModel한테서 받아야겠다
//> ListCell은 ViewModel로 부터 받은 정보로 뷰 업데이트 하기
//
//ViewModel
//- BountyViewModel
//> BountyViewModel을 만들고, 뷰레이어에서 필요한 메서드 만들기
//> 모델 가지고 있기 .. BountyInfo 들
//let bountyInfoList: [BountyInfo] = [
// BountyInfo(name: "brook",bounty: 3300000),
// BountyInfo(name: "chopper",bounty: 50),
// BountyInfo(name: "franky",bounty: 4400000),
// BountyInfo(name: "luffy",bounty: 3000000),
// BountyInfo(name: "nami",bounty: 1600000),
// BountyInfo(name: "robin",bounty: 800000),
// BountyInfo(name: "sanji",bounty: 77000000),
// BountyInfo(name: "zoro",bounty: 12000000)
//]
let viewModel = BountyViewModel()
// 데이터 세팅
// let nameList = ["brook","chopper","franky","luffy","nami","robin","sanji","zoro"]
// let bountyList = [3300000,50,4400000,3000000,1600000,800000,77000000,12000000]
// prepare : segue가 수행되기 직전에 준비하는 메소드
override func prepare(for segue: UIStoryboardSegue, sender: Any?) {
// DetailViewController 에게 데이터를 줄 거다.
if segue.identifier == "showDetail" {
let vc = segue.destination as? DetailViewController
if let index = sender as? Int {
// let bountyInfo = bountyInfoList[index]
let bountyInfo = viewModel.bountyInfo(at: index)
// vc?.name = nameList[index]
// vc?.buntry = bountyList[index]
vc?.viewModel.update(model:bountyInfo)
// vc?.bountyInfo = bountyInfo
// vc?.name = bountyInfo.name
// vc?.buntry = bountyInfo.bounty
}
}
}
override func viewDidLoad() {
super.viewDidLoad()
}
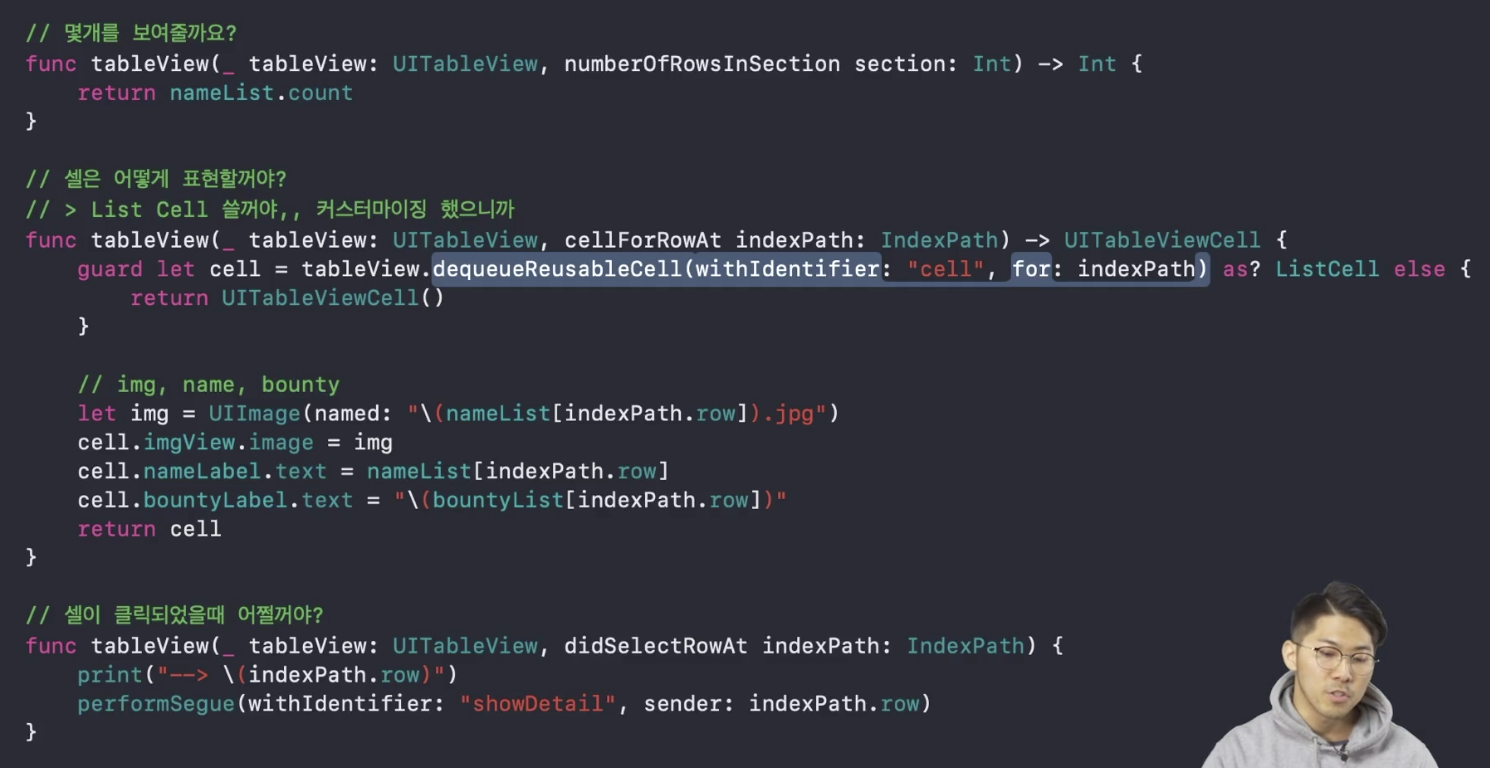
// UITableViewDataSource 에서 질문하는거에 대해 답
func tableView(_ tableView: UITableView, numberOfRowsInSection section: Int) -> Int {
//return bountyList.count
//return bountyInfoList.count
return viewModel.numOfBountyInfoList
}
// 어떻게 표현할 거니?
func tableView(_ tableView: UITableView, cellForRowAt indexPath: IndexPath) -> UITableViewCell {
// 재활용되는 놈을 가져오는 dequeueReusableCell
// 여러개 셀들이 있을 때 셀들을 구분하는 구분자 이름을 cell로 지정
// 셀 위치 : indexpath
// optional이 될 수도 있으니까 guard 넣기 - Optional binding(guard) 버전
// guard let cell = tableView.dequeueReusableCell(withIdentifier: "cell", for: indexPath) as? ListCell else{
// return UITableViewCell()
// }
// let img = UIImage(named: "\(nameList[indexPath.row]).jpg")
// cell.imgView.image = img
// cell.nameLable.text = nameList[indexPath.row]
// cell.bountyLable.text = "\(bountyList[indexPath.row])"
// return cell
// 위의 코드와 같은데 Optional binding(if let) 버전
if let cell = tableView.dequeueReusableCell(withIdentifier: "cell", for: indexPath) as? ListCell{
// let img = UIImage(named: "\(nameList[indexPath.row]).jpg")
// cell.imgView.image = img
// cell.nameLable.text = nameList[indexPath.row]
// cell.bountyLable.text = "\(bountyList[indexPath.row])"
// let bountyInfo = bountyInfoList[indexPath.row]
let bountyInfo = viewModel.bountyInfo(at: indexPath.row)
cell.update(info.bountyInfo)
// cell.imgView.image = bountyInfo.image
// cell.nameLable.text = bountyInfo.name
// cell.bountyLable.text = "\(bbountyInfo.bounty)"
return cell
}else{
return UITableViewCell()
}
}
/* 이렇게 코드만 작성하고 실행하면 위의 코드가 적용이 안되있음
table view를 bounty view controller에 control로 끌어당겨서 "어떠한 질문을 할건지 물어보자" 선택 후 연결한다.
여기선 dataSource, delegate 를 연결
-> connections inspector 를 보면
" 아 테이블 뷰가 dataSource라는 대리인을 통해서 bounty view controller 한테 물어보겠구나 "
" delegate라는 대리인을 통해서 클릭했을 때 어떻게 할거야? " 라고 물어보겠구나 */
// UITableViewDelegate
// 클릭할때 어떻게 반응할거야
func tableView(_ tableView: UITableView, didSelectRowAt indexPath: IndexPath) {
// 몇번째 아이가 클릭된지 알 기 위해서 indexPath 출력
// indexPath : 몇번째의 정보를 가지고 있는지
print("\(indexPath.row)")
// 연결(Segue 세그웨이)할 뿐만 아니라 수행해라
// 구분자 : showDetail , sender : segue를 수행하는데 있어서 오브젝트를 같이 껴서 보낼 때
// sender에게 이게 몇 번째 셀이다 라는 정보를 줌
performSegue(withIdentifier: "showDetail", sender: indexPath.row )
}
}
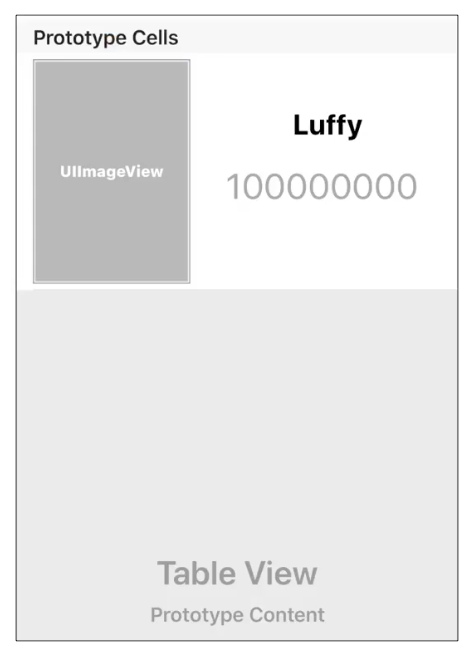
// custom cell 만들기
// custom cell = ListCell
class ListCell : UITableViewCell {
@IBOutlet weak var imgView : UIImageView!
@IBOutlet weak var nameLable : UILabel!
@IBOutlet weak var bountyLable : UILabel!
func update(info: BountyInfo){
imgView.image = info.image
nameLabel.text = info.name
bountyLabel.text = "\(info.bounty)"
}
}
// 위의 ListCell을 만든 후 스토리보드로 가서 cell의 identity inspector로 가기 -> class 명을 ListCell로 적기
struct BountyInfo{
let name: String
let bounty: Int
var image: UIImage? {
return UIImage(named: "\(name).jpg")
}
init(name:String,bounty:Int){
self.name = name
self.bounty = bounty
}
class BountyViewModel {
let bountyInfoList: [BountyInfo] = [
BountyInfo(name: "brook",bounty: 3300000),
BountyInfo(name: "chopper",bounty: 50),
BountyInfo(name: "franky",bounty: 4400000),
BountyInfo(name: "luffy",bounty: 3000000),
BountyInfo(name: "nami",bounty: 1600000),
BountyInfo(name: "robin",bounty: 800000),
BountyInfo(name: "sanji",bounty: 77000000),
BountyInfo(name: "zoro",bounty: 12000000)
]
var sortedList: [BountyInfo]{
let sortedList = bountyInfoList.sorted { prev, next in
return prev.bounty > next.bounty
}
return sortedList
}
var numOfBountyInfoList: Int {
return bountyInfoList.count
}
func bountyInfo(at index: Int) -> BountyInfo{
return bountyInfoList[index]
}
}
- DetailViewController.swift
//
//  DetailViewController.swift
//  BountyList
//
//  Created by 이하연 on 2020/10/28.
//

import UIKit

class DetailViewController: UIViewController {


//MVVM
//
//Model
//- BountyInfo
//> BountyInfo 만들자
//
//View
// - imgView,nameLabel,bountylabel
// - view들은 viewModel를 통해서 구성되기 ?
//> ListCell 필요한 정보를 ViewModel한테서 받아야겠다
//> ListCell은 ViewModel로 부터 받은 정보로 뷰 업데이트 하기
//
//ViewModel
//- DetailViewModel
//> 뷰레이어에서 필요한 메서드 만들기
//> 모델 가지고 있기 .. BountyInfo 들


    @IBOutlet weak var imgView : UIImageView!
    @IBOutlet weak var nameLable :  UILabel!
    @IBOutlet weak var bountyLable :  UILabel!

//    var name : String?
//    var buntry:Int?

//    var bountyInfo: BountyInfo?

	let viewModel = DetailViewModel()

    // viewDidLoad는 이 뷰컨트롤러가 메모리에 올라온 시점에 호출됨 , 즉 바로 직전에 호출되므로 updateUI를 여기서 호출시키자
    override func viewDidLoad() {
        super.viewDidLoad()
        updateUI()

    }

    func updateUI(){

        if let bountyInfo = viewModel.bountyInfo{
        	imgView.image = bountyInfo.image
            nameLabel.text = bountyInfo.name
            bountyLabel.text = "\(bounty)"
        }

//    	if let bountyInfo = self.bountyInfo{
//        	imgView.image = bountyInfo.image
//            nameLabel.text = bountyInfo.name
//            bountyLabel.text = "\(bounty)"
//        }

//        if let name = self.name , let buntry = self.buntry {
//            let img = UIImage(named: "\(name).jpg")
//            imgView.image = img
//            nameLable.text =  name
//            bountyLable.text = "\(buntry)"
//        }
    }

    @IBAction func close(_ sender: Any) {
        // dismiss 사라지다
        // completion은 이 버튼이 사라지고나서 그 후에 동작되어야 할 것들 적어주면 그 이후에 동작됨
        dismiss(animated: true , completion: nil)
    }

}
class DetailViewModel{
    var bountyInfo: BountyInfo?

    func update(model: BountyInfo?){
    	bountyInfo = model
    }
}
5.Main.storyboard
6. CollectionView
- colum 한 개 이상 가질 수 있음
- 각 데이터의 방향을 수평 or 수직으로 나열할 건지를 정할 수 있음
- 각 데이터는 collectionview cell을 통해서 표현
- 이 cell은 다양한 스타일로 표현 가능
- 직접 개발자가 Customizing을 통해 사용 가능
- UITableView에 의해서 데이터의 나열이 매우 자유롭기 때문에 많은 아이템뷰에서 collectionview를 항상 고려하게 됨
6.1 UICollectionViewLayout
- 컬렉션뷰는 자유로운 레이아웃 때문에 레이아웃에 대해서 전문적으로 관리해주는 객체가 필요하다 -> 이때 이를 관리해주는 객체가 UICollectionViewLayout
- UICollectionViewFlowLayout : 애플에서 지원
- 구현은 datasource , delegate 를 사용
7. Animation
: 시간에 따라 , 뷰의 상태가 바뀌는 것
-
딱딱한 앱의 사용성을 개선
-
몰입성 높임 -> 사용자의 주의를 끌 수 있음
-
시작, 끝, 시간
-
애니메이션 API
- withDuration : 애니메이션 진행되는 시간
- 애니메이션 시킬 활동 (애니메이션 클로저)
animations: {
layoutIfNeeded()
}
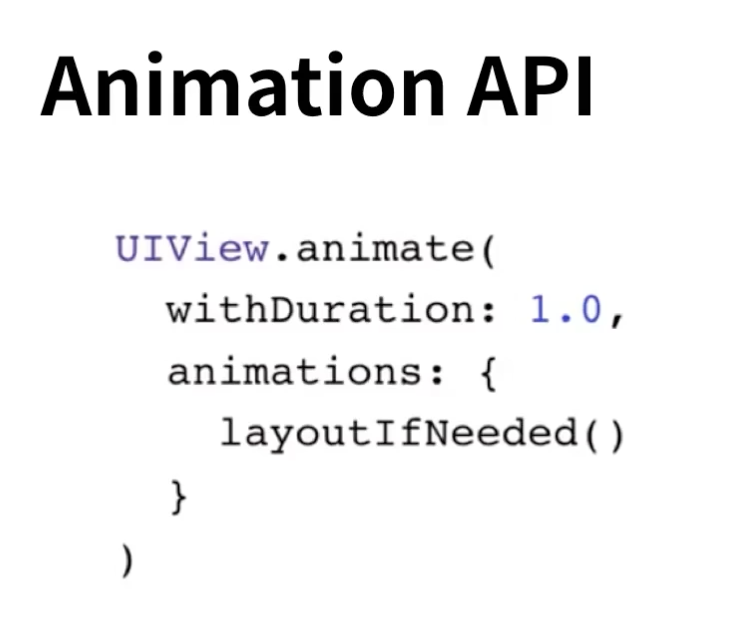
- 위의 애니메이션은 레이아웃 constraints를 통해서 간접적으로 애니메이션 만듬
8. Animating View Properties
- 이제 뷰의 속성을 직접 이용해서 애니메이팅하는 방법 알아볼거임
- 3가지 categories
- position & size : bounds, frame, center
- transformation : rotation, scale, translation
- appearance : backgroundColor , alpha
- 주의사항 : 오토레이아웃이므로 주의

:D