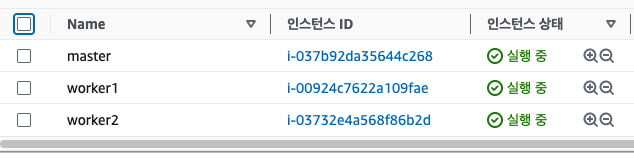
위와같이 마스터노드 1개와 워커노드 2개로 클러스터를 구축하려고한다.
본 포스팅에서는 다루지 않지만, 최종목표는 gpu를 할당해 ml 모델을 서빙하는것이다.
쿠버네티스 설치
IPv4 포워딩 및 iptables에서 브리지된 트래픽 확인
아래 언급된 지침을 실행합니다.

cat <<EOF | sudo tee /etc/modules-load.d/k8s.conf
overlay
br_netfilter
EOF

sudo modprobe overlay
sudo modprobe br_netfilter

# sysctl params required by setup, params persist across reboots
cat <<EOF | sudo tee /etc/sysctl.d/k8s.conf
net.bridge.bridge-nf-call-iptables  = 1
net.bridge.bridge-nf-call-ip6tables = 1
net.ipv4.ip_forward                 = 1
EOF

# Apply sysctl params without reboot
sudo sysctl --system
sudo apt-get update && sudo apt-get install -y apt-transport-https curl
curl -s https://packages.cloud.google.com/apt/doc/apt-key.gpg | sudo apt-key add -
cat <<EOF | sudo tee /etc/apt/sources.list.d/kubernetes.list
deb http://apt.kubernetes.io/ kubernetes-xenial main
EOF
sudo apt-get update
sudo apt-get install -y kubelet kubeadm kubectl
sudo apt-mark hold kubelet kubeadm kubectl
curl https://baltocdn.com/helm/signing.asc | gpg --dearmor | sudo tee /usr/share/keyrings/helm.gpg > /dev/null
sudo apt-get install apt-transport-https --yes
echo "deb [arch=$(dpkg --print-architecture) signed-by=/usr/share/keyrings/helm.gpg] https://baltocdn.com/helm/stable/debian/ all main" | sudo tee /etc/apt/sources.list.d/helm-stable-debian.list
sudo apt-get update
sudo apt-get install helm
위와같이 설정하고 클러스터를 생성한다.
ubuntu@ip-172-31-0-171:~$ sudo kubeadm init --pod-network-cidr=10.244.0.0/16
[init] Using Kubernetes version: v1.27.4
[preflight] Running pre-flight checks
error execution phase preflight: [preflight] Some fatal errors occurred:
[ERROR CRI]: container runtime is not running: output: time="2023-08-08T07:23:05Z" level=fatal msg="validate service connection: CRI v1 runtime API is not implemented for endpoint \"unix:///var/run/containerd/containerd.sock\": rpc error: code = Unimplemented desc = unknown service runtime.v1.RuntimeService"
, error: exit status 1
[preflight] If you know what you are doing, you can make a check non-fatal with--ignore-preflight-errors=...
To see the stack trace of this error execute with --v=5 or higher
위와같은 에러가 발생했는데, container 런타임에 대한 에러로 보인다.
containerd 설정파일을 지우고, 재시작 후 다시 클러스터를 생성한다.
ubuntu@ip-172-31-0-171:~$ sudo rm -fr /etc/containerd/config.toml
ubuntu@ip-172-31-0-171:~$ sudo systemctl restart containerd
ubuntu@ip-172-31-0-171:~$ sudo kubeadm init
클러스터 생성을 성공하면 아래에 명령어가 나온다.
mkdir -p $HOME/.kube
sudo cp -i /etc/kubernetes/admin.conf $HOME/.kube/config
sudo chown $(id -u):$(id -g) $HOME/.kube/config
export KUBECONFIG=/etc/kubernetes/admin.conf
그대로 실행시켜준다.
그리고 kubectl이 정상적으로 api 서버에 요청하는지 확인한다.
ubuntu@ip-172-31-0-171:~$ sudo kubectl get nodes
E0808 07:27:54.292498 41776 memcache.go:265] couldn't get current server API group list: Get "http://localhost:8080/api?timeout=32s": dial tcp 127.0.0.1:8080: connect: connection refused
E0808 07:27:54.292739 41776 memcache.go:265] couldn't get current server API group list: Get "http://localhost:8080/api?timeout=32s": dial tcp 127.0.0.1:8080: connect: connection refused
E0808 07:27:54.294111 41776 memcache.go:265] couldn't get current server API group list: Get "http://localhost:8080/api?timeout=32s": dial tcp 127.0.0.1:8080: connect: connection refused
E0808 07:27:54.295414 41776 memcache.go:265] couldn't get current server API group list: Get "http://localhost:8080/api?timeout=32s": dial tcp 127.0.0.1:8080: connect: connection refused
E0808 07:27:54.296717 41776 memcache.go:265] couldn't get current server API group list: Get "http://localhost:8080/api?timeout=32s": dial tcp 127.0.0.1:8080: connect: connection refused
The connection to the server localhost:8080 was refused - did you specify the right host or port?
위 에러가 발생했는데, 호스트가 api 서버에 요청할 권한이 없는것으로보인다.
--kubeconfig 옵션에 admin.conf 파일을 명시하면 권한문제는 해결된다.

export KUBECONFIG=/etc/kubernetes/admin.conf
위와같이 export 하면 매번 --kubeconfig 옵션을 주지 않아도 되는데,
export 방식은 세션을 재접속하면 초기화되므로 .bashrc 에 추가하는게 편하다.


쿠버네티스 공식 문서를 보면
admin.conf경고 : Kubeadm은 Subject: O = system:masters, CN = kubernetes-admin. system:masters인증 계층(예: RBAC)을 우회하는 획기적인 슈퍼 사용자 그룹입니다. admin.conf누구와도 파일을 공유하지 말고 kubeadm kubeconfig user명령을 사용하여 kubeconfig 파일을 생성하여 사용자에게 사용자 정의 권한을 부여하십시오. 자세한 내용은 추가 사용자를 위한 kubeconfig 파일 생성을 참조하십시오 .
위와같은 경고문이 있다. 하지만, 편의를 위해서 별도의 사용자그룹을 만들지 않고 진행한다.
네트워크 애드온 설치
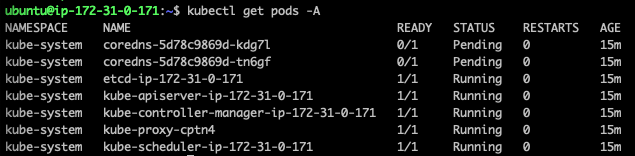
클러스터가 실행되었지만 coredns pod은 실행되지 않은것을 확인할 수 있다. 클러스터 DNS(CoreDNS)는 네트워크가 설치되기 전에 시작되지 않는다.
CNI(Container Network Interface) 기반 Pod 네트워크를 추가해야 pod 간에 통신이 가능하다.
CNI 구현체는 calico, flannel 등 여러가지가 있다. 클러스터 특성에 따라 선택하는걸로 알고있지만 운영하려고 설정하는게 아니라 단순히 star가 많은 flannel을 사용하려고한다.
-
kubectl 사용하는 방법
kubectl apply -f https://github.com/flannel-io/flannel/releases/latest/download/kube-flannel.yml
-
helm 사용하는 방법
kubectl create ns kube-flannel
kubectl label --overwrite ns kube-flannel pod-security.kubernetes.io/enforce=privileged
helm repo add flannel https://flannel-io.github.io/flannel/
helm install flannel --set podCidr="10.244.0.0/16" --namespace kube-flannel flannel/flannel
flannel을 설치했는데 여전히 coredns pod이 pending 상태라 확인해봤는데,
Warning FailedScheduling 4m37s default-scheduler 0/1 nodes are available: 1 node(s) had untolerated taint {node.kubernetes.io/disk-pressure: }. preemption: 0/1 nodes are available: 1 Preemption is not helpful for scheduling..
라는 경고가 있었다. disk-pressure는 디스크 공간이 부족해 나타나는것으로 보여 확인해봤다.
df -h
Filesystem Size Used Avail Use% Mounted on
/dev/root 97G 83G 15G 86% /
...
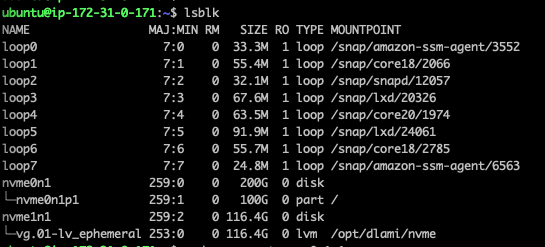
모든 노드의 인스턴스는 100GB 스토리지를 할당했다.
메인 파일시스템인 /dev/root 의 사용률이 86% 정도 나오는데, 일반적으로 85% 이상의 디스크를 사용하면 노드에 disk-pressure taint를 생성할 수 있다고한다.

인스턴스들의 볼륨을 모두 100GB -> 200GB 로 추가했다.
추가된 드라이브를 파티션화 해야한다.

파일시스템을 재할당한다.


이제 coredns를 삭제해 pod을 재시작시킨다.
kubectl delete pods -n kube-system -l k8s-app=kube-dns
정상적으로 coredns pod이 실행되고있다.
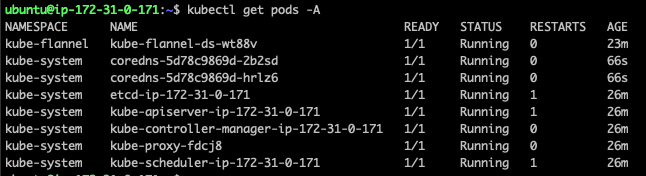
worker 노드 참여
클러스터를 생성할때 나왔던 kubeadm join ~~~
명령어를 worker 노드에서 사용해 클러스터에 참여할 수 있다.
만약 토큰을 잊어먹었다면 아래 명령어로 재발급 받을 수 있다.
sudo kubeadm token create --print-join-command
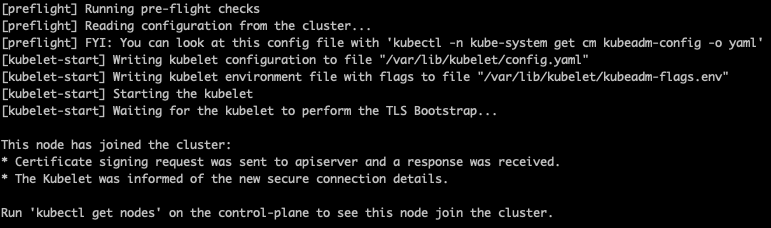
위와같이 참여할 수 있다.
하지만, 참여만 했다고 api 서버에 요청할 수 있는것은 아니다.
ubuntu@ip-172-31-9-152:~$ kubectl get nodes
E0808 08:20:57.936797 36930 memcache.go:265] couldn't get current server API group list: Get "http://localhost:8080/api?timeout=32s": dial tcp 127.0.0.1:8080: connect: connection refused
E0808 08:20:57.937107 36930 memcache.go:265] couldn't get current server API group list: Get "http://localhost:8080/api?timeout=32s": dial tcp 127.0.0.1:8080: connect: connection refused
E0808 08:20:57.938394 36930 memcache.go:265] couldn't get current server API group list: Get "http://localhost:8080/api?timeout=32s": dial tcp 127.0.0.1:8080: connect: connection refused
E0808 08:20:57.939734 36930 memcache.go:265] couldn't get current server API group list: Get "http://localhost:8080/api?timeout=32s": dial tcp 127.0.0.1:8080: connect: connection refused
E0808 08:20:57.941004 36930 memcache.go:265] couldn't get current server API group list: Get "http://localhost:8080/api?timeout=32s": dial tcp 127.0.0.1:8080: connect: connection refused
The connection to the server localhost:8080 was refused - did you specify the right host or port?
사용자 권한을 별도로 만들지 않을것이기 때문에, master 노드의 admin.conf 파일을 worker 노드에 복사해 사용한다.
위 과정을 모든 워커노드에 반영한다.
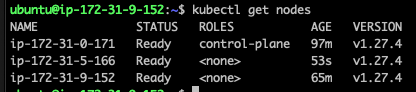
클러스터에 노드들이 참여되었다.
배포
워커노드에 잘 분산되어 배포되는지 확인하기 위해 nginx 웹서버를 배포하려고한다.
nginx-deployment.yaml
apiVersion: apps/v1
kind: Deployment
metadata:
  name: nginx-deployment
  labels:
    app: nginx
spec:
  replicas: 3
  selector:
    matchLabels:
      app: nginx
  template:
    metadata:
      labels:
        app: nginx
    spec:
      containers:
      - name: nginx
        image: nginx:latest
nginx-service.yaml
apiVersion: v1
kind: Service
metadata:
  name: nginx-service
spec:
  selector:
    app: nginx
  ports:
    - protocol: TCP
      port: 80
      targetPort: 80
  type: NodePort
deployment, service 구성파일을 정의했다.
aws ec2를 사용하고있지만, ingress controller는 사용하지않는다(elb 설정을 해야함)
servide를 NodePort로 사용하기때문에 외부에서 요청을 받을 수 있다.

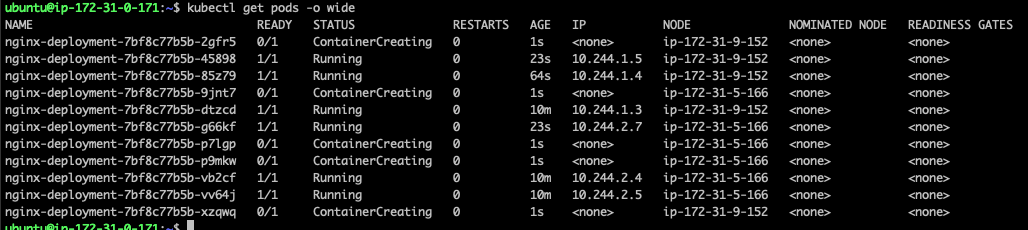
nginx pod이 3개 배포되었고, 2개 1개로 워커노드에 나눠져 배포되었다.

각 pod에 대한 로그인데 적당히 분배되어 요청이 들어오는것도 확인된다.
이제 deployment의 replica 수를 조절해 각 node에 적절히 분산되어 배치되는지 테스트해보려고한다.
kubectl scale deployment <DEPLOYMENT_NAME> --replicas=<NUMBER_OF_REPLICAS> -n
4개
6개
11개


잘 분배되는것을 확인할 수 있다.
pod 재분배
혹시나 싶어 pod 갯수를 3개로 줄여봤는데 예상과달리 하나의 node에 pod이 모두 배치되었다.
불균형한 pod 분포를 어떻게 해결해야하는지 찾아봤는데 다음과 같은 방법들이 있다고한다.
- Pod Topology Spread Constraints: 쿠버네티스 1.18부터, Pod Topology Spread Constraints를 사용하여 Pod들이 클러스터의 노드들에 어떻게 분산될지 제어할 수 있습니다. 이 기능을 사용하면, 같은 Deployment의 Pod들이 특정 노드나 zone에 과도하게 분산되지 않도록 조정할 수 있습니다.
- Pod Affinity/Anti-Affinity: Pod Affinity와 Anti-Affinity 규칙을 사용하여 Pod들이 어떤 노드에 스케줄링되어야 할지, 또는 어떤 노드에 스케줄링되지 말아야 할지 제어할 수 있습니다. 예를 들어, Anti-Affinity 규칙을 사용하여 같은 Deployment의 Pod들이 같은 노드에 위치하지 않도록 할 수 있습니다.
- 노드 taints 및 pod tolerations: 노드에 taint를 추가하여 특정 Pod만 해당 노드에서 실행되도록 제어할 수 있으며, Pod에 toleration을 추가하여 taint가 있는 노드에서 실행될 수 있게 할 수 있습니다.
- 재스케일링: 먼저 replicas를 0으로 설정하여 모든 Pod를 종료한 다음 원하는 수치로 다시 스케일링을 수행하면 노드 간의 균형을 어느 정도 회복할 수 있습니다. 이 방법은 빠르게 Pod 분포를 재조정하려는 경우에 유용하지만, 서비스 중단 시간이 발생할 수 있으므로 주의해야 합니다.
Pod Topology Spread Constraints 방식을 선택했고, nginx-deployment.yaml 파일을 다음과같이 수정했다.
apiVersion: apps/v1
kind: Deployment
metadata:
  name: nginx-deployment
  labels:
    app: nginx
spec:
  replicas: 3
  selector:
    matchLabels:
      app: nginx
  template:
    metadata:
      labels:
        app: nginx
    spec:
      containers:
      - name: nginx
        image: nginx:latest
      topologySpreadConstraints:
      - maxSkew: 1
        topologyKey: kubernetes.io/hostname
        whenUnsatisfiable: ScheduleAnyway
        labelSelector:
          matchLabels:
            app: nginx
topologySpreadConstraints 필드가 추가되었다.
whenUnsatisfiable 필드의 기본값이 DoNotSchedule 인데, 기본값대로면 분산 제약족너을 만족하지 않으면 pod을 배포하지않는다. 위와같이 설정했을때 pod들이 pending 상태에서 걸리는 상황이 나와서, 차이가 가장 적은 노드에게 우선순위를 부여해 pod를 배포했다.