React useEffect
- useEffect(이펙트 함수, 의존성 배열);
배열 안에 있는 변수 중 하나라도 값이 변경되었을 때 이펙트 함수 실행
의존성 배열이 없다면 DOM이 변경된 이후 이펙트 함수를 실행한다.
수정하기
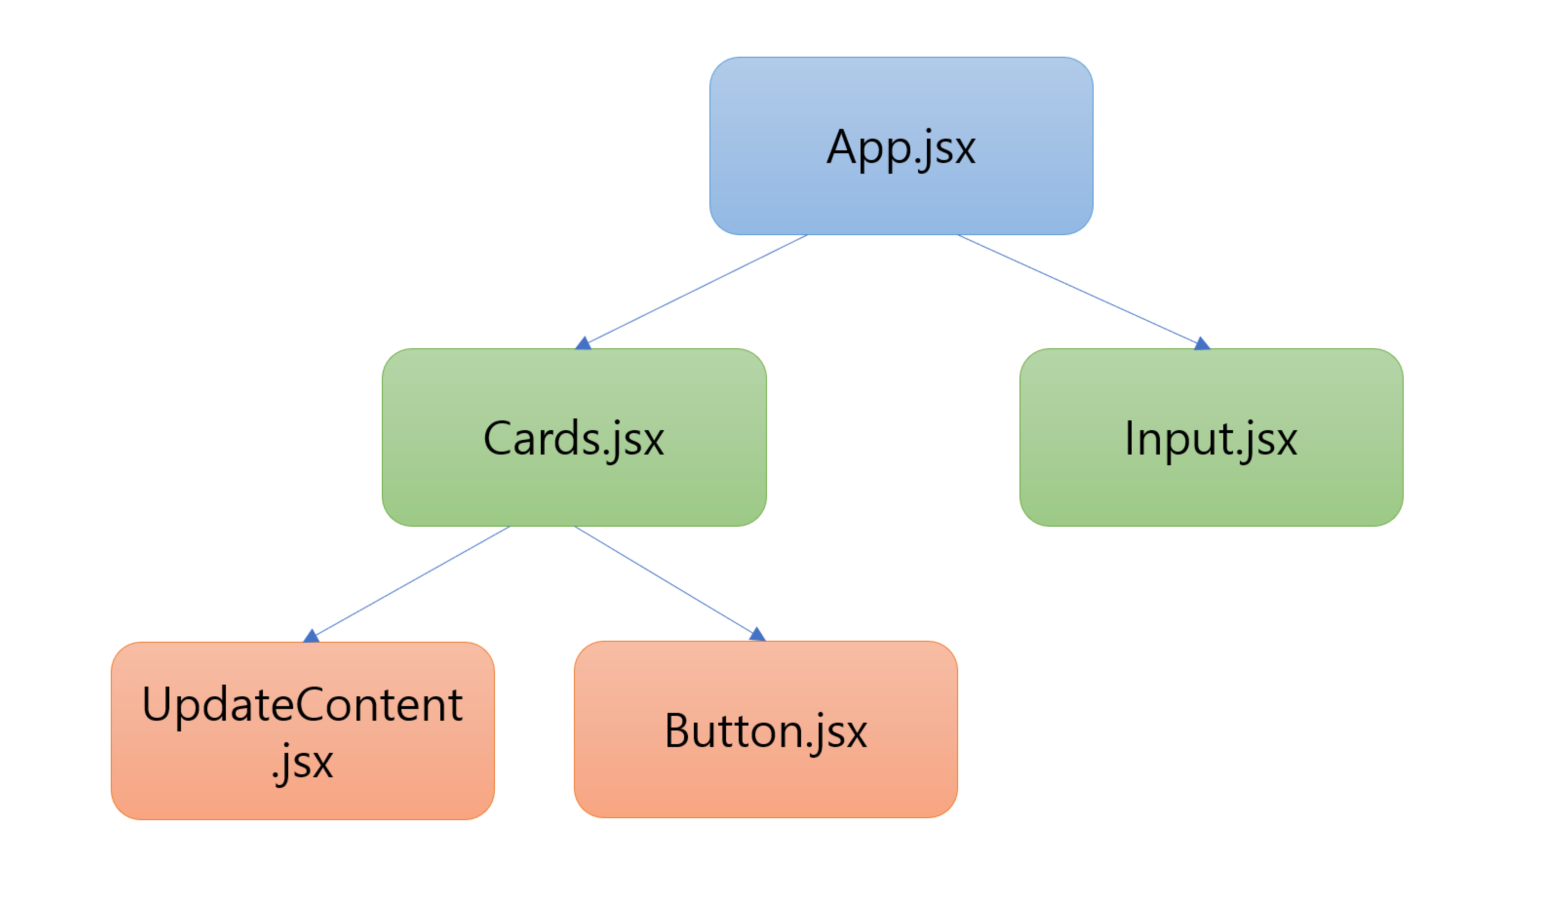
Cards.jsx에서 필요한 동작과 태그들을 정의하고 입력부분을 UpdateContent.jsx에 분리하니 좀 더 생각하기 편했다.
App.jsx에서 수정부분이 hidden으로 감춰져 있고 값은 담겨있기 때문에 completeUpdateButton함수에서 선택자로 값을 가져오고 데이터를 처리한 뒤, setworking으로 상태를 변경해주었더니 렌더링이 되었다.
App.jsx
const completeUpdateButton = (id, event) => {
    const HIDDEN_CLASSNAME = 'hidden';

    const updateBox = event.target.closest('.todo-box');
    const currentContent = updateBox.querySelector('.todo-text'); // 기존 보이는 제목과 내용
    const newContent = updateBox.querySelector('.update-box'); // 수정하는 칸
    const currentButtons = updateBox.querySelector('.buttons'); // 버튼 담긴 태그

    currentContent.classList.remove(HIDDEN_CLASSNAME);
    currentButtons.querySelector('.update').classList.remove(HIDDEN_CLASSNAME);
    newContent.classList.add(HIDDEN_CLASSNAME);
    currentButtons.querySelector('.update-complete').classList.add(HIDDEN_CLASSNAME);

    const newTitleValue = newContent.querySelector('.update-title').value;
    const newContentValue = newContent.querySelector('.update-content').value;


    const newSetting = (id) =>{
      const newWorking = working.map((data) => {
          if(data.id === id) {
              return {...data, work: newTitleValue, content: newContentValue}
          }
          return data;
      });

      localStorage.setItem('todokey', JSON.stringify([...newWorking]));
      setworking(newWorking);
    };

    newSetting(id);
  };
컴포넌트 관계도
JS 피드백
.env 파일에 전역으로 사용하게 되는 것들을 넣어주면 된다. (환경변수 파일, node.js 모듈)
프로젝트 최상위에 위치한다.
공통으로 쓰이는 것들을 하나로 모아두는 것이 좋다.
localhost도 마찬가지
Promise
3가지 상태
1. pending
요청 직후 상태
2. fulfill
값을 받아온 상태
3. rejct
문제 생겼을 때 상태
res.json()을 then, await으로 처리하는 이유
요청을 하면 Promise 객체가 반환되는데 then, await처리를 해주지 않으면 pending상태가 반환되기 때문에 받아온 값을 사용할 수 없기 때문이다.
props.children vs props drilling
작은규모 -> props drilling
보기 편함
큰 규모 -> props.children
JS 자습
새로 알게 된 것
- padStart()
문자열.padStart(늘릴길이, 아니라면 앞에 채울것);- 선택자
  const quote = document.querySelector("#quote span:first-child");
  const author = document.querySelector("#quote span:last-child");
선택자를 사용할 때 첫번째 요소와 마지막 요소를 선택할 수 있다.
- createElement
const bgImage = document.createElement("img");→ console.log 해보면 <img>가 나타난다.
이를 이용해서 태그를 추가할 수 있다.
const bgImage = document.createElement("img");
bgImage.src = `img/${chosenImage}`;
=> <img src="img/1.jpeg">
-
document.태그.appendChild()
태그에 body라면 body안에 3번에서 만든 요소를 넣을 수도 있다. -
<태그 required>
필수로 입력하게 만드는데 입력되지 않았다면 새로고침을 수행한다. -
버튼이벤트
매개변수로 받은 event는 target으로 HTML element를 볼 수 있다.
내일 시험보기 전에 프로젝트 코드에서 동일한 부분들을 줄이는 리팩토링을 해야겠다.
