로그인 세션에서만 유지하기
const signIn = async (event) => {
event.preventDefault();
try {
await setPersistence(auth, browserSessionPersistence);
const userCredential = await signInWithEmailAndPassword(auth, email, password);
console.log(userCredential);
dispatch(setUser());
handleLocation();
} catch (error) {
switch (error.code) {
case 'auth/user-not-found':
alert('이메일이 일치하지 않습니다.');
break;
case 'auth/wrong-password':
alert('비밀번호가 일치하지 않습니다.');
break;
default:
alert('로그인에 실패 했습니다.');
break;
}
}
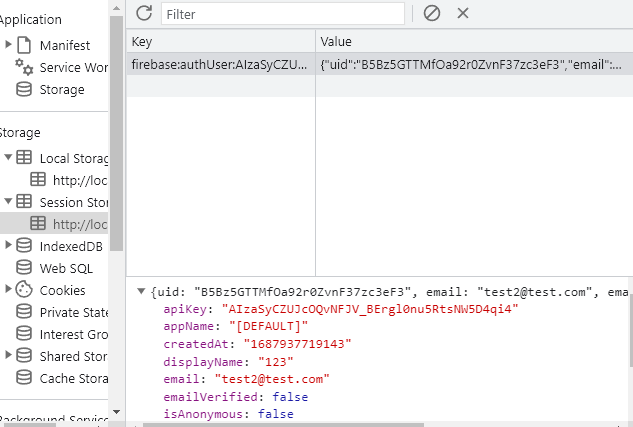
};공식문서를 참고하여 Session에 있을 때 로그인 상태를 확인할 수 있도록 작업하였다.
SessionStorage내에 들어오는 것을 확인할 수 있다!
세션에 정보 있는지 확인하기
firebase.js
export const loginCheck = () => {
  const sessionKey = `firebase:authUser:${process.env.REACT_APP_FB_API_KEY}:[DEFAULT]`;
  const isLogin = sessionStorage.getItem(sessionKey);

  return isLogin;
};
해당 함수로 로그인 되었는지 확인할 수 있다.
로그인 완료 시 이전 페이지로 이동
useLocation을 사용하여 state에 값을 넣어주고 로그인 페이지에서 값을 가져와 사용한다.
Headernav
navigate('/login', { state: { preURL: `${location.pathname}` } });LoginPage
 useEffect(() => {
    if (loginCheck()) {
      alert('이미 로그인 상태입니다.');
      navigate(`${location.state.preURL}`);
    }
  }, []);

  const handleLocation = () => {
    if (user) {
      if (location.state) {
        navigate(`${location.state.preURL}`);
      } else {
        navigate('/');
      }
    }
  };
마이페이지
import React, { useEffect, useState } from 'react';
import Footer from '../components/Frame/Footer';

import { MainWrapper } from '../stylecomponents/Wrapper';
import Headernav from '../components/Frame/Headernav';
import { styled } from 'styled-components';
import { Modal, ModalBackground } from '../stylecomponents/Modal';
import { commonButton } from '../stylecomponents/Button';
import { loginCheck } from '../firebase';
import { useNavigate } from 'react-router';
import { useSelector } from 'react-redux';

function MyPage() {
  const [modalState, setModalState] = useState(false);
  const user = useSelector((user) => user.currentuser);
  const navigate = useNavigate();
  const openModal = () => {
    console.log(user);
    setModalState(true);
  };
  const closeModal = () => {
    setModalState(false);
  };

  // 프로필 업데이트
  const myupdateProfile = () => {};

  useEffect(() => {
    if (!loginCheck()) {
      alert('로그인 해주세요');
      navigate('/');
    }
  }, []);

  return (
    <>
      <Headernav />
      <MainWrapper>
        <Mypagetitle>
          <h1>My Page</h1>
          <Updateprofilebtn onClick={openModal}>프로필 수정하기</Updateprofilebtn>
        </Mypagetitle>
        <h2>내가 작성한 게시글</h2>
        <Section></Section>
      </MainWrapper>
      <Footer />
      {modalState && (
        <div>
          <ModalBackground />
          <Modal>
            <h2>프로필 사진</h2>
            <img src={`${user.photoURL}`} alt="profile"></img>
            <Findimgfile>파일 찾기</Findimgfile>
            <h2>닉네임</h2>
            <Input value={`${user.displayname}`} />
            <SaveMypagebtn onClick={myupdateProfile}>저장</SaveMypagebtn>
            <ModalClosebtn onClick={closeModal}>닫기</ModalClosebtn>
          </Modal>
        </div>
      )}
    </>
  );
}

export default MyPage;

const Section = styled.div`
  display: flex;
  justify-content: center;
  text-align: center;
  margin: 0 auto;
  margin-top: 40px;
  font-weight: bold;
`;

const Mypagetitle = styled.div`
  display: flex;
  margin: 10px;
  padding: 0px 20px;
  align-items: center;
  justify-content: space-between;
`;

const Updateprofilebtn = styled.button`
  background-color: #eb9307;
  color: white;
  font-weight: 600;
  font-size: 0.9rem;
  border-radius: 14px;
  border: none;
  padding: 10px;
  margin: 3px;
  height: 40px;
  &:hover {
    cursor: pointer;
    background-color: #ff8f05;
    color: black;
  }
`;

const ModalClosebtn = styled(commonButton)``;

const SaveMypagebtn = styled(commonButton)``;

const Findimgfile = styled(commonButton)``;

const Input = styled.input`
  border: 1px solid rgb(51, 51, 51);
  height: 40px;
  width: 200px;
  outline: none;
  border-radius: 8px;
  padding-left: 12px;
  padding-right: 12px;
`;
useState로 로그인 상태에 따라 활성화 되는 버튼이 다르게 만들었고, Headernav에서 setUser를 하기 때문에 따로 작업하지 않아도 데이터를 가져와 사용할 수 있다.
Input의 value가 특정 값으로 되어있는데, onChange로 수정해주어야 한다.
해야하는 것
-
프로필 업데이트 기능
사용자의 폴더에서 사진을 담아 화면에 잘 담겼는지 보여주어야 하고, 저장 버튼을 누르면 닉네임과 프로필 사진이 firebase에 프로필을 업데이트 해주어야 한다.
세션에 업데이트 된 내용이 잘 저장되었는지 확인하고 redux에서 사용자 정보를 새로 set 해주어야 한다. -
자신이 작성한 게시글만 불러와서 화면에 출력하기
id, uid 등등 팀원이 저장해둔 db를 확인하고 작성자 정보와 현재 로그인한 사람의 정보를 비교해서 filter를 수행해준다.
3글자 마다 콤마 찍기
const chageEnteredNum = (e) => {
    const value = e.target.value;
    const removedCommaValue = Number(value.replaceAll(",", ""));
    setNum(removedCommaValue.toLocaleString());
  };
값을 꺼내와서 콤마가 있었으면 초기화해서 순수한 숫자로 만들고 다시 콤마가 들어가게 만들어서 set해준다.
file 지정하기
State를 사용하여 선택된 파일을 지정할 수 있다.
  const [selectefFile, setselectefFile] = useState(null);

  const handleFileSelect = (event) => {
    setselectefFile(event.target.files[0]);
  };

<Findimgfile type="file" onChange={handleFileSelect} />
console.log를 사용하면 다음과 같이 파일의 정보를 볼 수 있다.
file upload
input 태그로 파일을 업로드 할 대에는 uploadBytes 함수를 사용한다.
- ref 함수
Storage의 위치를 참조할 수 있다.
ref(storage, '폴더/파일이름')
/를 기준으로 폴더가 생성된다.
const handleUpload = async () => {
    const profileimgRef = ref(storage, `profile/${cuser.uid}/${selectefFile.name}`);
    await uploadBytes(profileimgRef, selectefFile);

    const downloadURL = await getDownloadURL(profileimgRef);
    console.log(downloadURL);
  };
콘솔에서 저장된 파일의 이미지 주소를 확인할 수 있다!!

프로필 사진 업데이트 하기
동작과정
1. 기존 storage의 파일 or 폴더를 삭제한다.
2. 저장을 눌렀을 때 파일을 업로드 한다.
2-1. 사용자 프로필의 photoURL을 업데이트 해준다. + 닉네임도 업데이트 해준다.
2-2. 프로필 사진과 닉네임을 set해준다.
2-3. modal 창을 닫는다.
새 아이디어
파일이름을 변경해서 덮어씌워지도록 만든다!
파일경로를
const profileimgRef = ref(storage, profile/${cuser.uid}/profilePhoto`)
로 만들고 profilePhoto 라는 이름으로 들어가게 만들어줬다.
// 사진 업로드
  const handleUpload = async () => {
    const profileimgRef = ref(storage, `profile/${user.uid}/profilePhoto`);

    if (selectefFile === null && user.photoURL === DEFAULT_PHOTO) {
      myupdateProfile(nikname, DEFAULT_PHOTO);
    } else {
      await uploadBytes(profileimgRef, selectefFile); // 파일 업로드

      const downloadURL = await getDownloadURL(profileimgRef);

      myupdateProfile(nikname, downloadURL);
    }
  };

  // 프로필 업데이트
  const myupdateProfile = async (newName, newPhoto) => {
    await updateProfile(auth.currentUser, {
      displayName: newName,
      photoURL: newPhoto
    })
      .then(() => {
        dispatch(setUser());
      })
      .then(() => {
        setNikname(user.displayName);
        setPhoto(user.photoURL);
        alert('프로필이 업데이트 되었습니다!');
        closeModal();
      })
      .catch((error) => {
        alert('프로필 업데이트에 실패했습니다.');
      });
  };
특정 상황에서 내가 생각한대로 동작하지 않는 자잘한 버그들이 있었는데, 이걸 수정하면서 프로젝트가 왜 그렇게 오래 걸리는지 깨달은 것 같다.
