
데이터 및 스토리지 형식 통일
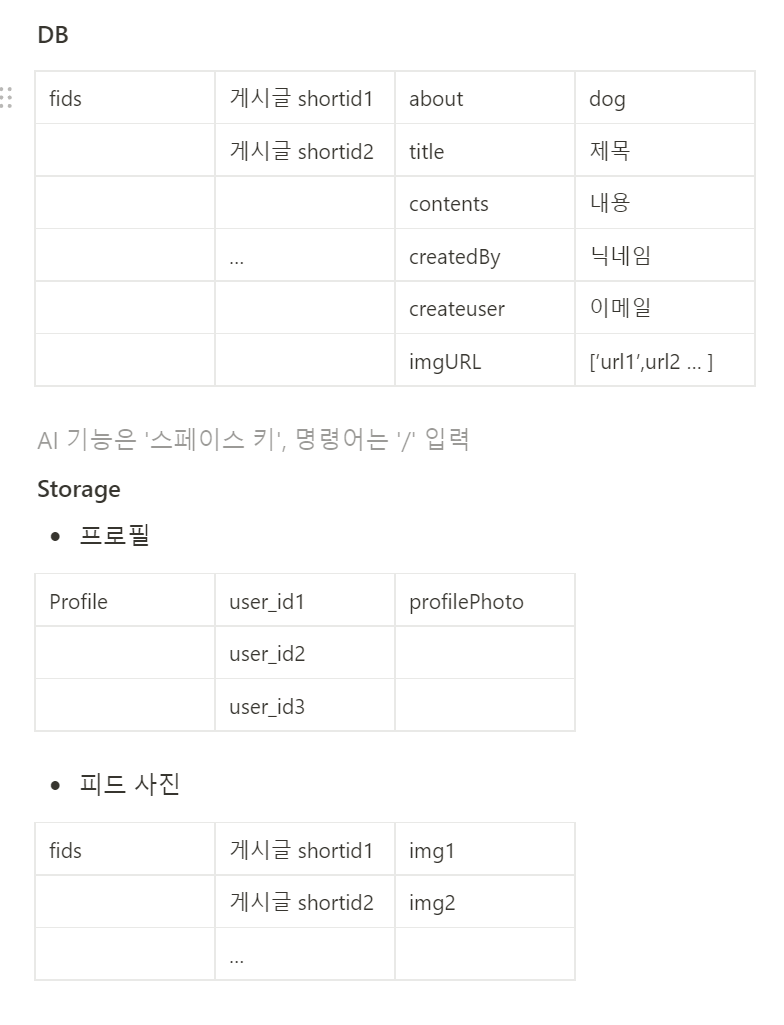
어떤 것을 기준으로 데이터를 불러올지 어려운 것 같아서 정리하고 의견을 얘기해보며 데이터 형식을 설계해봤다.
input 태그
type="file"로 파일을 입력받을 수 있고 accept 속성으로 업로드할 수 있는 파일의 타입을 고를 수 있다.
type="file"의 style 변경하기
htmlFor
htmlFor에 input의 아이디나 네임을 적어 인풋과 연결할 수 있다.
<FindimgfileWrap>
              <label htmlFor="ex_file">파일 선택</label>
              <Findimgfile
                type="file"
                id="ex_file"
                onChange={(e) => {
                  handleFileSelect(e);
                }}
                accept="image/*"
              />
              {selectefFile.name}
            </FindimgfileWrap>
// 파일 선택 style
const FindimgfileWrap = styled.div`
  margin: 0 8px 0 8px;
  img {
    max-width: 325px;
  }
  label {
    background-color: #eb9307;
    color: white;
    font-weight: 600;
    font-size: 0.9rem;
    border-radius: 14px;
    border: none;
    padding: 10px;
    margin: 3px;
    height: 40px;

    &:hover {
      cursor: pointer;
      background-color: #ff8f05;
      color: black;
    }

    &:active {
      background-color: #0d3f8f;
      color: white;
    }
  }
  input[type='file'] {
    position: absolute;
    width: 0;
    height: 0;
    padding: 0;
    margin: -1px;
    overflow: hidden;
    clip: rect(0, 0, 0, 0);
    border: 0;
  }
`;
const Findimgfile = styled.input``;
label을 클릭하면 input이 동작하도록 만들어주었다!
{selectefFile.name} error
모달창을 열었을 때 파일이 선택되지 않았을 때 값이 없기 때문에 error가 발생한다.
따라서, 상황에 따라 값을 return 해주는 함수를 추가해준다.
const handleFileSelectName = () => {
    if (selectefFile === null) {
      return '이미지 없음';
    } else {
      return selectefFile.name;
    }
  };

<FindimgfileWrap>
              <label htmlFor="ex_file">파일 선택</label>
              <Findimgfile
                type="file"
                id="ex_file"
                onChange={(e) => {
                  handleFileSelect(e);
                }}
                accept="image/*"
              />
              {handleFileSelectName()}
            </FindimgfileWrap>
불필요한 파일 정리
게시글 fids 관리
처음 맨 위의 컴포넌트가 렌더링 되었을 때 fid의 데이터들이 담겨지도록 수정하였다.
fids typeError
새로고침 했을 때, CardList가 받는 에러가 발생했다.
배열 형태를 map해주어야 하는데 어디선가 잘못 들어오는 것으로 예상하였다.
const initialState = {};
fids를 초기화하는 값을 객체로 해두어서 오류가 발생한 것이였다.
배열형태로 선언해주니 문제를 해결할 수 있었다.
firebase.js
export const fetchData = async () => {
  const q = query(collection(db, 'fids'));
  const querySnapshot = await getDocs(q);
  const data = querySnapshot.docs.map((doc) => ({
    id: doc.id,
    ...doc.data()
  }));

  return data;
};
해당 함수는 db를 불러오는 함수이다.
App.jsx
useEffect(() => {
    const getFidsdata = async () => {
      const fidsData = await fetchData();
      dispatch(firstsetFids(fidsData));
    };
    getFidsdata();
  }, []);
db를 실행하고 fid 상태관리에서 setting해준다.
fids.js
// action value
const FIRST_SET_FIDS = 'FIRSTSET_FIDS';
const ADD_FIDS = 'ADD_FIDS';
const DELETE_FIDS = 'DELETE_FIDS';

// 인기글, 최신글

// 초기값
const initialState = [{}]; //새로고침 오류 방지

// action creator
export const firstsetFids = (payload) => {
 return {
   type: FIRST_SET_FIDS,
   payload
 };
};

export const deleteFids = (payload) => {
 return {
   type: DELETE_FIDS,
   payload
 };
};

// 리듀서
const fids = (state = initialState, action) => {
 switch (action.type) {
   case FIRST_SET_FIDS:
     console.log('action', action.payload);
     return action.payload;
   case ADD_FIDS:
     return state;

   case DELETE_FIDS:
     return {};
   default:
     return state;
 }
};

export default fids;
피드를 관리하는 redux에 필요한 것들을 먼저 정의해주고 setting을 수행해주었다.
마이페이지, 카테고리 별 filtering
마이페이지
const user = auth.currentUser;
  const fids = useSelector((fids) =>
    fids.fids.filter((fid) => {
      return fid.createUser === user.email;
    })
  );
.
.
  const [myfids, setMyfids] = useState([]);

useEffect(() => {
    if (!loginCheck()) {
      // alert('로그인 해주세요');
      navigate('/');
    } else {
      onAuthStateChanged(auth, (user) => {
        setMyfids(fids);
      }); // 사용자 인증정보가 바뀔 때 마다
    }
  }, [user]);
.
.
<CardList fids={myfids} />
현재 로그인 된 email과 작성자의 email를 비교해서 필터링 해주고 출력되는 CardList에 필터링된 카드들을 props로 보내줘서 출력하게 만들어줬다.
카테고리 별 페이지
const fids = useSelector((fids) =>
    fids.fids.filter((fid) => {
      return fid.about === animal;
    })
  );
똑같은 방식으로 비교해줘서 필터링 해주었다.
해결해야 할 문제
posting 수행시 모든 게시물의 이미지가 변경된다. -> db, storage확인 필요
posting 수행시 redux add 추가해서 리렌더링 되도록 상태 관리 action 추가
삭제, 수정 버튼은 본인 게시물일 때에만 나타나야 함 -> 마이페이지 filtering이랑 유사할 듯
수정하기 기능
삭제 : db 내용 지우면 x, 삭제 버튼 누를 시 redux로 상태 관리 action 추가
user정보를 redux로 관리해봤었는데 auth.currentUser를 사용하면 쉽게 사용할 수 있어서 제거하고 todoList를 했던 것 처럼 작업하는 것이 좋을 것 같다.
프로젝트를 진행하면서 redux나 style component, 비동기 등에 더 숙련도가 올라간 것 같다.
팀원들의 코드를 고쳐보면서 db형식, api문서, 코드 설계 방식 등등 회의를 통해 더 명확하게 진행했으면 진행률을 더 높일 수 있었을 듯 하다.
이번 프로젝트를 마치면 리액트 책을 읽어보면서 어떤 기능들이 있었는지 살펴봐야겠다.
