✏️ 서론
존경하는 개발자이자 유튜버인 Interactive Developer 김종민 님의 영상 구글에서 입사 제의 받은 포트폴리오에 매료된 나는, 그의 문제해결능력과 창의성뿐 아니라 개발자로서 모든 점을 배우고 싶었다.
위에 언급한 영상에 나오는 작품 Plant Trees는 특히 나에게 큰 충격을 준 작품이었고, 나도 이런 인터렉티브한 작품을 만들어보고 싶다는 생각에 그의 재생목록 Creative Coding을 보며 공부했다.
Plant Trees는 코드리뷰 영상이 없어 아쉬웠지만, 내가 해결해보자하는 욕심이 생겨 무작정 vscode를 열었다.
✏️ 폴더구조
📦root
 ┣ 📂src
 ┃ ┣ 📂css
 ┃ ┃ ┗ 📜style.css
 ┃ ┗ 📂js
 ┃ ┃ ┣ 📜app.js
 ┃ ┃ ┣ 📜branch.js
 ┃ ┃ ┗ 📜tree.js
 ┗ 📜index.html
구현을 위해 큰 도화지를 하나 만들어야 한다. 도화지를 만들고 앱을 동작하기 위한 app.js를 만들고, 이 도화지 안에 여러 개의 나무가 그려지기 때문에 나무를 객체로 빼서 만들기 위한 tree.js를 만든다.
또한 각각의 나무(tree.js) 안에서 여러 개의 나뭇가지가 자라기 때문에 나뭇가지를 객체로 표현하기 위한 branch.js를 만든다.
✏️ 밑 작업
index.html
<body>
	<script src="./src/js/app.js" type="module"></script>
</body>
<body> 태그 안에 <script> 태그로 app.js를 불러오고, import와 export가 가능하도록 type을 module로 선언해준다.
app.js
class App {
  constructor() {
    // 캔버스 생성 후 랜더링
    this.canvas = document.createElement('canvas');
    document.body.appendChild(this.canvas);

    // context 생성
    this.ctx = this.canvas.getContext('2d');
    // 레티나 디스플레이에서도 제대로 보이기 위해
    this.pixelRatio = window.devicePixelRatio > 1 ? 2 : 1;

    window.addEventListener('resize', this.resize.bind(this), false);
  	this.resize();
  }

  resize() {
    ...
  }
}

window.onload = () => {
  new App();
};
우선 App class가 로드되면 constractor() 가 바로 실행되어 canvas를 랜더링한다.
레티나 디스플레이를 사용하는 유저들도 선명하게 보이기 위해 window.devicePixelRatio를 가져와 이 값이 1보다 크면 캔버스의 사이즈와 비율을 2배, 1 이하면 1배로 설정하고자 이 값을 저장한다.
그리고 resize() 함수를 만들어 윈도우창의 크기가 변경되면 캔버스 크기도 변경되도록 window 이벤트를 추가한다.
resize() {
  // body의 너비와 높이 저장
  this.stageWidth = document.body.clientWidth;
  this.stageHeight = document.body.clientHeight;

  // 디스플레이 비율에 맞추어 캔버스 사이즈와 비율 조정
  this.canvas.width = this.stageWidth * this.pixelRatio;
  this.canvas.height = this.stageHeight * this.pixelRatio;
  this.ctx.scale(this.pixelRatio, this.pixelRatio);

  // 리사이즈시 캔버스를 비워줌
  this.ctx.clearRect(0, 0, this.stageWidth, this.stageHeight);
}
마지막에 캔버스를 비워주는 이유는 이전 사이즈일 때 그려진 내용들이 현재 사이즈에서 어색하게 보이는 것을 방지하기 위함이다.
여기까지 하면 밑작업은 끝이다. 개발자도구를 통해 윈도우 창의 크기에 따라 canvas의 사이즈가 변경되는 것을 확인하고, 다음 스텝으로 넘어가자.
✏️ 나무 기둥 그리기
우선 화면의 가운데에 나무를 하나 그려보자.
나무를 그리는 방식은 다음과 같다.
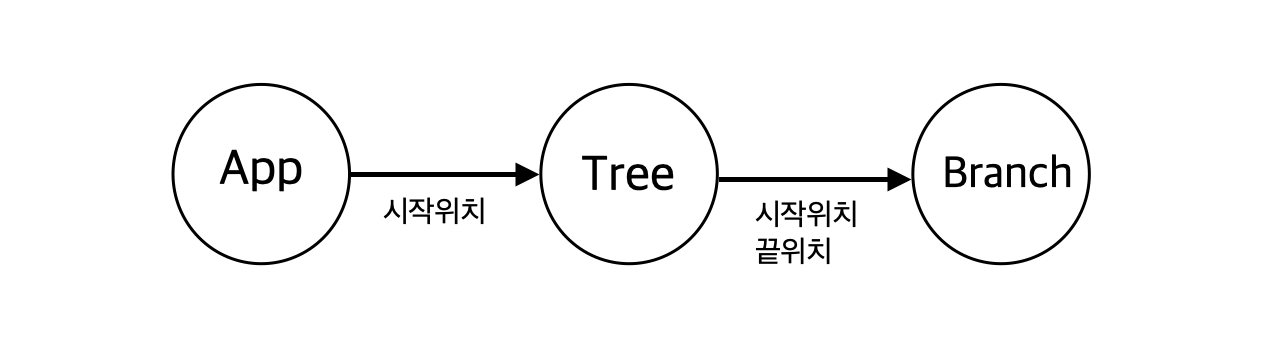
- App에서 나무의 시작 위치를 구해 Tree 객체 생성
- Tree에서 가지의 시작 위치, 끝 위치를 구해 가지 객체 생성
- Branch에서 시작 위치, 끝 위치로 캔버스에 가지 그리기
어느정도 흐름 구상이 되었으니, 바로 class들을 구성해보자.
branch.js
export class Branch {
  constructor(startX, startY, endX, endY) {
    this.startX = startX;
    this.startY = startY;
    this.endX = endX;
    this.endY = endY;
  }

  draw(ctx) {
  }
}
tree.js
import { Branch } from './branch.js';

export class Tree {
  constructor(ctx, posX, posY) {
    this.ctx = ctx;
    this.posX = posX;
    this.posY = posY;
    this.branches = []; // 가지들을 담을 공간

    this.init();
  }

  init() {
    this.createBranch(this.posX, this.posY);
    this.draw(this.ctx);
  }

  createBranch(startX, startY) {
    // 가지 생성
  }

  draw(ctx) {
    // 가지들을 캔버스에 draw
  }
}
app.js
import { Tree } from './tree.js';

class App {
  constructor() {
    ...
    window.addEventListener('resize', this.resize.bind(this), false);
    this.resize();

    // 화면 가운데에 나무 생성
    new Tree(this.ctx, this.stageWidth / 2, this.stageHeight);
  }
  ...
}
App에서 화면 가운데에 나무가 생성되도록 화면 너비의 / 2 지점을 x좌표로 잡아 나무 객체를 생성한다.
이렇게 각 클래스들을 서로 연결해놨으니 나무를 그려볼텐데,
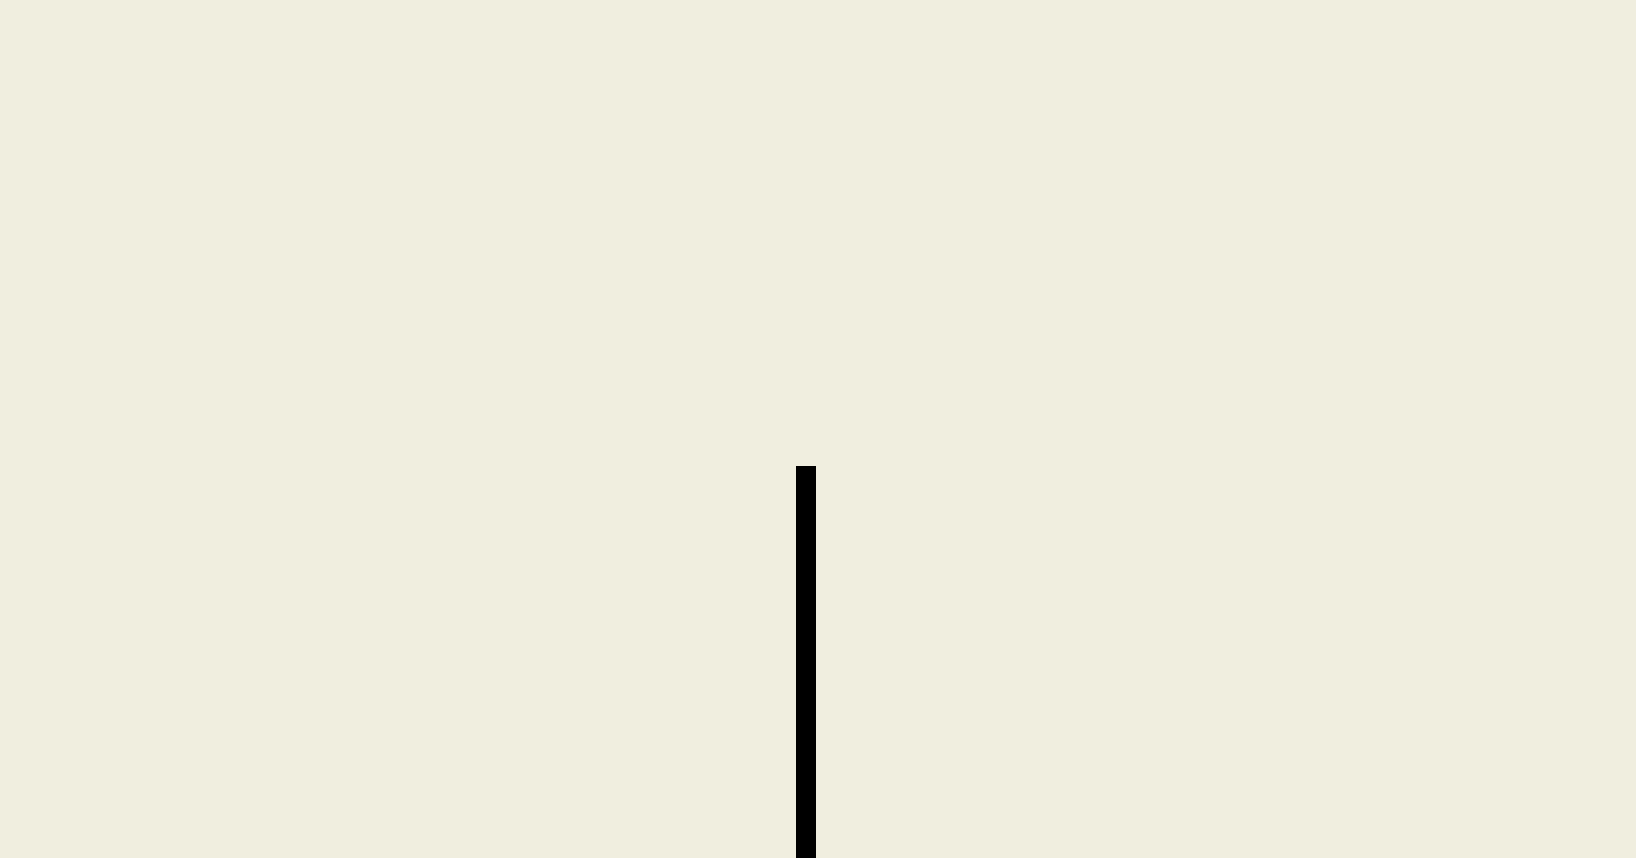
우선 길이 200px짜리 나무 기둥을 하나 그려보자.
tree.js
export class Tree {
  ...
  createBranch(startX, startY) {
    const len = 200;
    const endX = startX;
    const endY = startY - len;

    this.branches.push(new Branch(startX, startY, endX, endY));
  }

  draw(ctx) {
    for (let i = 0; i < this.branches.length; i++) {
      this.branches[i].draw(ctx);
    }
  }
}
아래에서 위의 방향으로 그림을 그려줄텐데, 그러기 위해선 startY 값에서 길이 값을 빼준 endY를 구해야 한다.
좌표를 구했으면 가지를 생성해 branches 배열에 넣어주고, branch의 draw() 함수를 호출해 가지를 그려주자.
branch.js
export class Branch {
  constructor(startX, startY, endX, endY) {
    this.startX = startX;
    this.startY = startY;
    this.endX = endX;
    this.endY = endY;
    this.color = '#000000';
    this.lineWidth = 10;
  }

  draw(ctx) {
    ctx.beginPath();

    ctx.moveTo(this.startX, this.startY); // 선의 시작 위치 지정
    ctx.lineTo(this.endX, this.endY); // 선의 끝 위치 지정

    ctx.lineWidth = this.lineWidth; // 선의 두깨
    ctx.fillStyle = this.color;
    ctx.strokeStyle = this.color;

    ctx.stroke();
    ctx.closePath();
  }
}
여기까지 완성하면 아래와 같이 나무 기둥이 생성된 것을 볼 수 있다.
뭔가 엄청 많이한 것 같은데... 고작 선 하나 그었다니😂
하지만 위에 대부분은 틀을 잡기 위한 밑작업이었고, 이제 머리만 굴리면 되는 재미있는(?) 일들만 남았으니 열심히 달려보자🔥
✏️ 나뭇가지 그리기
이제 가지들을 그려줄텐데 밑에 그림처럼 가지는 depth를 나누어 하나의 가지당 가지 두 개씩 생성되게 만드려고 한다.
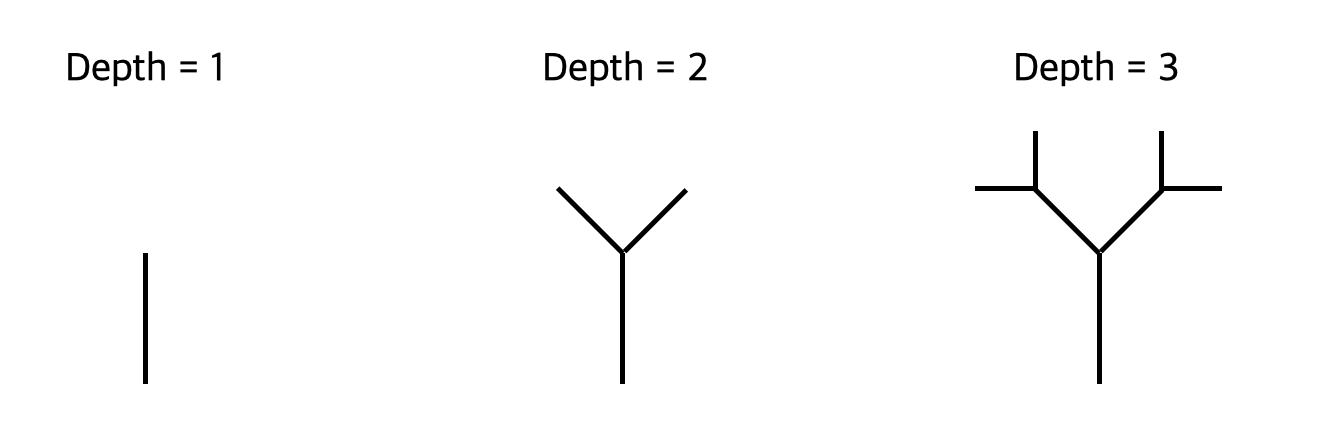
문제는 저 휘어진 가지를 표현하는 것이다.
여기서 어떻게 할지 고민을 많이 했는데😂
지금 캔버스에서 선을 긋는 방식이 시작 지점과 끝 지점의 좌표를 구하고 이어주는 것이니 시작 지점과 각도를 활용해 끝 지점의 좌표를 구해야 할 것 같다.
어떻게 끝 지점 좌표를 구할까?
지금 시작 지점의 좌표와 길이가 있으므로 삼각함수를 활용하면 좌표를 구할 수 있을 것 같았다.
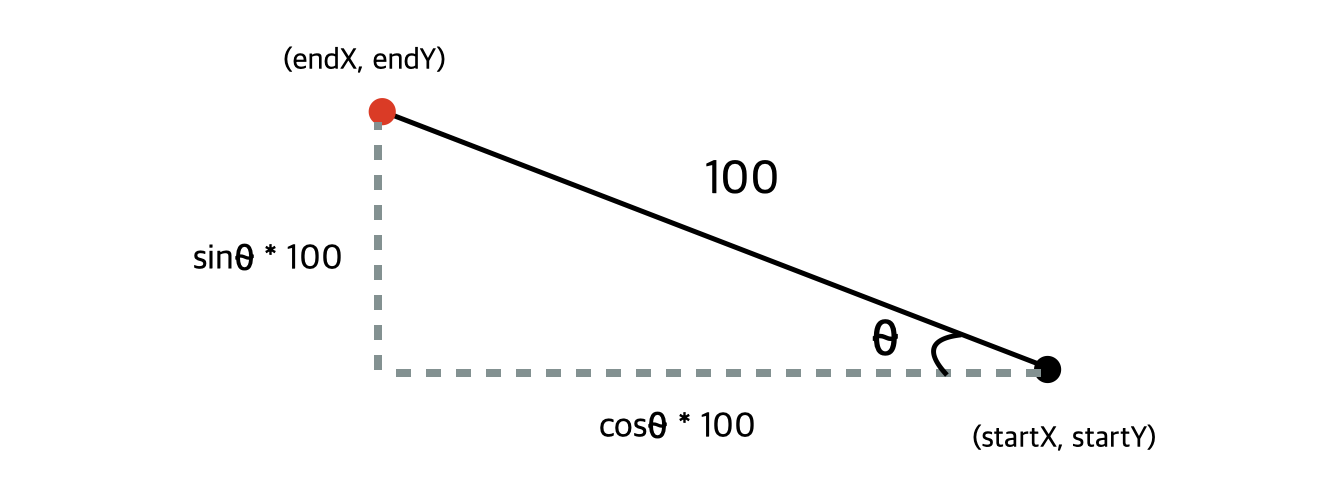
시작 지점에서 각도 ⍬ 만큼 휘어진 곳의 좌표를 구한다고 했을 때, 좌표 계산은 다음과 같다.
- x좌표: 선의 길이 * cos⍬ + startX
- y좌표: 선의 길이 * sin⍬ + startY
이대로 endX, endY 좌표를 계산해 코드를 작성해보자.
tree.js
export class Tree {
  constructor(ctx, posX, posY) {
    this.ctx = ctx;
    this.posX = posX;
    this.posY = posY;
    this.branches = [];
    this.depth = 2; // depth 추가

    this.init();
  }

  init() {
    // 시작 각도는 -90도를 주어 아래에서 위로 나무 기둥이 자라도록한다.
    // 시작 depth는 0으로 준다.
    this.createBranch(this.posX, this.posY, -90, 0);
    this.draw(this.ctx);
  }

  // 매개변수  angle, depth 추가
  createBranch(startX, startY, angle, depth) {
    if (depth === this.depth) return;

    const len = 100; // 길이 100으로 변경
    const endX = startX + this.cos(angle) * len;
    const endY = startY + this.sin(angle) * len;

    this.branches.push(new Branch(startX, startY, endX, endY));

    this.createBranch(endX, endY, angle - 30, depth + 1);
    this.createBranch(endX, endY, angle + 30, depth + 1);
  }

  draw(ctx) {
    for (let i = 0; i < this.branches.length; i++) {
      this.branches[i].draw(ctx);
    }
  }

  // 각도 관련 함수 추가
  cos(angle) {
    return Math.cos(this.degToRad(angle));
  }
  sin(angle) {
    return Math.sin(this.degToRad(angle));
  }
  degToRad(angle) {
    return (angle / 180.0) * Math.PI;
  }
}
변수 this.depth를 추가하고 우선 2로 주었다.
createBranch() 함수에 매개변수 depth, angle을 추가하고 하나의 가지가 생성되어 branches에 가지가 push되면 생성된 가지의 끝부분을 시작으로 30도씩 좌우 각도를 주어 가지 2개를 또 생성해준다.
이렇게 마지막 depth까지 재귀호출되면 return 한다.
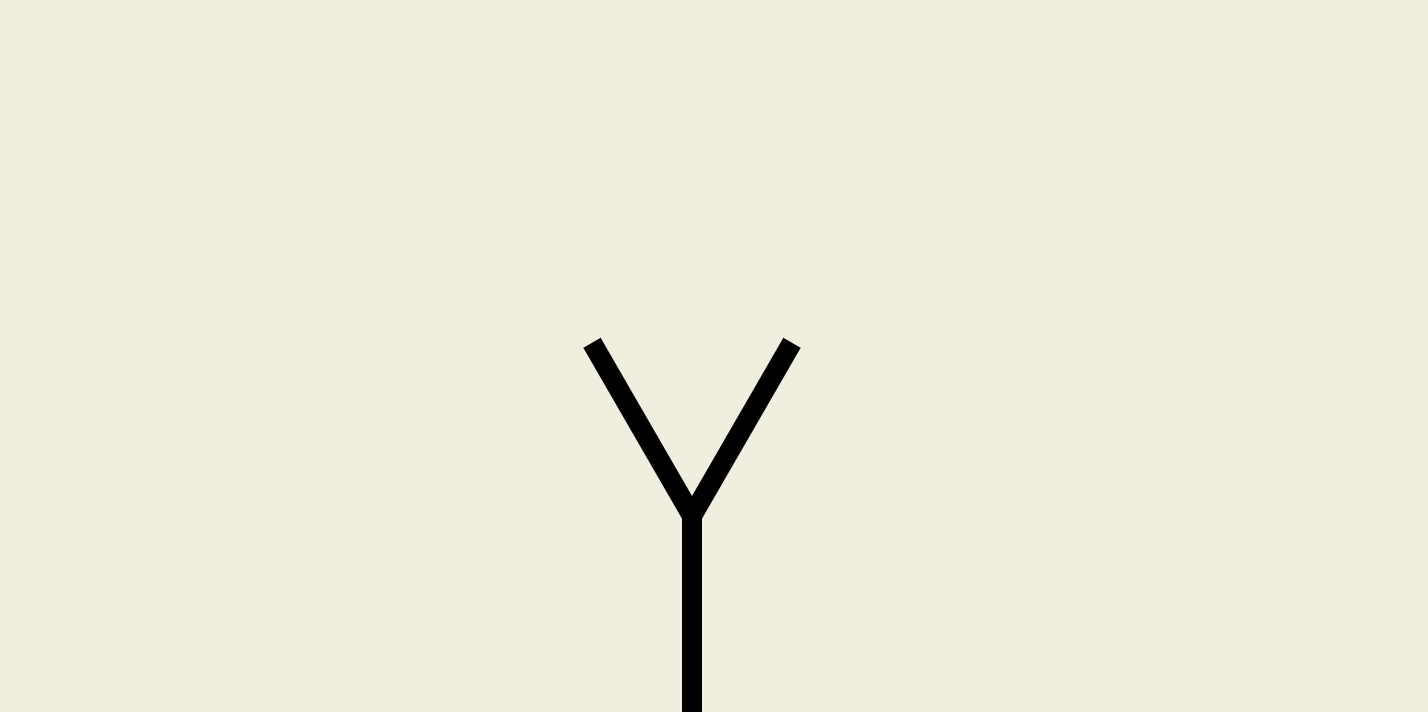
여기까지 했으면 다음과 같이 두 개의 가지가 추가로 생긴 것을 볼 수 있다!
this.depth 를 5로 바꿔보면
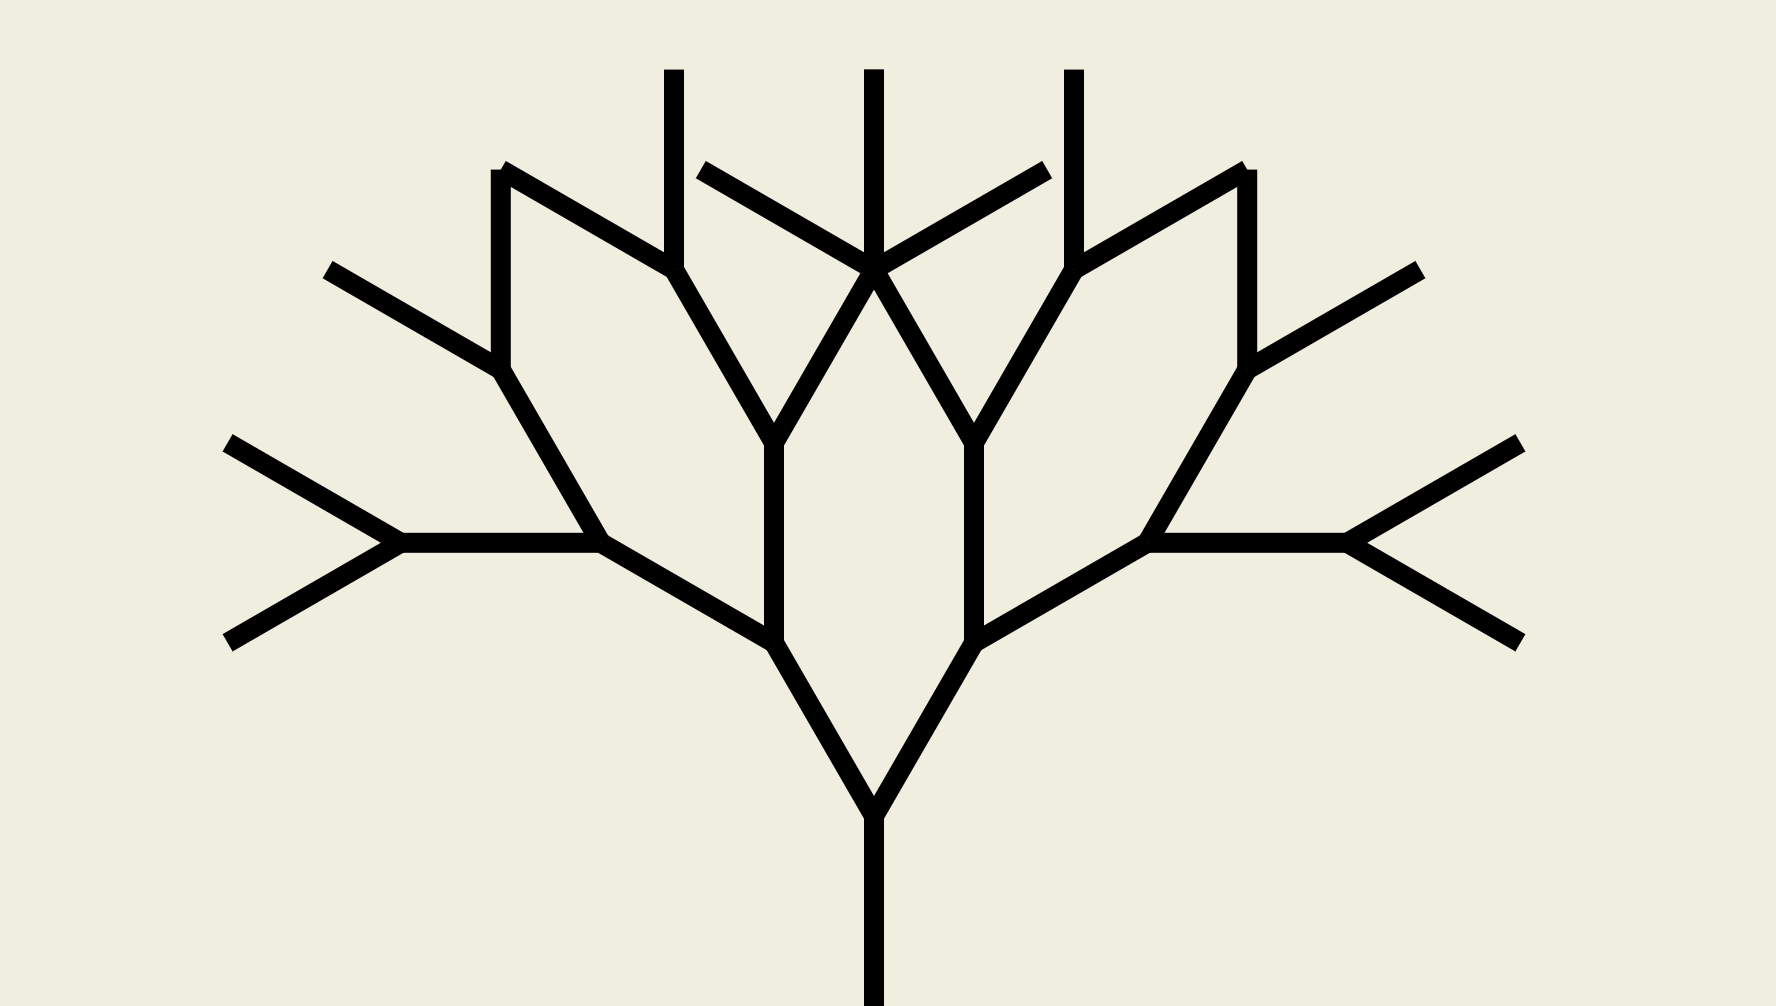
드디어 나무의 모양이 나오기 시작했다😀
이제 depth별로 가지의 길이, 굵기만 이쁘게 바꿔주면 될 것 같다.
✏️ 나무 디자인
branch.js
export class Branch {
  constructor(startX, startY, endX, endY, lineWidth) {
    this.startX = startX;
    this.startY = startY;
    this.endX = endX;
    this.endY = endY;
    this.color = '#000000';
    this.lineWidth = lineWidth;
  }

  draw(ctx) {
    ctx.beginPath();

    ctx.moveTo(this.startX, this.startY); // 선의 시작 위치 지정
    ctx.lineTo(this.endX, this.endY); // 선의 끝 위치 지정

    ctx.lineWidth = this.lineWidth; // 선의 두깨
    ctx.fillStyle = this.color;
    ctx.strokeStyle = this.color;

    ctx.stroke();
    ctx.closePath();
  }
}
depth별로 가지 굵기를 다르게 하기 위해, Tree로부터 lineWidth를 받아 this.lineWidth로 저장해 draw() 함수의 ctx.lineWidth 값으로 준다.
다음으로 tree에서 값을 조절하는데, 이것저것 열심히 시도해본 결과...😅
제일 마음에 들었던 코드는 이 코드였다.
tree.js
import { Branch } from './branch.js';

export class Tree {
  constructor(ctx, posX, posY) {
    this.ctx = ctx;
    this.posX = posX;
    this.posY = posY;
    this.branches = [];
    this.depth = 11; // depth 11로 변경

    this.init();
  }

  init() {
    this.createBranch(this.posX, this.posY, -90, 0);
    this.draw(this.ctx);
  }

  createBranch(startX, startY, angle, depth) {
    if (depth === this.depth) return;

    // random 함수를 만들어 가지들의 길이를 랜덤으로 준다.
    // depth가 0 즉, 나무 기둥을 그릴땐 최소, 최대 길이를 달리한다.
    const len = depth === 0 ? this.random(10, 13) : this.random(0, 11);

    // 현재 depth의 역을 곱해주어 depth가 점점 늘어날 수록 길이가 가늘게 함
    const endX = startX + this.cos(angle) * len * (this.depth - depth);
    const endY = startY + this.sin(angle) * len * (this.depth - depth);

    this.branches.push(
      new Branch(startX, startY, endX, endY, this.depth - depth)
    );

    // 각도도 랜덤하게 부여
    this.createBranch(endX, endY, angle - this.random(15, 23), depth + 1);
    this.createBranch(endX, endY, angle + this.random(15, 23), depth + 1);
  }

  draw(ctx) {
    for (let i = 0; i < this.branches.length; i++) {
      this.branches[i].draw(ctx);
    }
  }

  cos(angle) {
    return Math.cos(this.degToRad(angle));
  }
  sin(angle) {
    return Math.sin(this.degToRad(angle));
  }
  degToRad(angle) {
    return (angle / 180.0) * Math.PI;
  }

  // random 함수 추가
  random(min, max) {
    return min + Math.floor(Math.random() * (max - min + 1));
  }
}
branch.js
export class Branch {
  constructor(startX, startY, endX, endY, lineWidth) {
    this.startX = startX;
    this.startY = startY;
    this.endX = endX;
    this.endY = endY;
    this.color = '#000000';
    this.lineWidth = lineWidth;
  }

  draw(ctx) {
    ctx.beginPath();

    ctx.moveTo(this.startX, this.startY); // 선의 시작 위치 지정
    ctx.lineTo(this.endX, this.endY); // 선의 끝 위치 지정

    if (this.lineWidth < 3) {
      ctx.lineWidth = 0.5;
    } else if (this.lineWidth < 7) {
      ctx.lineWidth = this.lineWidth * 0.7;
    } else if (this.lineWidth < 10) {
      ctx.lineWidth = this.lineWidth * 0.9;
    } else {
      ctx.lineWidth = this.lineWidth;
    }

    ctx.fillStyle = this.color;
    ctx.strokeStyle = this.color;

    ctx.stroke();
    ctx.closePath();
  }
}
결과는 다음과 같다.
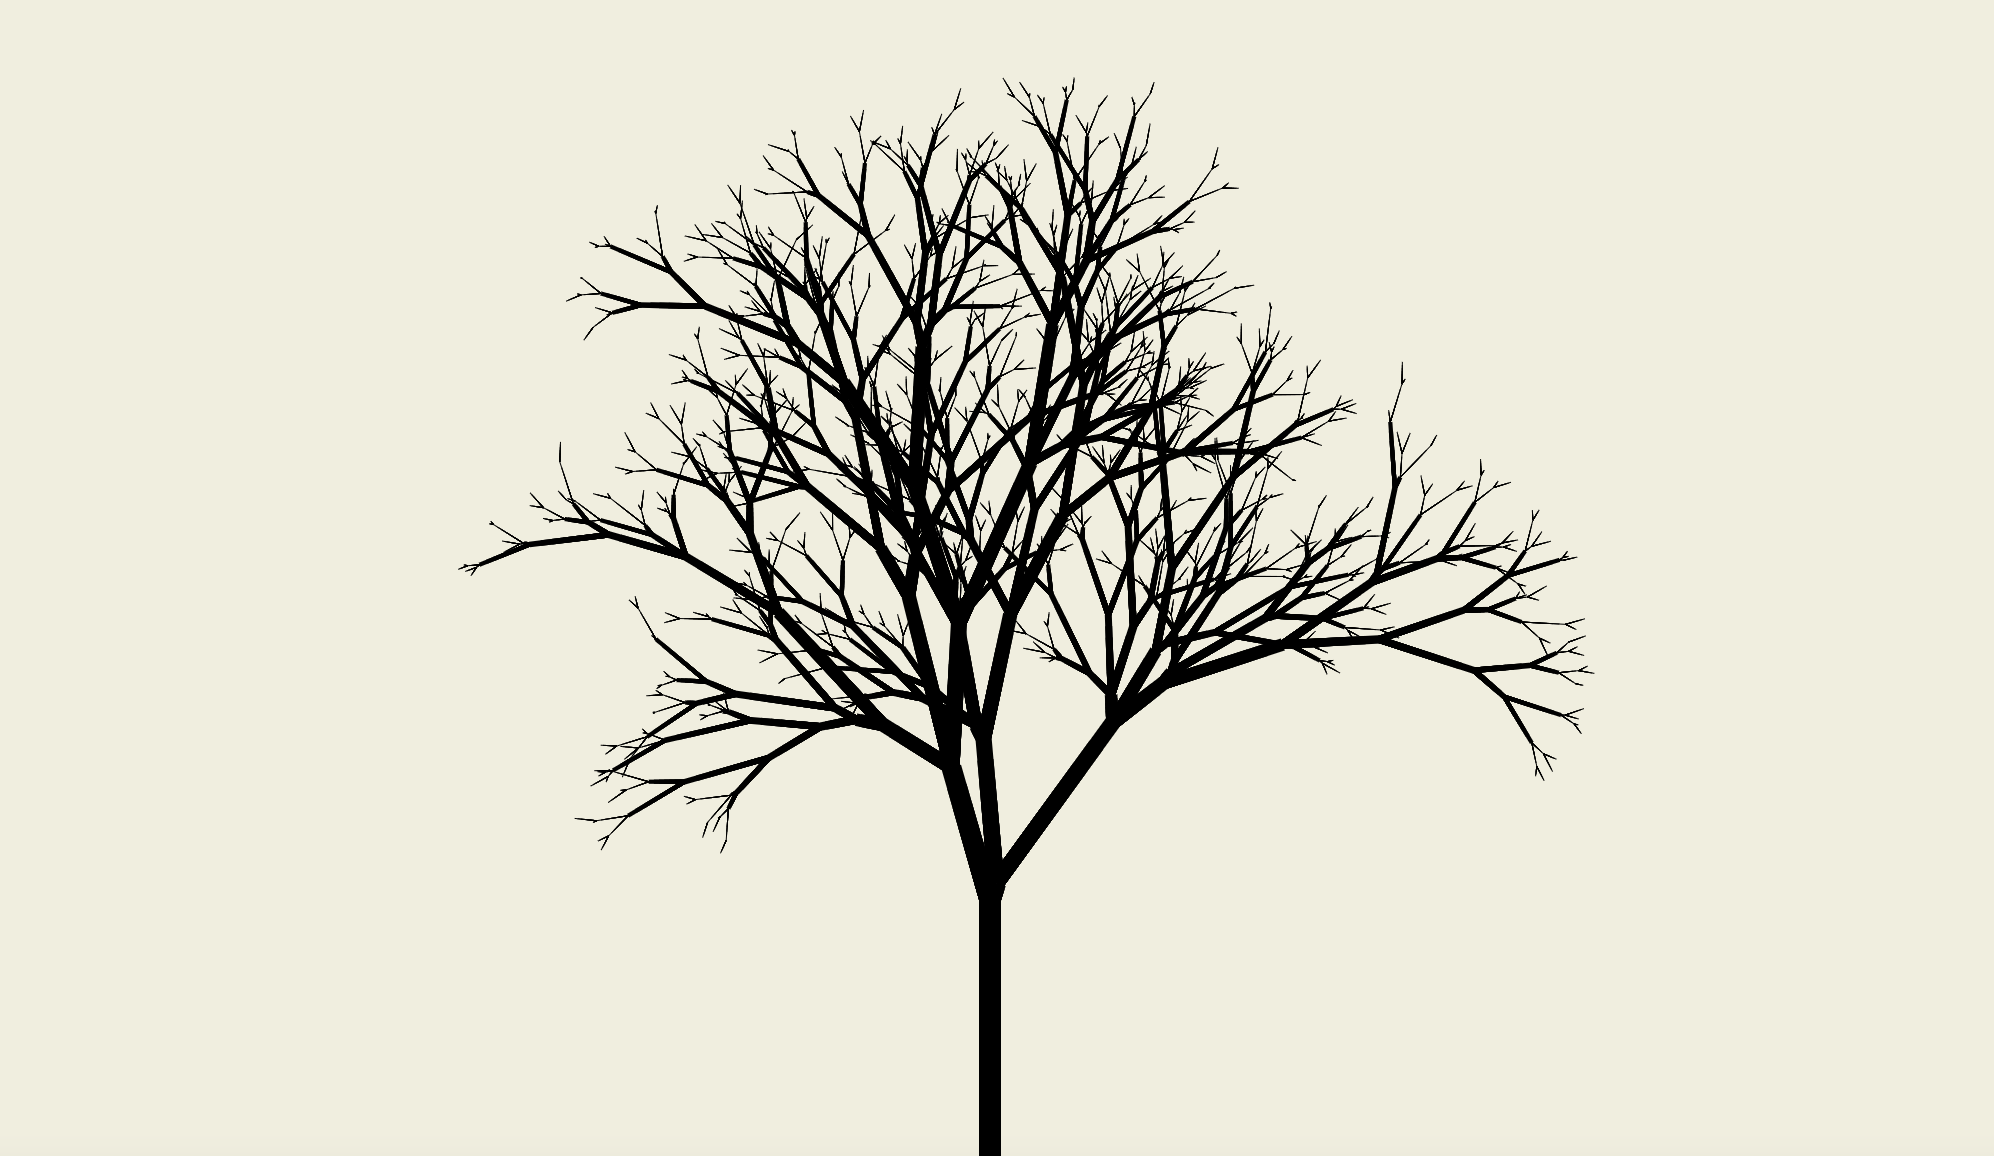
생각보다 이쁘게 나와서 만족한다😀
✏️ 다음편
원래 하나의 글에 전부 작성하려 했는데, 코드와 사진을 넣다보니 양이 너무 많아져서 2편으로 쪼개게 되었다.
다음편에서 클릭시 나무가 자라는 이벤트를 추가해보도록 하자!

26개의 댓글


저는 interactive developer님 유튜브 영상보면서 막연히 대단하다, 저걸 어떻게 만들었지 생각에 그쳤었는데
실제로 구현해보시다니 정말 대단하시네요. 프론트엔드로 취업준비중인데 코드 참고 잘하구 갑니다:)

와 글 정말 잘봤습니다.
저도 김종민님 영상 보고 저런 걸 만들어보고 싶다 라는 생각에 취미로 공부를 시작했다가
점점 더 재미를 느껴서 더 진지하게 공부를 하고 있습니다.
맨 처음 봤을 때는 아예 코드를 이해못했지만 지금 만드시는거 보고 조금은 이해하지만
그래도 더 공부하고 나중에 하자 이런 마음으로 있었는데
글 올리신거 보고 게을렀던 저를 반성합니다
저도 코드 적으신거 다시봐서 시도해보겠습니다!
좋은글 감사합니다!
혹시 캔버스 독학하신건가요?
아니면 어느정도 스스로 구현하면서 종민님 영상 보시면서 배우신건가요?


저거 김종민씨 작품보다 먼저 유고나카무라라는 일본 플래시 디자이너가 2000년도 초중반에 먼저 만들었었어요. 유저가 후원하면 하나씩 나뭇가지가 생기고 한 그루씩 생겨나고, 그 수만큼 오프라인에서 나무를 심는 프로젝트가 있었어요.


글 잘 봤습니다~
나뭇잎도 자라나게 만들면 이쁠 것 같아용