.gif)
1편에서 화면의 가운데에 나무를 그려주는 작업을 했다.
이번 편에선 클릭시 나무가 그려지는 이벤트와 아래에서부터 서서히 자라나는 효과를 구현해보자!
✏️ 클릭 이벤트
클릭 이벤트는 간단하다.
지금은 App에서 Tree 객체 하나가 자동으로 생성되면 Tree의 draw() 함수가 자동으로 실행되어 나무가 그려지게끔 동작하는데, 클릭 이벤트가 발생했을 때 App에서 Tree 객체가 생성되게 하면 된다.
App.js
import { Tree } from './tree.js';

class App {
  constructor() {
    this.canvas = document.createElement('canvas');
    document.body.appendChild(this.canvas);

    this.ctx = this.canvas.getContext('2d');
    this.pixelRatio = window.devicePixelRatio > 1 ? 2 : 1;

    // click이벤트 추가
    window.addEventListener('resize', this.resize.bind(this), false);
    window.addEventListener('click', this.click.bind(this), false);
    this.resize();
  }

  resize() {
    this.stageWidth = document.body.clientWidth;
    this.stageHeight = document.body.clientHeight;

    this.canvas.width = this.stageWidth * this.pixelRatio;
    this.canvas.height = this.stageHeight * this.pixelRatio;
    this.ctx.scale(this.pixelRatio, this.pixelRatio);

    this.ctx.clearRect(0, 0, this.stageWidth, this.stageHeight);
  }

  // click 함수 추가
  click(event) {
    const { clientX } = event;
    new Tree(this.ctx, clientX, this.stageHeight);
  }
}

window.onload = () => {
  new App();
};
App에 click() 함수를 구현하고 마우스의 x좌표와 화면의 가장 밑 좌표인 this.stageHeight를 사용해 Tree 객체를 생성한다.

화면을 클릭하면 클릭한 위치에 나무가 자라는 것을 볼 수 있다. 😀
클릭시 나무가 자라는데, 이번엔 밑에서부터 서서히 자라나는 작업을 해보자.
✏️ 가지가 자라나는 효과
가지가 자라나는 효과를 주려면 어떻게 해야할까?
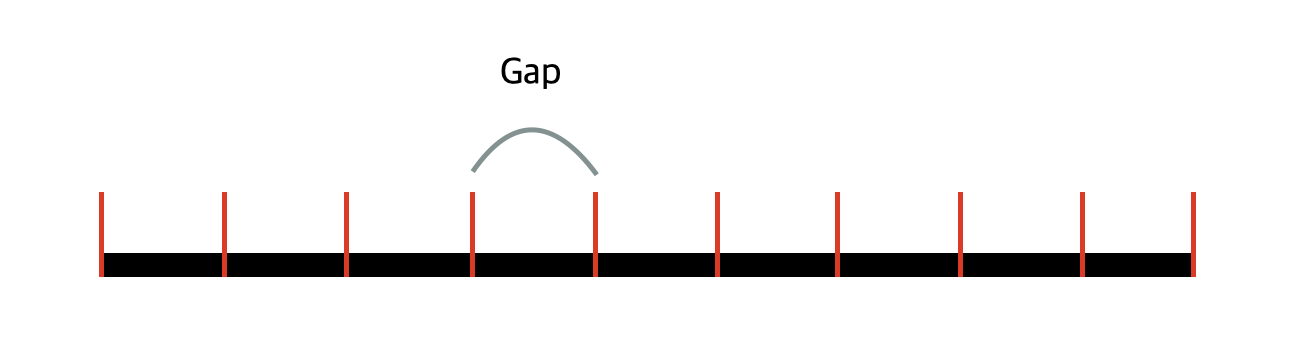
그림처럼 구간을 나누고 requestAnimationFrame() 함수를 사용해 draw()를 호출해서 Gap에 해당하는 길이만큼 계속 그려준다면 자라나는 효과를 나타낼 수 있을 것 같다.
branch.js
export class Branch {
  constructor(startX, startY, endX, endY, lineWidth) {
    this.startX = startX;
    this.startY = startY;
    this.endX = endX;
    this.endY = endY;
    this.color = '#000000';
    this.lineWidth = lineWidth;

    this.frame = 100; // 가지를 100등분으로 나누기 위한 변수 frame 선언
    this.cntFrame = 0; // 현재 frame

    // 가지의 길이를 frame으로 나누어 구간별 길이를 구함
    this.gapX = (this.endX - this.startX) / this.frame;
    this.gapY = (this.endY - this.startY) / this.frame;

    // 구간별 가지가 그려질 때 끝 좌표
    this.currentX = this.startX;
    this.currentY = this.startY;
  }

  draw(ctx) {
    // 현재 frame인 cntFrame이 설정한 frame과 같다면 draw를 하지 않는다.
    if (this.cntFrame === this.frame) return;

    ctx.beginPath();

    // 구간별 길이를 더해주어 다음 구간의 끝 좌표를 구함
    this.currentX += this.gapX;
    this.currentY += this.gapY;

    ctx.moveTo(this.startX, this.startY);
    ctx.lineTo(this.currentX, this.currentY); // 끝 좌표를 currentX,Y로

    if (this.lineWidth < 3) {
      ctx.lineWidth = 0.5;
    } else if (this.lineWidth < 7) {
      ctx.lineWidth = this.lineWidth * 0.7;
    } else if (this.lineWidth < 10) {
      ctx.lineWidth = this.lineWidth * 0.9;
    } else {
      ctx.lineWidth = this.lineWidth;
    }

    ctx.fillStyle = this.color;
    ctx.strokeStyle = this.color;

    ctx.stroke();
    ctx.closePath();

    this.cntFrame++; // 현재 프레임수 증가
  }
}
다음과 같이 100개의 구간으로 나누어 branch가 계속 그려지게 한다.
tree.js
import { Branch } from './branch.js';

export class Tree {
  ...

  draw() {
    for (let i = 0; i < this.branches.length; i++) {
      this.branches[i].draw(this.ctx);
    }

    requestAnimationFrame(this.draw.bind(this));
  }

  ...
}
다음으로 tree.js에서 draw() 함수 밑에 requestAnimationFrame() 함수를 사용해 draw()를 재귀호출 해보면 가지가 자라나는 효과를 구현 할 수 있다.
.gif)
오잉?! 가지가 자라긴 자라는데 나무가 자란다는 느낌이 아니다 🥲
생각해보니 tree.js에서 가지들을 생성하고 하나의 배열 안에 다 집어넣은 후, 모든 가지들에 대해 draw() 함수를 호출하다보니 가지들이 전부 동시에 자라는게 문제인 것 같다.
✏️ 나무가 자라나는 효과
가지를 depth별로 집어넣고 한 depth의 가지들이 끝까지 그려진 후에 다음 depth를 그리도록 코드를 수정해야겠다.
tree.js
import { Branch } from './branch.js';

export class Tree {
  constructor(ctx, posX, posY) {
    this.ctx = ctx;
    this.posX = posX;
    this.posY = posY;
    this.branches = [];
    this.depth = 11;

    this.cntDepth = 0; // depth별로 그리기 위해 현재 depth 변수 선언
    this.animation = null; // 현재 동작하는 애니메이션

    this.init();
  }

  init() {
    // depth별로 가지를 저장하기 위해 branches에 depth만큼 빈배열 추가
    for (let i = 0; i < this.depth; i++) {
      this.branches.push([]);
    }

    this.createBranch(this.posX, this.posY, -90, 0);
    this.draw();
  }

  createBranch(startX, startY, angle, depth) {
    if (depth === this.depth) return;

    const len = depth === 0 ? this.random(10, 13) : this.random(0, 11);

    const endX = startX + this.cos(angle) * len * (this.depth - depth);
    const endY = startY + this.sin(angle) * len * (this.depth - depth);

    // depth에 해당하는 위치의 배열에 가지를 추가
    this.branches[depth].push(
      new Branch(startX, startY, endX, endY, this.depth - depth)
    );

    this.createBranch(endX, endY, angle - this.random(15, 23), depth + 1);
    this.createBranch(endX, endY, angle + this.random(15, 23), depth + 1);
  }

  draw() {
    // 다 그렸으면 requestAnimationFrame을 중단해 메모리 누수가 없게 함.
    if (this.cntDepth === this.depth) {
      cancelAnimationFrame(this.animation);
    }

    // depth별로 가지를 그리기
    for (let i = this.cntDepth; i < this.branches.length; i++) {
      let pass = true;

      for (let j = 0; j < this.branches[i].length; j++) {
        pass = this.branches[i][j].draw(this.ctx);
      }

      if (!pass) break;
      this.cntDepth++;
    }

    this.animation = requestAnimationFrame(this.draw.bind(this));
  }
}
branch.js
export class Branch {
  ...

  draw(ctx) {
    // 가지를 다 그리면 true 리턴
    if (this.cntFrame === this.frame) return true;

    ctx.beginPath();

    this.currentX += this.gapX;
    this.currentY += this.gapY;

    ctx.moveTo(this.startX, this.startY);
    ctx.lineTo(this.currentX, this.currentY);

    ctx.lineWidth = this.lineWidth;
    ctx.fillStyle = this.color;
    ctx.strokeStyle = this.color;

    ctx.stroke();
    ctx.closePath();

    this.cntFrame++;

    // 다 안그렸으면 false를 리턴
    return false;
  }
}branch.js의 draw() 함수에서 가지가 다 그려지면 true, 그렇지 않으면 false를 반환한다.
tree.js에서 depth별로 가지를 저장해두고 draw 함수에서 depth별 가지를 그리는데, 현재 depth에서 가지들이 전부 다 그려져 pass == true가 되면 다음 depth로 for문이 진행되지만, 다 그려지지 않아 pass == false인 경우 draw() 함수를 종료해 다음 depth의 가지들이 그려지지 않게 했다.
마지막으로 나무가 전부 그려지면 cancelAnimationFrame()을 호출해 불필요한 애니메이션의 반복으로 메모리누수가 일어나지 않도록 한다.
이렇게 코드를 수정한 결과!
.gif)
속도가 너무 느리니 branch.js의 frame을 10정도로 수정해보자
.gif)
나무가 자라는 효과를 완성했다 😀
취향에 따라 나무 색도 한번 바꿔보는 것도 좋을 것 같다.
.gif)
필자는 색 몇개를 정해놓고 랜덤으로 색이 지정되게 한 후, depth별로 흰 색과 섞어 Interactive Developer 김종민 님의 작품과 비슷한 효과를 내고자 했다.
✏️ 후기
Interactive Developer 김종민 님의 영상 구글에서 입사 제의 받은 포트폴리오에 나오는 Plant tree라는 작품을 보고 따라 만들어보았는데, 생각보다 꽤 난이도가 있었다. 그래도 김종민님의 영상들을 보고 배운 덕분인지, 문제에 직면할 때 마다 큰 난관 없이 해결 할 수 있었다.
다 만들고나니 코드는 그리 길지 않았지만 대략 6~7시간정도 만든거같다 😂
엉덩이가 무거운 탓에 한번 작업을 시작하면 쉬지않고 하는 경향이 있는데, 그 탓인지 완성하자마자 진이 빠져버렸다..
그래도 일에 치여 살다가 오랜만에 아트웍 작업을 하며 머리도 굴려보고, 중간중간에 결과물도 보며 재미있게 작업했던 것 같다.
앞으로도 가끔씩 만들어야지 😃

18개의 댓글


.jpg)
만들어 보고 싶다는 동기가 생길 만큼 정말 멋진 결과물이네요!
저도 글 보면서 한 번 시도해봐야겠어요. 좋은 글 써주셔서 진심으로 감사 드립니다🙏🏻


The person who made the work is so wonderful. The growth rate of the tree is also very smooth. Perfect. drift f1


澳门太阳城免费代理 | https://143315.com/2022-fifa-final.html
澳门太阳城试玩账号 | https://143315.com/2022-fifia-2.html
澳门太阳城真人 | https://143315.com/2022fifa-betting.html
澳门太阳城真人网站 | https://143315.com/2023wbc.html
澳门太阳城真人在线游戏 | https://143315.com/2024new-year.html
澳门太阳城真人在线 | https://143315.com/539-tricks.html
澳门太阳城真人游戏 | https://143315.com/539crack.html
澳门太阳城真人官网 | https://143315.com/96m.html
澳门太阳城真人开户 | https://143315.com/about-doin.html
澳门太阳城真人代理 | https://143315.com/analysis-of-online-casinos.html
澳门太阳城真人百家乐 | https://143315.com/app-download.html
澳门太阳城真人百家乐开户 | https://143315.com/avia-gaming.html
澳门太阳城真人百家乐代理 | https://143315.com/baccarat-tips.html
澳门太阳城真人百家乐游戏 | https://143315.com/baccarat.html
澳门太阳城真人百家乐官网 | https://143315.com/beijing-pk10.html
澳门太阳城娱乐城官方网站 | https://143315.com/bng-slot-2.html
澳门太阳城百家乐 | https://143315.com/bng-slot-diamond.html
澳门太阳城百家乐开户 | https://143315.com/bng-slot-houyi.html
澳门太阳城百家乐代理 | https://143315.com/bng-slot-jungle.html
澳门太阳城百家乐官网 | https://143315.com/boya-game.html
澳门太阳城百家乐游戏 | https://143315.com/bwin-slot-mazu.html
澳门太阳城百家乐在线 | https://143315.com/casino-experience.html
澳门太阳城百家乐在线开户 | https://143315.com/casino-scam.html
澳门太阳城百家乐在线代理 | https://143315.com/casino-term.html
澳门太阳城集團 | https://143315.com/chess-casino.html
澳门太阳城娛樂場 | https://143315.com/contact-us-2.html
菲律宾太阳城游戏 | https://143315.com/contact-us.html
菲律宾太阳城游戏官网 | https://143315.com/dg-baccarat-win.html
菲律宾太阳城游戏代理 | https://143315.com/disclaimer.html
菲律宾太阳城游戏开户 | https://143315.com/discount.html
菲律宾太阳城游戏网址 | https://143315.com/e-sports.html
菲律宾太阳城游戏赚钱 | https://143315.com/electronic-games.html
菲律宾太阳城游戏官方 | https://143315.com/entertainment-city-guide.html
菲律宾太阳城游戏登入 | https://143315.com/evaluate.html
菲律宾太阳城真人荷官 | https://143315.com/farmslot.html
菲律宾太阳城试玩 | https://143315.com/fishing-2.html
菲律宾太阳城免费开户 | https://143315.com/fishing.html
菲律宾太阳城免费代理 | https://143315.com/forget-password.html
菲律宾太阳城试玩账号 | https://143315.com/game-tips.html
菲律宾太阳城真人 | https://143315.com/gaming-knowledge.html
菲律宾太阳城真人网站 | https://143315.com/gr-chess.html
菲律宾太阳城真人在线游戏 | https://143315.com/gr-fishing.html
菲律宾太阳城真人在线 | https://143315.com/how-to-choose-an-online-casino.html
菲律宾太阳城真人游戏 | https://143315.com/how-to-deposit.html
菲律宾太阳城真人官网 | https://143315.com/how-to-win-after-losing-money.html
菲律宾太阳城真人开户 | https://143315.com/how-to-withdraw.html
菲律宾太阳城真人代理 | https://143315.com/
菲律宾太阳城真人百家乐 | https://143315.com/latest-entertainment-city-news.html
菲律宾太阳城真人百家乐开户 | https://143315.com/live-casino.html
菲律宾太阳城真人百家乐代理 | https://143315.com/live-score.html
菲律宾太阳城真人百家乐游戏 | https://143315.com/login-tutorial.html
菲律宾太阳城真人百家乐官网 | https://143315.com/lottery-compare.html
菲律宾太阳城娱乐城官方网站 | https://143315.com/lottery-online-vs-store.html
菲律宾太阳城百家乐 | https://143315.com/lottery-ticket.html
菲律宾太阳城百家乐开户 | https://143315.com/lottery.html
菲律宾太阳城百家乐代理 | https://143315.com/machine.html
菲律宾太阳城百家乐官网 | https://143315.com/mahjong.html
菲律宾太阳城百家乐游戏 | https://143315.com/ob-game.html
菲律宾太阳城百家乐在线 | https://143315.com/online-vs-store-lottery.html
菲律宾太阳城百家乐在线开户 | https://143315.com/pm-chess.html
菲律宾太阳城百家乐在线代理 | https://143315.com/pm-fishing-machine.html
菲律宾太阳城集團 | https://143315.com/pm21bj.html
菲律宾太阳城娛樂場 | https://143315.com/pmmahjong.html
百家乐 | https://143315.com/privacy-policy.html
百家乐真人官方 | https://143315.com/responsible-betting.html
百家乐游戏 | https://143315.com/rg-slot-fruit.html
百家乐游戏规则 | https://143315.com/rsg-slot-thor.html
百家乐技巧 | https://143315.com/rsg-slot.html
百家乐试玩 | https://143315.com/slot-godofwealth.html
百家乐补牌规则 | https://143315.com/slot-machine-online-vs-store.html
百家乐技巧打法 | https://143315.com/slot-machine.html
百家乐公式打法 | https://143315.com/slot-secret-2.html
百家乐开户 | https://143315.com/slotmachine-2.html
百家乐代理 | https://143315.com/sporting-events.html
百家乐在线 | https://143315.com/super-lottery-2.html
百家乐在线娱乐 | https://143315.com/taiwan-casino.html
百家乐真人 | https://143315.com/terms-of-service.html
百家乐真人荷官 | https://143315.com/texas-hold.html
百家乐真人游戏 | https://143315.com/tu-dragon.html
百家乐官方网 | https://143315.com/wbc-champion.html
百家乐AG | https://143315.com/wbc-list.html
百家乐真人免费玩 | https://143315.com/wbc-os.html
百家乐真人免费开户 | https://143315.com/wbc-rule.html
澳门新葡京 | https://143315.com/wbc-tw.html
澳门新葡京真人官方 | https://143315.com/wbc2023.html
澳门新葡京游戏 | https://143315.com/weathy.html
澳门新葡京游戏规则 | https://143315.com/word-cup16.html
澳门新葡京技巧 | https://143315.com/zg-fishing.html
澳门新葡京试玩 | https://1433155.com/0.html
澳门新葡京补牌规则 | https://1433155.com/2022-fifa-final.html
澳门新葡京技巧打法 | https://1433155.com/2022-fifia-2.html
澳门新葡京公式打法 | https://1433155.com/2022fifa-betting.html
澳门新葡京开户 | https://1433155.com/2022soccer-rules.html
澳门新葡京代理 | https://1433155.com/2023wbc.html
澳门新葡京在线 | https://1433155.com/2024-uefa-euro.html
澳门新葡京在线娱乐 | https://1433155.com/2024fraud-2.html
澳门新葡京真人 | https://1433155.com/2024new-year.html
澳门新葡京真人荷官 | https://1433155.com/539-tricks.html
澳门新葡京真人游戏 | https://1433155.com/539crack.html
澳门新葡京官方网 | https://1433155.com/96m.html
澳门新葡京AG | https://1433155.com/9gamble.html
澳门新葡京真人免费玩 | https://1433155.com/about-fm.html
澳门新葡京真人免费开户 | https://1433155.com/ai-analyze.html
新葡京游戏 | https://1433155.com/allbet-intro.html
新葡京游戏官网 | https://1433155.com/analysis-of-online-casinos.html
新葡京游戏代理 | https://1433155.com/app-download.html
新葡京游戏开户 | https://1433155.com/avia-gaming.html
新葡京游戏网址 | https://1433155.com/baccarat.html
新葡京游戏赚钱 | https://1433155.com/beijing-pk10.html
新葡京游戏官方 | https://1433155.com/bng-slot-2.html
新葡京游戏登入 | https://1433155.com/bng-slot-diamond.html
新葡京真人荷官 | https://1433155.com/bng-slot-houyi.html
新葡京试玩 | https://1433155.com/bng-slot-jungle.html
新葡京免费开户 | https://1433155.com/bng-slot.html
新葡京免费代理 | https://1433155.com/boya-game.html
新葡京试玩账号 | https://1433155.com/bwin-slot-mazu.html
新葡京真人 | https://1433155.com/bwin-slot.html
新葡京真人网站 | https://1433155.com/casino-168.html
新葡京真人在线游戏 | https://1433155.com/casino-addicted.html
新葡京真人在线 | https://1433155.com/casino-experience.html
新葡京真人游戏 | https://1433155.com/casino-fraud-certified.html
新葡京真人官网 | https://1433155.com/casino-free-cash.html
新葡京真人开户 | https://1433155.com/casino-profits-scamming.html
新葡京真人代理 | https://1433155.com/casino-recommend.html
新葡京真人百家乐 | https://1433155.com/casino-scam.html
新葡京真人百家乐开户 | https://1433155.com/casino-term.html
新葡京真人百家乐代理 | https://1433155.com/casino-terminology.html
新葡京真人百家乐游戏 | https://1433155.com/champion.html
新葡京真人百家乐官网 | https://1433155.com/chess-casino.html
新葡京娱乐城官方网站 | https://1433155.com/choose-entertainment-city.html
新葡京百家乐 | https://1433155.com/contact-us-2.html
新葡京百家乐开户 | https://1433155.com/contact-us.html
新葡京百家乐代理 | https://1433155.com/core-value.html
新葡京百家乐官网 | https://1433155.com/db-slot-world-cup-showdown.html
新葡京百家乐游戏 | https://1433155.com/dg-baccarat-win.html
新葡京百家乐在线 | https://1433155.com/dg-intro.html
新葡京百家乐在线开户 | https://1433155.com/disclaimer.html
新葡京百家乐在线代理 | https://1433155.com/discount.html
澳门新葡京游戏官网 | https://1433155.com/e-sports.html
澳门新葡京游戏代理 | https://1433155.com/electronic-games.html
澳门新葡京游戏开户 | https://1433155.com/entertainment-city-guide.html
澳门新葡京游戏网址 | https://1433155.com/evaluate.html
澳门新葡京游戏赚钱 | https://1433155.com/faq-100.html
澳门新葡京游戏官方 | https://1433155.com/farmslot.html
澳门新葡京游戏登入 | https://1433155.com/first-savings-offer.html
澳门新葡京免费开户 | https://1433155.com/fishing-2.html
澳门新葡京免费代理 | https://1433155.com/fishing.html
澳门新葡京试玩账号 | https://1433155.com/fm-casino-fraud.html
澳门新葡京真人网站 | https://1433155.com/fm-comment.html
澳门新葡京真人在线游戏 | https://1433155.com/fm-dragon.html
澳门新葡京真人在线 | https://1433155.com/fm-evaluate-fraud.html
澳门新葡京真人官网 | https://1433155.com/fm-evaluate.html
澳门新葡京真人开户 | https://1433155.com/fm-guaranteed-withdrawal.html
澳门新葡京真人代理 | https://1433155.com/forget-password.html
澳门新葡京真人百家乐 | https://1433155.com/fraud-casino.html
澳门新葡京真人百家乐开户 | https://1433155.com/gamble-law.html
澳门新葡京真人百家乐代理 | https://1433155.com/gambling.html
澳门新葡京真人百家乐游戏 | https://1433155.com/game-tips.html
澳门新葡京真人百家乐官网 | https://1433155.com/gaming-knowledge.html
澳门新葡京娱乐城官方网站 | https://1433155.com/gr-chess.html
澳门新葡京百家乐 | https://1433155.com/gr-fishing.html
澳门新葡京百家乐开户 | https://1433155.com/gr-slot.html
澳门新葡京百家乐代理 | https://1433155.com/house-edge.html
澳门新葡京百家乐官网 | https://1433155.com/how-to-choose-an-online-casino.html
澳门新葡京百家乐游戏 | https://1433155.com/how-to-deposit.html
澳门新葡京百家乐在线 | https://1433155.com/how-to-withdraw.html
澳门新葡京百家乐在线开户 | https://1433155.com/id-personal-security.html
澳门新葡京百家乐在线代理 | https://1433155.com/
新葡京 | https://1433155.com/jiutian-xuannv.html
新葡京真人官方 | https://1433155.com/latest-entertainment-city-news.html
新葡京游戏规则 | https://1433155.com/live-betting.html
新葡京技巧 | https://1433155.com/live-casino.html
新葡京补牌规则 | https://1433155.com/live-score.html
新葡京技巧打法 | https://1433155.com/login-tutorial.html
新葡京公式打法 | https://1433155.com/lottery-compare.html
新葡京开户 | https://1433155.com/lottery-online-vs-store.html
新葡京代理 | https://1433155.com/lottery-ticket.html
新葡京在线 | https://1433155.com/lottery.html
新葡京在线娱乐 | https://1433155.com/machine.html
新葡京官方网 | https://1433155.com/mahjong.html
新葡京AG | https://1433155.com/marketing-chaos.html
新葡京真人免费玩 | https://1433155.com/nba-livebet.html
新葡京真人免费开户 | https://1433155.com/nba-odds.html
新葡京网址 | https://1433155.com/nba-playoffs.html
新葡京娱乐城 | https://1433155.com/nba-sports-betting-options.html
新葡京娱乐开户 | https://1433155.com/ob-game.html
新葡京娱乐代理 | https://1433155.com/ob-real.html
新葡京娱乐官网 | https://1433155.com/ob-sport.html
新葡京官网 | https://1433155.com/offside.html
新葡京在线代理 | https://1433155.com/og-intro.html
新葡京在线开户 | https://1433155.com/online-vs-store-lottery.html
新葡京官方网址 | https://1433155.com/pm-chess.html
新葡京官方开户 | https://1433155.com/pm-fishing-machine.html
新葡京官方代理 | https://1433155.com/pm21bj.html
新葡京官方赌场 | https://1433155.com/pmmahjong.html
新葡京官方娱乐 | https://1433155.com/privacy-policy.html
新葡京娱乐 | https://1433155.com/recommended-slot-games.html
新葡京娱乐场app | https://1433155.com/responsible-betting.html
新葡京博彩官网 | https://1433155.com/rg-slot-fruit.html
新葡京赌场 | https://1433155.com/roulette-game.html
新葡京娱乐场 | https://1433155.com/rsg-fishing.html
新葡京老虎机怎么玩 | https://1433155.com/rsg-game.html
新葡京app | https://1433155.com/rsg-slot-thor.html
新葡京筹码 | https://1433155.com/rsg-slot.html
新葡京棋牌 | https://1433155.com/sa-intro.html
新葡京澳门 | https://1433155.com/slot-godofwealth.html
新葡京国际 | https://1433155.com/slot-machine-online-vs-store.html
新葡京人 | https://1433155.com/slot-machine.html
新葡京 会员 | https://1433155.com/slot-secret-2.html
新葡京赌场会员卡 | https://1433155.com/slotmachine-2.html
新葡京会员卡 | https://1433155.com/soccer-handicap.html
新葡京 香港 | https://1433155.com/sporting-events.html
新葡京 威尼斯 | https://1433155.com/sports-lottery.html
新葡京 威尼斯人 | https://1433155.com/storm-of-seth.html
新葡京 官网 | https://1433155.com/super-lottery-2.html
新葡京logo | https://1433155.com/super-sport.html
新葡京落成 | https://1433155.com/taiwan-casino.html
新葡京老虎機 | https://1433155.com/terms-of-service.html
澳門 新葡京 | https://1433155.com/terms.html
新葡京 poker | https://1433155.com/texas-hold.html
新葡京平台 | https://1433155.com/wbc-champion.html
新葡京体彩投注中心 | https://1433155.com/wbc-list.html
新葡京集团 | https://1433155.com/wbc-os.html
新葡京网站 | https://1433155.com/wbc-rule.html
新葡京网上赌场 | https://1433155.com/wbc-tw.html
新葡京娛樂 | https://1433155.com/wbc2023.html
新葡京怎么玩 | https://1433155.com/weathy.html
新葡京娱乐场 澳门 | https://1433155.com/win539.html
新葡京娱乐城 澳门 | https://1433155.com/wip88.html
新葡京娱乐场 巴士 | https://1433155.com/wm-intro.html
新葡京赌场 会员 | https://1433155.com/word-cup16.html
新葡京赌场 英语 | https://1433155.com/wordcup-nosex.html
澳门新葡京app | https://1433155.com/xinbao-sport.html
新葡京下载 | https://1433155.com/zg-fishing.html
澳门新葡京集团 | https://1433155.com/zg-slot.html
澳门新葡京集团APP | https://1433166.com/2022-fifa-final.html
澳门新葡京娱乐 | https://1433166.com/2022-fifia-2.html
澳门新葡京赌场 | https://1433166.com/2022fifa-betting.html
澳门新葡京官网 | https://1433166.com/2023wbc.html
澳门新葡京网址 | https://1433166.com/2024new-year.html
澳门新葡京博彩 | https://1433166.com/539-tricks.html
澳门新葡京网络赌博平台 | https://1433166.com/539crack.html
澳门新葡京娱乐城 | https://1433166.com/96m.html
澳门新葡京APP | https://1433166.com/about-jhf.html
澳门新葡京集团官网 | https://1433166.com/analysis-of-online-casinos.html
澳门新葡京娱乐开户 | https://1433166.com/app-download.html
澳门新葡京娱乐代理 | https://1433166.com/avia-gaming.html
澳门新葡京网络博彩 | https://1433166.com/baccarat.html
澳门新葡京在线开户 | https://1433166.com/beijing-pk10.html
澳门新葡京在线代理 | https://1433166.com/bng-slot-2.html
澳门新葡京在线官网 | https://1433166.com/bng-slot-diamond.html
澳门新葡京赌博 | https://1433166.com/bng-slot-houyi.html
澳门新葡京在线赌博 | https://1433166.com/bng-slot-jungle.html
澳门新葡京赌博开户 | https://1433166.com/boya-game.html
澳门新葡京赌博代理 | https://1433166.com/bwin-slot-mazu.html
澳门新葡京博彩公司 | https://1433166.com/casino-experience.html
澳门新葡京网址大全 | https://1433166.com/casino-scam.html
澳门新葡京如何开户 | https://1433166.com/casino-term.html
澳门新葡京在线网址 | https://1433166.com/cgh-dragon.html
澳门新葡京娱乐网址 | https://1433166.com/cgh-slot-fruit.html
澳门新葡京博彩网址 | https://1433166.com/chess-casino.html
澳门新葡京博彩开户 | https://1433166.com/contact-us-2.html
澳门新葡京如何代理 | https://1433166.com/contact-us.html
澳门新葡京哪里开户 | https://1433166.com/dg-baccarat-win.html
澳门新葡京官方网址 | https://1433166.com/disclaimer.html
新葡京集团APP | https://1433166.com/discount.html
新葡京洗钱案 | https://1433166.com/e-sports.html
新葡京周焯华 | https://1433166.com/electronic-games.html
新葡京博彩 | https://1433166.com/entertainment-city-faq.html
新葡京网络赌博平台 | https://1433166.com/entertainment-city-guide.html
新葡京APP | https://1433166.com/evaluate.html
新葡京集团官网 | https://1433166.com/farmslot.html
新葡京网络博彩 | https://1433166.com/fishing-2.html
新葡京在线官网 | https://1433166.com/fishing.html
新葡京赌博 | https://1433166.com/forget-password.html
新葡京在线赌博 | https://1433166.com/game-tips.html
新葡京赌博开户 | https://1433166.com/gaming-knowledge.html
新葡京赌博代理 | https://1433166.com/gr-chess.html
新葡京博彩公司 | https://1433166.com/gr-fishing.html
新葡京网址大全 | https://1433166.com/how-to-choose-an-online-casino.html
新葡京如何开户 | https://1433166.com/how-to-deposit.html
新葡京在线网址 | https://1433166.com/how-to-withdraw.html
新葡京娱乐网址 | https://1433166.com/
新葡京博彩网址 | https://1433166.com/latest-entertainment-city-news.html
新葡京博彩开户 | https://1433166.com/live-casino.html
新葡京如何代理 | https://1433166.com/live-score.html
新葡京哪里开户 | https://1433166.com/login-tutorial.html
新葡京app下载 | https://1433166.com/lottery-compare.html
线上新葡京 | https://1433166.com/lottery-online-vs-store.html
线上新葡京开户 | https://1433166.com/lottery-ticket.html
线上新葡京代理 | https://1433166.com/lottery.html
线上新葡京官网 | https://1433166.com/machine.html
线上新葡京娱乐 | https://1433166.com/mahjong-blast.html
新葡京集团老板 | https://1433166.com/mahjong.html
新葡京集团酒店 | https://1433166.com/ob-game.html
新葡京博弈 | https://1433166.com/online-gaming-platform.html
新葡京迪士尼 | https://1433166.com/online-vs-store-lottery.html
新葡京 斗六 | https://1433166.com/pm-chess.html
新葡京股票 | https://1433166.com/pm-fishing-machine.html
新葡京集团股东 | https://1433166.com/pm21bj.html
新葡京集团ptt | https://1433166.com/pmmahjong.html
新葡京集团主席 | https://1433166.com/privacy-policy.html
新葡京品牌 | https://1433166.com/responsible-betting.html
新葡京 ptt | https://1433166.com/rsg-slot-thor.html
新葡京推荐 | https://1433166.com/rsg-slot.html
新葡京体育 | https://1433166.com/slot-godofwealth.html
新葡京娱乐城ptt | https://1433166.com/slot-machine-online-vs-store.html
新葡京娱乐集团 | https://1433166.com/slot-machine.html
新葡京集团 赌场 | https://1433166.com/slot-secret-2.html
新葡京集团app | https://1433166.com/slotmachine-2.html
新葡京集团网址 | https://1433166.com/sporting-events.html
新葡京电子 | https://1433166.com/super-lottery-2.html
新葡京电子游戏 | https://1433166.com/taiwan-casino.html
新葡京电子游戏试玩 | https://1433166.com/terms-of-service.html
新葡京电子游戏官网 | https://1433166.com/texas-hold.html
新葡京在线电子游戏 | https://1433166.com/wbc-champion.html
新葡京棋牌游戏 | https://1433166.com/wbc-list.html
新葡京视讯 | https://1433166.com/wbc-os.html
新葡京彩票游戏 | https://1433166.com/wbc-rule.html
新葡京捕鱼 | https://1433166.com/wbc-tw.html
新葡京捕鱼游戏 | https://1433166.com/wbc2023.html
新葡京电子竞技 | https://1433166.com/weathy.html
新葡京体育开户 | https://1433166.com/word-cup16.html
좋은 글 너무 잘봤습니당~~👍👍👍