Canny Edge Detection with Codes in Python from Scratch
안녕하세요, :)입니다.
사실 저번 포스트를 마지막으로 하려고 했는데, 이 주제를 다루지 않고 떠난다는건 개인적으로 용납이 안되기에.. 써보려 합니다 ㅎㅎ
제가 2021년 3개월간 공부했던 기법 중 예술의 축에 들기로 손에 꼽는 기법입니다. 바로 Canny Edge Detection algorithm인데요, 1986년 John F. Canny에 의해 발명되었습니다. (지금 2021인데.. 얼마나 머리가 좋은 걸까요)
긴 말 없이 바로 시작하겠습니다. 참고로, 이번 포스트는 python 코드와 함께 진행했습니다.
Intro
※ Canny Edge Detection에 관한 설명을 제 깃허브에 한/영 버전으로 적어놓았으니 참고하시길 바랍니다.
 이전의 Sobel, Robert, Prewitt 등등의 edge detection 방식은 사실 단순히 mask 구성의 변화를 통해서 수직 - 수평 검출성 강화 등을 도모한 방식입니다.
그러나, Canny Edge Detection은 다음과 같은 네 단계의 알고리즘으로 구성되어 있습니다.
- 1. Gaussian blurring
- 2. Detect direction and intensity of pixel gradient using Sobel mask
- 3. Non-maximum suppression
- 4. Determine edges using Hysteresis threshold
한글로 바꿔보면,
- 1. 가우시안 블러링을 사용한 노이즈 제거
- 2. 소벨 마스크를 이용한 방향 및 화소 기울기 강도 검출
- 3. 비최대치 억제
- 4. 이력 임계값으로 에지 검출
정도입니다. 이제 각 step을 밟으면서 결과가 어떻게 변화하는지 확인해보겠습니다.
1. 가우시안 블러링을 사용한 노이즈 제거
Edge Detection은 noise에 굉장히 민감합니다. 따라서, noise elimination이 진행되어야 하는데 이는 Gaussian Mask를 사용해서 blur하게 됩니다.
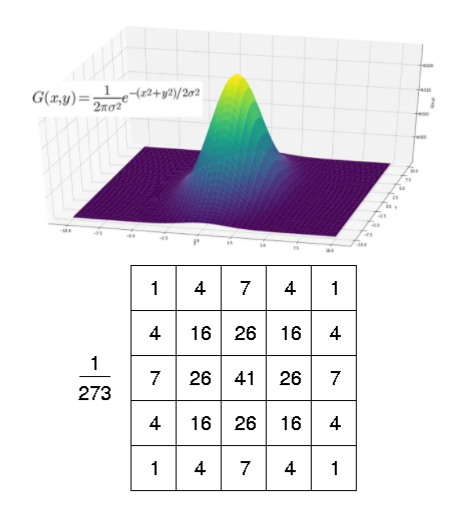
Gaussian Mask 란, 다음과 같이 3차원 Gaussian Distribution의 y값 비율에 맞추어 Mask또한 중심계수를 기준으로 유사하게 구성하여 blur 효과를 갖게되는 mask입니다.
우리의 귀여운 뽀로로를 통해 설명을 하겠습니다 :)
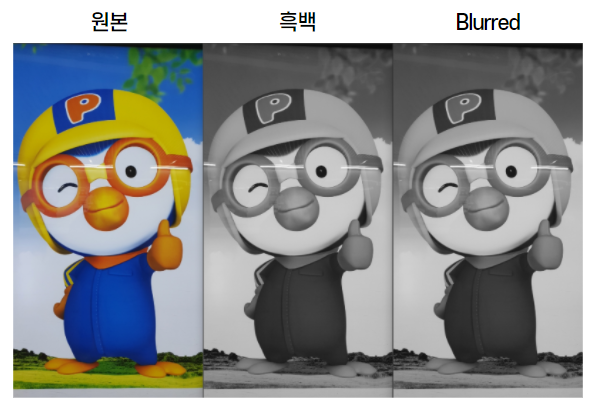 Edge 검출은 흑백 사진에서 이뤄지기 때문에, 우선 흑백사진으로 바꿔줍니다. 그 다음, 5x5 size의 Gaussian Mask를 씌워 blur 했는데요, 생각보다 차이가 없어보이죠?
아마도 사진 크기를 줄이기도 했고, 무엇보다 원래 뽀로로 사진이 매끈해서 noise가 없었다는 점이 이유일 것 같습니다.
Codes
import numpy as np, cv2

image = cv2.imread("images/canny2.jpg", cv2.IMREAD_GRAYSCALE)
if image is None: raise Exception("영상파일 읽기 오류")
image = cv2.resize(image, (321, 600))

gaus_img = cv2.GaussianBlur(image, (5, 5), 0.3)
2. 소벨 마스크를 이용한 방향 및 화소 기울기 강도 검출
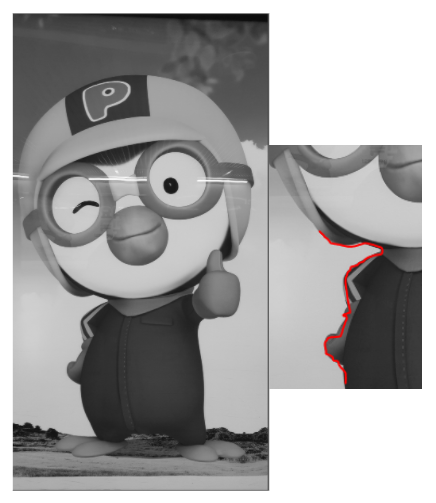 우리는 사진을 보자마자, 흐려진 우리 뽀로로의 우측 어깨선이 edge임을 대번에 알 수 있습니다. 제 컴퓨터에게도 인식시키려면 어떻게 해야할까요?
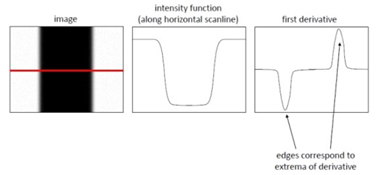
Edge는 결국 화소의 강도가 순간적으로 변하는 지점이기 때문에, 화소 기울기 계산을 통해서 검출하도록 할 수 있습니다.
파란 화살표 부분은 밝은 반면, 민트 화살표 부분은 어둡습니다. 이러한 경계면이 빨간 선을 따라 이어지면서, 인간이 시각적으로 'Edge'라고 인식하게 되는 것입니다.
Canny Edge Detection은 여기에서 Sobel Mask를 사용하는데, 다음 식에 따라서;
x, y방향의 gradient를 종합한 Edge Gradient (=magnitude) 이미지를 만들 수 있습니다.
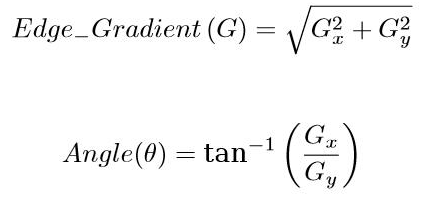
Magnitude image는 다음과 같습니다.
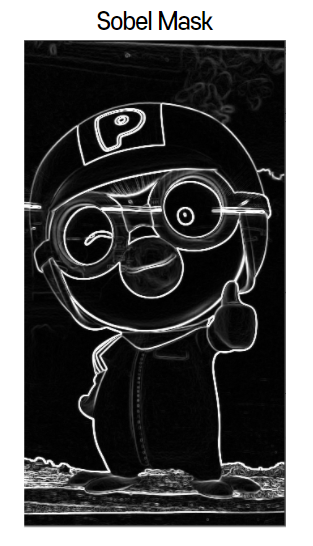 드디어 Edge Detection 티가 조금씩 나기 시작합니다. 가로, 세로 방향의 edges를 꽤나 잘 잡은 모습을 볼 수 있네요 :)
Codes
Gx = cv2.Sobel(np.float32(gaus_img), cv2.CV_32F, 1, 0, 3) # x방향, kernel size = 3
Gy = cv2.Sobel(np.float32(gaus_img), cv2.CV_32F, 0, 1, 3) # y방향, kernel size = 3

sobel = cv2.magnitude(Gx, Gy)
sobel = np.clip(sobel, 0, 255).astype(np.uint8) # Magnitude의 발산을 막아주기 위해 필수
3. 비최대치 억제
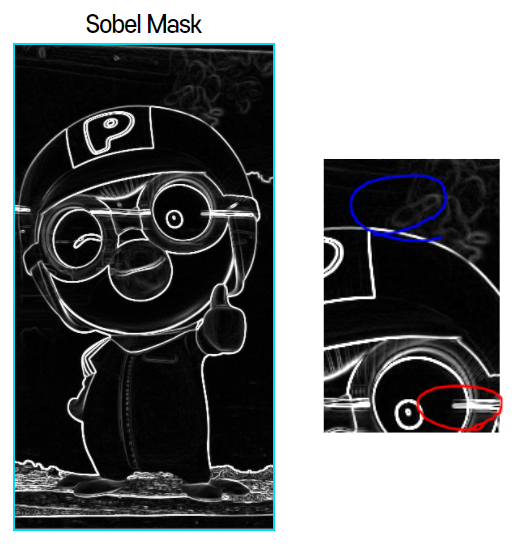 그런데 오른쪽 사진을 보니, 뭔가 선(Edge)들의 두께가 일정하지 않아보입니다. 정확히는, Edge라기엔 뚱뚱한 선들이 조금 많아보입니다.
 분명히 화소가 급격히 변하는 지점은 맨 오른쪽 사진에서처럼 '단 한 군데'일텐데, 저렇게 가끔 두꺼운 선이 나온다는 것은 뭘 의미할까요?
바로 Edge같아보여서 검출했으나, '더 Edge같은 구간'이 옆에 존재하는 상황입니다.
비유하자면, 각 반의 1등만 모이기로 했는데, 1등만큼 똑똑한 2등도 따라와버린 셈입니다.안타깝지만 쳐내야겠죠
비최대치 억제(Non-Maximum Suppression, NMS)라는 이름 그대로입니다. '진짜 화소 강도 차이가 큰 Edge(= 최대치)'를 제외하고는 모두 억제하는 것입니다.
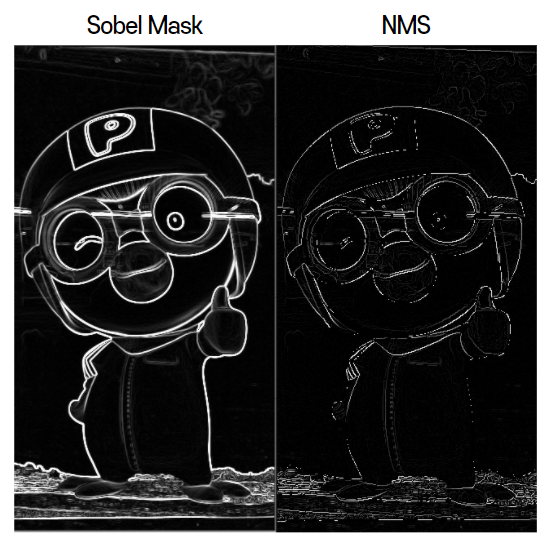 NMS 이후, 얇은 Edge를 제외한 선들이 모두 억제되었습니다.
여기서 "NMS 이전이 결과가 더 좋지 않은가?"라고 생각하실 수 있는데요. 현실의 이미지 다수는 제가 예제로 쓰는 뽀로로처럼 Object / Edge가 명확하지도 않고, noise가 없지도 않습니다.
이를 고려했을 때, 다른 이미지에서는 Edge랍시고 이리저리 두꺼운 선들이 난무할 가능성이 있기 때문에 NMS는 꼭 필요한 과정입니다.
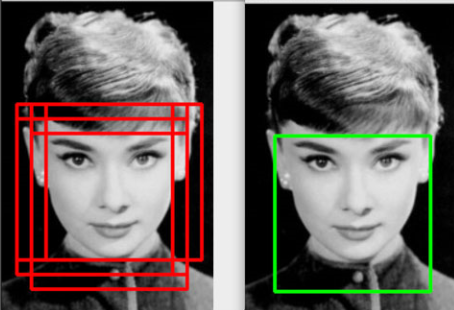
참고로, NMS는 Edge뿐만 아니라 bounding box의 suppression 용도로도 사용됩니다. (YOLO에서 사용됨)
Codes
def nonmax_suppression(sobel, direct):
    rows, cols = sobel.shape[:2]
    dst = np.zeros((rows, cols), np.float32)
    for i in range(1, rows-1):
        for j in range(1, cols-1):
            # 관심 영역 참조 통해 이웃 화소 가져오기
            values = sobel[i-1:i+2, j-1:j+2].flatten()
            first = [3, 0, 1, 2]
            id = first[direct[i, j]]
            v1, v2 = values[id], values[8-id]
            dst[i, j] = sobel[i, j] if (v1 < sobel[i, j] > v2) else 0
    return dst

directs = cv2.phase(Gx, Gy) / (np.pi/4)
directs = directs.astype(int) % 4
max_sobel = nonmax_suppression(sobel, directs)
4. 이력 임계값으로 에지 검출
여전히 부족할 수 있으니, 마지막으로 Hysteresis Thresholding이라는 기법을 사용합니다. 결론부터 말해서, 두 가지 임계값을 정한 뒤, 각 구간에 대한 처리를 다르게 하는 것입니다.
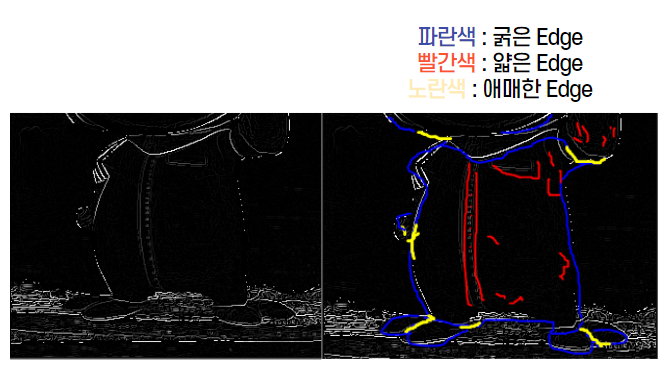
4.1 Double Thresholding
두 개의 임계값을 정하는 과정입니다.
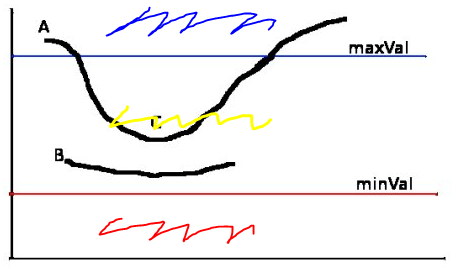 위와 같이 maxVal과 minVal이라는 임계값을 정했을 때
파란색 구간, 노란색 구간그리고 빨간색 구간 총 세 구간으로 나눌 수 있습니다.
파란색 구간은 강한 강도의 Edge이기 때문에 살릴 것이고,
빨간색 구간은 약한 강도의 Edge이기 때문에 버릴 것이며,
노란색 구간은 애매한 강도의 Edge이기 때문에 '상황을 봐서' 결정할 것입니다.
'상황을 봐서'란, 노란색 구간이 파란색 구간의 Edge와 붙어있는 경우 연결되도록 두고, 빨간색 구간의 Edge와 붙어있거나 홀로 존재하는 경우에는 버리는 것입니다.
B와 C는 똑같이 노란색 구간에 있으나, B는 maxVal 위의 Edge와 연결되지 않고 홀로 존재하기 때문에 버려집니다. 반면, C는 A라는 파란색 구간에 있는 Edge와 연결되어 있기 때문에 살려두게 됩니다.
4.2 Edge Tracking by Hysteresis
 이제 위에서 thresholding했던 대로 Edge를 tracking하는 과정을 거치면!
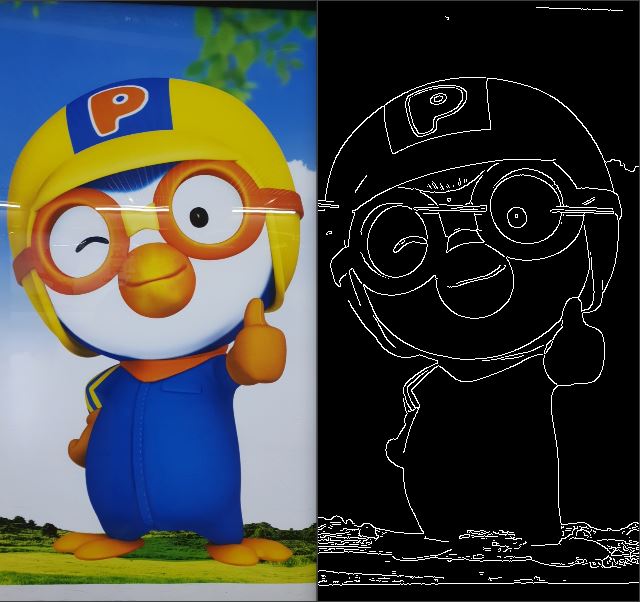
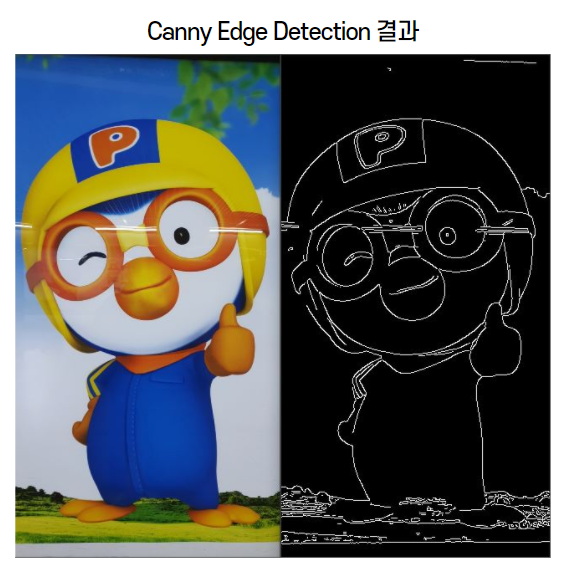
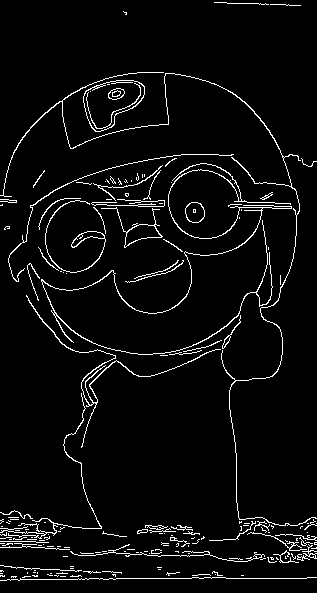 이처럼 매우 깔끔하게 Edge를 detect할 수 있습니다.
※마지막 사진은 결과를 명확히 보이기 위해서 opencv의 Canny Edge library 함수를 사용한 결과 사진입니다.
Codes
def trace(max_sobel, i, j, low):
    h, w = max_sobel.shape
    if (0 <= i < h and 0 <= j < w) == False: return
    if pos_ck[i, j] > 0 and max_sobel[i, j] > low:
        pos_ck[i, j] = 255
        canny[i, j] = 255

        trace(max_sobel, i-1, j-1, low)
        trace(max_sobel, i, j-1, low)
        trace(max_sobel, i+1, j-1, low)
        trace(max_sobel, i-1, j, low)
        trace(max_sobel, i+1, j, low)
        trace(max_sobel, i-1, j+1, low)
        trace(max_sobel, i, j+1, low)
        trace(max_sobel, i+1, j+1, low)

def hysteresis_th(max_sobel, low, high):
    rows, cols = max_sobel.shape[:2]
    for i in range(1, rows-1):
        for j in range(1, cols-1):
            if max_sobel[i, j] >= high: trace(max_sobel, i, j, low)

hysteresis_th(max_sobel, 100, 150)
Summary
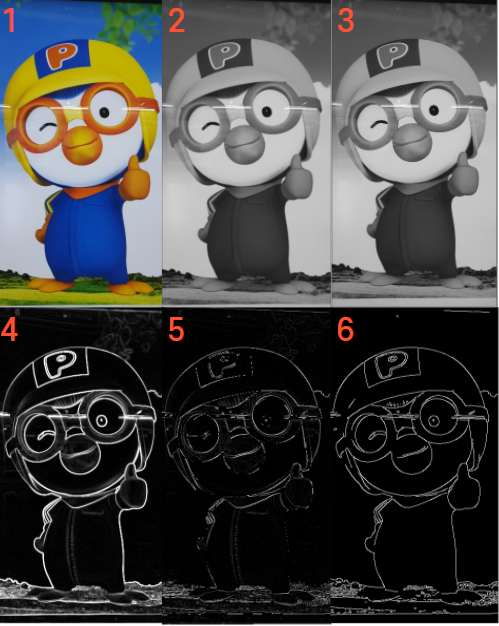
1 : 원본
2 : 흑백
3 : Gaussian blurred
4 : Edge detected using Sobel mask
5 : Non-Maximum Suppression
6 : Hysteresis Thresholding
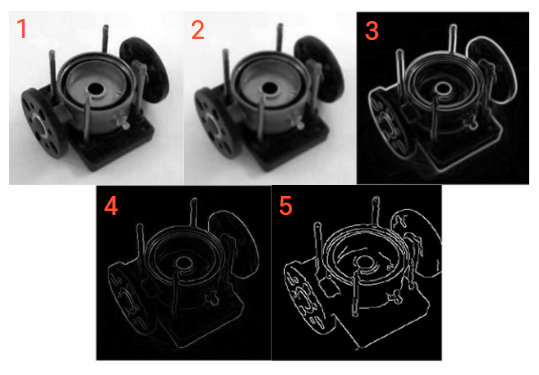 1 : 원본
2 : Gaussian blurred
3 : Edge detected using Sobel mask
4 : Non-Maximum Suppression
5 : Hysteresis Thresholding
Full Codes
import numpy as np, cv2

def nonmax_suppression(sobel, direct):
    rows, cols = sobel.shape[:2]
    dst = np.zeros((rows, cols), np.float32)
    for i in range(1, rows-1):
        for j in range(1, cols-1):
            # 관심 영역 참조 통해 이웃 화소 가져오기
            values = sobel[i-1:i+2, j-1:j+2].flatten()
            first = [3, 0, 1, 2]
            id = first[direct[i, j]]
            v1, v2 = values[id], values[8-id]

            # # if문으로 이웃 화소 가져오기
            # if direct[i, j] == 0:
            #     v1, v2 = sobel[i, j-1], sobel[i, j+1]
            # if direct[i, j] == 1:
            #     v1, v2 = sobel[i-1, j-1], sobel[i+1, j+1]
            # if direct[i, j] == 2:
            #     v1, v2 = sobel[i-1, j], sobel[i+1, j]
            # if direct[i, j] == 3:
            #     v1, v2 = sobel[i+1, j-1], sobel[i-1, j+1]

            # dst[i, j] = sobel[i, j] if (v1 < sobel[i, j]) & (v2 < sobel[i, j]) else 0
            dst[i, j] = sobel[i, j] if (v1 < sobel[i, j] > v2) else 0
    return dst

def trace(max_sobel, i, j, low):
    h, w = max_sobel.shape
    if (0 <= i < h and 0 <= j < w) == False: return
    if pos_ck[i, j] > 0 and max_sobel[i, j] > low:
        pos_ck[i, j] = 255
        canny[i, j] = 255

        trace(max_sobel, i-1, j-1, low)
        trace(max_sobel, i, j-1, low)
        trace(max_sobel, i+1, j-1, low)
        trace(max_sobel, i-1, j, low)
        trace(max_sobel, i+1, j, low)
        trace(max_sobel, i-1, j+1, low)
        trace(max_sobel, i, j+1, low)
        trace(max_sobel, i+1, j+1, low)

def hysteresis_th(max_sobel, low, high):
    rows, cols = max_sobel.shape[:2]
    for i in range(1, rows-1):
        for j in range(1, cols-1):
            if max_sobel[i, j] >= high: trace(max_sobel, i, j, low)

image = cv2.imread("images/canny2.jpg", cv2.IMREAD_GRAYSCALE)
image = cv2.resize(image, (321, 600))

image_c = cv2.imread("images/canny2.jpg", cv2.IMREAD_COLOR)
image_c = cv2.resize(image_c, (321, 600))
cv2.imshow("color", image_c)

if image is None: raise Exception("영상파일 읽기 오류")

pos_ck = np.zeros(image.shape[:2], np.uint8)
canny = np.zeros(image.shape[:2], np.uint8)

# 캐니 에지 검출
gaus_img = cv2.GaussianBlur(image, (5, 5), 0.3)
cv2.imshow("gaussian", gaus_img)
Gx = cv2.Sobel(np.float32(gaus_img), cv2.CV_32F, 1, 0, 3)
Gy = cv2.Sobel(np.float32(gaus_img), cv2.CV_32F, 0, 1, 3)

# Gx = cv2.convertScaleAbs(Gx)
# Gy = cv2.convertScaleAbs(Gy)

sobel = cv2.magnitude(Gx, Gy)
sobel = np.clip(sobel, 0, 255).astype(np.uint8)
print(f"<sobel>\n화소값 총합 : {cv2.sumElems(sobel)} \n화소 최대값 : {np.max(sobel)} \n화소 최소값 : {np.min(sobel)} \n행렬 형태 : {sobel.shape}")

directs = cv2.phase(Gx, Gy) / (np.pi/4)
directs = directs.astype(int) % 4
max_sobel = nonmax_suppression(sobel, directs)
max_sobel = max_sobel.astype(np.uint8)
print(f"<max_sobel>\n화소값 총합 : {cv2.sumElems(max_sobel)} \n화소 최대값 : {np.max(max_sobel)} \n화소 최소값 : {np.min(max_sobel)} \n행렬 형태 : {max_sobel.shape}")

cv2.imshow("nonmax_suppression", max_sobel)
# cv2.waitKey(0)

print(sobel >= max_sobel)
checker = sobel >= max_sobel
unique, counts = np.unique(checker, return_counts=True)
checker = dict(zip(unique, counts))
print(checker)

m = 0
n = 0
print(f"sobel의 화소값 : {sobel[m, n]} \nmax_sobel의 화소값 : {max_sobel[m, n]}")

##################
nonmax = max_sobel.copy()


hysteresis_th(max_sobel, 100, 150)

print(nonmax)
print(max_sobel)
print(nonmax == max_sobel)

canny = max_sobel.copy()
canny2 = cv2.Canny(image, 100, 150)

cv2.imshow("image", image)
cv2.imshow("sobel", sobel)
cv2.imshow("canny", canny)
cv2.imshow("OpenCV_Canny", canny2)
cv2.waitKey(0)
후기
1월에 영상처리 책의 CHAPTER 7을 읽던 도중 알게 되었던 기법입니다.
정말.. 제대로 이해하고 싶어서 온갖 자료를 다 헤집고 밤을 새서 깃허브에 정리해놨던 기억이 있네요.
지금에 와서야 SOTA는 아닐 수도 있지만, 여전히 제 마음속에선 SOTA 중 SOTA입니다.
사실 가장 중요한 8방향 추적 (NMS 中)에 대한 자세한 설명을 생략했는데요, 입대를 3일 앞둔 시점이라 깔끔하게 서술할 자신이 없어 제대로 못할 바에는 미래의 나에게 맡기자는 심정으로 건너뛰게 되었습니다.
다음에 뵙겠습니다. 긴 글 읽어주셔서 감사합니다!
Reference
안녕하세요 영상처리에 관심이 많은 대학생입니다. 소중한 자료를 잘 보았습니다. hysteresis thresholding을 직접 코드로 만드는 것이 아주 공부가 많이 됐습니다. 하지만 궁금한 점이 생겼습니다. trace 함수에서 pos_ck[i, j] > 0 인 경우는 일어나지 않는거 아닌가요? 2차원 0배열로 만들었고 변화를 주지 않은 것 같아서요. 따라서 trace를 해도 원본이 그대로 나올 것 같습니다.