Memory allocation (메모리 할당), references (참조), pointers to members,
switch
Memory allocation
C++은 세 가지 기본 타입의 메모리 할당을 지원한다.
1. 정적 메모리 할당(static memory allocation) : 정적 변수와 전역변수에 대해 발생한다. 이러한 타입의 변수에 대한 메모리는 프로그램이 실행될 때 한 번 할당되며, 프로그램 수명 내내 지속한다.
2. 자동 메모리 할당(auto memory allocation) : 함수 매개 변수와 지역 변수에 대해 발생한다. 이러한 타입의 변수에 대한 메모리는 관련 블록을 입력할 때 할당되고, 블록을 종료할 때 필요에 따라 여러 번 해제된다.
3. 동적 메모리 할당(dynamic memory allocation) : 이 포스트의 주제다.
c언어에서는 malloc, calloc을 통해 메모리를 할당했다면, c++에서는 new를 통해서 메모리를 할당할수 있다.
형식
::(optional) new (placement_params)(optional) ( type ) initializer(optionalnew int(*[10])(); // error: parsed as (new int) (*[10]) ()
new (int (*[10])()); // okay: allocates an array of 10 pointers to functionsdouble* p = new double[]{1,2,3}; // creates an array of type double[3]
auto p = new auto('c'); // creates a single object of type char. p is a char*
auto q = new std::integral auto(1); // OK: q is a int*
auto q = new std::floating_point auto(true) // ERROR: type constraint not satisfied
auto r = new std::pair(1, true); // OK: r is a std::pair<int, bool>*
auto r = new std::vector; // ERROR: element type can't be deduced위와같이 새롭게 선언해서 할당할수 있다.
malloc 과 new 차이.
- malloc 은 할당할 사이즈를 정확히 넣어주어야한다.
- new는 자료형과 초기화 시킬 값들을 넣어주면 알아서 사이즈에 맞게 할당해준다.
- malloc은 realloc이라는 기능이 있어서 재할당이 가능하다. new 는 재할당 기능이없다. 재할당이 번번한 작업이라면 malloc을 쓴단다.
- new는 클래스를 생성할때 생성자 기능이 있다.
참조형 변수 (Reference variable)
지난 시간에 했다. 생략
pointers to members
c언어에서 함수의 주소를 대입할때 아래와 같이 선언하고 사용하는 방법이 있었다.
void pr(){...}

int main()

{

    void(*p)();        // 함수포인터 선언

선언
#1    p = pr;              // 맞음

#2    p = ≺            // 맞음

사용
#1    p()                   // 맞음

#2    (*p)();              // 맞음

}
이번시간에는 c++에서 처음 배운, 멤버함수를 포인터로 사용하는 방법에 대해 정리 해보겠습니다.
위에서 사용한 pr의 경우 일반 함수였지만, 만약 pr이 멤버 함수였다면?
void Tipsware::pr(){...}
int main()
{
	Tipwsware tw;
   void(Tipsware::*p) = &Tipsware::Pr;
   //void(Tipsware::*p) = Tipsware::Pr; // c++에서는 함수 주소를 함수 포인터에 대입할때 &를 생략하는걸 허용하지 않는다. 그래서 에러가 난다고 합니다.

   사용
   tw.*p(5); // 이런식으로 사용하면된다.
}
클래스의 멤버함수는 객체와 상관없이 주소가 하나다. 어떤 객체든 같은 함수를 사용하기 때문이다. (하나의 코드영역)
멤버함수는 객체의 용량을 차지하지 않는다. 코드영역에 메모리로 존재한다.
멤버변수가 없이 멤버함수만 있는 클래스 객체의 크기는 1바이트이다.
this 쓰는 이유
멤버객체 const
class X {
private:
  int a;
public:
  void f(int b) {
		a = b;
  }
  void s(int b) const {
		a = b;
  }
};
X라는 클래스 안에 f라는 함수와 s라는 함수가 있다.
두 함수의 차이는 const이다.
두개는 어떻게 다를까?
알다 시피 클래스 맴버 객체에는 this 포인터가 생략되어잇다.
public:
  void f(int b) {
		this->a = b;
  }
이런식으로 위의 f함수는 this가 들어있다. 그런데, s함수의 경우 뒤에 const가 붙었는데, 이건, this를 const형으로 사용하겠다는 의미다.
고로 s 함수인,
  void s(int b) const {
		this->a = b;
이지만, this가 const이므로 값을 변환 시킬수 없다. 고로 위의 코드는 에러가 난다.
상속
상속이 필요한 이유.
class test
{
	private :
   	int tmp;
   public :
   	void play(int parm_data)
       {
       	tmp = parm_data;
       }
}

class test2
{
	private :
   	int tmp;
   public :
   	void play(int parm_data)
       {
       	if(parm_data < 0) parm_data = parm_data * - 1;
       	tmp = parm_data;
       }
}

void main ()
{
	test a;
   test2 a2;

   a.play(-1);
   a2.play(-1);
}
위와같이 play라는 내용이 중복되는 부분이 많은 코드임에도 이를 달리해주기 위해서 새로운 클래스를 만들어 주어야했다.
test2에서 test의 play를 불러와 사용함.
이러한 중복되는 코드들을 최대한 줄이고자 cpp에서는 상속의 개념이 존재한다.
 class test
 {
 	protected :
    	int tmp;
    public :
    	void paly(int parm_data)
        {
        	tmp = parm_data;
        }
 }

 class test2 : public test
 {
    public :
    	void paly(int parm_data)
        {
        	if(parm_data < 0) parm_data = parm_data * - 1;
              test::play(parm_data);
        }
 }

 void main ()
 {
 	test a;
    test2 a2;

    a.play(-1);
    a2.play(-1);
 }
위에서 보면, test2 클래스를 선언할떄 : public test를 추가 해 준었다. 이러면 public한 데이터들을 상속해서 사용할수 있다.
그 후 이전과 다르게 test2에서 똑같은 함수를 만들 필요없이, 부모에 있던 함수를 호출해서 사용하면 똑같은 코드를 작성하지 않아도 된다. (test::play(parm_data);)
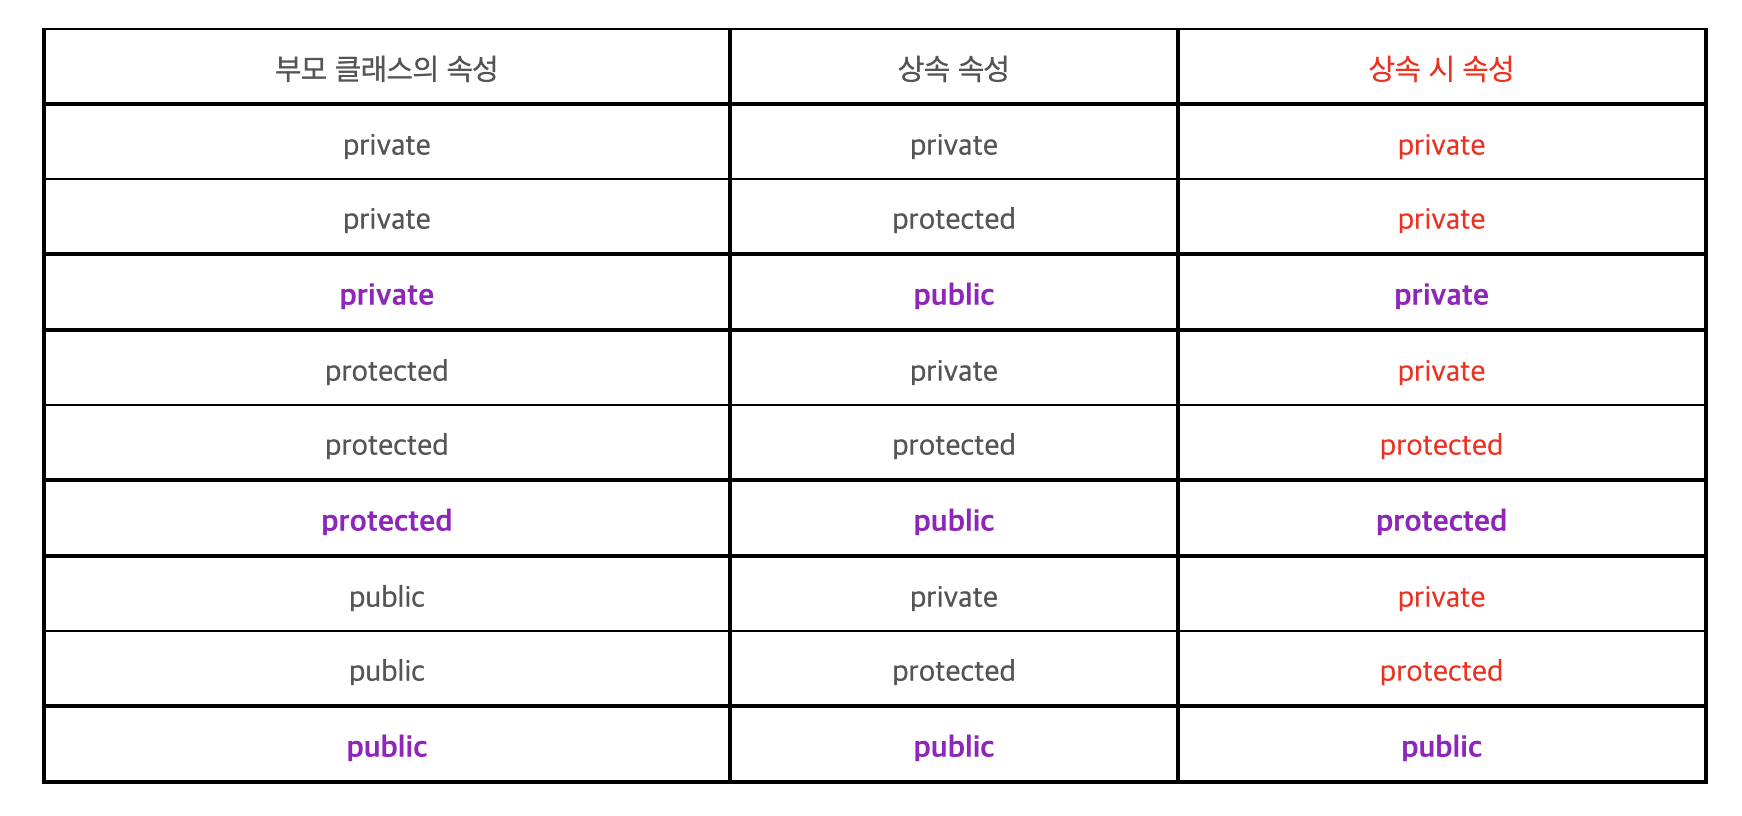
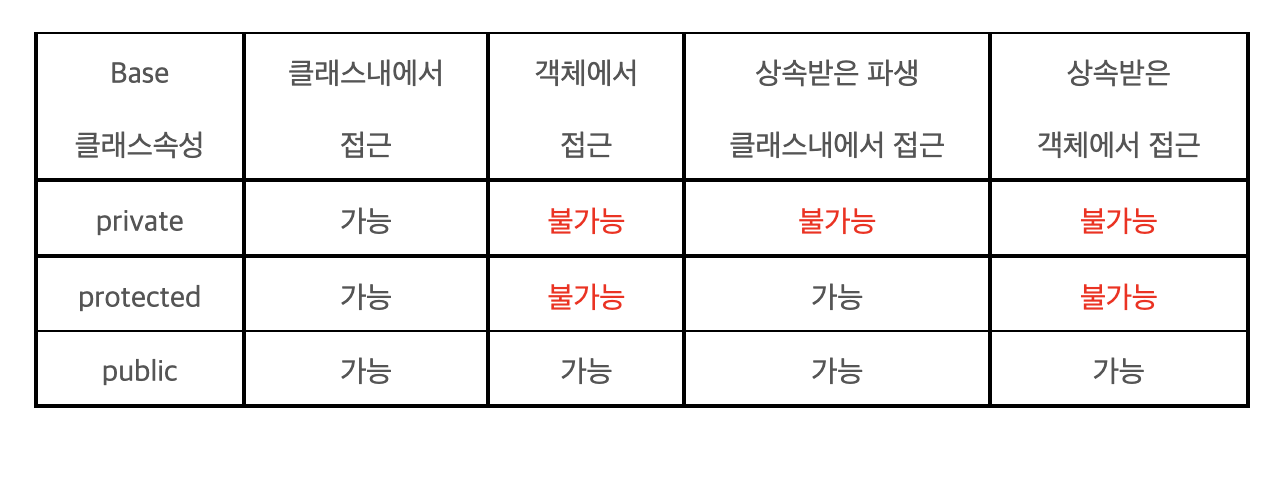
클래스에서 접근권한자가 3가지가 있는데, public, private, protected
public과 protected 는 상속받은 자식에서 부모로 접근이 가능하고,
private는 자식에서 부모로 접근 불가능하다.
protected와 private는 나머지는 똑같이 작동한다.
public이 자식으로 상속되면, protected성격으로 상속된다.
상속2
상속을 받을때 상속권한을 제한하여, 어떤식으로 상속받을지 정할수 있다.
 class test
 {
 	private:
    	int tmp1;
 	protected :
    	int tmp2;
	public :
    	int tmp3
}

 class test2 : public test
 {
 	tmp1 = 1; //private는  상속에서 사용불가.
    tmp2 = 1; // protected 는 protected로 사용가능
    tmp3 = 1; // public 는 public로 사용가능
    }
class test
{
private:
int tmp1;
protected :
int tmp2;
public :
int tmp3
}
class test2 : protected test
{
tmp1 = 1; //private는 상속에서 사용불가.
tmp2 = 1; // protected 는 protected로 사용가능
tmp3 = 1; // public 는 protected로 사용가능
} class test
{
private:
int tmp1;
protected :
int tmp2;
public :
int tmp3
}
class test2 : private test
{
tmp1 = 1; //private는 상속에서 사용불가.
tmp2 = 1; // protected 는 private로 사용가능
tmp3 = 1; // public 는 private로 사용가능switch
  switch(x)
  {
  	case 0:
  		cout << "Zero";
  	case 1:
  		cout << "One";
  	case 2:
  		cout << "Two";
이런식으로 사용할수 있고, 주의 할점은 switch문은 저중 하나가 실행된다고 if~else문처럼 끝나는게 아니라, case 0 이 실행되었더라도 case 2까지 모두 비교해보고 일치하는게 있으면 추가적으로 실행 없으면 끝낸다.
동적할당 예시
Zombie *first = new Zombie[N];N개 만큼 Zombie자료형을 생성.
지울 때 는
delete [] first;참조와 포인터의 차이.
  5     std::string str;
  6     str = "HI THIS IS BRAIN";
  7     std::string *stringPTR = &str;
  8     std::string &stringREF = str;
둘 다 똑같이 주소를 stringPTR, stringREF 에 넣게 되지만 사용법이 다르고, stringPTR은 추가적으로 자기자신의 주소도 포함하여 저장해야한다.
초기화 리스트(Member Initialization List)
  3 HumanA::HumanA ( std::string name, Weapon &club ) : C(club)
  4 {
  5     HumanA::name = name;
  6 }
생성자에선, ": C(club)"형태로 초기화리스트를 사용할수 잇는데, 생성자에서 인스턴스를 생성할때, C를 (club)형태로 생성할 수 있다.
iostream, ofstream
Input file stream : 파일로 부터 어떠한 것들을 가지고와서 프로그램에 입력할 수 있게 도와주는 클래스입니다.
Ouput file stream : 파일에 어떠한 것들을 가지고가 입력하는 것을 도와주는 클래스.
이 클래스의 객체는파일버프객체를 내부 스트림 버퍼 로 사용하여 연결된 파일(있는 경우)에 대해 입력/출력 작업을 수행합니다.
https://www.cplusplus.com/reference/fstream/ifstream/?kw=ifstream
if문없이 조건 처리
 28 void    karen::complain( std::string level )
 29 {
 30     void    (karen::*exec_func)(void);
 31
 32     exec_func = &karen::nothing;
 33     (!level.compare("DEBUG") && (exec_func = &karen::debug));
 34     (!level.compare("INFO") && (exec_func = &karen::info));
 35     (!level.compare("WARNING") && (exec_func = &karen::warning));
 36     (!level.compare("ERROR") && (exec_func = &karen::error));
 37     (this->*exec_func)();
 38 }
이런게 과제에 왜 있었을까?? 잘 모르겠지만.. 쨋든 if문 없이, 이런식으로 compare함수를 통해 비교하고 작동하게 만들었다.
switch case
 21     switch(i)
 22     {
 23         case 4:
 24             std::cout << "[ Probably complaining about insignificant     problems ]" << std::endl;
 25             break;
 26         case 0:
 27             test.complain( "DEBUG" );
 28         case 1:
 29             test.complain( "INFO" );
 30         case 2:
 31             test.complain( "WARNING" );
 32         case 3:
 33             test.complain( "ERROR" );
 34     }
위 처럼 switch문을 이용해, 조건들을 if문과 조금 다른 방법으로 처리하는 걸 배웠다.
