이 게임의 핵심은 백그라운드 재생이다
내가 원하는 백그라운드 재생을 위한 처음 생각했던 조건은 크게 2가지다
- 게임 화면이 없는 부분은 투명해지고 모니터 화면이 클릭이 되어야 한다
- 게임이 아닌 모니터 내에서 타이핑을 해도 게임에서 반응이 와야한다
우선 1번 로직은 세팅법이 몇 가지 필요하다
유니티부터 세팅하자면 2가지의 설정이 필요하다
- 카메라 설정
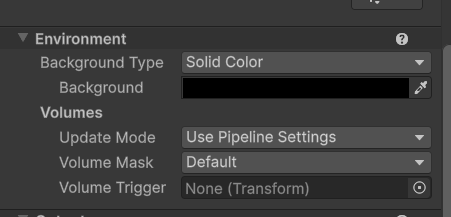
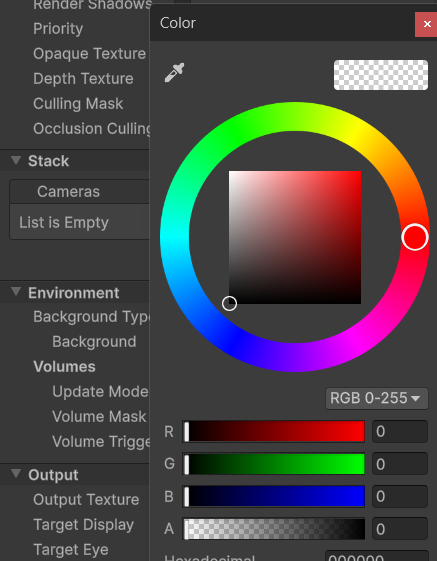
카메라에서 백그라운드 타입을 Sloid Color로 하고 백그라운드를 투명하게 해야한다, 사실 기본적으로 이렇게 되어있는데 꼭 확인해보아야한다
- 프로젝트 세팅 설정
Edit -> Project Setting -> Resolution and Presentation
탭에서 2가지를 설정해야 한다
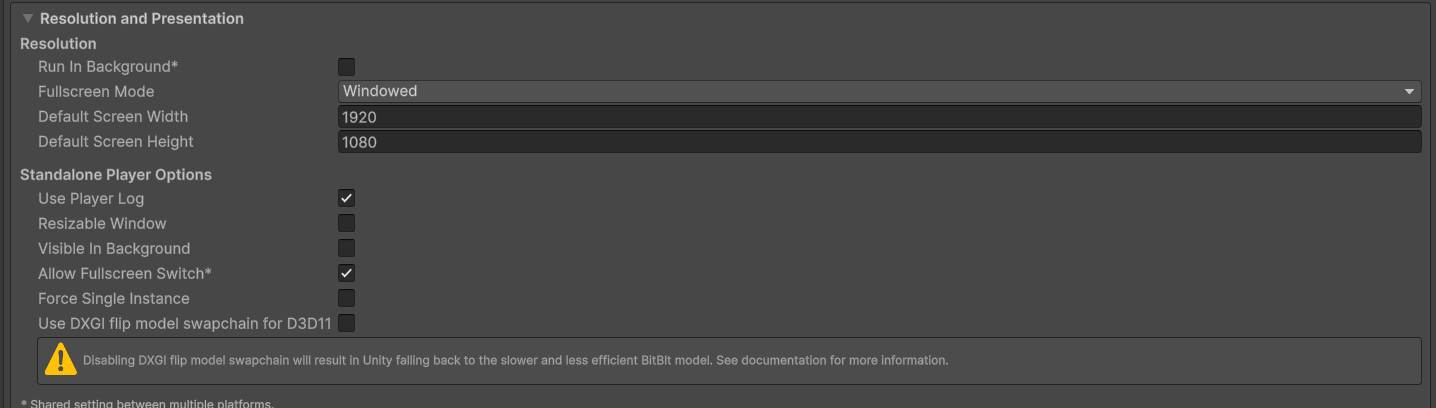
1. Fullscreen mode : Windowed으로 설정해야 한다
2. Use DXGI 탭 : 체크를 해제해야 한다
그러나 필자는 유니티 6.2를 쓰고 있는데 이 때문에 추가적인 설정을 해주어야 했다
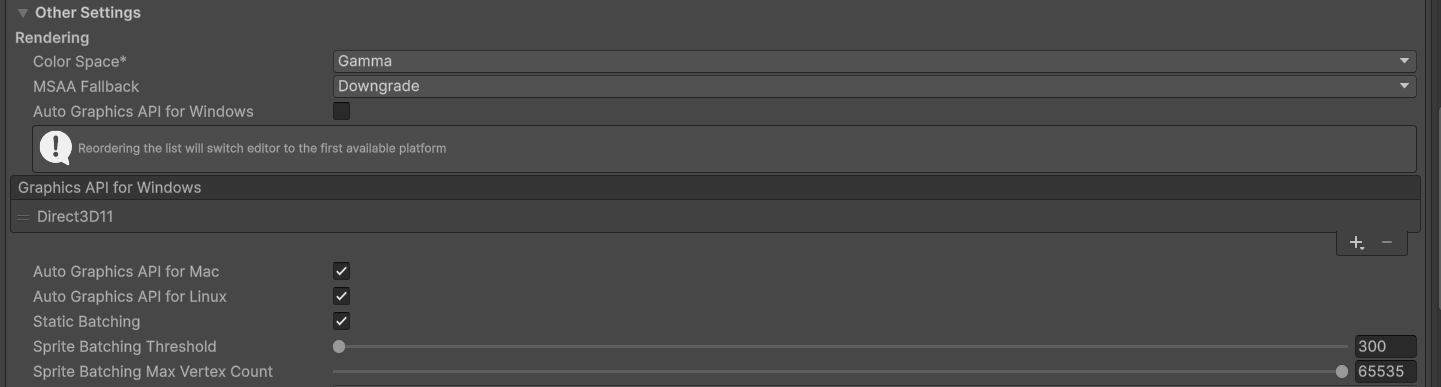
Auto Graphics API For Windows를 끄면 Direct3D11, Directd3D12 2개가 나오는데 이 중에서 12를 삭제해야 한다
그 후 Color Space를 Gamma로 바꿔주면 원할하게 세팅할 수 있다
이렇게 되면 유니티 내 설정은 마무리가 되고 코드로 짜주어야 하는데 그 전에 내가 이 게임을 만들면서 생긴 여러 가지 이슈에 대해 적어보면서 이를 해결한 법에 대해 적어보려고 한다
- 듀얼 모니터 내 상호작용
- 듀얼 모니터의 화면 해상도가 다를 때 대응법
- 모니터 내 타이핑 상호작용 꼬임 이슈
- 게임과 모니터 사이의 마우스 인식 로직
- 태스크바 가림 이슈
이 모든걸 적용한 코드를 미리 적어두고 아래에 이슈들에 대한 해결책을 알려주도록 하겠다
using System;
using System.Collections;
using System.Runtime.InteropServices;
using UnityEngine;
using UnityEngine.EventSystems;
using UnityEngine.InputSystem; // [중요] New Input System 네임스페이스 추가

public class WindowClickThrough : MonoBehaviour
{
    private struct MARGINS { public int cxLeftWidth; public int cxRightWidth; public int cyTopHeight; public int cyBottomHeight; }

    [DllImport("user32.dll")] private static extern IntPtr GetActiveWindow();
    [DllImport("user32.dll", EntryPoint = "SetWindowLongPtr")] private static extern IntPtr SetWindowLongPtr(IntPtr hWnd, int nIndex, IntPtr dwNewLong);
    [DllImport("user32.dll", EntryPoint = "GetWindowLongPtr")] private static extern IntPtr GetWindowLongPtr(IntPtr hWnd, int nIndex);
    [DllImport("Dwmapi.dll")] private static extern uint DwmExtendFrameIntoClientArea(IntPtr hWnd, ref MARGINS margins);
    [DllImport("user32.dll", SetLastError = true)] private static extern bool SetWindowPos(IntPtr hWnd, IntPtr hWndInsertAfter, int X, int Y, int cx, int cy, uint uFlags);
    [DllImport("user32.dll")] private static extern bool GetWindowRect(IntPtr hWnd, out RECT lpRect);

    [StructLayout(LayoutKind.Sequential)]
    public struct RECT
    {
        public int Left;
        public int Top;
        public int Right;
        public int Bottom;
    }

    const int GWL_STYLE = -16;
    const int GWL_EXSTYLE = -20;
    const uint WS_POPUP = 0x80000000;
    const uint WS_VISIBLE = 0x10000000;
    const uint WS_EX_LAYERED = 0x00080000;
    const uint WS_EX_TRANSPARENT = 0x00000020;
    static readonly IntPtr HWND_TOPMOST = new IntPtr(-1);
    const uint SWP_NOSIZE = 0x0001;
    const uint SWP_NOMOVE = 0x0002;
    const uint SWP_NOZORDER = 0x0004;
    const uint SWP_SHOWWINDOW = 0x0040;
    const uint SWP_FRAMECHANGED = 0x0020;

    private IntPtr _hWnd;
    private bool _isClickThrough = false;

    // DPI Awareness
    [DllImport("user32.dll")] private static extern bool SetProcessDpiAwarenessContext(IntPtr value);
    private static readonly IntPtr DPI_AWARENESS_CONTEXT_PER_MONITOR_AWARE_V2 = new IntPtr(-4);

    // Monitor API
    delegate bool MonitorEnumDelegate(IntPtr hMonitor, IntPtr hdcMonitor, ref RECT lprcMonitor, IntPtr dwData);
    [DllImport("user32.dll")]
    private static extern bool SetForegroundWindow(IntPtr hWnd);

    [DllImport("user32.dll")]
    private static extern bool EnumDisplayMonitors(IntPtr hdc, IntPtr lprcClip, MonitorEnumDelegate lpfnEnum, IntPtr dwData);
    [DllImport("user32.dll")] private static extern bool GetMonitorInfo(IntPtr hMonitor, ref MONITORINFO lpmi);

    [StructLayout(LayoutKind.Sequential)]
    public struct MONITORINFO
    {
        public int cbSize;
        public RECT rcMonitor;
        public RECT rcWork;
        public uint dwFlags;
    }

    private void Awake()
    {
        // [DPI 설정] Windows 10 (1703+) 이상에서 동작. 구버전에서는 무시됨.
        try {
            SetProcessDpiAwarenessContext(DPI_AWARENESS_CONTEXT_PER_MONITOR_AWARE_V2);
        } catch { /* 구버전 윈도우 호환성 처리: 무시 */ }
    }

    IEnumerator Start()
    {
        Screen.fullScreenMode = FullScreenMode.Windowed;
        Application.runInBackground = true;

        if (Camera.main != null)
        {
            Camera.main.clearFlags = CameraClearFlags.SolidColor;
            Camera.main.backgroundColor = Color.clear;
            Camera.main.allowHDR = false;
        }

        yield return null;

        _hWnd = GetActiveWindow();
        SetupWindowTransparency();

        // 초기 시작 시 기본 모니터 설정 (0번 모니터로 이동)
        MoveToMonitor(0);

        _isClickThrough = false;
    }

    // [Fix] 투명창 설정이 풀리는 현상 방지를 위해 별도 메소드로 분리
    private void SetupWindowTransparency()
    {
        MARGINS margins = new MARGINS { cxLeftWidth = -1 };
        DwmExtendFrameIntoClientArea(_hWnd, ref margins);

        SetWindowLongPtr(_hWnd, GWL_STYLE, new IntPtr(WS_POPUP | WS_VISIBLE));
        SetWindowLongPtr(_hWnd, GWL_EXSTYLE, new IntPtr(WS_EX_LAYERED));

        // [Fix] 스타일을 강제로 리셋했으므로, 내부 상태 변수도 '클릭 투과 아님(Interactive)'으로 동기화해야
        // 다음 프레임에 SetClickThrough가 정상적으로 작동함.
        _isClickThrough = false;
    }

    [DllImport("user32.dll")] private static extern short GetAsyncKeyState(int vKey);
    private const int VK_1 = 0x31;
    private const int VK_2 = 0x32;

    void Update()
    {
        // 1번, 2번 키로 모니터 이동
        // Input.GetKeyDown은 포커스가 없으면 작동하지 않으므로 CheckGlobalInput으로 대체하거나
        // 여기서는 간단히 GetAsyncKeyState 사용 (KeyboardStackManager와 별개로 창 이동용)

        // 1번 키 (Top numeric)
        bool key1State = (GetAsyncKeyState(0x31) & 0x8000) != 0;
        if (key1State && !_key1Pressed)
        {
            MoveToMonitor(0);
        }
        _key1Pressed = key1State;

        // 2번 키
        bool key2State = (GetAsyncKeyState(0x32) & 0x8000) != 0;
        if (key2State && !_key2Pressed)
        {
            MoveToMonitor(1);
        }
        _key2Pressed = key2State;


        // 매 프레임 마우스 위치에 따라 클릭 투과 여부 결정
        CheckInteractive();
    }

    private bool _key1Pressed = false;
    private bool _key2Pressed = false;

    private void MoveToMonitor(int monitorIndex)
    {
        var monitors = new System.Collections.Generic.List<MONITORINFO>();

        EnumDisplayMonitors(IntPtr.Zero, IntPtr.Zero,
            (IntPtr hMonitor, IntPtr hdcMonitor, ref RECT lprcMonitor, IntPtr dwData) =>
            {
                MONITORINFO mi = new MONITORINFO();
                mi.cbSize = Marshal.SizeOf(mi);
                if (GetMonitorInfo(hMonitor, ref mi))
                {
                    monitors.Add(mi);
                }
                return true;
            }, IntPtr.Zero);

        if (monitorIndex >= 0 && monitorIndex < monitors.Count)
        {
            MONITORINFO targetMonitor = monitors[monitorIndex];

            // [수정] rcMonitor(전체 화면) 대신 rcWork(작업 영역, 태스크바 제외)를 사용하여
            // 윈도우가 태스크바를 가리지 않도록 조정합니다.
            int width = targetMonitor.rcWork.Right - targetMonitor.rcWork.Left;
            int height = targetMonitor.rcWork.Bottom - targetMonitor.rcWork.Top;

            // 윈도우 이동 및 크기 조정
            SetWindowPos(_hWnd, HWND_TOPMOST,
                targetMonitor.rcWork.Left,
                targetMonitor.rcWork.Top,
                width, height,
                SWP_SHOWWINDOW | SWP_FRAMECHANGED);

            // [중요] Unity 내부 해상도도 맞춰줘야 Raycast가 정확함
            if (Screen.width != width || Screen.height != height)
            {
                Screen.SetResolution(width, height, FullScreenMode.Windowed);
            }

            // [Fix] 해상도 변경 혹은 이동 후 배경이 하얗게 변하는 문제 해결을 위해 스타일 재적용
            SetupWindowTransparency();

            // [포커스 복구] 이동 후 포커스를 잃어 입력을 못 받는 현상 방지
            SetForegroundWindow(_hWnd);

            Debug.Log($"Moved to Monitor {monitorIndex} (WorkArea): {width}x{height} at ({targetMonitor.rcWork.Left}, {targetMonitor.rcWork.Top})");
        }
    }

    private void SetClickThrough(bool isTransparent)
    {
        // [Fix] 내부 변수(_isClickThrough)에 의존하지 않고, 실제 윈도우 스타일을 매번 확인하여
        // Unity 엔진(SetResolution 등)에 의해 스타일이 리셋되었을 경우 즉시 복구합니다.

        long currentStyle = GetWindowLongPtr(_hWnd, GWL_EXSTYLE).ToInt64();

        // WS_EX_LAYERED는 투명 및 클릭 투과를 위해 필수 (항상 포함되어야 함)
        long newStyle = currentStyle | WS_EX_LAYERED;

        if (isTransparent)
        {
            // 투명(클릭 투과) 상태 -> WS_EX_TRANSPARENT 추가
            newStyle |= WS_EX_TRANSPARENT;
        }
        else
        {
            // 상호작용 가능 상태 -> WS_EX_TRANSPARENT 제거
            newStyle &= ~WS_EX_TRANSPARENT;
        }

        // 실제 스타일이 목표와 다를 경우에만 API 호출 (성능 최적화)
        if (currentStyle != newStyle)
        {
            SetWindowLongPtr(_hWnd, GWL_EXSTYLE, new IntPtr(newStyle));

            // 스타일 변경 시 DWM 투명 영역도 확실하게 연장 (하얀 배경 방지)
            if ((currentStyle & WS_EX_LAYERED) == 0) // Layered 속성이 없었다가 생겼다면
            {
                MARGINS margins = new MARGINS { cxLeftWidth = -1 };
                DwmExtendFrameIntoClientArea(_hWnd, ref margins);
            }
            SetWindowPos(_hWnd, HWND_TOPMOST, 0, 0, 0, 0, SWP_NOSIZE | SWP_NOMOVE | SWP_NOZORDER | SWP_FRAMECHANGED);
        }
    }

    // Win32 API Definitions for Hardware Mouse
    [StructLayout(LayoutKind.Sequential)]
    public struct POINT { public int X; public int Y; }

    [DllImport("user32.dll")] private static extern bool GetCursorPos(out POINT lpPoint);
    [DllImport("user32.dll")] private static extern bool GetClientRect(IntPtr hWnd, out RECT lpRect);
    [DllImport("user32.dll")] private static extern bool ClientToScreen(IntPtr hWnd, ref POINT lpPoint);

    private void CheckInteractive()
    {
        bool isPointerOverUI = false;

        POINT p;
        if (GetCursorPos(out p)) // 마우스 글로벌 좌표
        {
            // [Fix] GetWindowRect 대신 ClientToScreen을 사용하여
            // 윈도우의 테두리/그림자 영역을 배제하고 실제 Unity가 렌더링되는 Client 영역 기준으로 좌표를 계산합니다.

            POINT clientTopLeft = new POINT { X = 0, Y = 0 };
            ClientToScreen(_hWnd, ref clientTopLeft);

            RECT clientRect;
            GetClientRect(_hWnd, out clientRect); // clientRect.Left/Top은 항상 0
            int clientWidth = clientRect.Right - clientRect.Left;
            int clientHeight = clientRect.Bottom - clientRect.Top;

            // Unity Screen 해상도와 실제 Client 영역 크기 비교 (비율 보정)
            float scaleX = (float)Screen.width / clientWidth;
            float scaleY = (float)Screen.height / clientHeight;

            // 로컬 좌표 계산 (Unity는 좌하단이 0,0)
            // 글로벌 마우스 Y가 증가할수록(아래로 갈수록) Unity Y는 감소해야 함
            // Client Bottom의 글로벌 Y = clientTopLeft.Y + clientHeight

            float localX = (p.X - clientTopLeft.X) * scaleX;
            int globalClientBottom = clientTopLeft.Y + clientHeight;
            float localY = (globalClientBottom - p.Y) * scaleY;

            // 화면 범위 내에 있는지 먼저 체크 (벗어났다면 굳이 레이캐스트 할 필요 없음)
            if (localX >= 0 && localX <= Screen.width && localY >= 0 && localY <= Screen.height)
            {
                Vector2 vectorPos = new Vector2(localX, localY);
                PointerEventData pointerData = new PointerEventData(EventSystem.current)
                {
                    position = vectorPos
                };

                System.Collections.Generic.List<RaycastResult> results = new System.Collections.Generic.List<RaycastResult>();
                EventSystem.current.RaycastAll(pointerData, results);

                foreach(var result in results)
                {
                    if (result.gameObject != null)
                    {
                        isPointerOverUI = true;
                        break;
                    }
                }

                if (!isPointerOverUI && Camera.main != null)
                {
                    Vector2 worldPoint = Camera.main.ScreenToWorldPoint(vectorPos);
                    RaycastHit2D hit = Physics2D.Raycast(worldPoint, Vector2.zero);
                    if (hit.collider != null)
                    {
                        isPointerOverUI = true;
                    }
                }
            }
        }

        SetClickThrough(!isPointerOverUI);
    }

    // 종료 버튼 연결용 함수
    public void QuitGame()
    {
        #if UNITY_EDITOR
            UnityEditor.EditorApplication.isPlaying = false;
        #else
            Application.Quit();
        #endif
    }
}
1. 듀얼 모니터 환경에서의 상호작용 문제
게임 창을 한 모니터에서 다른 모니터로 이동시키면 다음과 같은 문제가 발생했다.
- 마우스 위치가 어긋남
- UI 클릭 판정이 틀어짐
- 게임 오브젝트 클릭 판정 실패
이를 해결하기 위해
SetWindowPos(...)
Screen.SetResolution(width, height, FullScreenMode.Windowed);
윈도우 창을 모니터 위치로 이동시키고
1. Unity 내부 해상도를 해당 모니터 크기로 맞춘다.
2. 이 과정을 거쳐야 Raycast와 마우스 좌표가 정확히 일치하게 된다.
2. 듀얼 모니터 해상도가 서로 다른 경우
모니터마다 해상도가 다른 경우, 단순히 창만 이동시키면 입력 좌표가 크게 틀어진다.
이를 해결하기 위해 마우스 좌표를 다음 순서로 변환했다
- Windows 전역 마우스 좌표 획득
- 현재 창의 클라이언트 영역 좌표 계산
- Unity 해상도 기준으로 스케일 보정
- Y축 좌표 반전 처리
이를 위해
float localX = ...
float localY = ...
이를 통해 어느 모니터로 이동해도 좌표 판정이 유지되도록 만들었다
3. 게임이 아닌 프로그램에서 타이핑할 때 입력 꼬임 문제
기본 Unity 입력 시스템은 창이 포커스를 잃으면 입력을 받지 못한다.
하지만 이 프로젝트는 다음과 같은 상황을 전제로 한다.
- 사용자는 브라우저, 메신저, IDE 등을 사용한다.
- 동시에 게임도 계속 입력을 받아야 한다.
즉, 포커스가 없어도 입력이 필요하다.
이를 위해 Unity 입력 대신 Windows API를 사용했다
GetAsyncKeyState(...)이 함수는 특정 창이 아니라 OS 전체 기준 키 상태를 읽어온다.
그래서 알트탭 후에도 입력 감지 가능, 다른 창 클릭 중에도 게임 입력 유지가 가능해진다
4. 게임과 모니터 사이 마우스 인식 문제
게임 영역이 아닌 부분은 클릭이 모니터로 통과되어야 하고,
게임 영역에서는 정상 상호작용이 이루어져야 한다
이를 위해 매 프레임 다음 과정을 수행한다
1. 마우스 위치 획득
2. Unity 좌표로 변환
3. UI Raycast 검사
4. Physics2D Raycast 검사
EventSystem.current.RaycastAll(...)
Physics2D.Raycast(...)
이를 통해 UI 또는 오브젝트가 감지되면 클릭을 게임이 받게 하고,
아니면 클릭을 모니터로 통과시킨다
5. 클릭 투과 상태 토글 구조
클릭 투과는 Windows 창 스타일 중 하나인
WS_EX_TRANSPARENT속성으로 제어되고
속성이 있으면 클릭 통과, 없으면 게임이 클릭을 받는 구조이다
그래서
long currentStyle = GetWindowLongPtr(...)
long newStyle = ...
이 코드로 현재 스타일을 읽고 필요한 상태로 적용하는 구조이다
왜 내부 상태 변수를 믿지 않는가?
Unity에서 해상도를 변경하거나 창을 이동하면
윈도우 스타일이 중간에 변경되는 경우가 있다
그래서 코드에서는 내부 변수 대신
실제 윈도우 스타일을 매번 읽고 복구하도록 설계했다
이 방식 덕분에 클릭 투과가 풀리는 현상이 거의 발생하지 않는다
6. 모니터 이동 후 배경이 하얗게 변하는 문제
특정 상황에서 창을 이동하면 투명 배경이 하얗게 변하는 현상이 발생했다
이를 해결하기 위해 다음 처리를 추가했다
DwmExtendFrameIntoClientArea(...)Layered 스타일이 새로 적용될 때마다 DWM 확장을 다시 수행하여
투명 상태가 유지되도록 했다
7. Update 루프를 통한 안정성 확보
이 시스템은 매 프레임 다음을 수행한다
- 키 입력 체크
- 마우스 위치 계산
- UI/오브젝트 판정
- 클릭 투과 상태 조정
이 구조는 약간 무거워 보일 수 있지만,
실제로는 다음 최적화가 적용되어 있다
화면 밖에서는 Raycast를 수행하지 않음
스타일 변경이 필요한 경우에만 Win32 API 호출
즉, 매 프레임 확인은 하지만 실제 비용은 최소화한 로직으로 구현되었다
이런 느낌으로 구현을 해서 결론적으로 나온 결과물은
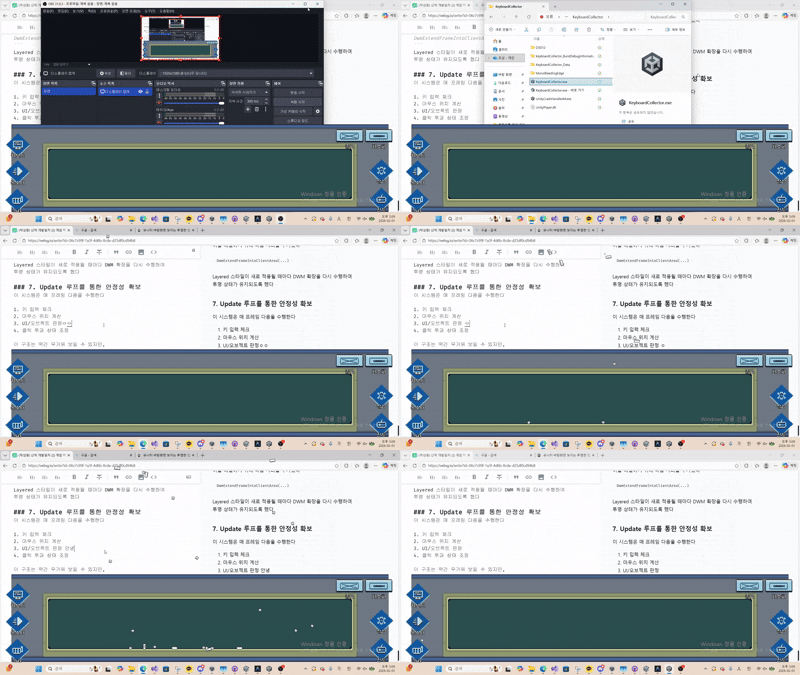
요런 느낌으로 완성이 된다