Ansible
-
환경
- Ubuntu 16 와 CentOS7
- Memory 1024 MB
- CPU 1
- 네스티드 VT-x/AMD-V
-
우분투 OS
- other - Asia - Korea Of Republic
root계정 활성화; root 패스워드 지정 :sudo passwd rootroot계정 ssh 접근 활성화
# 일반 유저에서 사용자 변경 또는 root로 로그인 수행
$ su root

# root_로그인 허용
vi /etc/ssh/sshd_config
----------------------------------------
`PermitRootLogin` 부분 prohibit-password => yes 로 변경
PermitRootLogin prohibit-password -> yes
----------------------------------------

# ssh 재시작
sudo service ssh restart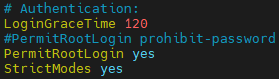
앤서블 실습
--- 앤서블 실습 환경 (cpu, ram 용량)
ansible-server 1c 1g
centos-node01 1c 1g
ubuntu-node01 1c 1g
앤서블 설치
yum install epel-release -y
yum --enablerepo=epel -y install ansible
ansible --version앤서블의 CLI
/etc/ansible/hosts: 내가 관리할 서버의 정보 입력[centos/ubuntu]는 그 그룹 전체를 의미한다.
[centos]
192.168.1.213

[ubuntu]
192.168.1.228pingssh 접속 여부 확인 및 파이썬 설치 확인
# hosts 파일 안에 있는 모든 호스트에게 ssh 접속을 한뒤 ping 명령을 수행
# 파이썬이 설치 되어있는지 확인하는 과정
## yes, yes : 질문이 두개가 나오는데 앞에 꺼에 묻혔다.
## 유저 이름을 별도로 지정하지 않으면 `root`  계정을 의미
ansible all -m ping 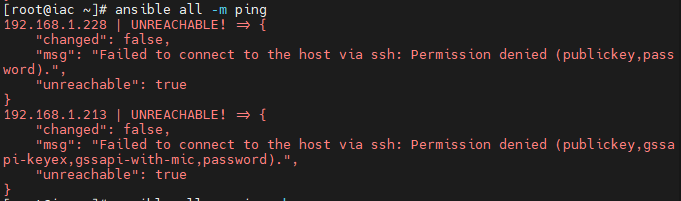
## `-k` : ask password, 패스워드를 물어보겠다.
## 서버들이 유저와 패스워드가 같아야 가능한 일.
ansible all -m ping -k # ask password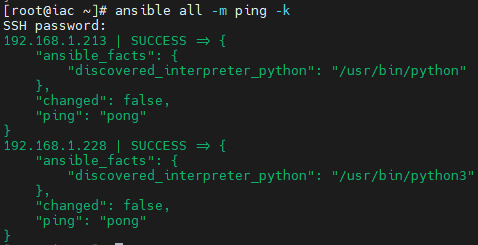
# centos 서버 그룹 들로 패스워드 지정
ansible centos -m ping -k
# ubuntu 서버 그룹 들로 패스워드 지정
ansible ubuntu -m ping -k
## `ubuntu` 사용자로 접속
ansible ubuntu -m ping -k --user ubuntu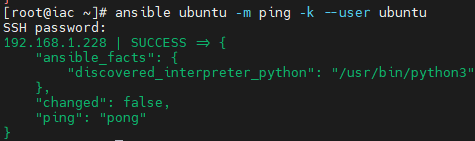
- 임의의 파일 이름안에 있는 정보로 확인해보기
echo "192.168.1.213" >> inventory.list
echo "192.168.1.228" >> inventory.list
ansible all -i inventory.list -m ping -k

# `inventory.list` 내부의 192.168.1.213 에게만 ping 수행
ansible 192.168.1.213 -i inventory.list -m ping -k

ansible all --list-hosts
- 관리되는
hosts파일의 서버의 리스트 조회
ansible all --list-hosts
----------------------------------------
  hosts (2):
    192.168.1.213
    192.168.1.228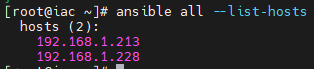
shell모듈(-m <module>) 선택 후 구문(-a <command>) 전달
# `shell` 모듈 선택(`-m`), `-a` 구문
# uptime -> turn-on 후 경과된 시간
ansible all -m shell -a "uptime" -k

# 파일 시스템의 사용 가능 공간 표시
ansible all -m shell -a "df -h" -k

# 메모리 사용량
ansible all -m shell -a "free -h" -k

# 모든 서버에 "kosa" 라는 사용자 만들기
ansible all -m user -a "name=kosa" -k

# "kosa" 사용자가 추가 됐는지 확인
ansible all -m shell -a "tail -n 1 /etc/passwd" -k

# "kosa" 사용자 제거
ansible all -m user -a "name=kosa state=absent" -k
센토스 아파치 애드혹 관리
# yum 모듈을 이용하여 `httpd` 패키지를 설치
# yum install -y httpd
ansible centos -m yum -a "name=httpd state=present" -k


# 리소스를 가져와 `index.html` 파일로 저장
curl https://www.nginx.com/ -o index.html

# index.html 파일을 centos 서버 그룹들의 /var/www/html/index.html 로 복사
ansible centos -m copy -a "src=index.html dest=/var/www/html/index.html" -k
ansible centos -m service -a "name=httpd state=started" -k
ansible centos -m shell -a "systemctl status firewalld" -k
ansible centos -m shell -a "systemctl start firewalld" -k
ansible centos -m shell -a "firewall-cmd --permanent --zone=public --add-service=http" -k
ansible centos -m shell -a "firewall-cmd --reload" -k
ansible centos -m service -a "name=httpd state=stopped" -k
ansible centos -m shell -a "systemctl stop firewalld" -k

# apache 패키지 삭제(absent)
ansible centos -m yum -a "name=httpd state=absent" -k
우분투 아파치 애드혹 관리
# apt 모듈을 이용하여 `apache2` 패키지를 설치
# apt install -y apache2
ansible ubuntu -m apt -a "name=apache2 state=present" -k
ansible ubuntu -m copy -a "src=index.html dest=/var/www/html/index.html" -k
ansible ubuntu -m service -a "name=apache2 state=stopped" -k
ansible ubuntu -m service -a "name=apache2 state=started" -k
ansible ubuntu -m apt -a "name=apache2 state=absent" -k
멱등성
- Idempotency
- 여러 번 적용해도 결과가 바뀌지 않으며 수정된 부분이 있다면 그 부분만 새롭게 반영되는 특징이 있다.
# `172.16.0.100` 가 두번 추가된다.
echo "`172.16.0.100`" >> inventory.list
cat inventory.list
echo "172.16.0.100" >> inventory.list
cat inventory.list

# `172.16.0.200` 가 한번만 추가된다.
ansible localhost -c local -m lineinfile -a "path=inventory.list line=172.16.0.200"
cat inventory.list
ansible localhost -c local -m lineinfile -a "path=inventory.list line=172.16.0.200"
cat inventory.list
플레이북 구조
- Ansible 플레이북
- Ansible.Builtin
yaml형식으로 작성된 각각의 Playbook 들은 하나 이상의 Play를 가지며, 각각의 Play는 하나 이상의 task(앤서블 모듈)을 실행
- name: Playbook Tutorial # `-` 로 시작 하는 3 줄이 한블록.
  hosts:  all # `:` 으로 구분해 항목명과 값을 설정한 키-값 형식으로 되어있다.
  tasks:		# 항목명의 위치가 정렬되어 있다. yaml 은 들여쓰기가 데이터 구조의 깊이를 의미
센토스, 우분투 아파치 설치 플레이북
apache_install.yaml
vi apache_install.yaml
----------------------------------------
- name: Install apache on centos
  hosts: centos

  tasks:
    - name: install apache web server
      yum: name=httpd state=present # ansible centos -m yum -a "name=httpd state=present" -k
    - name: upload default index.html for web server
      get_url: url=https://www.nginx.com dest=/var/www/html/ mode=0644
    - name: start apache web server
      service: name=httpd state=started enabled=yes

- name: Install apache on ubuntu
  hosts: ubuntu

  tasks:
    - name: install apache web server
      apt: name=apache2 state=present
    - name: upload default index.html for web server
      get_url: url=https://www.nginx.com dest=/var/www/html/ mode=0644
    - name: start apache web server
service: name=apache2 state=started- playbook 실행
ansible-playbook apache_install.yml -k
센토스, 우분투 아파치 삭제 플레이북
apache_remove.yml: absent -> 제거를 의미
vi apache_remove.yml
----------------------------------------
- name: Remove apache on centos
  hosts: centos

  tasks:
    - name: remove apache web server
      yum: name=httpd state=absent

- name: Remove apache on ubuntu
  hosts: ubuntu

  tasks:
    - name: remove apache web server
apt: name=apache2 state=absent- playbook 실행
ansible-playbook apache_remove.yml -k
앤서블 환경 설정 자동화
-
- Ansible은 작업을 여러 번 실행하기 위해
loop,with_<lookup>,until키워드를 제공합니다. - Standard loops
- Ansible은 작업을 여러 번 실행하기 위해
-
env.yml
vi env.yml
----------------------------------------
- name: Setup for the Ansible's Environment
  hosts: localhost

  tasks:
    - name: Add "/etc/ansible/hosts"
      blockinfile:
        path: /etc/ansible/hosts
        block: |	# 마커 라인에 추가할 내용, "|" 은 개행한 내용을 다 포함하겠다는 의미
          centos]
          192.168.1.213

          [ubuntu]
          192.168.1.228 ansible_python_interpreter=/usr/bin/python3

    - name: Configure Bashrc
      lineinfile: # 텍스트 파일의 줄 관리
        path: /root/.bashrc
        	# with_items 에 나열된 항목을 추가
			# "path" 에 삽입/수정(line)
        line: "{{ item }}"
      with_items: # 하위 항목을  loop를 도는 것 같다.
        - "alias ans='ansible'"
- "alias anp='ansible-playbook'"- 플레이북 실행
ansible-playbook env.yml -k
keypair 설정
- keypair_old.yml
vi keypair_old.yml
----------------------------------------
- name: Setup for the Ansible's Environment
  hosts: localhost

  tasks:
    - name: Generate sshkey
      shell: "{{ item }}"
      with_items:
        - "ssh-keyscan 192.168.1.213 >> ~/.ssh/known_hosts"
- "ssh-keyscan 192.168.0.228 >> ~/.ssh/known_hosts"- 플레이북 실행 후 결과 확인
ansible-playbook keypair_old.yml -k
ans -m ping -k- keypair_new.yml
vi keypair_new.yml
----------------------------------------
- name: Create known_hosts between server and nodes
  hosts: all
  connection: local
  serial: 1

  tasks:
    - name: ssh-keyscan for known_hosts file
      command: /usr/bin/ssh-keyscan -t ecdsa {{ ansible_host }} # 매직 변수 ansible_host 활용하여 hosts ip 호출
      register: keyscan

    - name: input key
      lineinfile:
        path: ~/.ssh/known_hosts
        line: "{{ item }}"
        create: yes
      with_items:
        - "{{ keyscan.stdout_lines }}"

- name: Create authorized_keys between server and nodes
  hosts: all
  connection: local
  vars:
    ansible_password: <패스워드> # 패스워드를 입력, 하지만 문서에 하드 코딩은 별로 좋지 않다.

  tasks:
    - name: ssh-keygen for authorized_keys file
      openssh_keypair:
        path: ~/.ssh/id_rsa # 생성한 key 페어를 아래 name: input... 설정으로 복사
        size: 2048
        type: rsa
        force: False # overwrite하지 않는다는 False라고 값을 넣거나 아니면 삭제하거나 하면 되겠습니다.

    - name: input key for each node # ssh-copy-id
      connection: ssh
      authorized_key:
        user: root
        state: present
        key: "{{ lookup('file', '~/.ssh/id_rsa.pub') }}"
- 플레이북 실행
anp keypair_new.yml센토스, 우분투 엔진엑스 설치 플레이북
- nginx_install.yml
vi nginx_install.yml
----------------------------------------
- name: Install nginx on centos
  hosts: centos

  tasks:
  	# ngixn 설치를 위해 외부 저장소 활성화
    - name: install epel-release
      yum:
        name: epel-release
        state: latest
    # nginx 설치
    - name: install nginx web server
      yum:
        name: nginx
        state: present
    # nginx 인덱스 페이지 가져와 설정
    - name: upload default index.html for web server
      get_url: url=https://www.nginx.com dest=/usr/share/nginx/html/ mode=0644
    - name: start nginx web server
      service: name=nginx state=started enabled=yes

- name: Install nginx on ubuntu
  hosts: ubuntu

  tasks:
    - name: install nginx web server
      apt: pkg=nginx state=present update_cache=yes  # apt update
    - name: Upload default index.html for web server
      get_url: url=https://www.nginx.com dest=/var/www/html/
mode=0644 validate_certs=no- 플레이북 실행
ansible-playbook nginx_install.yml센토스, 우분투 엔진엑스 삭제 플레이북
- nginx_remove.yml
vi nginx_remove.yml
----------------------------------------
- name: Remove nginx on centos
  hosts: centos

  tasks:
    - name: remove nginx web server
      yum: name=nginx state=absent

- name: Remove nginx on ubuntu
  hosts: ubuntu

  tasks:
    - name: remove nginx web server
apt: pkg=nginx* state=absent- 플레이북 실행
ansible-playbook nginx_remove.yml센토스, 우분투 NFS 설치 플레이북
- ansible 서버에서 다음 방화벽 설정
firewall-cmd --permanent --add-service=nfs
firewall-cmd --permanent --add-service=mountd
firewall-cmd --permanent --add-service=rpc-bind
firewall-cmd --reload- nfs.yml
vi nfs.yml
----------------------------------------
- name: Setup for nfs server
  hosts: localhost

  tasks:
    - name: Open firewall services
      firewalld:
        permanent: yes
        immediate: yes
        service: "{{ item }}"
        state: enabled
      with_items:
        - rpc-bind
        - nfs
        - mountd

    - name: make nfs_shared directory
      file:
        path: /root/nfs_shared
        state: directory
        mode: 0777

    - name: configure /etc/exports
      lineinfile:
        path: /etc/exports
        line: /root/nfs_shared 192.168.0.0/20(rw,sync)

    - name: Install NFS
      yum:
        name: nfs-utils
        state: present

    - name: nfs service start
      service:
        name: nfs-server
        state: restarted
        enabled: yes

- name: Setup for nfs clients
  hosts: centos

  tasks:
    - name: make nfs_client directory
      file:
        path: /root/nfs
        state: directory

    - name: Install NFS
      yum:
        name: nfs-utils
        state: present

    - name: mount point directory as client # mount -t nfs 192.168.1.210:/root/nfs_shared /root/nfs
      mount:
        path: /root/nfs
        src: 192.168.1.159:/root/nfs_shared # nfs(iac 서버 의 ip_address)
        fstype: nfs
        state: mounted

- name: Setup for nfs clients U
  hosts: ubuntu

  tasks:
    - name: make nfs_client directory
      file:
        path: /root/nfs
        state: directory

    - name: Install NFS-U
      apt:
        pkg: nfs-common
        state: present
        update_cache: yes

    - name: mount point directory as client
      mount:
        path: /root/nfs
        src: 192.168.1.159:/root/nfs_shared
        fstype: nfs
        opts: nfsvers=3
state: mounted- 플레이북 실행
ansible-playbook nfs.yml -k워드프레스 만들기
- wordpress.yml
vi wordpress.yml
----------------------------------------
- name: Setup for webserver
  hosts: webserver

  tasks:  # yum 이니까 센토스
    - name: Install http
      yum:
        name: "{{ item }}"
        state: present
      with_items:
        - httpd
        - php
        - php-mysql
        - php-gd
        - php-mbstring
        - wget
        - unzip

    - name: Unarchive a file that needs to be downloaded (added in 2.0)
      ansible.builtin.unarchive:
        src: https://ko.wordpress.org/wordpress-4.8.2-ko_KR.zip
        dest: /var/www/html
        remote_src: yes

    - name: chown
      file:
        path: /var/www/html/wordpress
        owner: "apache"
        group: "apache"
        recurse: "yes"

    - name: web service restart
      service:
        name: httpd
        state: restarted

- name: Setup for dbserver
  hosts: dbserver

  tasks:  # apt 이니까 우분투
    - name: Install mariadb
      apt:
        pkg: mariadb-server
        state: present
        update_cache: yes

    - name: Install pymysql
      apt:
        pkg: python-pymysql
        state: present

    - name: Install pymysql
      apt:
        pkg: python3-pymysql
        state: present

    - name: set root password
      mysql_user:
        name: 'root'
        password: '{{ mysql_root_password }}'
        login_unix_socket: /var/run/mysqld/mysqld.sock
        state: present

    - name: edit file
      replace:
        path: /etc/mysql/mariadb.conf.d/50-server.cnf
        regexp: "bind-address"
        replace: "#bind-address"

    - name: db service restart
      service:
        name: mysql
        state: restarted

    - name: Create database
      mysql_db:
        db: wordpress
        login_unix_socket: /var/run/mysqld/mysqld.sock
        state: present

    - name: Create database user
      mysql_user:
        user: wpuser
        password: wppass
        priv: "wordpress.*:ALL,GRANT"
        host: '%'
        login_unix_socket: /var/run/mysqld/mysqld.sock
state: present- 플레이북 실행
--extra-vars: 변수 주입
anp wordpress.yml --extra-vars "mysql_root_password=test1234"
끄적끄적 쓰는곳