Terraform
Terraform 이란?
- 과거 시스템 관리자는 인프라를 수동으로 구축하고 관리했습니다. 그리고 모든 서버, 데이터베이스, 로드 밸런서, 네트워크를 수작업으로 생성하고 관리했기 때문에 서버 다운, 구성 실수, 배포 오류가 자주 발생하였습니다.
- 테라폼은 간단한 선언적 언어를 사용하여 인프라를 코드로 정의합니다. 몇 가지 명령을 사용하여 AWS, Azure, GCP 같은 다양한 퍼블릭 클라우드 공급자와 오픈스택, ESXi 같은 프라이빗 클라우드와 가상화 플랫폼에서 해당 인프라를 배포 및 관리하게 합니다.
- 가상 환경에서의 서버를 의미
Terraform 작동 방식
- 테라폼은 해시코프사에서 Go언어로 개발한 오픈소스도구입니다. 운영체제마다 바이너리 파일이 존재하는데 Go 코드는 하나의 바이너리 파일로 컴파일되며
Terraform이라는 명령어로 실행할 수 있습니다. 이Terraform명령어를 사용하여 노트북, 데스크탑, 빌드 서버 또는 다른 컴퓨터에서든 인프라를 배포할 수 있으며 이를 위해 추가 인프라(마스터, 에이전트)를 생성할 필요가 없습니다.Terraform명령어가 AWS, Azure, GCP, Openstack 등의 Provider를 대신해 API를 호출하여 리소스를 생성
- 테라폼은 생성하려는 인프라 정보가 담겨 있는 텍스트로 이루어진 테라폼 구성 파일을 생성하여 API를 호출합니다. 이러한 구성 값들이 '코드형 인프라'를 만드는 바로 그 '코드'입니다. 팀의 누군가가 인프라를 수정하고자 할 때, 서버에 직접 접속하여 작업하거나 수작업으로 수정하는 대신 테라폼을 사용하여 구성 파일을 수정할 있습니다.
Terraform 주요 명령어
*.tf스크립트 작성terraform init: terraform 명령어에는 테라폼의 기본 기능이 포함되어 있지만 모든 공급자 (AWS, Azure, GCP 등)에 대한 코드가 포함되어 있지 않습니다. 그렇게 때문에terraform init명령어를 실행하여 테라폼에 코드를 스캔하도록 지시하고 어느 공급자인지 확인하고, 필요한 코드를 다운로드하도록 해야 합니다. 기본적으로 공급자 코드는 테라폼의.terraform폴더에 플러그인 형태로 다운로드됩니다.terraform plan: 테라폼이 구성 파일을 사용하여 작업을 수행하기 전에 코드의 온전성을 검사할 수 있습니다. (미리확인)plan명령어는 리눅스에서 쓰이는 diff 명령의 결괏값과 유사합니다. (비교)+가 있는 항목은 추가-가 있는 항목은 삭제~가 있는 항목은 수정
terraform apply: 테라폼의 구성 파일을 실행
테라폼 변수 사용 방법
- 변수에
default를 설정하지 않으면terraform apply이전에 변수를 지정해야 합니다.- 테라폼은 unassigned variable을 지원하지 않습니다.
- 테라폼에 변수를 전달하는 방법은 여러가지이며, 여러개의 변수가 전달되었을 경우 우선순위에 따라 가장 마지막에 찾은 값을 사용.
- 변수 할당하는 방법
- prompted : 할당되지 않은 변수가 있는 채로 plan, destroy, apply 할 경우 사용
- file : 파일명이 terraform.tfvars, *.auto.tfvars 인 파일을 생성하면 자동으로 변수가 로딩 되며, -var-file 플래그를 사용하여 다른 파일명을 가진 변수 파일도 로드 할 수 있습니다.
- CLI flag : CLI flag를 통해서 변수를 할당
기본 값 이용하기
- 테라폼은 변수를 정의할 때
variable블록에서default키워드를 사용하여 기본값을 설정할 수 있습니다. 그러나 실행 중에 사용자에게 값을 입력받기 위해선 기본값 대신var함수를 사용할 수 있습니다.
사용자 입력 받기
-
테라폼은 실행 중에 사용자에게 변수 값을 입력받을 수 있습니다.
-
실행 중에 터미널에서 변수 값에 대한 프롬프트가 나타납니다.
-
예를 들어, 다음과 같이 사용자에게
index_document및error_document값을 입력받을 수 있습니다:variable "website_setting" { type = object({ index_document = string error_document = string }) } resource "example_resource" { index_document = var.website_setting.index_document error_document = var.website_setting.error_document }
변수 파일 사용 (Variable Files)
- 변수 값을 파일에 저장하고 해당 파일을 테라폼 실행 시에 참조할 수 있습니다.
- 변수를 정의한 파일 (예:
variables.tfvars)을 생성하고, 테라폼 실행 시에-var-file플래그를 사용하여 해당 파일을 지정합니다.# variables.tfvars website_setting = { index_document = "custom_index.html" error_document = "custom_error.html" }terraform apply -var-file=variables.tfvars
환경 변수 사용(Enviroment Variables)
- 환경 변수를 사용하여 변수 값을 설정할 수 있습니다.
- 변수의 이름을 대문자로 바꾸고,
TF_VAR_접두어를 붙인 후 환경 변수로 값을 설정합니다.
export TF_VAR_website_setting='{"index_document": "env_index.html", "error_document": "env_error.html"}'
terraform apply
작성 예시
resource "<PROVIDER>_<TYPE>" "<NAME>" {
  [CONFIG ...]
}PROVIDER는 aws 같은 공급자의 이름이고TYPE은 instance 같이 해당 공급자에서 생성할 리소스 유형입니다.NAME은 테라폼 코드에서 이 리소스를 참조하기 위해 사용할 수 있는 example과 같은 '식별자'입니다.CONFIG는 특정 리소스에 대한 하나 이상의 인수(argument)로 구성됩니다.
- 예시
- main 논리적 ID 와 유사
resource "aws_vpc" "main" {
  cidr_block = var.base_cidr_block
}- 테라폼 블록
<BLOCK TYPE> "<BLOCK LABEL>" "<BLOCK LABEL>" { # Block body <IDENTIFIER> = <EXPRESSION> # Argument }- 블록은 다른 콘텐츠의 컨테이너이며 일반적으로 리소스와 같은 일종의 개체 구성을 나타냅니다. 블록에는 블록 유형이 있고 , 0개 이상의 레이블이 있을 수 있으며 , 여러 인수와 중첩된 블록을 포함하는 본문이 있습니다. 대부분의 Terraform 기능은 구성 파일의 최상위 블록에 의해 제어됩니다.
- 인수는 이름에 값을 할당합니다. 블록 내에 나타납니다.
- 식은 문자 그대로 또는 다른 값을 참조하고 결합하여 값을 나타냅니다. 인수의 값으로 나타나거나 다른 표현식 내에 나타납니다.
테라폼 버전 관리
-
terraform {
  required_providers {
    aws = {
      source  = "hashicorp/aws"
      version = "~> 5.5"        # ~> 5.5 : 5.5 이상인 모든 5.x 버전 적용
    }
  }

  required_version = ">= 1.5.0" # >= 1.2.0 : 1.2.0 아상인 모든 버전
}

provider "aws" {
  region  = "ap-northeast-2"
}

# Create a VPC
resource "aws_vpc" "example" {
  cidr_block = "10.150.0.0/16"
}
용어 / 함수 등
locals
Terraform 지역 값(또는 "로컬")은 표현식이나 값에 이름을 할당합니다. 로컬을 사용하면 로컬을 여러 번 참조할 수 있으므로 코드의 중복을 줄일 수 있어 Terraform 구성이 간소화됩니다. 또한 지역값은 하드코딩된 값 대신 의미 있는 이름을 사용하여 더 읽기 쉬운 구성을 작성하는 데 도움이 될 수 있습니다.
Function
file Functionfile(path): 파일은 지정된 경로에 있는 파일의 내용을 읽고 문자열로 반환합니다.- 테라폼 실행을 시작할 때 디스크에 이미 존재하는 파일에만 사용할 수 있습니다.
file("${path.module}/hello.txt")
Hello World
lookup Functionlookup(map, key, default): 키가 주어지면 맵에서 단일 요소의 값을 검색, 지정된 키가 존재하지 않으면 지정된 기본값이 대신 반환
templatefile Functiontemplatefile(path, vars): 지정된 경로에서 파일을 읽고 제공된 템플릿 변수 집합(vars를 통해서 얻은 Map/Object)을 사용하여 해당 템플릿 파일을 렌더링 한다.- "vars" 인수는 객체여야 합니다
path에서 파일을 읽어 들여서 파일의 String Templates(${var.name} 같은 것 - ${...}) 중에vars의 변수에 해당되는 것(ex. name=kim)이 있다면 치환해줌 =>var.name => kim
yamldecode Functionyamldecode(...): 문자열을 YAML의 하위 집합으로 구문 분석하고 해당 값의 표현을 생성합니다.
count 와 for_each
count 대신 for_each를 사용해야 하는 경우
- 인스턴스가 거의 동일하다면
count가 적절합니다. - arguments 중 일부에 정수에서 직접 파생할 수 없는 고유한 값이 필요한 경우
for_each를 사용하는 것이 더 안전합니다.
주어진 리소스 또는 모듈 블록은 count와 for_each를 모두 사용할 수 없습니다.
count- 정수를 허용하며 리소스 또는 모듈의 인스턴스를 해당 수만큼 만듭니다. 각 인스턴스에는 연결된 고유한 인프라 오브젝트가 있으며, 구성이 적용될 때 각 인스턴스는 개별적으로 생성, 업데이트 또는 소멸됩니다.
for_each메타 인수는map또는문자열 set을 받아들이고 해당map또는set의 각 항목에 대한 인스턴스를 만듭니다. 각 인스턴스에는 연결된 고유한 인프라 개체가 있으며, 구성이 적용될 때 각 인스턴스는 개별적으로 생성, 업데이트 또는 소멸됩니다.each.key - 이 인스턴스에 해당하는
map키(또는set멤버)입니다.
each.value - 이 인스턴스에 해당하는map값입니다. (set이 제공된 경우, 각.키와 동일합니다.)for_each값은 원하는 리소스 인스턴스당 하나의 요소가 있는Map또는Set이어야 합니다.
시퀀스를for_each값으로 사용하려면toset함수와 같이set값을 명시적으로 반환하는 표현식을 사용해야 합니다.
for_each 에 사용되는 값에 대한 제한 사항
for_each메타 인수는map또는strings 의 set을 허용- 그러나 대부분의 인자와는 달리
for_each값은 Terraform 이 원격 리소스 작업을 수행하기 전에 반드시 알고 있어야 합니다.- 즉, 구성이 적용된 후에야 알 수 있는 리소스 속성(예: 객체가 생성될 때 원격 API에서 생성된 고유 ID)을
for_each가 참조할 수 없습니다.
- 즉, 구성이 적용된 후에야 알 수 있는 리소스 속성(예: 객체가 생성될 때 원격 API에서 생성된 고유 ID)을
구문 예시
-
context = yamldecode(file(var.config_file)).context- var.config_file 변수에 해당되는 파일을 불러옴
- 그중 context에 해당되는 부분을 "context" 지역 변수에 담음
-
config = yamldecode(templatefile(var.config_file, local.context))- var.config_file로 지정된 파일이 템플릿으로 사용되며, local.context 변수가 두 번째 매개변수로 전달
- config_file 상의 YAML 형식의 문자열 템플릿에 local.context에 해당되는 변수가 있다면 값으로 치환하여 다시 맵 또는 객체와 같은 데이터 구조로 디코딩
- 따라서 전체 코드는 YAML 파일을 읽어들이고, 그 중에서 context 섹션을 디코딩하여 맵으로 변환
- 이 맵을 config 변수에 할당
-
megazonecloud = local.config.megazonecloud- 읽어들인 로컬 변수 config 의 megazonecloud 의 값을 megazonecloud 지역 변수에 담음.
lifecycle
lifecycle을 통해 사전/사후 조건을 설정할 수 있다.- Preconditions and Postconditions
- precondition
- postcondition
- arguments
- condition, error_message
- 전제 조건 및 후제 조건의 사용 사례
- AMI ID는 x86_64 아키텍처용 운영 체제가 포함된 AMI를 참조해야 합니다. 전제 조건은 호출자가 실수로 다른 아키텍처용 AMI를 빌드하여 이 가상 머신이 호스팅하려는 소프트웨어를 실행하지 못할 수 있는 경우를 감지합니다.
- EC2 인스턴스에는 공용 DNS 호스트 이름이 할당되어야 합니다. Amazon Web Services에서 EC2 인스턴스는 특정 방식으로 구성된 가상 네트워크에 속한 경우에만 공용 DNS 호스트 이름이 할당됩니다. 사후 조건은 선택한 가상 네트워크가 올바르게 구성되지 않은 경우 이를 감지하여 사용자에게 네트워크 설정을 디버깅하라는 메시지를 표시합니다.
- EC2 인스턴스에는 암호화된 루트 볼륨이 있습니다. 전제 조건은 이 EC2 인스턴스에서 실행 중인 소프트웨어가 암호화되지 않은 볼륨에서 예상대로 작동하더라도 루트 볼륨이 암호화되도록 보장합니다. 이렇게 하면 다른 구성 요소가 새 EC2 인스턴스에 의존하기 전에 Terraform이 즉시 오류를 생성할 수 있습니다.
- Preconditions and Postconditions
Checks
check- 일반적인 리소스 수명 주기 외에 인프라를 검증할 수 있습니다. 어설트 블록을 통해 사용자 지정 조건을 추가할 수 있으며, 이 블록은 계획이 끝날 때 실행되어 단계를 적용하고 경고를 생성하여 인프라 내의 문제를 알려줍니다.
어설션이 포함된 확인 블록을 사용하여 Terraform 웹사이트가 정상인지 확인하는 예제
-
조건이
false으로 평가되면 Terraform은error_message표현식의 결과를 포함하는 오류 메시지를 생성합니다. 여러 어설션을 선언하는 경우, Terraform은 실패한 모든 조건에 대해 오류 메시지를 반환check "health_check" { data "http" "terraform_io" { url = "https://www.terraform.io" } assert { condition = data.http.terraform_io.status_code == 200 error_message = "${data.http.terraform_io.url} returned an unhealthy status code" } }
Dynamic Blocks
- dynamic Blocks
resource,data,provider및provisioner블록 내에서 지원되는 특수 dynamic 블록 유형을 사용하여setting과 같이 반복 가능한nested blocks을 동적으로 구성- 구성 중인 리소스 유형, 데이터 소스, 공급자 또는 프로비저너에 속하는 인수만 생성할 수 있습니다.
dynamic Blocks을 과도하게 사용하면 구성을 읽고 유지 관리하기 어려울 수 있으므로 재사용 가능한modules의 깔끔한 사용자 인터페이스를 구축하기 위해 세부 정보를 숨겨야 하는 경우에만dynamic Blocks을 사용하는 것이 좋습니다.
-
for_each값은 원하는 nested block 당 하나의 요소가 있는 컬렉션이어야 합니다.-
컬렉션 - 맵(Map)이나 셋(Set)
- Set을 사용하는 경우
- Set은 중복된 요소를 허용하지 않는 컬렉션입니다.
- 일반적으로 리소스 인스턴스를 생성할 때 고유한 값을 가지는 경우에 Set을 사용합니다.
variable "instance_types" { default = ["t2.micro", "t3.large", "m5.large"] } resource "aws_instance" "example" { for_each = toset(var.instance_types) ami = "ami-12345678" instance_type = each.key } # 위의 예제에서 var.instance_types는 Set으로, 각 요소는 서로 다른 instance_type을 나타냅니다.- Map을 사용하는 경우
- Map은 각 요소에 대해 특정 값을 가지며, 키와 값의 쌍으로 이루어진 데이터 구조입니다.
- 일반적으로 각 요소에 대해 추가적인 속성을 지정해야 하는 경우에 Map을 사용합니다.
variable "instances" { default = { instance1 = { ami = "ami-12345678", type = "t2.micro" }, instance2 = { ami = "ami-87654321", type = "t2.small" }, } } resource "aws_instance" "example" { for_each = var.instances ami = each.value.ami instance_type = each.value.type } # 위의 예제에서 var.instances는 Map으로, 각 요소는 instance1 및 instance2라는 키를 가지며, 각각의 값은 하나의 인스턴스를 나타내는 Map입니다. - Set을 사용하는 경우
-
파일 시스템 및 작업 공간 정보
path.module: 표현식이 위치한 모듈의 파일 시스템 경로(현재 "path.module" 이 있는 파일의 위치인듯)- 원격 모듈 소스를 사용하는지 로컬 모듈 소스를 사용하는지에 따라 다른 동작이 발생할 수 있으므로 쓰기 작업에서 path.module 을 사용하지 않는 것이 좋습니다. 로컬 모듈을 여러 번 호출하면 동일한 소스 디렉터리를 사용하므로 각 호출 중에 path.module 의 데이터를 덮어쓰게 됩니다. 이로 인해 경쟁 조건과 예기치 않은 결과가 발생할 수 있습니다.
-
그래서 이 코드는 무슨 의미인가?
data "terraform_remote_state" "vpcs" {
  backend = "local"

  config = {
    path = "${path.module}/../vpcs/terraform.tfstate"
  }
}
backend = "local"- 로컬 백엔드는 상태 파일이 로컬 파일 시스템에 저장된 경우에 사용path = "${path.module}/../vpcs/terraform.tfstate"
이 부분은 로컬 백엔드에 필요한 구성을 정의
"path"라는 하위 키를 사용하여 상태 파일의 경로를 정의
path = "${path.module}/../vpcs/terraform.tfstate"- 이 부분은 현재 모듈의 디렉토리에서 ../vpcs/terraform.tfstate로 상태 파일의 경로를 지정합니다. ${path.module}은 현재 Terraform 모듈의 디렉토리를 나타냅니다.
이 코드는 다른 Terraform 구성에서 terraform_remote_state.vpcs 데이터를 사용하여 원격 상태의 값을 참조할 수 있습니다. 예를 들어, 다른 모듈에서 terraform_remote_state.vpcs.outputs.some_value 와 같은 형식으로 사용할 수 있습니다.
cf
- 테라폼의 Data Sources 중
remote_state- Terraform 백엔드에서 상태 데이터를 검색합니다. 이를 통해 하나 이상의 Terraform 구성의 루트 수준 출력을 다른 구성의 입력 데이터로 사용할 수 있습니다.
모듈
modules
- 함께 사용되는 여러 리소스를 위한 컨테이너
- 디렉터리에 함께 보관된 .tf 및/또는 .tf.json 파일 모음으로 구성
- Terraform 에서 리소스 구성을 패키징하고 재사용하는 주요 방법
테라폼에서 모듈이란?
-
Terraform 모듈은 단일 디렉터리에 있는 Terraform 구성 파일의 집합
-
하나 이상의
.tf파일이 있는 단일 디렉토리로 구성된 간단한 구성도 모듈이다. - 아래는 가장 간단한 모듈. ├── LICENSE ├── README.md ├── main.tf ├── variables.tf ├── outputs.tf
필수 인자
- Source
- 모듈의 구성 파일이 포함된 로컬 디렉터리 경로이거나 Terraform이 다운로드하여 사용해야 하는 원격 모듈 소스
- Module Blocks 의 Module Sources 는 원하는 하위 모듈의 소스 코드를 찾을 수 있는 위치
- 테라폼은 다른 테라폼 명령이 사용할 수 있도록 테라폼 초기화의 모듈 설치 단계에서 이 인수를 사용하여 소스 코드를 로컬 디스크의 디렉터리에 다운로드합니다.
- 로컬 경로의 경우 복사하지 않고 로컬 경로에 있는 모듈을 읽어서 사용한다.
- 모듈의 구성 파일이 포함된 로컬 디렉터리 경로이거나 Terraform이 다운로드하여 사용해야 하는 원격 모듈 소스
- 목적에 따른 소스의 유형
- 주로 반복되는 코드 요소를 고려하기 위한 목적으로 사용되는 밀접하게 관련된 모듈에는 로컬 파일 경로(
Local Paths)- 로컬 경로는 module registry(;Terraform Registry) 주소와 구분하기 위해
./또는../로 시작하여 로컬 경로임을 나타내야 합니다. - Terraform은 슬래시, 드라이브 문자 등으로 시작하는 절대 파일 시스템 경로를 로컬 경로로 간주하지 않습니다. 대신, Terraform은 이를 원격 모듈과 유사한 방식으로 처리하여 로컬 모듈 캐시에 복사합니다.
- 로컬 경로는 module registry(;Terraform Registry) 주소와 구분하기 위해
- 여러 호출 구성에서 공유하려는 모듈에는 기본 Terraform 모듈 레지스트리
- 주로 반복되는 코드 요소를 고려하기 위한 목적으로 사용되는 밀접하게 관련된 모듈에는 로컬 파일 경로(
모듈 출력 값 액세스
모듈에 정의된 리소스는 캡슐화되어 있으므로 호출 모듈은 해당 속성에 직접 액세스할 수 없습니다. 그러나 자식 모듈은 출력 값을 선언하여 호출 모듈이 액세스할 특정 값을 선택적으로 내보낼 수 있습니다.
- 하위 모듈 출력에 액세스하기
- 상위 모듈에서 하위 모듈의 출력은
module.<MODULE NAME>.<OUTPUT NAME>으로 표현식으로 사용할 수 있습니다. 예를 들어web_server라는 이름의 하위 모듈이instance_ip_addr라는 출력을 선언한 경우module.web_server.instance_ip_addr로 해당 값에 액세스할 수 있습니다.
- 상위 모듈에서 하위 모듈의 출력은
모듈 개발 구조
$ tree complete-module/
.
├── README.md
├── main.tf
├── variables.tf
├── outputs.tf
├── ...
├── modules/
│   ├── nestedA/
│   │   ├── README.md
│   │   ├── variables.tf
│   │   ├── main.tf
│   │   ├── outputs.tf
│   ├── nestedB/
│   ├── .../
├── examples/
│   ├── exampleA/
│   │   ├── main.tf
│   ├── exampleB/
│   ├── .../
Terraform 설치
- 테라폼 설치
## yum 패키지매니저 관련 유틸리티 모음
yum install -y yum-utils

## 저장소 설정
yum-config-manager --add-repo https://rpm.releases.hashicorp.com/RHEL/hashicorp.repo

## 테라폼 설치
yum -y install terraform

## 버전 확인
terraform --version
----------------------------------------
Terraform v1.4.6 => 현재 최신 버전(2023.05.16)
on linux_amd64
----------------------------------------

## aws 액세스 정보 확인
cat .aws/credentials
----------------------------------------
[default]
aws_access_key_id = AKIA3AN7LK5OOOWEGPP6
aws_secret_access_key = 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
----------------------------------------


## IaC 하는 과정에서는 별도의 워크스페이스를 만드는 것이 낫다.
mkdir terraform && cd $_
mkdir tf-test && cd $_
Terraform 실습
기본 VPC에 간단한 EC2 생성 실습
- main.tf - 프로토콜이 ICMP 이면
From/toPort에서-1값 은 모든 포트를 의미,IpProtocol에서-1값은 모든 프로토콜을 의미
vi main.tf
----------------------------------------
provider "aws" { # Cloud Service Provider ; AWS 로 지정
region = "ap-northeast-2" # 서울 리전 지정
}
resource "aws_instance" "example" {
ami = "ami-035da6a0773842f64"
instance_type = "t2.micro"
# 두개 이상의 정보가 들어가는 리스트 "[...]" 대괄호를 이용
# 아래의 resource의 정의된 id를 가져온다.
vpc_security_group_ids = [aws_security_group.instance.id]
# \#cloud-boothook, boot시 적용 가능하게 하는 부분
user_data = <<-EOF
#cloud-boothook
#!/bin/bash
yum install -y httpd
systemctl enable --now httpd
echo "<h1>example</h1>" > /var/www/html/index.html
EOF
tags = {
Name = "terraform-example"
}
}
# "instance" -> "aws_security_group" 리소스를 참조하기 위해 지정한 논리적 이름
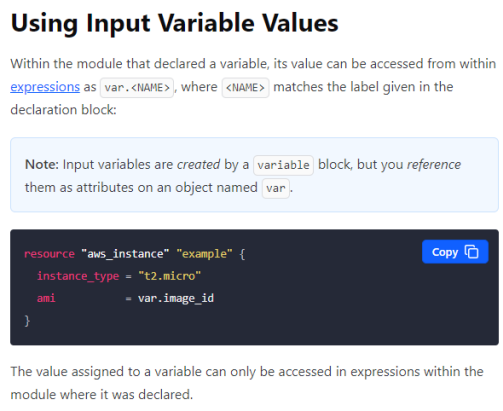
resource "aws_security_group" "instance" {
# https://developer.hashicorp.com/terraform/language/values/variables#using-input-variable-values
# var.security_group_name
# 변수로 지정한 "security_group_name" 의 값을 가져온다.
# "terraform-example-instance" 값이 들어간다.
name = var.security_group_name
# 보안 그룹 작성 사용법
# https://registry.terraform.io/providers/hashicorp/aws/latest/docs/resources/security_group
ingress {
from_port = 80
to_port = 80
protocol = "tcp"
cidr_blocks = ["0.0.0.0/0"]
}
ingress {
from_port = 22
to_port = 22
protocol = "tcp"
cidr_blocks = ["0.0.0.0/0"]
}
# protocol이 ICMP이면 from/to_port 에서 `-1` 값은 모든 port를 의미
# protocol에서 `-1` 값은 모든 프로토콜을
# 즉 아래는 로컬에서 나가는 모든 요청을 의미
egress {
from_port = 0
to_port = 0
protocol = "-1"
cidr_blocks = ["0.0.0.0/0"]
}
tags = {
Name = "tf-web"
}
}
variable "security_group_name" {
description = "The name of the security group"
type = string
default = "terraform-example-instance"
}
# Output Values 사용법
# https://developer.hashicorp.com/terraform/language/values/outputs
output "public_ip" {
value = aws_instance.example.public_ip
description = "The public IP of the Instance"
}
----------------------------------------terraform init
## Provider 를 확인하여 플러그인을 설치
terraform init
----------------------------------------
Initializing the backend...

Initializing provider plugins...
- Finding latest version of hashicorp/aws...
- Installing hashicorp/aws v4.67.0...
- Installed hashicorp/aws v4.67.0 (signed by HashiCorp)

Terraform has created a lock file .terraform.lock.hcl to record the provider
selections it made above. Include this file in your version control repository
so that Terraform can guarantee to make the same selections by default when
you run "terraform init" in the future.

Terraform has been successfully initialized!

You may now begin working with Terraform. Try running "terraform plan" to see
any changes that are required for your infrastructure. All Terraform commands
should now work.

If you ever set or change modules or backend configuration for Terraform,
rerun this command to reinitialize your working directory. If you forget, other
commands will detect it and remind you to do so if necessary.
----------------------------------------
terraform plan,+항목은 추가를 의미
## 있는 자원 없는 자원을 파악해 어떻게 수행할지 보여줌
terraform plan
----------------------------------------

Terraform used the selected providers to generate the following execution plan.
Resource actions are indicated with the following symbols:
  + create

Terraform will perform the following actions:

  # aws_instance.example will be created
  + resource "aws_instance" "example" {
      + ami                                  = "ami-035da6a0773842f64"
      + arn                                  = (known after apply)
      + associate_public_ip_address          = (known after apply)
      + availability_zone                    = (known after apply)
      + cpu_core_count                       = (known after apply)
      + cpu_threads_per_core                 = (known after apply)
      + disable_api_stop                     = (known after apply)
      + disable_api_termination              = (known after apply)
      + ebs_optimized                        = (known after apply)
      + get_password_data                    = false
      + host_id                              = (known after apply)
      + host_resource_group_arn              = (known after apply)
      + iam_instance_profile                 = (known after apply)
      + id                                   = (known after apply)
      + instance_initiated_shutdown_behavior = (known after apply)
      + instance_state                       = (known after apply)
      + instance_type                        = "t2.micro"
      + ipv6_address_count                   = (known after apply)
      + ipv6_addresses                       = (known after apply)
      + key_name                             = (known after apply)
      + monitoring                           = (known after apply)
      + outpost_arn                          = (known after apply)
      + password_data                        = (known after apply)
      + placement_group                      = (known after apply)
      + placement_partition_number           = (known after apply)
      + primary_network_interface_id         = (known after apply)
      + private_dns                          = (known after apply)
      + private_ip                           = (known after apply)
      + public_dns                           = (known after apply)
      + public_ip                            = (known after apply)
      + secondary_private_ips                = (known after apply)
      + security_groups                      = (known after apply)
      + source_dest_check                    = true
      + subnet_id                            = (known after apply)
      + tags                                 = {
          + "Name" = "terraform-example"
        }
      + tags_all                             = {
          + "Name" = "terraform-example"
        }
      + tenancy                              = (known after apply)
      + user_data                            = "9fc7eb74df4aa342b34cc357e2f3c9149443d8e1"
      + user_data_base64                     = (known after apply)
      + user_data_replace_on_change          = false
      + vpc_security_group_ids               = (known after apply)
    }

  # aws_security_group.instance will be created
  + resource "aws_security_group" "instance" {
      + arn                    = (known after apply)
      + description            = "Managed by Terraform"
      + egress                 = [
          + {
              + cidr_blocks      = [
                  + "0.0.0.0/0",
                ]
              + description      = ""
              + from_port        = 0
              + ipv6_cidr_blocks = []
              + prefix_list_ids  = []
              + protocol         = "-1"
              + security_groups  = []
              + self             = false
              + to_port          = 0
            },
        ]
      + id                     = (known after apply)
      + ingress                = [
          + {
              + cidr_blocks      = [
                  + "0.0.0.0/0",
                ]
              + description      = ""
              + from_port        = 22
              + ipv6_cidr_blocks = []
              + prefix_list_ids  = []
              + protocol         = "tcp"
              + security_groups  = []
              + self             = false
              + to_port          = 22
            },
          + {
              + cidr_blocks      = [
                  + "0.0.0.0/0",
                ]
              + description      = ""
              + from_port        = 80
              + ipv6_cidr_blocks = []
              + prefix_list_ids  = []
              + protocol         = "tcp"
              + security_groups  = []
              + self             = false
              + to_port          = 80
            },
        ]
      + name                   = "terraform-example-instance"
      + name_prefix            = (known after apply)
      + owner_id               = (known after apply)
      + revoke_rules_on_delete = false
      + tags                   = {
          + "Name" = "tf-web"
        }
      + tags_all               = {
          + "Name" = "tf-web"
        }
      + vpc_id                 = (known after apply)
    }

Plan: 2 to add, 0 to change, 0 to destroy.

Changes to Outputs:
  + public_ip = (known after apply)

───────────────────────────────────────────────────────────────────────────────────

Note: You didn't use the -out option to save this plan, so Terraform can't
guarantee to take exactly these actions if you run "terraform apply" now.
----------------------------------------
terraform apply
## 적용
terraform apply
----------------------------------------

...

aws_security_group.instance: Creating...
aws_security_group.instance: Creation complete after 2s [id=sg-0247d139426f1928d]
aws_instance.example: Creating...
aws_instance.example: Still creating... [10s elapsed]
aws_instance.example: Still creating... [20s elapsed]
aws_instance.example: Still creating... [30s elapsed]
aws_instance.example: Creation complete after 32s [id=i-0438d1a40a85ea9e9]

Apply complete! Resources: 2 added, 0 changed, 0 destroyed.

Outputs:

public_ip = "15.165.235.5"- 웹서버 접속 확인 - Outpups 으로 나온
public_ip의 값
curl 15.165.235.5 - 태그 변경 후
terraform-example->tf-web01,~는 변경 사항을 의미
\# terraform plan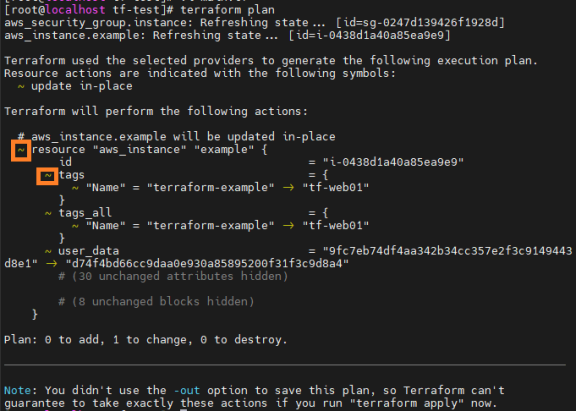
terraform.tfstate에 과거에 진행한 내역이 있다.

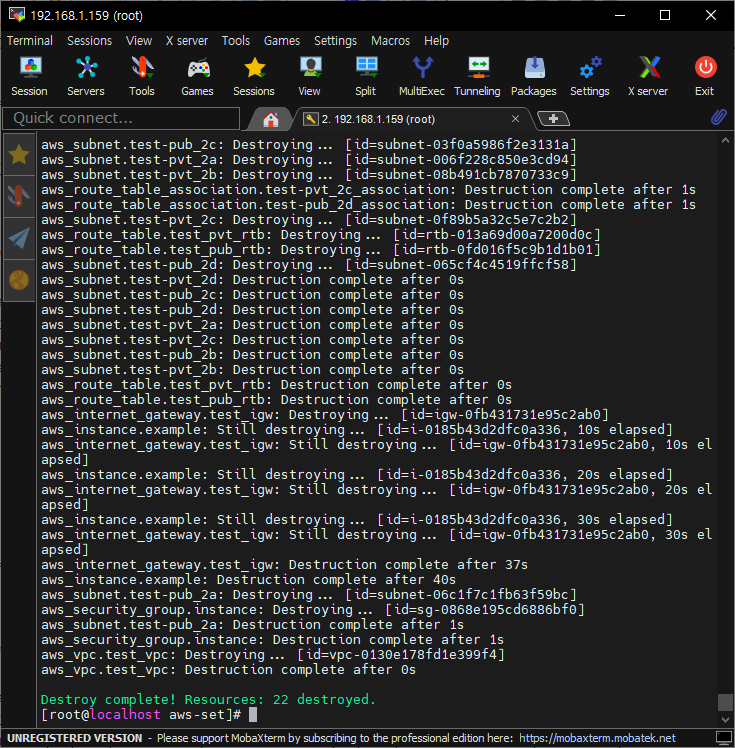
리소스 정리
terraform destroy,-항목은 삭제를 의미
VPC 실습
- 워크스페이스 생성(작업 공간 생성)
mkdir aws-set && cd $_- 하나의 파일로 작성 가능하나 하나의 작업 공간에 분리된 파일로 작성하고
terraform작업을 수행할 수 있다.
- 하나의 파일로 작성 가능하나 하나의 작업 공간에 분리된 파일로 작성하고
- variables.tf
vi variables.tf
---------------------------------------
variable "security_group_name" {
  description = "The name of the security group"
  type        = string
  default     = "terraform-example-instance"
}
---------------------------------------- main.tf
vi main.tf
---------------------------------------
provider "aws" {
  region = "ap-northeast-2"
}

### vpc start ###

resource "aws_vpc" "test_vpc" {
  cidr_block  = "192.168.0.0/16"
  enable_dns_hostnames = true # VPC가 퍼블릭 IP 주소가 있는 인스턴스에 퍼블릭 DNS 호스트 이름을 할당하도록 지원할 여부를 결정
  enable_dns_support = true # Amazon에서 제공하는 DNS 서버를 통해 DNS 확인을 지원하는지 여부를 결정
  instance_tenancy = "default"

  tags = {
    Name = "test-vpc"
  }
}

# https://developer.hashicorp.com/terraform/language/data-sources
# https://registry.terraform.io/providers/hashicorp/aws/latest/docs/data-sources/availability_zones
# 가용 영역 데이터 소스를 사용하면 공급자에 구성된 리전 내의 AWS 계정이 액세스할 수 있는 AWS 가용 영역 목록에 액세스할 수 있습니다.
# 어떻게 하면 서브넷을 좀더 편하게 만들 수 있을까? 동적으로??? 나의 계정내에 존재하는
# 이미 존재하는 리소스를 가져오는 것
# 사용 가능한 상태인 가용영역 정보를 가져오라
data "aws_availability_zones" "available" {
  state = "available"
}

# test_vpc 라는 곳에서 id를 가져오겠다.
resource "aws_subnet" "test-pub_2a" {
  vpc_id = aws_vpc.test_vpc.id
  cidr_block = "192.168.0.0/20"
  map_public_ip_on_launch = true

	# 가져오려는 가용영역이 몇번째 가용 영역이냐? names[idx]
	# ap-northeast-2a : names[0]
  availability_zone = data.aws_availability_zones.available.names[0]
  tags = {
    Name = "test-pub-2a"
  }
}

resource "aws_subnet" "test-pub_2b" {
  vpc_id = aws_vpc.test_vpc.id
  cidr_block = "192.168.16.0/20"
  map_public_ip_on_launch = true

	# ap-northeast-2b : names[1]
  availability_zone = data.aws_availability_zones.available.names[1]
  tags = {
    Name = "test-pub-2b"
  }
}

resource "aws_subnet" "test-pub_2c" {
  vpc_id = aws_vpc.test_vpc.id
  cidr_block = "192.168.32.0/20"
  map_public_ip_on_launch = true

	# ap-northeast-2c : names[2]
  availability_zone = data.aws_availability_zones.available.names[2]
  tags = {
    Name = "test-pub-2c"
  }
}

resource "aws_subnet" "test-pub_2d" {
  vpc_id = aws_vpc.test_vpc.id
  cidr_block = "192.168.48.0/20"
  map_public_ip_on_launch = true

	# ap-northeast-2d : names[3]
  availability_zone = data.aws_availability_zones.available.names[3]
  tags = {
    Name = "test-pub-2d"
  }
}

resource "aws_subnet" "test-pvt_2a" {
  vpc_id = aws_vpc.test_vpc.id
  cidr_block = "192.168.64.0/20"

	# map_public_ip_on_launch 는 `default : false` 라 생략 가능
  map_public_ip_on_launch = false
  availability_zone = data.aws_availability_zones.available.names[0]
  tags = {
    Name = "test-pvt-2a"
  }
}

resource "aws_subnet" "test-pvt_2b" {
  vpc_id = aws_vpc.test_vpc.id
  cidr_block = "192.168.80.0/20"
  availability_zone = data.aws_availability_zones.available.names[1]
  tags = {
    Name = "test-pvt-2b"
  }
}

resource "aws_subnet" "test-pvt_2c" {
  vpc_id = aws_vpc.test_vpc.id
  cidr_block = "192.168.96.0/20"
  availability_zone = data.aws_availability_zones.available.names[2]
  tags = {
    Name = "test-pvt-2c"
  }
}

resource "aws_subnet" "test-pvt_2d" {
  vpc_id = aws_vpc.test_vpc.id
  cidr_block = "192.168.112.0/20"
  availability_zone = data.aws_availability_zones.available.names[3]
  tags = {
    Name = "test-pvt-2d"
  }
}

	# 만듬과 동시에 Attach 작업도 수행된다.
resource "aws_internet_gateway" "test_igw" {
  vpc_id = aws_vpc.test_vpc.id
  tags = {
    Name = "test-igw"
  }
}

	# 라우팅 테이블 생성과 동시에 라우팅 경로 설정
resource "aws_route_table" "test_pub_rtb" {
  vpc_id = aws_vpc.test_vpc.id

  route {
    cidr_block = "0.0.0.0/0"
    gateway_id = aws_internet_gateway.test_igw.id
  }
  tags = {
    Name = "test-pub-rtb"
  }
}

resource "aws_route_table" "test_pvt_rtb" {
  vpc_id = aws_vpc.test_vpc.id

  tags = {
    Name = "test-pvt-rtb"
  }
}

resource "aws_route_table_association" "test-pub_2a_association" {
  subnet_id = aws_subnet.test-pub_2a.id
  route_table_id = aws_route_table.test_pub_rtb.id
}

resource "aws_route_table_association" "test-pub_2b_association" {
  subnet_id = aws_subnet.test-pub_2b.id
  route_table_id = aws_route_table.test_pub_rtb.id
}

resource "aws_route_table_association" "test-pub_2c_association" {
  subnet_id = aws_subnet.test-pub_2c.id
  route_table_id = aws_route_table.test_pub_rtb.id
}

resource "aws_route_table_association" "test-pub_2d_association" {
  subnet_id = aws_subnet.test-pub_2d.id
  route_table_id = aws_route_table.test_pub_rtb.id
}

resource "aws_route_table_association" "test-pvt_2a_association" {
  subnet_id = aws_subnet.test-pvt_2a.id
  route_table_id = aws_route_table.test_pvt_rtb.id
}

resource "aws_route_table_association" "test-pvt_2b_association" {
  subnet_id = aws_subnet.test-pvt_2b.id
  route_table_id = aws_route_table.test_pvt_rtb.id
}

resource "aws_route_table_association" "test-pvt_2c_association" {
  subnet_id = aws_subnet.test-pvt_2c.id
  route_table_id = aws_route_table.test_pvt_rtb.id
}

resource "aws_route_table_association" "test-pvt_2d_association" {
  subnet_id = aws_subnet.test-pvt_2d.id
  route_table_id = aws_route_table.test_pvt_rtb.id
}

### vpc end ###

### ec2 start ###

resource "aws_instance" "example" {
  ami                    = "ami-035da6a0773842f64"
  instance_type          = "t2.micro"
  subnet_id              = aws_subnet.test-pub_2a.id
  vpc_security_group_ids = [aws_security_group.instance.id]
  key_name               = "test-key"

	# 유저 데이터, 외부 파일에서 불러오는 법 file(<FILE_PATH>)
  user_data              = file("user-data.sh")

  tags = {
    Name = "terraform-example"
  }
}

resource "aws_security_group" "instance" {
  vpc_id = aws_vpc.test_vpc.id
  name = var.security_group_name

	# from, to는 포트의 범위를 의미 Ex. 80-90번, 80번 부터 90으로 오는 요청
  ingress {
    from_port   = 80
    to_port     = 80
    protocol    = "tcp"
    cidr_blocks = ["0.0.0.0/0"]
  }
  ingress {
    from_port   = 22
    to_port     = 22
    protocol    = "tcp"
    cidr_blocks = ["106.253.56.124/32"]
  }
  ingress {
    from_port   = -1		# icmp 요청이 오는 모든 포트
    to_port     = -1
    protocol    = "icmp"
    cidr_blocks = ["0.0.0.0/0"]
  }
  egress {
    from_port   = 0
    to_port     = 0					# 모든 포트
    protocol    = "-1"				# 모든 프로토콜
    cidr_blocks = ["0.0.0.0/0"]		# 모든 목적지
  }
  tags = {
    Name = "terraform-sg"
  }
}

### ec2 end ###
---------------------------------------- user-data.sh,
food.tar를 이용하기 위해서 이미 s3에 파일을 퍼블릭 권한으로 업로드 한다.
vi user-data.sh
---------------------------------------
#cloud-boothook
#!/bin/bash
yum install -y httpd wget
systemctl enable --now httpd
cd /tmp
wget https://s3.ap-northeast-2.amazonaws.com/seoul.goorm.shop/food.tar
tar xvf food.tar -C /var/www/html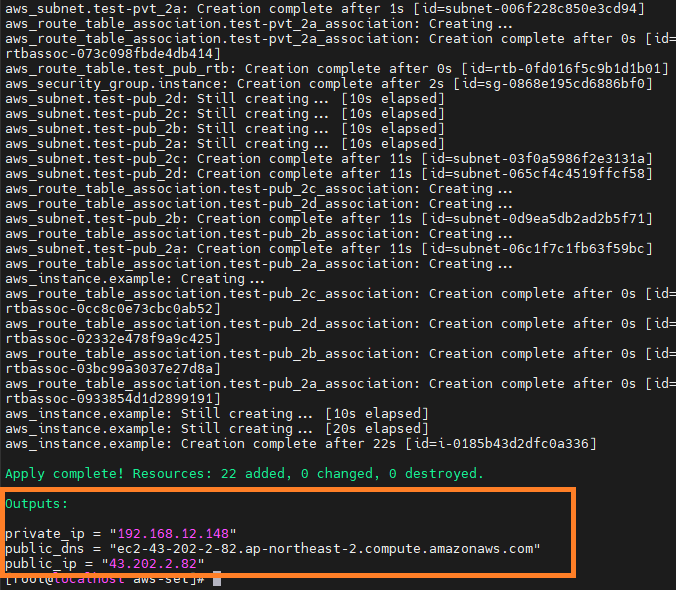
---------------------------------------- output.tf
vi out.put.tf
---------------------------------------
output "public_ip" {
  value       = aws_instance.example.public_ip
  description = "The public IP of the Instance"
}

output "public_dns" {
  value       = aws_instance.example.public_dns
  description = "The Public dns of the Instance"
}

output "private_ip" {
  value       = aws_instance.example.private_ip
  description = "The Private_ip of the Instance"
}
----------------------------------------
리소스 생성/삭제 작업
# 리소스 생성
terraform init
terraform plan
terraform apply -auto-approve # -auto-approve 옵션을 추가하면 yes 생략 가능
terraform output public_ip

# 리소스 제거
terraform destroy -auto-approve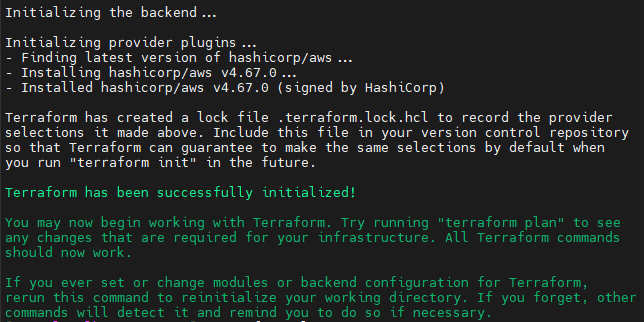
- 웹서버 접속

- 리소스 제거
destroy
- 웹서버 접속
EC2 ALB 실습
- lifecycle
- create-resources-before-they-are-destroyed
- 반드시 발생해야 하는 변경 사항의 경우
create_before_destroy특성을 사용하여 이전 리소스를 삭제하기 전에 새 리소스를 생성
- 워크스페이스 생성
mkdir ec2-alb && cd $_- main.tf
provider "aws" {
  region = "ap-northeast-2"
}

resource "aws_vpc" "test_vpc" {
  cidr_block  = "192.168.0.0/16"
  enable_dns_hostnames = true
  enable_dns_support = true
  instance_tenancy = "default"

  tags = {
    Name = "test-vpc"
  }
}

data "aws_availability_zones" "available" {
  state = "available"
}

resource "aws_subnet" "test-pub_2a" {
  vpc_id = aws_vpc.test_vpc.id
  cidr_block = "192.168.0.0/20"
  map_public_ip_on_launch = true
  availability_zone = data.aws_availability_zones.available.names[0]
  tags = {
    Name = "test-pub-2a"
  }
}

resource "aws_subnet" "test-pub_2b" {
  vpc_id = aws_vpc.test_vpc.id
  cidr_block = "192.168.16.0/20"
  map_public_ip_on_launch = true
  availability_zone = data.aws_availability_zones.available.names[1]
  tags = {
    Name = "test-pub-2b"
  }
}

resource "aws_subnet" "test-pub_2c" {
  vpc_id = aws_vpc.test_vpc.id
  cidr_block = "192.168.32.0/20"
  map_public_ip_on_launch = true
  availability_zone = data.aws_availability_zones.available.names[2]
  tags = {
    Name = "test-pub-2c"
  }
}

resource "aws_subnet" "test-pub_2d" {
  vpc_id = aws_vpc.test_vpc.id
  cidr_block = "192.168.48.0/20"
  map_public_ip_on_launch = true
  availability_zone = data.aws_availability_zones.available.names[3]
  tags = {
    Name = "test-pub-2d"
  }
}

resource "aws_subnet" "test-pvt_2a" {
  vpc_id = aws_vpc.test_vpc.id
  cidr_block = "192.168.64.0/20"
  map_public_ip_on_launch = false
  availability_zone = data.aws_availability_zones.available.names[0]
  tags = {
    Name = "test-pvt-2a"
  }
}

resource "aws_subnet" "test-pvt_2b" {
  vpc_id = aws_vpc.test_vpc.id
  cidr_block = "192.168.80.0/20"
  availability_zone = data.aws_availability_zones.available.names[1]
  tags = {
    Name = "test-pvt-2b"
  }
}

resource "aws_subnet" "test-pvt_2c" {
  vpc_id = aws_vpc.test_vpc.id
  cidr_block = "192.168.96.0/20"
  availability_zone = data.aws_availability_zones.available.names[2]
  tags = {
    Name = "test-pvt-2c"
  }
}

resource "aws_subnet" "test-pvt_2d" {
  vpc_id = aws_vpc.test_vpc.id
  cidr_block = "192.168.112.0/20"
  availability_zone = data.aws_availability_zones.available.names[3]
  tags = {
    Name = "test-pvt-2d"
  }
}

resource "aws_internet_gateway" "test_igw" {
  vpc_id = aws_vpc.test_vpc.id
  tags = {
    Name = "test-igw"
  }
}

resource "aws_route_table" "test_pub_rtb" {
  vpc_id = aws_vpc.test_vpc.id

  route {
    cidr_block = "0.0.0.0/0"
    gateway_id = aws_internet_gateway.test_igw.id
  }
  tags = {
    Name = "test-pub-rtb"
  }
}

resource "aws_route_table" "test_pvt_rtb" {
  vpc_id = aws_vpc.test_vpc.id

  tags = {
    Name = "test-pvt-rtb"
  }
}

resource "aws_route_table_association" "test-pub_2a_association" {
  subnet_id = aws_subnet.test-pub_2a.id
  route_table_id = aws_route_table.test_pub_rtb.id
}

resource "aws_route_table_association" "test-pub_2b_association" {
  subnet_id = aws_subnet.test-pub_2b.id
  route_table_id = aws_route_table.test_pub_rtb.id
}

resource "aws_route_table_association" "test-pub_2c_association" {
  subnet_id = aws_subnet.test-pub_2c.id
  route_table_id = aws_route_table.test_pub_rtb.id
}

resource "aws_route_table_association" "test-pub_2d_association" {
  subnet_id = aws_subnet.test-pub_2d.id
  route_table_id = aws_route_table.test_pub_rtb.id
}

resource "aws_route_table_association" "test-pvt_2a_association" {
  subnet_id = aws_subnet.test-pvt_2a.id
  route_table_id = aws_route_table.test_pvt_rtb.id
}

resource "aws_route_table_association" "test-pvt_2b_association" {
  subnet_id = aws_subnet.test-pvt_2b.id
  route_table_id = aws_route_table.test_pvt_rtb.id
}

resource "aws_route_table_association" "test-pvt_2c_association" {
  subnet_id = aws_subnet.test-pvt_2c.id
  route_table_id = aws_route_table.test_pvt_rtb.id
}

resource "aws_route_table_association" "test-pvt_2d_association" {
  subnet_id = aws_subnet.test-pvt_2d.id
  route_table_id = aws_route_table.test_pvt_rtb.id
}

variable "security_group_name" {
  description = "The name of the security group"
  type        = string
  default     = "test-sg-alb"
}

resource "aws_security_group" "test_web_sg_alb" {
  name   = var.security_group_name
#  vpc_id = data.aws_vpc.test_vpc.id
  vpc_id = aws_vpc.test_vpc.id
  ingress {
    from_port   = 80
    to_port     = 80
    protocol    = "tcp"
    cidr_blocks = ["0.0.0.0/0"]
  }
  ingress {
    from_port   = 443
    to_port     = 443
    protocol    = "tcp"
    cidr_blocks = ["0.0.0.0/0"]
  }
  egress {
    from_port   = 0
    to_port     = 0
    protocol    = "-1"
    cidr_blocks = ["0.0.0.0/0"]
  }
  tags = {
    Name = "test-sg-alb"
  }
}

resource "aws_lb" "frontend" {
	# 로드밸런서의 이름
  name               = "alb-example"
	# 외부에서 인터넷을 통해서 접근하는 로드밸런서임을 설정
  internal           = false
	# 로드 밸런서 타입 지정
  load_balancer_type = "application"
  security_groups    = [aws_security_group.test_web_sg_alb.id]
  subnets            = [
    aws_subnet.test-pub_2a.id,
    aws_subnet.test-pub_2c.id
  ]

  tags = {
    Name = "test-alb"
  }

	# https://developer.hashicorp.com/terraform/language/meta-arguments/lifecycle
	# https://developer.hashicorp.com/terraform/tutorials/state/resource-lifecycle?utm_source=WEBSITE&utm_medium=WEB_IO&utm_offer=ARTICLE_PAGE&utm_content=DOCS#create-resources-before-they-are-destroyed
	# 반드시 발생해야 하는 변경 사항의 경우 `create_before_destroy` 특성을 사용하여 이전 리소스를 삭제하기 전에 새 리소스를 생성
  lifecycle { create_before_destroy = true }
}


resource "aws_instance" "alb_vm_01" {
  ami                    = "ami-035da6a0773842f64"
  instance_type          = "t2.micro"
  subnet_id              = aws_subnet.test-pub_2a.id
  vpc_security_group_ids = [aws_security_group.test_web_sg_alb.id]
  key_name  = "test-key"
  user_data = <<-EOF
              #! /bin/bash
              yum install -y httpd
              systemctl enable --now httpd
              echo "Hello, Terraform01" > /var/www/html/index.html
              EOF

  tags = {
    Name = "ALB01"
  }
}

resource "aws_instance" "alb_vm_02" {
  ami                    = "ami-035da6a0773842f64"
  instance_type          = "t2.micro"
  subnet_id              = aws_subnet.test-pub_2c.id
  vpc_security_group_ids = [aws_security_group.test_web_sg_alb.id]
  key_name  = "test-key"
  user_data = <<-EOF
              #! /bin/bash
              yum install -y httpd
              systemctl enable --now httpd
              echo "Hello, Terraform02" > /var/www/html/index.html
              EOF

  tags = {
    Name = "ALB02"
  }
}

resource "aws_lb_target_group" "tg" {
  name        = "TargetGroup"
  port        = 80
  target_type = "instance"
  protocol    = "HTTP"
  vpc_id      = aws_vpc.test_vpc.id

  health_check {
    path                = "/"
    protocol            = "HTTP"
    matcher             = "200"
    interval            = 15
    timeout             = 3
    healthy_threshold   = 2
    unhealthy_threshold = 2
  }
}

	# 로드 밸런서 와 대상 그룹은 리소스 ID 정보 대신 Amazon Resource Number(;ARN)를 이용
resource "aws_alb_target_group_attachment" "tgattachment01" {
  target_group_arn = aws_lb_target_group.tg.arn
  target_id        = aws_instance.alb_vm_01.id
  port             = 80
}

resource "aws_alb_target_group_attachment" "tgattachment02" {
  target_group_arn = aws_lb_target_group.tg.arn
  target_id        = aws_instance.alb_vm_02.id
  port             = 80
}

resource "aws_lb_listener" "front_end" {
  load_balancer_arn = aws_lb.frontend.arn
  port              = "80"
  protocol          = "HTTP"

	# 규칙
  default_action {
    type             = "forward"
    target_group_arn = aws_lb_target_group.tg.arn
  }
}

output "lb_dns_name" {
  description = "The DNS name of the load balancer."
  value       = aws_lb.frontend.dns_name
}-
리소스 생성 / 제거
terraform init # 구성만 참조하고 원격 상태, 공급자 API 등과 # 같은 원격 서비스에 액세스하지 않고 디렉터리의 구성 파일을 유효성 검사합니다. terraform validate terraform plan terraform apply -auto-approve terraform output lb_dns_name ## 리소스 제거 terraform destory -auto-approve- 확인
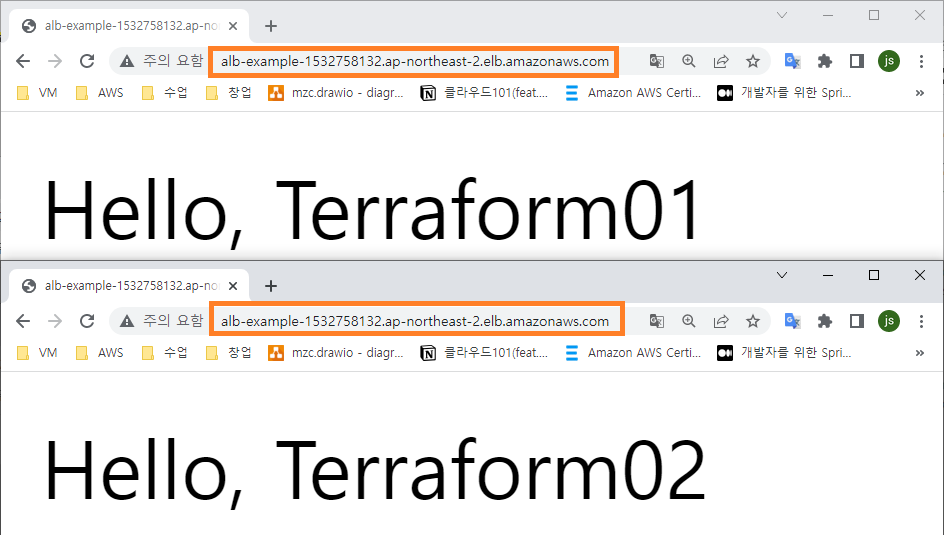
- 확인
EC2 ASG 실습
- 워크스페이스 생성
mkdir ec2-asg && cd $_ - variables.tf
vi variables.tf
---------------------------------------
variable "instance_security_group_name" {
  description = "The name of the security group for the EC2 Instances"
  type        = string
  default     = "terraform-example-instance"
}

variable "http_port" {
  description = "The port the server will use for HTTP requests"
  type        = number
  default     = 80
}

variable "ssh_port" {
  description = "The port the server will use for SSH requests"
  type        = number
  default     = 22
}

variable "alb_name" {
  description = "The name of the ALB"
  type        = string
  default     = "terraform-asg-example"
}

variable "alb_security_group_name" {
  description = "The name of the security group for the ALB"
  type        = string
  default     = "terraform-example-alb"
}
---------------------------------------- main.tf
vi main.tf
---------------------------------------
provider "aws" {
  region = "ap-northeast-2"
}

### test-vpc ###

resource "aws_vpc" "test_vpc" {
  cidr_block  = "192.168.0.0/16"
  enable_dns_hostnames = true
  enable_dns_support = true
  instance_tenancy = "default"

  tags = {
    Name = "test-vpc"
  }
}

data "aws_availability_zones" "available" {
  state = "available"
}

resource "aws_subnet" "test-pub_2a" {
  vpc_id = aws_vpc.test_vpc.id
  cidr_block = "192.168.0.0/20"
  map_public_ip_on_launch = true
  availability_zone = data.aws_availability_zones.available.names[0]
  tags = {
    Name = "test-pub-2a"
  }
}

resource "aws_subnet" "test-pub_2b" {
  vpc_id = aws_vpc.test_vpc.id
  cidr_block = "192.168.16.0/20"
  map_public_ip_on_launch = true
  availability_zone = data.aws_availability_zones.available.names[1]
  tags = {
    Name = "test-pub-2b"
  }
}

resource "aws_subnet" "test-pub_2c" {
  vpc_id = aws_vpc.test_vpc.id
  cidr_block = "192.168.32.0/20"
  map_public_ip_on_launch = true
  availability_zone = data.aws_availability_zones.available.names[2]
  tags = {
    Name = "test-pub-2c"
  }
}

resource "aws_subnet" "test-pub_2d" {
  vpc_id = aws_vpc.test_vpc.id
  cidr_block = "192.168.48.0/20"
  map_public_ip_on_launch = true
  availability_zone = data.aws_availability_zones.available.names[3]
  tags = {
    Name = "test-pub-2d"
  }
}

resource "aws_subnet" "test-pvt_2a" {
  vpc_id = aws_vpc.test_vpc.id
  cidr_block = "192.168.64.0/20"
  map_public_ip_on_launch = false
  availability_zone = data.aws_availability_zones.available.names[0]
  tags = {
    Name = "test-pvt-2a"
  }
}

resource "aws_subnet" "test-pvt_2b" {
  vpc_id = aws_vpc.test_vpc.id
  cidr_block = "192.168.80.0/20"
  availability_zone = data.aws_availability_zones.available.names[1]
  tags = {
    Name = "test-pvt-2b"
  }
}

resource "aws_subnet" "test-pvt_2c" {
  vpc_id = aws_vpc.test_vpc.id
  cidr_block = "192.168.96.0/20"
  availability_zone = data.aws_availability_zones.available.names[2]
  tags = {
    Name = "test-pvt-2c"
  }
}

resource "aws_subnet" "test-pvt_2d" {
  vpc_id = aws_vpc.test_vpc.id
  cidr_block = "192.168.112.0/20"
  availability_zone = data.aws_availability_zones.available.names[3]
  tags = {
    Name = "test-pvt-2d"
  }
}

resource "aws_internet_gateway" "test_igw" {
  vpc_id = aws_vpc.test_vpc.id
  tags = {
    Name = "test-igw"
  }
}

resource "aws_route_table" "test_pub_rtb" {
  vpc_id = aws_vpc.test_vpc.id

  route {
    cidr_block = "0.0.0.0/0"
    gateway_id = aws_internet_gateway.test_igw.id
  }
  tags = {
    Name = "test-pub-rtb"
  }
}

resource "aws_route_table" "test_pvt_rtb" {
  vpc_id = aws_vpc.test_vpc.id

  tags = {
    Name = "test-pvt-rtb"
  }
}

resource "aws_route_table_association" "test-pub_2a_association" {
  subnet_id = aws_subnet.test-pub_2a.id
  route_table_id = aws_route_table.test_pub_rtb.id
}

resource "aws_route_table_association" "test-pub_2b_association" {
  subnet_id = aws_subnet.test-pub_2b.id
  route_table_id = aws_route_table.test_pub_rtb.id
}

resource "aws_route_table_association" "test-pub_2c_association" {
  subnet_id = aws_subnet.test-pub_2c.id
  route_table_id = aws_route_table.test_pub_rtb.id
}

resource "aws_route_table_association" "test-pub_2d_association" {
  subnet_id = aws_subnet.test-pub_2d.id
  route_table_id = aws_route_table.test_pub_rtb.id
}

resource "aws_route_table_association" "test-pvt_2a_association" {
  subnet_id = aws_subnet.test-pvt_2a.id
  route_table_id = aws_route_table.test_pvt_rtb.id
}

resource "aws_route_table_association" "test-pvt_2b_association" {
  subnet_id = aws_subnet.test-pvt_2b.id
  route_table_id = aws_route_table.test_pvt_rtb.id
}

resource "aws_route_table_association" "test-pvt_2c_association" {
  subnet_id = aws_subnet.test-pvt_2c.id
  route_table_id = aws_route_table.test_pvt_rtb.id
}

resource "aws_route_table_association" "test-pvt_2d_association" {
  subnet_id = aws_subnet.test-pvt_2d.id
  route_table_id = aws_route_table.test_pvt_rtb.id
}

### asg ###

resource "aws_security_group" "instance" {
  name   = var.instance_security_group_name
  vpc_id = aws_vpc.test_vpc.id

  ingress {
    from_port   = var.http_port
    to_port     = var.http_port
    protocol    = "tcp"
    cidr_blocks = ["0.0.0.0/0"]
  }
  ingress {
    from_port   = 22
    to_port     = 22
    protocol    = "tcp"
    cidr_blocks = ["0.0.0.0/0"]
  }
  ingress {
    from_port   = -1
    to_port     = -1
    protocol    = "icmp"
    cidr_blocks = ["0.0.0.0/0"]
  }
  egress {
    from_port   = 0
    to_port     = 0
    protocol    = "-1"
    cidr_blocks = ["0.0.0.0/0"]
  }
}

	# 시작 구성, 나중에 시작 템플릿으로 해보는 것도?
resource "aws_launch_configuration" "example" {
  image_id        = "ami-035da6a0773842f64"
  instance_type   = "t2.micro"
  security_groups = [aws_security_group.instance.id]
  key_name        = "test-key"

	# 웹서버가 설치된 이미지를 생성해서 사용하게 되면 필요 없어진다.
  # user_data       = file("user-data.sh")
  user_data       = file("user-data.sh")

  # Required when using a launch configuration with an auto scaling group.
  lifecycle {
    create_before_destroy = true
  }
}

	# 오토스케일링 그룹 설정 - 가용영역, 설정 정보 기입
resource "aws_autoscaling_group" "example" {
  launch_configuration = aws_launch_configuration.example.name
  vpc_zone_identifier  = [
    aws_subnet.test-pub_2a.id,
    aws_subnet.test-pub_2c.id
  ]

  target_group_arns = [aws_lb_target_group.asg.arn]

	# https://stackoverflow.com/questions/42466157/whats-the-difference-between-elb-health-check-and-ec2-health-check
	# 데몬이 죽어서 반응이 안보여도 실제 앱이 작동하는지 확인 하고 인스턴스를 관리
	# default; EC2
  health_check_type = "ELB"

  min_size         = 2
  desired_capacity = 2
  max_size         = 4

  tag {
    key                 = "Name"
    value               = "terraform-asg-example"
		# propagate; 전파
		# 태그 정보를 생성할때 전파( 넣겠다. )
    propagate_at_launch = true
  }
}

resource "aws_lb" "example" {

  name               = var.alb_name

	# ALB 설정
  load_balancer_type = "application"
	# 가용성을 생각해서 여러 서브넷에
  subnets            = [
    aws_subnet.test-pub_2a.id,
    aws_subnet.test-pub_2b.id,
    aws_subnet.test-pub_2c.id,
    aws_subnet.test-pub_2d.id
  ]
  security_groups    = [aws_security_group.alb.id]
}

resource "aws_lb_listener" "http" {
  load_balancer_arn = aws_lb.example.arn
  port              = var.http_port
  protocol          = "HTTP"

  default_action {
    type             = "forward"
    target_group_arn = aws_lb_target_group.asg.arn
  }
}

resource "aws_lb_target_group" "asg" {

  name = var.alb_name

  port     = var.http_port
  protocol = "HTTP"
  vpc_id   = aws_vpc.test_vpc.id

  health_check {
    path                = "/"
    protocol            = "HTTP"
    matcher             = "200"
    interval            = 15
    timeout             = 3
    healthy_threshold   = 2
    unhealthy_threshold = 2
  }
}

resource "aws_security_group" "alb" {
  vpc_id = aws_vpc.test_vpc.id
  name   = var.alb_security_group_name

  # Allow inbound HTTP requests
  ingress {
    from_port   = var.http_port
    to_port     = var.http_port
    protocol    = "tcp"
    cidr_blocks = ["0.0.0.0/0"]
  }

  # Allow all outbound requests
  egress {
    from_port   = 0
    to_port     = 0
    protocol    = "-1"
    cidr_blocks = ["0.0.0.0/0"]
  }
}

	# Scale-In 정책, 기본적으로 `policy_type` 은 `SimpleScaling`
resource "aws_autoscaling_policy" "scale_in" {
  name                   = "ScaleInPolicy"
  autoscaling_group_name = aws_autoscaling_group.example.name
	# ChangeInCapacity : 인스턴스 개수
  adjustment_type        = "ChangeInCapacity"
	# 인스턴스를 하나씩 제거한다.
  scaling_adjustment     = -1
	# 조정 활동이 완료된 후부터 다음 조정 활동이 시작될 수 있는 시간(초)
  cooldown               = 300
}

resource "aws_cloudwatch_metric_alarm" "scale_in" {
  alarm_description   = "Monitors CPU utilization for Terramino ASG"

	# Scale-In 정책에 영향을 받아 액션을 취하겠다.
  alarm_actions       = [aws_autoscaling_policy.scale_in.arn]
  alarm_name          = "ScaleInAlarm"

	# `threshold` 보다 작거나 같은 경우 (threshold 값 이하)
  comparison_operator = "LessThanOrEqualToThreshold"

	# 경보와 관련된 지표의 네임스페이스
  namespace           = "AWS/EC2"
  metric_name         = "CPUUtilization"
  threshold           = "30"
  evaluation_periods  = "1"

	# 지정된 항목이 적용되는 기간(초)
  period              = "300"
  statistic           = "Average"

	# 인스턴스 개별로 보거나 인스턴스 유형(type) 으로 묶어서 보거나 같은 오토스케일링 그룹으로 묶어서 보는 것
  dimensions = {
    AutoScalingGroupName = aws_autoscaling_group.example.name
  }
}

resource "aws_autoscaling_policy" "scale_out" {
  name                   = "ScaleOutPolicy"
  autoscaling_group_name = aws_autoscaling_group.example.name
  adjustment_type        = "ChangeInCapacity"
  scaling_adjustment     = 1
  cooldown               = 300
}

resource "aws_cloudwatch_metric_alarm" "scale_out" {
  alarm_description   = "Monitors CPU utilization for Terramino ASG"
  alarm_actions       = [aws_autoscaling_policy.scale_out.arn]
  alarm_name          = "ScaleOutAlarm"
  comparison_operator = "GreaterThanOrEqualToThreshold"
  namespace           = "AWS/EC2"
  metric_name         = "CPUUtilization"
  threshold           = "70"
  evaluation_periods  = "1"
  period              = "300"
  statistic           = "Average"

  dimensions = {
    AutoScalingGroupName = aws_autoscaling_group.example.name
  }
}
---------------------------------------- outputs.tf
vi outputs.tf
---------------------------------------
output "alb_dns_name" {
  value       = aws_lb.example.dns_name
  description = "The domain name of the load balancer"
}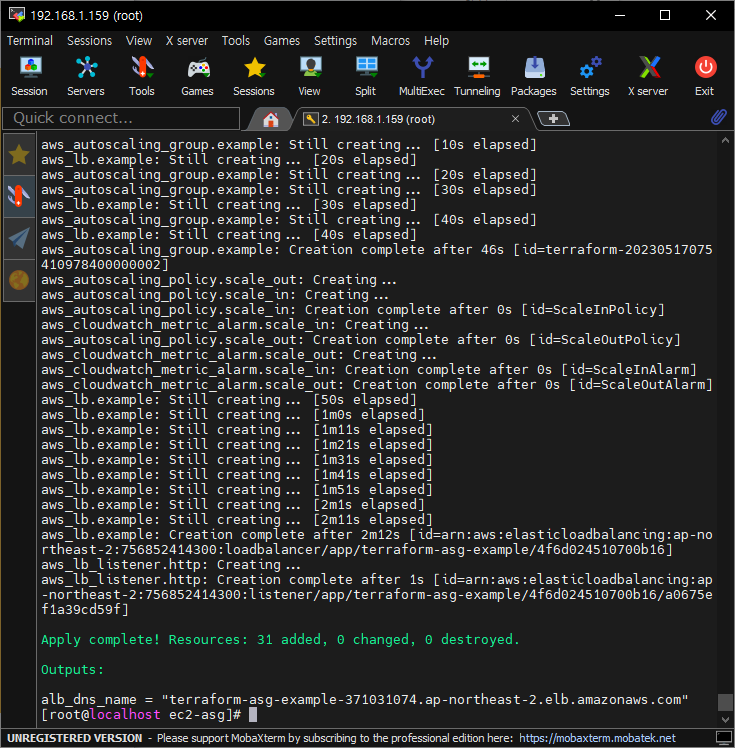
---------------------------------------- 리소스 생성/제거
terraform init
terraform validate
terraform plan
terraform apply -auto-approve
terraform output alb_dns_name

## 리소스 제거
terraform destroy -auto-approve- 리소스 생성 확인
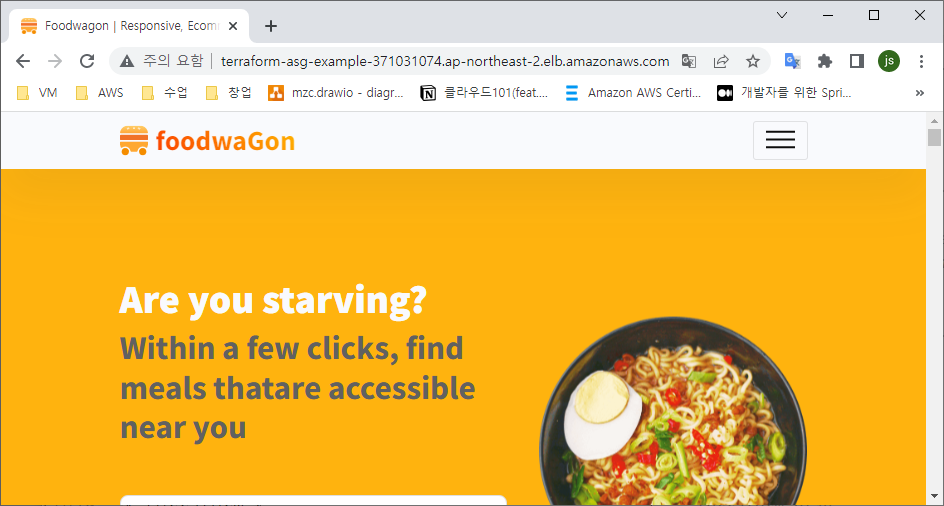
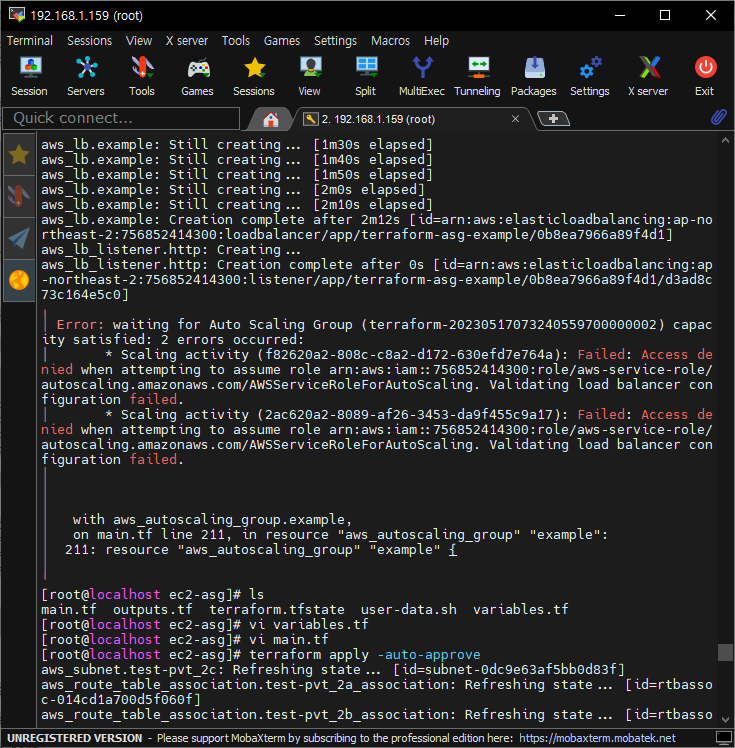
- 생성중 에러 - 다시 생성시 괜찮다. 사유는 ,,,
참고
- Terraform Registry
- Providers
- Provider 설정 / 찾기 / 명명 등의 내용
- What's the difference between elb health check and ec2 health check?
EC2 health check은 하이퍼바이저 및 네트워킹 관점에서 인스턴스 가용성을 감시합니다. 예를 들어 하드웨어 문제가 있는 경우 확인이 실패합니다. 또한 인스턴스가 잘못 구성되어 네트워크 요청에 응답하지 않는 경우 결함이 있는 것으로 표시됩니다.ELB health check은 인스턴스의 지정된 TCP 포트가 연결을 수락하는지 또는 지정된 웹 페이지가 2xx 코드를 반환하는지 확인합니다. 따라서 ELB 상태 확인은 조금 더 스마트하며 인스턴스가 작동하는지 확인하는 대신 실제 앱이 작동하는지 확인합니다.- 즉, 세 번째 검사 유형인 사용자 지정 상태 검사가 있습니다. 간단한 HTTP 요청으로 애플리케이션을 확인할 수 없고 고급 테스트 로직이 필요한 경우 API: Health Checks for Auto Scaling Instances를 통해 코드에서 사용자 지정 검사를 구현하고 인스턴스 상태를 설정할 수 있습니다.
hashicorp/http
- http (Data Source)
- 요청을 보내서 체크하는 예시
data "http" "example" {
  url = "https://checkpoint-api.hashicorp.com/v1/check/terraform"
  # method = "GET" # default value: "GET"

  # Optional request headers
  request_headers = {
    Accept = "application/json"
  }

  # https 요청을 보낸 응답 상태 코드가 201, 204 인지 확인하는 예시
  lifecycle {
    postcondition {
      condition     = contains([201, 204], self.status_code)
      error_message = "Status code invalid"
    }
  }
}