
Vue 컴포넌트 흐름
🔄 Provide/Inject
Provide/Inject는 Vue에서 깊이 중첩된 컴포넌트 간 통신을 위한 방법으로, 프롭 드릴링(Prop Drilling) 문제를 해결
Prop Drilling 문제
큰 컴포넌트 트리에서 조상 컴포넌트가 깊이 중첩된 자식 컴포넌트에게 정보를 전달하려면 중간의 모든 컴포넌트가 해당 프롭을 전달해야 하는 번거로움
상위 컴포넌트
  └── 중간 컴포넌트 1 (프롭 전달만 함)
      └── 중간 컴포넌트 2 (프롭 전달만 함)
          └── 목표 컴포넌트 (실제로 프롭 사용)
이 문제의 해결책은 공통 저장소를 만들어 공유
provide 사용법
상위 컴포넌트의 인스턴스 내부에 provide 객체를 생성하여 하위 컴포넌트에 데이터를 제공
// 컴포지션 API 사용
import { provide, ref } from 'vue'

// 단순 값 제공
provide('message', '안녕하세요')

// 반응형 값 제공
const count = ref(0)
provide('counter', count)
// 옵션 API 사용
export default {
provide() {
return {
message: '안녕하세요',
counter: this.count
}
}
}앱 수준의 provide도 가능:
// main.js
app.provide('appMessage', '앱 수준 메시지')
inject 사용법
하위 컴포넌트에서 조상 컴포넌트가 provide한 내용을 조회
// 컴포지션 API 사용
import { inject } from 'vue'

// 기본값 없이 주입
const message = inject('message')

// 기본값 설정
const counter = inject('counter', 0)
// 옵션 API 사용
export default {
inject: ['message', 'counter'],
// 또는 별칭 사용
inject: {
localMessage: { from: 'message' }
}
}반응성 값 사용 시 문제점
props와 달리 provide/inject는 양방향 반응성을 가지므로 의도치 않은 값의 조작이 발생할 수 있음
Solution 1: readonly() 사용
import { readonly } from 'vue'
provide('counter', readonly(count)) // 읽기 전용으로 제공
Solution 2: validation 함수와 함께 객체 형태로 전달
provide('counterState', {
  count: count,
  increment: () => {
    if (userHasPermission) count.value++
  }
})
Props/emit vs Provide/Inject
| 특성 | Props/emit | Provide/Inject |
|---|---|---|
| 데이터 흐름 | 명시적 | 암시적 |
| 결합도 | 높음 | 낮음 |
| 범위 | 얕은 (부모-자식) | 깊은 (조상-자손) |
| 주로 사용 | 중/소 규모 앱 | 깊은 컴포넌트 트리 |
기본적으로 props/emit을 사용하고 너무 복잡해지면 Pinia 등 전문 상태 관리 라이브러리를 활용
🧩 Slot
슬롯(Slot)은 "끼워 넣거나 집어 넣을 수 있는 구멍, 틈새, 자리, 시간"을 의미. Vue에서는 상위 컴포넌트에서 하위 컴포넌트에 템플릿 조각을 전달하는 방법
props는 정보를 전달하고, slot은 템플릿 조각을 전달
기본 사용법
하위 컴포넌트에서 슬롯을 정의:
<!-- ChildComponent.vue -->
<div>
  <slot></slot> <!-- 여기에 상위 컴포넌트의 내용이 삽입 -->
</div>
상위 컴포넌트에서 사용:
<!-- ParentComponent.vue -->
<ChildComponent>
  <p>이 내용이 슬롯에 삽입</p>
</ChildComponent>
fallback 컨텐츠
슬롯에 대한 대체(fallback) 컨텐츠를 지정. 컨텐츠가 제공되지 않았을 때만 렌더링
<!-- ChildComponent.vue -->
<slot>
  <!-- 기본 컨텐츠: 슬롯에 아무것도 전달되지 않으면 이 내용이 표시 -->
  <p>컨텐츠가 제공되지 않았습니다</p>
</slot>
중요한 점은 slot 컨텐츠는 상위 컴포넌트 소속이며, 하위 컴포넌트에서 렌더링 되지만 상위 컴포넌트의 데이터 범위에 접근 가능
컴포넌트 간 데이터 활용
하위 컴포넌트에서 상위 컴포넌트로 데이터를 전달 가능. v-slot을 통해 전달 받은 값 활용
<!-- ChildComponent.vue -->
<slot :item="item" :index="index"></slot>

<script setup>
const item = ref({ name: '상품명', price: 1000 })
</script>
<!-- ParentComponent.vue -->
<ChildComponent v-slot="slotProps">
<p>상품명: {{ slotProps.item.name }}</p>
</ChildComponent>
<!-- 구조 분해 할당도 가능 -->
<ChildComponent v-slot="{ item }">
<p>상품명: {{ item.name }}</p>
</ChildComponent>named slot
하나의 컴포넌트에 여러 개의 슬롯을 작성하고 구별하기 위한 이름을 부여. 레이아웃을 구성하는 경우에 특히 유용
<!-- LayoutComponent.vue -->
<header>
  <slot name="header">기본 헤더 내용</slot>
</header>
<main>
  <slot>기본 메인 내용</slot> <!-- 이름 없는 슬롯은 'default' 슬롯 -->
</main>
<footer>
  <slot name="footer">기본 푸터 내용</slot>
</footer>
상위 컴포넌트에서 사용:
<!-- ParentComponent.vue -->
<LayoutComponent>
  <template v-slot:header>
    <h1>사이트 제목</h1>
  </template>

  <p>메인 콘텐츠입니다</p>

  <template v-slot:footer>
    <p>Copyright © 2025</p>
  </template>
</LayoutComponent>

<!-- 축약형 문법: v-slot:header -> #header -->
<LayoutComponent>
  <template #header>헤더 내용</template>
  <p>기본 슬롯 내용</p>
  <template #footer>푸터 내용</template>
</LayoutComponent>
요약
-
Provide/Inject: 깊이 중첩된 컴포넌트 간 통신을 위한 방법으로, 프롭 드릴링 문제를 해결
provide- 상위 컴포넌트에서 데이터 제공inject- 하위 컴포넌트에서 데이터 주입- 주의: 반응형 값 사용 시 readonly()를 사용하거나 검증 함수를 추가하여 안전하게 사용
-
Slot: 상위 컴포넌트에서 하위 컴포넌트에 템플릿 조각을 전달하는 방법
- 기본 슬롯 - 단일 슬롯 정의와 사용
- fallback 컨텐츠 - 슬롯에 컨텐츠가 제공되지 않았을 때 표시할 내용
- scoped slot - 하위 컴포넌트에서 상위 컴포넌트로 데이터 전달
- named slot - 여러 슬롯을 구분하기 위한 이름 부여
Vue.js에서 컴포넌트 간 상태 흐름을 효과적으로 관리하려면 상황에 맞게 props/emit, provide/inject, slot을 적절히 활용하는 것이 중요
컴포넌트 연습
시험 페이지를 만들어보자!
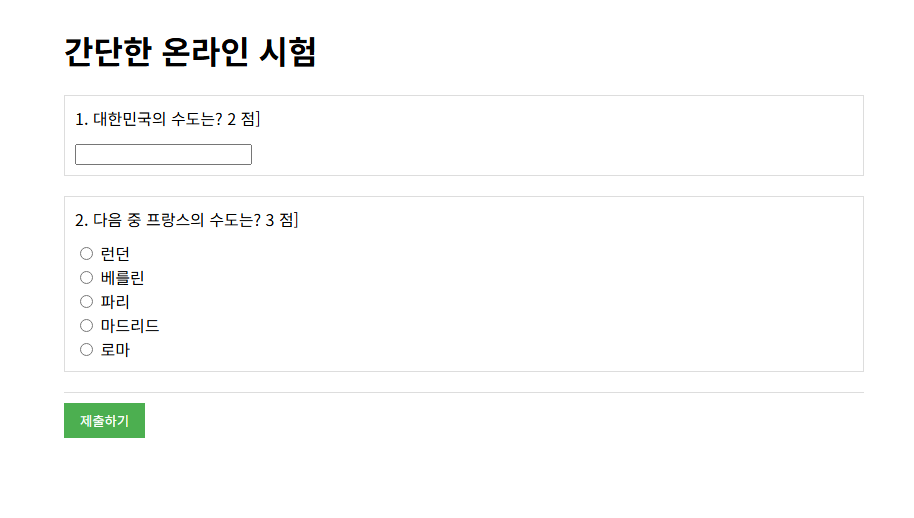
문제를 보면 문제 부분, 답 입력 부분, 정답 여부, 이렇게 3 구조로 비슷하게 구성된 것을 확인할 수 있다
그래서 QuestionBase.vue 를 만들어줘서 틀을 만들어주자
<!-- QuestionBase.vue - 기본 문제 컴포넌트 -->
<template>
  <div class="question">
    <div class="question-header">
      <!--문제를 구성-->
      {{ number }}. {{ text }} {{ points }} 점]
    </div>

    <!-- TODO: EX01-3. 각 문제 유형별 답변을 입력 받기 위한 slot을 구성하세요. 이름은 answerInput -->
    <slot name="answer-input">문제가 표시되는 영역</slot>

    <!-- 채점 결과 표시 영역 -->
    <div class='result' v-show="isSubmitted">
      <span v-if="isCorrect" class="correct">
        정답입니다. + {{ points }} 점
      </span>
      <span v-else class="incorrect">
        오답입니다. 정답은 {{ correctAnswer }}
      </span>
    </div>

    <!--END-->
  </div>
</template>

<script setup>
defineProps({
  number:{ type: Number, required:true, },
  text: {type: String, required: true},
  points: {type: Number, required: true},
  correctAnswer: [String,Number],
  isSubmitted: Boolean,
  isCorrect: Boolean,
})
</script>
문제가 객관식이면 답 입력을 선택하는 방식을 slot에 넣어주고 주관식이면 답을 적을 수 있도록 slot에 넣어준다
QuestionMultipleChoice.vue
<!-- MultipleChoiceQuestion.vue - 객관식 문제 컴포넌트 -->
<template>
    <!-- slot을 통해 options의 내용이 보여지며 change 이벤트에서 answerUpdate를 호출한다. -->
  <QuestionBase v-bind="props">
    <template #answer-input>
      <div v-for="(option, index) in options" :key="option">
        <label for="">
          <input type="radio" :value="index" v-model="localAnswer" :disabled="isSubmitted" @change="answerUpdate"/>
          {{ option }}
        </label>
      </div>
    </template>
  </QuestionBase>
</template>
QuestionShortAnswer.vue
<template>
    <!-- slot에 전달되는 input은 localAnswer와 model로 연결되고 게으른 input event 발생 시 answerUpdate를 호출한다.-->
    <!-- submit 된 상태에서는 field가 disabled 된다.-->
  <QuestionBase v-bind="props">
    <template #answer-input>
      <input type="text" v-model="localAnswer" @blur="answerUpdate" :disabled="isSubmitted"/>
    </template>
  </QuestionBase>
  <!--END-->
</template>
이제 v-for와 v-if를 사용해서 type별로 어떤 형식으로 표현할지를 결정하여 문제를 표현해줄 수 있다!
<template>
  <div class="exam">
    <h1>간단한 온라인 시험</h1>

    <div class="questions">
      <!-- 하위 컴포넌트를 만들 때 question 내용과 isSubmitted를 바인딩하고 answerUpdated 이벤트를 처리한다.-->
      <template v-for="question in questions" :key="question.number">
        <ShortAnswerQuestion v-if="question.type==='short_answer'" v-bind="question"
          :isSubmitted="isSubmitted" @answerUpdated="updateAnswers">
        </ShortAnswerQuestion>

        <MultipleChoiceQuestion v-if="question.type==='multi_choice'"
        v-bind="question" :isSubmitted="isSubmitted"
        @answerUpdated="updateAnswers">
        </MultipleChoiceQuestion>

      </template>
    </div>

    <div class="exam-controls">
       <button @click="submitExam" :disabled="isSubmitted">제출하기</button>
       <div class="total-score" v-if="isSubmitted">
        총점: {{ totalScore }} / {{ totalPossibleScore }} 점</div>
    </div>
  </div>
</template>
결과
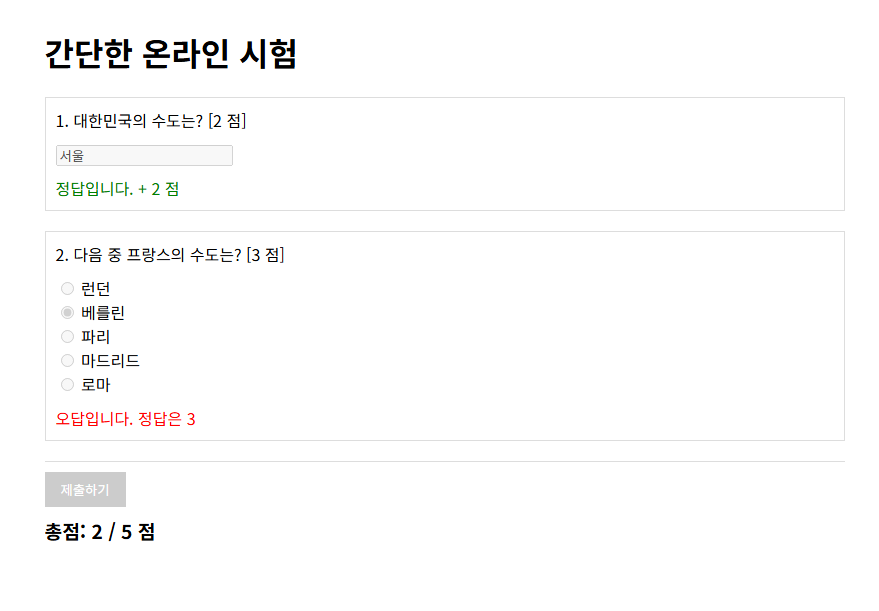
slot을 활용하여 템플릿을 상황에 맞게 꼽아 넣고, emit과 props를 활용해서 값을 상위, 하위 컴포넌트끼리 주고받아서 값을 연결해주었다!
