[Kubernetes in Google Cloud] - Lecture4. Managing Deployments Using Kubernetes Engine
빅데이터특화과정
GOAL
- Container 관리와 확장에 대한 학습
- Continuous Deployment, Blue-Green Deployments, Canary Deployments 등의 배포 시나리오
- kubectl tool 연습
- 배포 yaml 파일 생성
- Launch, update and scale deployments
- Updating Deployments와 Deployment style 연습
참고
- CD(Continuous Deployment) : 변경사항을 repository에서 고객이 사용 가능한 프로덕션 환경까지 자동으로 릴리즈하는 것
- 지속적인 서비스 제공
00. Introduction to deployments
Heterogeneous deployments는 2개 이상의 다른 infrastructure 환경이나 특정한 기술 또는 기능적 요구를 다루는 영역을 연결시키는 작업을 포함한다.
- 배포의 세부 사항에 따라
hybrid,multi-cloud,public-private라고 한다.
해당 글에서 heterogeneous deployments는 single cloud environment, multiple public cloud environments(multi-cloud) 또는 on-premises와 public cloud environments (hybrid 또는 public-private)의 결합을 포함한다.
Single environment 나 region으로 제한된 배포에서 다양한 비즈니스와 기술적 도전이 생길 수 있다.
- Maxed out resources : 단일 환경 그리고 일부 on-premises 환경에서, 제품의 요구 사항을 만족시키는 compute, networking, 그리고 storage resources를 사용하지 못할 수가 있다.
- Limited geographic reach : Single environment에서 배포는 하나의 배포와 다른 것이 지리적으로 먼 사람을 요구한다. Traffic은 전 세계를 돌아 중심으로 갈 수 있다. (??)
- Limited availability : 웹 스케일 트래픽 패턴은 애플리케이션이 fault-tolerant와 resilent(탄력성)을 시험한다.
- Vendor lock-in : Vendor-level platform과 infrastructure abstractions는 애플리케이션 포팅을 방해할 수 있다.
- Inflexible resources : Compute, storage, or networking offering의 부분 집합으로 제한될 수 있다.
Heterogeneous Deployments는 이런 문제들을 다루는 데 도움을 줄 수 있다. 하지만 Heterogeneous Deployments는 프로그래밍 방식의 결정 지향 절차와 진행을 사용하여 설계해야 한다.
일회성(one-off) 또는 임시 배포(ad-hoc) 절차는 deployments나 processes가 깨지기 쉽고 오류를 허용하지 않을 수 있다.
임시 배포 절차(Ad-hoc processes)는 data를 잃거나 traffic을 drop할 수 있다.
좋은 배포 절차는 반복 가능해야 하며, provisioning 관리, configuration 그리고 maintenance를 위한 검증된 접근 방식을 사용해야 한다.
Heterogeneous deployment에 대한 세 가지 공통 시나리오
- multi-cloud deployments
- fronting on-premises data
- continuous integration/continuous delivery (CI/CD) processes
아래 예시에서 Kubernetes와 다른 infrastructure resources를 사는 잘 설계된 접근 방식(well-architected apporaches)을 살펴보며, Heterogeneous Deployments에 대한 공통 사용 사례를 연습하자.
실습환경 준비
1 ) Container를 생성, 운영 및 배포하기 위한 샘플 코드 가져오기gsutil -m cp -r gs://spls/gsp053/orchestrate-with-kubernetes . cd orchestrate-with-kubernetes/kubernetes2 ) 3개의 노드로 구성된 cluster 생성하기
gcloud container clusters create bootcamp \
   --machine-type e2-small \
   --num-nodes 3 \
   --scopes
"https://www.googleapis.com/auth/projecthosting,storage-rw"

***output***
NAME: bootcamp
LOCATION: us-central1-f
MASTER_VERSION: 1.25.7-gke.1000
MASTER_IP: 35.222.59.81
MACHINE_TYPE: e2-small
NODE_VERSION: 1.25.7-gke.1000
NUM_NODES: 3
STATUS: RUNNING
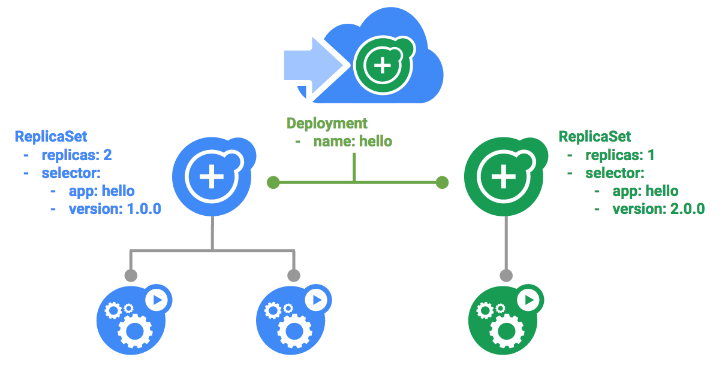
01. Learn about the deployment object
Deployment object 살펴보기
1 ) kubectl의 explain 명령어로 deployment object 탐색
kubectl explain deployment
# `--recursive` option을 사용하여 모든 필드를 볼 수 있음

**output**
KIND:     Deployment
VERSION:  apps/v1

DESCRIPTION:
     Deployment enables declarative updates for Pods and ReplicaSets.

FIELDS:
   apiVersion   <string>


kubectl explain deployment --recursive
# deployment object의 구조와 개별 필드를 이해하기 위해 explain 명령어를 사용할 수 있음
kubectl explain deployment.metadata.name

**output**
KIND:     Deployment
VERSION:  apps/v1

FIELD:    name <string>

DESCRIPTION:
     Name must be unique within a namespace. Is required when creating
     resources, although some resources may allow a client to request the
     generation of an appropriate name automatically. Name is primarily intended
     for creation idempotence and configuration definition. Cannot be updated.
     More info: http://kubernetes.io/docs/user-guide/identifiers#names
02. Create a deployment
1 ) deployment/auth.yaml 파일 업데이트 하기
containers:
- name : auth
  image : "kelseyhightower/auth:1.0.0"
Output
apiVersion: apps/v1
kind: Deployment
metadata:
name: auth
spec:
replicas: 1
selector:
matchLabels:
app: auth
template:
metadata:
labels:
app: auth
track: stable
spec:
containers:
- name: auth
image: "kelseyhightower/auth:1.0.0"
ports:
- name: http
containerPort: 80
- name: health
containerPort: 81
...🐬 Deployment가 어떻게 하나의 replica를 생성하고 auth container의 1.0.0 버전을 사용하는지 알아보자.
kubectl create은 auth deployment를 생성하는 명령어로, deployment manifest에서 데이터를 conform하는 하나의 pod를 만든다.
- Pods의 숫자를 늘리고 싶을 때 (확장하고 싶을 때 )
replicas숫자를 변경하면 된다.
3 ) kubectl create를 이용하여 deployment object를 생성해보자.
kubectl create -f deployments/auth.yaml4 ) Deployment 생성확인
kubectl get deployments5 ) Replicasets 생성 확인
Deployment가 생성되면 kubernetes는 deployment를 위한 ReplicaSet을 생성할 것이다. ReplicaSet이 생성되었는지 verify할 수 있다.
kubectl get replicasets

NAME              DESIRED   CURRENT   READY   AGE
auth-7f587bb5c9   1         1         1       45s
5 ) Deployment의 일부로써 생성된 Pods 확인
kubectl get pods🐬 Auth Deployment에 대한 서비스 생성해보자.
- service manifest 파일은 이미 살펴 봤으니 skip
6 ) Auth service 생성하기
kubectl create -f services/auth.yaml7 ) hello deployment 생성하기
kubectl create -f deployments/hello.yaml
kubectl create -f services/hello.yaml
8 ) Frontend deployment 생성하기
kubectl create secret generic tls-certs --from-file tls/
kubectl create configmap nginx-frontend-conf --from-file=nginx/frontend.conf
kubectl create -f deployments/frontend.yaml
kubectl create -f services/frontend.yaml

**nginx/frontend.conf**
upstream hello {
    server hello.default.svc.cluster.local;
}

upstream auth {
    server auth.default.svc.cluster.local;
}

server {
    listen 443;
    ssl    on;

    ssl_certificate     /etc/tls/cert.pem;
    ssl_certificate_key /etc/tls/key.pem;

    location / {
        proxy_pass http://hello;
    }

    location /login {
        proxy_pass http://auth;
    }
}

**deployments/frontend.yaml**
apiVersion: apps/v1
kind: Deployment
metadata:
  name: frontend
spec:
  replicas: 1
  selector:
    matchLabels:
      app: frontend
  template:
    metadata:
      labels:
        app: frontend
        track: stable
    spec:
      containers:
        - name: nginx
          image: "nginx:1.9.14"
          lifecycle:
            preStop:
              exec:
                command: ["/usr/sbin/nginx","-s","quit"]
          volumeMounts:
            - name: "nginx-frontend-conf"
              mountPath: "/etc/nginx/conf.d"
            - name: "tls-certs"
              mountPath: "/etc/tls"
      volumes:
        - name: "tls-certs"
          secret:
            secretName: "tls-certs"
        - name: "nginx-frontend-conf"
          configMap:
            name: "nginx-frontend-conf"
            items:
              - key: "frontend.conf"
                path: "frontend.conf"

**services/frontend.yaml**
kind: Service
apiVersion: v1
metadata:
  name: "frontend"
spec:
  selector:
    app: "frontend"
  ports:
    - protocol: "TCP"
      port: 443
      targetPort: 443
  type: LoadBalancer
frontend 를 위한 ConfigMap을 생성했다.
9 ) 외부 IP와 frontend 연결
kubectl get services frontend
curl -ks https://<EXTERNAL-IP>
한 줄로 curl을 사용하기 위해
kubectl의 템플릿 속성을 사용할 수 있다.
curl -ks https://`kubectl get svc frontend -o=jsonpath="{.status.loadBalancer.ignoress[0].ip}"`03. Deployment 확장하기
spec.replicas필트를 업데이트하여 deployment를 확장할 수 있다.
1 ) kubectl explain으로 필드 설명 확인
kubectl explain deployment.spec.replicas

KIND:     Deployment
VERSION:  apps/v1

FIELD:    replicas <integer>

DESCRIPTION:
     Number of desired pods. This is a pointer to distinguish between explicit
     zero and not specified. Defaults to 1.
2 ) kubectl scale을 사용하여 replica file 업데이트하기
kubectl scale deployment hello --replicas=5🐬 Deployment가 업데이트 되면, Kubernetes는 연관된 ReplicaSet을 자동으로 업데이트하고 전체 Pods의 수가 5가되도록 새로운 Pods를 생성한다.
3 ) hello Pods가 5개 있는지 확인하기
kubectl get pods | grep hello- | wc -l4 ) Application scale back하기
kubectl scale deployment hello --replicas=35 ) hello Pods가 3개 있는지 확인하기
kubectl get pods | grep hello- | wc -lPods 그룹을 어떻게 관리하고 확장하는지 배웠다!
- replicas 의 개수를 조절하여 pods 확장
04. Rolling update
Deployments는 rolling update를 통해 새로운 이미지 업데이트를 지원한다.
Deployment가 새로운 버전으로 업데이트될 때, 새로운 ReplicaSet을 생성하고 새로운 ReplicaSet에서 replicas의 수가 천천히 증가한다. (이전 ReplicaSet에서 replicas는 감소)
1 ) Trigger a rolling update (롤링 업데이트 시작하기)
a ) Deployment 업데이트 하기
kubectl edit deployment hellob ) image 변경하기
...
containers:
  image: kelseyhightower/hello:2.0.0
...
변경 후, 업데이트된 deployment가 cluster에 저장되고 kubernetes가 rolling update를 시작한다.
c ) Kubernetes가 생성한 새로운 ReplicaSet 보기
kubectl get replicasetd ) Rollout history에서 새로운 entry 보기
kubectl rollout history deployment/hello2 ) Pause a rolling update
Rollout 실행 중 문제를 발견한 경우
a ) rollout pause
kubectl rollout pause deployment/hellob ) Rollout의 현재 상태 확인하기
kubectl rollout status deployment/helloc ) Pods 에서 직접적으로 확인하기
kubectl get pods -o jsonpath --template='{range .items[*]}{.metadata.name}{"\t"}{"\t"}{.spec.containers[0].image}{"\n"}{end}'3 ) Rolling Update 재시작
Rollout이 중지되면 일부 pods는 새 버전이고 일부는 이전 버전임을 의미한다.
a )resume command로 rolling out 계속하기
kubectl rollout resume deployment/hellob ) Rollout이 완료되면, status 로 확인할 수 있다.
kubectl rollout status deployment/hellooutput
deployment "hello" successfully rolled out
4 ) Rollback an update
a ) rollout command를 사용하여 이전 버전으로 roll back
kubectl rollout undo deployment/hellob ) History에서 roll back 확인
kubectl rollout history deployment/helloc ) 모든 pod들이 roll back 되었는지 확인하기
kubectl get pods -o jsonpath --template='{range .items[*]}{.metadata.name}{"\t"}{"\t"}{.spec.containers[0].image}{"\n"}{end}'🐬 지연 시간 없이 애플리케이션을 업데이트하는 방법과 Kubernetes deployments를 위한 rolling updates에 대해 배웠다.!
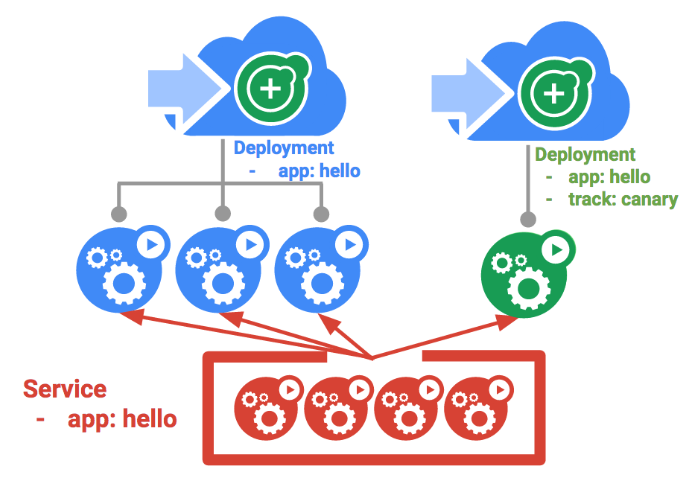
05. Canary Deployments
일부 사용자를 대상으로 새로운 배포판을 시험하고 싶을 때 canary deployment
- 일부 사용자들을 대상으로 변경하여 새로운 배포판에 대한 위험도를 완화할수 있다.
1 ) Create a canary deployment
Canary Deployment는 여러 deployment로 구성된다.
- 새로운 버전, 안정된 버전 등
a ) 새로운 버전에 대한 Canary Deployment 생성
cat deployments/hello-canary.yamloutput
apiVersion: apps/v1
kind: Deployment
metadata:
name: hello-canary
spec:
replicas: 1
selector:
matchLabels:
app: hello
template:
metadata:
labels:
app: hello
track: canary# Use ver 2.0.0 so it matches version on service selector version: 2.0.0 spec: containers: - name: hello image: kelseyhightower/hello:2.0.0 ports: - name: http containerPort: 80 - name: health containerPort: 81...
b ) canary deployment 생성하기
kubectl create -f deployments/hello-canary.yamlc ) Canary deployment 생성 후, hello와 hello-canary 두 개의 deployments가 생성됨
kubectl get deployments
helloservice는app:hello선택기로 pods를 찾을 수 있다.
- canary deployment는 더 적은 수의 pods를 가지기 때문에, 더 적은 사용자들에게 보여진다.
2 ) Canary Deployment 확인하기
a ) hello 버전 확인
curl -ks https://`kubectl get svc frontend -o=jsonpath="{.status.loadBalancer.ignoress[0].ip}"`/version몇 번 실행해보면 25% 정도 2.0.0으로 보임을 알 수 있음
3 ) Canary deployments in production - session affininty
사용자에게 특정 배포를 고정하고 싶은 경우
- session affinity로 서비스를 만들어서 해결할 수 있음
- 동일한 유저는 항상 같은 버전을 서비스 받게 됨
🐬
sessionAffinity필드를 추가해서 ClientIP가 같을 경우 항상 같은 버전의 application으로 request
kind: Service
apiVersion: v1
metadata:
  name: "hello"
spec:
  sessionAffinity: ClientIP
  selector:
    app: "hello"
  ports:
    - protocol: "TCP"
      port: 80
      targetPort: 80
프로덕션 단계에서 Canary deployments를 사용할 때는 sessionAffinity를 사용하자.
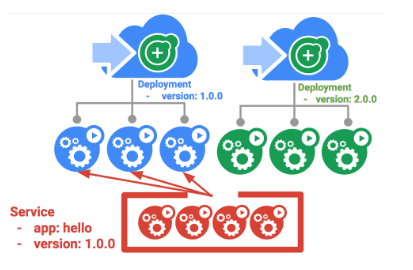
06. Blue-green deployments
Rolling update는 최소한의 오버헤드, 최소한의 퍼포먼스 영향 그리고 지연 타임으로 배포를 가능하게 해주므로 이상적이다.
✨ 완전 배포 후에 load balancer를 수정하는 것이 이득일 때가 있다.
- 이 때,
blue-green deployments를 사용해보자.
쿠버네티스는 두 개의 분리된 배포를 만들어서 목적을 달성한다.
- 하나는 "blue" 버전으로 이전 것이고, 다른 하나는 "green" 버전으로 새로운 것이다.
"blue" 버전을 위해 기존의 hello 배포를 사용하자.
- 해당 배포는 Router로 동작하는 Service를 통해 접근 가능하다.
"green" 버전이 실행되면, Service를 업데이트하여 해당 버전을 사용하도록 전환한다.
blue-green deployments의 주요 단점
- Application을 호스트 하는 데 필요한 자원을 적어도 2배 이상 필요
- 한 번에 두 개의 버전을 배포하기 전에 충분한 자원이 있는지 확인 해야 한다.
1 ) The service
Selector는 "blue" deployment와는 일치하지만 "green"과는 일치하지 않을 것이다. (다른 버전이므로)
첫 번째 서비스 업데이트
kubectl apply -f services/hello-blue.yaml
resource service/hello is missing은 자동으로 패치되면서 발생하므로 무시
2 ) Updating using Blue-Green deployment
blue-green deployment를 지원하기 위해, 새로운 버전을 위해 "green" deployment를 만들어야한다.
- green deployment는 version label과 image path를 업데이트 한다.
apiVersion: apps/v1
kind: Deployment
metadata:
  name: hello-green
spec:
  replicas: 3
  selector:
    matchLabels:
      app: hello
  template:
    metadata:
      labels:
        app: hello
        track: stable
        version: 2.0.0
    spec:
      containers:
        - name: hello
          image: kelseyhightower/hello:2.0.0
          ports:
            - name: http
              containerPort: 80
            - name: health
              containerPort: 81
          resources:
            limits:
              cpu: 0.2
              memory: 10Mi
          livenessProbe:
            httpGet:
              path: /healthz
              port: 81
              scheme: HTTP
            initialDelaySeconds: 5
            periodSeconds: 15
            timeoutSeconds: 5
          readinessProbe:
            httpGet:
              path: /readiness
              port: 81
              scheme: HTTP
            initialDelaySeconds: 5
            timeoutSeconds: 1
a ) green deployment 만들기
kubectl create -f deployments/hello-green.yamlb ) green deployment가 실행되면, 현재 버전인 1.0.0이 여전히 실행되고 있는지 확인
curl -ks https://`kubectl get svc frontend -o=jsonpath="{.status.loadBalancer.ingress[0].ip}"`/versionc ) Service를 업데이트하여 새 버전을 가리키도록 하자.
kubectl apply -f services/hello-green.yamld ) Service가 업데이트되면, "green" deployment가 즉시 사용될 것이다. 이제 항상 새로운 버전이 확인된다.
curl -ks https://`kubectl get svc frontend -o=jsonpath="{.status.loadBlancer.ingress[0].ip}"`/version3 ) Blue-Green rollback
필요하다면 같은 방법으로 이전 버전으로 롤백할 수 있다.
a ) "blue" deployment가 실행되는 동안, service를 이전 버전으로 업데이트할 수 있다.
kubectl apply -f services/hello-blue.yamlb ) service를 업데이트하고 나면, 성공적인 롤백이다. 다시, 올바른 버전이 사용되고 있는지 확인해보자.
curl -ks https://`kubectl get svc frontend -o=jsonpath="{.status.loadBalancer.ingress[0].ip}"`/version구글 퀵랩 Kubernetes in Google Cloud를 학습하고 정리한 내용입니다.