[Kubernetes in Google Cloud] - Lecture5. Continuous Delivery with Jenkins in Kubernetes Engine
빅데이터특화과정
GOAL
Kubernetes 엔진에서
Jenkins로 continuous delivery pipeline 구성하는 방법 배우기
Jenkins는 공유 저장소에 코드를 통합하는 개발자들이 사용하는 자동 서버- 빌드, 테스트 그리고 배포 파이프라인을 유연하게 다룰 수 있게 하는 자동 서버
Kubernetes Engine Cluster로 Jenkins application을 Provision
Helm Package Manager를 사용하여 Jenkins application 설정
Jenkins application 특징 탐색
Jenkins pipeline 생성과 연습
00. 개요
1 ) What is Kubernetes Engine?
쿠버네티스를 구글 클라우드에서 호스팅한 것으로, 강력한 cluster 관리와 container에 대한 지위 시스템을 제공
2 ) What is Jenkins?
Build, test 그리고 deployment pipeline을 자동화하는 서버
- Continuous Delivery 과정에서 부하 걱정 없이 빠르게 반복하게 해줌
3 ) What is Continuous Delivery / Continuous Deployment?
Build process가 container를 사용하면, 하나의 virtual host가 여러 operating system에서 job을 실행할 수 있음
ephemeral build executors를 제공 : 빌드가 활발히 진행 중일 때, batch processing job 같이 다른 클러스터의 일을 위해 resource를 남겨둠- 단 몇 초만에 수행되는 빠른 속도
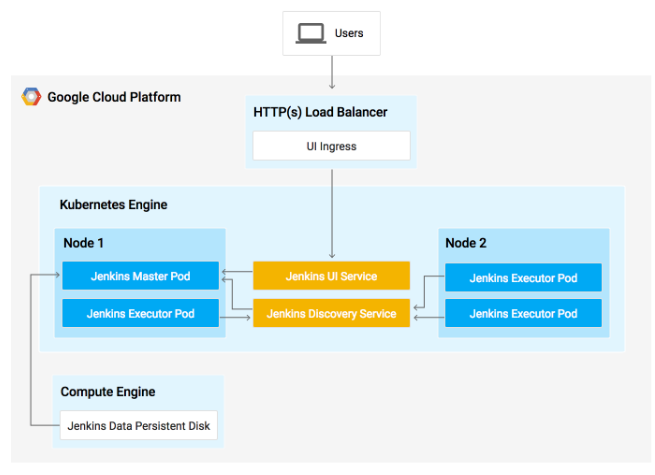
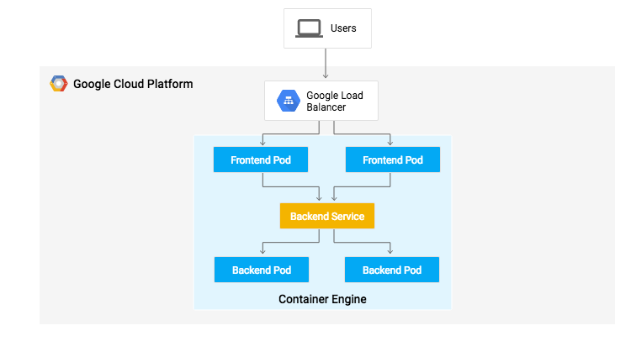
Google's global load balancer로 인스턴스로 들어오는 web traffic routing을 자동으로 해줌
- 로드 밸런서는 SSL 종료를 처리하고 웹 프런트와 결합된 Google의 백본 네트워크로 구성된 글로벌 IP 주소를 활용
- 유저가 가장 빠른 접근이 가능한 곳으로 안내
01. Download the source code
gcloud config set compute/zone

gsutil cp gs://spls/gsp051/continuous-deployment-on-kubernetes.zip .

unzip continuous-deployment-on-kubernetes.zip

cd continuous-deployment-on-kubernetes
02. Provisioning Jenkins
1 ) Creating a Kubernetes cluster
Kubernetes cluster를 provision하는 명령어
gcloud container clusters create jenkins-cd \
--num-nodes 2 \
--machine-type n1-standard-2 \
--scopes
"https://www.googleapis.com/auth/source.read_write,cloud-platform"

# cluster 가 실행중인지 확인
gcloud container clusters list

# cluster에 대한 자격 증명 확인
gcloud container clusters get-credentials jenkins-cd

# 새로 provision한 cluster에 접근 가능한지 확인
kubectl cluster-info
03. Setup Helm
Charts 저장소로부터 Jenkins 설치할거임
Helm은 구성(configure)과 쿠버네티스 애플리케이션 배포(deploy)를 쉽게 해주는 package manager
- Jenkins를 설치하면, CI/CD 파이프라인을 설정할 수 있다.
# 1. Helm의 stable chart repo추가하기
helm repo add jenkins https://charts.jenkins.io

# 2. Repo 최신 버전인지 확인
helm repo update
04. Configure and Install Jenkins
Jenkins를 설치할 때, values 파일은 설치(setup)에 필요한 값들을 제공하는 템플릿으로 사용할 수 있다.
쿠버네티스 클라우드를 자동으로 설정하고 필요한 플러그인을 추가하기 위해 custom values 파일을 사용할 수 있다.
Jenkins가 cluster와 GCP 프로젝트에 연결되게 해줌
- Kubernetes:latest
- Workflow-multibranch:latest
- Git:latest
- Configuration-as-code:latest
- Google-oauth-plugin:latest
- Google-source-plugin:latest
- Google-storage-plugin:latest
1 ) Helm CLI로 구성 세팅에 맞는 chart 배포
helm install cd jenkins/jenkins -f jenkins/values.yaml --wait2 ) Jenkins pod 실행 확인
kubectl get pods 3 ) Cluster에 배포 가능한 Jenkins service account 설정
kubectl create clusterrolebinding jenkins-deploy --clusterrole=cluster-admin --serviceaccound=default:cd-jenkins

**output**
clusterrolebinding.rbac.authorization.k8s.io/jenkins-deploy created
4 ) Cloud Shell로부터 Jenkins UI로 포드 포워딩
export POD_NAME=$(kubectl get pods --namespace default -l "app.kubernetes.io/component=jenkins-master" -l "app.kubernetes.io/instance=cd" -o jsonpath="{.items[0].metadata.name}")

kubectl port-forward $POD_NAME 8080:8080 >> /dev/null &
5 ) Jenkins Service가 잘 생성되었는지 확인
kubectl get svc

**output**
NAME               CLUSTER-IP     EXTERNAL-IP   PORT(S)     AGE
cd-jenkins         10.35.249.67           8080/TCP    3h
cd-jenkins-agent   10.35.248.1            50000/TCP   3h
kubernetes         10.35.240.1            443/TCP     9h
Builder nodes가 Jenkins 마스터가 필요로 할 때 자동으로 launch 할 수 있도록 젠킨스를 위한 쿠버네티스 플러그인을 사용할 수 있음
일이 완료되면 자동적으로 꺼지고 리소스를 clusters resource pool로 반환
Service는 Selector와 일치하는 모둔 pods에 대해 8080과 50000번 포트로 노출된다. 이는 쿠버네티스 클러스터 내에서 Jenkins web UI와 builder/agent 등록 포트를 노출한다. 추가적으로 jenkins-ui 서비스는 클러스터 외부에서 접근할 수 없도록 ClusterIP를 사용하여 노출된다.
05. Connect to Jenkins
1 ) Jenkins 차트는 자동으로 admin pw를 생성한다.
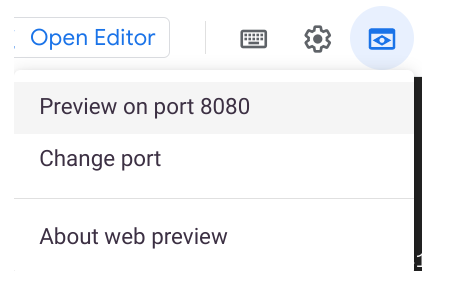
printf $(kubectl get secret cd-jenkins -o jsonpath=:"{.data.jenkins-admin-password}" | base64 --decode);echo2 ) Jenkins user interface는 Web Preview로 볼 수 있다.
- login 을 요구하면 앞서 생성된 자동 pw로 admin 계정을 사용할 수 있음
쿠버네티스 클러스터에서 젠킨스 설정 완료 !
- Jenkins는 다음 섹션에서 자동화된 CI/CD 파이프라인을 관리한다.
06. Understanding the Application
CD Pipeline에서
gceme라는 sample application을 배포해보자.
- Go 언어로 장성되어 있고, sampe-app 폴더에 위치한다.
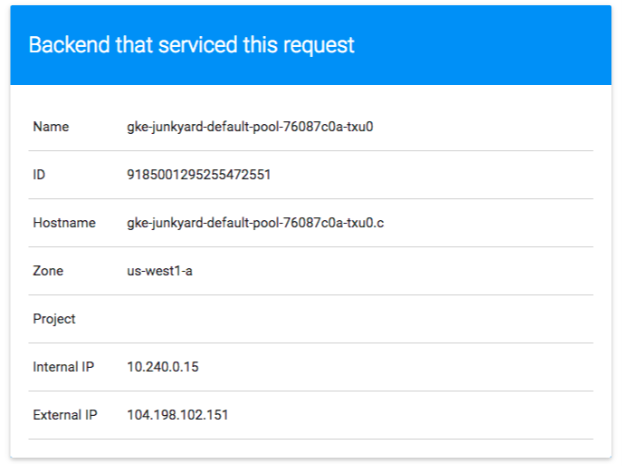
- gceme binary를 Compute Engine instance위에서 실행할 때, app은 instance의 메타데이터를 정보 카드에 보여준다.
애플리케이션은 두 가지 운영 모드를 지원함으로써 microservice를 모방한다.
- backend mode
- gceme는 8080 포트를 listen하며 JSON 포맷으로 Compute Engine instance metadata를 반환한다.
- frontend mode
- backend gceme service를 질의하고 유저 인터페이스에서 JSON 결과를 렌더링한다.
07. Deploying the Application
두 개의 다른 환경에 애플리케이션을 배포해보자.
- Production : 유저가 접근할 수 있는 live site
- Canary : 적은 용량의 사이트로, 유저 트래픽의 일부만 받음
- 모든 유저에게 배포하기 전에 live traffic을 가진 소프트웨어를 증명할 환경으로 사용
1 ) Cloud shell에서 sample application directory 생성
cd sample-app2 ) deployment를 논리적으로 고립(isolate)하기 위한 namespace 생성
kubectl create ns production3 ) Production과 Canary Deployments생성 후 kubectl apply 코맨드를 사용하여 Service 생성
kubectl apply -f k8s/production -n production
kubectl apply -f k8s/canary -n production
kubectl apply -f k8s/services -n production
디폴트 값으로 단 하나의 frontend replica만 배포된다.
kubectl scalecommand를 사용하면 모든 시간에서 적어도 4개의 replicas가 실행됨을 보장할 수 있다.
4 ) Production 환경 Frontends를 Scale up하기
kubectl scale deployment gceme-frontend-production -n production --replicas 45 ) Frontend를 위해 5개의 pods가 실행되고 4개의 production traffic과 1개의 canary 가 release 된 것을 확인하자.
- Canary release 는 유저 5명 중 1명에게만 영향을 미칠 것이다.
kubectl get pods -n production -l app=gceme -l role=frontend6 ) Backend를 위해 2개의 pods가 실행되고 1개는 production을 위해, 1개는 canary를 위해 release된 것을 확인하자.
kubectl get pods -n production -l app=gceme -l role=backend7 ) Production services에 대한 외부 IP를 검색하자.
kubectl get service gceme-frontend -n production

**output**
NAME            TYPE          CLUSTER-IP     EXTERNAL-IP     PORT(S)  AGE
gceme-frontend  LoadBalancer  10.79.241.131  104.196.110.46  80/TCP   5h
8 ) 환경 변수로 Frontend Service load balancer IP를 저장하자.
export FRONTEND_SERVICE_IP=$(kubectl get -o jsonpath="{.status.loadBalancer.ingress[0].ip}" --namespace=production services gceme-frontend)9 ) 브라우저에서 프론트엔드 외부 IP 주소를 통해 두 서비스에 모두 접근 가능함을 확인하자.
10 )# Service 버전 확인
curl http://$FRONTEND_SERVICE_IP/versionSample Application 배포 완료! 다음으로, 변경사항을 지속적이고 안정적으로 배포하기 위한 파이프라인을 만들어보자.
08. Creating the Jenkins Pipeline
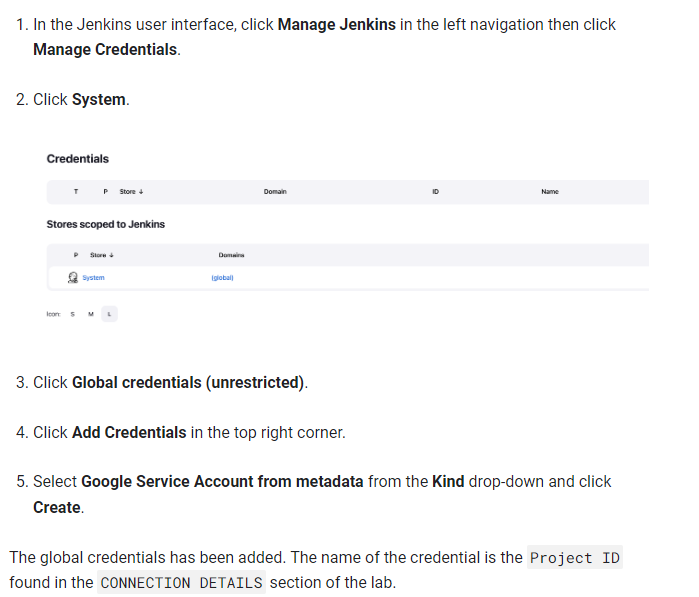
1 ) Account Credentials
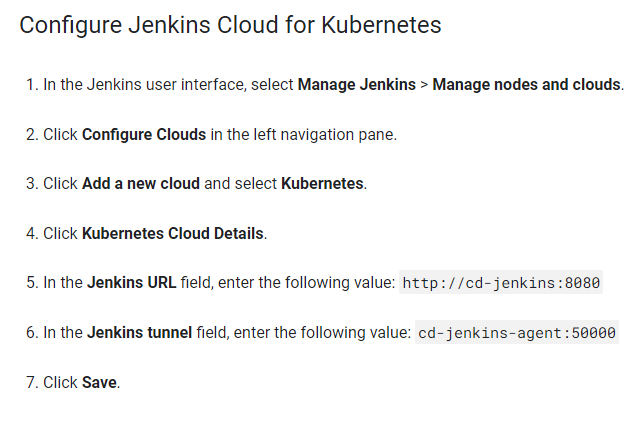
2 ) Jenkins Cloud 설정
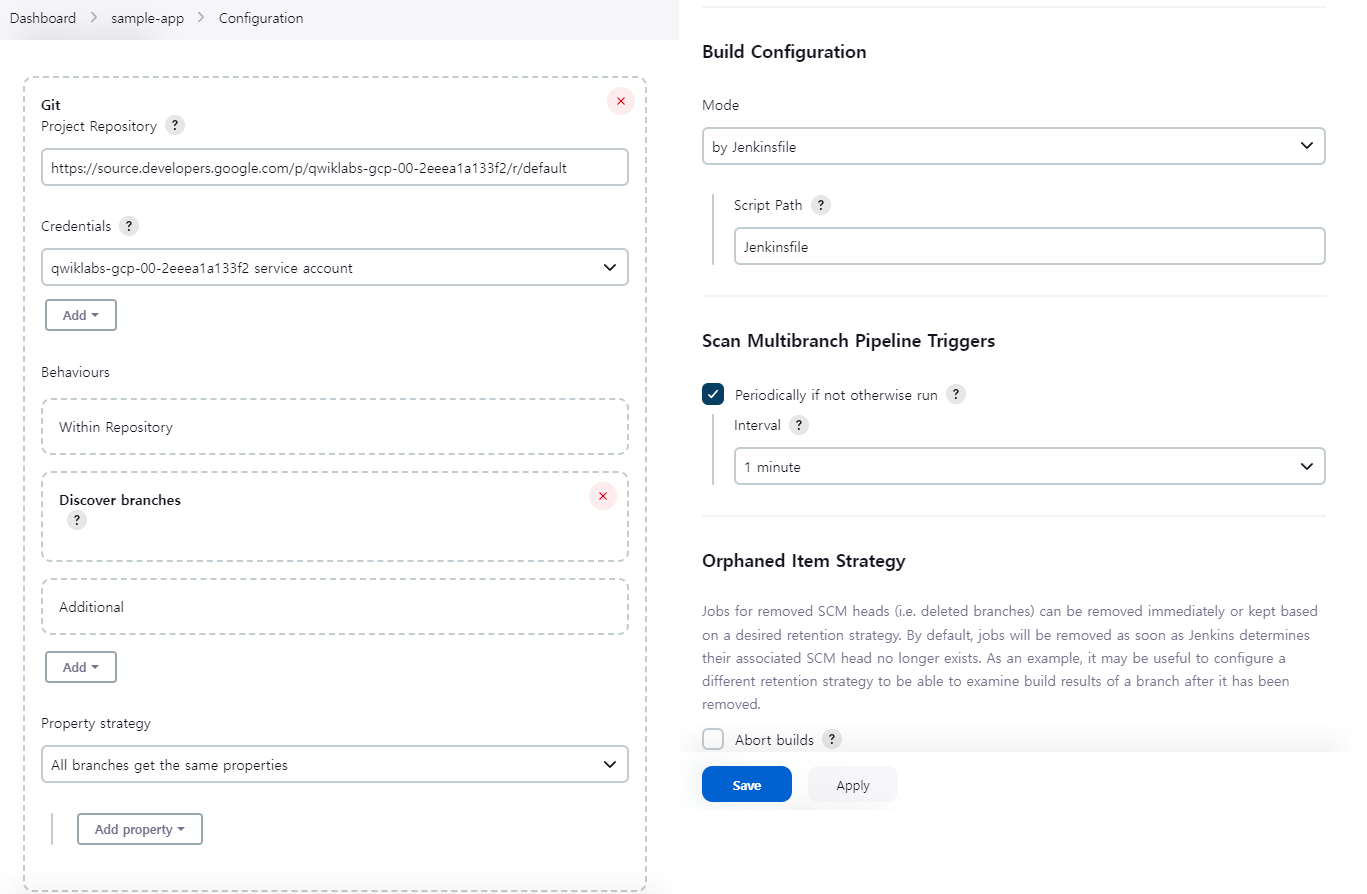
3 ) Jenkins Job 설정
이제 커밋하면 자동 빌드되어 배포한다~!
09. Creating the deveplopment environment
개발 브랜치는 개발자들이 자신의 코드 변경사항을 테스트하기 위한 환경이다. 이 환경은 application의 scaled-down 버전이지만, 실제 환경과 동일한 메카니즘으로 배포되어야 한다.
1 ) Creating a development branch
Feature Branch로부터 개발 환경을 만들기 위해, Git server에 branch를 push하고 Jenkins가 환경을 배포하도록 할 수 있다.
- Development 브랜치를 생성하고 Git Server에 push
git checkout -b new-feature2 ) Modifying the pipeline definition
파이프라인을 정의하는
Jenkinsfile은 Jenkins Pipeline Groovy syntax를 이용하여 작성된다.
Jenkinsfile을 사용하는 것은 소스코드를와 함께 있는 하나의 파일에서 전체 build pipeline을 표현하는 것을 허용한다.Pipelines은 병렬화같은 강력한 기능을 지원하며 manual user approval이 필요하다.
Pipeline이 기대한대로 동작하게 하기 위해서는 Jenkinsfile을 수정하여 project ID를 설정해야 한다.
PROJECT_ID를REPLACE_WITH_YOUR_PROJECT_ID값에 넣자.
- lab의
CONNECTION DETAILS섹션에서 찾을 수 있음- 또는
gcloud config get-value project에서 찾을 수 있음CLUSTER_ZONE의 값 변경
gcloud config get compute/zone을 입력하면 값을 얻을 수 있다.
vi Jenkinsfile

PROJECT = "REPLACE_WITH_YOUR_PROJECT_ID"
APP_NAME = "gceme"
FE_SVC_NAME = "${APP_NAME}-frontend"
CLUSTER = "jenkins-cd"
CLUSTER_ZONE = ""
IMAGE_TAG = "gcr.io/${PROJECT}/${APP_NAME}:${env.BRANCH_NAME}.${env.BUILD_NUMBER}"
JENKINS_CRED = "${PROJECT}"
3 ) Modify the site
vi html.go

<div class="card orange">

vi main.go

const version string = "2.0.0"
10. Kick off Deployment
변경사항이 git repository로 push되고 나면 Jenkins User Interface Navigate에서 new-feature branch를 빌드할 수 있다.
- 변경사항 반영에 수 분 걸릴 수 있다.
git add Jenkinsfile html.go main.go
git commit -m "Version 2.0.0"
git push origin new-feature- 아래와 같은 output message가 나오면
new-featurebranch가 cluster에 배포 완료된 것이다.
kubectl --namespace=new-feature apply...배포 시나리오에서 public-facing load balancer를 사용하지 않았다. 애플리케이션 보안을 위해 kubectl proxy를 사용할 수 있다.
proxy는 인테넷에 서비스 노출 없이 쿠버네티스 API와 로컬 머신에서 클러스터 내의 서비스로의 proxies requests를 authenticates한다. (인증, 권한)
- 모두 처리되면 background 에서 proxy 시작하기
kubectl proxy &localohost에서 보낸 요청으로 애플리케이션에 접근할 수 있고kubectlproxy가 서비스로 포워드 하는지 확인해보자.
curl \
http://localhost:8001/api/v1/namespaces/new-feature/services/gceme-frontend:80/proxy/version

**response**
2.0.0

**error**
- 변경사항이 아직 전파되지 않은 경우
- 조금 더 기다리면 됨

{
  "kind": "Status",
  "apiVersion": "v1",
  "metadata": {
  },
  "status": "Failure",
  "message": "no endpoints available for service \"gceme-frontend:80\"",
  "reason": "ServiceUnavailable",
  "code": 503
개발 환경 구성 완료!
- new feature를 테스트하기 위해 canary release 배포를 해보자.
11. Deploying a canary release
최신 코드가 개발 환경에서 동작함을 확인했으니 canary 환경에 코드를 배포해보자.
1 ) canary branch 생성
git checkout -b canary
git push origin canary
2 ) Jenkins에서 canary pipeline이 시작된 것을 확인할 수 있다.
- 완료되면 service URL을 확인 했을 때, 일부 트래픽이 새로운 버전으로 서브되는 것을 볼 수 있다.
- 5번 중 1번은 2.0.0으로 표출
export FRONTEND_SERVICE_IP=$(kubectl get -o \
jsonpath="{.status.loadBalancer.ingress[0].ip}" --namespace=production services gceme-frontend)

while true; do curl http://$FRONTEND_SERVICE_IP/version; sleep 1; done
12. Deploying to production
Canary release가 성공적으로 완료되고 어떤 유저 컴플레인도 없으면 나머지 production 에도 배포해보자.
1 ) branch merge
git checkout master
git merge canary
git push origin master
Jenkins에서 master pipeline이 실행됨
2 ) 완료 후 service URL을 확인해보면 모든 traffic이 2.0.0 으로 응답 받는다.
export FRONTEND_SERVICE_IP=$(kubectl get -o \
jsonpath="{.status.loadBalancer.ingress[0].ip}" --namespace=production services gceme-frontend)

while true; do curl http://$FRONTEND_SERVICE_IP/version; sleep 1; done
3 ) 서비스의 외부 IP 주소 확인하기
네비게이션 색상이 파란색에서 주황색으로 변경된 것을 확인할 수 있음
kubectl get service gceme-frontend -n production13. Quiz
1 ) Which are the following Kubernetes namespaces used in the lab?
- production, default, kube-system
2 ) The Helm chart is a collection of files that describe a related set of Kubernetes resources.
- True
- reference : https://helm.sh/docs/topics/charts/
구글 퀵랩 Kubernetes in Google Cloud를 학습하고 정리한 내용입니다.