PyTorch 기본
1강 Introduction to Pytorch
참고자료
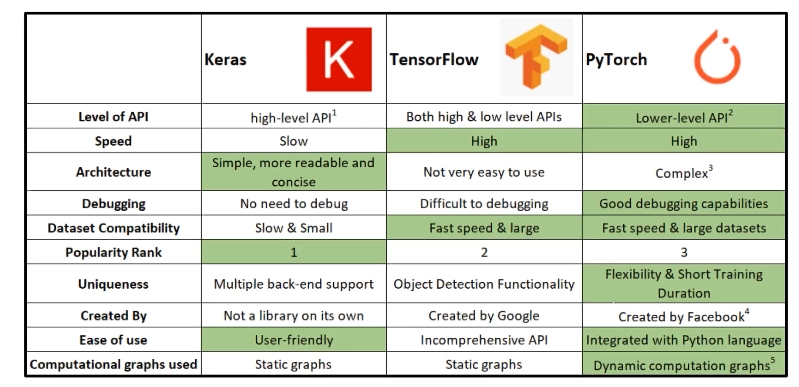
다양한 DeepLearning Framework 에 대한 소개
다양한 DeepLearning Framework 가 나와있다.
- Top2 : TensorFlow , PyTorch
- Keras 는 TensorFlow2.0 부터 TF 에 포함되었다.
- PyTorch 가 low-level API 라고 하지만, Keras 와 결합하여 사용하는 등 다양하게 쓸 수 있다.
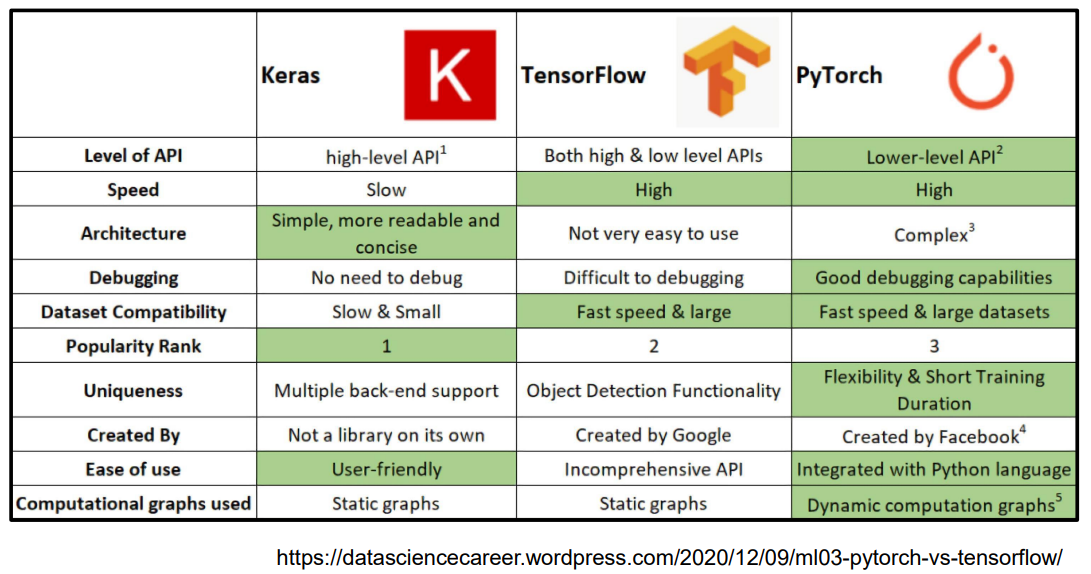
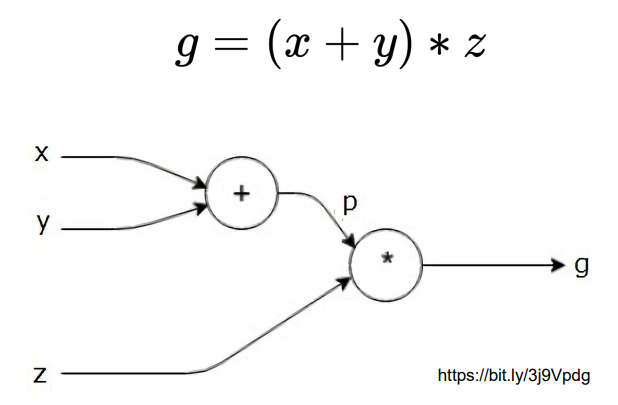
- TensorFlow 와 PyTorch 는 그래프를 그리는 방식에 차이가 있다.
- TensorFlow : Static graphs
- 실행시점에 backward propagation 이 일어남 (
Define and Run) - Define and run
- Production , Cloud , Multi-GPU 사용이 쉽다. (
scalability)
- 실행시점에 backward propagation 이 일어남 (
- PyTorch : Dynamic computation graphs ( DCG )
- 실행시점에서 그래프가 그려짐 (
Define by Run) - Debugging 이 쉽다.
- 즉시 확인 가능 pythonic code
- GPU 지원, 좋은 API 와 많은 커뮤니티
numpy+AutoGrad+Function- numpy 구조를 가지는 Tensor 객체로 array 표현
- 자동미분을 지원하여 DL 연산 지원
- 다양한 형태의 DL 연산을 지원하는 함수와 모델 지원
- 실행시점에서 그래프가 그려짐 (
- TensorFlow : Static graphs
2강 PyTorch Basics
- numpy + AutoGrad 로 numpy 연산을 잘 이해하면 학습에 도움이 된다.
GOAL
- 데이터들의 연산을 위한 Tensor 사용법
- 자동 미분기능 AutoGrad 학습
- Tensor를 학습하여 Custom Network 를 작성할 수 있는 기본 지식 익히기
- AutoGrad 작동 원리를 배워 backward 함수의 내부 동작 확인하기
Tensor
- 다차원 array를 표현하는 PyTorch 클래스
- numpy 의 ndarray 와 동일
- weight 와 같은 것들이 Tensor 객체로 다루어지기 때문에, 직접 객체를 생성하는 경우는 거의 없다.
- 기본적으로 tensor 가 가질 수 있는 data type 은 numpy 와 유사하지만, GPU를 지원한다는 점이 다르다.
torch.cuda.DoubleTensortorch.DoubleTensor
Tensor 객체 생성
"""
numpy - ndarray
"""

import numpy as np
n_array = np.arange(10).reshape(2,5)
print(n_array)
print("ndim : ", n_array.ndim, "shape : ", n_array.shape)

"""
pytorch - tensor with numpy
"""
import torch
t_array = torch.FloatTensor(n_arra)
print(t_array)
print("ndim : ", t_array.ndim, "shape :", t_array.shape)

"""
pytorch - tensor with list
"""
data = [[3,5], [10,5]]
x_data = torch.tensor(data)
x_data

"""
pytorch - tensor with ndarray
"""
nd_array_ex = np.array(data)
tensor_array = torch.from_numpy(nd_array_ex)
tensor_array
numpy operation 대부분을 지원한다.
data = [[3,5,20], [10,5,50], [1,5,10]]
x_data = torch.tensor(data)

x_data[1:]
# tensor([[10, 5, 50],
		  [1, 5, 10]] )

x_data[:2,1:]
# tensor([[5, 20],
         [5, 50]])

x_data.flatten()
# tensor([3, 5, 20, 10, 5, 50, 1, 5, 10])

torch.ones_like(x_data)
# tensor([[1, 1, 1],
  		  [1, 1, 1],
          [1, 1, 1]])

x_data.numpy()
# array([[3, 5, 20],
         [10, 5, 50],
         [1, 5, 10]], dtype=int64)

x_data.shape
# torch.Size([3,3])

x_data.dtype
# torch.int64
pytorch 의 tensor는 GPU 에 올려서 사용가능하다.
x_data.device
# device(type='cpu')

if torch.cuda.is_available():
    x_data_cuda = x_data.to('cuda')

x_data_cuda.device
# device(type='cuda', index=0)
Tensor handling : view, squeeze, unsqueeze 등
- view : reshape 과 동일하게 tensor의 shape 을 변환
- reshape 대신 view 사용을 권장
- squeeze : 차원의 개수가 1인 차원을 삭제 ( 압축 )
- unsqueeze : 차원의 개수가 1인 차원을 추가
tensor_ex = torch.rand(size=(2,3,2))
tensor_ex
"""
tensor([[[0.4805, 0.4049],
         [0.1574, 0.7056],
         [0.8500, 0.5285]],

        [[0.9401, 0.4884],
         [0.8762, 0.4487],
         [0.4005, 0.8982]]])
"""

# 2x3x2 = 12
# 열의 개수가 6으로 정해서 행의 개수는 2로 추정됨
tensor_ex.view([-1,6])

"""
tensor([[0.4805, 0.4049, 0.1574, 0.7056, 0.8500, 0.5285],
        [0.9401, 0.4884, 0.8762, 0.4487, 0.4005, 0.8982]])
"""
view 와 reshape
값이 메모리에 할당 될 때 view 는 값을 연속적으로 표현하는 것을 보장하지만, reshape 은 보장하지 않음
"""
view
"""
a = torch.zeros(3,2)
b = a.view(2,3)
a.fill_(1)
# a와 b 모두 값이 1로 채워져 있다.

"""
reshape
"""

a = torch.zeros(3,2)
b = a.t().reshape(6)
a.fill_(1)
# a는 값이 1로 채워져 있으나, b는 값이 0로 채워져있다.
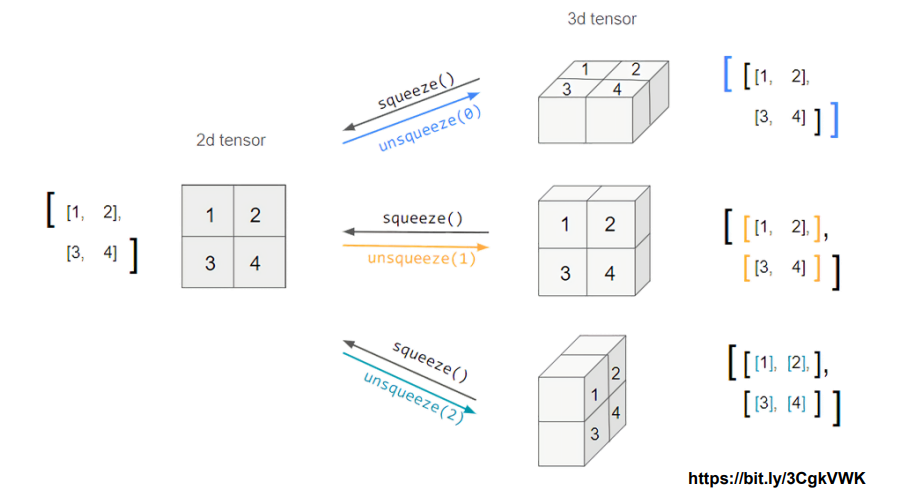
Tensor squeeze and unsqueeze
tensor_ex = torch.rand(size = (2,1,2))
tensor_ex.squeeze()
"""
tensor([[0.2551, 0.2143],
        [0.3940, 0.0090]])
"""

tensor_ex = torch.rand(size = (2,2))
tensor_ex.unsqueeze(0).shape # torch.size([1, 2, 2])
print(tensor_ex.unsueeze(0))
"""
tensor([[[0.2083, 0.2474],
         [0.9142, 0.2821]]])
"""

tensor_ex.unsqueeze(1).shape # torch.Size([2, 1, 2])
print(tensor_ex.unsqueeze(1))
"""
tensor([[[0.2083, 0.2474]],

        [[0.9142, 0.2821]]])
"""
tensor_ex.unsqueeze(2).shape # torch.Size([2, 2, 1])
print(tensor_ex.unsqueeze(2))
"""
tensor([[[0.2083],
         [0.2474]],

        [[0.9142],
         [0.2821]]])
"""
Tensor operations
- 기본적인 tensor의 operations 는 numpy와 동일
- dimension 이 맞지 않으면 연산오류
n1 = np.arange(10).reshape(2,5)
t1 = torch.FloatTensor(n1)

t1 + t1
# tensor([[ 0.,  2.,  4.,  6.,  8.],
#        [10., 12., 14., 16., 18.]])

t1 - t1
# tensor([[0., 0., 0., 0., 0.],
#        [0., 0., 0., 0., 0.]])

t1 + 10
# tensor([[10., 11., 12., 13., 14.],
#        [15., 16., 17., 18., 19.]])
행렬곱셈 연산은 dot 대신 mm 을 사용
dot: 내적mm: matrix multiplication
n2 = np.arange(10).reshape(5,2)
t2 = torch.FloatTensor(n2)
t3 = t1.mm(t2)

"""
t1 = tensor([[0., 1., 2., 3., 4.],
        [5., 6., 7., 8., 9.]])

t2 = tensor([[0., 1.],
        [2., 3.],
        [4., 5.],
        [6., 7.],
        [8., 9.]])

t3 = tensor([[ 60.,  70.],
        [160., 195.]])
"""
t1.mm(t2)
"""
tensor([[ 60.,  70.],
        [160., 195.]])
"""

t1.dot(t2)
# RuntimeError

t1.matmul(t2)
"""
tensor([[ 60.,  70.],
        [160., 195.]])
"""

a = torch.rand(10)
b = torch.rand(10)
a.dot(b)
# tensor(2.2410)

a = torch.rand(10)
b = torch.rand(10)
a.mm(b)
# RuntimeError
mm과 matmul 차이 : broadcasting 지원
- mm : broadcasting 지원 X
- matmul : broadcasting 지원 O
a = torch.rand(5,2,3)
b = torch.rand(3)
a.matmul(b) # broadcasting to (5,2,3)- unsqueeze 와 squeeze 를 이용하여 mm 을 통해 계산결과를 확인할 수 있다.
a[0].mm(torch.unsqueeze(b,1)).squeeze()
#
KEY
- squeeze 와 unsqueeze 의 차이 이해
- numpy 와 pytorch 의 유사성
- mm , dot 그리고 matmul 의 차이
Tensor operations for ML/DL formula
- 여러 ML/DL 연산을 지원한다.
- 필요한 기능을 검색하여 사용해보자.
예시로 softmax 연산, one_hot encoding 등을 보여준다.
import torch
import torch.nn.functional as F

tensor = torch.FloatTensor([0.5, 0.7, 0.1])
h_tensor = F.softmax(tensor, dim=0)
h_tensor
# tensor([0.3458, 0.4224, 0.2318])

y = torch.randint(5, (10,5))
y_label = y.argmax(dim=1)

y_label
# tensor([0, 1, 3, 0, 3, 4, 4, 3, 2, 0])

torch.nn.functional.one_hot(y_label)
"""
tensor([[1, 0, 0, 0, 0],
        [0, 1, 0, 0, 0],
        [0, 0, 0, 1, 0],
        [1, 0, 0, 0, 0],
        [0, 0, 0, 1, 0],
        [0, 0, 0, 0, 1],
        [0, 0, 0, 0, 1],
        [0, 0, 0, 1, 0],
        [0, 0, 1, 0, 0],
        [1, 0, 0, 0, 0]])
"""

import itertools
a = [1, 2, 3]
b = [4, 5]
list(itertools.product(a,b))
# [(1, 4), (1, 5), (2, 4), (2, 5), (3, 4), (3, 5)]


tensor_a = torch.tensor(a)
tensor_b = torch.tensor(b)
torch.cartesian_prod(tensor_a,tensor_b)
"""
tensor([[1, 4],
        [1, 5],
        [2, 4],
        [2, 5],
        [3, 4],
        [3, 5]])
"""
AutoGrad
자동 미분 지원 : backward 함수
일반적으로 Linear 같은 함수를 사용하는데, 함수들은 기본적으로 `requires_grad 값이 True 로 되어 있다.
w = torch.tensor(2.0, requires_grad = True )
y = w**2
z = 10*y + 25
z.backward()
w.grad
vector 에 대한 미분
참고backward의 argument로 전달된 gradient는 값을 전달한 것으로 , 의 기울기를 outut tensor 의 shape 과 동일한 형태로 전달
a = torch.tensor([2., 3.], requires_grad = True)
b = torch.tensor([6., 4.], requires_grad = True )
Q = 3*a**3 - b**2
external_grad = torch.tensor([1., 1.,])
Q.backward(gradient=external_grad)

a.grad # tensor([36., 81.])
b.grad # tensor([-12., -8.])
3강 PyTorch 프로젝트 구조 이해하기
이번 강의에선 Jupyter 노트북을 사용하는 것을 넘어서기 위해 PyTorch 학습 프로젝트 구성에 대해 학습합니다. OOP와 모듈의 개념을 통해 프로젝트를 구성하는 방법과 PyTorch에서 구성되는 모듈들을 함께 살펴봅니다.
기본적인 PyTorch 사용법과 함께 VSCode와 SSH로 연결해서 Colab을사용하는 방법등 딥러닝 학습을 위해 환경을 구축하는 방법도 다룹니다.
GOAL
- PyTorch 학습 프로젝트 구성
- OOP 와 모듈의 개념을 이용해 프로젝트를 구성하는 방법
- PyTorch 에서 구성되는 모듈 살펴보기
- 기본적인 PyTorch 사용법, VSCode 와 SSH 로 연결해서 Colab을 사용하는 방법 등 딥러닝 학습을 위해 환경을 구축하는 방법
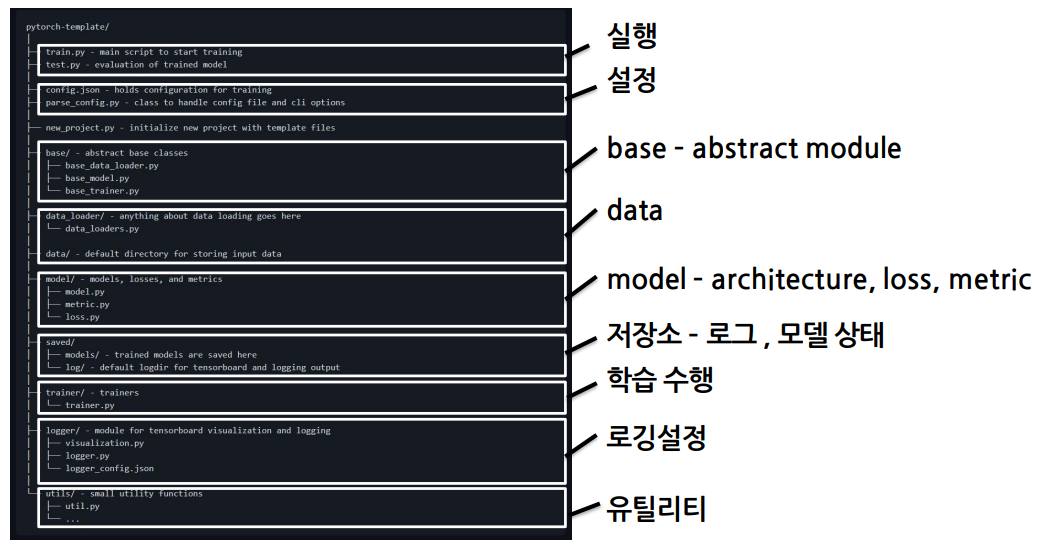
PyTorch Project Template Overview
초기 단계: 대화식 개발 과정이 유리- 학습과정과 디버깅 등 지속적으로 확인이 가능
배포 및 공유 단계: notebook 공유에 어려움이 있음- 재현이 어렵고 실행순서가 꼬일 수 있음
- DL 코드도 하나의 프로그램
- 개발 용이성이 확보되어야 하고 유지 보수 향상이 필요
Project Template
- 다양한 프로젝트 템플릿이 존재하므로 필요에 따라 수정하여 사용
- 실행, 데이터, 모델, 설정, 로깅, 지표, 유틸리티 등 다양한 모듈들을 분리하여 프로젝트 템플릿화
Python Project Template 설정
Week1 Python 강의에서 anaconda 사용을 추천받았다.
아래 내용에 대한 환경 설정을 해보자!
- anaconda 환경에서 pytorch 설정
- git clone 하여 template 구조 확인
- vscode 에서 ssh 연결을 통해 colab 코드 확인
1. conda 가상환경 만들기
# 새로운 가상환경
conda create -n torch_practice python==3.8

# 가상환경 리스트
conda env list

# 가상환경 삭제
conda env remove -n 가상환경이름

# 가상환경 접속
conda activate torch_practice
2. tensorflow 및 pytorch 설치
- 썩 좋은 방법 같진 않다.
- GPU 확인이 안돼서 인터넷에 찾아보니 CUDA 11.7 은 아직 조금 불안정한 것 같다.
conda install tensorflow
conda install pytorch
3. PyTorch Template 설정하기
git clone https://github.com/victoresque/pytorch-template

# clone 한 folder 내에서 실행
python3 new_project.py MyProject

cd MyProject

code . # vscode 실행
3-1. 환경설정 참고
프로젝트의 환경을 requirement.txt 로 저장할 수 있다.
위에서 clone 한 template project 에도 requirements.txt 가 포함되어 있기 때문에 패키지 파일들을 모두 설치해주자.
# 현재 가상환경에 깔려있는 라이브러리 버전확인
conda list

# 가상환경 내보내기
conda env export > conda_requirements.txt

# 가상환경 설치하기
conda env create -f conda_requirements.txt

# pip install list 내보내기
pip freeze > requirements.txt

# pip 환경 구축하기
pip install -r requirements.txt
3-2. module 'distutils' has no attribute 'version'
- setuptools 의 버그로 보인다.
- 패치된 버그라고 59.5.0 버전을 사용하라는 조언..
- 근데 60번대 버전이 나온 지금도 오류가 발생하는게 맞는건가..!? 다른 이유가 있는건 아닌지 궁금해진다.
pip uninstall setuptools
pip install setuptools==59.5.0
4. 템플릿을 이용하여 train.py 실행해보기
python train.py -c config.json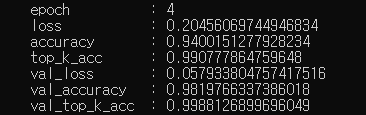
5. colab 에서 연결해보기
checklist
- Runtime 설정이 GPU 로 되어 있는지 확인하기
- Google Drive 에 연결하여 사용하기
- SSH 로 VSCode 와 연결하기
5-1. 구글 드라이브와 연결하기
# torch 설치
!pip3 install torch
!pip3 install torchvision

# google drive mount
from google.colab import drive
drive.mount('/content/drive')

# template clone
!git clone https://github.com/victoresque/pytorch-template

%cd /content/pytorch-template

!python new_project.py MNIST-example
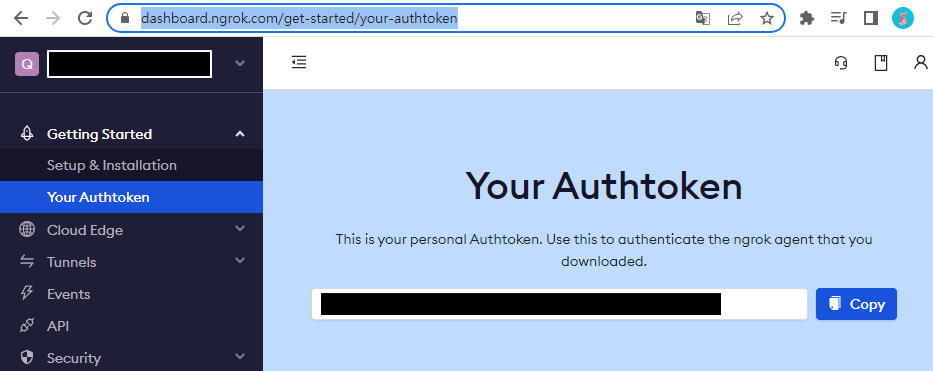
5-2. token 발급 및 설정
5-3. 코드 설정
NGROK_TOKEN = '' # ngrok 토큰
PASSWORD = '' # 비밀번호 설정
!pip install colab-ssh
from colab_ssh import launch_ssh
launch_ssh(NGROK_TOKEN, PASSWORD)
"""
Host google_colab_ssh
HostName 0.0.0.0
User root
Port 11111
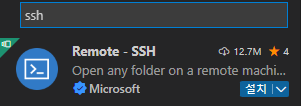
"""5-3. VSCode extension 설치
5-4. ctrl+shift+p : 새 호스트 추가
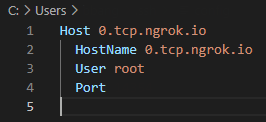
ssh root@HostName -p Port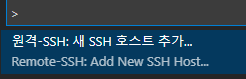
- config file에 아래와 같이 작성된다.
5-5. 호스트에 연결

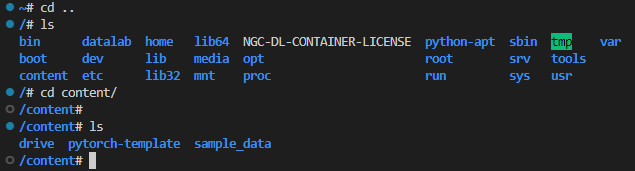
5-6. 환경 접근하기

5-7. 코랩의 코드를 google drive 에 복사
cd content/drive/MyDrive/workspace # mount된 drive 폴더로 이동
cp -r /content/pytorch-template ./
5-8. 코드보기
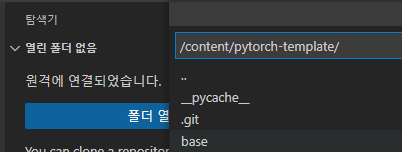
코드 구조 살펴보기
train.py
- main 파일에서 config 설정이 됨
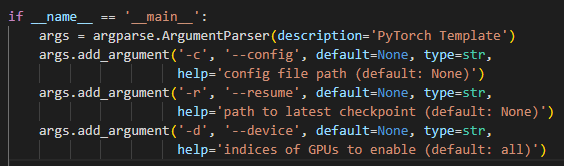
- parse_config.py 에서 config parsing
- init_obj 를 이용하여 config 에 정의된 data_loader 를 불러온다.
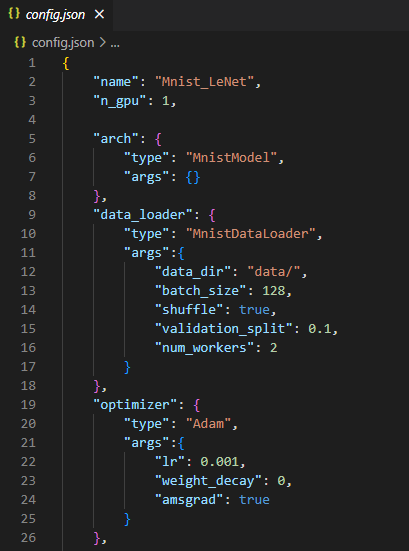
config.json
- 어떤 데이터, optimizer , loss function 등을 쓸지 미리 정의해둘 수 있음
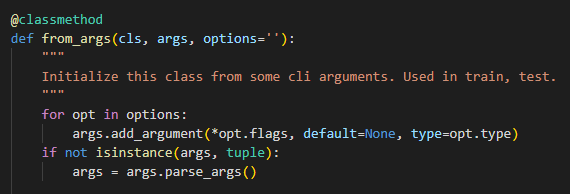
parse_config.py
factory pattern 으로 구현되어 있음
- class명과 argument, option 을 전달하면 객체 반환
__getitem__: index 를 이용하여 값을 가져올 수 있다. config 파일에 쉽게 접근할 수 있도록 도와줌- get_attribute 방식으로 데이터를 capsulation 해서 다룰 수 있다.
class Test(object):
    def __getitem__(self, items):
        print (type(items), items)

# Driver code
test = Test()
test[3]
test[3:63:3]

"""
<class 'int'> 5
<class 'slice'> slice(5, 65, 5)
"""
util.py
- read_json : json file 을 읽어와 dictionary 반환
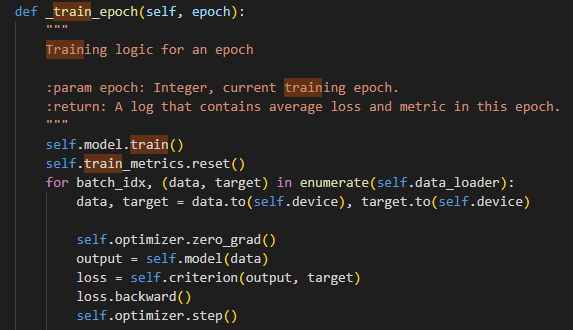
trainer.py
- base/base_trainer.py 의 BaseTrainer class 를 상속 받는다.
- _train_epoch 구현 필요함
조언
- 어떤 식으로 코드를 짜는 것이 좋고, 어떻게 따라가는 것인지 주석을 추가하면서 읽어가보면 도움이 될 것
- data centric AI 터미널에 익숙해져야 한다.
이 글은 커넥트 재단 Naver AI Boost Camp 교육자료를 참고했습니다.