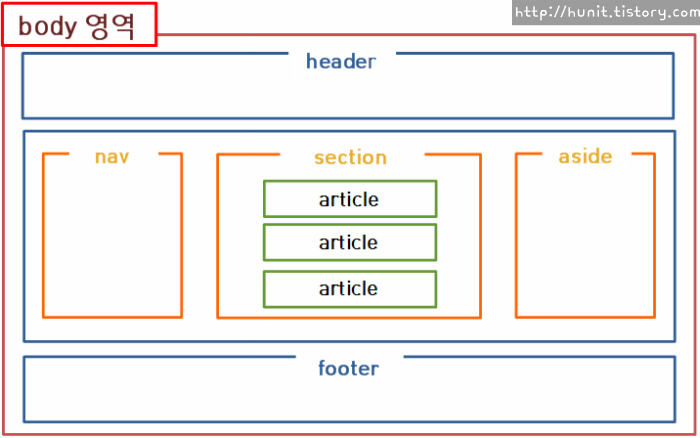
출처 : 유튜브 드림코딩 HTML tag, 반응형 웹
참고) validator.w.org => 유요한 tag 사용했는지 검증해주는 웹사이트
HTML 구조

- article : 여러가지 item 들을 그룹화해서 재사용 가능한 아이들이 모여져있는 곳.
HTML에 쓰이는 tag는 크게 box tag와 item tag 로 나뉜다.
BOX Tag
Box Tag : Box 형태가 되는 tag들. 구조를 이룬다. 사용자들에게 보여지지 않는다.
ex) header, nav(=navigator), aside, footer, main, section, article, div(묶어서 styling 할 필요가 있을 때), spam, form
ITEM Tag
Item Tag : 사용자들에게 보여지는 tag들
ex) a(Anchor), button, input, label, img, video, audio, map, canvas, table
Tag & Element & Attribute
<p class = "editor_note">My cat is very grumpy.</p>

<----설명 ---->
<p> : opening tag
</p> : closing tag
My cat is very grumpy. : content
<p>My cat is very grumpy.</p> : element
class = "editor_note" : attribute
자주 쓰이는 item tag들
▪️ Anchor Tag
<a href="http://google.com" target = _blank>Click</a>▪️ ol, ul, li Tag
<ol type = "i" reversed>
	<li>1</li>
    <li>2</li>
</ol>
tag 내의 attribute 자세한 정보는 MDN을 통하여 찾아볼 것!
▪️ input Tag
input : 사용자에게 data를 요구해서 받을 수 있다. label tag와 자주 쓰인다.
label tag는 사용자에게 어떤 정보를 원하는지 명확하게 나타내준다.
<label for ="input_name">Name : </label>
<input id ="input_name" type ="text">
위 둘은 inline element 이다.
input이 page 내에 여러개 있을 수 있기에 id 이름이라는 고유의 식별장치를 준다.
label for ="input_name" 은 input_name을 위한 label 이라는 의미이다.
Responsive Web
fluid layout
유동적인 레이아웃이 선호된다.
flex grid, flex box, %, vw, vh 등이 쓰인다.
Media Query
media query는 css 요소이다.
문법 :
@media screen and(min-width:800px){
	.container{width:50%;}
   					}
screen 너비가 800px이상이면 container style을 적용해주라는 의미의 코드이다.
- screen 자리에 들어갈 수 있는 것들 : speech, print, all
- and 와 함께 쓰일 수 있는 것들 : not, only, ,(comma)
간단 tag 작성 꿀팁
.class
---> <div class=""></div> 출력된다.


div>ul>ol
--->부모, 자식 tag가 만들어진다.


div> ul + ol
---> 형제 tag가 만들어진다.

ul>ol*5
---> 반복해서 만들 수 있다.

div>ul>li^ol
---> ^을 이용하여 ul 과 ol 이 형제 tag가 될 수 있게 만들어준다.
- tag 그룹화 하기 ()
코드를 입력하세요
div>(header>ul>li*2>a)+footer>p


--->
<div>
	<header>
    	<ul>
        	<li><a href=""></a></li>
            <li><a href=""></a></li>
        </ul>
    </header>
    <footer>
    	<p></p>
    </footer>
</div>- tag 안에 text 넣기 {}
p{hello}
---> <p>hello</p>- 자동번호 넣기 $
p.class${item $}*5
--->
<p class="class 1">item1</p>
<p class="class 2">item2</p>
<p class="class 3">item3</p>
<p class="class 4">item4</p>
<p class="class 5">item5</p>
- 더미용 text 생성하기 lorem
p>lorem
p>lorem4 ---> 4가지 단어만 나옴