이번에는 netWorking에 대해서 알아보겠습니다
바로 시작할게요
세팅
# 코드 다운로드, 작업 디렉터리 이동
git clone https://github.com/gasida/aews.git
cd aews/2w

# 변수 지정
export TF_VAR_KeyName=$(aws ec2 describe-key-pairs --query "KeyPairs[].KeyName" --output text)
export TF_VAR_ssh_access_cidr=$(curl -s ipinfo.io/ip)/32
echo $TF_VAR_KeyName $TF_VAR_ssh_access_cidr

# 배포 : 12분 정도 소요

terraform init
terraform plan
nohup sh -c "terraform apply -auto-approve" > create.log 2>&1 &
tail -f create.log


# 자격증명 설정
terraform output -raw configure_kubectl
aws eks --region ap-northeast-2 update-kubeconfig --name myeks

aws eks --region ap-northeast-2 update-kubeconfig --name myeks
kubectl config rename-context $(cat ~/.kube/config | grep current-context | awk '{print $2}') myeks- AWS VPC CNI 소개
- AWS EKS - VPC CNI 1편 - POD 통신
K8S CNI: Container Network Interface 는 k8s 네트워크 환경을 구성해준다 - 링크, 다양한 플러그인이 존재 - 링크AWS VPC CNI: 파드 IP 할당, 파드의 IP 네트워크 대역과 노드(워커)의 IP 대역이 같아서 직접 통신이 가능 - Docs , Github , Proposal
파드에 ip 할당 방법
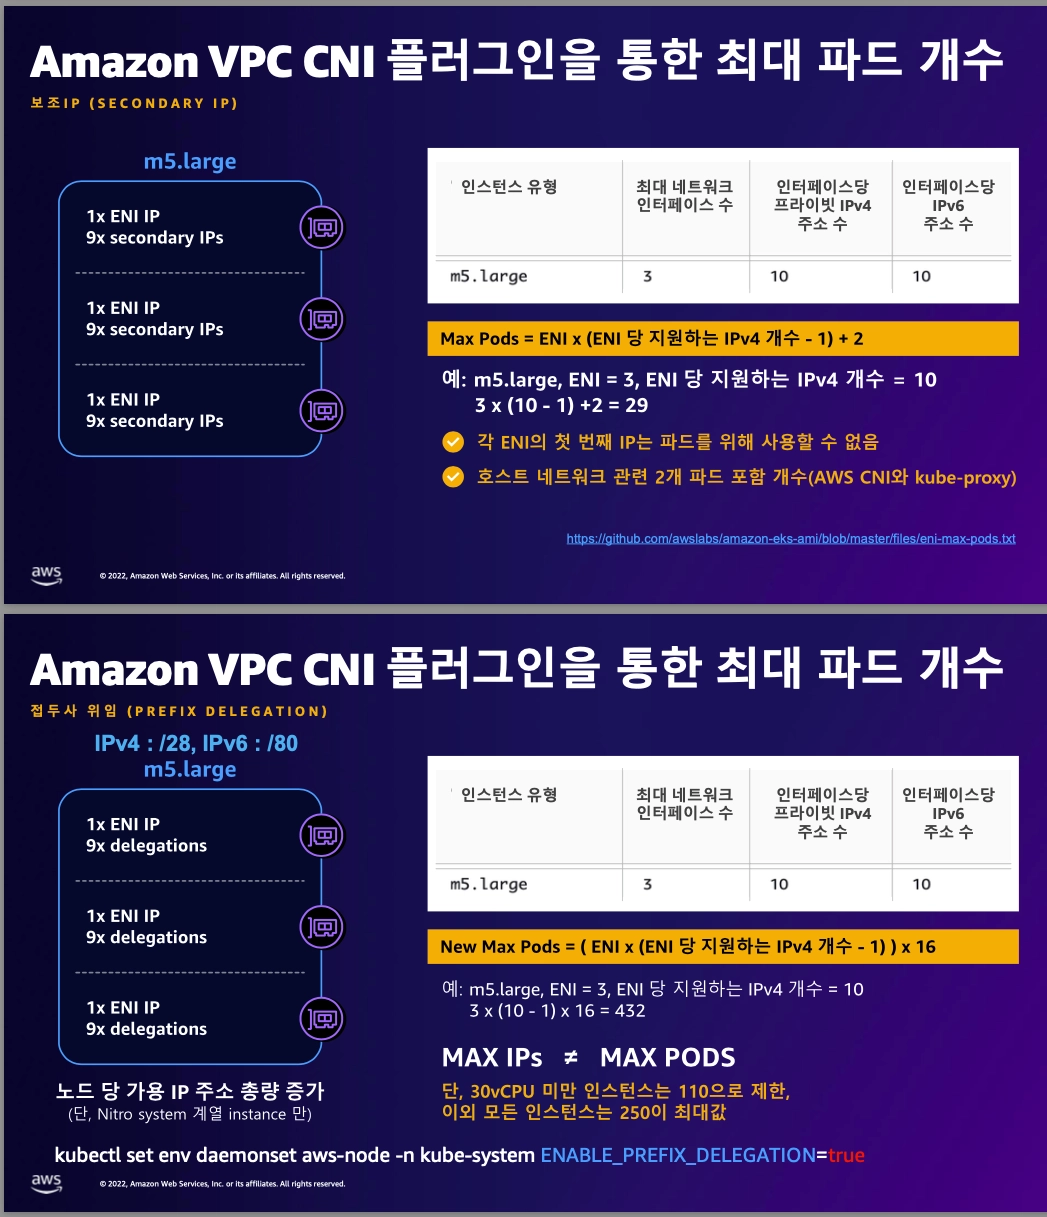
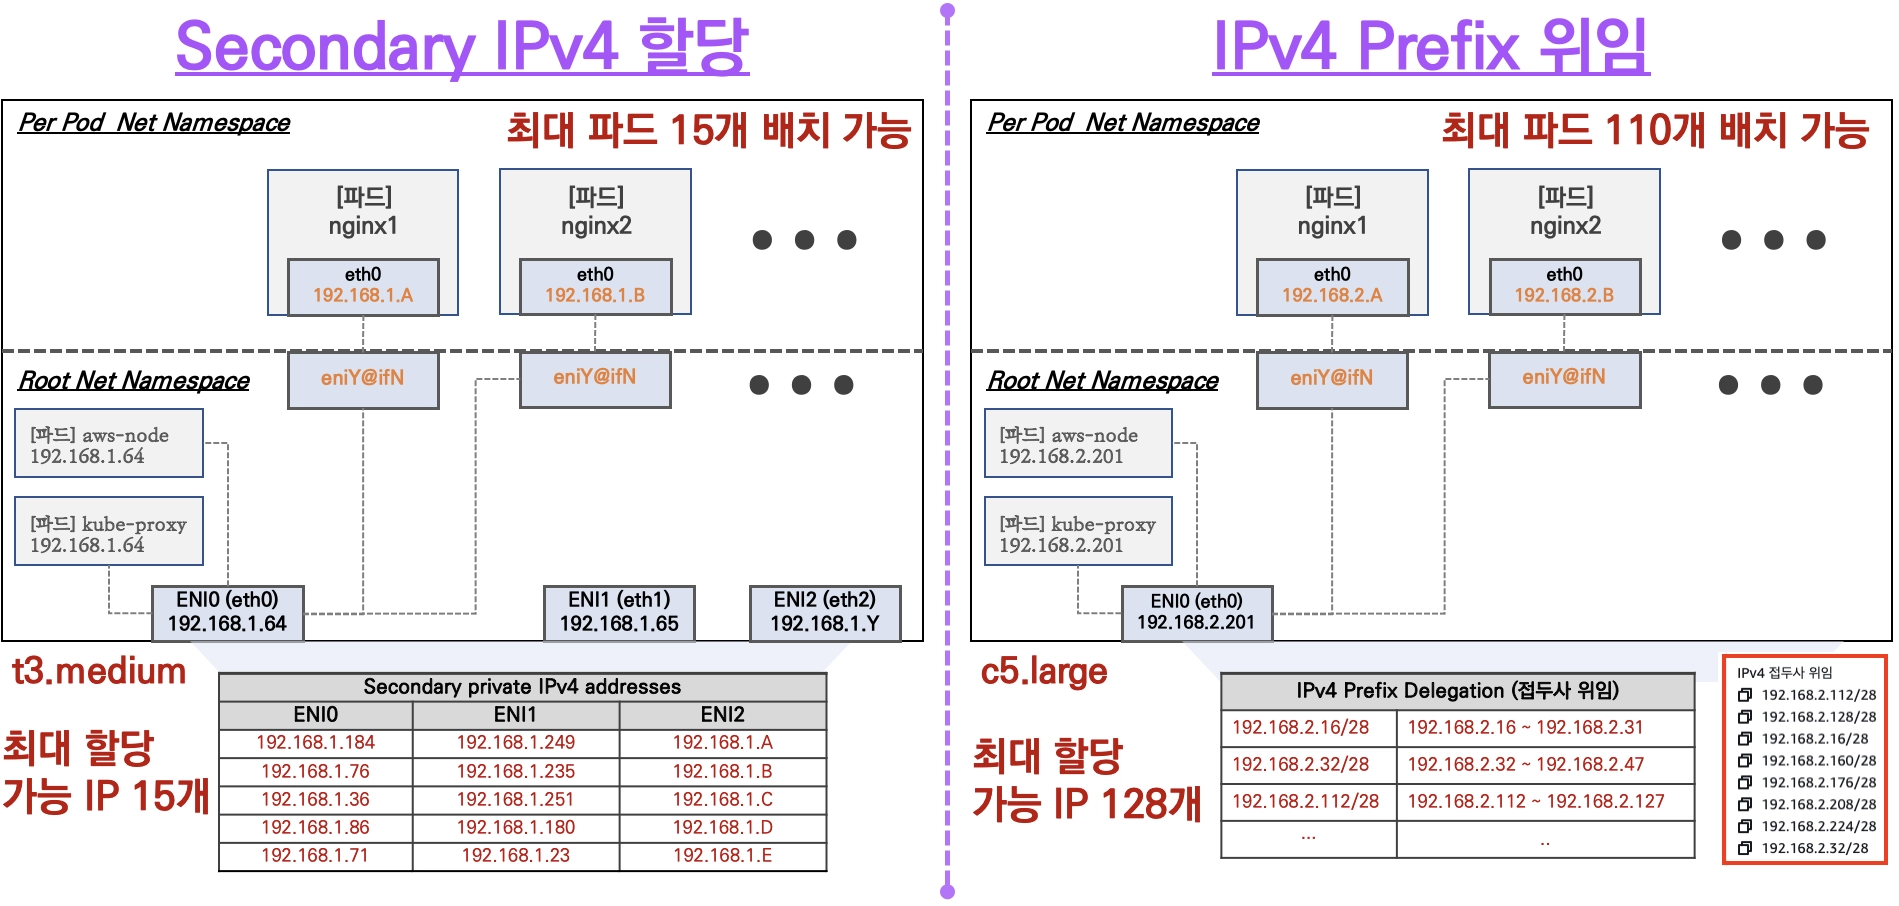
- [보조 IP] Secondary IPv4 addresses : 인스턴스 유형에 최대 ENI 갯수와 할당 가능 IP 수를 조합하여 선정
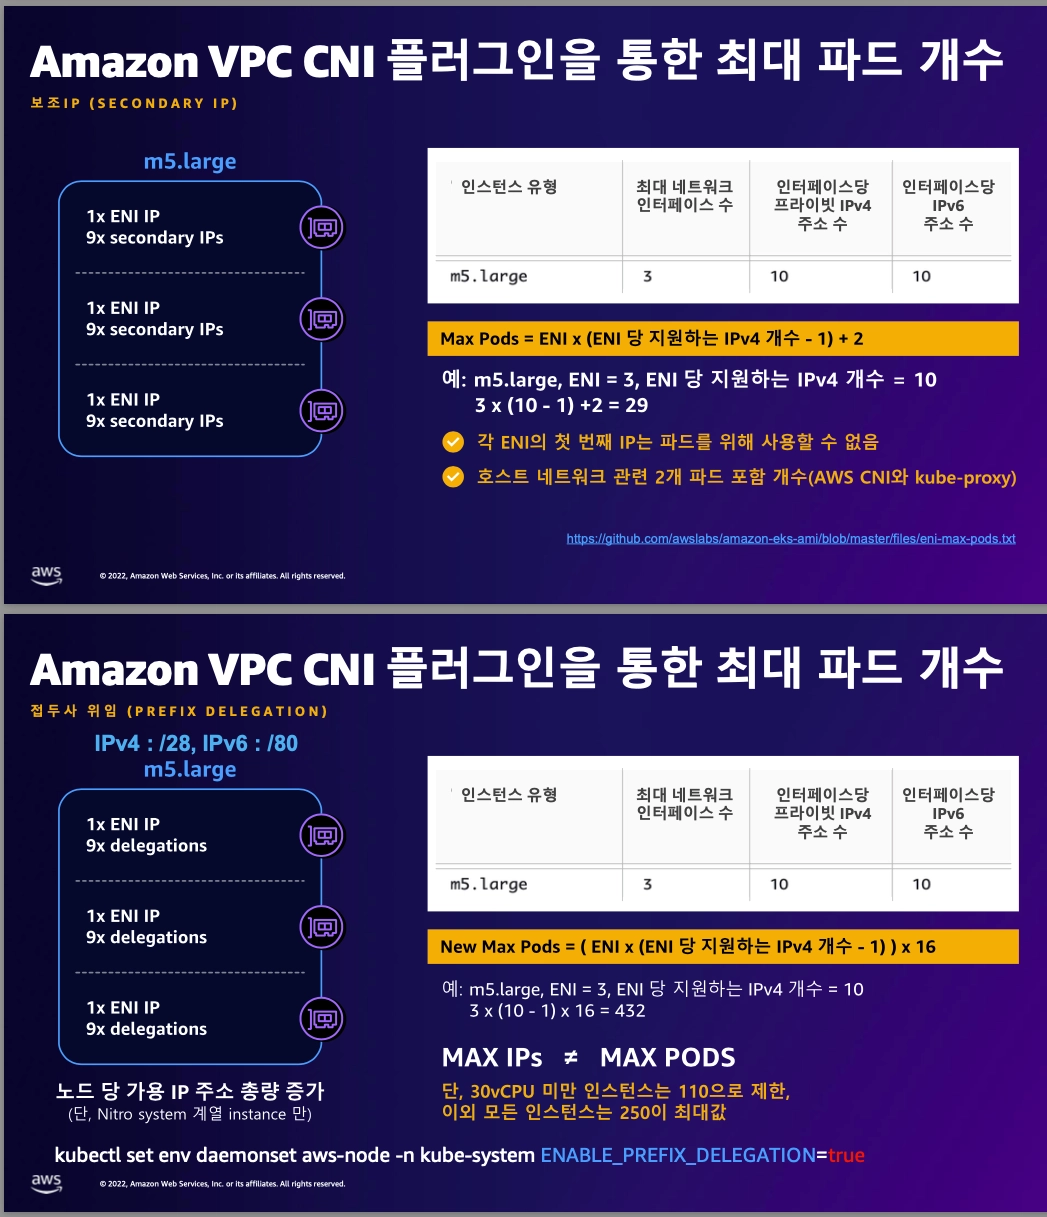
[접두사 위임] IPv4 Prefix Delegation : IPv4 28bit 서브넷(prefix)를 위임하여 할당 가능 IP 수와 인스턴스 유형에 권장하는 최대 갯수로 선정
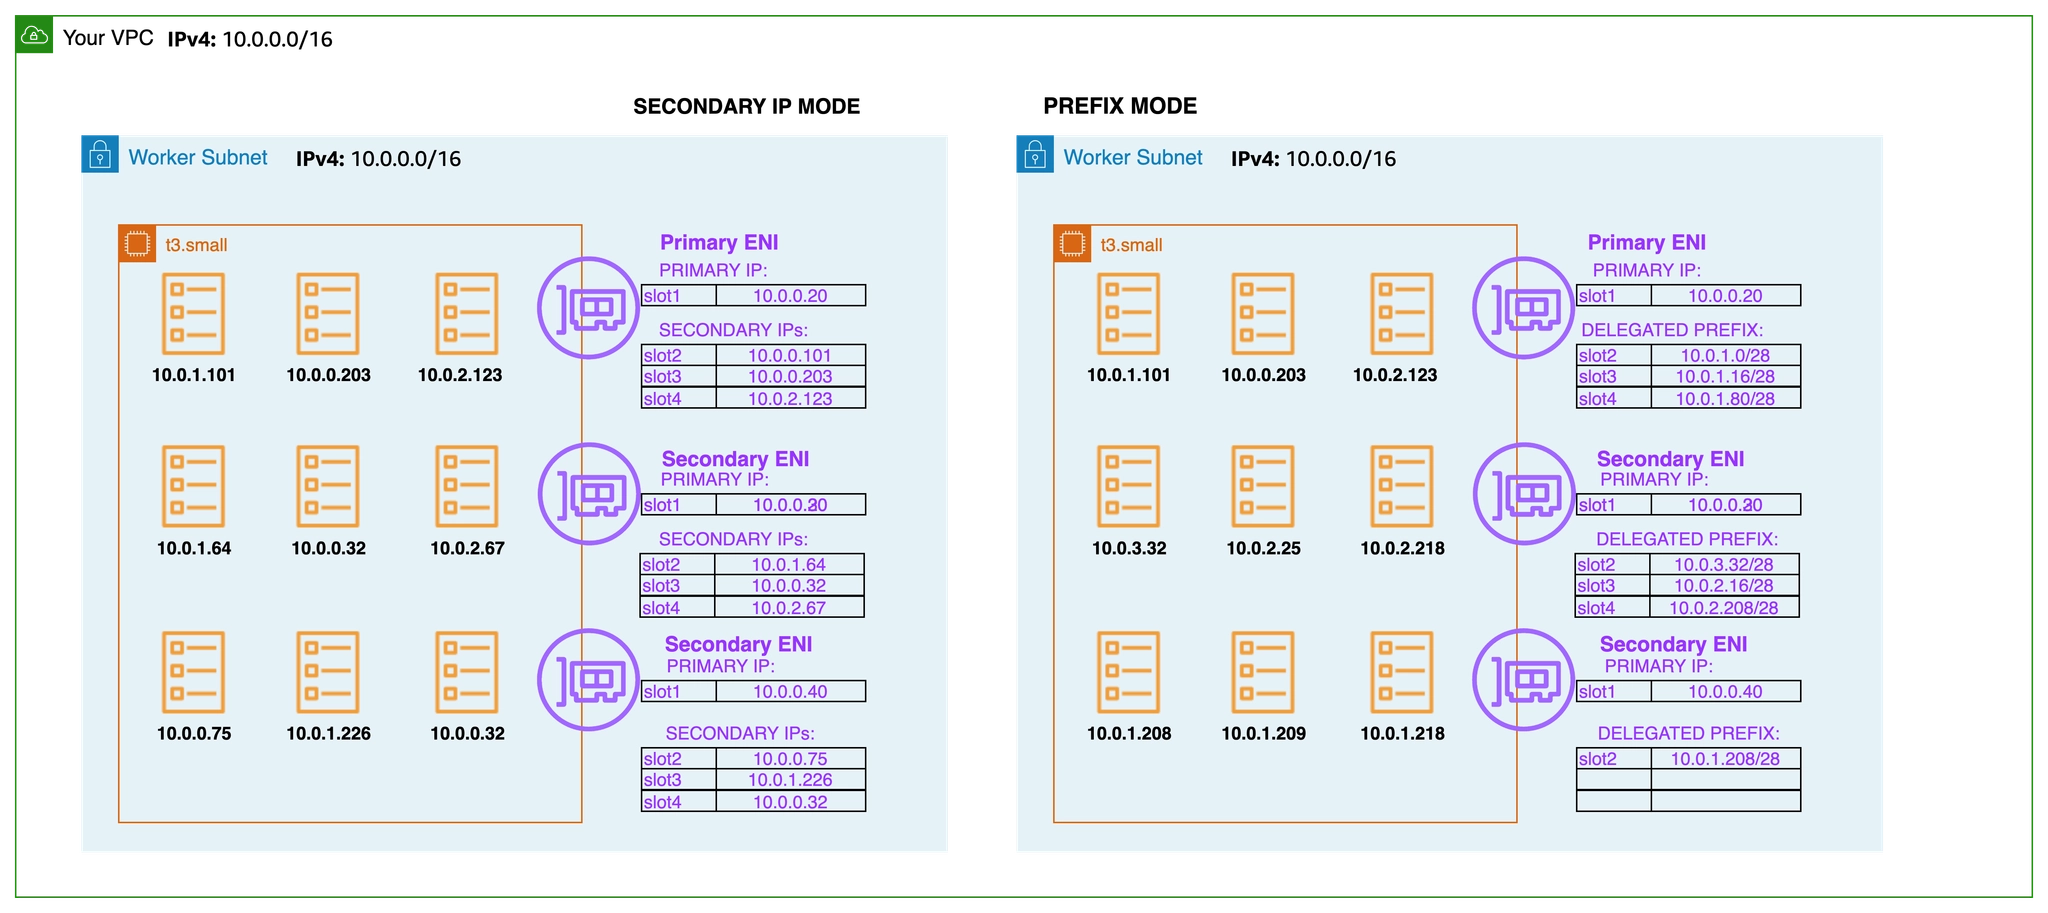
AWS VPC CNI Custom Networking : 노드와 파드 대역 분리, 파드에 별도 서브넷 부여 후 사용 - Docs
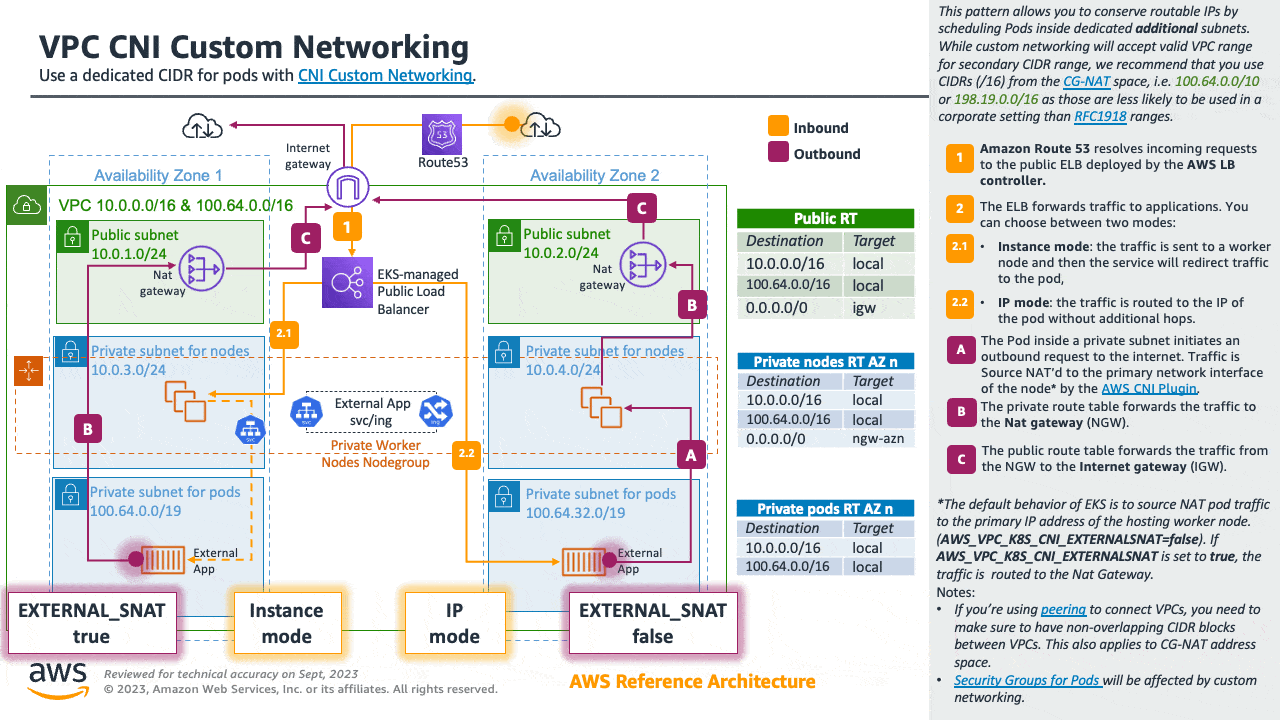
노드에서 기본 네트워크 정보를 확인해보자
# EC2 ENI IP 확인
aws ec2 describe-instances --query "Reservations[*].Instances[*].{PublicIPAdd:PublicIpAddress,PrivateIPAdd:PrivateIpAddress,InstanceName:Tags[?Key=='Name']|[0].Value,Status:State.Name}" --filters Name=instance-state-name,Values=running --output table

# 아래 IP는 각자 실습 환경에 따라 사용
N1=15.165.200.177
N2=3.38.169.225
N3=43.201.28.208

# 워커 노드 SSH 접속
for i in $N1 $N2 $N3; do echo ">> node $i <<"; ssh -o StrictHostKeyChecking=no ec2-user@$i hostname; echo; done
- check
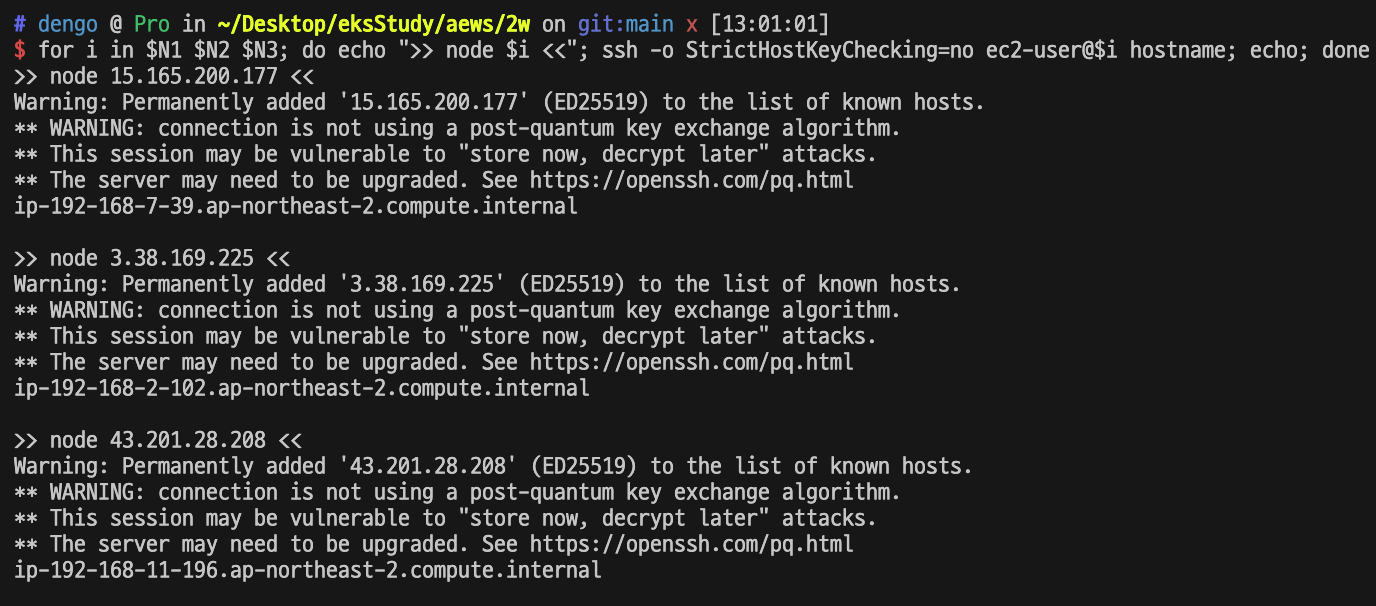
네트워크 기본 정보 확인
# 파드 상세 정보 확인
kubectl get daemonset aws-node --namespace kube-system -owide
kubectl describe daemonset aws-node --namespace kube-system

# kube-proxy config 확인 : 모드 iptables 사용
kubectl describe cm -n kube-system kube-proxy-config
...
mode: "iptables"
...

kubectl describe cm -n kube-system kube-proxy-config | grep iptables: -A5
iptables:
  masqueradeAll: false
  masqueradeBit: 14
  minSyncPeriod: 0s
  syncPeriod: 30s


# aws-node 데몬셋 env 확인
kubectl get ds aws-node -n kube-system -o json | jq '.spec.template.spec.containers[0].env'

# 노드 IP 확인
aws ec2 describe-instances --query "Reservations[*].Instances[*].{PublicIPAdd:PublicIpAddress,PrivateIPAdd:PrivateIpAddress,InstanceName:Tags[?Key=='Name']|[0].Value,Status:State.Name}" --filters Name=instance-state-name,Values=running --output table

# 파드 IP 확인
kubectl get pod -n kube-system -o=custom-columns=NAME:.metadata.name,IP:.status.podIP,STATUS:.status.phase

# 파드 이름 확인
kubectl get pod -A -o name

# 파드 갯수 확인
kubectl get pod -A -o name | wc -l
-check
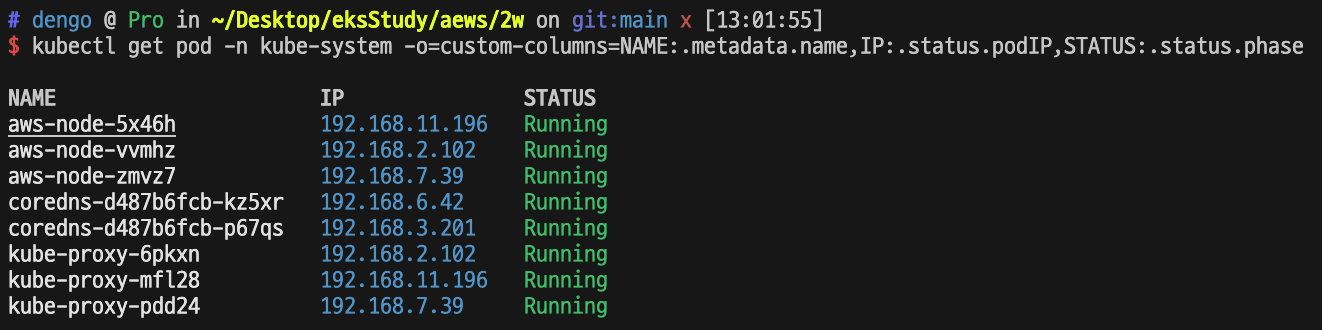
정말 신기한 게 이렇게 CLI로 다 확인이 가능하다는게 아직도 신기합니다.
노드에 네트워크 정보 확인
# cni log 확인
for i in $N1 $N2 $N3; do echo ">> node $i <<"; ssh ec2-user@$i tree /var/log/aws-routed-eni ; echo; done
for i in $N1 $N2 $N3; do echo ">> node $i <<"; ssh ec2-user@$i sudo cat /var/log/aws-routed-eni/plugin.log | jq ; echo; done
for i in $N1 $N2 $N3; do echo ">> node $i <<"; ssh ec2-user@$i sudo cat /var/log/aws-routed-eni/ipamd.log | jq ; echo; done

# 네트워크 정보 확인 : eniY는 pod network 네임스페이스와 veth pair
for i in $N1 $N2 $N3; do echo ">> node $i <<"; ssh ec2-user@$i sudo ip -br -c addr; echo; done
for i in $N1 $N2 $N3; do echo ">> node $i <<"; ssh ec2-user@$i sudo ip -c addr; echo; done
for i in $N1 $N2 $N3; do echo ">> node $i <<"; ssh ec2-user@$i sudo ip -c route; echo; done

ssh ec2-user@$N1 sudo iptables -t nat -S
ssh ec2-user@$N1 sudo iptables -t nat -L -n -v
워커 노드의 기본 네트워크 구성을 알아보자
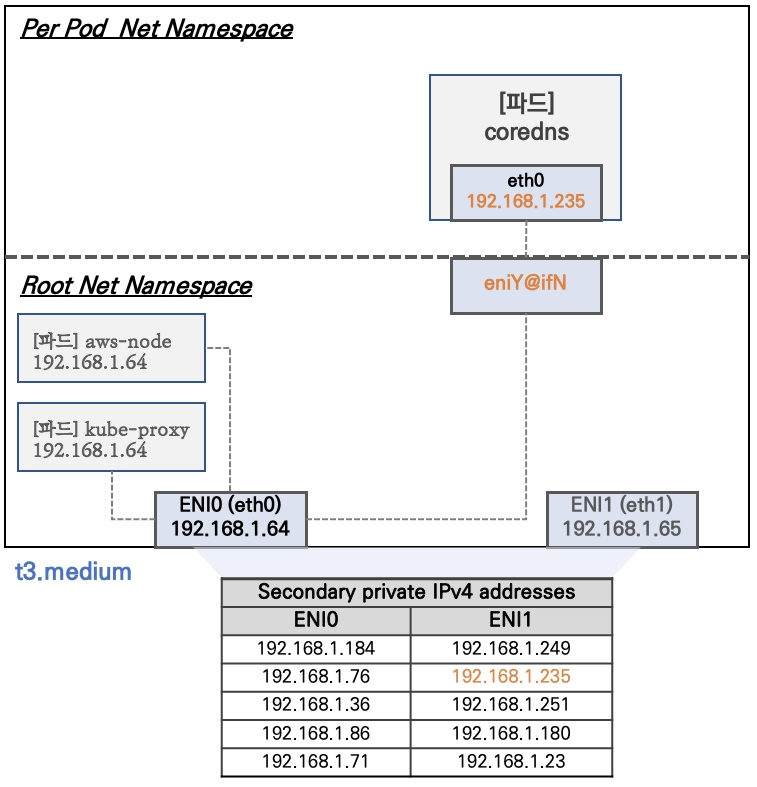
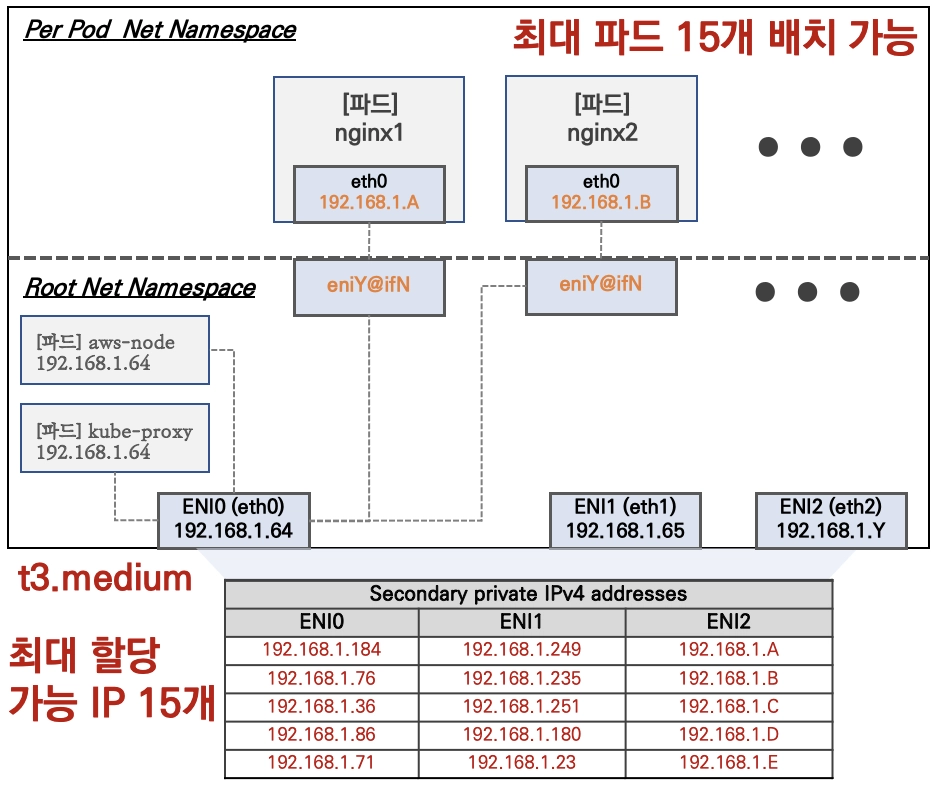
- Network 네임스페이스는 호스트(Root)와 파드 별(Per Pod)로 구분된다
- 특정한 파드(kube-proxy, aws-node)는 호스트(Root)의 IP를 그대로 사용한다 ⇒ 파드의 Host Network 옵션
- t3.medium 의 경우 ENI 마다 최대 6개의 IP를 가질 수 있다
- ENI0, ENI1 으로 2개의 ENI는 자신의 IP 이외에 추가적으로 5개의 보조 프라이빗 IP를 가질수 있다
- coredns 파드는 veth 으로 호스트에는 eniY@ifN 인터페이스와 파드에 eth0 과 연결되어 있다
워커 노드1 인스턴스의 네트워크 정보 확인 : 프라이빗 IP와 보조 프라이빗 IP 확인
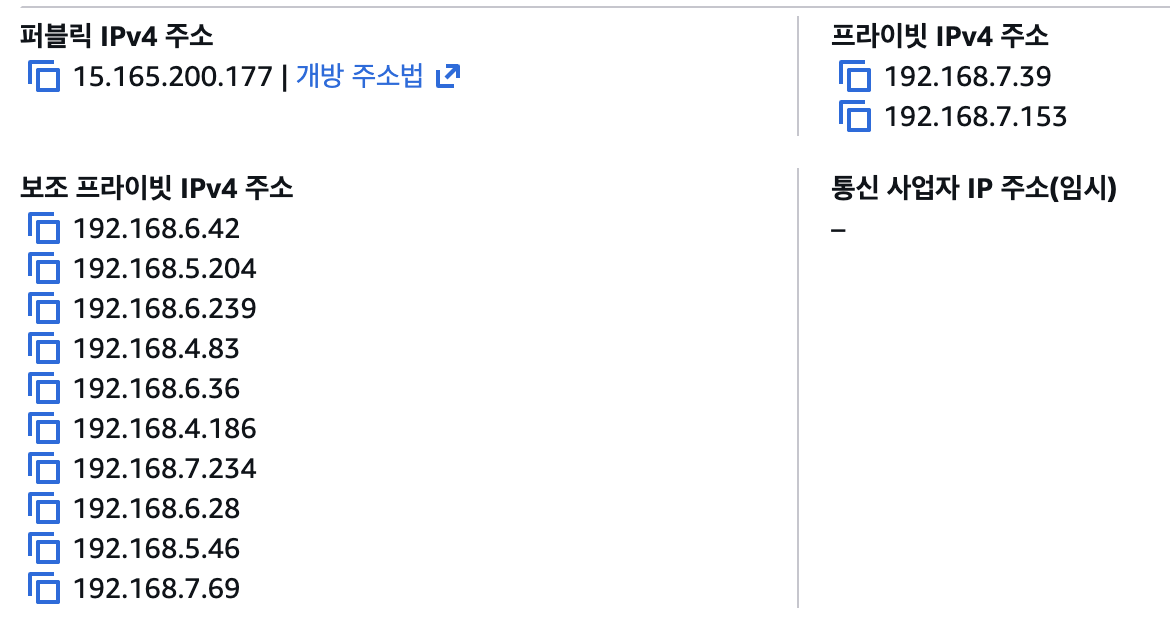
보조 IPv4 주소를 coredns 파드가 사용하는지 확인 ⇒ coredns 파드가 배치되지 않은 워커 노드에 ENI 갯수 확인!
# coredns 파드 IP 정보 확인
kubectl get pod -n kube-system -l k8s-app=kube-dns -owide
NAME                      READY   STATUS    RESTARTS   AGE   IP              NODE                                               NOMINATED NODE   READINESS GATES
coredns-d487b6fcb-7x24g   1/1     Running   0          13m   192.168.1.63    ip-192-168-1-36.ap-northeast-2.compute.internal    <none>           <none>
coredns-d487b6fcb-vb248   1/1     Running   0          13m   192.168.3.133   ip-192-168-3-208.ap-northeast-2.compute.internal   <none>           <none>

# 노드의 라우팅 정보 확인 >> EC2 네트워크 정보의 '보조 프라이빗 IPv4 주소'와 비교해보자
for i in $N1 $N2 $N3; do echo ">> node $i <<"; ssh ec2-user@$i sudo ip -c route; echo; done

# IpamD debugging commands
# https://github.com/aws/amazon-vpc-cni-k8s/blob/master/docs/troubleshooting.md
for i in $N1 $N2 $N3; do echo ">> node $i <<"; ssh ec2-user@$i curl -s http://localhost:61679/v1/enis | jq; echo; done
Network-Multitool 디플로이먼트 생성 - https://github.com/Praqma/Network-MultiTool
# [터미널1~3] 노드 모니터링
ssh ec2-user@$N1
watch -d "ip link | egrep 'ens|eni' ;echo;echo "[ROUTE TABLE]"; route -n | grep eni"

ssh ec2-user@$N2
watch -d "ip link | egrep 'ens|eni' ;echo;echo "[ROUTE TABLE]"; route -n | grep eni"

ssh ec2-user@$N3
watch -d "ip link | egrep 'ens|eni' ;echo;echo "[ROUTE TABLE]"; route -n | grep eni"

# Network-Multitool 디플로이먼트 생성
cat <<EOF | kubectl apply -f -
apiVersion: apps/v1
kind: Deployment
metadata:
  name: netshoot-pod
spec:
  replicas: 3
  selector:
    matchLabels:
      app: netshoot-pod
  template:
    metadata:
      labels:
        app: netshoot-pod
    spec:
      containers:
      - name: netshoot-pod
        image: praqma/network-multitool
        ports:
        - containerPort: 80
        - containerPort: 443
        env:
        - name: HTTP_PORT
          value: "80"
        - name: HTTPS_PORT
          value: "443"
      terminationGracePeriodSeconds: 0
EOF

# 파드 이름 변수 지정
PODNAME1=$(kubectl get pod -l app=netshoot-pod -o jsonpath='{.items[0].metadata.name}')
PODNAME2=$(kubectl get pod -l app=netshoot-pod -o jsonpath='{.items[1].metadata.name}')
PODNAME3=$(kubectl get pod -l app=netshoot-pod -o jsonpath='{.items[2].metadata.name}')
echo $PODNAME1 $PODNAME2 $PODNAME3

# 파드 확인
kubectl get pod -o wide
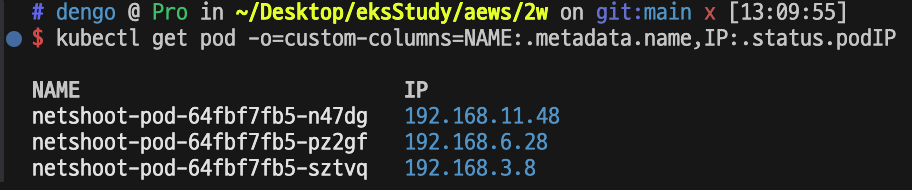
kubectl get pod -o=custom-columns=NAME:.metadata.name,IP:.status.podIP

# 노드에 라우팅 정보 확인
for i in $N1 $N2 $N3; do echo ">> node $i <<"; ssh ec2-user@$i sudo ip -c route; echo; done- check
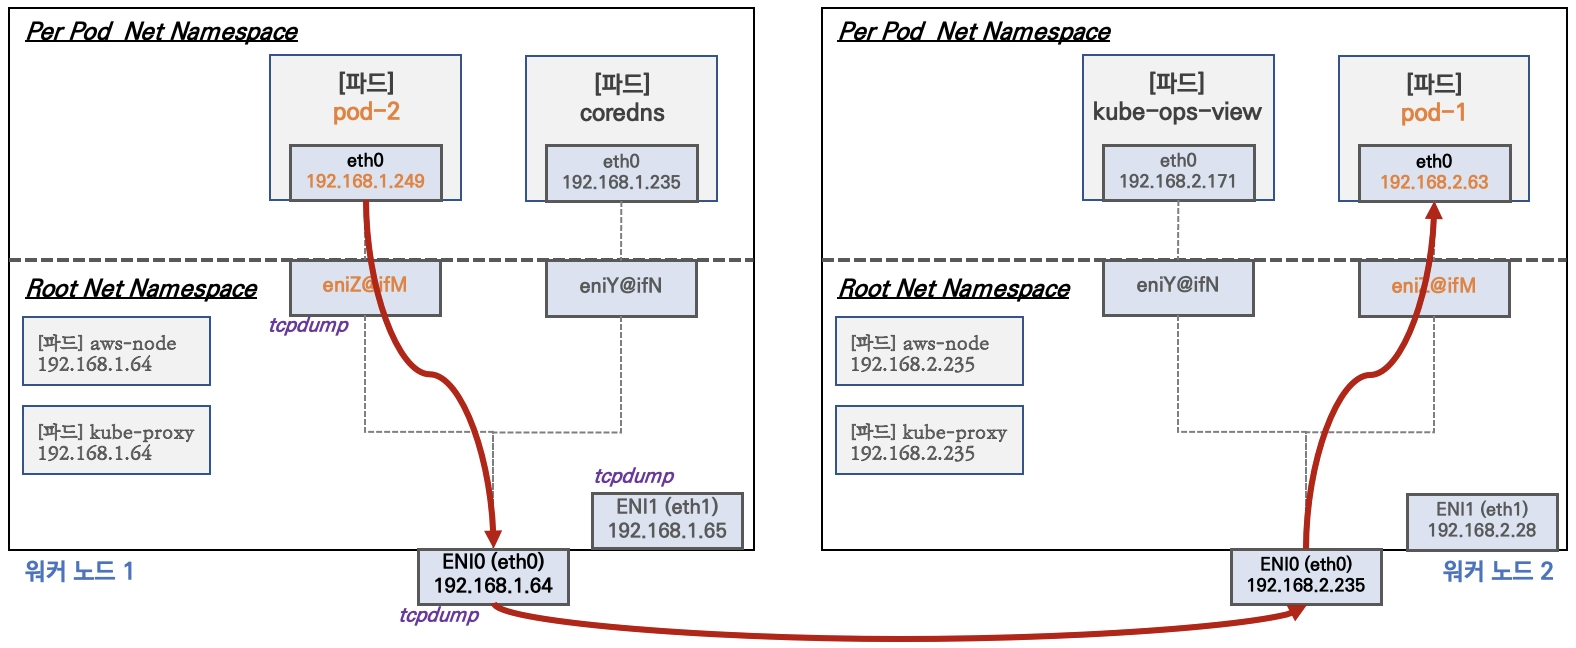
노드 간 파드 통신
목표: 파드간 통신 시 tcpdump 내용을 확인하고 통신 과정을 알아본다- 파드간 통신 흐름 : AWS VPC CNI 경우 별도의 오버레이(Overlay) 통신 기술 없이, VPC Native 하게 파드간 직접 통신이 가능하다
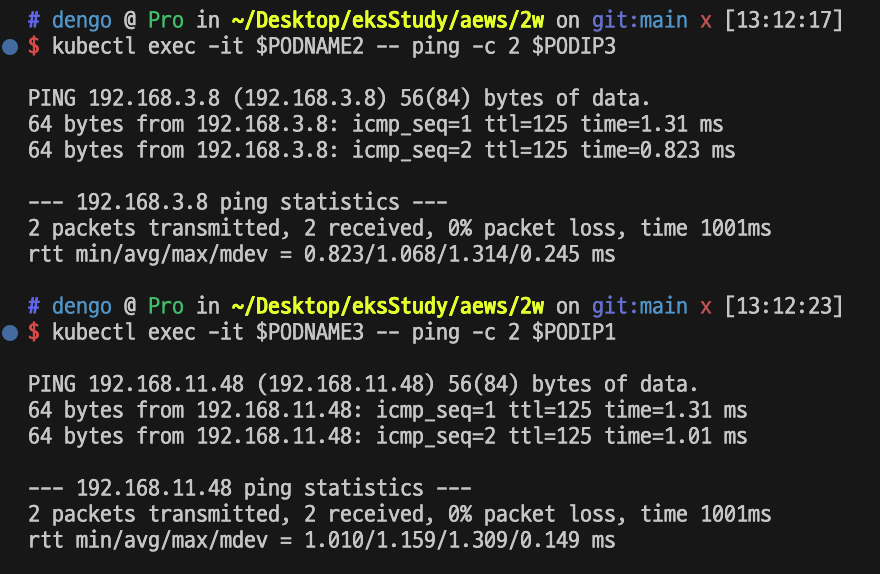
[실습] 파드간 통신 테스트 및 확인 : 별도의 NAT 동작 없이 통신 가능!
# 파드 IP 변수 지정
PODIP1=$(kubectl get pod -l app=netshoot-pod -o jsonpath='{.items[0].status.podIP}')
PODIP2=$(kubectl get pod -l app=netshoot-pod -o jsonpath='{.items[1].status.podIP}')
PODIP3=$(kubectl get pod -l app=netshoot-pod -o jsonpath='{.items[2].status.podIP}')
echo $PODIP1 $PODIP2 $PODIP3

# 파드1 Shell 에서 파드2로 ping 테스트
kubectl exec -it $PODNAME1 -- ping -c 2 $PODIP2
kubectl exec -it $PODNAME1 -- curl -s http://$PODIP2
kubectl exec -it $PODNAME1 -- curl -sk https://$PODIP2

# 파드2 Shell 에서 파드3로 ping 테스트
kubectl exec -it $PODNAME2 -- ping -c 2 $PODIP3

# 파드3 Shell 에서 파드1로 ping 테스트
kubectl exec -it $PODNAME3 -- ping -c 2 $PODIP1


# 워커 노드 EC2 : TCPDUMP 확인
## For Pod to external (outside VPC) traffic, we will program iptables to SNAT using Primary IP address on the Primary ENI.
sudo tcpdump -i any -nn icmp
sudo tcpdump -i ens5 -nn icmp
sudo tcpdump -i ens6 -nn icmp
sudo tcpdump -i eniYYYYYYYY -nn icmp

[워커 노드1]
# routing policy database management 확인
ip rule

# routing table management 확인
ip route show table local
ip route show table main
ip route show table 2
-check
파드에서 외부 통신
파드에서 외부 통신 흐름 : iptable 에 SNAT 을 통하여 노드의 eth0(ens5) IP로 변경되어서 외부와 통신됨
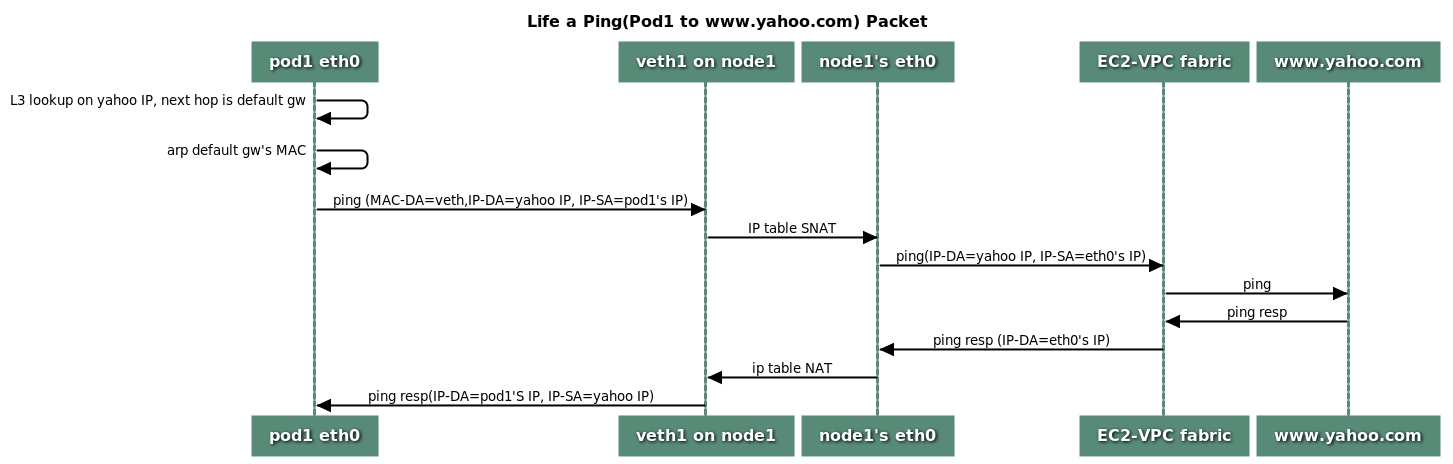
[실습] 파드에서 외부 통신 테스트 및 확인
# pod-1 Shell 에서 외부로 ping
kubectl exec -it $PODNAME1 -- ping -c 1 www.google.com
kubectl exec -it $PODNAME1 -- ping -i 0.1 www.google.com
kubectl exec -it $PODNAME1 -- ping -i 0.1 8.8.8.8

# 워커 노드 EC2 : TCPDUMP 확인
sudo tcpdump -i any -nn icmp
sudo tcpdump -i ens5 -nn icmp

# 퍼블릭IP 확인
for i in $N1 $N2 $N3; do echo ">> node $i <<"; ssh ec2-user@$i curl -s ipinfo.io/ip; echo; echo; done

# 작업용 EC2 : pod-1 Shell 에서 외부 접속 확인 - 공인IP는 어떤 주소인가?
## The right way to check the weather - 링크
for i in $PODNAME1 $PODNAME2 $PODNAME3; do echo ">> Pod : $i <<"; kubectl exec -it $i -- curl -s ipinfo.io/ip; echo; echo; done
kubectl exec -it $PODNAME1 -- curl -s wttr.in/seoul
kubectl exec -it $PODNAME1 -- curl -s wttr.in/seoul?format=3
kubectl exec -it $PODNAME1 -- curl -s wttr.in/Moon
kubectl exec -it $PODNAME1 -- curl -s wttr.in/:help


# 워커 노드 EC2
## 출력된 결과를 보고 어떻게 빠져나가는지 고민해보자!
ip rule
ip route show table main
sudo iptables -L -n -v -t nat
sudo iptables -t nat -S

# 파드가 외부와 통신시에는 아래 처럼 'AWS-SNAT-CHAIN-0' 룰(rule)에 의해서 SNAT 되어서 외부와 통신!
# 참고로 뒤 IP는 eth0(ENI 첫번째)의 IP 주소이다
# --random-fully 동작 - 링크1  링크2
sudo iptables -t nat -S | grep 'A AWS-SNAT-CHAIN'
-A AWS-SNAT-CHAIN-0 ! -d 192.168.0.0/16 -m comment --comment "AWS SNAT CHAIN" -j RETURN
-A AWS-SNAT-CHAIN-0 ! -o vlan+ -m comment --comment "AWS, SNAT" -m addrtype ! --dst-type LOCAL -j SNAT --to-source 192.168.1.251 --random-fully

## 아래 'mark 0x4000/0x4000' 매칭되지 않아서 RETURN 됨!
-A KUBE-POSTROUTING -m mark ! --mark 0x4000/0x4000 -j RETURN
-A KUBE-POSTROUTING -j MARK --set-xmark 0x4000/0x0
-A KUBE-POSTROUTING -m comment --comment "kubernetes service traffic requiring SNAT" -j MASQUERADE --random-fully
...

# 카운트 확인 시 AWS-SNAT-CHAIN-0에 매칭되어, 목적지가 192.168.0.0/16 아니고 외부 빠져나갈때 SNAT 192.168.1.251(EC2 노드1 IP) 변경되어 나간다!
sudo iptables -t filter --zero; sudo iptables -t nat --zero; sudo iptables -t mangle --zero; sudo iptables -t raw --zero
watch -d 'sudo iptables -v --numeric --table nat --list AWS-SNAT-CHAIN-0; echo ; sudo iptables -v --numeric --table nat --list KUBE-POSTROUTING; echo ; sudo iptables -v --numeric --table nat --list POSTROUTING'

# conntrack 확인 : EC2 메타데이터 주소(169.254.169.254) 제외 출력
for i in $N1 $N2 $N3; do echo ">> node $i <<"; ssh ec2-user@$i sudo conntrack -L -n |grep -v '169.254.169'; echo; done
conntrack v1.4.5 (conntrack-tools):
icmp     1 28 src=172.30.66.58 dst=8.8.8.8 type=8 code=0 id=34392 src=8.8.8.8 dst=172.30.85.242 type=0 code=0 id=50705 mark=128 use=1
tcp 6 23 TIME_WAIT src=172.30.66.58 dst=34.117.59.81 sport=58144 dport=80 src=34.117.59.81 dst=172.30.85.242 sport=80 dport=44768 [ASSURED] mark=128 use=1- check
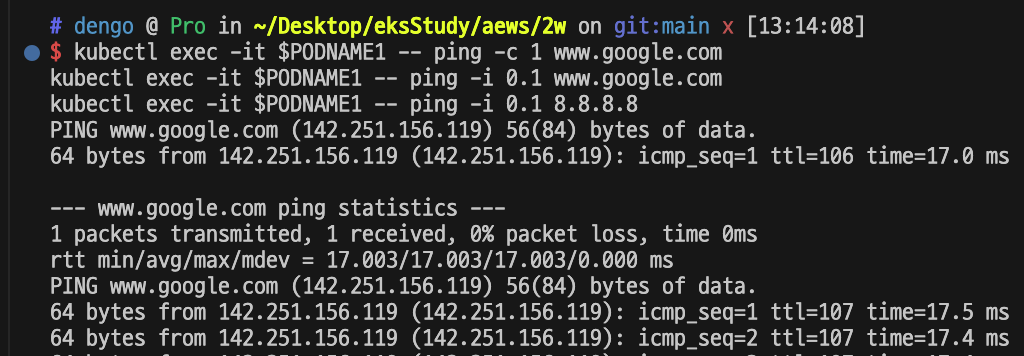
외부로 핑도 잘된다
다음 실습을 위해서 디플로이먼트 삭제: kubectl delete deploy netshoot-podAWS VPC CNI 설정 변경
# aws-node DaemonSet의 env 확인
kubectl get ds aws-node -n kube-system -o json | jq '.spec.template.spec.containers[0].env'
...
  {
    "name": "WARM_ENI_TARGET",
    "value": "1"
  },
...

# 노드 정보 확인 : 노드 중 1대는 eni 가 1개만 배치됨!
for i in $N1 $N2 $N3; do echo ">> node $i <<"; ssh ec2-user@$i sudo ip -c addr; echo; done
for i in $N1 $N2 $N3; do echo ">> node $i <<"; ssh ec2-user@$i sudo ip -c route; echo; done

# IpamD debugging commands  https://github.com/aws/amazon-vpc-cni-k8s/blob/master/docs/troubleshooting.md
for i in $N1 $N2 $N3; do echo ">> node $i <<"; ssh ec2-user@$i curl -s http://localhost:61679/v1/enis | jq; echo; done
AWS VPC CNI 설정 변경 적용
  # add-on
  addons = {
    coredns = {
      most_recent = true
    }
    kube-proxy = {
      most_recent = true
    }
    vpc-cni = {
      most_recent = true
      before_compute = true
      configuration_values = jsonencode({
        env = {
          #WARM_ENI_TARGET = "1" # 현재 ENI 외에 여유 ENI 1개를 항상 확보
          WARM_IP_TARGET  = "5" # 현재 사용 중인 IP 외에 여유 IP 5개를 항상 유지, 설정 시 WARM_ENI_TARGET 무시됨
          MINIMUM_IP_TARGET   = "10" # 노드 시작 시 최소 확보해야 할 IP 총량 10개
          #ENABLE_PREFIX_DELEGATION = "true"
          #WARM_PREFIX_TARGET = "1" # PREFIX_DELEGATION 사용 시, 1개의 여유 대역(/28) 유지
        }
      })
    }
  }
-check
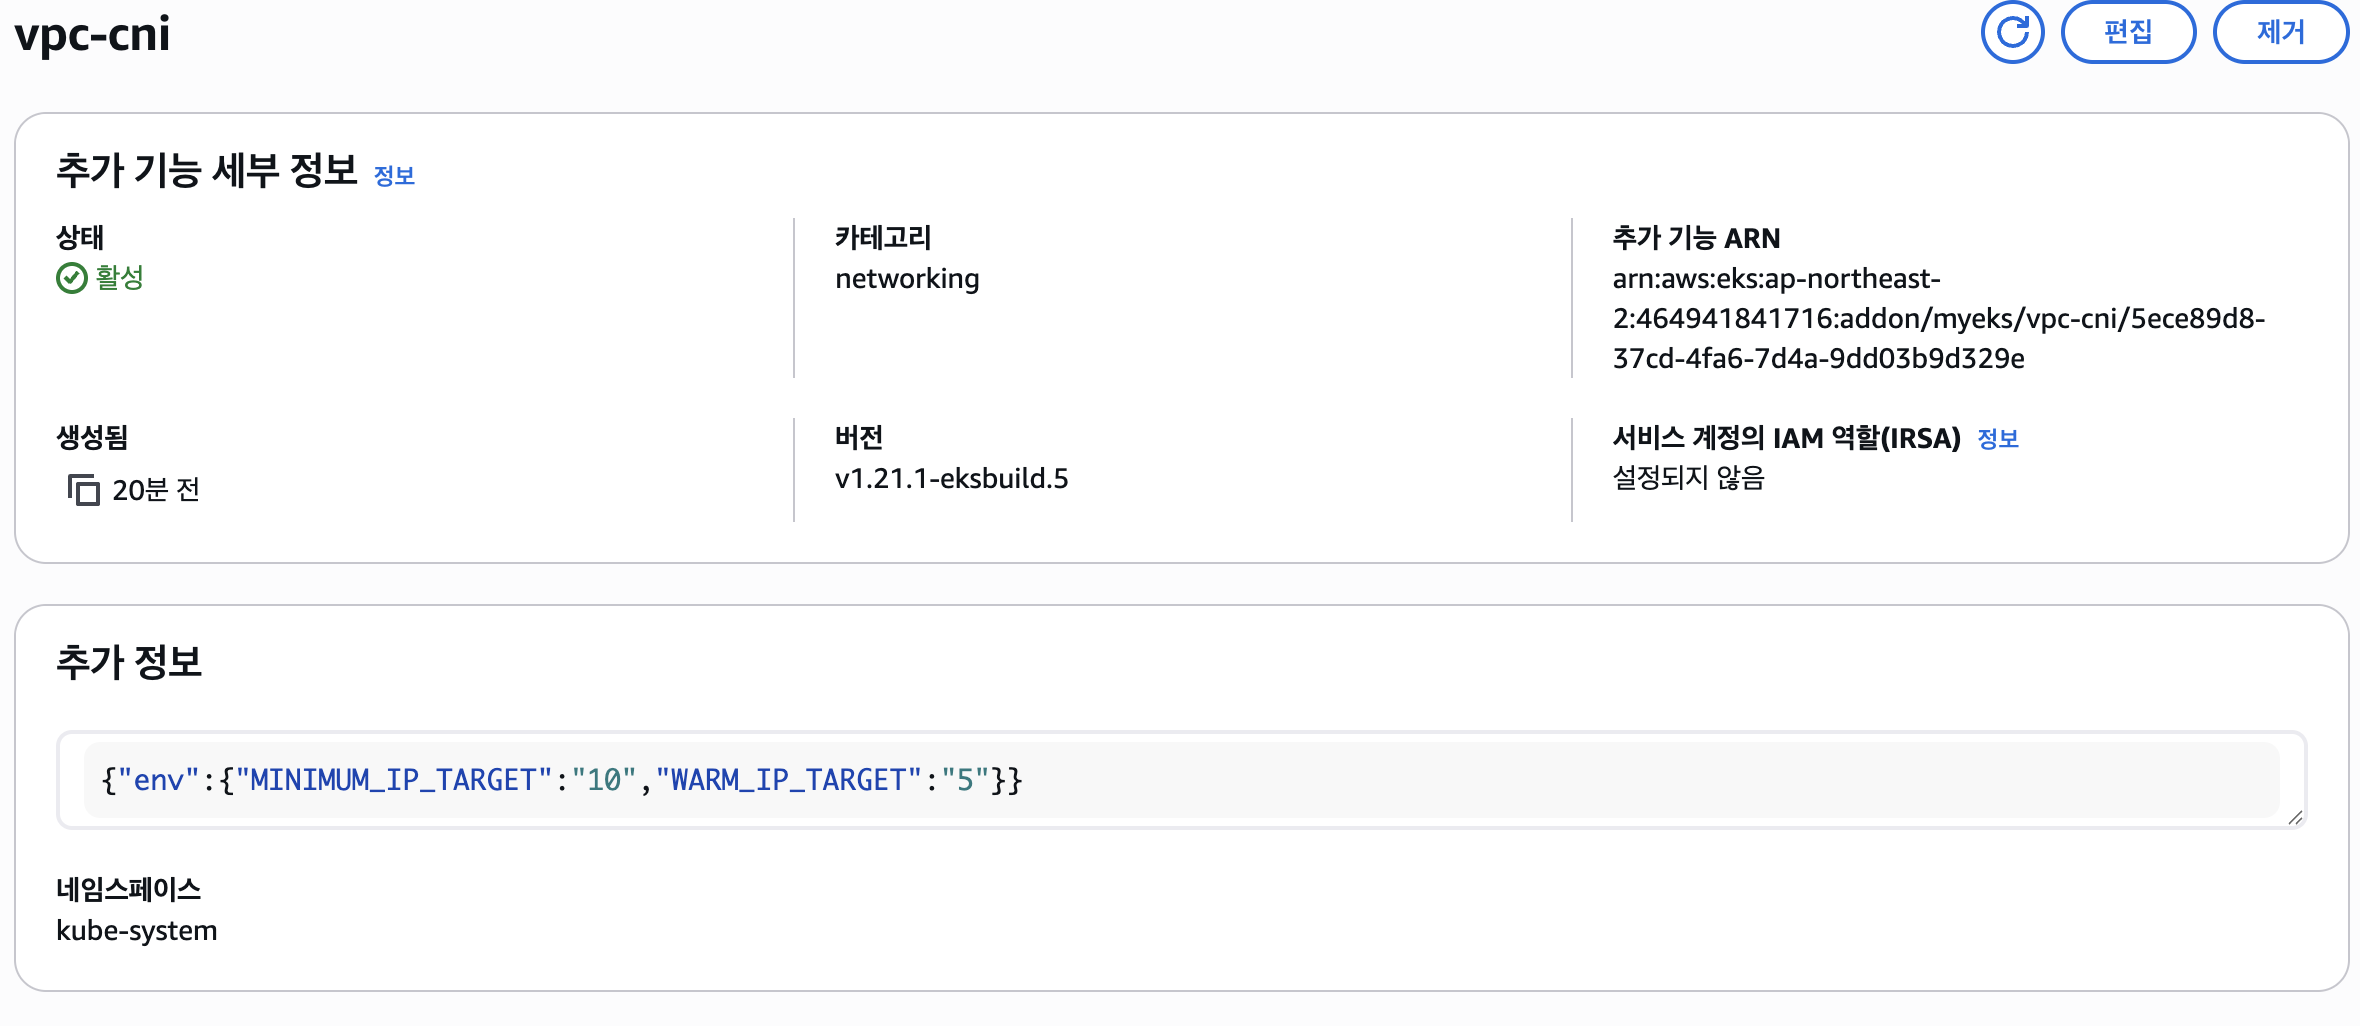
# 파드 재생성 확인
kubectl get pod -n kube-system -l k8s-app=aws-node

# addon 확인
eksctl get addon --cluster myeks
NAME            VERSION                 STATUS  ISSUES  IAMROLE UPDATE AVAILABLE        CONFIGURATION VALUES             NAMESPACE        POD IDENTITY ASSOCIATION ROLES
coredns         v1.13.2-eksbuild.3      ACTIVE  0                                                                        kube-system
kube-proxy      v1.34.5-eksbuild.2      ACTIVE  0                                                                        kube-system
vpc-cni         v1.21.1-eksbuild.5      ACTIVE  0                                       {"env":{"MINIMUM_IP_TARGET":"10","WARM_IP_TARGET":"5"}}   kube-system

# aws-node DaemonSet의 env 확인
kubectl get ds aws-node -n kube-system -o json | jq '.spec.template.spec.containers[0].env'
kubectl describe ds aws-node -n kube-system | grep -E "WARM_IP_TARGET|MINIMUM_IP_TARGET"

# 노드 정보 확인 : (hostNetwork 제외) 파드가 없는 노드에도 ENI 추가 확인!
for i in $N1 $N2 $N3; do echo ">> node $i <<"; ssh ec2-user@$i sudo ip -c addr; echo; done
for i in $N1 $N2 $N3; do echo ">> node $i <<"; ssh ec2-user@$i sudo ip -c route; echo; done


# cni log 확인
for i in $N1 $N2 $N3; do echo ">> node $i <<"; ssh ec2-user@$i tree /var/log/aws-routed-eni ; echo; done
for i in $N1 $N2 $N3; do echo ">> node $i <<"; ssh ec2-user@$i sudo cat /var/log/aws-routed-eni/plugin.log | jq ; echo; done
for i in $N1 $N2 $N3; do echo ">> node $i <<"; ssh ec2-user@$i sudo cat /var/log/aws-routed-eni/ipamd.log | jq ; echo; done

# IpamD debugging commands  https://github.com/aws/amazon-vpc-cni-k8s/blob/master/docs/troubleshooting.md
for i in $N1 $N2 $N3; do echo ">> node $i <<"; ssh ec2-user@$i curl -s http://localhost:61679/v1/enis | jq; echo; done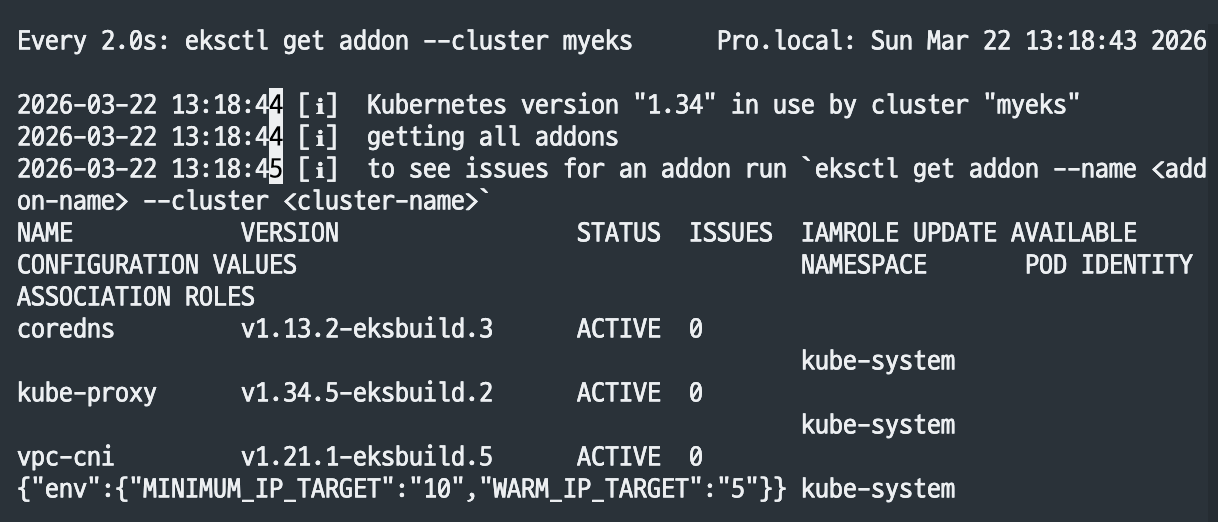
아주 잘 올라왔습니다.
이제 파드 생성 갯주 제한을 해보겠습니다.
사전 준비 : kube-ops-view 설치
# kube-ops-view
helm repo add geek-cookbook https://geek-cookbook.github.io/charts/
helm install kube-ops-view geek-cookbook/kube-ops-view --version 1.2.2 --set service.main.type=NodePort,service.main.ports.http.nodePort=30000 --set env.TZ="Asia/Seoul" --namespace kube-system

# 확인
kubectl get deploy,pod,svc,ep -n kube-system -l app.kubernetes.io/instance=kube-ops-view

# kube-ops-view 접속
open "http://$N1:30000/#scale=1.5"
open "http://$N1:30000/#scale=1.3"
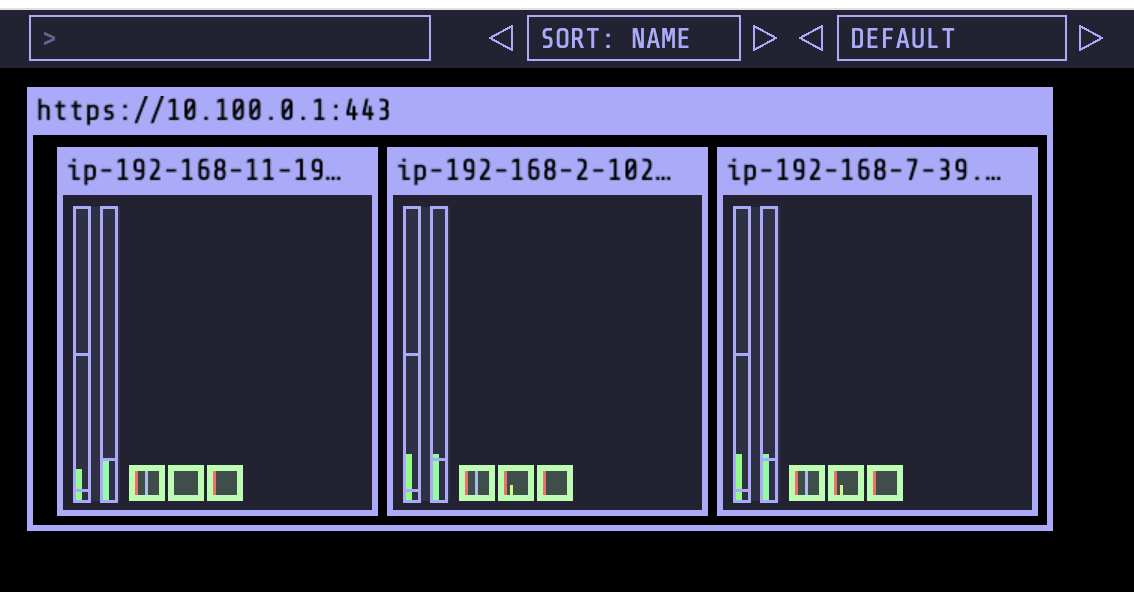
[보조 IP] Secondary IPv4 addresses (기본값) : 인스턴스 유형에 최대 ENI 갯수와 할당 가능 IP 수를 조합하여 선정
- [보조 IP] 워커 노드의 인스턴스 타입 별 파드 생성 갯수 제한
- 인스턴스 타입 별 ENI 최대 갯수와 할당 가능한 최대 IP 갯수에 따라서 파드 배치 갯수가 결정됨
- 단, aws-node 와 kube-proxy 파드는 호스트의 IP를 사용함으로 최대 갯수에서 제외함
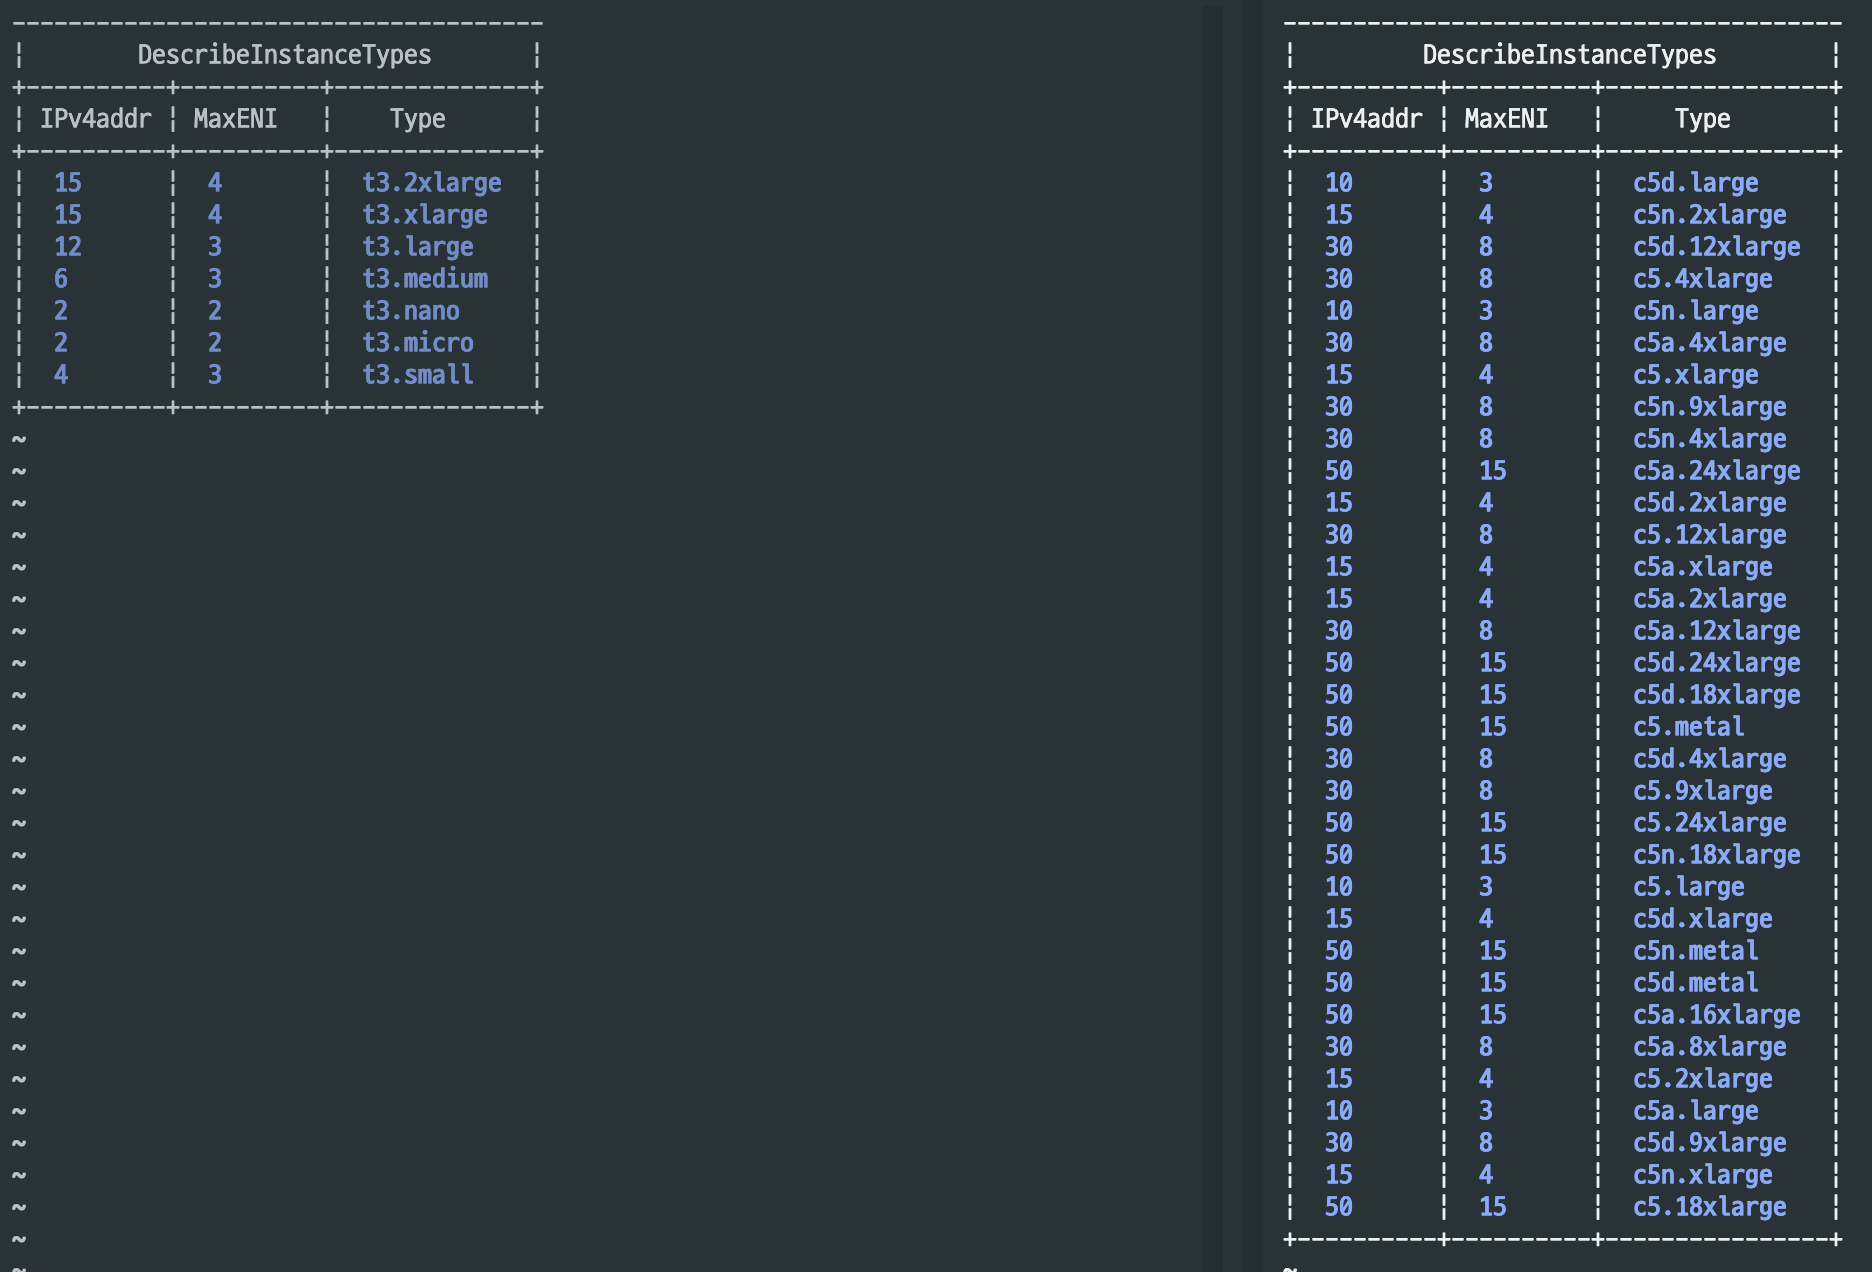
[보조 IP] 워커 노드의 인스턴스 정보 확인 : t3.medium 사용 시
# t3 타입의 정보(필터) 확인
aws ec2 describe-instance-types --filters Name=instance-type,Values=t3.\* \
 --query "InstanceTypes[].{Type: InstanceType, MaxENI: NetworkInfo.MaximumNetworkInterfaces, IPv4addr: NetworkInfo.Ipv4AddressesPerInterface}" \
 --output table
--------------------------------------
|        DescribeInstanceTypes       |
+----------+----------+--------------+
| IPv4addr | MaxENI   |    Type      |
+----------+----------+--------------+
|  15      |  4       |  t3.2xlarge  |
|  6       |  3       |  t3.medium   |
|  12      |  3       |  t3.large    |
|  15      |  4       |  t3.xlarge   |
|  2       |  2       |  t3.micro    |
|  2       |  2       |  t3.nano     |
|  4       |  3       |  t3.small    |
+----------+----------+--------------+

# c5 타입의 정보(필터) 확인
aws ec2 describe-instance-types --filters Name=instance-type,Values=c5\*.\* \
 --query "InstanceTypes[].{Type: InstanceType, MaxENI: NetworkInfo.MaximumNetworkInterfaces, IPv4addr: NetworkInfo.Ipv4AddressesPerInterface}" \
 --output table
10      |  3       |  c5.large

# 파드 사용 가능 계산 예시 : aws-node 와 kube-proxy 파드는 host-networking 사용으로 IP 2개 남음
((MaxENI * (IPv4addr-1)) + 2)
t3.medium 경우 : ((3 * (6 - 1) + 2 ) = 17개 >> aws-node 와 kube-proxy 2개 제외하면 15개

# 워커노드 상세 정보 확인 : 노드 상세 정보의 Allocatable 에 pods 에 17개 정보 확인
kubectl describe node | grep Allocatable: -A6
Allocatable:
  cpu:                         1930m
  ephemeral-storage:           27905944324
  hugepages-1Gi:               0
  hugepages-2Mi:               0
  memory:                      3388360Ki
  pods:                        17
-check
이렇게 가능한 max ENI를 확인할 수 있습니다.
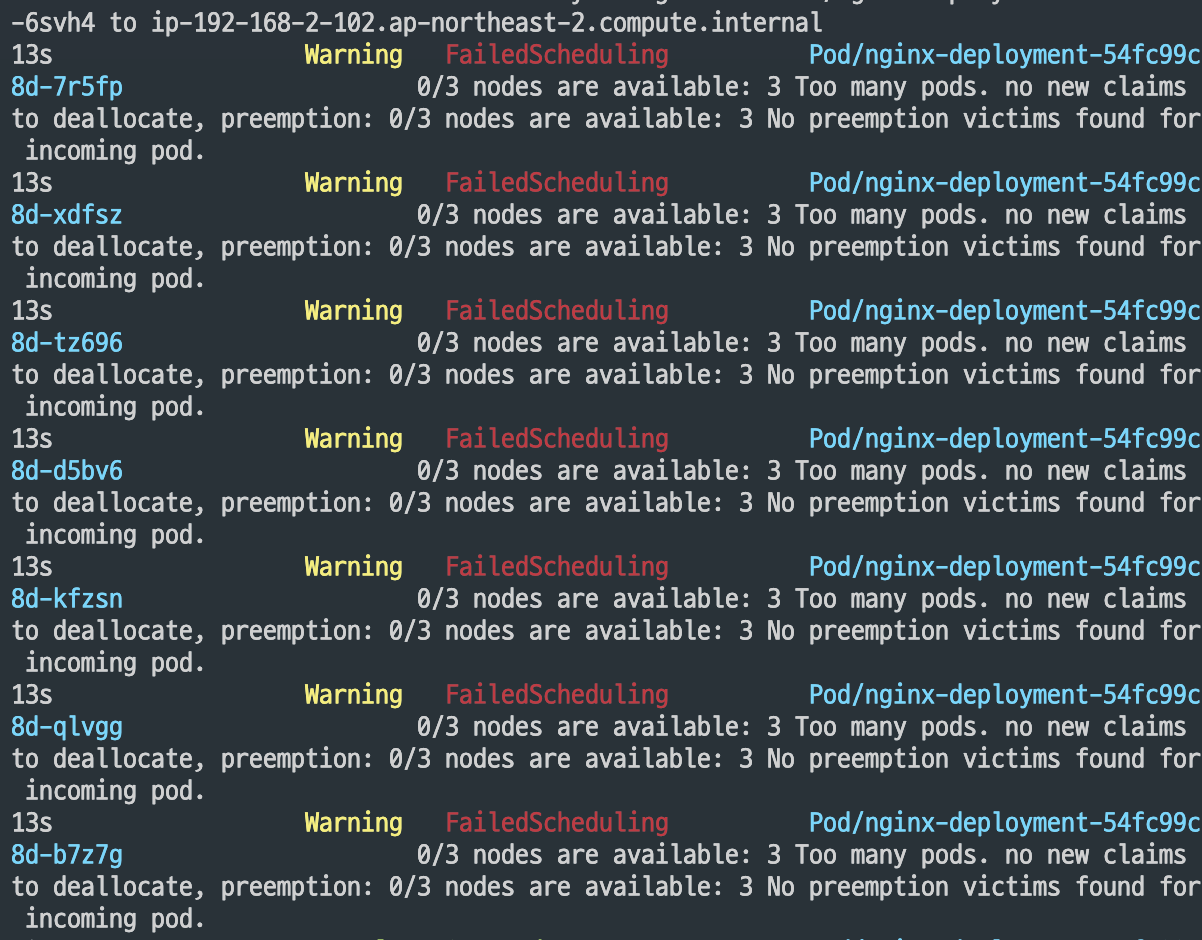
[보조 IP] 최대 파드 생성 및 확인
# 워커 노드 3대 EC2 - 모니터링 : 각각 ssh 접속 후
while true; do ip -br -c addr show && echo "--------------" ; date "+%Y-%m-%d %H:%M:%S" ; sleep 1; done

# 터미널1
watch -d 'kubectl get pods -o wide'

# 터미널2
## 디플로이먼트 생성
cat <<EOF | kubectl apply -f -
apiVersion: apps/v1
kind: Deployment
metadata:
  name: nginx-deployment
  labels:
    app: nginx
spec:
  replicas: 3
  selector:
    matchLabels:
      app: nginx
  template:
    metadata:
      labels:
        app: nginx
    spec:
      containers:
      - name: nginx
        image: nginx:alpine
        ports:
        - containerPort: 80
EOF

# 파드 확인
kubectl get pod -o wide
kubectl get pod -o=custom-columns=NAME:.metadata.name,IP:.status.podIP

# 파드 증가 테스트 >> 파드 정상 생성 확인, 워커 노드에서 eth, eni 갯수 확인
kubectl scale deployment nginx-deployment --replicas=8

# 파드 증가 테스트 >> 파드 정상 생성 확인, 워커 노드에서 eth, eni 갯수 확인 >> 어떤일이 벌어졌는가?
kubectl scale deployment nginx-deployment --replicas=15

# 파드 증가 테스트 >> 파드 정상 생성 확인, 워커 노드에서 eth, eni 갯수 확인 >> 어떤일이 벌어졌는가?
kubectl scale deployment nginx-deployment --replicas=30

# 파드 증가 테스트 >> 파드 정상 생성 확인, 워커 노드에서 eth, eni 갯수 확인 >> 어떤일이 벌어졌는가?
kubectl scale deployment nginx-deployment --replicas=50

# 파드 생성 실패!
kubectl events

kubectl get pods | grep Pending
nginx-deployment-7fb7fd49b4-d4bk9   0/1     Pending   0          3m37s
nginx-deployment-7fb7fd49b4-qpqbm   0/1     Pending   0          3m37s
...

kubectl describe pod <Pending 파드> | grep Events: -A5
Events:
  Type     Reason            Age   From               Message
  ----     ------            ----  ----               -------
  Warning  FailedScheduling  45s   default-scheduler  0/3 nodes are available: 1 node(s) had untolerated taint {node-role.kubernetes.io/control-plane: }, 2 Too many pods. preemption: 0/3 nodes are available: 1 Preemption is not helpful for scheduling, 2 No preemption victims found for incoming pod.


# cni log 확인
for i in $N1 $N2 $N3; do echo ">> node $i <<"; ssh ec2-user@$i tree /var/log/aws-routed-eni; echo; done
for i in $N1 $N2 $N3; do echo ">> node $i <<"; ssh ec2-user@$i sudo cat /var/log/aws-routed-eni/plugin.log | jq ; echo; done
for i in $N1 $N2 $N3; do echo ">> node $i <<"; ssh ec2-user@$i sudo cat /var/log/aws-routed-eni/ipamd.log | jq ; echo; done
  "msg": "IP pool stats for network card 0: Total IPs/Prefixes = 15/0, AssignedIPs/CooldownIPs: 15/0, c.maxIPsPerENI = 5"

# IpamD debugging commands  https://github.com/aws/amazon-vpc-cni-k8s/blob/master/docs/troubleshooting.md
for i in $N1 $N2 $N3; do echo ">> node $i <<"; ssh ec2-user@$i curl -s http://localhost:61679/v1/enis | jq; echo; done | grep -E 'node|TotalIPs|AssignedIPs'
>> node 13.124.203.19 <<
    "TotalIPs": 15,
    "AssignedIPs": 15,
>> node 43.203.146.201 <<
    "TotalIPs": 15,
    "AssignedIPs": 15,
>> node 3.34.197.113 <<
    "TotalIPs": 15,
    "AssignedIPs": 15,

for i in $N1 $N2 $N3; do echo ">> node $i <<"; ssh ec2-user@$i curl -s http://localhost:61679/v1/enis | jq; echo; done
>> node 3.35.209.223 <<
{
  "0": {
    "TotalIPs": 15,
    "AssignedIPs": 15,
    "ENIs": {
      "eni-075a2211bde1784b7": {
        "ID": "eni-075a2211bde1784b7",
        "IsPrimary": false,
        "IsTrunk": false,
        "IsEFA": false,
        "DeviceNumber": 2,
        "AvailableIPv4Cidrs": {
          "192.168.10.18/32": {
            "Cidr": {
              "IP": "192.168.10.18",
              "Mask": "/////w=="
            },
            "IPAddresses": {
              "192.168.10.18": {
                "Address": "192.168.10.18",
                "IPAMKey": {
                  "networkName": "aws-cni",
                  "containerID": "df22039a0ad35994a00b5bb506729c826b6dac8a57c04adbcf5d420c02bb28a9",
                  "ifName": "eth0"
                },
                "IPAMMetadata": {
                  "k8sPodNamespace": "default",
                  "k8sPodName": "nginx-deployment-54fc99c8d-qpsz6",
                  "interfacesCount": 1
                },
                "AssignedTime": "2026-03-18T12:53:36.541368951Z",
                "UnassignedTime": "0001-01-01T00:00:00Z"
              }
            },
            "IsPrefix": false,
            "AddressFamily": ""
          },
...
-check
생성 실패!
중요한
maxPods 결정 방법 - Docs , Kor
- 노드에 적용되는 최종
maxPods값은 특정 우선순위로 상호 작용하는 여러 구성 요소에 따라 달라집니다. - 우선순위(가장 높은 순서에서 낮은 순서):
-
관리형 노드 그룹 적용 - 사용자 지정 AMI 없이 관리형 노드 그룹을 사용하는 경우 Amazon EKS는 노드 사용자 데이터의
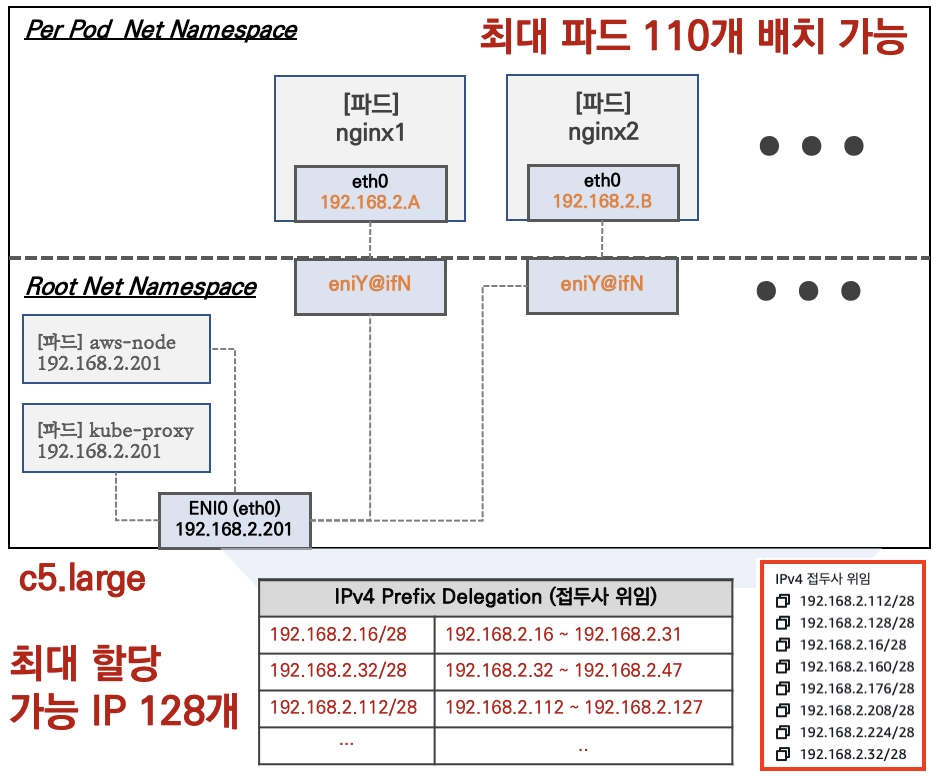
maxPods에 최대 한도를 적용합니다. vCPU가 30개 미만인 인스턴스의 경우 최대 한도는110입니다. vCPU가 30개를 초과하는 인스턴스의 경우 최대 한도는250입니다. 이 값은maxPodsExpression을 포함하여 다른maxPods구성보다 우선합니다.⇒ vCPU 30개 미만 EC2 인스턴스 유형은 (k8s 확장 권고값에 따라) 노드에 최대 파드 110개 제한이 되고,
vCPU 30이상 EC2 인스턴스 유형은 (AWS 내부 테스트 권고값에 따라) 노드에 최대 파드 250개 제한을 권고합니다. -
kubelet
maxPods구성 - kubelet 구성에서 직접maxPods를 설정하는 경우(예: 사용자 지정 AMI를 사용하는 시작 템플릿을 통해) 이 값이maxPodsExpression보다 우선합니다. -
nodeadm
maxPodsExpression-NodeConfig에서maxPodsExpression을 사용하는 경우 nodeadm은 표현식을 평가하여maxPods를 계산합니다. 이 방법은 우선순위가 더 높은 소스에 의해 값이 아직 설정되지 않은 경우에만 유효합니다. -
기본 ENI 기반 계산 - 다른 값이 설정되지 않은 경우 AMI는 인스턴스 유형에서 지원하는 탄력적 네트워크 인터페이스 및 IP 주소 수를 기반으로
maxPods를 계산합니다. 이는(number of ENIs × (IPs per ENI − 1)) + 2공식과 동일합니다.+ 2는 포드 IP 주소를 소비하지 않는 모든 노드에서 실행되는 Amazon VPC CNI 및kube-proxy를 고려합니다.
-
- 관리형 노드 그룹과 자체 관리형 노드 비교
- 사용자 지정 AMI 없이 관리형 노드 그룹을 사용하면 Amazon EKS가 노드의 부트스트랩 사용자 데이터에
maxPods값을 주입합니다. 이는 다음을 의미합니다.maxPods값은 항상 인스턴스 크기에 따라110또는250으로 제한됩니다.- 구성한 모든
maxPodsExpression은 이 주입된 값으로 재정의됩니다. - 다른
maxPods값을 사용하려면 시작 템플릿에서 사용자 지정 AMI를 지정하고-use-max-pods false를-kubelet-extra-args '--max-pods=my-value'와 함께bootstrap.sh스크립트로 전달합니다. 예시는 시작 템플릿을 사용한 관리형 노드 사용자 지정 섹션을 참조하세요.
- 자체 관리형 노드를 사용하면 부트스트랩 프로세스를 완벽하게 제어할 수 있습니다.
NodeConfig에서maxPodsExpression을 사용하거나bootstrap.sh에--max-pods를 직접 전달할 수 있습니다.
- 사용자 지정 AMI 없이 관리형 노드 그룹을 사용하면 Amazon EKS가 노드의 부트스트랩 사용자 데이터에
[IPv4 접두사 위임] 설정 - Docs , Workshop
eks.tf 수정
  # add-on
  addons = {
    coredns = {
      most_recent = true
    }
    kube-proxy = {
      most_recent = true
    }
    vpc-cni = {
      most_recent = true
      before_compute = true
      configuration_values = jsonencode({
        env = {
          #WARM_ENI_TARGET = "1" # 현재 ENI 외에 여유 ENI 1개를 항상 확보
          #WARM_IP_TARGET  = "5" # 현재 사용 중인 IP 외에 여유 IP 5개를 항상 유지, 설정 시 WARM_ENI_TARGET 무시됨
          #MINIMUM_IP_TARGET   = "10" # 노드 시작 시 최소 확보해야 할 IP 총량 10개
          ENABLE_PREFIX_DELEGATION = "true"
          #WARM_PREFIX_TARGET = "1" # PREFIX_DELEGATION 사용 시, 1개의 여유 대역(/28) 유지
        }
      })
    }
  }
적용!
# 모니터링
watch -d kubectl get pod -n kube-system -l k8s-app=aws-node # aws-node 데몬셋 파드 확인
watch -d eksctl get addon --cluster myeks # addon 확인

# 적용
terraform plan
terraform apply -auto-approve

# 기존 파드들도 위 설정 적용을 위해 재기동 해두자!
kubectl rollout restart -n kube-system deployment coredns
kubectl rollout restart -n kube-system deployment kube-ops-view
-check
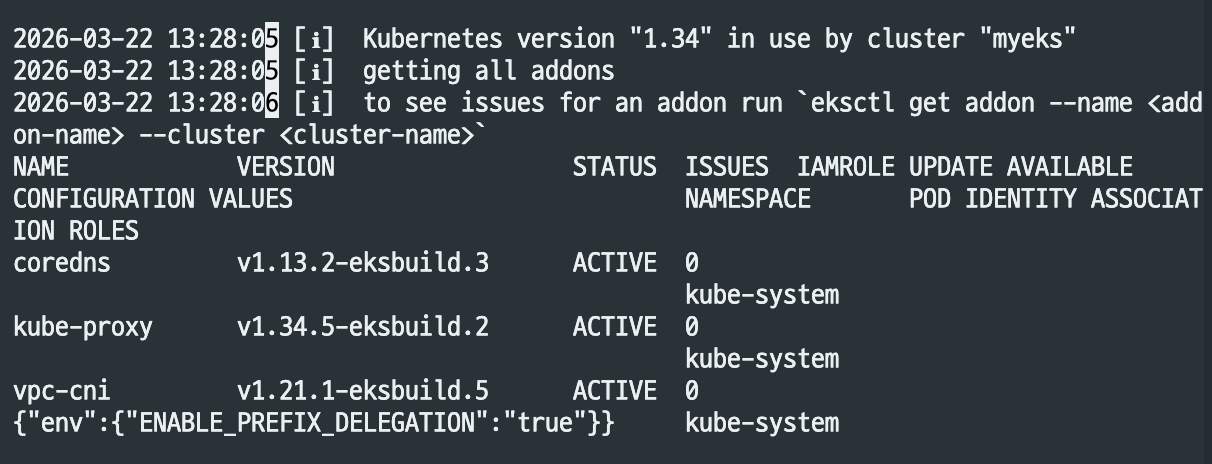
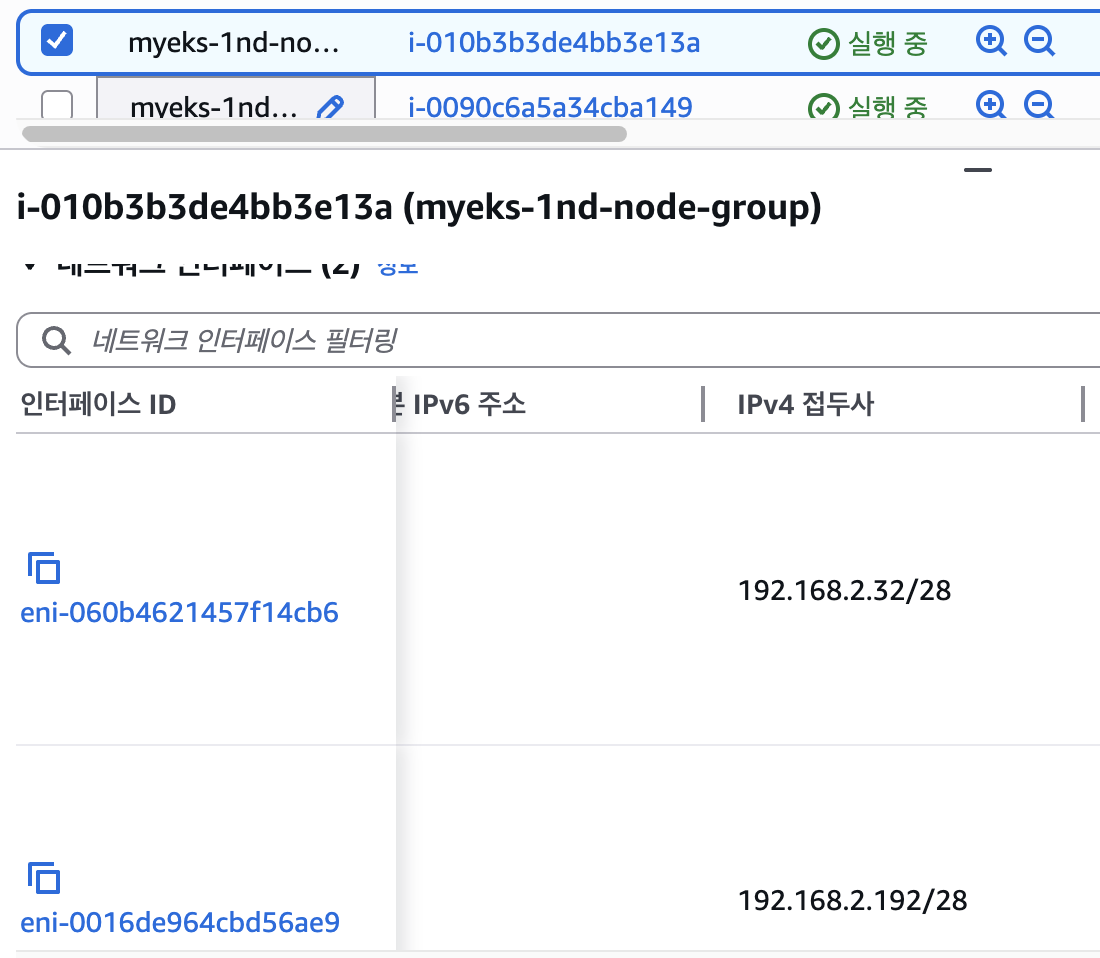
이제 실험!
[IPv4 접두사 위임] 최대 파드 생성 및 확인
# 워커 노드 EC2 - 모니터링
while true; do ip -br -c addr show && echo "--------------" ; date "+%Y-%m-%d %H:%M:%S" ; sleep 1; done

# 터미널1
watch -d 'kubectl get pods -o wide'

# 터미널2
## 디플로이먼트 생성
cat <<EOF | kubectl apply -f -
apiVersion: apps/v1
kind: Deployment
metadata:
  name: nginx-deployment
  labels:
    app: nginx
spec:
  replicas: 15
  selector:
    matchLabels:
      app: nginx
  template:
    metadata:
      labels:
        app: nginx
    spec:
      containers:
      - name: nginx
        image: nginx:alpine
        ports:
        - containerPort: 80
EOF


# 파드 확인
kubectl get pod -o wide
kubectl get pod -o=custom-columns=NAME:.metadata.name,IP:.status.podIP


# 파드 증가 테스트 >> 파드 정상 생성 확인, 워커 노드에서 eth, eni 갯수 확인
kubectl scale deployment nginx-deployment --replicas=30

# 파드 증가 테스트 >> 파드 정상 생성 확인, 워커 노드에서 eth, eni 갯수 확인
kubectl scale deployment nginx-deployment --replicas=50
kubectl events


# cni log 확인
for i in $N1 $N2 $N3; do echo ">> node $i <<"; ssh ec2-user@$i tree /var/log/aws-routed-eni; echo; done
for i in $N1 $N2 $N3; do echo ">> node $i <<"; ssh ec2-user@$i sudo cat /var/log/aws-routed-eni/plugin.log | jq ; echo; done
for i in $N1 $N2 $N3; do echo ">> node $i <<"; ssh ec2-user@$i sudo cat /var/log/aws-routed-eni/ipamd.log | jq ; echo; done
  "msg": "IP stats for Network Card 0 - total IPs: 32, assigned IPs: 15, cooldown IPs: 0"

# IpamD debugging : IP 할당 가능하지만, maxPods 에서 제한됨!
for i in $N1 $N2 $N3; do echo ">> node $i <<"; ssh ec2-user@$i curl -s http://localhost:61679/v1/enis | jq; echo; done
for i in $N1 $N2 $N3; do echo ">> node $i <<"; ssh ec2-user@$i curl -s http://localhost:61679/v1/enis | jq; echo; done | grep -E 'node|TotalIPs|AssignedIPs'
>> node 13.124.203.19 <<
    "TotalIPs": 32,
    "AssignedIPs": 15,
>> node 43.203.146.201 <<
    "TotalIPs": 33,
    "AssignedIPs": 15,
>> node 3.34.197.113 <<
    "TotalIPs": 33,
    "AssignedIPs": 15,
-check

[IPv4 접두사 위임] kubelet 에 maxPods (임시) 수정 후 최대 파드 생성 시도(110대)
while true; do kubectl describe node -l tier=primary | grep pods | uniq ; sleep 1; done
while true; do kubectl get pod | grep Pending | wc -l ; sleep 1; done
-check

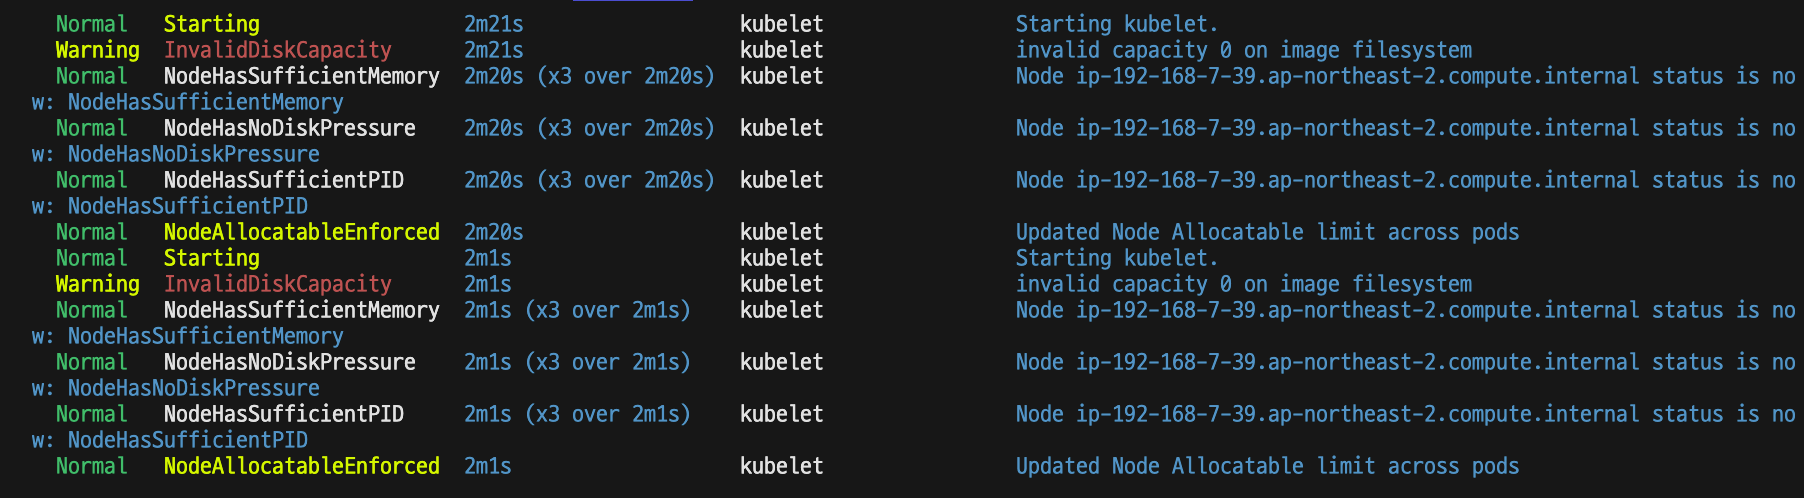
110개를 만들고

확인해보니
ip가 부족하다고 나오네요
이 기세를 몰아서 쭉 한번에 포스팅하겠습니다.
Service & Amazon EKS 네트워킹 지원
K8S 서비스 소개 : kube-proxy 모드 - iptables, ipvs, nftables, eBPF - 링크 , Finda , 커피고래
서비스 모드는 총 5가지가 있습니다.
1. User space 프록시 모드 → 현재는 미사용
2. Iptables 프록시 모드 (iptables APIs → netfilter subsystem)
3. IPVS 프록시 모드 (kernel IPVS , iptables APIs → netfilter subsystem) http://www.linuxvirtualserver.org/software/ipvs.html
4.nftables 프록시 모드 (nftables API → netfilter subsystem) - https://netfilter.org/projects/nftables/
5.eBPF 모드 + XDP
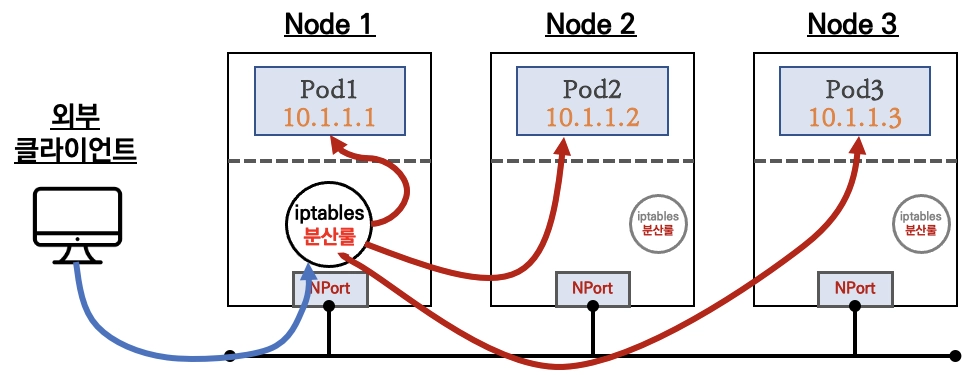
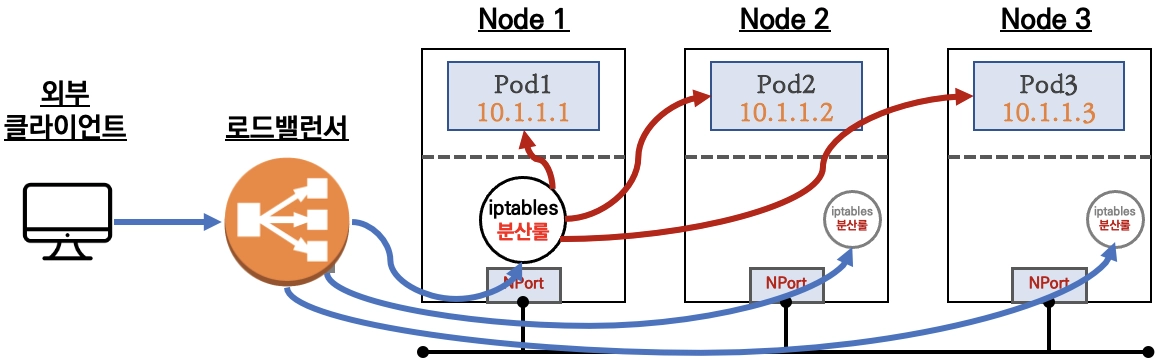
K8S 서비스 종류
ClusterIP 타입
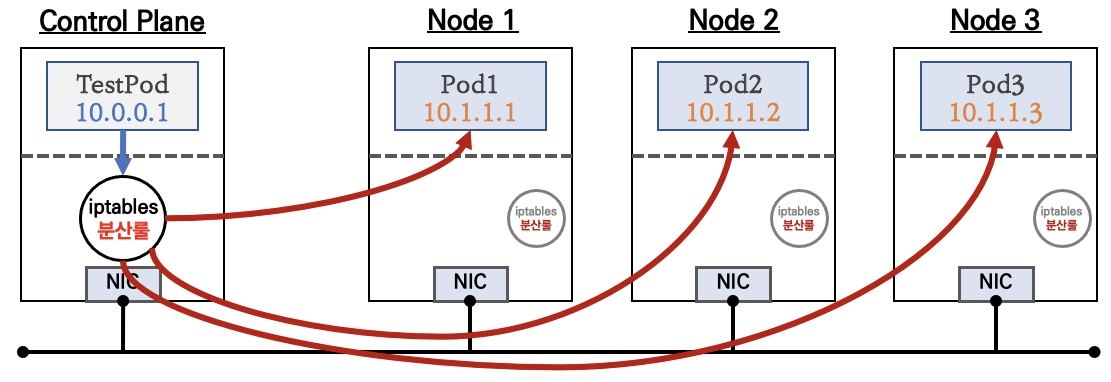
NodePort 타입
LoadBalancer 타입 (기본 모드) : NLB 인스턴스 유형 ⇒ 노드IP:노드포트
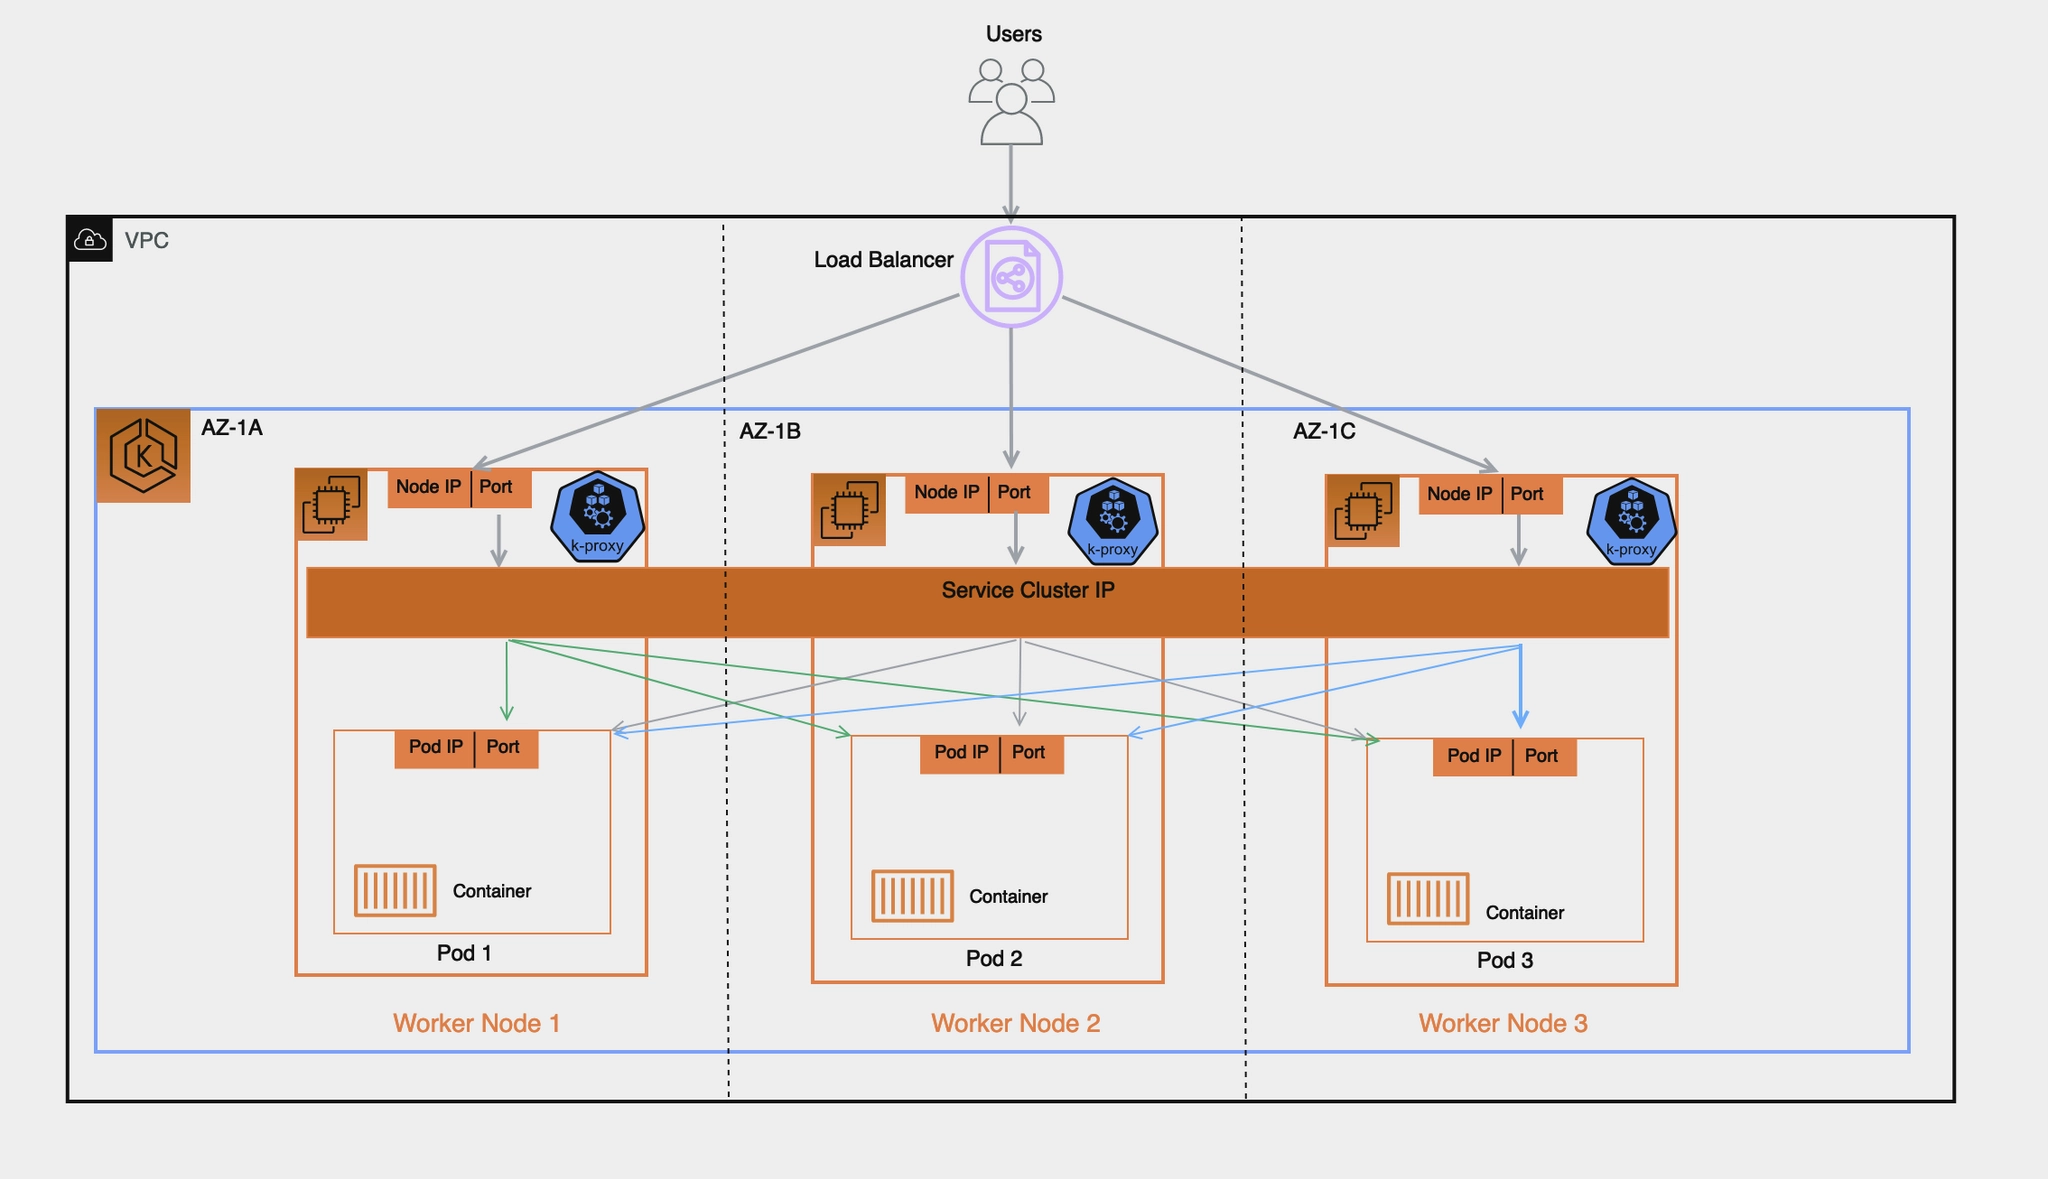
Amazon EKS 관련 서비스
Cloud Controller Manager 를 통해 K8S NodePort 정보를 사용하는 CLB/NLB 프로비저닝
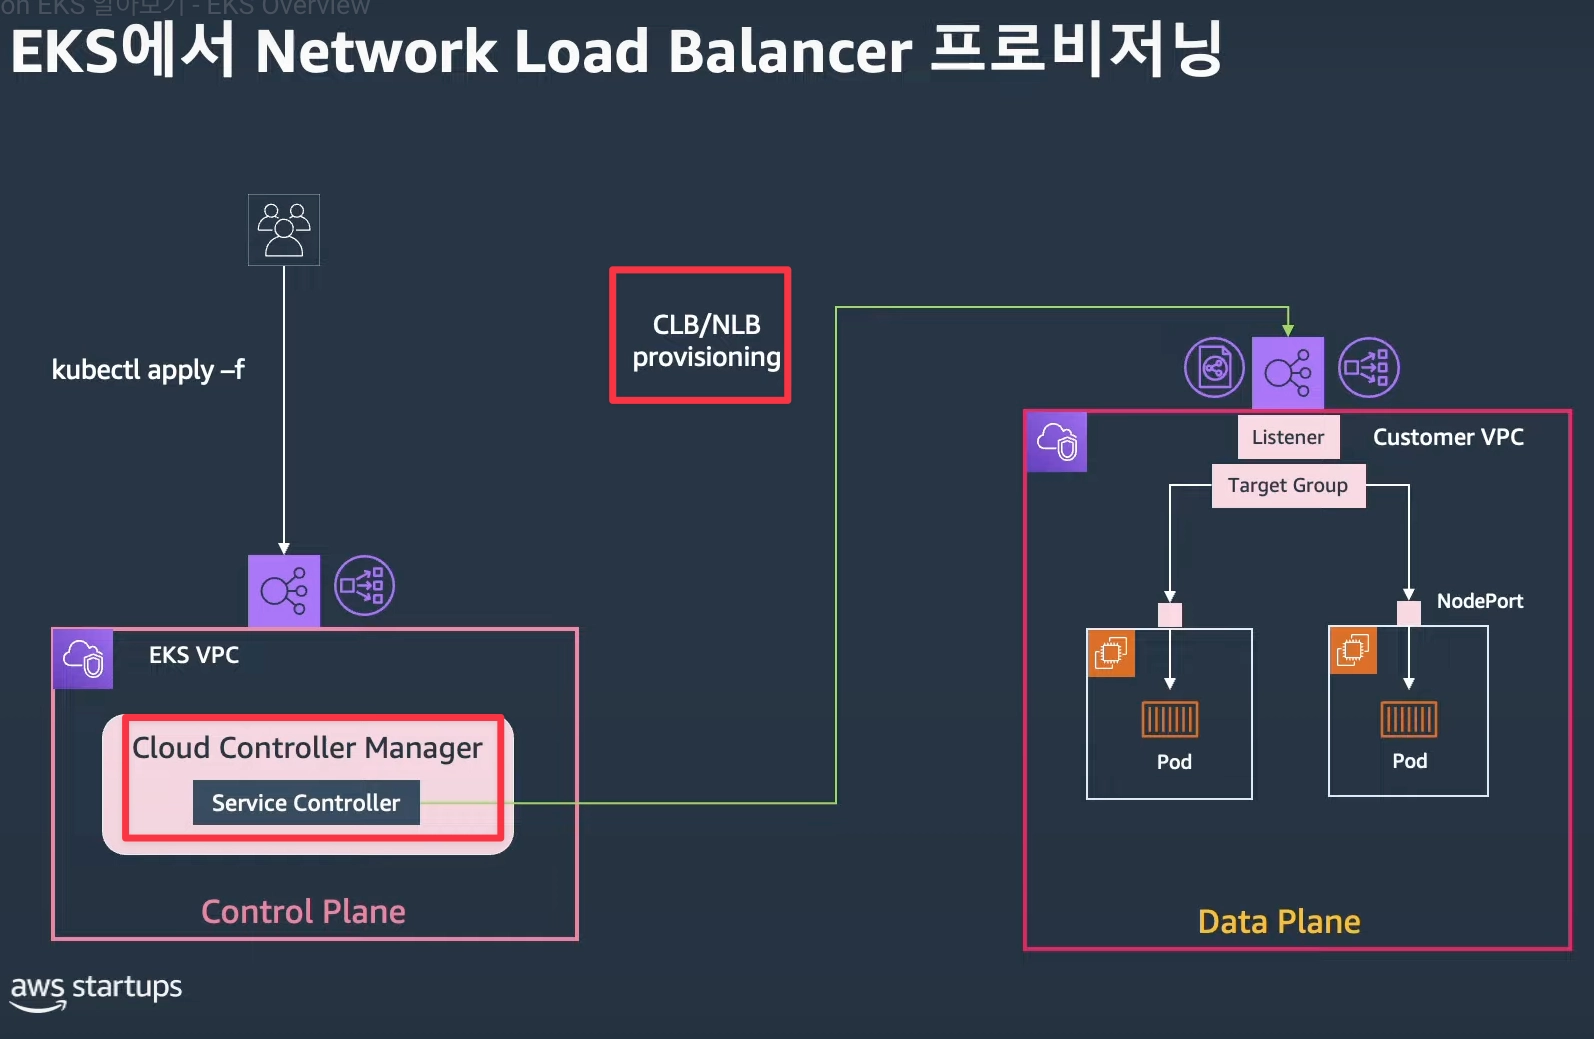
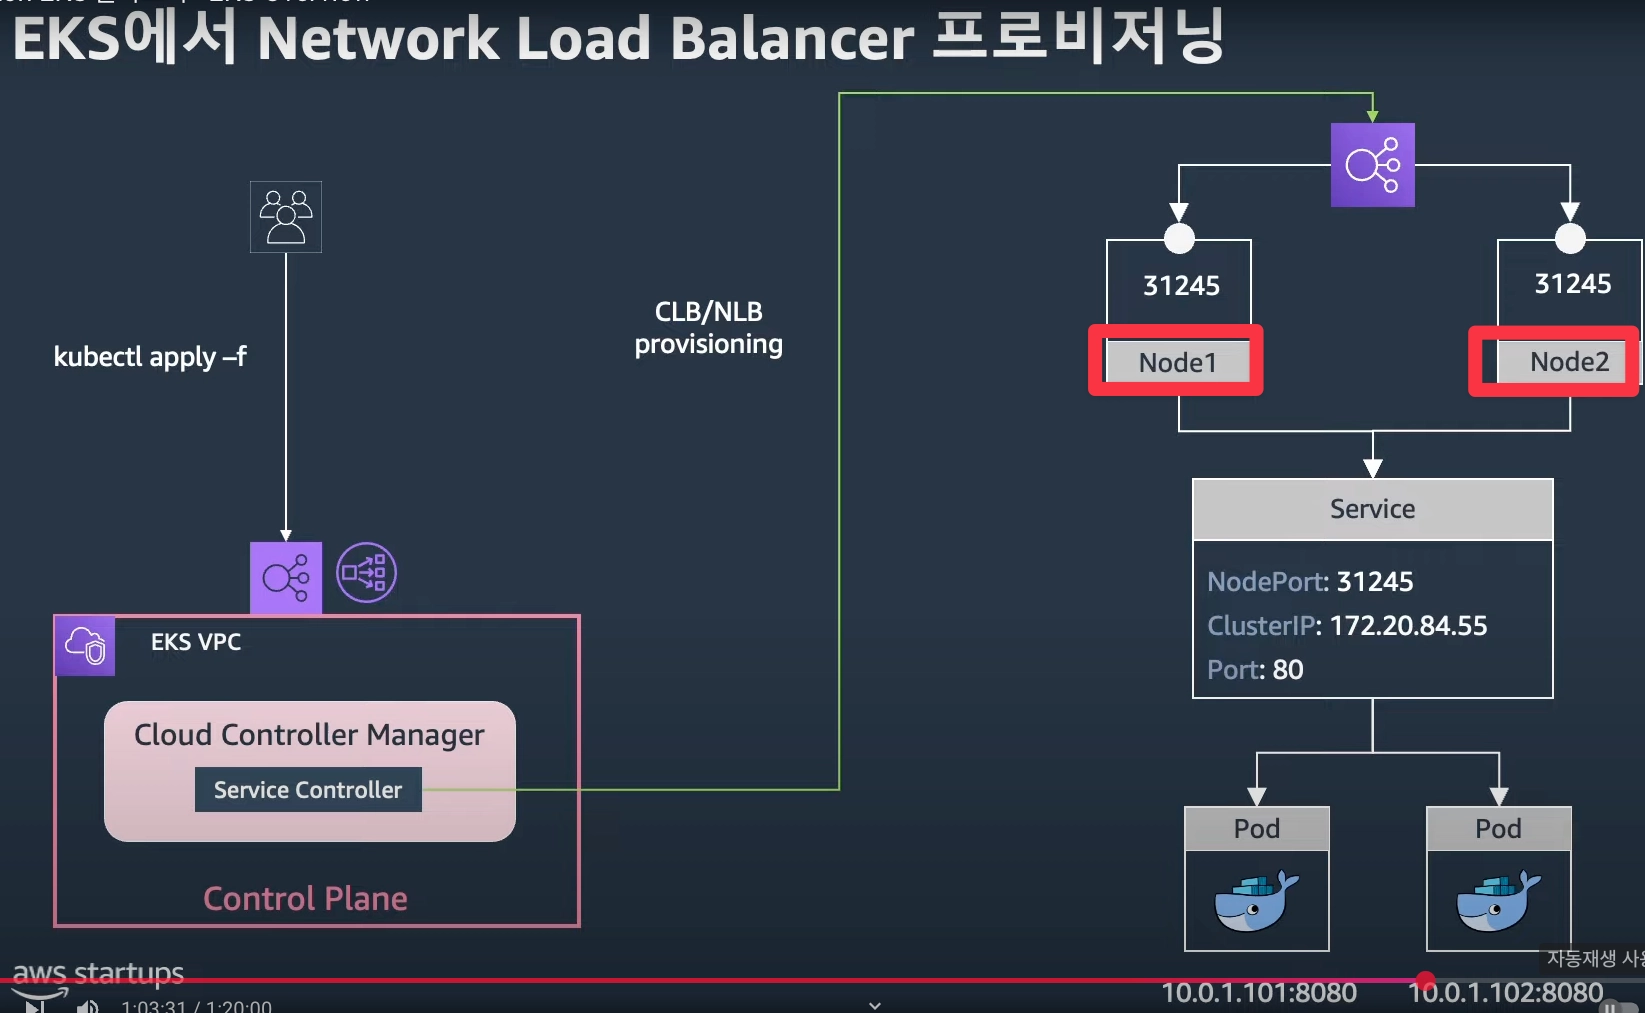
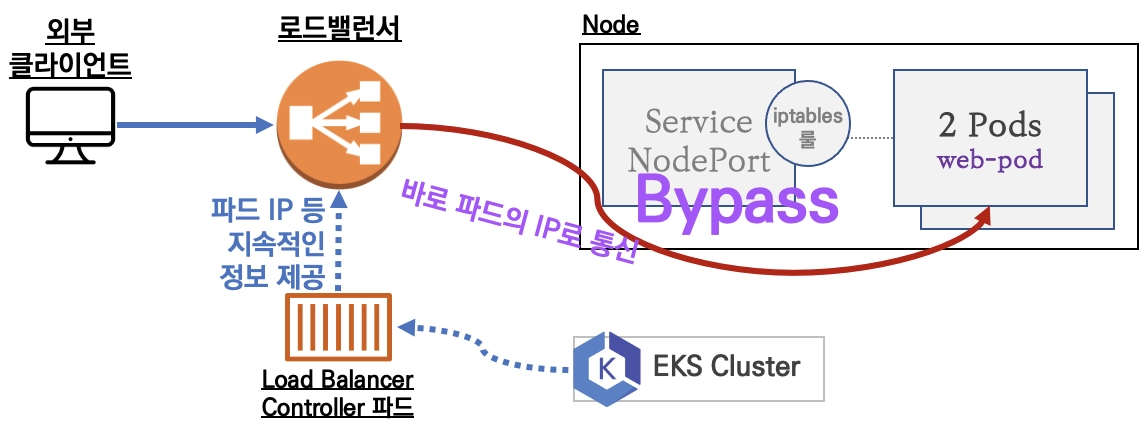
Service (LoadBalancer Controller) : AWS Load Balancer Controller + NLB (파드) IP 모드 동작 with AWS VPC CNI
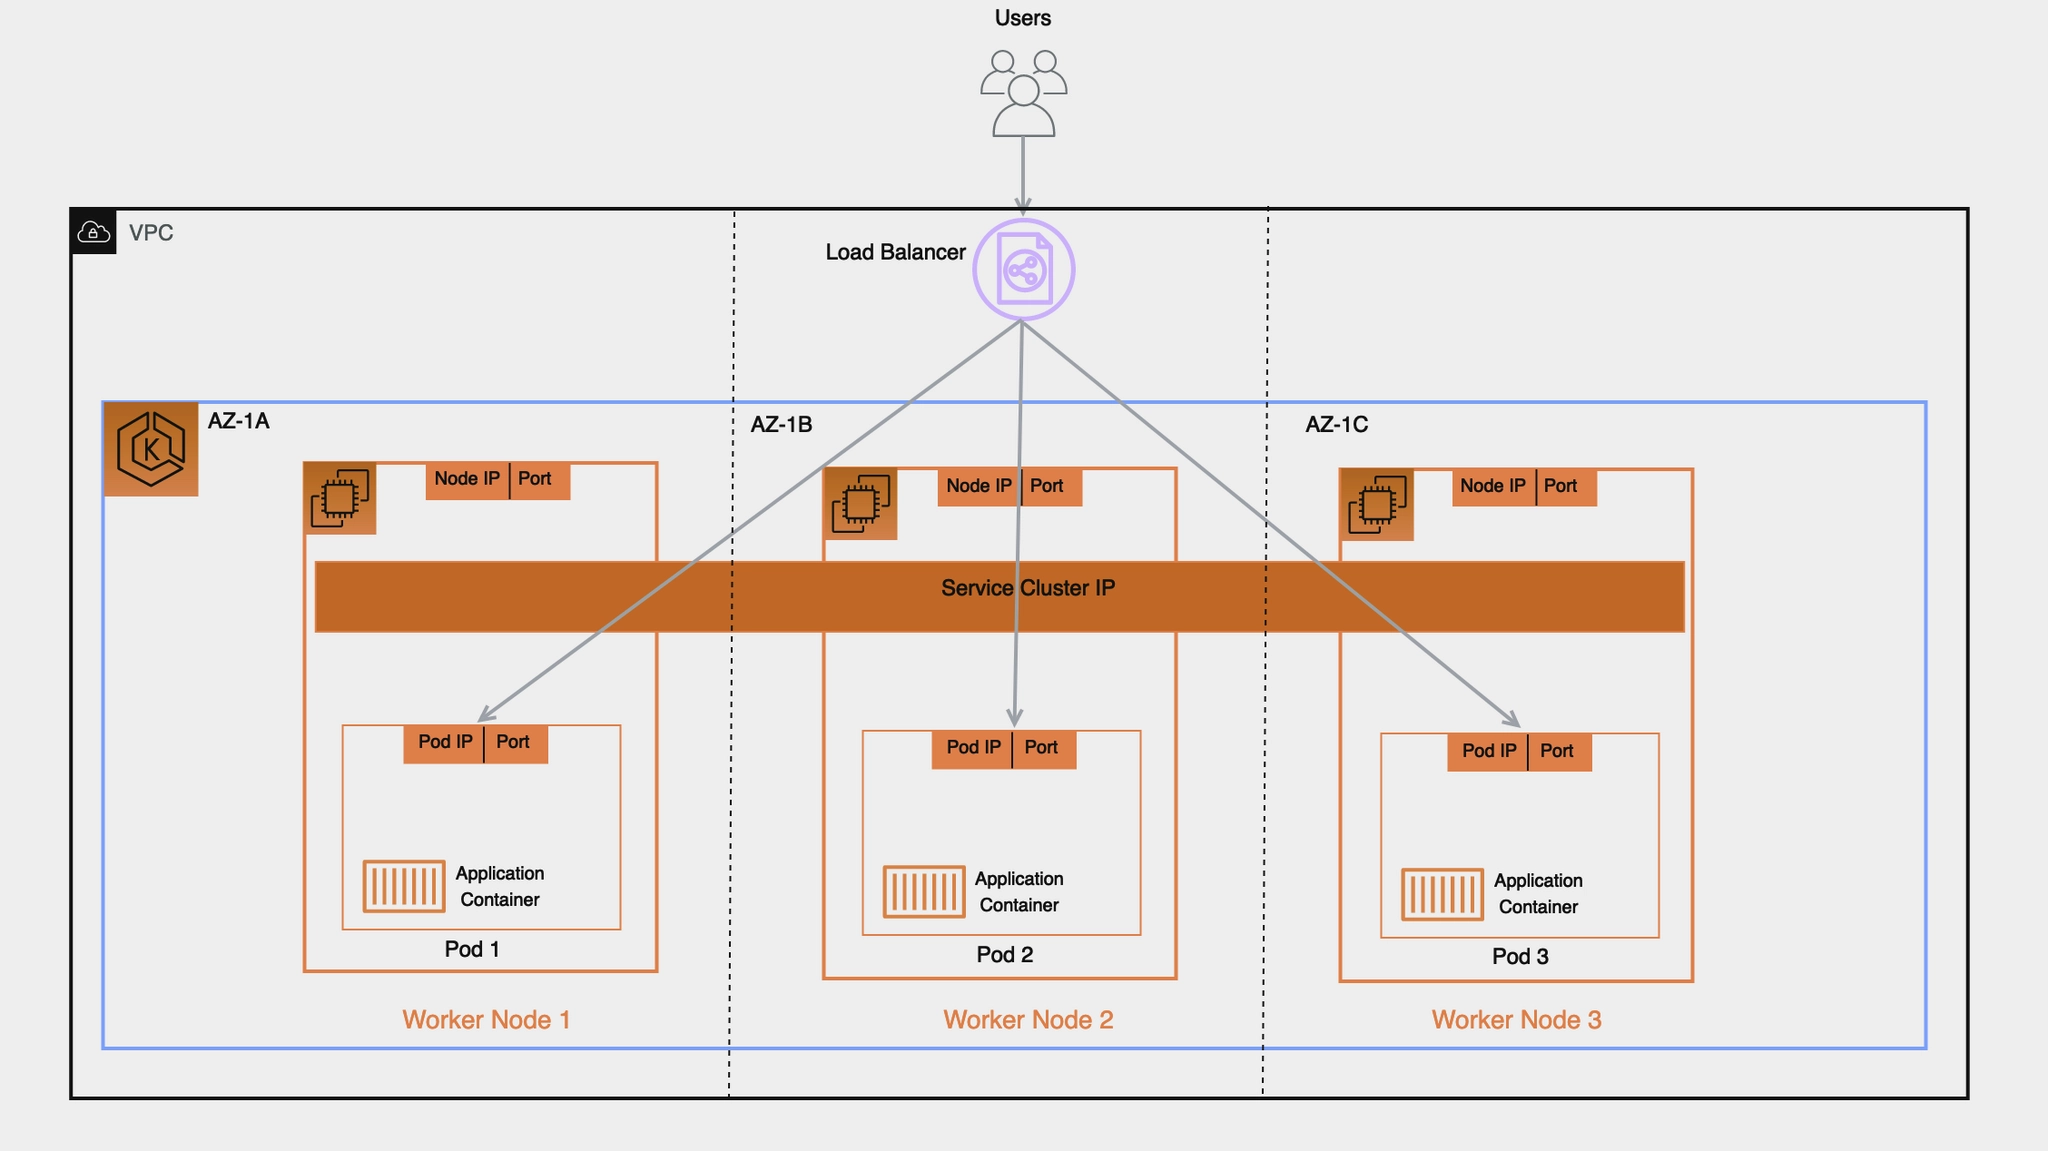
AWS 환경에서 외부 노출 방안 : Exposing Kubernetes Applications, Part 1: Service and Ingress Resources - 링크
요것도 있으니 찾아보면 좋을 것 같습니다.
AWS LoadBalancer Controller (LBC) & Service (L4)
AWS NLB 모드 정리
1.인스턴스 유형 : 노드에 NodePort로 전달
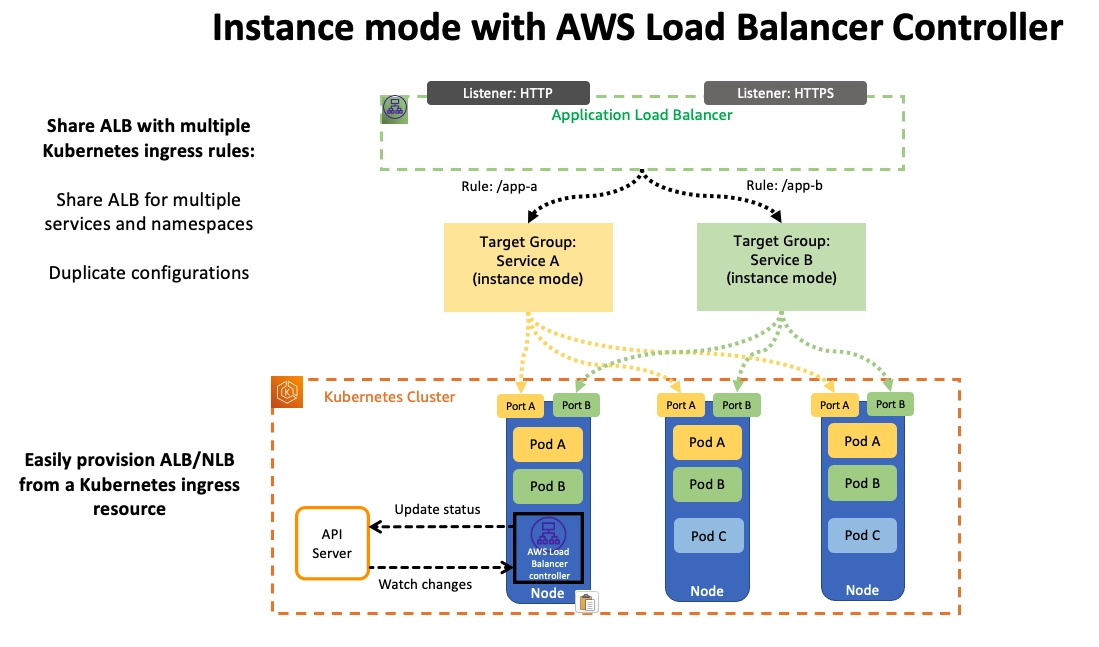
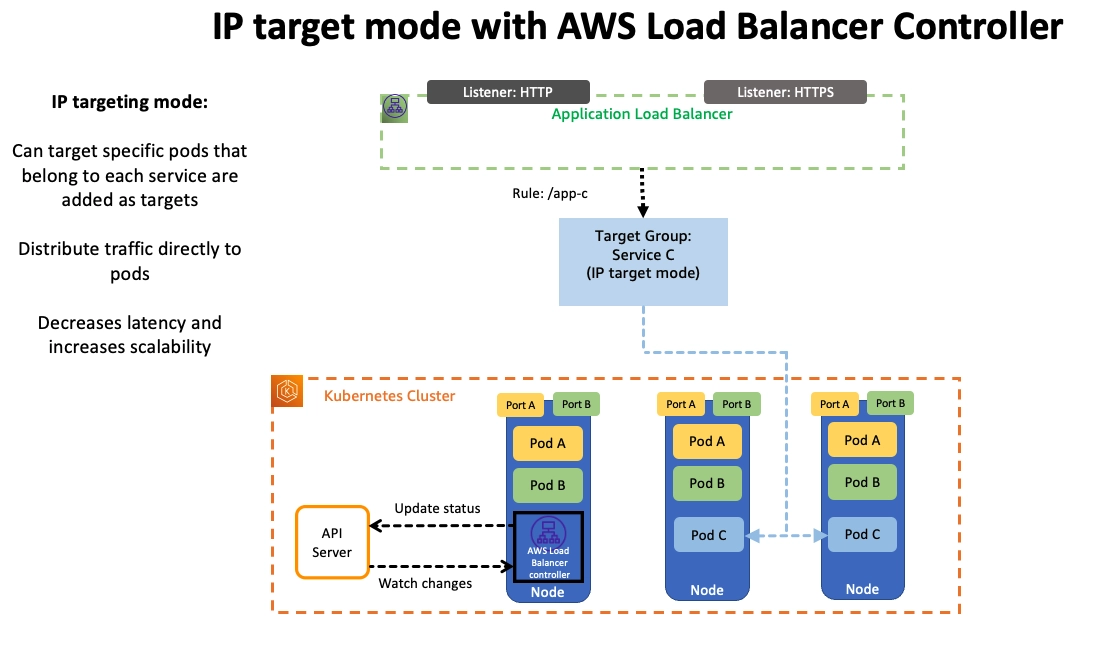
2.IP 유형 ⇒ 반드시 AWS LoadBalancer 컨트롤러 파드 및 정책 설정이 필요함!
AWS LBC with IRSA 설치 - Docs , Github → 아래 8번 LBC 파드 그림 확인!
AWS LBC(파드)가 AWS Service 를 이용하는 방법 : 방안1(IRSA), 방안2(Pod Identity), 방안3(EC2 Instance Profile - 비권장), 방안4(Static credentials - 절대 금지!) - 악분일상*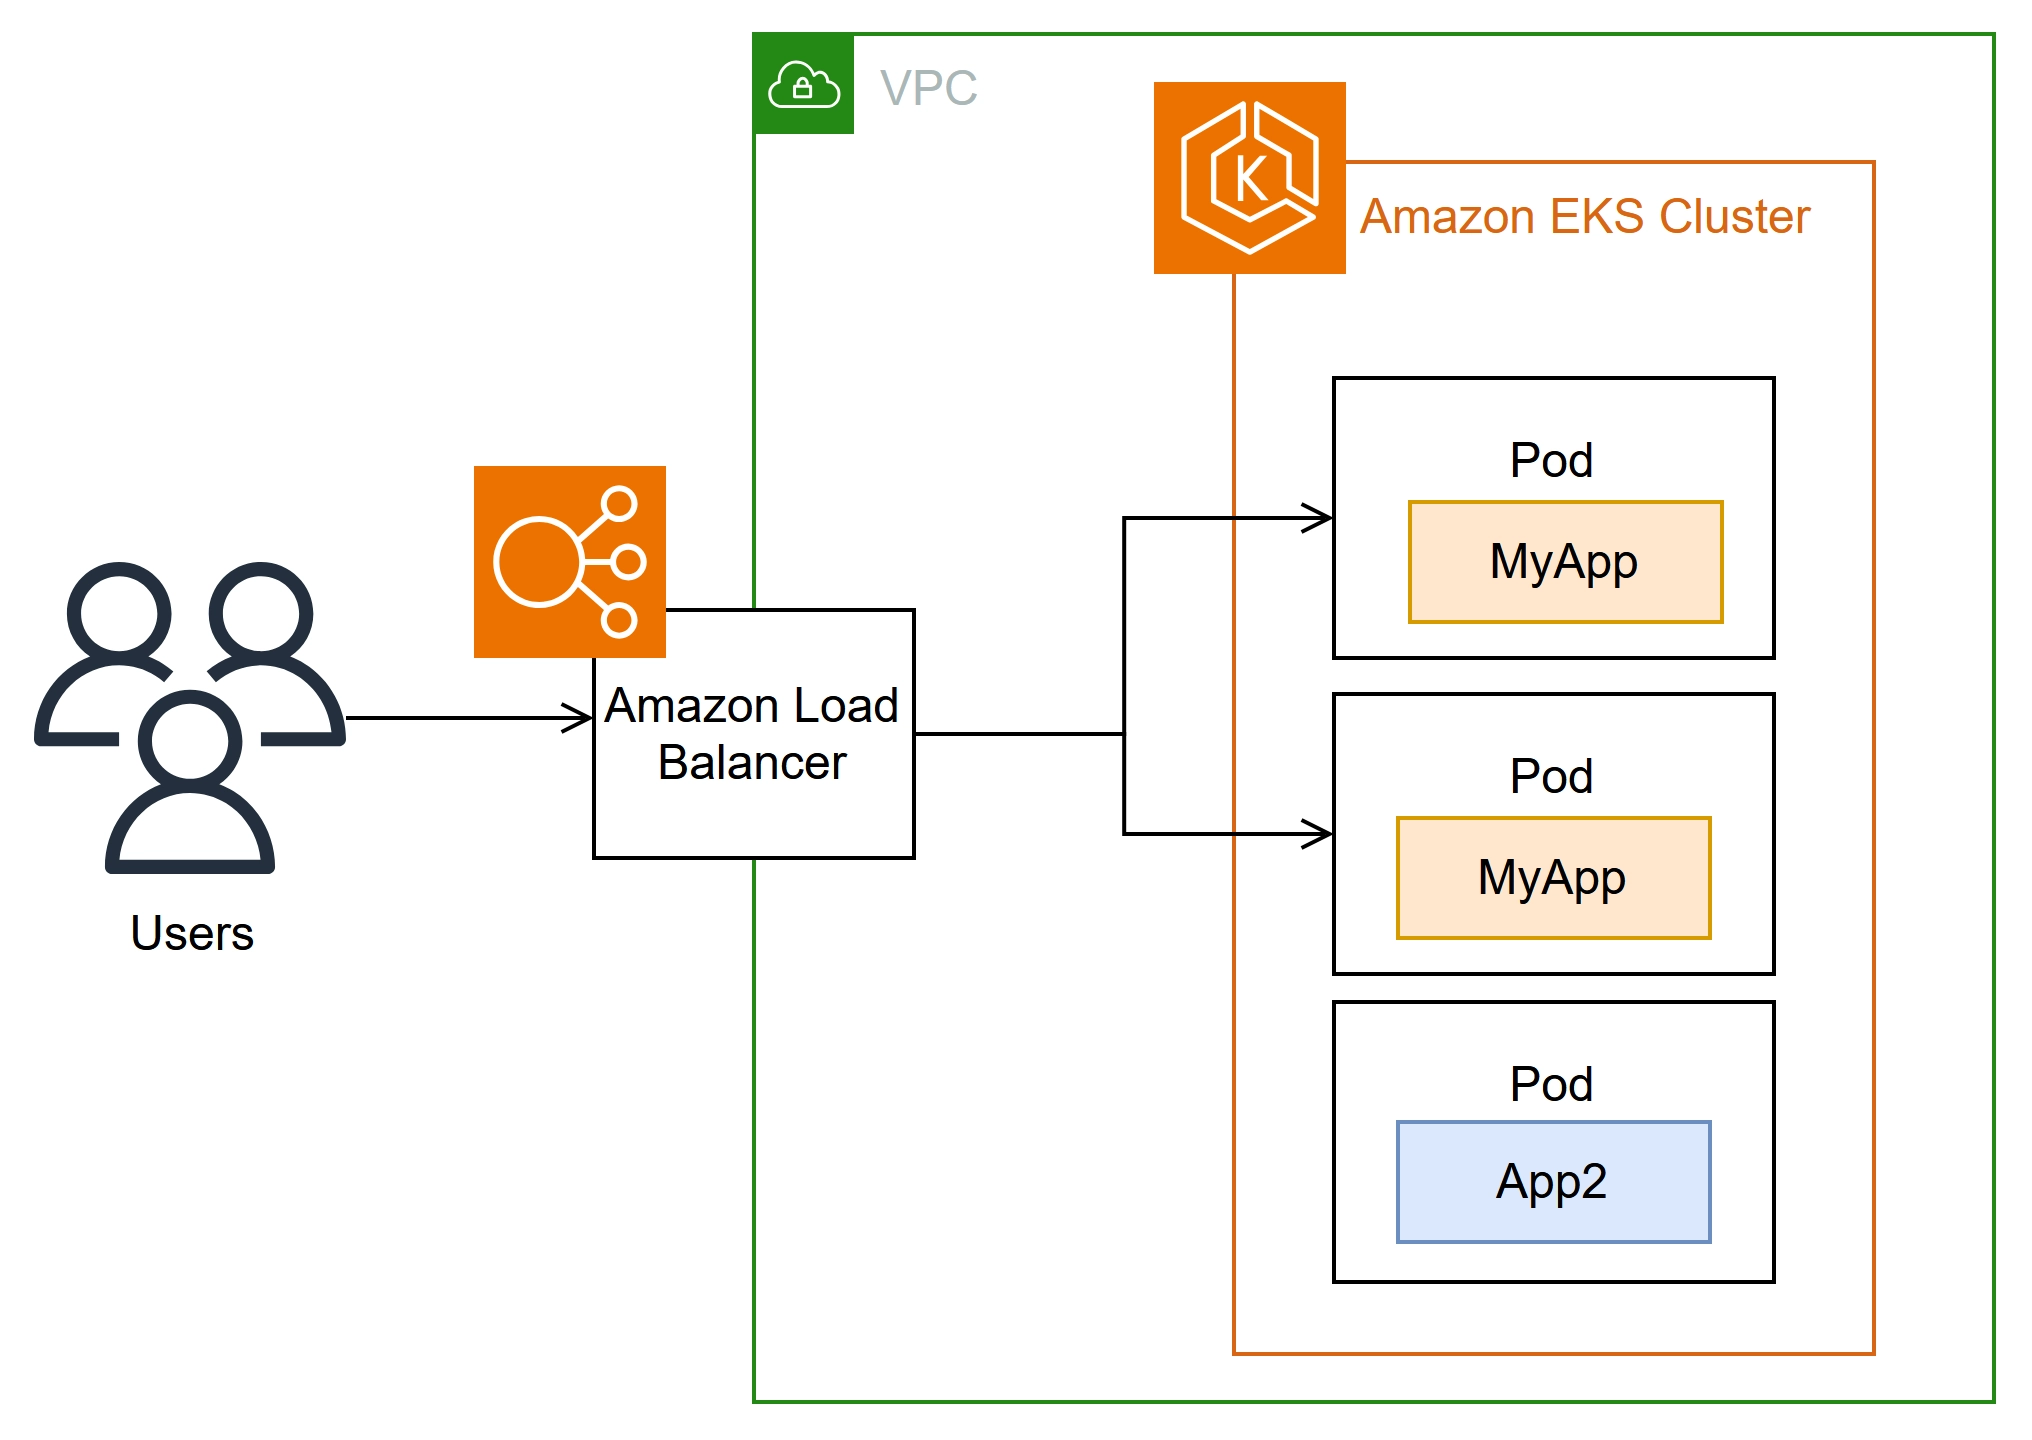
사전 확인
# OIDC Provider
aws iam list-open-id-connect-providers

aws eks describe-cluster --name myeks \
--query "cluster.identity.oidc.issuer" \
--output text
https://oidc.eks.ap-northeast-2.amazonaws.com/id/1BB80004FADD0C9E59C6641F386155BD

# public subnet 찾기
aws ec2 describe-subnets --filters "Name=tag:kubernetes.io/role/elb,Values=1" --output table

# private subnet 찾기
aws ec2 describe-subnets --filters "Name=tag:kubernetes.io/role/internal-elb,Values=1" --output table
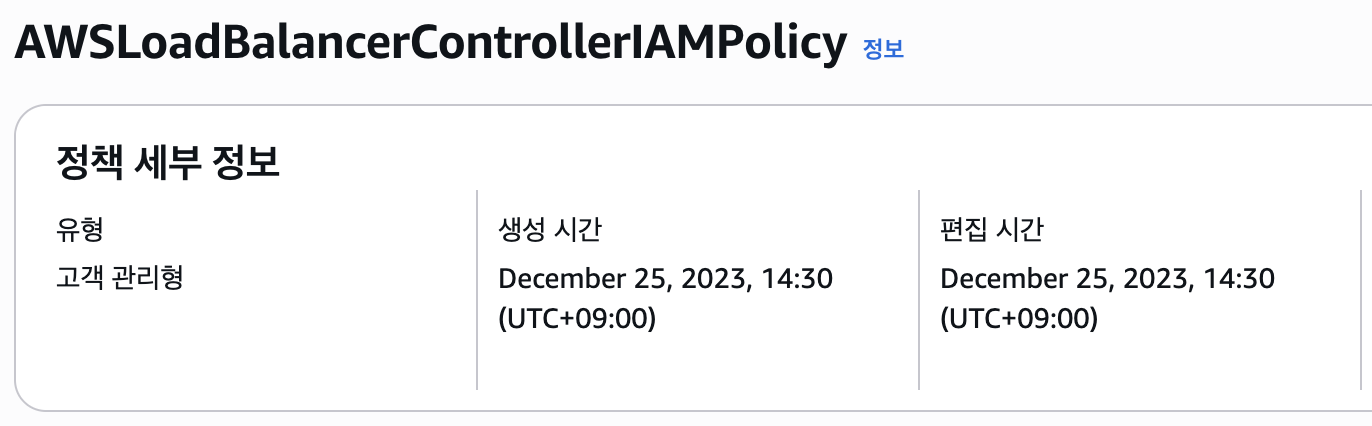
IAM Policy 생성 - Docs
# IAM Policy json 파일 다운로드 : Download an IAM policy for the AWS Load Balancer Controller that allows it to make calls to AWS APIs on your behalf.
curl -o aws_lb_controller_policy.json https://raw.githubusercontent.com/kubernetes-sigs/aws-load-balancer-controller/refs/heads/main/docs/install/iam_policy.json
cat aws_lb_controller_policy.json | jq

# AWSLoadBalancerControllerIAMPolicy 생성 : Create an IAM policy using the policy downloaded in the previous step.
aws iam create-policy \
    --policy-name AWSLoadBalancerControllerIAMPolicy \
    --policy-document file://aws_lb_controller_policy.json

# 확인
ACCOUNT_ID=$(aws sts get-caller-identity --query "Account" --output text)
aws iam get-policy --policy-arn arn:aws:iam::$ACCOUNT_ID:policy/AWSLoadBalancerControllerIAMPolicy | jq
-check
IRSA 생성
# IRSA 생성 : cloudforamtion 를 통해 IAM Role 생성
CLUSTER_NAME=myeks
eksctl get iamserviceaccount --cluster $CLUSTER_NAME
kubectl get serviceaccounts -n kube-system aws-load-balancer-controller

eksctl create iamserviceaccount \
  --cluster=$CLUSTER_NAME \
  --namespace=kube-system \
  --name=aws-load-balancer-controller \
  --attach-policy-arn=arn:aws:iam::$ACCOUNT_ID:policy/AWSLoadBalancerControllerIAMPolicy \
  --override-existing-serviceaccounts \
  --approve

# 확인
eksctl get iamserviceaccount --cluster $CLUSTER_NAME
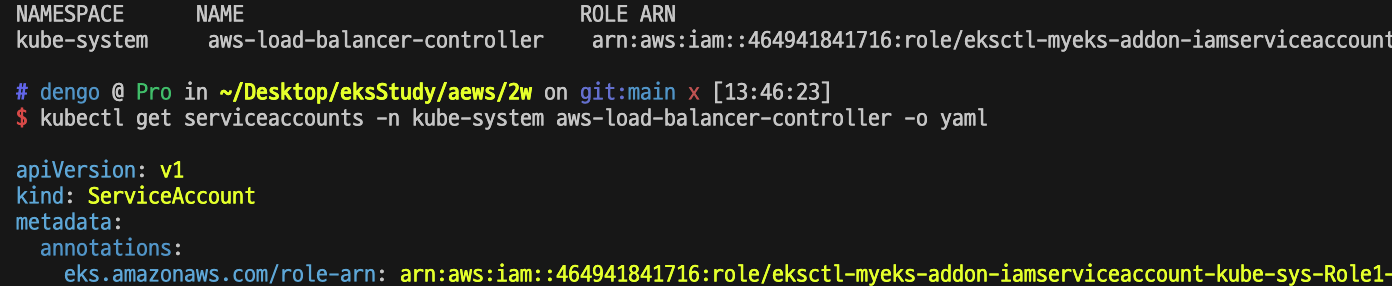
NAMESPACE       NAME                            ROLE ARN
kube-system     aws-load-balancer-controller    arn:aws:iam::911283464785:role/eksctl-myeks-addon-iamserviceaccount-kube-sys-Role1-n7mN9x019mGE

# k8s 에 SA 확인
# Inspecting the newly created Kubernetes Service Account, we can see the role we want it to assume in our pod.
kubectl get serviceaccounts -n kube-system aws-load-balancer-controller -o yaml
apiVersion: v1
kind: ServiceAccount
metadata:
  annotations:
    eks.amazonaws.com/role-arn: arn:aws:iam::911283464785:role/eksctl-myeks-addon-iamserviceaccount-kube-sys-Role1-cNSJN97wewS7
  ...
-check
AWS LBC 설치 - Link , Docs , values , IMDS-Hop-Limit
# Helm Chart Repository 추가
helm repo add eks https://aws.github.io/eks-charts
helm repo update

# Helm Chart - AWS Load Balancer Controller 설치
# https://github.com/aws/eks-charts/blob/master/stable/aws-load-balancer-controller/values.yaml
helm install aws-load-balancer-controller eks/aws-load-balancer-controller -n kube-system \
  --set clusterName=$CLUSTER_NAME \
  --set serviceAccount.name=aws-load-balancer-controller \
  --set serviceAccount.create=false

# 확인
helm list -n kube-system
NAME                            NAMESPACE       REVISION        UPDATED                                 STATUS          CHART                                     APP VERSION
aws-load-balancer-controller    kube-system     1               2026-03-19 14:06:42.3664 +0900 KST      deployed        aws-load-balancer-controller-3.1.0        v3.1.0

# 파드 상태 실패 확인
kubectl get pod -n kube-system -l app.kubernetes.io/name=aws-load-balancer-controller
NAME                                            READY   STATUS             RESTARTS      AGE
aws-load-balancer-controller-7875649799-vz9jj   0/1     Error              2 (26s ago)   43s
aws-load-balancer-controller-7875649799-wn799   0/1     CrashLoopBackOff   2 (5s ago)    43s

# 로그 확인 : vpc id 정보 획득 실패!
kubectl logs -n kube-system deployment/aws-load-balancer-controller
Found 2 pods, using pod/aws-load-balancer-controller-7875649799-vz9jj
{"level":"info","ts":"2026-03-19T06:06:48Z","msg":"version","GitVersion":"v3.1.0","GitCommit":"250024dbcc7a428cfd401c949e04de23c167d46e","BuildDate":"2026-02-24T18:21:40+0000"}
{"level":"error","ts":"2026-03-19T06:06:53Z","logger":"setup","msg":"unable to initialize AWS cloud","error":"failed to get VPC ID: failed to fetch VPC ID from instance metadata: error in fetching vpc id through ec2 metadata: get mac metadata: operation error ec2imds: GetMetadata, canceled, context deadline exceeded"}
-check

AWS LBC 가 Region 과 VPC ID 정보 획득 필요 : 방안1(helm 설치 시 파라미터 설정), 방안2(imds)
- 방안1 : helm 설치 시 파라미터 설정 - values
-set region=region-code-set vpcId=vpc-xxxxxxxx
- 방안2 : AWS 워커 노드들 인스턴스 메타데이터 옵션 수정 : 1 → 2 로 변경!
# 디플로이먼트 리스타트!
kubectl rollout restart -n kube-system deploy aws-load-balancer-controller

# 파드 상태 확인
kubectl get pod -n kube-system -l app.kubernetes.io/name=aws-load-balancer-controller
NAME                                            READY   STATUS    RESTARTS   AGE
aws-load-balancer-controller-86c9674468-cprsv   1/1     Running   0          35s
aws-load-balancer-controller-86c9674468-r2kbq   1/1     Running   0          16s

# crd 확인
kubectl get crd | grep -E 'elb|gateway'
albtargetcontrolconfigs.elbv2.k8s.aws           2026-03-17T02:04:08Z
ingressclassparams.elbv2.k8s.aws                2026-03-17T02:04:08Z
targetgroupbindings.elbv2.k8s.aws               2026-03-17T02:04:08Z
listenerruleconfigurations.gateway.k8s.aws      2026-03-17T02:04:09Z
loadbalancerconfigurations.gateway.k8s.aws      2026-03-17T02:04:09Z
targetgroupconfigurations.gateway.k8s.aws       2026-03-17T02:04:09Z

kubectl explain ingressclassparams.elbv2.k8s.aws
kubectl explain ingressclassparams.elbv2.k8s.aws.spec
kubectl explain ingressclassparams.elbv2.k8s.aws.spec.listeners
kubectl explain targetgroupbindings.elbv2.k8s.aws.spec
kubectl explain albtargetcontrolconfigs.elbv2.k8s.aws.spec


# AWS Load Balancer Controller 확인
kubectl get deployment -n kube-system aws-load-balancer-controller
kubectl describe deploy -n kube-system aws-load-balancer-controller
kubectl describe deploy -n kube-system aws-load-balancer-controller | grep 'Service Account'
  Service Account:  aws-load-balancer-controller

# 클러스터롤, 롤 확인
kubectl describe clusterrolebindings.rbac.authorization.k8s.io aws-load-balancer-controller-rolebinding
kubectl describe clusterroles.rbac.authorization.k8s.io aws-load-balancer-controller-role
...
PolicyRule:
  Resources                                              Non-Resource URLs  Resource Names  Verbs
  ---------                                              -----------------  --------------  -----
  targetgroupbindings.elbv2.k8s.aws                      []                 []              [create delete get list patch update watch]
  events                                                 []                 []              [create patch]
  configmaps                                             []                 []              [get delete create update]
  ingresses                                              []                 []              [get list patch update watch]
  services                                               []                 []              [get list patch update watch]
  ingresses.extensions                                   []                 []              [get list patch update watch]
  services.extensions                                    []                 []              [get list patch update watch]
  ingresses.networking.k8s.io                            []                 []              [get list patch update watch]
  services.networking.k8s.io                             []                 []              [get list patch update watch]
  globalaccelerators.aga.k8s.aws                         []                 []              [get list patch watch]
  listenerruleconfigurations.gateway.k8s.aws             []                 []              [get list watch patch]
  loadbalancerconfigurations.gateway.k8s.aws             []                 []              [get list watch patch]
  targetgroupconfigurations.gateway.k8s.aws              []                 []              [get list watch patch]
  gatewayclasses.gateway.networking.k8s.io               []                 []              [get list watch patch]
  gateways.gateway.networking.k8s.io                     []                 []              [get list watch patch]
  endpoints                                              []                 []              [get list watch]
  namespaces                                             []                 []              [get list watch]
  nodes                                                  []                 []              [get list watch]
  pods                                                   []                 []              [get list watch]
  ...(생략)
  ingresses/status                                       []                 []              [update patch]
  pods/status                                            []                 []              [update patch]
  services/status                                        []                 []              [update patch]
  targetgroupbindings/status                             []                 []              [update patch]
  ingresses.elbv2.k8s.aws/status                         []                 []              [update patch]
  pods.elbv2.k8s.aws/status                              []                 []              [update patch]
  services.elbv2.k8s.aws/status                          []                 []              [update patch]
  targetgroupbindings.elbv2.k8s.aws/status               []                 []              [update patch]
  ...(생략)
서비스/파드 배포 테스트 with NLB - Sample
# 모니터링
watch -d kubectl get pod,svc,ep,endpointslices

# 디플로이먼트 & 서비스 생성
cat << EOF > echo-service-nlb.yaml
apiVersion: apps/v1
kind: Deployment
metadata:
name: deploy-echo
spec:
replicas: 2
selector:
  matchLabels:
    app: deploy-websrv
template:
  metadata:
    labels:
      app: deploy-websrv
  spec:
    terminationGracePeriodSeconds: 0
    containers:
    - name: aews-websrv
      image: k8s.gcr.io/echoserver:1.10  # open https://registry.k8s.io/v2/echoserver/tags/list
      ports:
      - containerPort: 8080
---
apiVersion: v1
kind: Service
metadata:
name: svc-nlb-ip-type
annotations:
  service.beta.kubernetes.io/aws-load-balancer-nlb-target-type: ip
  service.beta.kubernetes.io/aws-load-balancer-scheme: internet-facing
  service.beta.kubernetes.io/aws-load-balancer-healthcheck-port: "8080"
  service.beta.kubernetes.io/aws-load-balancer-cross-zone-load-balancing-enabled: "true"
spec:
allocateLoadBalancerNodePorts: false  # K8s 1.24+ 무의미한 NodePort 할당 차단
ports:
  - port: 80
    targetPort: 8080
    protocol: TCP
type: LoadBalancer
selector:
  app: deploy-websrv
EOF

kubectl apply -f echo-service-nlb.yaml


# 확인
aws elbv2 describe-load-balancers --query 'LoadBalancers[*].State.Code' --output text
kubectl get deploy,pod
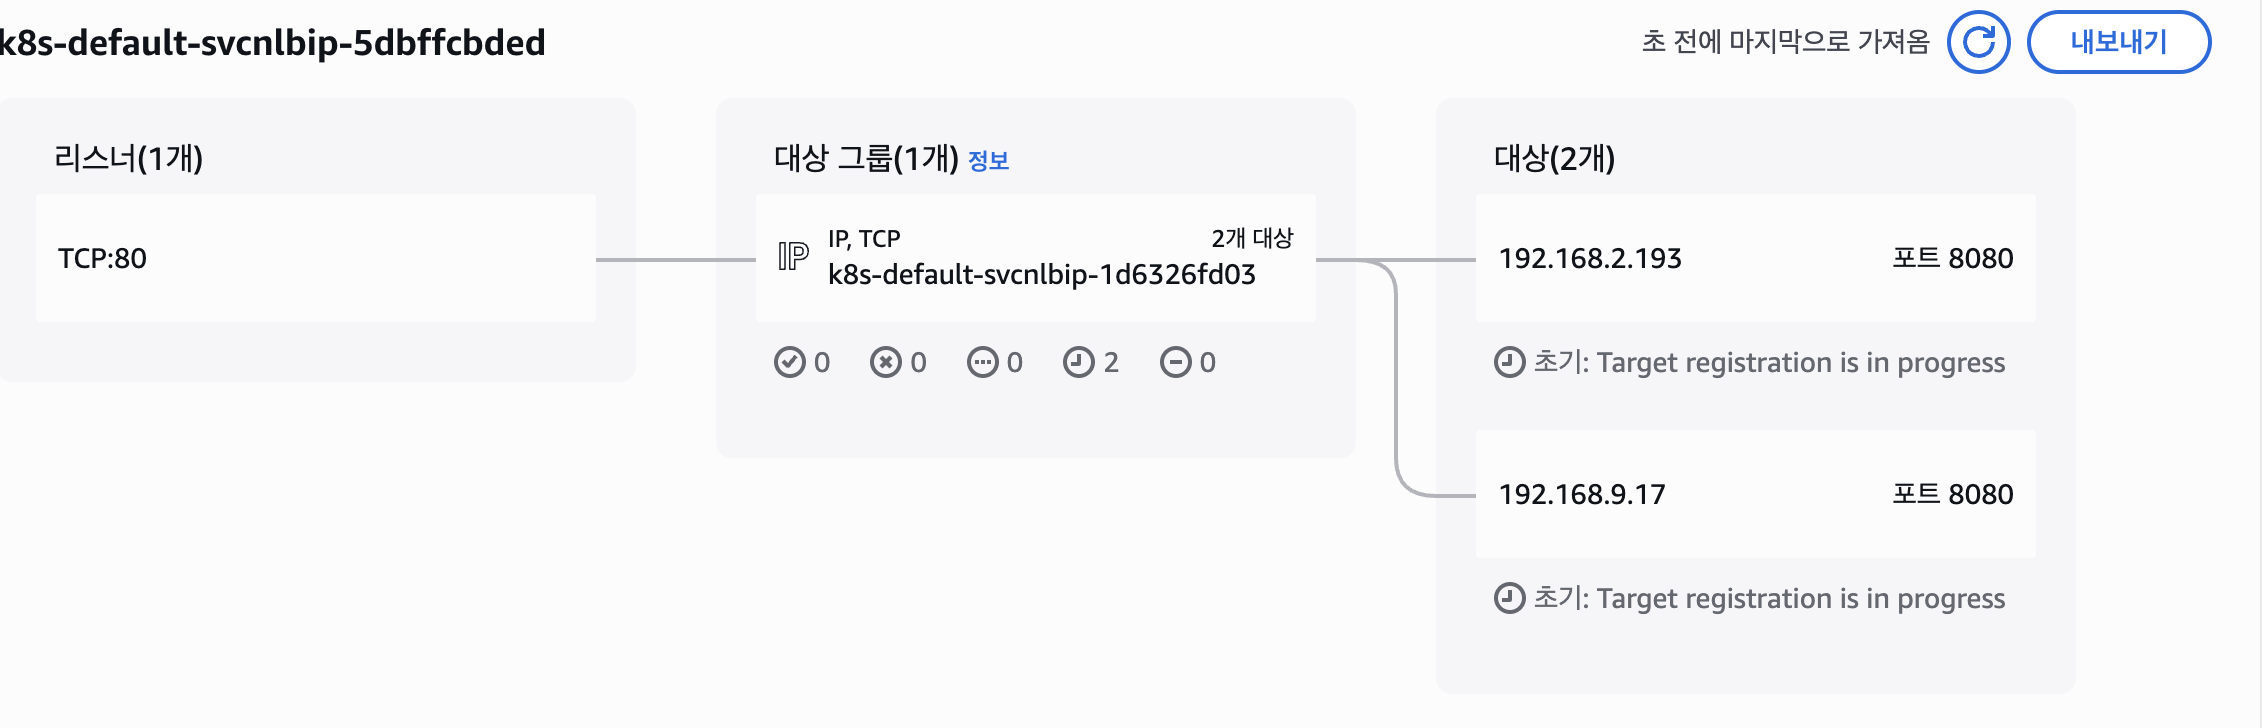
kubectl get svc,ep,ingressclassparams,targetgroupbindings
kubectl get targetgroupbindings -o json
-check
Ingress (L7 : HTTP)
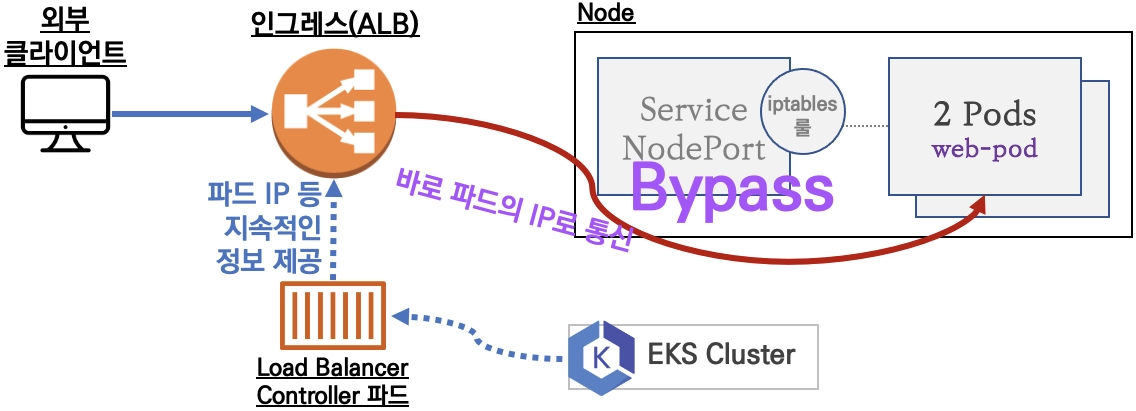
인그레스 소개: 클러스터 내부의 서비스(ClusterIP, NodePort, Loadbalancer)를 외부로 노출(HTTP/HTTPS) - Web Proxy 역할- AWS Load Balancer Controller + Ingress (ALB) IP 모드 동작 with AWS VPC CNI
서비스/파드 배포 테스트 with Ingress(ALB) - ALB
# 게임 파드와 Service, Ingress 배포
cat <<EOF | kubectl apply -f -
apiVersion: v1
kind: Namespace
metadata:
  name: game-2048
---
apiVersion: apps/v1
kind: Deployment
metadata:
  namespace: game-2048
  name: deployment-2048
spec:
  selector:
    matchLabels:
      app.kubernetes.io/name: app-2048
  replicas: 2
  template:
    metadata:
      labels:
        app.kubernetes.io/name: app-2048
    spec:
      containers:
      - image: public.ecr.aws/l6m2t8p7/docker-2048:latest
        imagePullPolicy: Always
        name: app-2048
        ports:
        - containerPort: 80
---
apiVersion: v1
kind: Service
metadata:
  namespace: game-2048
  name: service-2048
spec:
  ports:
    - port: 80
      targetPort: 80
      protocol: TCP
  type: NodePort
  selector:
    app.kubernetes.io/name: app-2048
---
apiVersion: networking.k8s.io/v1
kind: Ingress
metadata:
  namespace: game-2048
  name: ingress-2048
  annotations:
    alb.ingress.kubernetes.io/scheme: internet-facing
    alb.ingress.kubernetes.io/target-type: ip
spec:
  ingressClassName: alb
  rules:
    - http:
        paths:
        - path: /
          pathType: Prefix
          backend:
            service:
              name: service-2048
              port:
                number: 80
EOF

# 모니터링
watch -d kubectl get pod,ingress,svc,ep,endpointslices -n game-2048

# 생성 확인
kubectl get ingressclass
kubectl get ingress,svc,ep,pod -n game-2048
kubectl get-all -n game-2048
kubectl get targetgroupbindings -n game-2048

# ALB 생성 확인
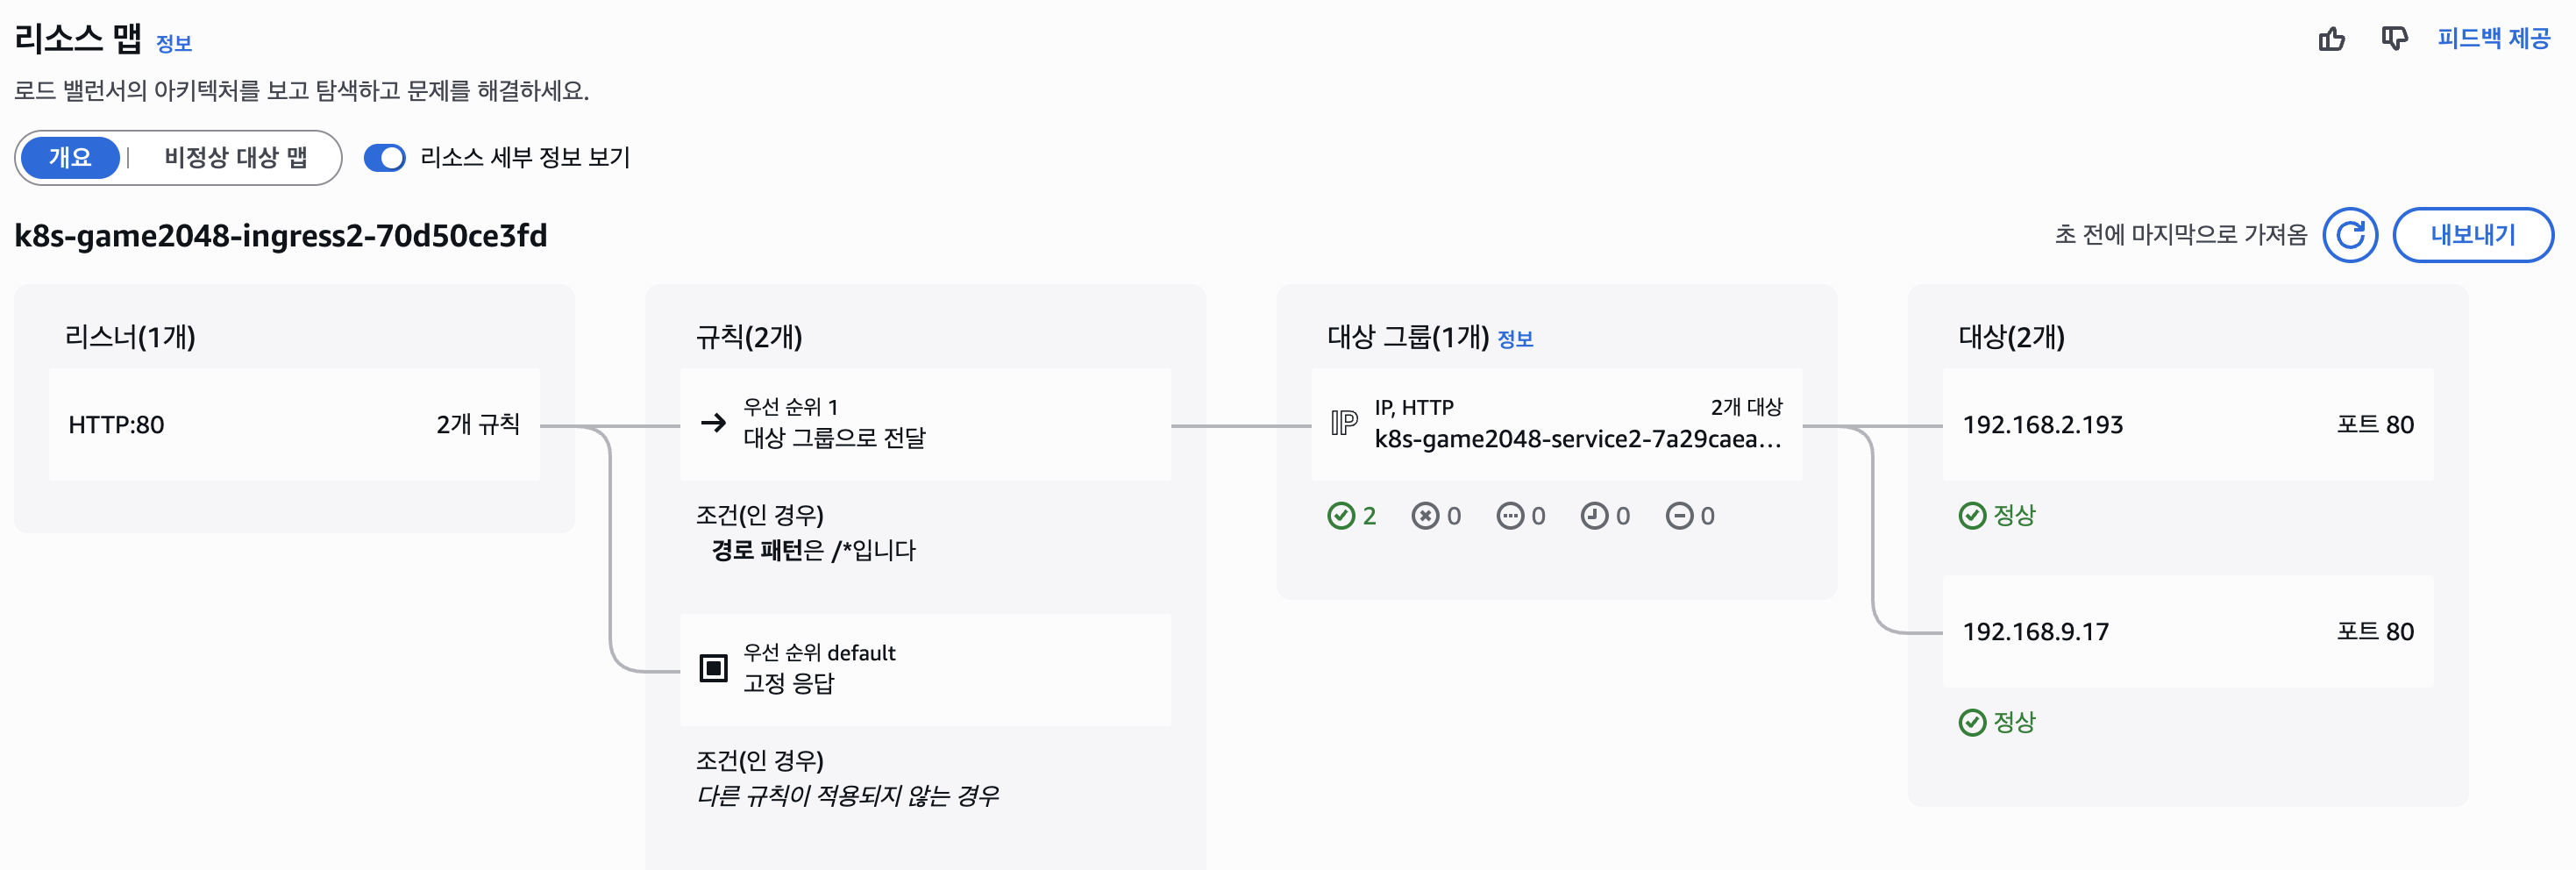
aws elbv2 describe-load-balancers --query 'LoadBalancers[?contains(LoadBalancerName, `k8s-game2048`) == `true`]' | jq
ALB_ARN=$(aws elbv2 describe-load-balancers --query 'LoadBalancers[?contains(LoadBalancerName, `k8s-game2048`) == `true`].LoadBalancerArn' | jq -r '.[0]')
aws elbv2 describe-target-groups --load-balancer-arn $ALB_ARN
TARGET_GROUP_ARN=$(aws elbv2 describe-target-groups --load-balancer-arn $ALB_ARN | jq -r '.TargetGroups[0].TargetGroupArn')
aws elbv2 describe-target-health --target-group-arn $TARGET_GROUP_ARN | jq

# Ingress 확인
kubectl describe ingress -n game-2048 ingress-2048
kubectl get ingress -n game-2048 ingress-2048 -o jsonpath="{.status.loadBalancer.ingress[*].hostname}{'\n'}"

# 게임 접속 : ALB 주소로 웹 접속
kubectl get ingress -n game-2048 ingress-2048 -o jsonpath='{.status.loadBalancer.ingress[0].hostname}' | awk '{ print "Game URL = http://"$1 }'

# 파드 IP 확인
kubectl get pod -n game-2048 -owide
-check
ExternalDNS
소개 : K8S 서비스/인그레스/GatewayAPI 생성 시 도메인을 설정하면, AWS(Route 53), Azure(DNS), GCP(Cloud DNS) 에 A 레코드(TXT 레코드)로 자동 생성/삭제
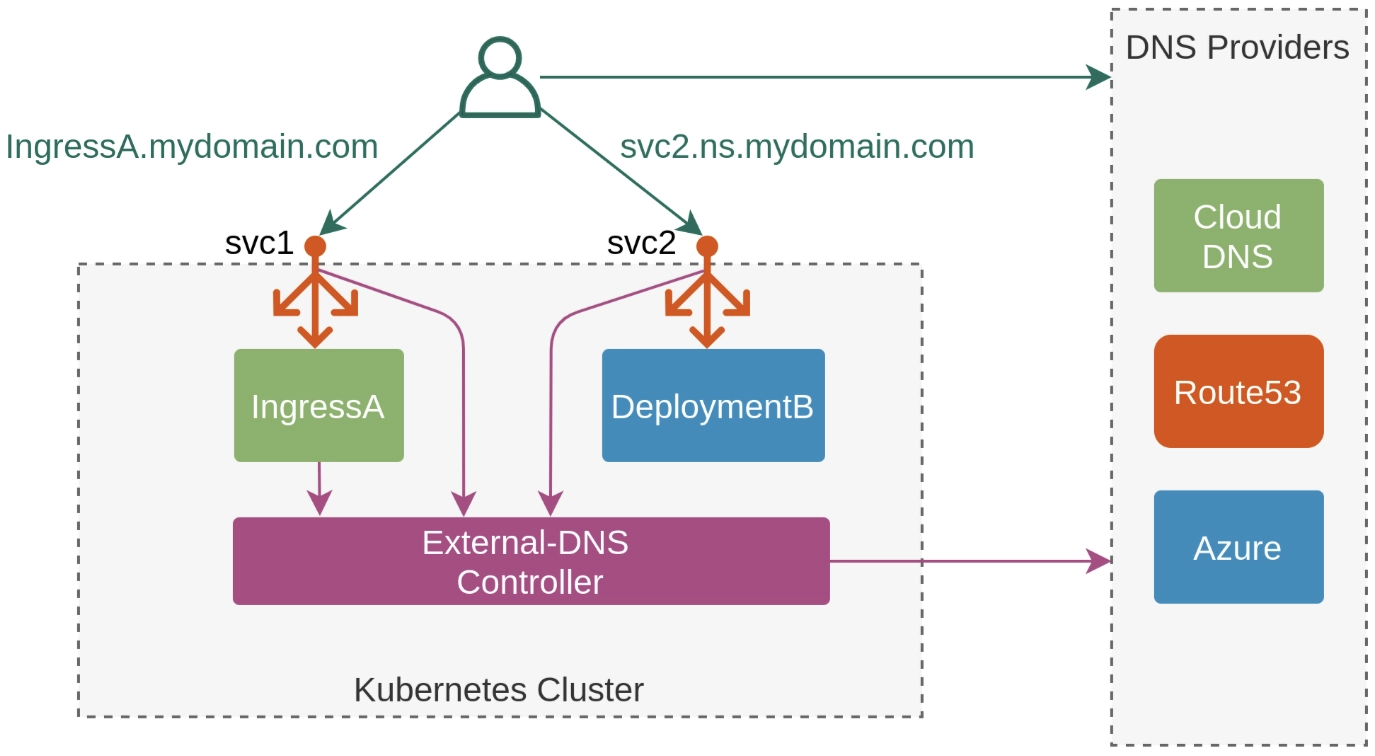
ExternalDNS 설치 : Public 도메인 소유를 하고 계셔야 합니다! - 링크
# 정책 파일 작성
cat << EOF > externaldns_controller_policy.json
{
  "Version": "2012-10-17",
  "Statement": [
    {
      "Effect": "Allow",
      "Action": [
        "route53:ChangeResourceRecordSets",
        "route53:ListResourceRecordSets",
        "route53:ListTagsForResources"
      ],
      "Resource": [
        "arn:aws:route53:::hostedzone/*"
      ]
    },
    {
      "Effect": "Allow",
      "Action": [
        "route53:ListHostedZones"
      ],
      "Resource": [
        "*"
      ]
    }
  ]
}
EOF

# IAM 정책 생성
aws iam create-policy \
  --policy-name ExternalDNSControllerPolicy \
  --policy-document file://externaldns_controller_policy.json

# 확인
ACCOUNT_ID=$(aws sts get-caller-identity --query "Account" --output text)
aws iam get-policy --policy-arn arn:aws:iam::$ACCOUNT_ID:policy/ExternalDNSControllerPolicy | jq


# IRSA 생성 : cloudforamtion 를 통해 IAM Role 생성
CLUSTER_NAME=myeks

eksctl create iamserviceaccount \
  --cluster=$CLUSTER_NAME \
  --namespace=kube-system \
  --name=external-dns \
  --attach-policy-arn=arn:aws:iam::$ACCOUNT_ID:policy/ExternalDNSControllerPolicy \
  --override-existing-serviceaccounts \
  --approve

# 확인
eksctl get iamserviceaccount --cluster $CLUSTER_NAME
NAMESPACE       NAME                            ROLE ARN
kube-system     aws-load-balancer-controller    arn:aws:iam::911283464785:role/eksctl-myeks-addon-iamserviceaccount-kube-sys-Role1-2REDIfJ9sfGa
kube-system     external-dns                    arn:aws:iam::911283464785:role/eksctl-myeks-addon-iamserviceaccount-kube-sys-Role1-F76qLAoueSgl

# k8s 에 SA 확인
# Inspecting the newly created Kubernetes Service Account, we can see the role we want it to assume in our pod.
kubectl get serviceaccounts -n kube-system external-dns -o yaml
apiVersion: v1
kind: ServiceAccount
metadata:
  annotations:
    eks.amazonaws.com/role-arn: arn:aws:iam::911283464785:role/eksctl-myeks-addon-iamserviceaccount-kube-sys-Role1-F76qLAoueSgl
  ...
ExternalDNS 배포
# 자신의 도메인 변수 지정
MyDomain=<자신의 도메인>
MyDomain=gasida.link

# 설정 파일 작성
cat << EOF > external-dns-values.yaml
provider: aws

# 위에서 생성한 ServiceAccount와 연동
serviceAccount:
  create: false
  name: external-dns

# 필터링 설정 (보안상 권장)
# 특정 도메인만 관리하도록 제한 (예: example.com)
domainFilters:
  - $MyDomain

# 레코드 업데이트 정책
# sync: 쿠버네티스에서 삭제되면 Route 53에서도 삭제 (주의 필요)
# upsert-only: 생성/수정만 하고 삭제는 수동으로 (안전함)
policy: sync

# 리소스 감지 대상
sources:
  - service
  - ingress

# (선택) 텍스트 레코드에 식별자 추가 (여러 클러스터가 동일 도메인 관리 시 충돌 방지)
txtOwnerId: "stduy-myeks-cluster"

registry: txt

# 로그 레벨
logLevel: info
EOF


# Helm 레포지토리 추가 및 업데이트
helm repo add external-dns https://kubernetes-sigs.github.io/external-dns/
helm repo update

# 차트 설치
helm install external-dns external-dns/external-dns \
  -n kube-system \
  -f external-dns-values.yaml

# 확인
helm list -n kube-system
kubectl get pod -l app.kubernetes.io/name=external-dns -n kube-system

# 로그 모니터링
kubectl logs deploy/external-dns -n kube-system -f
Service(NLB) + 도메인 연동(ExternalDNS) - 도메인체크
# 터미널1 (모니터링)
watch -d 'kubectl get pod,svc'
kubectl logs deploy/external-dns -n kube-system -f
혹은
kubectl stern -l app.kubernetes.io/name=external-dns -n kube-system

# 테트리스 디플로이먼트 배포
cat <<EOF | kubectl apply -f -
apiVersion: apps/v1
kind: Deployment
metadata:
  name: tetris
  labels:
    app: tetris
spec:
  replicas: 1
  selector:
    matchLabels:
      app: tetris
  template:
    metadata:
      labels:
        app: tetris
    spec:
      containers:
      - name: tetris
        image: bsord/tetris
---
apiVersion: v1
kind: Service
metadata:
  name: tetris
  annotations:
    service.beta.kubernetes.io/aws-load-balancer-nlb-target-type: ip
    service.beta.kubernetes.io/aws-load-balancer-scheme: internet-facing
    service.beta.kubernetes.io/aws-load-balancer-cross-zone-load-balancing-enabled: "true"
    service.beta.kubernetes.io/aws-load-balancer-backend-protocol: "http"
    #service.beta.kubernetes.io/aws-load-balancer-healthcheck-port: "80"
spec:
  selector:
    app: tetris
  ports:
  - port: 80
    protocol: TCP
    targetPort: 80
  type: LoadBalancer
EOF

# 배포 확인
kubectl get deploy,svc,ep tetris

# NLB에 ExternanDNS 로 도메인 연결
kubectl annotate service tetris "external-dns.alpha.kubernetes.io/hostname=tetris.$MyDomain"
while true; do aws route53 list-resource-record-sets --hosted-zone-id "${MyDnzHostedZoneId}" --query "ResourceRecordSets[?Type == 'A']" | jq ; date ; echo ; sleep 1; done

# Route53에 A레코드 확인
aws route53 list-resource-record-sets --hosted-zone-id "${MyDnzHostedZoneId}" --query "ResourceRecordSets[?Type == 'A']" | jq

# 확인
dig +short tetris.$MyDomain @8.8.8.8
dig +short tetris.$MyDomain

# 도메인 체크
echo -e "My Domain Checker Site1 = https://www.whatsmydns.net/#A/tetris.$MyDomain"
echo -e "My Domain Checker Site2 = https://dnschecker.org/#A/tetris.$MyDomain"

# 웹 접속 주소 확인 및 접속
echo -e "Tetris Game URL = http://tetris.$MyDomain"
-check

와우
대망의
Gateway API
- https://github.com/kubernetes-sigs/gateway-api : 현재 v1.5.1 릴리즈 - Release
- https://gateway-api.sigs.k8s.io/ : 공식 홈
- https://github.com/kubernetes-sigs/gateway-api/tree/main/conformance/reports : 버전 별 구현체 테스트 결과
- https://github.com/kubernetes-sigs/gateway-api/tree/main/conformance/reports/v1.3.0/aws-load-balancer-controller : AWS LBC
Gateway API 도입 가이드: NGINX Ingress에서 차세대 트래픽 관리로 | Engineering Playbook
- AWS Load Balancer Controller adds general availability support for Kubernetes Gateway API - Link
- [Youtube] 트래픽 폭주에도 흔들리지 않는 AI 서비스, Gateway API로 여는 안정적 확장성의 미래 - 이재영 | 무신사 - Link
- https://kubernetes-sigs.github.io/aws-load-balancer-controller/latest/guide/gateway/gateway/ : AWS LBC Gateway API
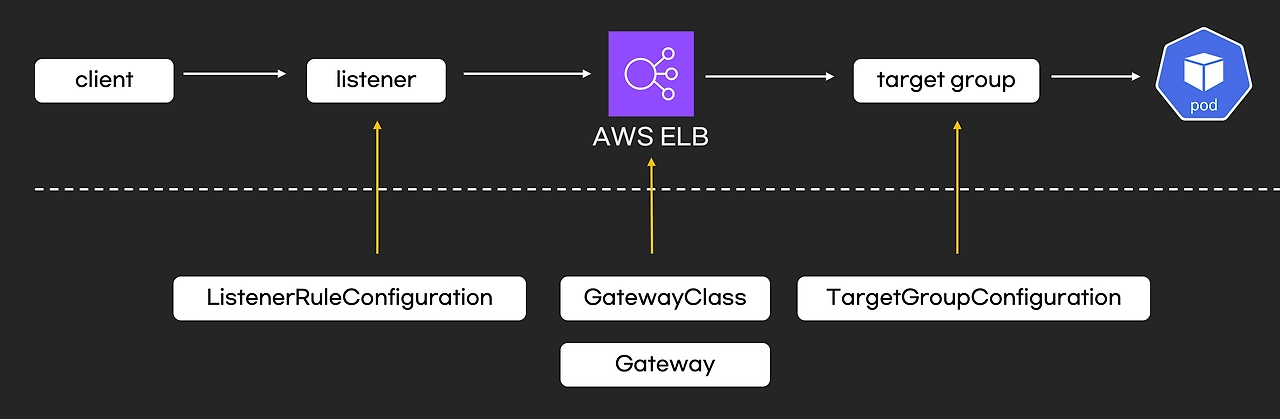
사전 준비 및 설정- Docs
# LBC > v2.13.0 버전 이상
kubectl describe pod -n kube-system -l app.kubernetes.io/name=aws-load-balancer-controller | grep Image: | uniq
    Image:         public.ecr.aws/eks/aws-load-balancer-controller:v3.1.0


# Installation of Gateway API CRDs # --server-side=true
kubectl apply -f https://github.com/kubernetes-sigs/gateway-api/releases/download/v1.3.0/standard-install.yaml     # [REQUIRED] # Standard Gateway API CRDs
kubectl apply -f https://github.com/kubernetes-sigs/gateway-api/releases/download/v1.3.0/experimental-install.yaml # [OPTIONAL: Used for L4 Routes] # Experimental Gateway API CRDs

kubectl get crd  | grep gateway.networking
backendtlspolicies.gateway.networking.k8s.io          2026-03-19T08:37:54Z
gatewayclasses.gateway.networking.k8s.io              2026-03-19T08:37:03Z
gateways.gateway.networking.k8s.io                    2026-03-19T08:37:04Z
grpcroutes.gateway.networking.k8s.io                  2026-03-19T08:37:04Z
httproutes.gateway.networking.k8s.io                  2026-03-19T08:37:04Z
referencegrants.gateway.networking.k8s.io             2026-03-19T08:37:05Z
tcproutes.gateway.networking.k8s.io                   2026-03-19T08:37:55Z
tlsroutes.gateway.networking.k8s.io                   2026-03-19T08:37:56Z
udproutes.gateway.networking.k8s.io                   2026-03-19T08:37:56Z
xbackendtrafficpolicies.gateway.networking.x-k8s.io   2026-03-19T08:37:56Z
xlistenersets.gateway.networking.x-k8s.io             2026-03-19T08:37:56Z

kubectl api-resources | grep gateway.networking
gatewayclasses                      gc                gateway.networking.k8s.io/v1           false        GatewayClass
gateways                            gtw               gateway.networking.k8s.io/v1           true         Gateway
grpcroutes                                            gateway.networking.k8s.io/v1           true         GRPCRoute
httproutes                                            gateway.networking.k8s.io/v1           true         HTTPRoute
referencegrants                     refgrant          gateway.networking.k8s.io/v1beta1      true         ReferenceGrant
tcproutes                                             gateway.networking.k8s.io/v1alpha2     true         TCPRoute
tlsroutes                                             gateway.networking.k8s.io/v1alpha2     true         TLSRoute
udproutes                                             gateway.networking.k8s.io/v1alpha2     true         UDPRoute
backendtlspolicies                  btlspolicy        gateway.networking.k8s.io/v1alpha3     true         BackendTLSPolicy
xbackendtrafficpolicies             xbtrafficpolicy   gateway.networking.x-k8s.io/v1alpha1   true         XBackendTrafficPolicy
xlistenersets                       lset              gateway.networking.x-k8s.io/v1alpha1   true         XListenerSet

kubectl explain gatewayclasses.gateway.networking.k8s.io.spec
kubectl explain gateways.gateway.networking.k8s.io.spec
kubectl explain httproutes.gateway.networking.k8s.io.spec


# Installation of LBC Gateway API specific CRDs
kubectl apply -f https://raw.githubusercontent.com/kubernetes-sigs/aws-load-balancer-controller/refs/heads/main/config/crd/gateway/gateway-crds.yaml

kubectl get crd | grep gateway.k8s.aws
listenerruleconfigurations.gateway.k8s.aws            2026-03-19T06:05:41Z
loadbalancerconfigurations.gateway.k8s.aws            2026-03-19T06:05:42Z
targetgroupconfigurations.gateway.k8s.aws             2026-03-19T06:05:41Z

kubectl api-resources | grep gateway.k8s.aws
listenerruleconfigurations                            gateway.k8s.aws/v1beta1                true         ListenerRuleConfiguration
loadbalancerconfigurations                            gateway.k8s.aws/v1beta1                true         LoadBalancerConfiguration
targetgroupconfigurations                             gateway.k8s.aws/v1beta1                true         TargetGroupConfiguration

kubectl explain loadbalancerconfigurations.gateway.k8s.aws.spec
kubectl explain listenerruleconfigurations.gateway.k8s.aws.spec
kubectl explain targetgroupconfigurations.gateway.k8s.aws.spec
LBC 에 Gateway API 활성화
# 설치 정보 확인
helm list -n kube-system
helm get values -n kube-system aws-load-balancer-controller # helm values 에 Args 및 활성화 값이 현재는 없음
kubectl describe deploy -n kube-system aws-load-balancer-controller | grep Args: -A2
    Args:
      --cluster-name=myeks
      --ingress-class=alb

# 모니터링
kubectl get pod -n kube-system -l app.kubernetes.io/name=aws-load-balancer-controller --watch

# deployment 에 feature flag를 활성화 : By default, the LBC will not listen to Gateway API CRDs.
KUBE_EDITOR="nano" kubectl edit deploy -n kube-system aws-load-balancer-controller
...
      - args:
        - --cluster-name=myeks
        - --ingress-class=alb
        - --feature-gates=NLBGatewayAPI=true,ALBGatewayAPI=true
...
# 확인
kubectl describe deploy -n kube-system aws-load-balancer-controller | grep Args: -A3
    Args:
      --cluster-name=myeks
      --ingress-class=alb
      --feature-gates=NLBGatewayAPI=true,ALBGatewayAPI=true
ExternalDNS 에 gateway api 지원 설정 - Docs
# deployment 에 gateway api 지원 설정 : external-dns-values.yaml 파일 편집 -> 아래 추가
--------------------------
# 리소스 감지 대상
sources:
  - service
  - ingress
  - gateway-httproute
  - gateway-grpcroute
  - gateway-tlsroute
  - gateway-tcproute
  - gateway-udproute
--------------------------

# ExternalDNS 에 gateway api 지원 설정
helm upgrade -i external-dns external-dns/external-dns -n kube-system -f external-dns-values.yaml

# 확인
kubectl describe deploy -n kube-system external-dns | grep Args: -A15
    Args:
      --log-level=info
      --log-format=text
      --interval=1m
      --source=service
      --source=ingress
      --source=gateway-httproute
      --source=gateway-grpcroute
      --source=gateway-tlsroute
      --source=gateway-tcproute
      --source=gateway-udproute
      --policy=sync
      --registry=txt
      --txt-owner-id=stduy-myeks-cluster
      --domain-filter=gasida.link
      --provider=aws
확인해보자
샘플 애플리케이션 배포 및 gateway api(externaldns) 를 사용한 http 접속
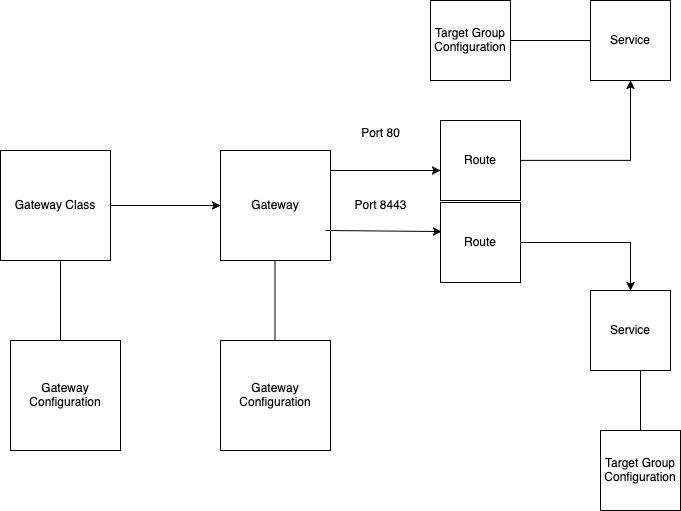
loadbalancerconfigurations - Docs
# loadbalancerconfigurations 생성
kubectl explain loadbalancerconfigurations.gateway.k8s.aws.spec
...
  scheme        <string>
  enum: internal, internet-facing
    scheme defines the type of LB to provision. If unspecified, it will be
    automatically inferred.
...

cat << EOF | kubectl apply -f -
apiVersion: gateway.k8s.aws/v1beta1
kind: LoadBalancerConfiguration
metadata:
  name: lbc-config
  namespace: default
spec:
  scheme: internet-facing
EOF

# 확인
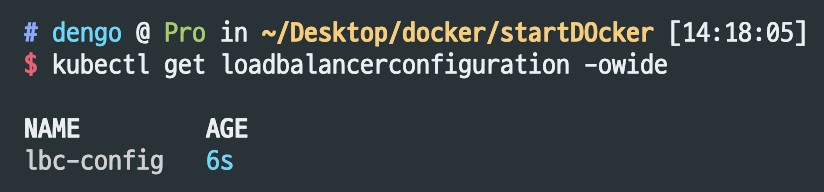
kubectl get loadbalancerconfiguration -owide
NAME         AGE
lbc-config   8s
gatewayclasses
# gatewayclasses 생성
kubectl explain gatewayclasses.spec
kubectl explain gatewayclasses.spec.parametersRef
cat << EOF | kubectl apply -f -
apiVersion: gateway.networking.k8s.io/v1
kind: GatewayClass
metadata:
  name: aws-alb
spec:
  controllerName: gateway.k8s.aws/alb
  parametersRef:
    group: gateway.k8s.aws
    kind: LoadBalancerConfiguration
    name: lbc-config
    namespace: default
EOF

# gatewayclasses 확인 : 약어 gc
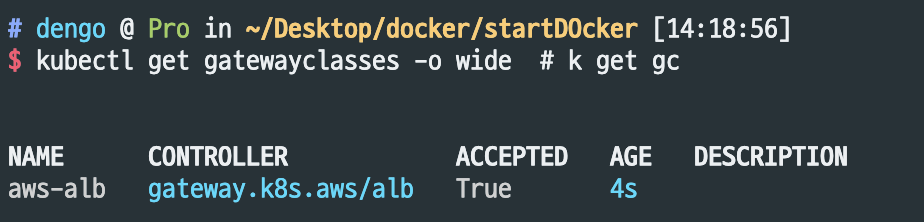
kubectl get gatewayclasses -o wide  # k get gc
NAME      CONTROLLER            ACCEPTED   AGE   DESCRIPTION
aws-alb   gateway.k8s.aws/alb   True       63s
-check
gateway
# gateways 생성
kubectl explain gateways.spec
cat << EOF | kubectl apply -f -
apiVersion: gateway.networking.k8s.io/v1
kind: Gateway
metadata:
  name: alb-http
spec:
  gatewayClassName: aws-alb
  listeners:
  - name: http
    protocol: HTTP
    port: 80
EOF

# gateways 확인 : 약어 gtw
kubectl get gateways  # k get gtw
NAME       CLASS     ADDRESS                                                                     PROGRAMMED   AGE
alb-http   aws-alb   k8s-default-albhttp-8d7d6da11f-126923743.ap-northeast-2.elb.amazonaws.com   Unknown      24s

# ALB 생성 확인
aws elbv2 describe-load-balancers | jq
aws elbv2 describe-target-groups

# 로그 모니터링
kubectl logs -l app.kubernetes.io/name=aws-load-balancer-controller -n kube-system -f
혹은
kubectl stern -l app.kubernetes.io/name=aws-load-balancer-controller -n kube-system
샘플 애플리케이션 배포
# 게임 파드와 Service 배포
cat <<EOF | kubectl apply -f -
apiVersion: apps/v1
kind: Deployment
metadata:
  name: deployment-2048
spec:
  selector:
    matchLabels:
      app.kubernetes.io/name: app-2048
  replicas: 2
  template:
    metadata:
      labels:
        app.kubernetes.io/name: app-2048
    spec:
      containers:
      - image: public.ecr.aws/l6m2t8p7/docker-2048:latest
        imagePullPolicy: Always
        name: app-2048
        ports:
        - containerPort: 80
---
apiVersion: v1
kind: Service
metadata:
  name: service-2048
spec:
  ports:
    - port: 80
      targetPort: 80
      protocol: TCP
  type: ClusterIP
  selector:
    app.kubernetes.io/name: app-2048
EOF

# 모니터링
watch -d kubectl get pod,ingress,svc,ep,endpointslices

# 생성 확인
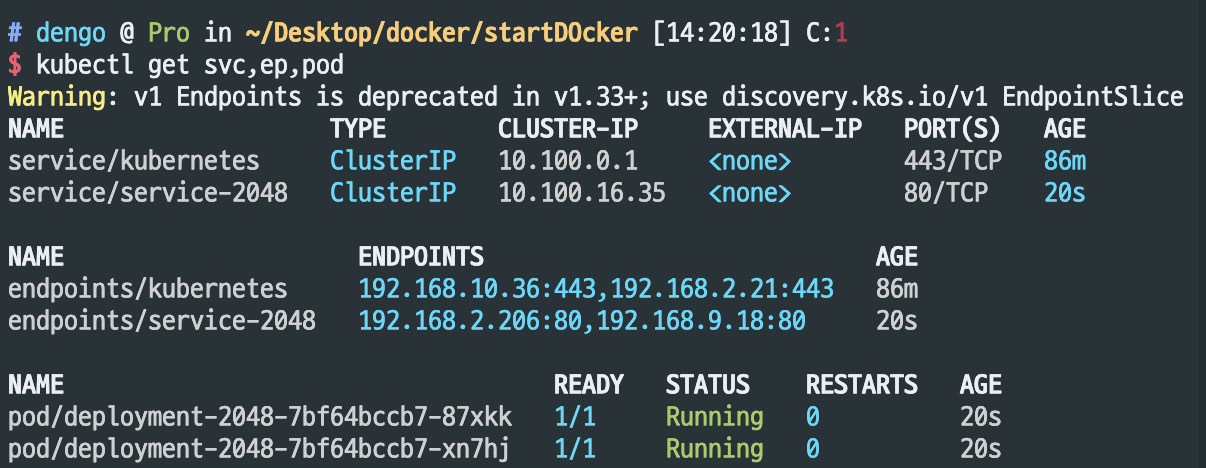
kubectl get svc,ep,pod
-check
TargetGroupConfiguration - Docs
# TargetGroupConfiguration 생성
kubectl explain httproutes.gateway.k8s.aws.spec
kubectl explain targetgroupconfigurations.gateway.k8s.aws.spec.defaultConfiguration

cat << EOF | kubectl apply -f -
apiVersion: gateway.k8s.aws/v1beta1
kind: TargetGroupConfiguration
metadata:
  name: backend-tg-config
spec:
  targetReference:
    name: service-2048
  defaultConfiguration:
    targetType: ip
    protocol: HTTP
EOF

# 확인
kubectl get targetgroupconfigurations -owide
NAME                SERVICE-NAME   AGE
backend-tg-config   backend        22s


# ALB 확인
aws elbv2 describe-load-balancers | jq
aws elbv2 describe-target-groups | jq
httproute
# 서비스 도메인명 변수 지정
GWMYDOMAIN=<각자 자신의 도메인명>
GWMYDOMAIN=gwapi.gasida.link

# httproute 생성
kubectl explain httproutes.spec
kubectl explain httproutes.spec.parentRefs
kubectl explain httproutes.spec.hostnames
kubectl explain httproutes.spec.rules

cat << EOF | kubectl apply -f -
apiVersion: gateway.networking.k8s.io/v1
kind: HTTPRoute
metadata:
  name: alb-http-route
spec:
  parentRefs:
  - group: gateway.networking.k8s.io
    kind: Gateway
    name: alb-http
    sectionName: http
  hostnames:
  - $GWMYDOMAIN
  rules:
  - backendRefs:
    - name: service-2048
      port: 80
EOF

# 확인
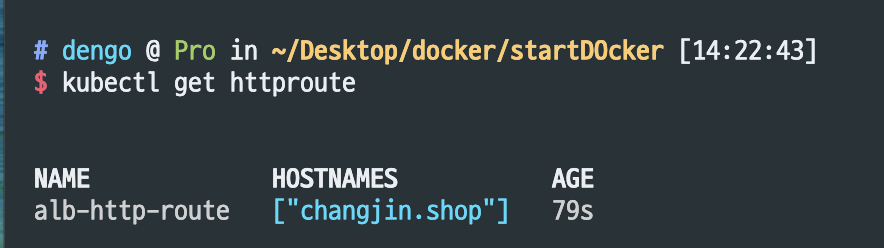
kubectl get httproute
NAME             HOSTNAMES               AGE
alb-http-route   ["gwapi.gasida.link"]   18s

# ALB 확인
aws elbv2 describe-load-balancers | jq
aws elbv2 describe-target-groups | jq

# 로그 모니터링
kubectl logs -l app.kubernetes.io/name=aws-load-balancer-controller -n kube-system -f
혹은
kubectl stern -l app.kubernetes.io/name=aws-load-balancer-controller -n kube-system
접속 테스트
# 확인
dig +short $GWMYDOMAIN @8.8.8.8
dig +short $GWMYDOMAIN

# 도메인 체크
echo -e "My Domain Checker Site1 = https://www.whatsmydns.net/#A/$GWMYDOMAIN"
echo -e "My Domain Checker Site2 = https://dnschecker.org/#A/$GWMYDOMAIN"

# 웹 접속 주소 확인 및 접속
echo -e "GW Api Sample URL = http://$GWMYDOMAIN"
-check
자원 삭제
# IRSA 설정 삭제
CLUSTER_NAME=myeks
eksctl delete iamserviceaccount --cluster=$CLUSTER_NAME --namespace=kube-system --name=external-dns
eksctl delete iamserviceaccount --cluster=$CLUSTER_NAME --namespace=kube-system --name=aws-load-balancer-controller

# 확인
eksctl get iamserviceaccount --cluster $CLUSTER_NAME
이상 2주차 공유를 마치겠습니다!!!!
