3주차 EKS Scaling 에 대해서 공부해보겠습니다.
EKS 관리형 노드 그룹
관리형 노드 그룹 myeks-ng-1 확인 : 온디멘드
# 노드 정보 확인
kubectl get nodes --label-columns eks.amazonaws.com/nodegroup,kubernetes.io/arch,eks.amazonaws.com/capacityType
# 관리형 노드 그룹 확인
eksctl get nodegroup --cluster myeks
aws eks describe-nodegroup --cluster-name myeks --nodegroup-name myeks-ng-1 | jq- check

관리형 노드 그룹 myeks-ng-2 : AWS Graviton (ARM) Instance - Link
AWS Graviton (ARM) Instance 소개 - Github , Blog
AWS Graviton 프로세서 : 64-bit Arm 프로세서 코어 기반의 AWS 커스텀 반도체 ⇒ 20~40% 향상된 가격대비 성능
관리형 노드 그룹 myeks-ng-2 : 신규 노드 그룹 추가 생성 by 테라폼
# 아래 코드 부분 주석 해제 후 테라폼 배포 실행!
terraform plan
terraform apply -auto-approve

# The aws eks wait nodegroup-active command can be used to wait until a specific EKS node group is active and ready for use.
aws eks wait nodegroup-active --cluster-name myeks --nodegroup-name myeks-ng-2
# 2nd 노드 그룹 (추가)
secondary = {
name = "${var.ClusterBaseName}-ng-2"
use_name_prefix = false
ami_type = "AL2023_ARM_64_STANDARD" # https://docs.aws.amazon.com/ko_kr/tnb/latest/ug/node-eks-managed-node.html#node-eks-managed-node-capabilities
instance_types = ["t4g.medium"]
desired_size = 1
max_size = 1
min_size = 1
disk_size = var.WorkerNodeVolumesize
subnets = module.vpc.private_subnets
vpc_security_group_ids = [aws_security_group.node_group_sg.id]
iam_role_name = "${var.ClusterBaseName}-ng-2"
iam_role_use_name_prefix = false
# 학습을 위해 EC2 Instance Profile 에 필요한 IAM Role 추가
iam_role_additional_policies = {
"${var.ClusterBaseName}AWSLoadBalancerControllerPolicy" = aws_iam_policy.aws_lb_controller_policy.arn
"${var.ClusterBaseName}ExternalDNSPolicy" = aws_iam_policy.external_dns_policy.arn
AmazonSSMManagedInstanceCore = "arn:aws:iam::aws:policy/AmazonSSMManagedInstanceCore"
}
# 노드에 배포된 파드에서 C2 Instance Profile 사용을 위해 EC2 메타데이터 호출을 위한 hop limit 2 증가
metadata_options = {
http_endpoint = "enabled"
http_tokens = "required" # IMDSv2 강제
http_put_response_hop_limit = 2 # hop limit = 2
}
# node label
labels = {
tier = "secondary"
}
# node taint
taints = {
frontend = {
key = "cpuarch"
value = "arm64"
effect = "NO_EXECUTE"
}
}
# AL2023 전용 userdata 주입
cloudinit_pre_nodeadm = [
{
content_type = "text/x-shellscript"
content = <<-EOT
#!/bin/bash
echo "Starting custom initialization..."
dnf update -y
dnf install -y tree bind-utils tcpdump nvme-cli links sysstat ipset htop
echo "Custom initialization completed."
EOT
}
]
}
- check

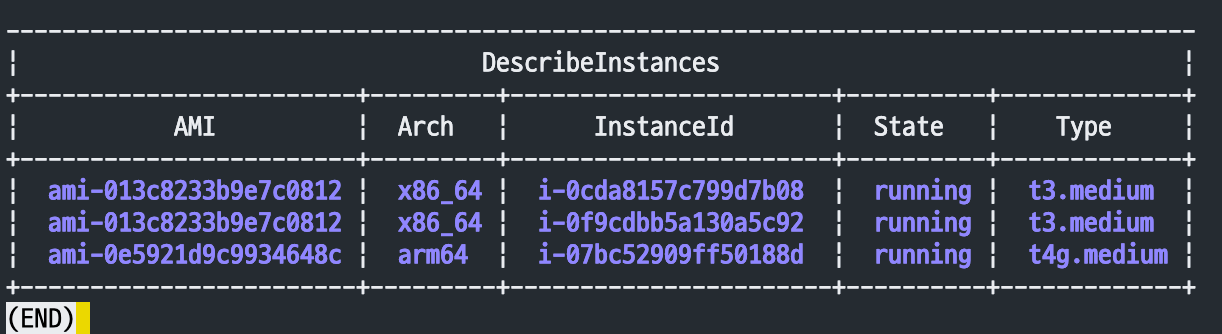
# 신규 노드 그룹 생성 확인
kubectl get nodes --label-columns eks.amazonaws.com/nodegroup,kubernetes.io/arch,eks.amazonaws.com/capacityType
NAME                                                STATUS   ROLES    AGE    VERSION               NODEGROUP    ARCH    CAPACITYTYPE
ip-192-168-16-236.ap-northeast-2.compute.internal   Ready    <none>   51m    v1.35.2-eks-f69f56f   myeks-ng-1   amd64   ON_DEMAND
ip-192-168-23-145.ap-northeast-2.compute.internal   Ready    <none>   51m    v1.35.2-eks-f69f56f   myeks-ng-1   amd64   ON_DEMAND
ip-192-168-20-75.ap-northeast-2.compute.internal    Ready    <none>   6m2s   v1.35.2-eks-f69f56f   myeks-ng-2   arm64   ON_DEMAND

eksctl get nodegroup --cluster myeks
CLUSTER NODEGROUP       STATUS  CREATED                 MIN SIZE        MAX SIZE        DESIRED CAPACITY        INSTANCE TYPE   IMAGE ID                ASG NAME                                                TYPE
myeks   myeks-ng-1      ACTIVE  2026-03-25T12:11:31Z    1               4               2                       t3.medium       AL2023_x86_64_STANDARD  eks-myeks-ng-1-c0ce9274-159c-bf55-e5f2-820078f71e89     managed
myeks   myeks-ng-2      ACTIVE  2026-03-25T12:57:15Z    1               1               1                       t4g.medium      AL2023_ARM_64_STANDARD  eks-myeks-ng-2-2ece9289-05f1-8823-26f5-10a335cadc1d     managed

aws eks describe-nodegroup --cluster-name myeks --nodegroup-name myeks-ng-2 | jq
aws eks describe-nodegroup --cluster-name myeks --nodegroup-name myeks-ng-2 | jq .nodegroup.taints
[
  {
    "key": "cpuarch",
    "value": "arm64",
    "effect": "NO_EXECUTE"  # 스케줄링 하지 않음 - 노드상에서 조건이 일치하지 않는 파드는 동작X. Taint 설정 전 이미 스케줄링된 파드(Toleration 미설정된)도 Evict됨.
  }
]

# k8s 노드 정보 확인
kubectl get node -l kubernetes.io/arch=arm64
kubectl get node -l tier=secondary -owide
kubectl describe node -l tier=secondary | grep -i taint
Taints:             cpuarch=arm64:NoExecute


# SSM 관리 대상 인스턴스 목록 조회
aws ec2 describe-instances \
  --instance-ids $(aws ssm describe-instance-information \
    --query "InstanceInformationList[?PingStatus=='Online'].InstanceId" \
    --output text) \
  --query "Reservations[].Instances[].{
    InstanceId:InstanceId,
    Type:InstanceType,
    Arch:Architecture,
    AMI:ImageId,
    State:State.Name
  }" \
  --output table
  -------------------------------------------------------------------------------------
|                                 DescribeInstances                                 |
+------------------------+---------+-----------------------+----------+-------------+
|           AMI          |  Arch   |      InstanceId       |  State   |    Type     |
+------------------------+---------+-----------------------+----------+-------------+
|  ami-013c8233b9e7c0812 |  x86_64 |  i-04a7732338201b363  |  running |  t3.medium  |
|  ami-013c8233b9e7c0812 |  x86_64 |  i-0deedd65e2ad0664d  |  running |  t3.medium  |
|  ami-0e5921d9c9934648c |  arm64  |  i-0bca7e84729c95af6  |  running |  t4g.medium |
+------------------------+---------+-----------------------+----------+-------------+

# 인스턴스 접속 후 arch 확인
aws ssm start-session --target i-08b07a8575315a3a7
--------------------------------------------------
sh-5.2$ arch
aarch64
--------------------------------------------------
해당 노드에 샘플 파드 배포 1
# sample-app 디플로이먼트 배포
cat <<EOF | kubectl apply -f -
apiVersion: apps/v1
kind: Deployment
metadata:
  name: sample-app
  labels:
    app: sample-app
spec:
  replicas: 1
  selector:
    matchLabels:
      app: sample-app
  template:
    metadata:
      labels:
        app: sample-app
    spec:
      nodeSelector:
        kubernetes.io/arch: arm64
      containers:
      - name: sample-app
        image: nginx:alpine
        ports:
        - containerPort: 80
        resources:
          requests:
            cpu: 100m
            memory: 128Mi
EOF

# 확인
kubectl describe pod -l app=sample-app


# 파드에 tolerations 설정으로 배치 실행!
cat <<EOF | kubectl apply -f -
apiVersion: apps/v1
kind: Deployment
metadata:
  name: sample-app
  labels:
    app: sample-app
spec:
  replicas: 1
  selector:
    matchLabels:
      app: sample-app
  template:
    metadata:
      labels:
        app: sample-app
    spec:
      nodeSelector:
        kubernetes.io/arch: arm64
      tolerations:
      - key: "cpuarch"
        operator: "Equal"
        value: "arm64"
        effect: "NoExecute"
      containers:
      - name: sample-app
        image: nginx:alpine
        ports:
        - containerPort: 80
        resources:
          requests:
            cpu: 100m
            memory: 128Mi
EOF
kubectl get events -w --sort-by '.lastTimestamp'

# 확인
kubectl get pod -l app=sample-app
kubectl describe pod -l app=sample-app

# 삭제
kubectl delete deploy sample-app- check

해당 노드에 샘플 파드 배포 2
# 샘플 애플리케이션 배포
cat << EOF | kubectl apply -f -
apiVersion: apps/v1
kind: Deployment
metadata:
  name: mario
  labels:
    app: mario
spec:
  replicas: 1
  selector:
    matchLabels:
      app: mario
  template:
    metadata:
      labels:
        app: mario
    spec:
      nodeSelector:
        kubernetes.io/arch: arm64
      tolerations:
      - key: "cpuarch"
        operator: "Equal"
        value: "arm64"
        effect: "NoExecute"
      containers:
      - name: mario
        image: pengbai/docker-supermario
EOF
kubectl get events -w --sort-by '.lastTimestamp'

# 확인
kubectl get pod -l app=mario
kubectl stern -l app=mario
+ mario-7cb97489b5-ftcbf › mario
mario-7cb97489b5-ftcbf mario exec /usr/local/tomcat/bin/catalina.sh: exec format error

# 해당 노드에 ssm 접속 후 local 에 컨테이너 이미지 매니페스트 정보에서 cpu arch 정보 확인 명령 추가해두자!

# 삭제
kubectl delete deploy mario- check

테라폼 코드에 관리형 노드 그룹 myeks-ng-2 주석 설정 후 terraform apply -auto-approve
관리형 노드 그룹 myeks-ng-3 : 신규 노드 그룹 추가 생성 by 테라폼
# 아래 코드 부분 주석 해제 후 테라폼 배포 실행!
terraform plan
terraform apply -auto-approve

# The aws eks wait nodegroup-active command can be used to wait until a specific EKS node group is active and ready for use.
aws eks wait nodegroup-active --cluster-name myeks --nodegroup-name myeks-ng-3- check
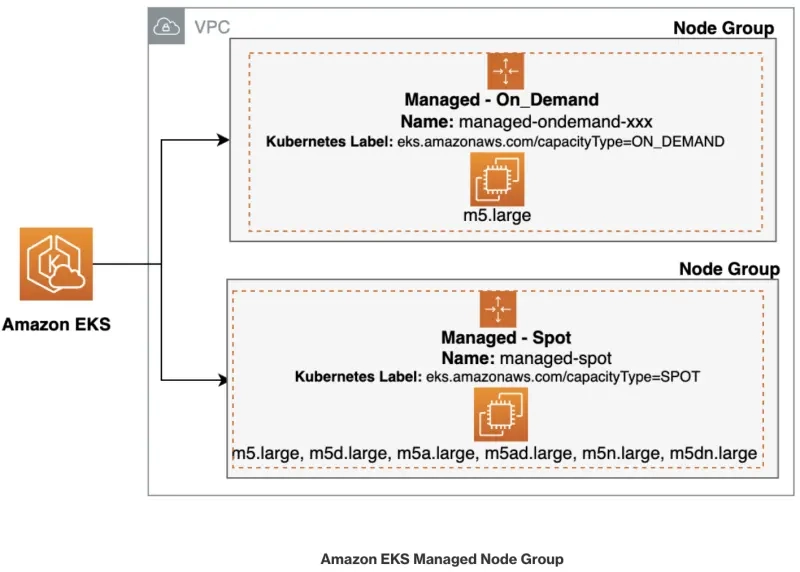

해당 노드에 샘플 파드 배포
# 파드 배포
cat <<EOF | kubectl apply -f -
apiVersion: v1
kind: Pod
metadata:
  name: busybox
spec:
  terminationGracePeriodSeconds: 3
  containers:
  - name: busybox
    image: busybox
    command:
    - "/bin/sh"
    - "-c"
    - "while true; do date >> /home/pod-out.txt; cd /home; sync; sync; sleep 10; done"
  nodeSelector:
    eks.amazonaws.com/capacityType: SPOT
EOF

# 파드가 배포된 노드 정보 확인
kubectl get pod -owide

# 삭제
kubectl delete pod busybox- check

Scaling up 소개
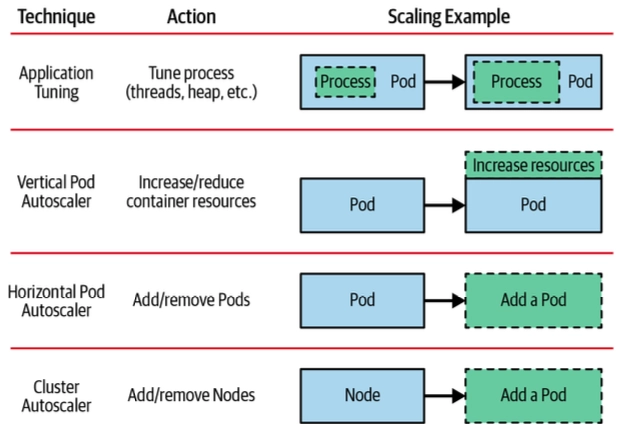
HPA - Horizontal Pod Autoscaler
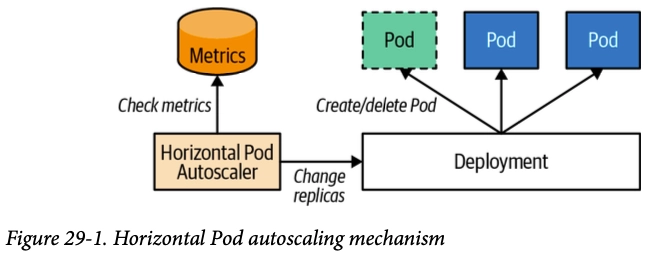
샘플 애플리케이션 배포 - Docs , K8S , AWS
# Run and expose php-apache server
# https://k8s.io/examples/application/php-apache.yaml
apiVersion: apps/v1
kind: Deployment
metadata:
  name: php-apache
spec:
  selector:
    matchLabels:
      run: php-apache
  template:
    metadata:
      labels:
        run: php-apache
    spec:
      containers:
      - name: php-apache
        image: registry.k8s.io/hpa-example
        ports:
        - containerPort: 80
        resources:
          limits:
            cpu: 500m
          requests:
            cpu: 200m
---
apiVersion: v1
kind: Service
metadata:
  name: php-apache
  labels:
    run: php-apache
spec:
  ports:
  - port: 80
  selector:
    run: php-apache
kubectl apply -f https://k8s.io/examples/application/php-apache.yaml

# 확인
kubectl exec -it deploy/php-apache -- cat /var/www/html/index.php
...

# 모니터링 : 터미널2개 사용
watch -d 'kubectl get hpa,pod;echo;kubectl top pod;echo;kubectl top node'
kubectl exec -it deploy/php-apache -- top
부하 발생을 위한 클라이언트용 파드 배포 및 반복 호출
# curl 파드 배포
cat <<EOF | kubectl apply -f -
apiVersion: v1
kind: Pod
metadata:
  name: curl
spec:
  containers:
  - name: curl
    image: curlimages/curl:latest
    command: ["sleep", "3600"]
  restartPolicy: Never
EOF

# 서비스명으로 호출 : 'kubectl exec -it deploy/php-apache -- top' 에 CPU 증가 확인!
kubectl exec -it curl -- curl php-apache
kubectl exec -it curl -- curl php-apache

# 서비스명으로 반복 호출
kubectl exec curl -- sh -c 'while true; do curl -s php-apache; sleep 1; done'
kubectl exec curl -- sh -c 'while true; do curl -s php-apache; sleep 0.5; done'
kubectl exec curl -- sh -c 'while true; do curl -s php-apache; sleep 0.1; done'
kubectl exec curl -- sh -c 'while true; do curl -s php-apache; sleep 0.01; done'
혹은 병렬 호출 (부하 테스트 느낌, 5개 worker 동시 요청)
kubectl exec -it curl -- sh -c '
for i in $(seq 1 5); do
  while true; do curl -s php-apache & sleep 1; done &
done
wait'
HPA 정책 생성 및 부하 발생 후 파드 오토 스케일링 확인
# Create the HorizontalPodAutoscaler : requests.cpu=200m - 알고리즘
# Since each pod requests 200 milli-cores by kubectl run, this means an average CPU usage of 100 milli-cores.
cat <<EOF | kubectl apply -f -
apiVersion: autoscaling/v2
kind: HorizontalPodAutoscaler
metadata:
  name: php-apache
spec:
  scaleTargetRef:
    apiVersion: apps/v1
    kind: Deployment
    name: php-apache
  minReplicas: 1
  maxReplicas: 10
  metrics:
  - type: Resource
    resource:
      name: cpu
      target:
        averageUtilization: 50
        type: Utilization
EOF
혹은
kubectl autoscale deployment php-apache --cpu-percent=50 --min=1 --max=10


# 확인
kubectl describe hpa
...
Metrics:                                               ( current / target )
  resource cpu on pods  (as a percentage of request):  0% (1m) / 50%
Min replicas:                                          1
Max replicas:                                          10
Deployment pods:                                       1 current / 1 desired
...

# HPA 설정 확인
kubectl get hpa php-apache -o yaml | kubectl neat
spec:
  minReplicas: 1               # [4] 또는 최소 1개까지 줄어들 수도 있습니다
  maxReplicas: 10              # [3] 포드를 최대 10개까지 늘립니다
  scaleTargetRef:
    apiVersion: apps/v1
    kind: Deployment
    name: php-apache           # [1] php-apache 의 자원 사용량에서
  metrics:
  - type: Resource
    resource:
      name: cpu
      target:
        type: Utilization
        averageUtilization: 50  # [2] CPU 활용률이 50% 이상인 경우


# 반복 접속 1 (파드1 IP로 접속) >> 아래 각각 실행 후 최대 증가 갯수 확인 해보기! 스터디 시간 상 sleep 0.01 바로 실행!
kubectl exec curl -- sh -c 'while true; do curl -s php-apache; sleep 0.5; done'
kubectl exec curl -- sh -c 'while true; do curl -s php-apache; sleep 0.1; done'
kubectl exec curl -- sh -c 'while true; do curl -s php-apache; sleep 0.01; done'


# 반복 접속 2 (서비스명 도메인으로 파드들 분산 접속) >> 증가 확인(몇개까지 증가되는가? 그 이유는?) 후 중지
## >> [scale back down] 중지 5분 후 파드 갯수 감소 확인
# Run this in a separate terminal
# so that the load generation continues and you can carry on with the rest of the steps
kubectl run -i --tty load-generator --rm --image=busybox:1.28 --restart=Never -- /bin/sh -c "while sleep 0.01; do wget -q -O- http://php-apache; done"


# Horizontal Pod Autoscaler Status Conditions
kubectl describe hpa
...
Events:
  Type    Reason             Age    From                       Message
  ----    ------             ----   ----                       -------
  Normal  SuccessfulRescale  13m    horizontal-pod-autoscaler  New size: 2; reason: cpu resource utilization (percentage of request) above target
  Normal  SuccessfulRescale  11m    horizontal-pod-autoscaler  New size: 3; reason: cpu resource utilization (percentage of request) above target
  Normal  SuccessfulRescale  11m    horizontal-pod-autoscaler  New size: 6; reason: cpu resource utilization (percentage of request) above target
  Normal  SuccessfulRescale  10m    horizontal-pod-autoscaler  New size: 8; reason: cpu resource utilization (percentage of request) above target
  Normal  SuccessfulRescale  5m35s  horizontal-pod-autoscaler  New size: 7; reason: All metrics below target
  Normal  SuccessfulRescale  4m35s  horizontal-pod-autoscaler  New size: 5; reason: All metrics below target
  Normal  SuccessfulRescale  4m5s   horizontal-pod-autoscaler  New size: 2; reason: All metrics below target
  Normal  SuccessfulRescale  3m50s  horizontal-pod-autoscaler  New size: 1; reason: All metrics below target
- check

HPA 프로메테우스 메트릭
kube_horizontalpodautoscaler_status_current_replicas
kube_horizontalpodautoscaler_status_desired_replicas
kube_horizontalpodautoscaler_status_target_metric
kube_horizontalpodautoscaler_status_condition

kube_horizontalpodautoscaler_spec_target_metric
kube_horizontalpodautoscaler_spec_min_replicas
kube_horizontalpodautoscaler_spec_max_replicas

# 엔드포인트 확인
kubectl exec -it curl -- curl -s kube-prometheus-stack-kube-state-metrics.monitoring.svc:8080/metrics
kubectl exec -it curl -- curl -s kube-prometheus-stack-kube-state-metrics.monitoring.svc:8080/metrics | grep -i horizontalpodautoscaler | grep HELP
# HELP kube_horizontalpodautoscaler_info Information about this autoscaler.
# HELP kube_horizontalpodautoscaler_metadata_generation [STABLE] The generation observed by the HorizontalPodAutoscaler controller.
# HELP kube_horizontalpodautoscaler_spec_max_replicas [STABLE] Upper limit for the number of pods that can be set by the autoscaler; cannot be smaller than MinReplicas.
# HELP kube_horizontalpodautoscaler_spec_min_replicas [STABLE] Lower limit for the number of pods that can be set by the autoscaler, default 1.
# HELP kube_horizontalpodautoscaler_spec_target_metric The metric specifications used by this autoscaler when calculating the desired replica count.
# HELP kube_horizontalpodautoscaler_status_target_metric The current metric status used by this autoscaler when calculating the desired replica count.
# HELP kube_horizontalpodautoscaler_status_current_replicas [STABLE] Current number of replicas of pods managed by this autoscaler.
# HELP kube_horizontalpodautoscaler_status_desired_replicas [STABLE] Desired number of replicas of pods managed by this autoscaler.
# HELP kube_horizontalpodautoscaler_annotations Kubernetes annotations converted to Prometheus labels.
# HELP kube_horizontalpodautoscaler_labels [STABLE] Kubernetes labels converted to Prometheus labels.
# HELP kube_horizontalpodautoscaler_status_condition [STABLE] The condition of this autoscaler.

kubectl exec -it curl -- curl -s kube-prometheus-stack-kube-state-metrics.monitoring.svc:8080/metrics | grep -i horizontalpodautoscaler
...
VPA - Vertical Pod Autoscaler
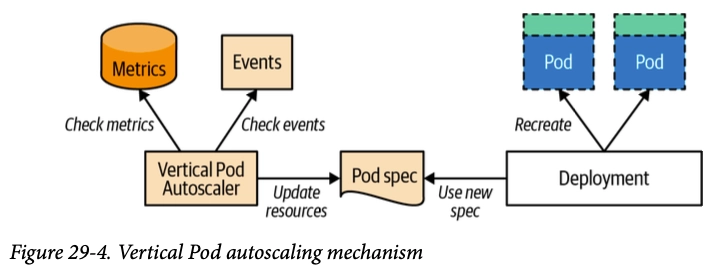
- VPA 소개 : pod resources.request을 최대한 최적값으로 수정 ⇒ 악분님 블로그에서 기본 소개
-
VPA는 HPA와 같이 사용할 수 없습니다.
-
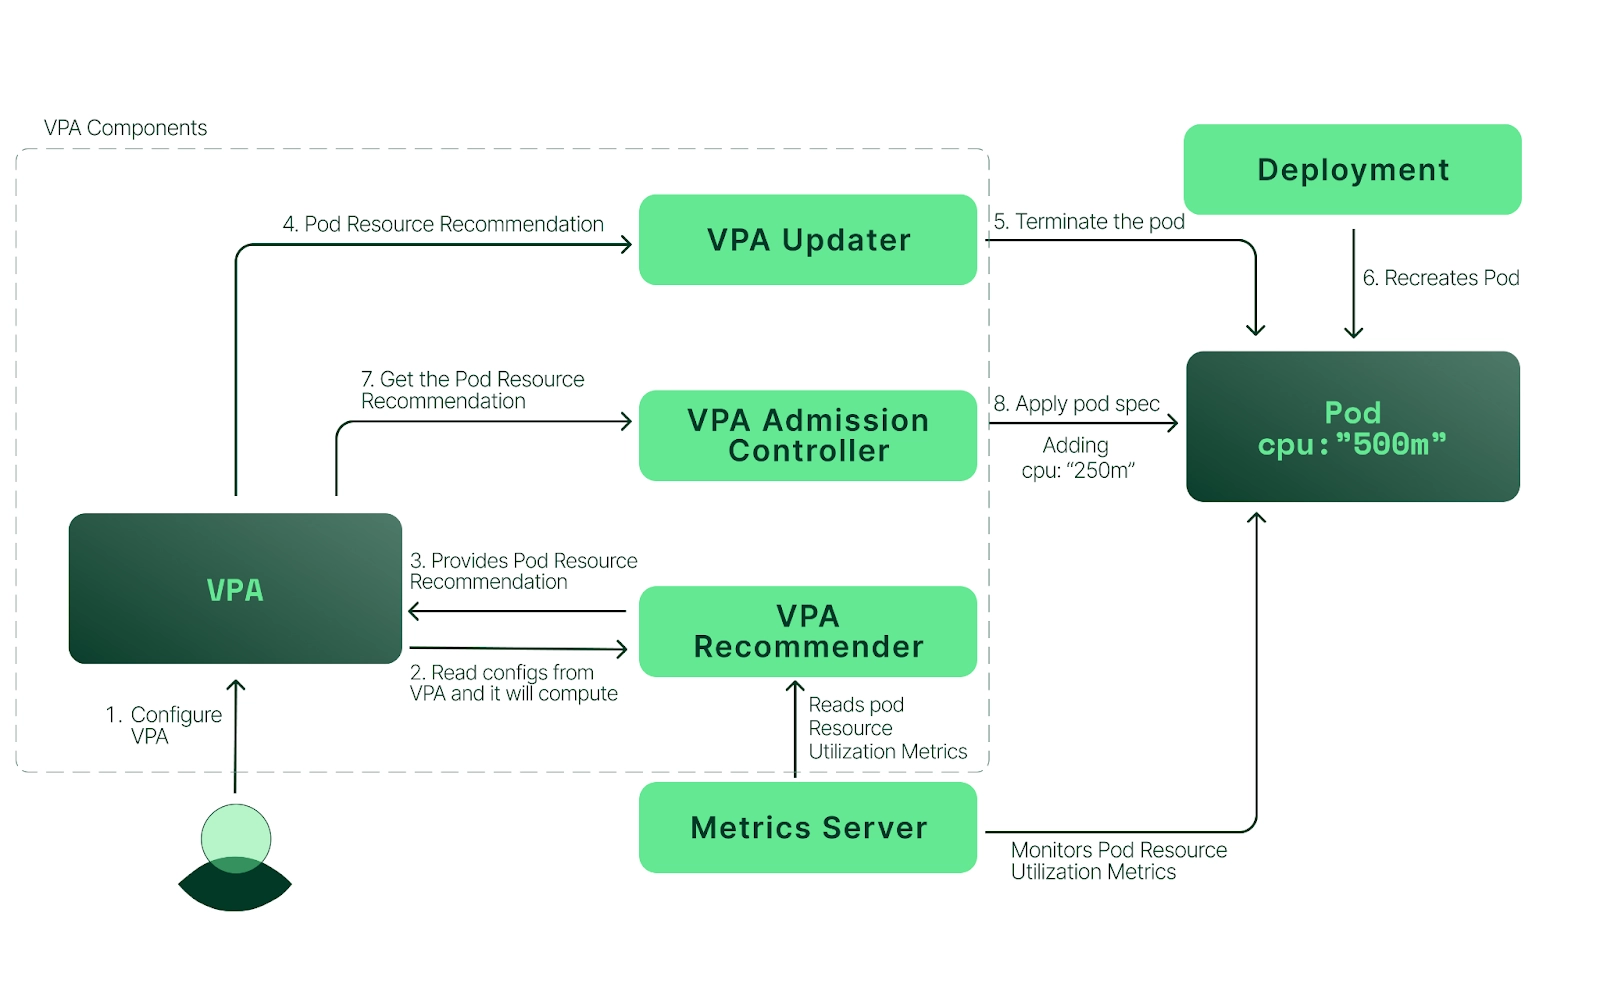
VPA는 pod자원을 최적값으로 수정하기 위해 pod를 재실행(기존 pod를 종료하고 새로운 pod실행)합니다.
-
계산 방식 : ‘기준값(파드가 동작하는데 필요한 최소한의 값)’ 결정 → ‘마진(약간의 적절한 버퍼)’ 추가 → 상세정리 Link
-
# CRD 설치 - feat: CPU startup boost in master (#9141)
kubectl apply -f https://raw.githubusercontent.com/kubernetes/autoscaler/refs/heads/master/vertical-pod-autoscaler/deploy/vpa-v1-crd-gen.yaml
# RBAC 설치 - VPA: Update vpa-rbac.yaml for allowing in place resize requests
kubectl apply -f https://raw.githubusercontent.com/kubernetes/autoscaler/refs/heads/master/vertical-pod-autoscaler/deploy/vpa-rbac.yaml

# 코드 다운로드
git clone https://github.com/kubernetes/autoscaler.git
cd ~/autoscaler/vertical-pod-autoscaler/
tree hack

# Deploy the Vertical Pod Autoscaler to your cluster with the following command.
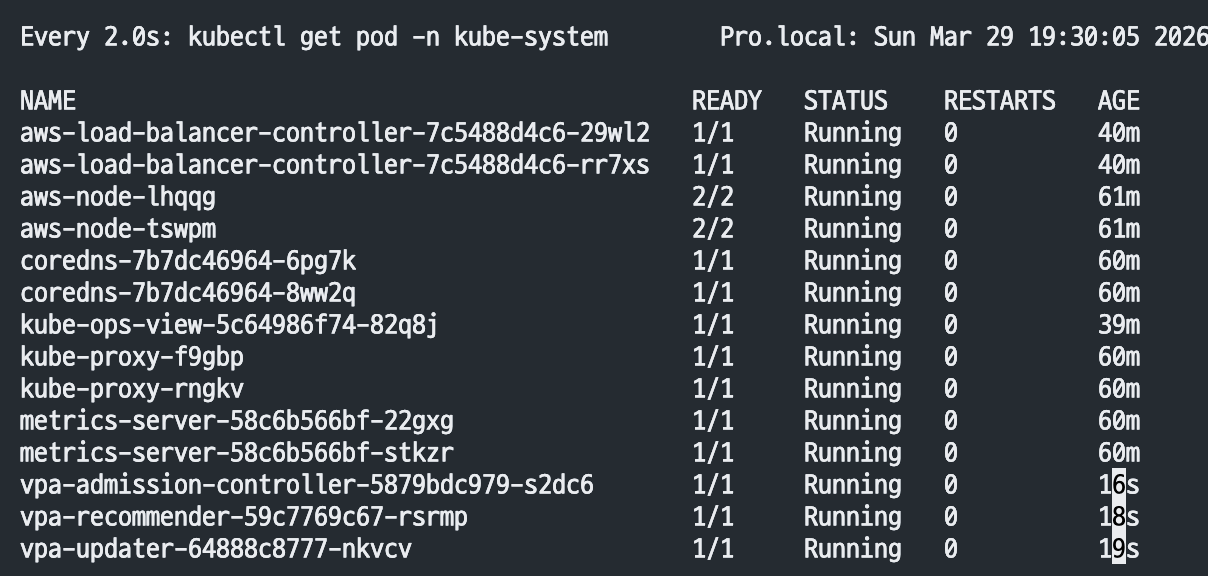
watch -d kubectl get pod -n kube-system
cat hack/vpa-up.sh
./hack/vpa-up.sh

kubectl get crd | grep autoscaling
kubectl get mutatingwebhookconfigurations vpa-webhook-config
kubectl get mutatingwebhookconfigurations vpa-webhook-config -o json | jq- check
# 모니터링
watch -d "kubectl top pod;echo "----------------------";kubectl describe pod | grep Requests: -A2"

# 공식 예제 배포
cd ~/autoscaler/vertical-pod-autoscaler/
cat examples/hamster.yaml
kubectl apply -f examples/hamster.yaml && kubectl get vpa -w

# 파드 리소스 Requestes 확인
kubectl describe pod | grep Requests: -A2
    Requests:
      cpu:        100m
      memory:     50Mi
--
    Requests:
      cpu:        587m
      memory:     262144k
--
    Requests:
      cpu:        587m
      memory:     262144k

# VPA에 의해 기존 파드 삭제되고 신규 파드가 생성됨
kubectl get events --sort-by=".metadata.creationTimestamp" | grep VPA
2m16s       Normal    EvictedByVPA             pod/hamster-5bccbb88c6-s6jkp         Pod was evicted by VPA Updater to apply resource recommendation.
76s Normal EvictedByVPA pod/hamster-5bccbb88c6-jc6gq Pod was evicted by VPA Updater to apply resource recommendation.- check

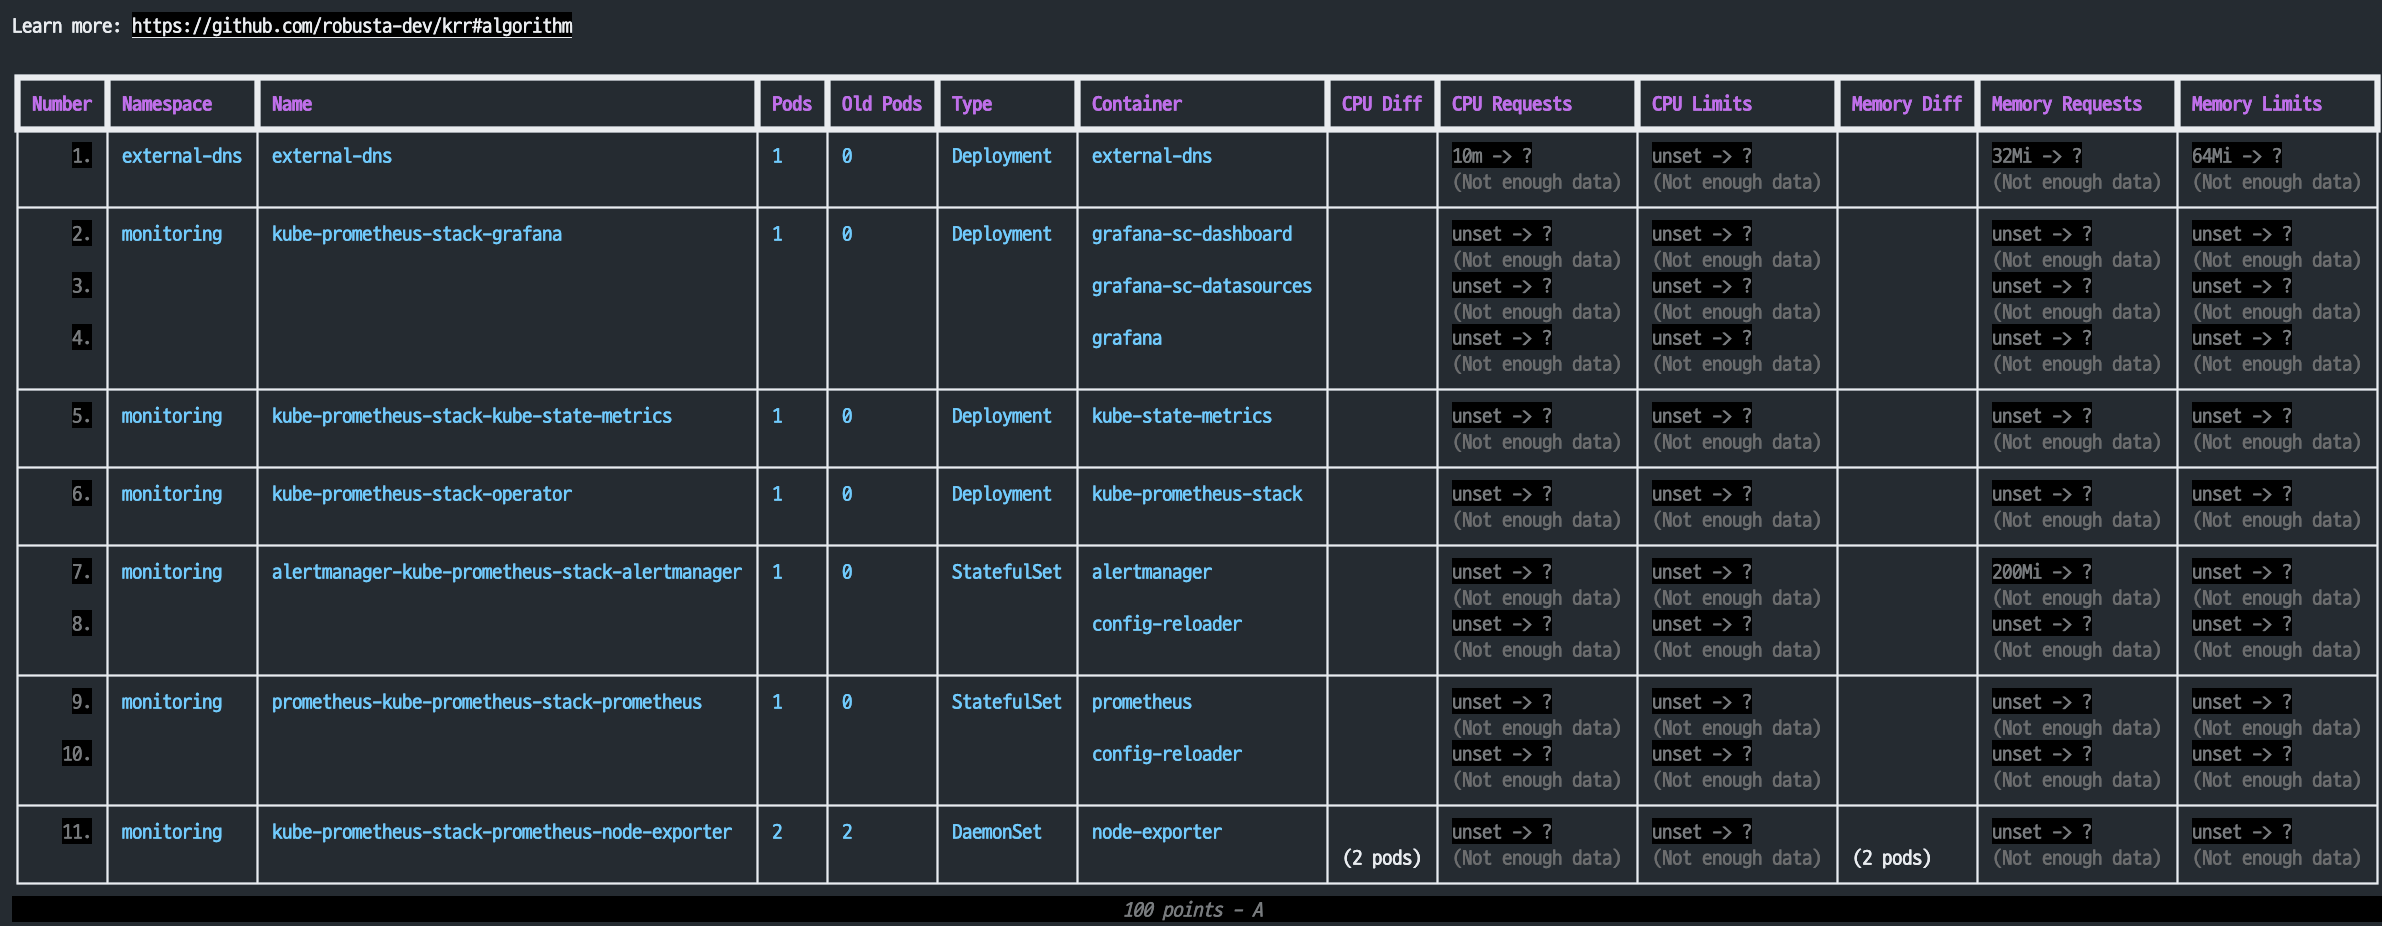
KRR: Prometheus-based Kubernetes Resource Recommendations - 링크 & Youtube - 링크 ⇒ Krr을 통한 최적화 작업 경험 - Blog- KRR(Kubernetes Resource Recommender)을 사용하면 실제 사용량 기준으로 Request와 Limit 사용량을 추천
- Difference with Kubernetes VPA
# macOS
brew tap robusta-dev/homebrew-krr
brew install krr
krr --help

# 히스토리 데이터 기간, CPU Percentile, 메모리 버퍼 등을 커스터마이징하여 추천 설정 가능
krr simple

# 1달(720시간) 데이터 기준으로 CPU Peak 사용량의 90%와 메모리 Peak 사용량의 10% 여유를 설정하는 예시
krr simple --history_duration 720 --cpu_percentile 90 --memory_buffer_percentage 10- check
KEDA - Kubernetes Event-driven Autoscaling
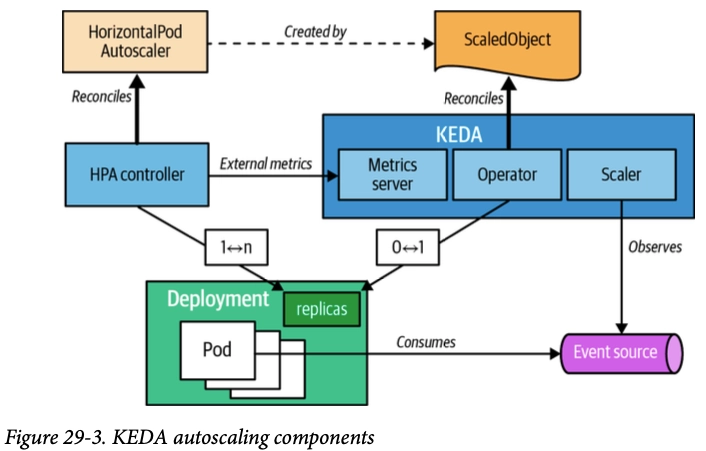
- 기존의 HPA(Horizontal Pod Autoscaler)는 리소스(CPU, Memory) 메트릭을 기반으로 스케일 여부를 결정하게 됩니다.
- 반면에 KEDA는 특정 이벤트를 기반으로 스케일 여부를 결정할 수 있습니다.
- 예를 들어 airflow는 metadb를 통해 현재 실행 중이거나 대기 중인 task가 얼마나 존재하는지 알 수 있습니다.
- 이러한 이벤트를 활용하여 worker의 scale을 결정한다면 queue에 task가 많이 추가되는 시점에 더 빠르게 확장할 수 있습니다.
KEDA with Helm 실습 : 특정 이벤트(cron 등)기반의 파드 오토 스케일링 - Chart , Grafana , Cron , SQS_Scale , aws-sqs-queue
# 설치 전 기존 metrics-server 제공 Metris API 확인
kubectl get --raw "/apis/metrics.k8s.io" -v=6 | jq
kubectl get --raw "/apis/metrics.k8s.io" | jq
{
  "kind": "APIGroup",
  "apiVersion": "v1",
  "name": "metrics.k8s.io",
  ...


# KEDA 설치 : serviceMonitor 만으로도 충분할듯..
cat <<EOT > keda-values.yaml
metricsServer:
  useHostNetwork: true

prometheus:
  metricServer:
    enabled: true
    port: 9022
    portName: metrics
    path: /metrics
    serviceMonitor:
      # Enables ServiceMonitor creation for the Prometheus Operator
      enabled: true
  operator:
    enabled: true
    port: 8080
    serviceMonitor:
      # Enables ServiceMonitor creation for the Prometheus Operator
      enabled: true
  webhooks:
    enabled: true
    port: 8020
    serviceMonitor:
      # Enables ServiceMonitor creation for the Prometheus webhooks
      enabled: true
EOT

helm repo add kedacore https://kedacore.github.io/charts
helm repo update
helm install keda kedacore/keda --version 2.16.0 --namespace keda --create-namespace -f keda-values.yaml

# KEDA 설치 확인
kubectl get crd | grep keda
kubectl get all -n keda
kubectl get validatingwebhookconfigurations keda-admission -o yaml
kubectl get podmonitor,servicemonitors -n keda
kubectl get apiservice v1beta1.external.metrics.k8s.io -o yaml

# CPU/Mem은 기존 metrics-server 의존하여, KEDA metrics-server는 외부 이벤트 소스(Scaler) 메트릭을 노출
## https://keda.sh/docs/2.16/operate/metrics-server/
kubectl get pod -n keda -l app=keda-operator-metrics-apiserver

# Querying metrics exposed by KEDA Metrics Server
kubectl get --raw "/apis/external.metrics.k8s.io/v1beta1" | jq
{
  "kind": "APIResourceList",
  "apiVersion": "v1",
  "groupVersion": "external.metrics.k8s.io/v1beta1",
  "resources": [
    {
      "name": "externalmetrics",
      "singularName": "",
      "namespaced": true,
      "kind": "ExternalMetricValueList",
      "verbs": [
        "get"
      ]
    }
  ]
}

# keda 네임스페이스에 디플로이먼트 생성
kubectl apply -f https://k8s.io/examples/application/php-apache.yaml -n keda
kubectl get pod -n keda

# ScaledObject 정책 생성 : cron
cat <<EOT > keda-cron.yaml
apiVersion: keda.sh/v1alpha1
kind: ScaledObject
metadata:
  name: php-apache-cron-scaled
spec:
  minReplicaCount: 0
  maxReplicaCount: 2  # Specifies the maximum number of replicas to scale up to (defaults to 100).
  pollingInterval: 30  # Specifies how often KEDA should check for scaling events
  cooldownPeriod: 300  # Specifies the cool-down period in seconds after a scaling event
  scaleTargetRef:  # Identifies the Kubernetes deployment or other resource that should be scaled.
    apiVersion: apps/v1
    kind: Deployment
    name: php-apache
  triggers:  # Defines the specific configuration for your chosen scaler, including any required parameters or settings
  - type: cron
    metadata:
      timezone: Asia/Seoul
      start: 00,15,30,45 * * * *
      end: 05,20,35,50 * * * *
      desiredReplicas: "1"
EOT
kubectl apply -f keda-cron.yaml -n keda

# 그라파나 대시보드 추가 : 대시보드 상단에 namespace : keda 로 변경하기!
# KEDA 대시보드 Import : https://github.com/kedacore/keda/blob/main/config/grafana/keda-dashboard.json

# 모니터링
watch -d 'kubectl get ScaledObject,hpa,pod -n keda'
kubectl get ScaledObject -w

# 확인
kubectl get ScaledObject,hpa,pod -n keda
kubectl get hpa -o jsonpath="{.items[0].spec}" -n keda | jq
...
"metrics": [
    {
      "external": {
        "metric": {
          "name": "s0-cron-Asia-Seoul-00,15,30,45xxxx-05,20,35,50xxxx",
          "selector": {
            "matchLabels": {
              "scaledobject.keda.sh/name": "php-apache-cron-scaled"
            }
          }
        },
        "target": {
          "averageValue": "1",
          "type": "AverageValue"
        }
      },
      "type": "External"
    }

# KEDA 및 deployment 등 삭제
kubectl delete ScaledObject -n keda php-apache-cron-scaled && kubectl delete deploy php-apache -n keda && helm uninstall keda -n keda
kubectl delete namespace keda
- check

CPA - Cluster Proportional Autoscaler
소개 및 실습 : 노드 수 증가에 비례하여 성능 처리가 필요한 애플리케이션(컨테이너/파드)를 수평으로 자동 확장 ex. coredns - Github Workshop
#
helm repo add cluster-proportional-autoscaler https://kubernetes-sigs.github.io/cluster-proportional-autoscaler

# CPA규칙을 설정하고 helm차트를 릴리즈 필요
helm upgrade --install cluster-proportional-autoscaler cluster-proportional-autoscaler/cluster-proportional-autoscaler

# nginx 디플로이먼트 배포
cat <<EOT > cpa-nginx.yaml
apiVersion: apps/v1
kind: Deployment
metadata:
  name: nginx-deployment
spec:
  replicas: 1
  selector:
    matchLabels:
      app: nginx
  template:
    metadata:
      labels:
        app: nginx
    spec:
      containers:
      - name: nginx
        image: nginx:latest
        resources:
          limits:
            cpu: "100m"
            memory: "64Mi"
          requests:
            cpu: "100m"
            memory: "64Mi"
        ports:
        - containerPort: 80
EOT
kubectl apply -f cpa-nginx.yaml

# CPA 규칙 설정
cat <<EOF > cpa-values.yaml
config:
  ladder:
    nodesToReplicas:
      - [1, 1]
      - [2, 2]
      - [3, 3]
      - [4, 3]
      - [5, 5]
options:
  namespace: default
  target: "deployment/nginx-deployment"
EOF
kubectl describe cm cluster-proportional-autoscaler

# 모니터링
watch -d kubectl get pod

# helm 업그레이드
helm upgrade --install cluster-proportional-autoscaler -f cpa-values.yaml cluster-proportional-autoscaler/cluster-proportional-autoscaler

# 노드 5개로 증가
export ASG_NAME=$(aws autoscaling describe-auto-scaling-groups --query "AutoScalingGroups[? Tags[? (Key=='eks:cluster-name') && Value=='myeks']].AutoScalingGroupName" --output text)
aws autoscaling update-auto-scaling-group --auto-scaling-group-name ${ASG_NAME} --min-size 5 --desired-capacity 5 --max-size 5
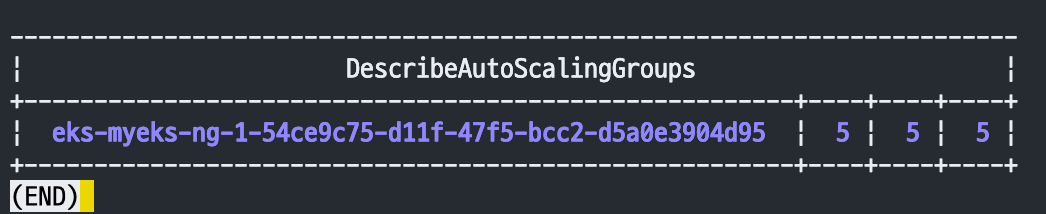
aws autoscaling describe-auto-scaling-groups --query "AutoScalingGroups[? Tags[? (Key=='eks:cluster-name') && Value=='myeks']].[AutoScalingGroupName, MinSize, MaxSize,DesiredCapacity]" --output table

# 노드 4개로 축소
aws autoscaling update-auto-scaling-group --auto-scaling-group-name ${ASG_NAME} --min-size 4 --desired-capacity 4 --max-size 4
aws autoscaling describe-auto-scaling-groups --query "AutoScalingGroups[? Tags[? (Key=='eks:cluster-name') && Value=='myeks']].[AutoScalingGroupName, MinSize, MaxSize,DesiredCapacity]" --output table- check
CA/CAS - Cluster Autoscaler
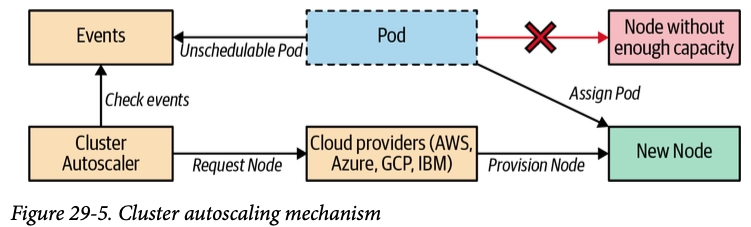
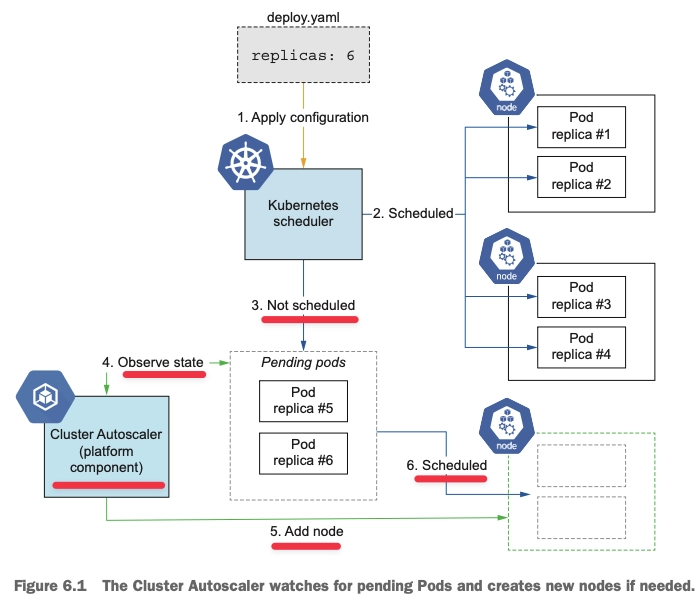
Cluster Autoscaler(CAS) 설정 - Workshop , Helm , Readme
# EKS 노드에 이미 아래 tag가 들어가 있음
# https://github.com/kubernetes/autoscaler/blob/master/cluster-autoscaler/cloudprovider/aws/README.md#auto-discovery-setup
# k8s.io/cluster-autoscaler/enabled : true
# k8s.io/cluster-autoscaler/myeks : owned
aws ec2 describe-instances  --filters Name=tag:Name,Values=myeks-ng-1 --query "Reservations[*].Instances[*].Tags[*]" --output json | jq
aws ec2 describe-instances  --filters Name=tag:Name,Values=myeks-ng-1 --query "Reservations[*].Instances[*].Tags[*]" --output yaml
...
- Key: k8s.io/cluster-autoscaler/myeks
      Value: owned
- Key: k8s.io/cluster-autoscaler/enabled
      Value: 'true'
...


# 현재 autoscaling(ASG) 정보 확인
# aws autoscaling describe-auto-scaling-groups --query "AutoScalingGroups[? Tags[? (Key=='eks:cluster-name') && Value=='클러스터이름']].[AutoScalingGroupName, MinSize, MaxSize,DesiredCapacity]" --output table
aws autoscaling describe-auto-scaling-groups \
    --query "AutoScalingGroups[? Tags[? (Key=='eks:cluster-name') && Value=='myeks']].[AutoScalingGroupName, MinSize, MaxSize,DesiredCapacity]" \
    --output table
-----------------------------------------------------------------
|                   DescribeAutoScalingGroups                   |
+------------------------------------------------+----+----+----+
|  eks-ng1-44c41109-daa3-134c-df0e-0f28c823cb47  |  3 |  3 |  3 |
+------------------------------------------------+----+----+----+

# MaxSize 6개로 수정
export ASG_NAME=$(aws autoscaling describe-auto-scaling-groups --query "AutoScalingGroups[? Tags[? (Key=='eks:cluster-name') && Value=='myeks']].AutoScalingGroupName" --output text)
aws autoscaling update-auto-scaling-group --auto-scaling-group-name ${ASG_NAME} --min-size 3 --desired-capacity 3 --max-size 6

# 확인
aws autoscaling describe-auto-scaling-groups --query "AutoScalingGroups[? Tags[? (Key=='eks:cluster-name') && Value=='myeks']].[AutoScalingGroupName, MinSize, MaxSize,DesiredCapacity]" --output table
-----------------------------------------------------------------
|                   DescribeAutoScalingGroups                   |
+------------------------------------------------+----+----+----+
|  eks-ng1-c2c41e26-6213-a429-9a58-02374389d5c3  |  3 |  6 |  3 |
+------------------------------------------------+----+----+----+

# 배포 : Deploy the Cluster Autoscaler (CAS)
curl -s -O https://raw.githubusercontent.com/kubernetes/autoscaler/master/cluster-autoscaler/cloudprovider/aws/examples/cluster-autoscaler-autodiscover.yaml
...
            - ./cluster-autoscaler
            - --v=4
            - --stderrthreshold=info
            - --cloud-provider=aws
            - --skip-nodes-with-local-storage=false # 로컬 스토리지를 가진 노드를 autoscaler가 scale down할지 결정, false(가능!)
            - --expander=least-waste # 노드를 확장할 때 어떤 노드 그룹을 선택할지를 결정, least-waste는 리소스 낭비를 최소화하는 방식으로 새로운 노드를 선택.
            - --node-group-auto-discovery=asg:tag=k8s.io/cluster-autoscaler/enabled,k8s.io/cluster-autoscaler/<YOUR CLUSTER NAME>
...

sed -i -e "s|<YOUR CLUSTER NAME>|myeks|g" cluster-autoscaler-autodiscover.yaml
kubectl apply -f cluster-autoscaler-autodiscover.yaml

# 확인
kubectl get pod -n kube-system | grep cluster-autoscaler
kubectl describe deployments.apps -n kube-system cluster-autoscaler
kubectl describe deployments.apps -n kube-system cluster-autoscaler | grep node-group-auto-discovery
      --node-group-auto-discovery=asg:tag=k8s.io/cluster-autoscaler/enabled,k8s.io/cluster-autoscaler/myeks

# (옵션) cluster-autoscaler 파드가 동작하는 워커 노드가 퇴출(evict) 되지 않게 설정
kubectl -n kube-system annotate deployment.apps/cluster-autoscaler cluster-autoscaler.kubernetes.io/safe-to-evict="false"
SCALE A CLUSTER WITH Cluster Autoscaler(CA) - Link
# 모니터링
kubectl get nodes -w
while true; do kubectl get node; echo "------------------------------" ; date ; sleep 1; done
while true; do aws ec2 describe-instances --query "Reservations[*].Instances[*].{PrivateIPAdd:PrivateIpAddress,InstanceName:Tags[?Key=='Name']|[0].Value,Status:State.Name}" --filters Name=instance-state-name,Values=running --output text ; echo "------------------------------"; date; sleep 1; done

# Deploy a Sample App
# We will deploy an sample nginx application as a ReplicaSet of 1 Pod
cat << EOF > nginx.yaml
apiVersion: apps/v1
kind: Deployment
metadata:
  name: nginx-to-scaleout
spec:
  replicas: 1
  selector:
    matchLabels:
      app: nginx
  template:
    metadata:
      labels:
        service: nginx
        app: nginx
    spec:
      containers:
      - image: nginx
        name: nginx-to-scaleout
        resources:
          limits:
            cpu: 500m
            memory: 512Mi
          requests:
            cpu: 500m
            memory: 512Mi
EOF
kubectl apply -f nginx.yaml
kubectl get deployment/nginx-to-scaleout

# Scale our ReplicaSet
# Let’s scale out the replicaset to 15
kubectl scale --replicas=15 deployment/nginx-to-scaleout && date

# 확인
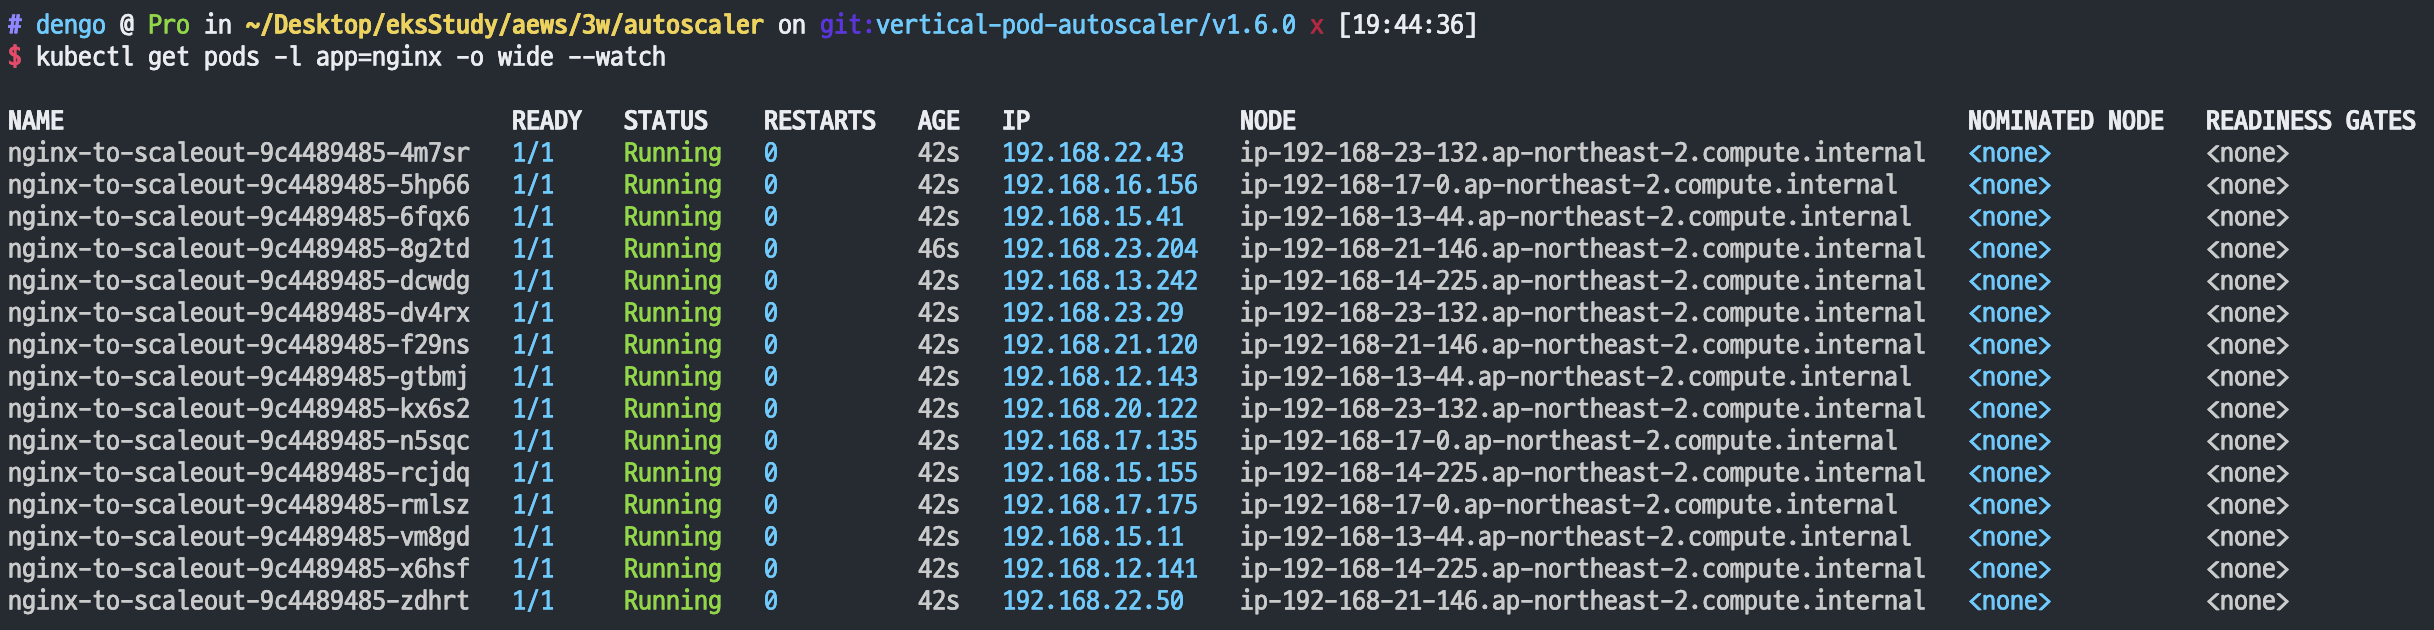
kubectl get pods -l app=nginx -o wide --watch
kubectl -n kube-system logs -f deployment/cluster-autoscaler

# 노드 자동 증가 확인
kubectl get nodes
aws autoscaling describe-auto-scaling-groups \
    --query "AutoScalingGroups[? Tags[? (Key=='eks:cluster-name') && Value=='myeks']].[AutoScalingGroupName, MinSize, MaxSize,DesiredCapacity]" \
    --output table

eks-node-viewer --resources cpu,memory
혹은
eks-node-viewer

# [운영서버 EC2] 최근 1시간 Fleet API 호출 확인 - Link
# https://ap-northeast-2.console.aws.amazon.com/cloudtrailv2/home?region=ap-northeast-2#/events?EventName=CreateFleet
aws cloudtrail lookup-events \
  --lookup-attributes AttributeKey=EventName,AttributeValue=CreateFleet \
  --start-time "$(date -d '1 hour ago' --utc +%Y-%m-%dT%H:%M:%SZ)" \
  --end-time "$(date --utc +%Y-%m-%dT%H:%M:%SZ)"

# (참고) Event name : UpdateAutoScalingGroup
# https://ap-northeast-2.console.aws.amazon.com/cloudtrailv2/home?region=ap-northeast-2#/events?EventName=UpdateAutoScalingGroup


# 디플로이먼트 삭제
kubectl delete -f nginx.yaml && date

# [scale-down] 노드 갯수 축소 : 기본은 10분 후 scale down 됨, 물론 아래 flag 로 시간 수정 가능 >> 그러니 디플로이먼트 삭제 후 10분 기다리고 나서 보자!
# By default, cluster autoscaler will wait 10 minutes between scale down operations,
# you can adjust this using the --scale-down-delay-after-add, --scale-down-delay-after-delete,
# and --scale-down-delay-after-failure flag.
# E.g. --scale-down-delay-after-add=5m to decrease the scale down delay to 5 minutes after a node has been added.

# 터미널1
watch -d kubectl get node- check
Karpenter - Just-in-time Nodes for Any Kubernetes Cluster
- [영상] Karpenter로 극한까지 Amazon EKS 비용 최적화 : 오픈소스 노드 수명 주기 관리 솔루션, 몇 초 만에 컴퓨팅 리소스 제공 - Youtube
- 소개 : 고성능의 지능형 k8s 컴퓨팅 프로비저닝 및 관리 솔루션, 수초 이내에 대응 가능, 더 낮은 컴퓨팅 비용으로 노드 선택
- 지능형의 동적인 인스턴스 유형 선택 - Spot, AWS Graviton 등
- 자동 워크로드 Consolidation 기능
- 일관성 있는 더 빠른 노드 구동시간을 통해 시간/비용 낭비 최소화
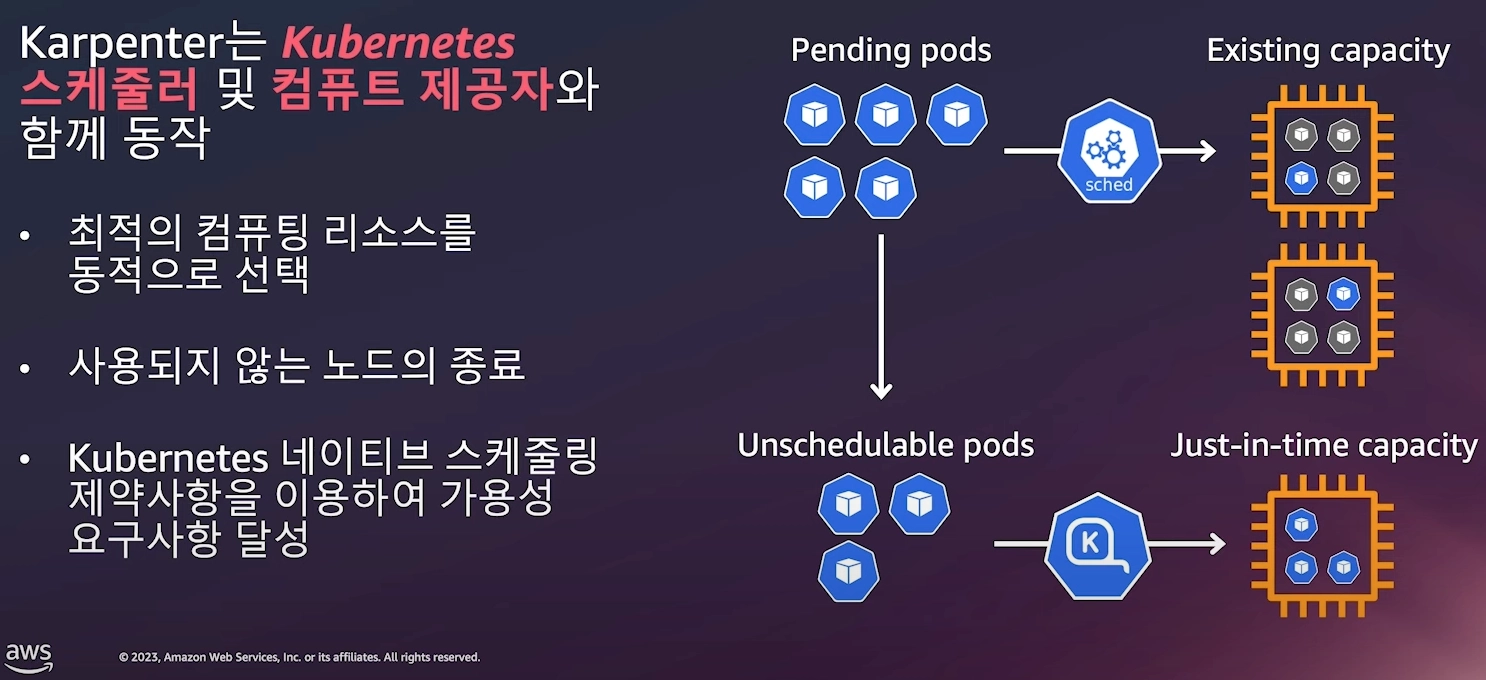
- 소개 : 고성능의 지능형 k8s 컴퓨팅 프로비저닝 및 관리 솔루션, 수초 이내에 대응 가능, 더 낮은 컴퓨팅 비용으로 노드 선택
Getting Started with Karpenter 실습 - Docs , Karpenter Workshop - Link
1. Install utilities
1. AWS CLI : 자격증명 설정
2. kubectl - the Kubernetes CLI
3. eksctl (>= v0.202.0) - the CLI for AWS EKS
4. helm - the package manager for Kubernetes
5. eks-node-view
Set environment variables
# 작업 디렉터리
cd ..
mkdir karpenter
cd karpenter

# 변수 설정
export KARPENTER_NAMESPACE="kube-system"
export KARPENTER_VERSION="1.10.0"
export K8S_VERSION="1.34"

export AWS_PARTITION="aws" # if you are not using standard partitions, you may need to configure to aws-cn / aws-us-gov
export CLUSTER_NAME="gasida-karpenter-demo" # ${USER}-karpenter-demo
export AWS_DEFAULT_REGION="ap-northeast-2"
export AWS_ACCOUNT_ID="$(aws sts get-caller-identity --query Account --output text)"
export TEMPOUT="$(mktemp)"
export ALIAS_VERSION="$(aws ssm get-parameter --name "/aws/service/eks/optimized-ami/${K8S_VERSION}/amazon-linux-2023/x86_64/standard/recommended/image_id" --query Parameter.Value | xargs aws ec2 describe-images --query 'Images[0].Name' --image-ids | sed -r 's/^.*(v[[:digit:]]+).*$/\1/')"

# 확인
echo "${KARPENTER_NAMESPACE}" "${KARPENTER_VERSION}" "${K8S_VERSION}" "${CLUSTER_NAME}" "${AWS_DEFAULT_REGION}" "${AWS_ACCOUNT_ID}" "${TEMPOUT}" "${ALIAS_VERSION}"
- Create a Cluster : eksctl 로 생성
- Use CloudFormation to set up the infrastructure needed by the EKS cluster. See CloudFormation for a complete description of what
cloudformation.yamldoes for Karpenter. - Create a Kubernetes service account and AWS IAM Role, and associate them using IRSA to let Karpenter launch instances.
- Add the Karpenter node role to the aws-auth configmap to allow nodes to connect.
- Use AWS EKS managed node groups for the kube-system and karpenter namespaces. Uncomment fargateProfiles settings (and comment out managedNodeGroups settings) to use Fargate for both namespaces instead.
- Set KARPENTER_IAM_ROLE_ARN variables.
- Create a role to allow spot instances.
- Run Helm to install Karpenter
- Use CloudFormation to set up the infrastructure needed by the EKS cluster. See CloudFormation for a complete description of what
# CloudFormation 스택으로 IAM Policy/Role, SQS, Event/Rule 생성 : 3분 정도 소요
curl -fsSL https://raw.githubusercontent.com/aws/karpenter-provider-aws/v"${KARPENTER_VERSION}"/website/content/en/preview/getting-started/getting-started-with-karpenter/cloudformation.yaml  > "${TEMPOUT}" \
&& aws cloudformation deploy \
  --stack-name "Karpenter-${CLUSTER_NAME}" \
  --template-file "${TEMPOUT}" \
  --capabilities CAPABILITY_NAMED_IAM \
  --parameter-overrides "ClusterName=${CLUSTER_NAME}"


# 클러스터 생성 : EKS 클러스터 생성 15분 정도 소요
eksctl create cluster -f - <<EOF
---
apiVersion: eksctl.io/v1alpha5
kind: ClusterConfig
metadata:
  name: ${CLUSTER_NAME}
  region: ${AWS_DEFAULT_REGION}
  version: "${K8S_VERSION}"
  tags:
    karpenter.sh/discovery: ${CLUSTER_NAME}

iam:
  withOIDC: true
  podIdentityAssociations:
  - namespace: "${KARPENTER_NAMESPACE}"
    serviceAccountName: karpenter
    roleName: ${CLUSTER_NAME}-karpenter
    permissionPolicyARNs:
    - arn:${AWS_PARTITION}:iam::${AWS_ACCOUNT_ID}:policy/KarpenterControllerNodeLifecyclePolicy-${CLUSTER_NAME}
    - arn:${AWS_PARTITION}:iam::${AWS_ACCOUNT_ID}:policy/KarpenterControllerIAMIntegrationPolicy-${CLUSTER_NAME}
    - arn:${AWS_PARTITION}:iam::${AWS_ACCOUNT_ID}:policy/KarpenterControllerEKSIntegrationPolicy-${CLUSTER_NAME}
    - arn:${AWS_PARTITION}:iam::${AWS_ACCOUNT_ID}:policy/KarpenterControllerInterruptionPolicy-${CLUSTER_NAME}
    - arn:${AWS_PARTITION}:iam::${AWS_ACCOUNT_ID}:policy/KarpenterControllerResourceDiscoveryPolicy-${CLUSTER_NAME}

iamIdentityMappings:
- arn: "arn:${AWS_PARTITION}:iam::${AWS_ACCOUNT_ID}:role/KarpenterNodeRole-${CLUSTER_NAME}"
  username: system:node:{{EC2PrivateDNSName}}
  groups:
  - system:bootstrappers
  - system:nodes
  ## If you intend to run Windows workloads, the kube-proxy group should be specified.
  # For more information, see https://github.com/aws/karpenter/issues/5099.
  # - eks:kube-proxy-windows

managedNodeGroups:
- instanceType: m5.large
  amiFamily: AmazonLinux2023
  name: ${CLUSTER_NAME}-ng
  desiredCapacity: 2
  minSize: 1
  maxSize: 10

addons:
- name: eks-pod-identity-agent
EOF


# eks 배포 확인
eksctl get cluster
eksctl get nodegroup --cluster $CLUSTER_NAME
eksctl get iamidentitymapping --cluster $CLUSTER_NAME
eksctl get iamserviceaccount --cluster $CLUSTER_NAME
eksctl get addon --cluster $CLUSTER_NAME

# config rename-context
kubectl ctx
kubectl config rename-context "<각자 자신의 IAM User>@<자신의 Nickname>-karpenter-demo.ap-northeast-2.eksctl.io" "karpenter-demo"
kubectl config rename-context "admin@gasida-karpenter-demo.ap-northeast-2.eksctl.io" "karpenter-demo"

# k8s 확인
kubectl ns default
kubectl cluster-info
kubectl get node --label-columns=node.kubernetes.io/instance-type,eks.amazonaws.com/capacityType,topology.kubernetes.io/zone
kubectl get pod -n kube-system -owide
kubectl get pdb -A
kubectl describe cm -n kube-system aws-auth

# EC2 Spot Fleet의 service-linked-role 생성 확인 : 만들어있는것을 확인하는 거라 아래 에러 출력이 정상!
# If the role has already been successfully created, you will see:
# An error occurred (InvalidInput) when calling the CreateServiceLinkedRole operation: Service role name AWSServiceRoleForEC2Spot has been taken in this account, please try a different suffix.
aws iam create-service-linked-role --aws-service-name spot.amazonaws.com || true

Install Karpenter
```bash
# Logout of helm registry to perform an unauthenticated pull against the public ECR
helm registry logout public.ecr.aws


# Karpenter 설치를 위한 변수 설정 및 확인
export CLUSTER_ENDPOINT="$(aws eks describe-cluster --name "${CLUSTER_NAME}" --query "cluster.endpoint" --output text)"
export KARPENTER_IAM_ROLE_ARN="arn:${AWS_PARTITION}:iam::${AWS_ACCOUNT_ID}:role/${CLUSTER_NAME}-karpenter"
echo "${CLUSTER_ENDPOINT} ${KARPENTER_IAM_ROLE_ARN}"

# karpenter 설치
helm upgrade --install karpenter oci://public.ecr.aws/karpenter/karpenter --version "${KARPENTER_VERSION}" --namespace "${KARPENTER_NAMESPACE}" --create-namespace \
  --set "settings.clusterName=${CLUSTER_NAME}" \
  --set "settings.interruptionQueue=${CLUSTER_NAME}" \
  --set controller.resources.requests.cpu=1 \
  --set controller.resources.requests.memory=1Gi \
  --set controller.resources.limits.cpu=1 \
  --set controller.resources.limits.memory=1Gi \
  --wait

# 확인
helm list -n kube-system
kubectl get-all -n $KARPENTER_NAMESPACE
kubectl get all -n $KARPENTER_NAMESPACE
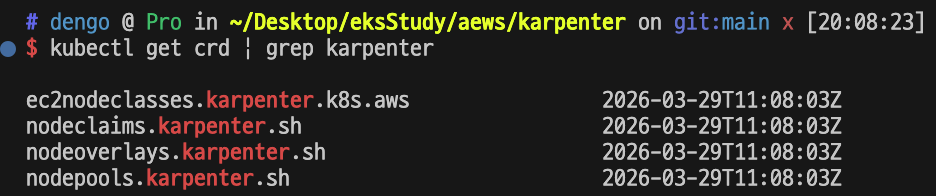
kubectl get crd | grep karpenter
ec2nodeclasses.karpenter.k8s.aws                2026-03-26T09:31:07Z
nodeclaims.karpenter.sh                         2026-03-26T09:31:07Z
nodeoverlays.karpenter.sh                       2026-03-26T09:31:08Z
nodepools.karpenter.sh                          2026-03-26T09:31:08Z
- check
프로메테우스 / 그라파나 설치 - Docs
# 프로메테우스 / 그라파나 설치
helm repo add grafana-charts https://grafana.github.io/helm-charts
helm repo add prometheus-community https://prometheus-community.github.io/helm-charts
helm repo update
kubectl create namespace monitoring

# 프로메테우스 설치
curl -fsSL https://raw.githubusercontent.com/aws/karpenter-provider-aws/v"${KARPENTER_VERSION}"/website/content/en/preview/getting-started/getting-started-with-karpenter/prometheus-values.yaml | envsubst | tee prometheus-values.yaml
helm install --namespace monitoring prometheus prometheus-community/prometheus --values prometheus-values.yaml
extraScrapeConfigs: |
    - job_name: karpenter
      kubernetes_sd_configs:
      - role: endpoints
        namespaces:
          names:
          - kube-system
      relabel_configs:
      - source_labels:
        - __meta_kubernetes_endpoints_name
        - __meta_kubernetes_endpoint_port_name
        action: keep
        regex: karpenter;http-metrics

# 프로메테우스 얼럿매니저 미사용으로 삭제
kubectl delete sts -n monitoring prometheus-alertmanager

# 프로메테우스 접속
kubectl port-forward --namespace monitoring svc/prometheus-server 9090:80 &
open http://127.0.0.1:9090


# 그라파나 설치
curl -fsSL https://raw.githubusercontent.com/aws/karpenter-provider-aws/v"${KARPENTER_VERSION}"/website/content/en/preview/getting-started/getting-started-with-karpenter/grafana-values.yaml | tee grafana-values.yaml
helm install --namespace monitoring grafana grafana-charts/grafana --values grafana-values.yaml
datasources:
  datasources.yaml:
    apiVersion: 1
    datasources:
    - name: Prometheus
      type: prometheus
      version: 1
      url: http://prometheus-server:80
      access: proxy
dashboardProviders:
  dashboardproviders.yaml:
    apiVersion: 1
    providers:
    - name: 'default'
      orgId: 1
      folder: ''
      type: file
      disableDeletion: false
      editable: true
      options:
        path: /var/lib/grafana/dashboards/default
dashboards:
  default:
    capacity-dashboard:
      url: https://karpenter.sh/preview/getting-started/getting-started-with-karpenter/karpenter-capacity-dashboard.json
    performance-dashboard:
      url: https://karpenter.sh/preview/getting-started/getting-started-with-karpenter/karpenter-performance-dashboard.json

# admin 암호
kubectl get secret --namespace monitoring grafana -o jsonpath="{.data.admin-password}" | base64 --decode ; echo
17JUGSjgxK20m4NEnAaG7GzyBjqAMHMFxRnXItLj

# 그라파나 접속
kubectl port-forward --namespace monitoring svc/grafana 3000:80 &
open http://127.0.0.1:3000
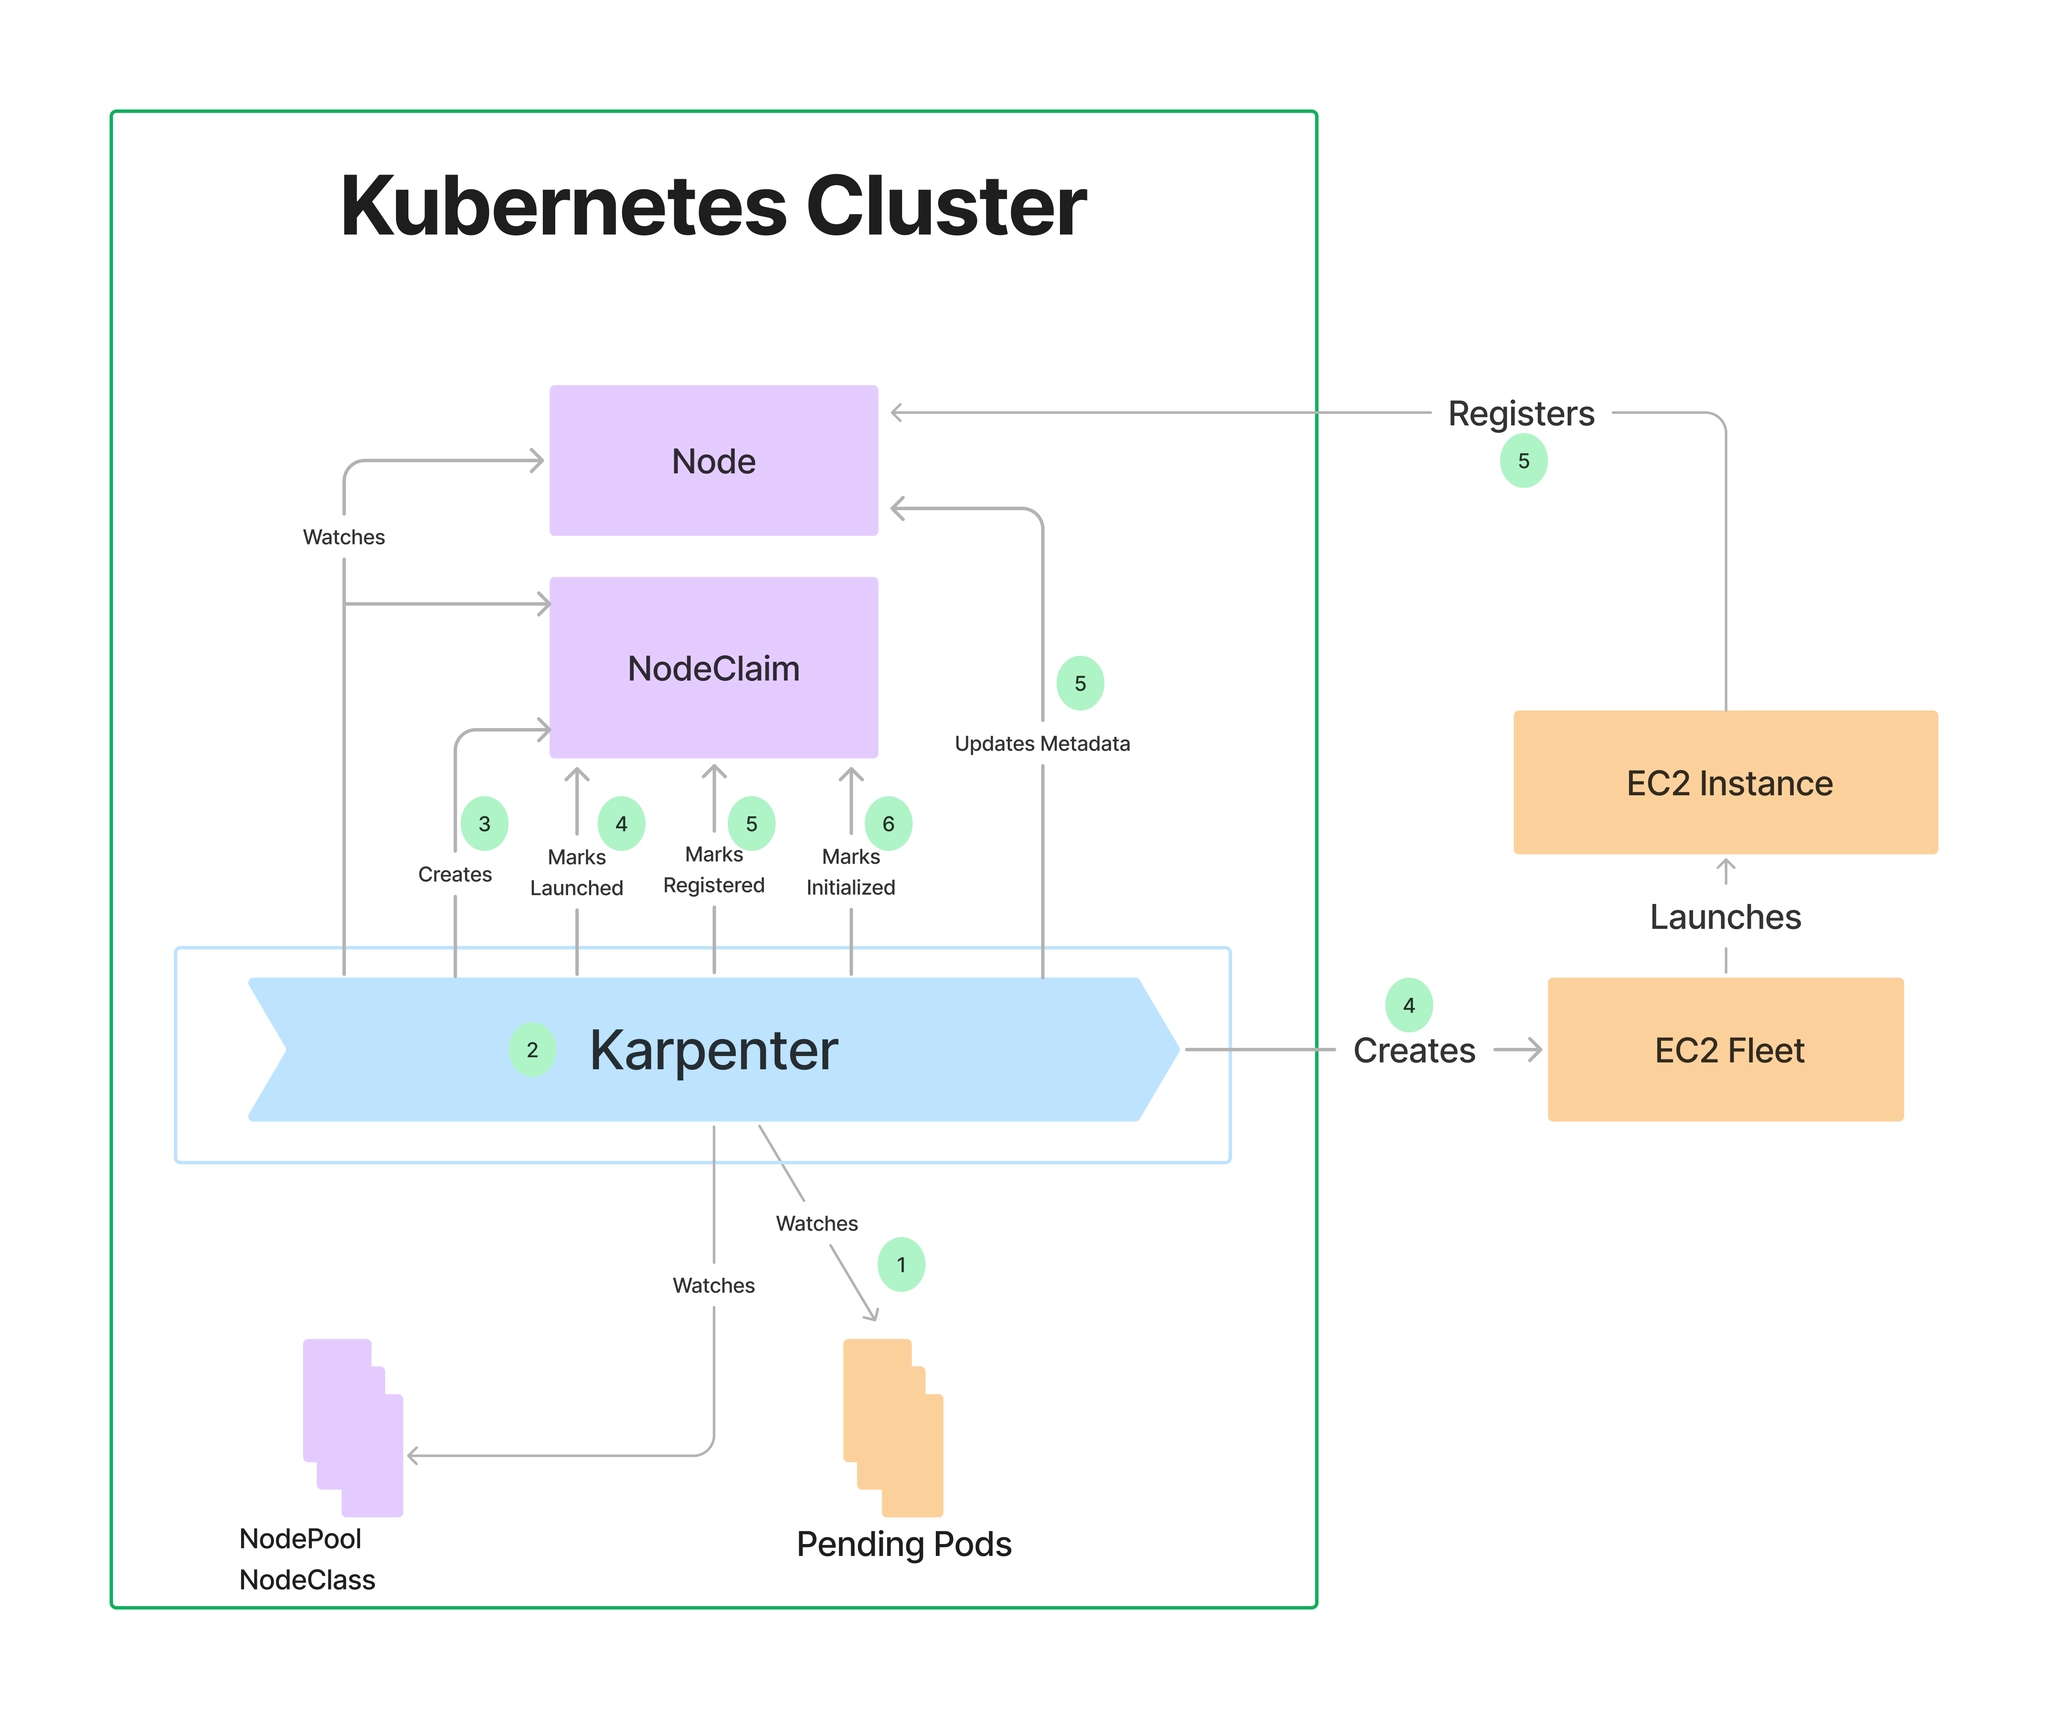
Create NodePool (구 Provisioner) - Workshop , Docs , NodeClaims
# 변수 확인
echo $ALIAS_VERSION
v20260318

# NodePool, EC2NodeClass 생성
cat <<EOF | envsubst | kubectl apply -f -
apiVersion: karpenter.sh/v1
kind: NodePool
metadata:
  name: default
spec:
  template:
    spec:
      requirements:
        - key: kubernetes.io/arch
          operator: In
          values: ["amd64"]
        - key: kubernetes.io/os
          operator: In
          values: ["linux"]
        - key: karpenter.sh/capacity-type
          operator: In
          values: ["on-demand"]
        - key: karpenter.k8s.aws/instance-category
          operator: In
          values: ["c", "m", "r"]
        - key: karpenter.k8s.aws/instance-generation
          operator: Gt
          values: ["2"]
      nodeClassRef:
        group: karpenter.k8s.aws
        kind: EC2NodeClass
        name: default
      expireAfter: 720h # 30 * 24h = 720h
  limits:
    cpu: 1000
  disruption:
    consolidationPolicy: WhenEmptyOrUnderutilized
    consolidateAfter: 1m
---
apiVersion: karpenter.k8s.aws/v1
kind: EC2NodeClass
metadata:
  name: default
spec:
  role: "KarpenterNodeRole-${CLUSTER_NAME}"       # replace with your cluster name
  amiSelectorTerms:
    - alias: "al2023@${ALIAS_VERSION}"            # ex) al2023@latest
  subnetSelectorTerms:
    - tags:
        karpenter.sh/discovery: "${CLUSTER_NAME}" # replace with your cluster name
  securityGroupSelectorTerms:
    - tags:
        karpenter.sh/discovery: "${CLUSTER_NAME}" # replace with your cluster name
EOF

# 확인
kubectl get nodepool,ec2nodeclass,nodeclaims- check
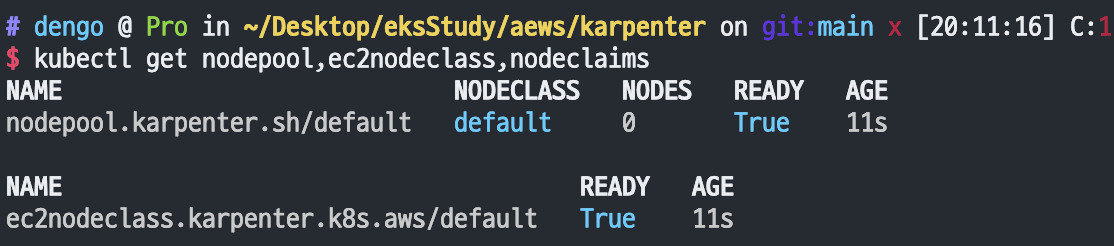
Scale up deployment : This deployment uses the pause image and starts with zero replicas.
# pause 파드 1개에 CPU 1개 최소 보장 할당할 수 있게 디플로이먼트 배포
cat <<EOF | kubectl apply -f -
apiVersion: apps/v1
kind: Deployment
metadata:
  name: inflate
spec:
  replicas: 0
  selector:
    matchLabels:
      app: inflate
  template:
    metadata:
      labels:
        app: inflate
    spec:
      terminationGracePeriodSeconds: 0
      securityContext:
        runAsUser: 1000
        runAsGroup: 3000
        fsGroup: 2000
      containers:
      - name: inflate
        image: public.ecr.aws/eks-distro/kubernetes/pause:3.7
        resources:
          requests:
            cpu: 1
        securityContext:
          allowPrivilegeEscalation: false
EOF


# [신규 터미널] 모니터링
eks-node-viewer --resources cpu,memory
eks-node-viewer --resources cpu,memory --node-selector "karpenter.sh/registered=true" --extra-labels eks-node-viewer/node-age


# Scale up
kubectl get pod
kubectl scale deployment inflate --replicas 5

# 출력 로그 분석해보자!
kubectl logs -f -n "${KARPENTER_NAMESPACE}" -l app.kubernetes.io/name=karpenter -c controller
kubectl logs -f -n "${KARPENTER_NAMESPACE}" -l app.kubernetes.io/name=karpenter -c controller | jq '.'
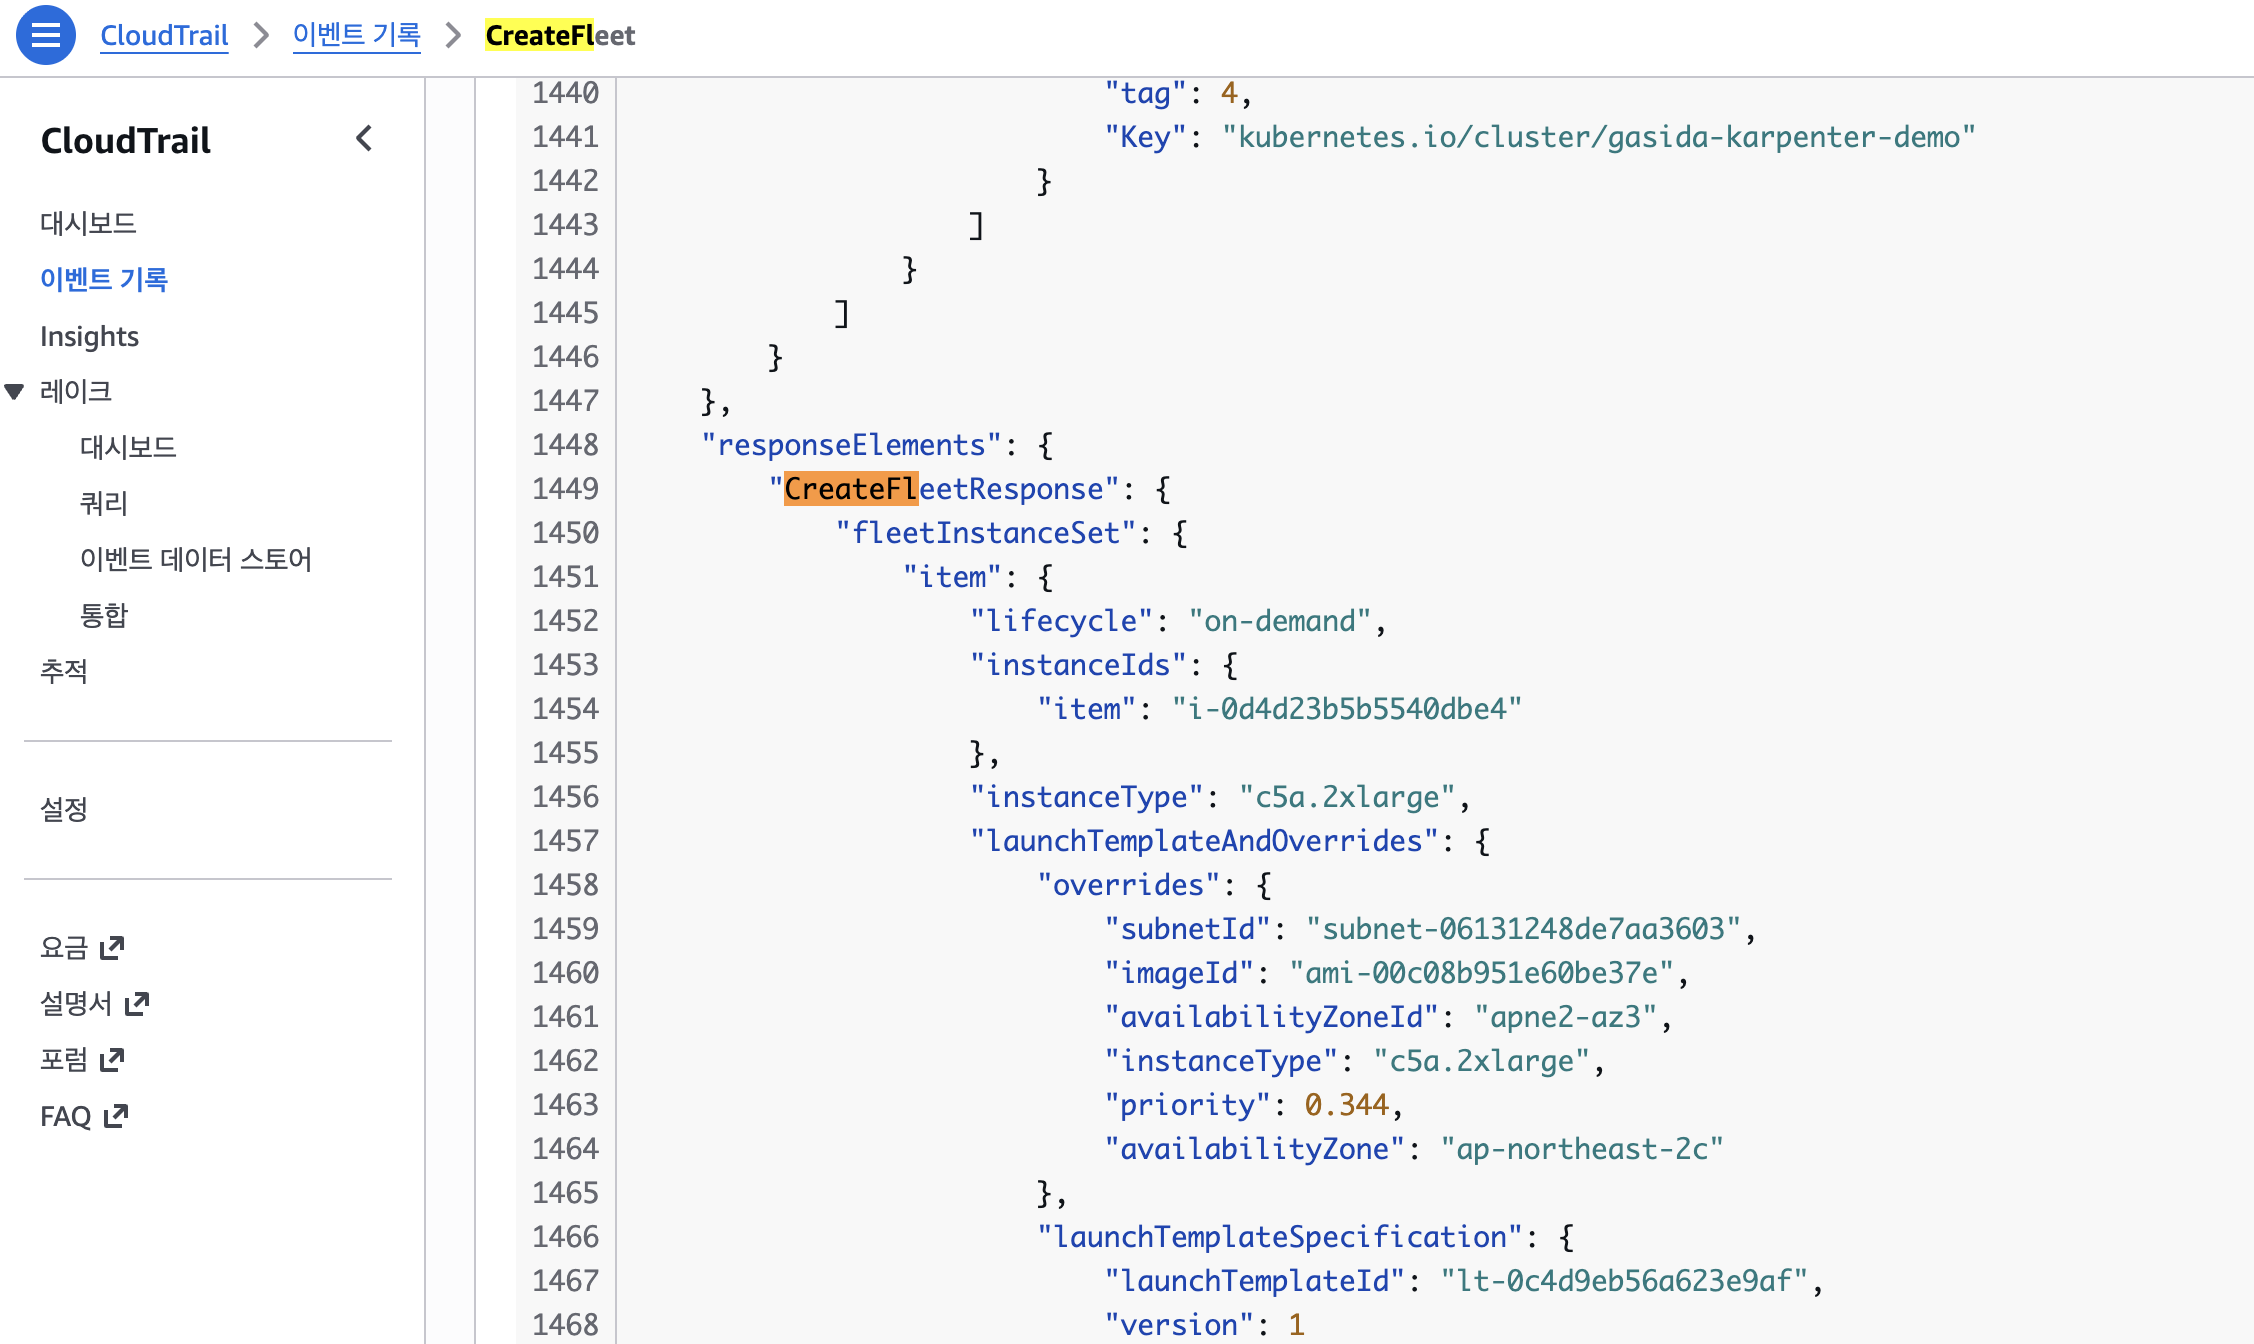
kubectl logs -n "${KARPENTER_NAMESPACE}" -l app.kubernetes.io/name=karpenter -c controller | grep 'launched nodeclaim' | jq '.'
{
  "level": "INFO",
  "time": "2026-03-26T09:36:32.718Z",
  "logger": "controller",
  "message": "launched nodeclaim",
  "commit": "d80cb86",
  "controller": "nodeclaim.lifecycle",
  "controllerGroup": "karpenter.sh",
  "controllerKind": "NodeClaim",
  "NodeClaim": {
    "name": "default-cnx7g"
  },
  "namespace": "",
  "name": "default-cnx7g",
  "reconcileID": "23bb6df5-4130-4eb4-90b7-839eb27d3247",
  "provider-id": "aws:///ap-northeast-2a/i-0e979d33e854e4d08",
  "instance-type": "c5a.2xlarge",
  "zone": "ap-northeast-2a",
  "capacity-type": "on-demand",
  "allocatable": {
    "cpu": "7910m",
    "ephemeral-storage": "17Gi",
    "memory": "14162Mi",
    "pods": "58",
    "vpc.amazonaws.com/pod-eni": "38"
  }
}

# 확인
kubectl get nodeclaims
NAME            TYPE          CAPACITY    ZONE              NODE                                                 READY   AGE
default-cnx7g   c5a.2xlarge   on-demand   ap-northeast-2a   ip-192-168-134-218.ap-northeast-2.compute.internal   True    45s

kubectl describe nodeclaims
...
Spec:
  Expire After:  720h
  Node Class Ref:
    Group:  karpenter.k8s.aws
    Kind:   EC2NodeClass
    Name:   default
  Requirements:
    Key:       karpenter.sh/capacity-type
    Operator:  In
    Values:
      on-demandz
    Key:       karpenter.k8s.aws/instance-category
    Operator:  In
    Values:
      c
      m
      r
    Key:       node.kubernetes.io/instance-type
    Operator:  In
    Values:
      c4.2xlarge
      c4.4xlarge
      c5.2xlarge
      c5.4xlarge
      c5a.2xlarge
      c5a.4xlarge
      c5a.8xlarge
      c5d.2xlarge
      c5d.4xlarge
      ...
    ...
  Resources:
    Requests:
      Cpu:   4150m
      Pods:  8
Status:
  Allocatable:
    Cpu:                        7910m
    Ephemeral - Storage:        17Gi
    Memory:                     14162Mi
    Pods:                       58
    vpc.amazonaws.com/pod-eni:  38
  Capacity:
    Cpu:                        8
    Ephemeral - Storage:        20Gi
    Memory:                     15155Mi
    Pods:                       58
    vpc.amazonaws.com/pod-eni:  38
...

#
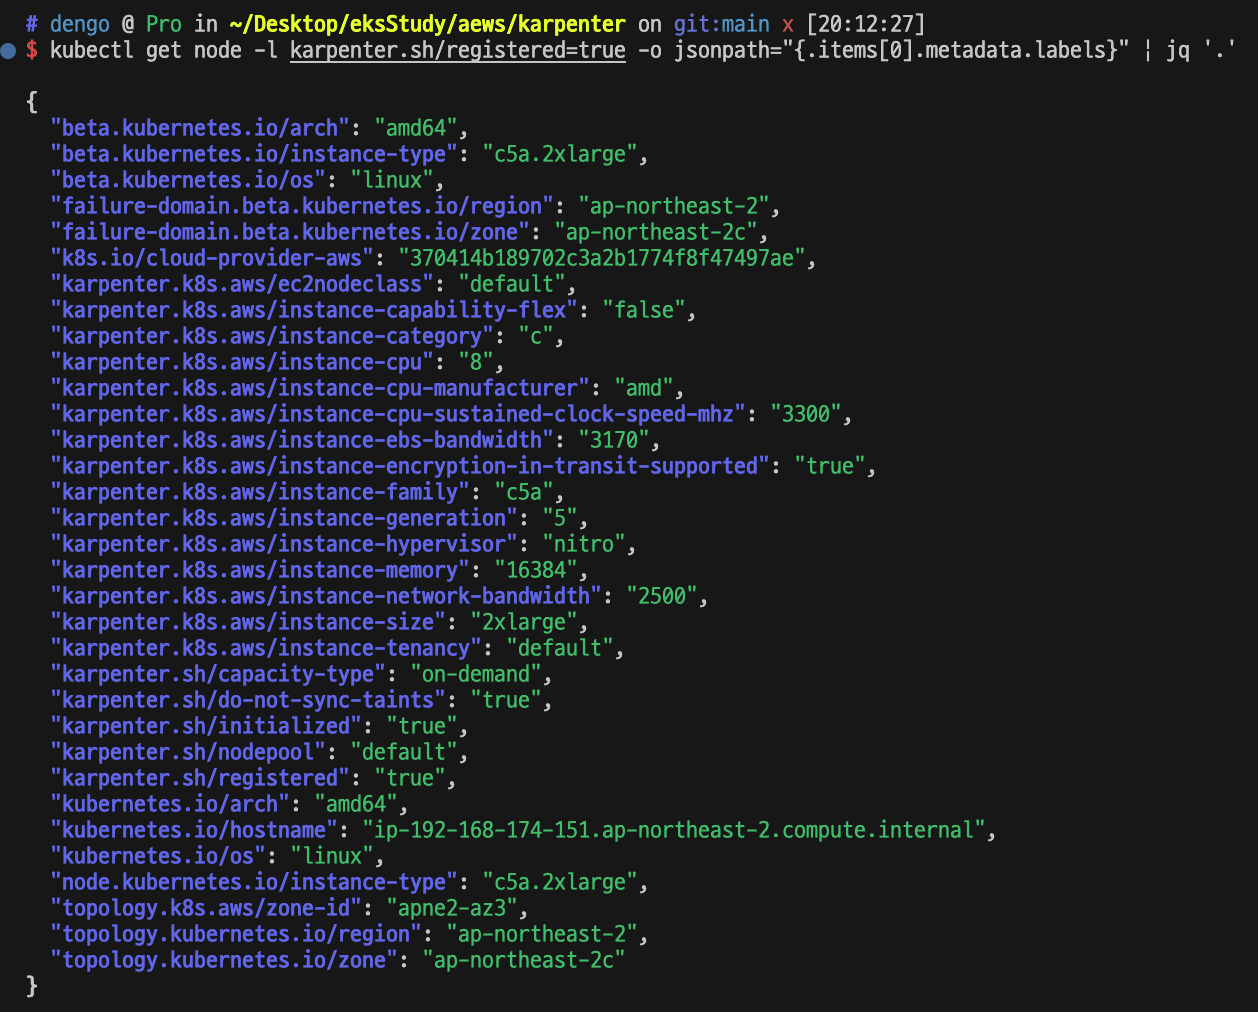
kubectl get node -l karpenter.sh/registered=true -o jsonpath="{.items[0].metadata.labels}" | jq '.'
...
  "karpenter.sh/initialized": "true",
  "karpenter.sh/nodepool": "default",
  "karpenter.sh/registered": "true",
...

# (옵션) 더욱 더 Scale up!
kubectl scale deployment inflate --replicas 30
kubectl logs -f -n "${KARPENTER_NAMESPACE}" -l app.kubernetes.io/name=karpenter -c controller | jq '.'- check
Scale Down deployment
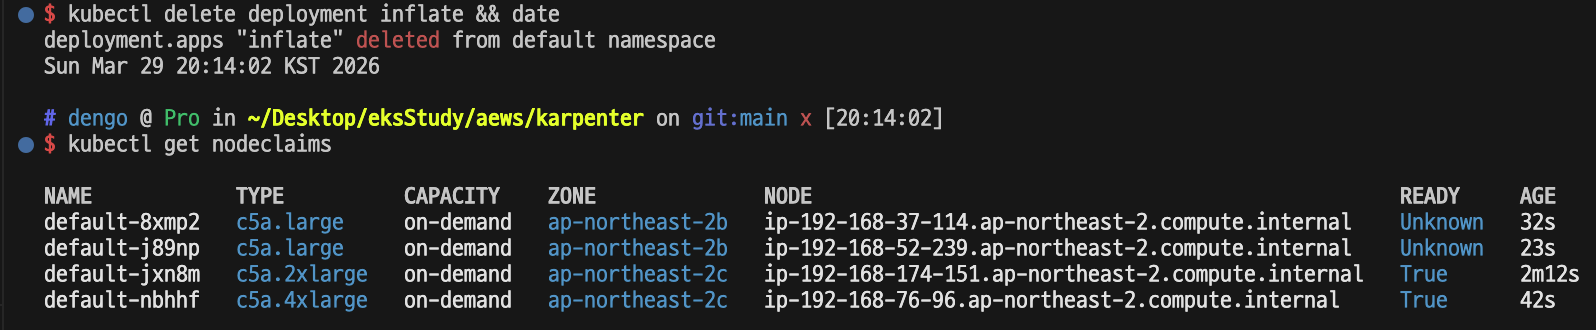
# Now, delete the deployment. After a short amount of time, Karpenter should terminate the empty nodes due to consolidation.
kubectl delete deployment inflate && date

# 출력 로그 분석해보자!
kubectl logs -f -n "${KARPENTER_NAMESPACE}" -l app.kubernetes.io/name=karpenter -c controller | jq '.'
...
{
  "level": "INFO",
  "time": "2025-03-02T06:53:28.780Z",
  "logger": "controller",
  "message": "disrupting nodeclaim(s) via delete, terminating 1 nodes (1 pods) ip-192-168-131-97.ap-northeast-2.compute.internal/c5a.large/on-demand",
  "commit": "058c665",
  "controller": "disruption",
  "namespace": "",
  "name": "",
  "reconcileID": "86a3a45c-2604-4a71-808a-21290301d096",
  "command-id": "51914aee-4e09-436f-af6d-794163c3d1c2",
  "reason": "underutilized"
}
{
  "level": "INFO",
  "time": "2025-03-02T06:53:29.532Z",
  "logger": "controller",
  "message": "tainted node",
  "commit": "058c665",
  "controller": "node.termination",
  "controllerGroup": "",
  "controllerKind": "Node",
  "Node": {
    "name": "ip-192-168-131-97.ap-northeast-2.compute.internal"
  },
  "namespace": "",
  "name": "ip-192-168-131-97.ap-northeast-2.compute.internal",
  "reconcileID": "617bcb4d-5498-44d9-ba1e-6c8b7d97c405",
  "taint.Key": "karpenter.sh/disrupted",
  "taint.Value": "",
  "taint.Effect": "NoSchedule"
}
{
  "level": "INFO",
  "time": "2025-03-02T06:54:03.234Z",
  "logger": "controller",
  "message": "deleted node",
  "commit": "058c665",
  "controller": "node.termination",
  "controllerGroup": "",
  "controllerKind": "Node",
  "Node": {
    "name": "ip-192-168-131-97.ap-northeast-2.compute.internal"
  },
  "namespace": "",
  "name": "ip-192-168-131-97.ap-northeast-2.compute.internal",
  "reconcileID": "8c71fb19-b7ae-4037-afef-fbf1c7343f84"
}
{
  "level": "INFO",
  "time": "2025-03-02T06:54:03.488Z",
  "logger": "controller",
  "message": "deleted nodeclaim",
  "commit": "058c665",
  "controller": "nodeclaim.lifecycle",
  "controllerGroup": "karpenter.sh",
  "controllerKind": "NodeClaim",
  "NodeClaim": {
    "name": "default-mfkgp"
  },
  "namespace": "",
  "name": "default-mfkgp",
  "reconcileID": "757b4d88-2bf2-412c-bf83-3149f9517d85",
  "Node": {
    "name": "ip-192-168-131-97.ap-northeast-2.compute.internal"
  },
  "provider-id": "aws:///ap-northeast-2a/i-00f22c8bde3faf646"
}
{
  "level": "INFO",
  "time": "2025-03-02T07:25:55.661Z",
  "logger": "controller",
  "message": "disrupting nodeclaim(s) via delete, terminating 1 nodes (0 pods) ip-192-168-176-171.ap-northeast-2.compute.internal/c5a.2xlarge/on-demand",
  "commit": "058c665",
  "controller": "disruption",
  "namespace": "",
  "name": "",
  "reconcileID": "0942417e-7ecb-437a-85db-adc553ccade9",
  "command-id": "b2b7c689-91ca-43c5-ac1c-2052bf7418c1",
  "reason": "empty"
}
{
  "level": "INFO",
  "time": "2025-03-02T07:25:56.783Z",
  "logger": "controller",
  "message": "tainted node",
  "commit": "058c665",
  "controller": "node.termination",
  "controllerGroup": "",
  "controllerKind": "Node",
  "Node": {
    "name": "ip-192-168-176-171.ap-northeast-2.compute.internal"
  },
  "namespace": "",
  "name": "ip-192-168-176-171.ap-northeast-2.compute.internal",
  "reconcileID": "6254e6be-2445-4402-b829-0bb75fa540e0",
  "taint.Key": "karpenter.sh/disrupted",
  "taint.Value": "",
  "taint.Effect": "NoSchedule"
}
{
  "level": "INFO",
  "time": "2025-03-02T07:26:49.195Z",
  "logger": "controller",
  "message": "deleted node",
  "commit": "058c665",
  "controller": "node.termination",
  "controllerGroup": "",
  "controllerKind": "Node",
  "Node": {
    "name": "ip-192-168-176-171.ap-northeast-2.compute.internal"
  },
  "namespace": "",
  "name": "ip-192-168-176-171.ap-northeast-2.compute.internal",
  "reconcileID": "6c126a63-8bfa-4828-8ef6-5d22b8c1e7cc"
}

#
kubectl get nodeclaims
- check
삭제
# Karpenter helm 삭제
helm uninstall karpenter --namespace "${KARPENTER_NAMESPACE}"

# Service(CLB) 삭제
kubectl delete svc -n kube-system kube-ops-view

# EC2 Launch Template 삭제
aws ec2 describe-launch-templates --filters "Name=tag:karpenter.k8s.aws/cluster,Values=${CLUSTER_NAME}" |
    jq -r ".LaunchTemplates[].LaunchTemplateName" |
    xargs -I{} aws ec2 delete-launch-template --launch-template-name {}

# 클러스터 삭제
eksctl delete cluster --name "${CLUSTER_NAME}"

# Karpenter IAM Role 등 생성한 CloudFormation 삭제
aws cloudformation delete-stack --stack-name "Karpenter-${CLUSTER_NAME}"
Fargate - Nodeless(Serverless) compute engine for containers
테라폼으로 실습 환경 배포 : EKS, fargate profile
#
git clone https://github.com/aws-ia/terraform-aws-eks-blueprints
tree terraform-aws-eks-blueprints/patterns
cd terraform-aws-eks-blueprints/patterns/fargate-serverless
엄청오래걸린다.. ㅠ
# 배포 : EKS, Add-ons, fargate profile - 13분 소요
terraform apply -target="module.eks" -auto-approve
terraform apply -target="module.eks_blueprints_addons" -auto-approve
terraform apply -auto-approve


# 배포 완료 후 확인
terraform state list
module.eks.data.aws_caller_identity.current
...

terraform output
...

# EKS 자격증명
$(terraform output -raw configure_kubectl) # aws eks --region ap-northeast-2 update-kubeconfig --name fargate-serverless
cat ~/.kube/config

# kubectl context 변경
kubectl ctx
kubectl config rename-context "arn:aws:eks:ap-northeast-2:$(aws sts get-caller-identity --query 'Account' --output text):cluster/fargate-serverless" "fargate-lab"

# k8s 노드, 파드 정보 확인
kubectl ns default
kubectl cluster-info
kubectl get node
kubectl get pod -A

# 상세 정보 확인
terraform show
...
terraform state list
terraform state show 'module.eks.aws_eks_cluster.this[0]'
terraform state show 'module.eks.data.tls_certificate.this[0]'
terraform state show 'module.eks.aws_cloudwatch_log_group.this[0]'
terraform state show 'module.eks.aws_eks_access_entry.this["cluster_creator"]'
terraform state show 'module.eks.aws_iam_openid_connect_provider.oidc_provider[0]'
terraform state show 'module.eks.data.aws_partition.current'
terraform state show 'module.eks.aws_iam_policy.cluster_encryption[0]'
terraform state show 'module.eks.aws_iam_role.this[0]'

terraform state show 'module.eks.time_sleep.this[0]'
terraform state show 'module.eks.module.kms.aws_kms_key.this[0]'
terraform state show 'module.eks.module.fargate_profile["kube_system"].aws_eks_fargate_profile.this[0]'
...- check

기본 정보 확인
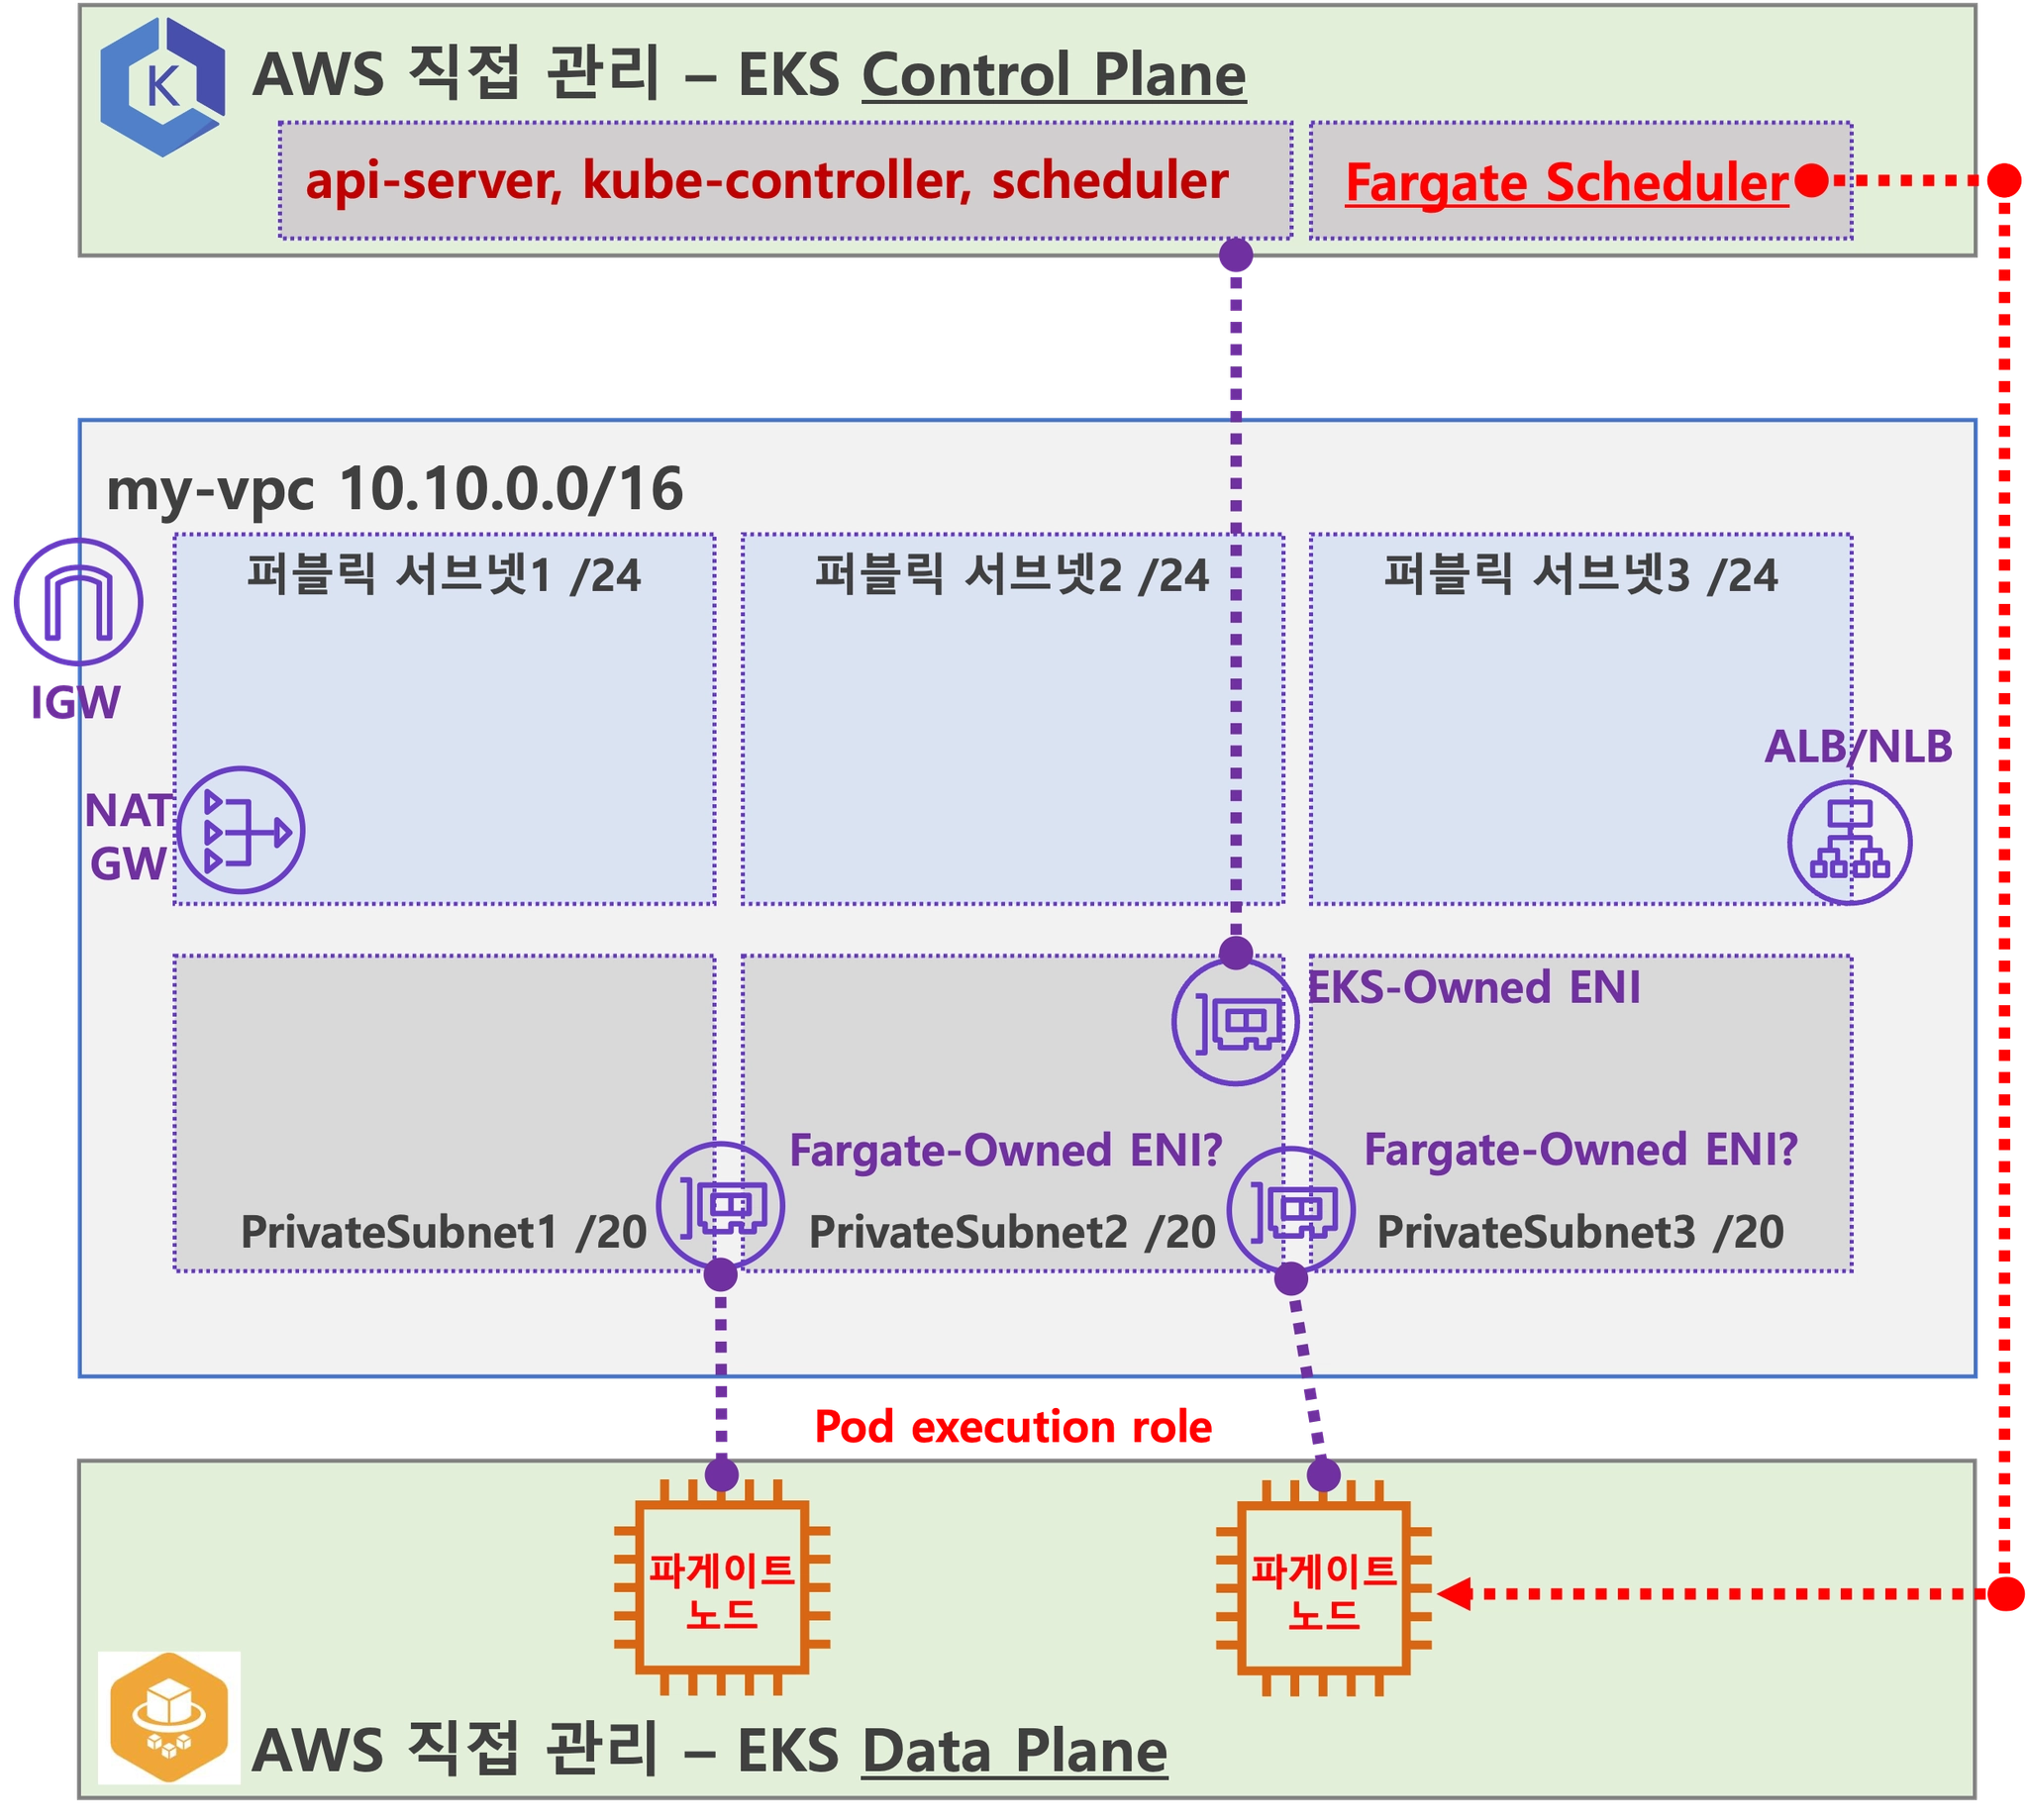
# k8s api service 확인 : ENDPOINTS 의 IP는 EKS Owned-ENI 2개
kubectl get svc,ep
NAME                 TYPE        CLUSTER-IP   EXTERNAL-IP   PORT(S)   AGE
service/kubernetes   ClusterIP   172.20.0.1   <none>        443/TCP   42m

NAME                   ENDPOINTS                           AGE
endpoints/kubernetes   10.10.21.253:443,10.10.32.164:443   42m


# node 확인 : 노드(Micro VM) 4대
kubectl get csr
kubectl get node -owide
NAME                                                      STATUS   ROLES    AGE     VERSION               INTERNAL-IP    EXTERNAL-IP   OS-IMAGE         KERNEL-VERSION                  CONTAINER-RUNTIME
fargate-ip-10-10-15-159.ap-northeast-2.compute.internal   Ready    <none>   7m50s   v1.30.8-eks-2d5f260   10.10.15.159   <none>        Amazon Linux 2   5.10.234-225.895.amzn2.x86_64   containerd://1.7.25
fargate-ip-10-10-30-57.ap-northeast-2.compute.internal    Ready    <none>   7m46s   v1.30.8-eks-2d5f260   10.10.30.57    <none>        Amazon Linux 2   5.10.234-225.895.amzn2.x86_64   containerd://1.7.25
fargate-ip-10-10-41-163.ap-northeast-2.compute.internal   Ready    <none>   7m46s   v1.30.8-eks-2d5f260   10.10.41.163   <none>        Amazon Linux 2   5.10.234-225.895.amzn2.x86_64   containerd://1.7.25
fargate-ip-10-10-43-78.ap-northeast-2.compute.internal    Ready    <none>   7m41s   v1.30.8-eks-2d5f260   10.10.43.78    <none>        Amazon Linux 2   5.10.234-225.895.amzn2.x86_64   containerd://1.7.25

kubectl describe node | grep eks.amazonaws.com/compute-type
Labels:             eks.amazonaws.com/compute-type=fargate
Taints:             eks.amazonaws.com/compute-type=fargate:NoSchedule
...

# 파드 확인 : 파드의 IP와 노드의 IP가 같다!
kubectl get pdb -n kube-system
kubectl get pod -A -owide
NAMESPACE     NAME                                            READY   STATUS    RESTARTS   AGE   IP             NODE                                                      NOMINATED NODE   READINESS GATES
kube-system   aws-load-balancer-controller-8577658566-5qkr6   1/1     Running   0          30m   10.10.15.159   fargate-ip-10-10-15-159.ap-northeast-2.compute.internal   <none>           <none>
kube-system   aws-load-balancer-controller-8577658566-hl72j   1/1     Running   0          30m   10.10.41.163   fargate-ip-10-10-41-163.ap-northeast-2.compute.internal   <none>           <none>
kube-system   coredns-64696d8b7f-2cvlv                        1/1     Running   0          30m   10.10.43.78    fargate-ip-10-10-43-78.ap-northeast-2.compute.internal    <none>           <none>
kube-system   coredns-64696d8b7f-s45g7                        1/1     Running   0          30m   10.10.30.57    fargate-ip-10-10-30-57.ap-northeast-2.compute.internal    <none>           <none>


# aws-load-balancer-webhook-service , eks-extension-metrics-api?
kubectl get svc,ep -n kube-system
NAME                                        TYPE        CLUSTER-IP      EXTERNAL-IP   PORT(S)                  AGE
service/aws-load-balancer-webhook-service   ClusterIP   172.20.72.191   <none>        443/TCP                  34m
service/eks-extension-metrics-api           ClusterIP   172.20.173.28   <none>        443/TCP                  42m

# eks-extension-metrics-api?
kubectl get apiservices.apiregistration.k8s.io | grep eks
v1.metrics.eks.amazonaws.com           kube-system/eks-extension-metrics-api   True        53m

kubectl get --raw "/apis/metrics.eks.amazonaws.com" | jq
kubectl get --raw "/apis/metrics.eks.amazonaws.com/v1" | jq


# configmap 확인
kubectl get cm -n kube-system
...

# aws-auth 보다 우선해서 IAM access entry 가 있음을 참고.
# 기본 관리노드 보다 system:node-proxier 그룹이 추가되어 있음.
# fargate profile 이 2개인데, 그 profile 갯수만큼 있음.
kubectl get cm -n kube-system aws-auth -o yaml
...
  mapRoles: |
    - groups:
      - system:bootstrappers
      - system:nodes
      - system:node-proxier
      rolearn: arn:aws:iam::911283464785:role/kube-system-2025031115064156060000000f
      username: system:node:{{SessionName}}
    ...

#
kubectl rbac-tool lookup system:node-proxier
  SUBJECT             | SUBJECT TYPE | SCOPE       | NAMESPACE | ROLE                | BINDING
----------------------+--------------+-------------+-----------+---------------------+-------------------------
  system:node-proxier | Group        | ClusterRole |           | system:node-proxier | eks:kube-proxy-fargate

kubectl rolesum -k Group system:node-proxier
...
Policies:
• [CRB] */eks:kube-proxy-fargate ⟶  [CR] */system:node-proxier
  Resource                         Name  Exclude  Verbs  G L W C U P D DC
  endpoints                        [*]     [-]     [-]   ✖ ✔ ✔ ✖ ✖ ✖ ✖ ✖
  endpointslices.discovery.k8s.io  [*]     [-]     [-]   ✖ ✔ ✔ ✖ ✖ ✖ ✖ ✖
  events.[,events.k8s.io]          [*]     [-]     [-]   ✖ ✖ ✖ ✔ ✔ ✔ ✖ ✖
  nodes                            [*]     [-]     [-]   ✔ ✔ ✔ ✖ ✖ ✖ ✖ ✖
  services                         [*]     [-]     [-]   ✖ ✔ ✔ ✖ ✖ ✖ ✖ ✖


#
kubectl get cm -n kube-system amazon-vpc-cni -o yaml
apiVersion: v1
data:
  branch-eni-cooldown: "60"
  minimum-ip-target: "3"
  warm-ip-target: "1"
  warm-prefix-target: "0"
  ...

# coredns 설정 내용
kubectl get cm -n kube-system coredns -o yaml

# 인증서 작성되어 있음 : client-ca-file , requestheader-client-ca-file
kubectl get cm -n kube-system extension-apiserver-authentication -o yaml

#
kubectl get cm -n kube-system kube-proxy -o yaml
kubectl get cm -n kube-system kube-proxy-config -o yaml
apiVersion: v1
data:
  config: |-
    apiVersion: kubeproxy.config.k8s.io/v1alpha1
    bindAddress: 0.0.0.0
    clientConnection:
      acceptContentTypes: ""
      burst: 10
      contentType: application/vnd.kubernetes.protobuf
      kubeconfig: /var/lib/kube-proxy/kubeconfig
      qps: 5
    clusterCIDR: ""
    configSyncPeriod: 15m0s
    conntrack:
      maxPerCore: 32768
      min: 131072
      tcpCloseWaitTimeout: 1h0m0s
      tcpEstablishedTimeout: 24h0m0s
    enableProfiling: false
    healthzBindAddress: 0.0.0.0:10256
    hostnameOverride: ""
    iptables:
      masqueradeAll: false
      masqueradeBit: 14
      minSyncPeriod: 0s
      syncPeriod: 30s
    ipvs:
      excludeCIDRs: null
      minSyncPeriod: 0s
      scheduler: ""
      syncPeriod: 30s
    kind: KubeProxyConfiguration
    metricsBindAddress: 0.0.0.0:10249
    mode: "iptables"
    nodePortAddresses: null
    oomScoreAdj: -998
    portRange: ""
coredns 파드 상세 정보 확인 : schedulerName: fargate-scheduler
# coredns 파드 상세 정보 확인
kubectl get pod -n kube-system -l k8s-app=kube-dns -o yaml
...
  spec:
    affinity:
      nodeAffinity:
        requiredDuringSchedulingIgnoredDuringExecution:
          nodeSelectorTerms:
          - matchExpressions:
            - key: kubernetes.io/os
              operator: In
              values:
              - linux
            - key: kubernetes.io/arch
              operator: In
              values:
              - amd64
              - arm64
      podAntiAffinity:
        preferredDuringSchedulingIgnoredDuringExecution:
        - podAffinityTerm:
            labelSelector:
              matchExpressions:
              - key: k8s-app
                operator: In
                values:
                - kube-dns
            topologyKey: kubernetes.io/hostname
          weight: 100
      ...
      resources:
        limits:
          cpu: 250m
          memory: 256M
        requests:
          cpu: 250m
          memory: 256M
      ...
      securityContext:
        allowPrivilegeEscalation: false
        capabilities:
          add:
          - NET_BIND_SERVICE
          drop:
          - ALL
        readOnlyRootFilesystem: true
    ...
    dnsPolicy: Default
    enableServiceLinks: true
    nodeName: fargate-ip-10-10-34-186.ap-northeast-2.compute.internal
    preemptionPolicy: PreemptLowerPriority
    priority: 2000001000
    priorityClassName: system-node-critical
    restartPolicy: Always
    schedulerName: fargate-scheduler
    securityContext: {}
    serviceAccount: coredns
    serviceAccountName: coredns
    terminationGracePeriodSeconds: 30
    tolerations:
    - effect: NoSchedule
      key: node-role.kubernetes.io/control-plane
    - key: CriticalAddonsOnly
      operator: Exists
    - effect: NoExecute
      key: node.kubernetes.io/not-ready
      operator: Exists
      tolerationSeconds: 300
    - effect: NoExecute
      key: node.kubernetes.io/unreachable
      operator: Exists
      tolerationSeconds: 300
    topologySpreadConstraints:
    - labelSelector:
        matchLabels:
          k8s-app: kube-dns
      maxSkew: 1
      topologyKey: topology.kubernetes.io/zone
      whenUnsatisfiable: ScheduleAnyway
    ...
    qosClass: Guaranteed
EKS - Compute(Nodes, Fargate profile - Pod execution role 확인), Add-ons, Access(IAM access entry), Control plane logs
fargate 에 kube-ops-view
# helm 배포
helm repo add geek-cookbook https://geek-cookbook.github.io/charts/
helm install kube-ops-view geek-cookbook/kube-ops-view --version 1.2.2 --set env.TZ="Asia/Seoul" --namespace kube-system

# 포트 포워딩
kubectl port-forward deployment/kube-ops-view -n kube-system 8080:8080 &

# 접속 주소 확인 : 각각 1배, 1.5배, 3배 크기
echo -e "KUBE-OPS-VIEW URL = http://localhost:8080"
echo -e "KUBE-OPS-VIEW URL = http://localhost:8080/#scale=1.5"
echo -e "KUBE-OPS-VIEW URL = http://localhost:8080/#scale=3"

open "http://127.0.0.1:8080/#scale=1.5" # macOS
fargate 에 netshoot 디플로이먼트(파드)
# 네임스페이스 생성
kubectl create ns study-aews

# 테스트용 파드 netshoot 디플로이먼트 생성 : 0.5vCPU 1GB 할당되어, 아래 Limit 값은 의미가 없음. 배포 시 대략 시간 측정해보자!
cat <<EOF | kubectl apply -f -
apiVersion: apps/v1
kind: Deployment
metadata:
  name: netshoot
  namespace: study-aews
spec:
  replicas: 1
  selector:
    matchLabels:
      app: netshoot
  template:
    metadata:
      labels:
        app: netshoot
    spec:
      containers:
      - name: netshoot
        image: nicolaka/netshoot
        command: ["tail"]
        args: ["-f", "/dev/null"]
        resources:
          requests:
            cpu: 500m
            memory: 500Mi
          limits:
            cpu: 2
            memory: 2Gi
      terminationGracePeriodSeconds: 0
EOF
kubectl get events -w --sort-by '.lastTimestamp'

# 확인 : 메모리 할당 측정은 어떻게 되었는지?
kubectl get pod -n study-aews -o wide
kubectl get pod -n study-aews -o jsonpath='{.items[0].metadata.annotations.CapacityProvisioned}'
0.5vCPU 1GB

# 디플로이먼트 상세 정보
kubectl get deploy -n study-aews netshoot -o yaml
...
  template:
    ...
    spec:
      ...
      schedulerName: default-scheduler
      securityContext: {}
      terminationGracePeriodSeconds: 0
...

# 파드 상세 정보 : admission control 이 동작했음을 알 수 있음
kubectl get pod -n study-aews -l app=netshoot -o yaml
...
  metadata:
    annotations:
      CapacityProvisioned: 0.5vCPU 1GB
      Logging: LoggingEnabled
    ...
    preemptionPolicy: PreemptLowerPriority
    priority: 2000001000
    priorityClassName: system-node-critical
    restartPolicy: Always
    schedulerName: fargate-scheduler
    ...
    qosClass: Burstable

#
kubectl describe pod -n study-aews -l app=netshoot | grep Events: -A10

#
kubectl get mutatingwebhookconfigurations.admissionregistration.k8s.io
kubectl describe mutatingwebhookconfigurations 0500-amazon-eks-fargate-mutation.amazonaws.com
kubectl get validatingwebhookconfigurations.admissionregistration.k8s.io

# 파드 내부에 zsh 접속 후 확인
kubectl exec -it deploy/netshoot -n study-aews -- zsh
-----------------------------------------------------
ip -c a
cat /etc/resolv.conf
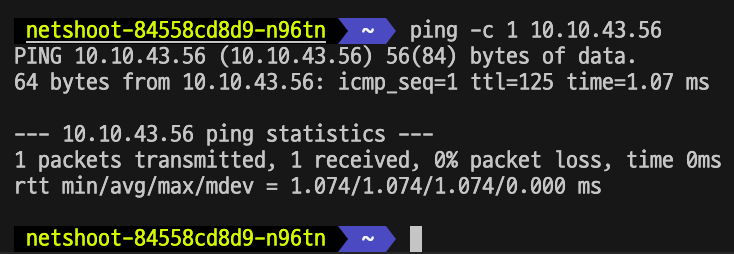
curl ipinfo.io/ip # 출력되는 IP는 어떤것? , 어떤 경로를 통해서 인터넷이 되는 걸까?
ping -c 1 <다른 파드 IP ex. coredns pod ip>
lsblk
df -hT /
cat /etc/fstab
exit
-----------------------------------------------------
- chcek

파드 권한과 호스트 네임스페이스 공유로 호스트 탈취 시도 - Blog
kubectl apply -f - <<EOF
apiVersion: v1
kind: Pod
metadata:
  name: root-shell
  namespace: study-aews
spec:
  containers:
  - command:
    - /bin/cat
    image: alpine:3
    name: root-shell
    securityContext:
      privileged: true
    tty: true
    stdin: true
    volumeMounts:
    - mountPath: /host
      name: hostroot
  hostNetwork: true
  hostPID: true
  hostIPC: true
  tolerations:
  - effect: NoSchedule
    operator: Exists
  - effect: NoExecute
    operator: Exists
  volumes:
  - hostPath:
      path: /
    name: hostroot
EOF

#
kubectl get pod -n study-aews root-shell
kubectl describe pod -n study-aews root-shell | grep Events: -A 10
Events:
  Type     Reason            Age   From               Message
  ----     ------            ----  ----               -------
  Warning  FailedScheduling  48s   fargate-scheduler  Pod not supported on Fargate: fields not supported: HostNetwork, HostPID, HostIPC, volumes not supported: hostroot is of an unsupported volume Type, invalid SecurityContext fields: Privileged

# 출력 메시지
# Pod not supported on Fargate: fields not supported:
# HostNetwork, HostPID, HostIPC, volumes not supported:
# hostroot is of an unsupported volume Type, invalid SecurityContext fields: Privileged

# 삭제
kubectl delete pod -n study-aews root-shell


# (참고) fargate가 아닌 권한이 충분한 곳에서 실행 시 : 아래 처럼 호스트 네임스페이스로 진입 가능!
kubectl -n kube-system exec -it root-shell -- chroot /host /bin/bash
root@myk8s-control-plane:/# id
uid=0(root) gid=0(root) groups=0(root),1(daemon),2(bin),3(sys),4(adm),6(disk),10(uucp),11,20(dialout),26(tape),27(sudo)
AWS ALB(Ingress)
# 게임 디플로이먼트와 Service, Ingress 배포
cat <<EOF | kubectl apply -f -
apiVersion: apps/v1
kind: Deployment
metadata:
  namespace: study-aews
  name: deployment-2048
spec:
  selector:
    matchLabels:
      app.kubernetes.io/name: app-2048
  replicas: 2
  template:
    metadata:
      labels:
        app.kubernetes.io/name: app-2048
    spec:
      containers:
      - image: public.ecr.aws/l6m2t8p7/docker-2048:latest
        imagePullPolicy: Always
        name: app-2048
        ports:
        - containerPort: 80
---
apiVersion: v1
kind: Service
metadata:
  namespace: study-aews
  name: service-2048
spec:
  ports:
    - port: 80
      targetPort: 80
      protocol: TCP
  type: ClusterIP
  selector:
    app.kubernetes.io/name: app-2048
---
apiVersion: networking.k8s.io/v1
kind: Ingress
metadata:
  namespace: study-aews
  name: ingress-2048
  annotations:
    alb.ingress.kubernetes.io/scheme: internet-facing
    alb.ingress.kubernetes.io/target-type: ip
spec:
  ingressClassName: alb
  rules:
    - http:
        paths:
        - path: /
          pathType: Prefix
          backend:
            service:
              name: service-2048
              port:
                number: 80
EOF


# 모니터링
watch -d kubectl get pod,ingress,svc,ep,endpointslices -n study-aews

# 생성 확인
kubectl get-all -n study-aews
kubectl get ingress,svc,ep,pod -n study-aews
kubectl get targetgroupbindings -n study-aews

# Ingress 확인
kubectl describe ingress -n study-aews ingress-2048
kubectl get ingress -n study-aews ingress-2048 -o jsonpath="{.status.loadBalancer.ingress[*].hostname}{'\n'}"

# 게임 접속 : ALB 주소로 웹 접속
kubectl get ingress -n study-aews ingress-2048 -o jsonpath='{.status.loadBalancer.ingress[0].hostname}' | awk '{ print "Game URL = http://"$1 }'

# 파드 IP 확인
kubectl get pod -n study-aews -owide

# 파드 증가
kubectl scale deployment -n study-aews  deployment-2048 --replicas 4

# 게임 실습 리소스  삭제
kubectl delete ingress ingress-2048 -n study-aews
kubectl delete svc service-2048 -n study-aews && kubectl delete deploy deployment-2048 -n study-aews
fargate job
#
cat <<EOF | kubectl apply -f -
apiVersion: batch/v1
kind: Job
metadata:
  name: busybox1
  namespace: study-aews
spec:
  template:
    spec:
      containers:
      - name: busybox
        image: busybox
        command: ["/bin/sh", "-c", "sleep 10"]
      restartPolicy: Never
  ttlSecondsAfterFinished: 60 # <-- TTL controller
---
apiVersion: batch/v1
kind: Job
metadata:
  name: busybox2
  namespace: study-aews
spec:
  template:
    spec:
      containers:
      - name: busybox
        image: busybox
        command: ["/bin/sh", "-c", "sleep 10"]
      restartPolicy: Never
EOF

#
kubectl get job,pod -n study-aews
kubectl get job -n study-aews -w
kubectl get pod -n study-aews -w
kubectl get job,pod -n study-aews

# 삭제
kubectl delete job -n study-aews --all- check

fargate logging
- 들어가며 → 내장 로그 라우터는 어디에서 구동될까요???
- Fargate의 Amazon EKS는 Fluent Bit 기반의 내장 로그 라우터를 제공합니다. 즉, Fluent Bit 컨테이너를 사이드카로 명시적으로 실행하지 않고 Amazon에서 실행합니다. 로그 라우터를 구성하기만 하면 됩니다.
- Amazon EKS on Fargate offers a built-in log router based on Fluent Bit. This means that you don’t explicitly run a Fluent Bit container as a sidecar, but Amazon runs it for you.
- 구성은 다음 기준을 충족해야 하는 전용 ConfigMap을 통해 이루어집니다.
- 이름 : aws-logging
- aws-observability라는 전용 네임스페이스에서 생성됨
- 5300자를 초과할 수 없습니다.
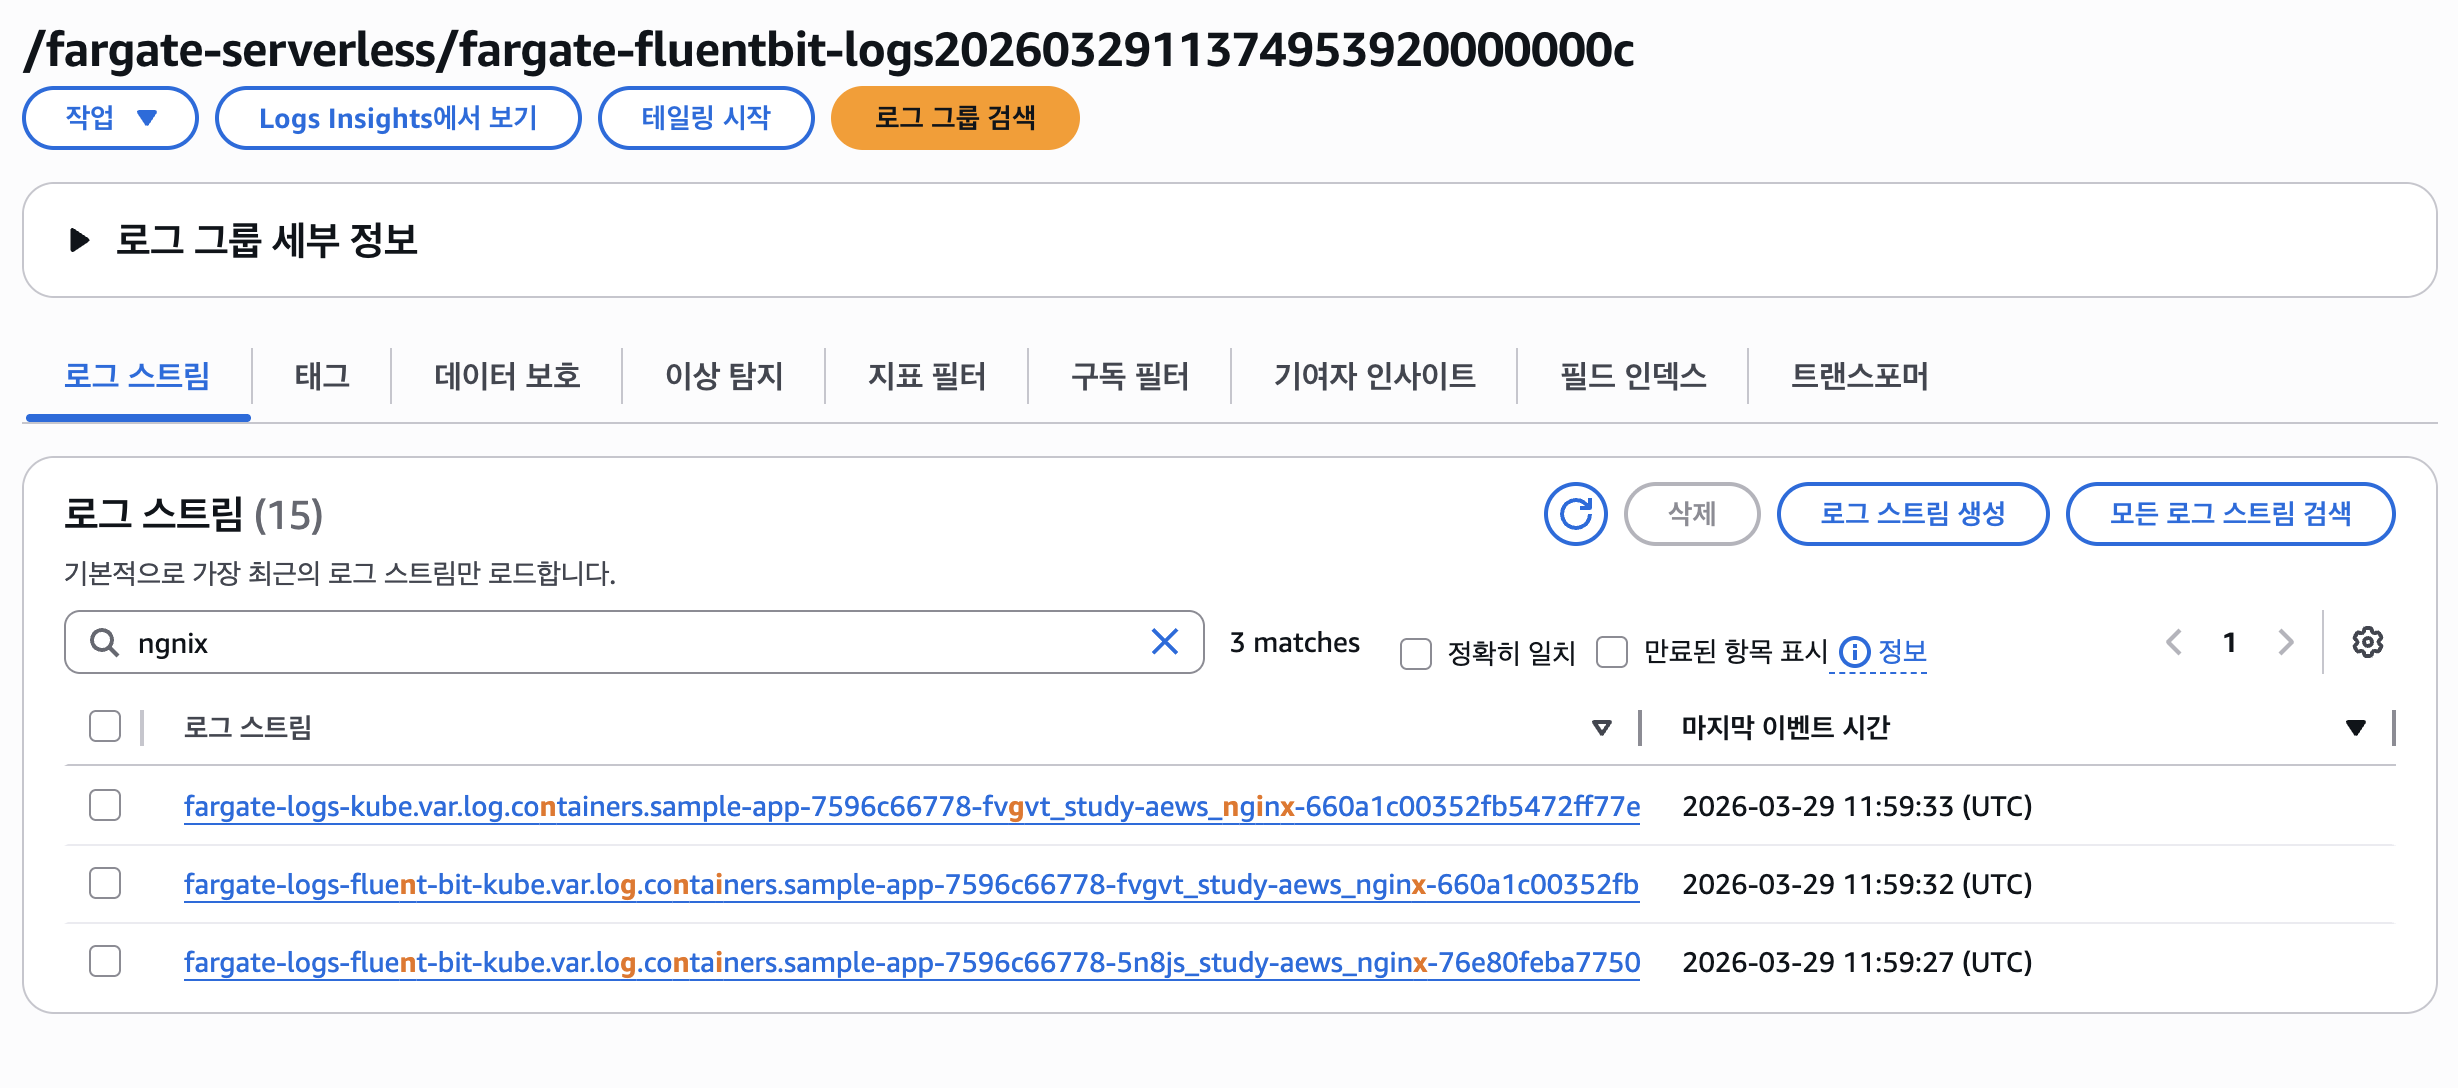
- ConfigMap을 생성하면 Fargate의 Amazon EKS가 자동으로 이를 감지하고 로그 라우터를 구성합니다. Fargate는 AWS에서 관리하는 Fluent Bit의 업스트림 호환 배포판인 Fluent Bit용 AWS 버전을 사용합니다. 자세한 내용은 GitHub의 Fluent Bit용 AWS를 참조하세요 - Docs
- 로그 라우터를 사용하면 AWS의 다양한 서비스를 로그 분석 및 저장에 사용할 수 있습니다. Fargate에서 Amazon CloudWatch, Amazon OpenSearch 서비스로 로그를 직접 스트리밍할 수 있습니다. 또한 Amazon Data Firehose를 통해 Amazon S3, Amazon Kinesis 데이터 스트림 및 파트너 도구와 같은 대상으로 로그를 스트리밍할 수도 있습니다.
- Fargate 포드를 배포할 기존 Kubernetes 네임스페이스를 지정하는 기존 Fargate 프로필입니다.
- Fargate의 Amazon EKS는 Fluent Bit 기반의 내장 로그 라우터를 제공합니다. 즉, Fluent Bit 컨테이너를 사이드카로 명시적으로 실행하지 않고 Amazon에서 실행합니다. 로그 라우터를 구성하기만 하면 됩니다.
로그 발생 nginx 배포
cat <<EOF | kubectl apply -f -
apiVersion: apps/v1
kind: Deployment
metadata:
  name: sample-app
  namespace: study-aews
spec:
  replicas: 2
  selector:
    matchLabels:
      app: nginx
  template:
    metadata:
      labels:
        app: nginx
    spec:
      containers:
      - image: nginx:latest
        name: nginx
        ports:
        - containerPort: 80
          name: http
        resources:
          requests:
            cpu: 500m
            memory: 500Mi
          limits:
            cpu: 2
            memory: 2Gi
---
apiVersion: v1
kind: Service
metadata:
  name: sample-app
  namespace: study-aews
spec:
  selector:
    app: nginx
  ports:
  - port: 80
    targetPort: 80
    protocol: TCP
  type: ClusterIP
EOF

# 확인
kubectl get pod -n study-aews -l app=nginx
kubectl describe pod -n study-aews -l app=nginx

# 반복 접속
kubectl exec -it deploy/netshoot -n study-aews -- curl sample-app | grep title
while true; do kubectl exec -it deploy/netshoot -n study-aews -- curl sample-app | grep title; sleep 1; echo ; date; done;

# 로그 확인
kubectl stern -n study-aews -l app=nginx- chceck
!! 이상으로 3주차 스터디 공유를 마치겠습니다!
