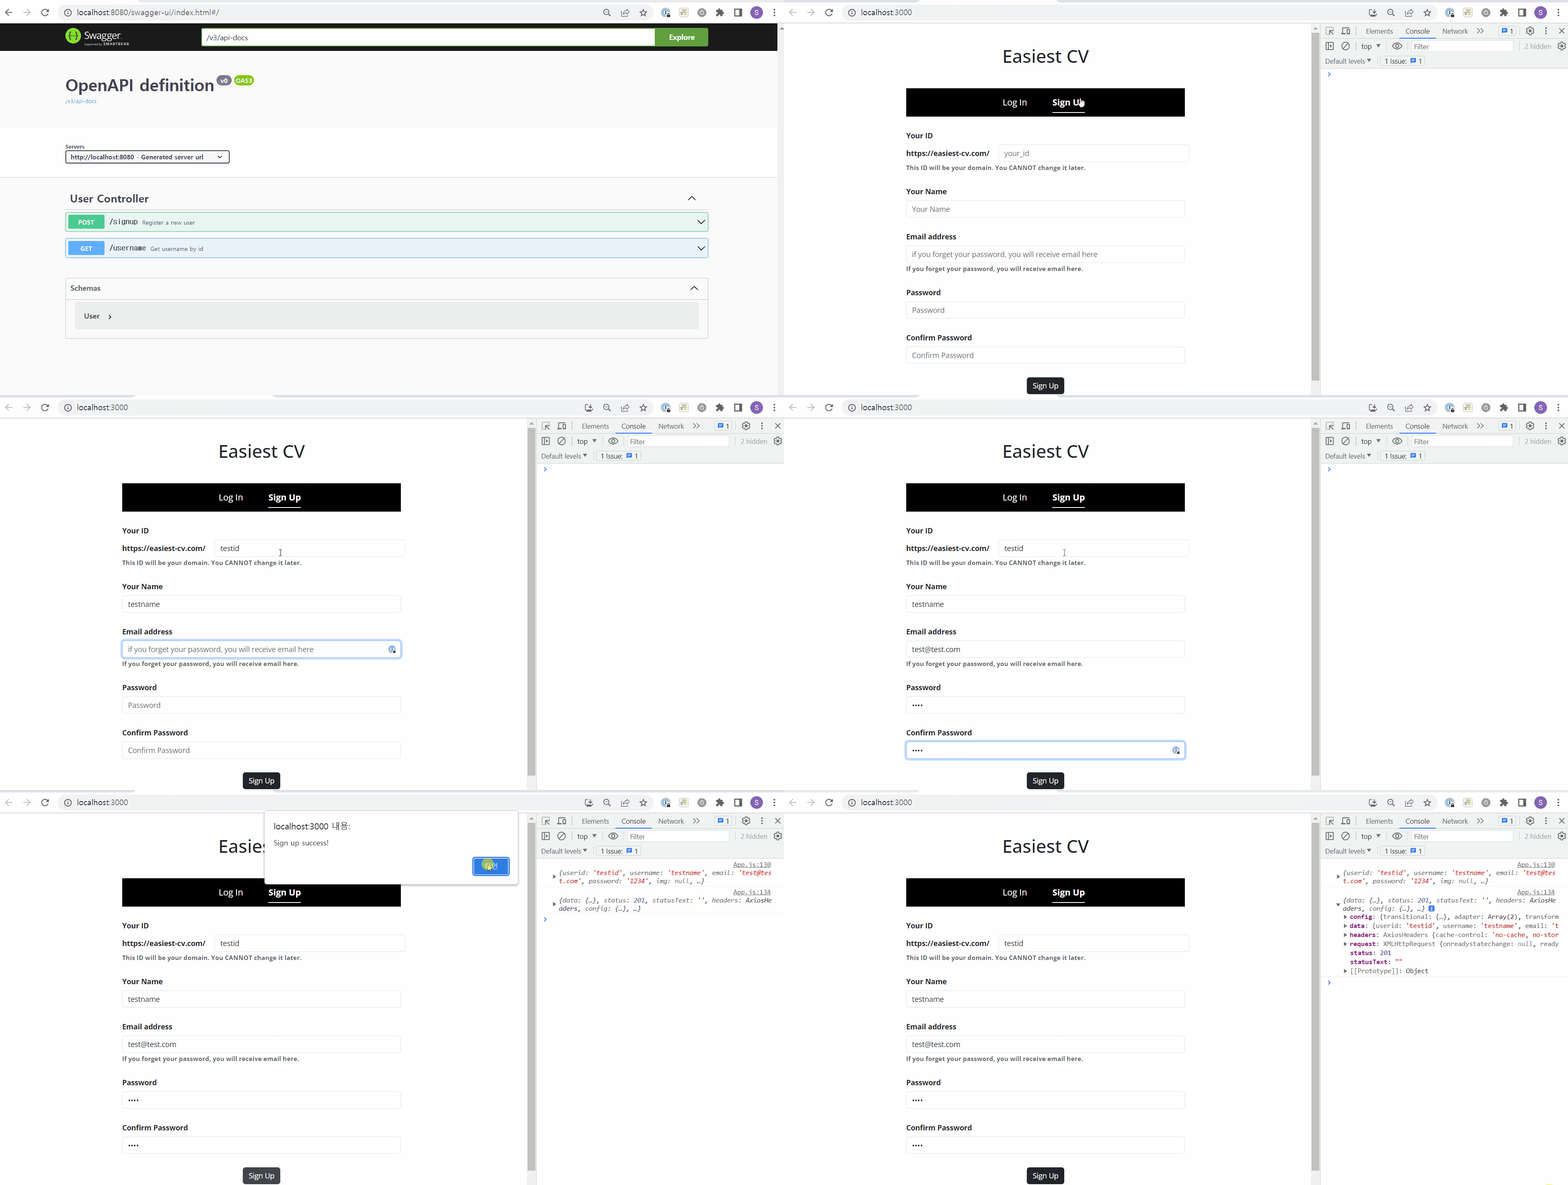
이번주에 한 일 요약
- Swagger 적용해 API 문서 자동화하기
- 회원가입 기능 구현
1. Spring에서 API 문서 자동화하기 - SpringDoc OpenAPI
Spring REST Docs: 이 라이브러리는 테스트를 통해 API 문서를 생성합니다. 이는 문서와 코드 사이의 불일치를 방지하며, 테스트 케이스를 작성하는 동안 문서를 작성하기 때문에 테스트 커버리지가 높은 API 문서를 만들 수 있습니다. 하지만, 이 라이브러리는 테스트 작성이 필요하고, API 문서를 만드는 과정이 비교적 복잡할 수 있습니다.
SpringDoc OpenAPI: 이 라이브러리는 Spring 애플리케이션의 API를 분석하여 OpenAPI 3.0 스펙에 따라 문서를 자동으로 생성합니다. 이는 훨씬 쉽게 API 문서를 만들 수 있게 해주지만, 이 라이브러리를 사용하면 코드와 문서 사이의 불일치 가능성이 존재합니다.
(출처: ChatGPT, 검증: API 문서화와 Spring Rest Docs 사용기)
두 라이브러리 이름이 비슷해서 저번 주까지는 헷갈렸는데, 이 둘이 다른 라이브러리더라.
고민 끝에 SpringDoc OpenAPI를 사용하기로 했다.
- FastAPI에 OpenAPI가 내장되어 있기 때문에 이미 사용해 본 경험이 있고
- 프로젝트의 규모가 작기 때문에 코드와 문서 사이의 불일치가 있더라도 비교적 찾아내기 쉬울 것이며
- 내가 테스트 코드 작성에 아직 익숙지 않다.
물론 3번의 경우 이 참에 TDD를 경험해 보고 싶은 욕심도 있어서 하루 동안 Spring REST Docs 찾아봤는데
https://hudi.blog/spring-rest-docs/ 이거 읽어보니까 API 문서 만드는 게 Swagger에 비해 정말 복잡하더라.
https://velog.io/@kjgi73k/Springboot3%EC%97%90-Swagger3%EC%A0%81%EC%9A%A9%ED%95%98%EA%B8%B0
님 감사합니다 ㅠㅠ
이 블로그 글의 도움을 많이 받았다.
implementation 'org.springdoc:springdoc-openapi-starter-webmvc-ui:2.0.2'그리고 여기로 접속해야 한다: http://localhost:8080/swagger-ui/index.html
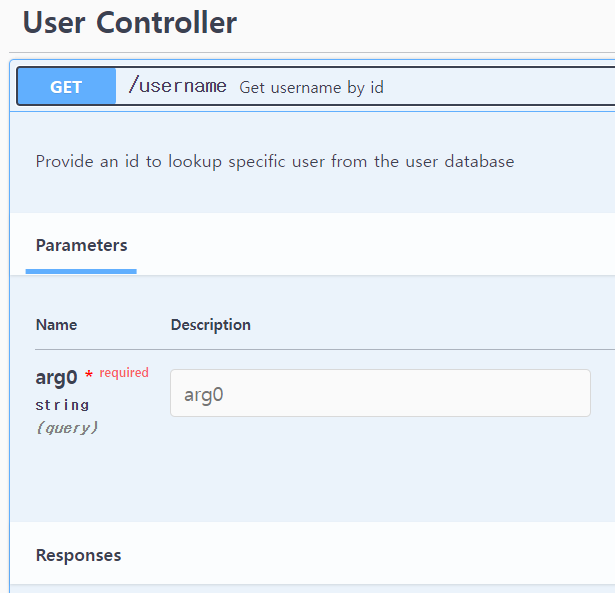
이렇게 뜨는 문제가 있었는데
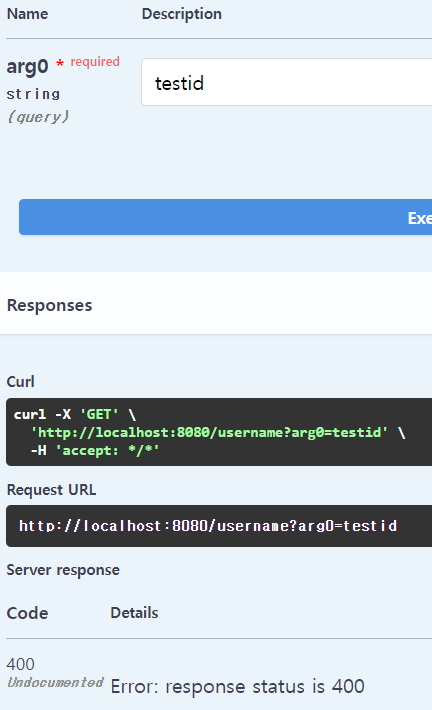
당연히 200 성공이 안 나왔다. argument 이름이 다르니까.
이거 설정하려면 이렇게 해야 한다.
@Operation(summary = "Get username by id", description = "Provide an id to lookup specific user from the user database")
@GetMapping("/username")
public String getUsername(@RequestParam(name="userid") String userid){
    return userService.getUsernameById(userid);
}
@RequestParam(name="userid") 이렇게 name을 설정해줘야 한다.
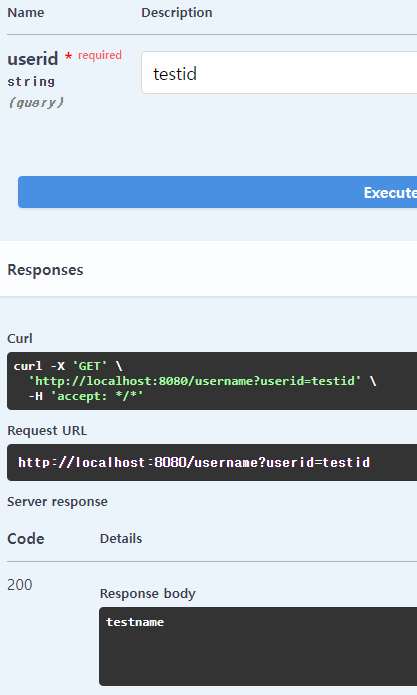
이제 잘 나온다!
2. 회원가입 기능 구현
회원가입 기능
프론트엔드에서 회원가입 폼을 채우고 signup 버튼을 누르면 post 요청이 날아가서
MySQL 데이터베이스에 유저 정보가 저장된다.
Front-end
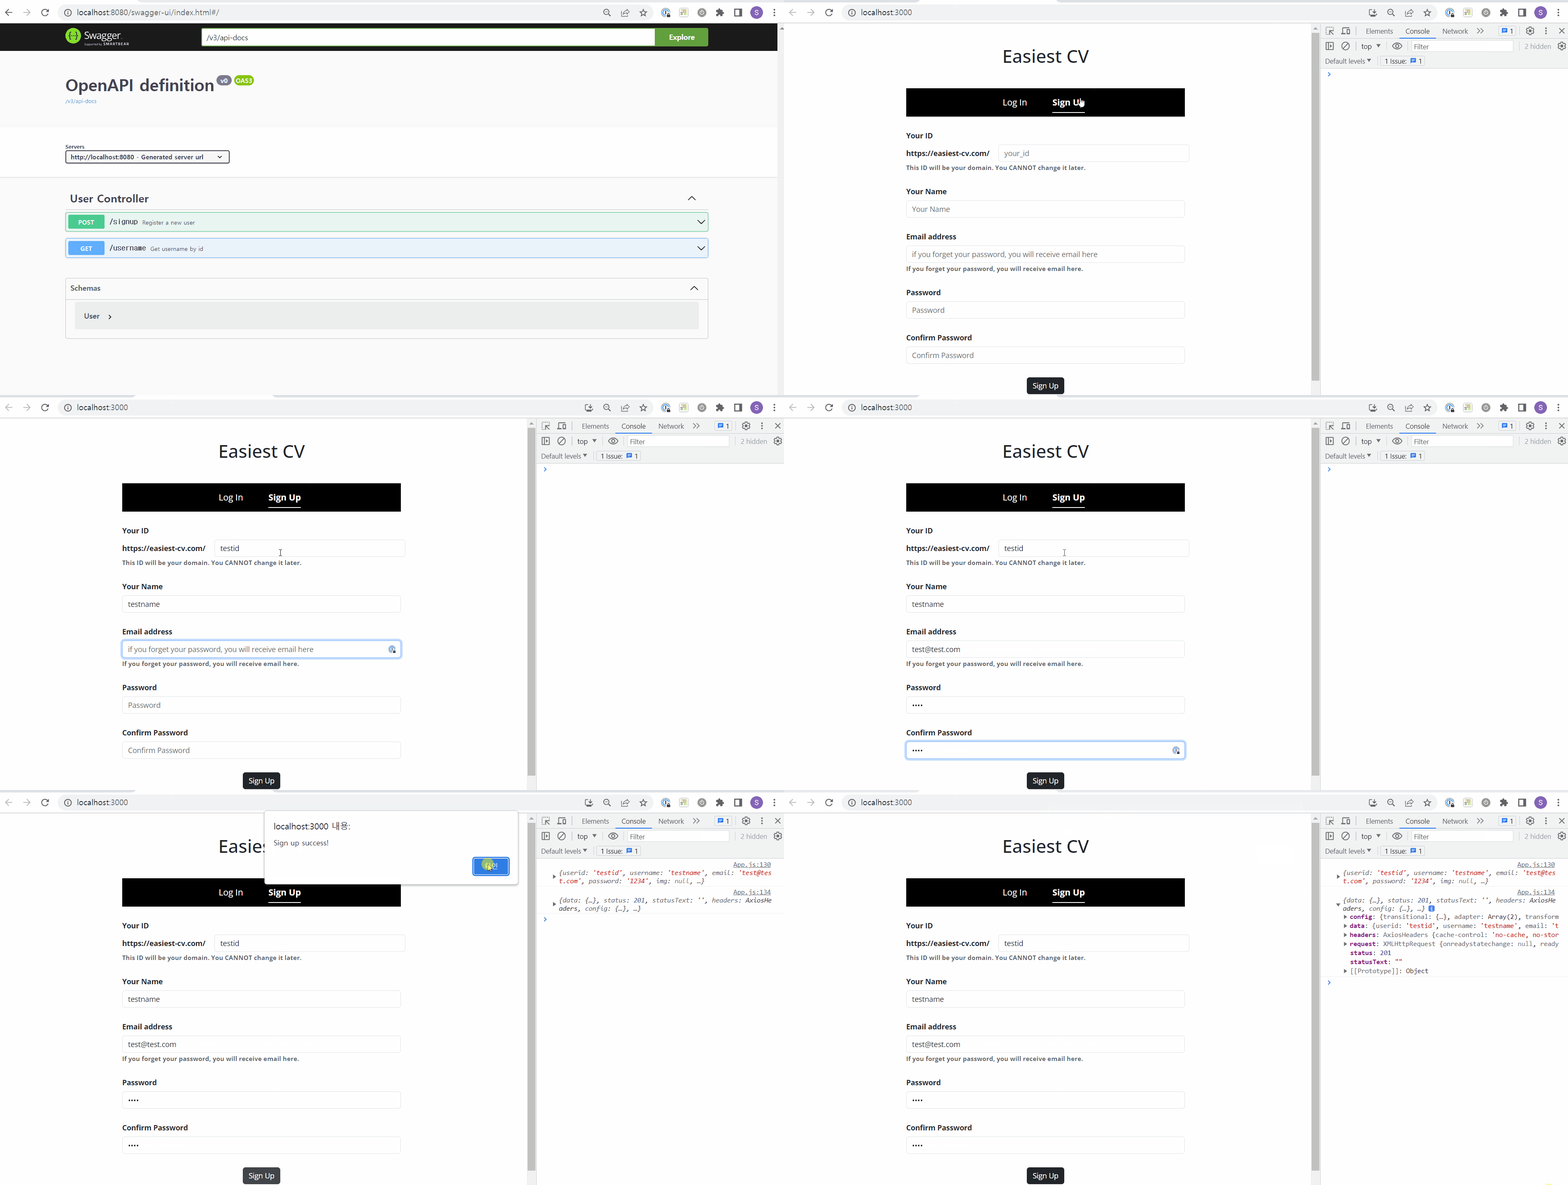
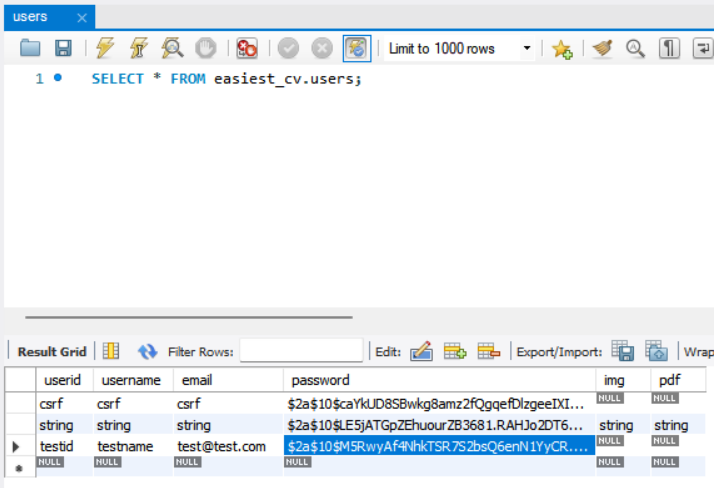
Sign Up 버튼 눌렀을 때 실행되는 코드는 다음과 같다.
const handleSignup = () => {
const data = {
  userid: userid,
  username: username,
  email: email,
  password: password,
  img: null,
  pdf: null,
};

if (!confirmed) {
  alert("Password is not confirmed!");
} else {
  console.log(data);
  axios
	.post("http://localhost:8080/signup", data)
	.then((res) => {
	  console.log(res);
	  alert("Sign up success!");
	})
	.catch((err) => {
	  console.log(err);
	  alert("Sign up failed: " + err.response.data);
	});
}
};
더 자세한 코드는 위의 내 깃허브 리포지토리에서 볼 수 있다.
프론트엔드야 뭐 어려울 게 없었다.
지금은 비밀번호 두 번 입력할 때 위 아래 동일하게 입력했는지 확인만 한 번 하고, 동일하면 Confirm Password 란의 빨간 border를 지우는 정도였으니까.
나중에 아이디 규칙이나 비밀번호 규칙 같은 걸 만들면 그에 따라서 검증하는 코드를 추가할지도 모르겠다. 이메일 형식 맞는지 검증하는 코드도.
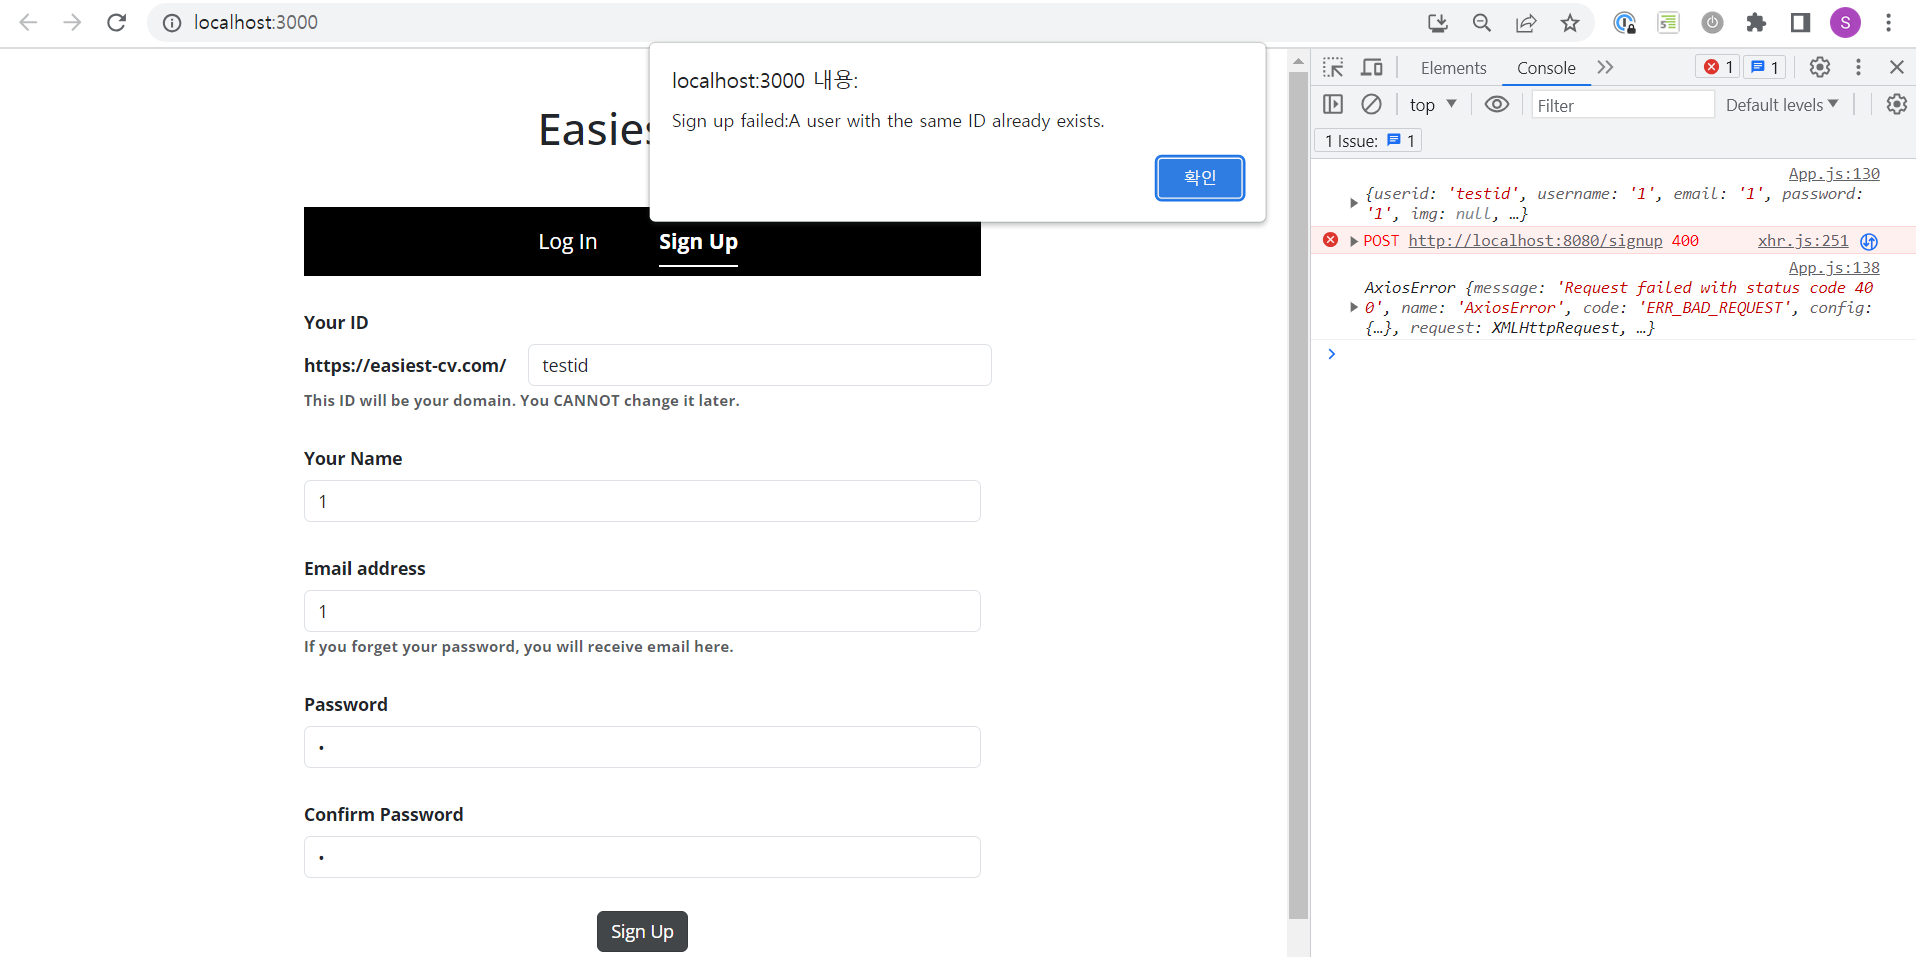
참고로 중복 아이디 입력 시에는 이렇게 백엔드에서 에러 메시지를 받아서 띄운다
Back-end
SecurityConfig
package EasiestCV.easiestCV.config;

import org.springframework.context.annotation.Bean;
import org.springframework.context.annotation.Configuration;
import org.springframework.security.config.annotation.web.builders.HttpSecurity;
import org.springframework.security.config.annotation.web.configuration.EnableWebSecurity;
import org.springframework.security.crypto.bcrypt.BCryptPasswordEncoder;
import org.springframework.security.crypto.password.PasswordEncoder;
import org.springframework.security.web.SecurityFilterChain;

import static org.springframework.security.config.Customizer.withDefaults;

@Configuration
@EnableWebSecurity
public class SecurityConfig {

    @Bean
    public PasswordEncoder passwordEncoder() {
        return new BCryptPasswordEncoder();
    }

    @Bean
    public SecurityFilterChain securityFilterChain(HttpSecurity http) throws Exception {
        return http
                .csrf(csrf -> csrf.disable())
                .authorizeHttpRequests(auth -> auth
//                        .requestMatchers("/{userid}/admin").authenticated()
                        .anyRequest().permitAll()
                )
                .build();
    }
}
PasswordEncoder 는 Spring Security에 있는 인터페이스이다.
주요 메서드로는 다음과 같은 것들이 있다.
String encode(CharSequence rawPassword): 주어진 비밀번호를 암호화.
boolean matches(CharSequence rawPassword, String encodedPassword): 주어진 비밀번호를 암호화하고, 그 결과를 이미 암호화된 비밀번호와 비교해서 일치하면 true, 그렇지 않으면 false를 리턴.
BCryptPasswordEncoder는PasswordEncoder인터페이스를 구현한 클래스로, BCrypt 해시 알고리즘을 사용하여 비밀번호를 암호화합니다. BCrypt는 CPU와 시간에 기반한 복잡도를 가진 암호화 알고리즘으로, 적절한 시간복잡도를 설정함으로써, 무작위 대입 공격(Brute-Force Attack)에 대해 강한 보호를 제공합니다.
...라고 ChatGPT가 말한다. BCrypt나 Brute-Force Attack이나 어디서 많이 들어본 것 같다. 아마 수업 시간에 배웠던 것 같은데 일단 그런가보다 하고 넘어가기로 한다.
SecurityFilterChain 은 Spring Security에서 HTTP 요청을 처리하는 필터들의 체인이다.
여기서는 HttpSecurity 객체를 이용해 이 체인을 구성하는 규칙들을 설정하고 있다.
csrf(csrf -> csrf.disable()): CSRF 보호를 비활성화.- CSRF : Cross-Site Request Forgery. 사용자가 자신의 의지와는 무관하게 공격자가 의도한 행동을 하도록 만드는 웹사이트 취약점 공격 방법. 예를 들어 해커의 계좌로 천만원을 송금하게 하는 링크를 사용자가 실수로 누르게 만든다든지.
* 이거 비활성화 안 했더니 자꾸 403 에러가 떠서 일단 테스트 중에는 비활성화해뒀다.
- CSRF : Cross-Site Request Forgery. 사용자가 자신의 의지와는 무관하게 공격자가 의도한 행동을 하도록 만드는 웹사이트 취약점 공격 방법. 예를 들어 해커의 계좌로 천만원을 송금하게 하는 링크를 사용자가 실수로 누르게 만든다든지.
authorizeHttpRequests(auth -> auth.anyRequest().permitAll()): HTTP 요청에 대한 접근 제어 설정.anyRequest().permitAll(): 모든 요청에 대해 인증 없이 접근 허용.
requestMatchers("/{userid}/admin").authenticated(): 주석 처리된 부분.{userid}/adminURL 패턴에 대한 요청은 인증된 사용자만 접근할 수 있게 하는 코드.- 아직 프론트엔드에서 라우팅 주소를 확실하게 안 만들어 놔서 일단 주석처리해 놨다. 다음주에 만들 예정.
http.build(): 위에서 정의된 규칙들을 사용해SecurityFilterChain객체를 생성하고 리턴.
아직은 보다시피 인증된 사용자만 접근할 수 있는 곳이 없다.
아직 로그인 기능과 더불어 프론트에서 라우팅 주소를 확실하게 안 만들기도 했고,
자꾸 회원가입에서 403 에러가 떠가지고ㅠㅠ 일단은 다 풀어놨다.
(아니 권한이 없으니까 만드려고 하는 게 회원가입인데 권한 없음 에러가 뜨는 게 말이 되는가?)
다음주에 로그인 기능 만들면서 본격적으로 해결해볼 예정이다.
WebConfig
@Configuration
public class WebConfig implements WebMvcConfigurer {

    @Override
    public void addCorsMappings(CorsRegistry registry) {
        registry.addMapping("/**")
                .allowedOrigins("http://localhost:3000") // Frontend URL
                .allowedMethods("*") // 필요한 HTTP 메소드를 허용하세요 (GET, POST, PUT, DELETE 등)
                .allowedHeaders("*") // 필요한 헤더를 허용하세요
                .allowCredentials(true);
    }
}
프론트엔드의 localhost:3000에서 오는 HTTP 요청을 허용해주기 위한 설정 클래스다.
나중에 배포하게 되면 로컬 주소가 아니라 배포 주소로 바꿔줘야겠지.
UserRepository
@Repository
public interface UserRepository extends JpaRepository<User, String> {
    Optional<User> findByUserid(String userId); // JPA 자동생성
}
findByUserid는 JPA의 특별한 메서드 네이밍 규칙을 따른다. 이 규칙을 따라 메서드 이름을 지으면 JPA가 자동으로 해당 메서드를 구현해준다.
이 메서드는 특정 userid 필드를 가진 User 엔티티 클래스를 리턴하는 메서드이다.
저거 이름을 findByUserId로 지어야 하나 findByUserid로 지어야 하나 헷갈려서 잠깐 찾아봤는데
@Id
@Column(name = "userid", nullable = false, unique = true)
private String userid;
필드 이름이 userid 이므로 findByUserid 라고 짓는 게 맞다.
userId였으면 findByUserId로 지어야 했을 거고.
UserService
private final UserRepository userRepository;
private final PasswordEncoder passwordEncoder;

@Autowired
public UserService(UserRepository userRepository, PasswordEncoder passwordEncoder) {
    this.userRepository = userRepository;
    this.passwordEncoder = passwordEncoder;
}

public User signup(User user){
	// check if a user with the same ID already exists
	if(userRepository.findByUserid(user.getUserid()).isPresent()){
		throw new RuntimeException("A user with the same ID already exists.");
	}

	// encode the user's password
	user.setPassword(passwordEncoder.encode(user.getPassword()));

	// save the new user to the database
	User savedUser = userRepository.save(user);

	// create new user to mysql database
	return savedUser;
}
id 중복 여부를 검사한 뒤 중복이면 에러를 뿜고,
아니면 패스워드를 인코딩해서 그 결과를 User 객체에 담아 리턴한다.
passwordEncoder 는 아까 SecurityConfig 에서 빈으로 등록한 BCryptPasswordEncoder 객체일 것이다.
UserController
@Operation(summary = "Register a new user", description = "Provide user details to register a new user")
@PostMapping("/signup")
public ResponseEntity<?> registerUser(@RequestBody User user) {
    try {
        User savedUser = userService.signup(user);
        return new ResponseEntity<>(savedUser, HttpStatus.CREATED);
    } catch (RuntimeException e) {
        return new ResponseEntity<>(e.getMessage(), HttpStatus.BAD_REQUEST);
    }
}ResponseEntity<?>를 사용하면, 성공한 경우와 실패한 경우에 서로 다른 타입의 response body를 리턴할 수 있다.
- 성공 시: 저장된 객체, 201 상태 코드(요청이 성공적으로 처리됨 + 새로운 리소스 생성됨) 리턴.
- 실패 시: 에러 메시지, 400 상태 코드 (클라이언트의 요청 형식이 잘못되었거나 데이터가 유효하지 않음)
반성 및 다음 주 계획
나의 ChatGPT-주도-개발 을 뼈아프게 반성했다. Spring Security 6는 챗지피티가 학습한 날짜 이후에 업데이트된 거라서 챗지피티가 몰랐기 때문이다.
이것 때문에 SecurityConfig 작성할 때 많이 더뎠다.
공식문서 읽어버릇해야 하는데.
다음 주에는 JWT를 사용해 로그인 기능을 만들 예정이다. 이건 회원가입 단계가 아니라 로그인 단계에서 사용되는 거더라.
로그인 만들다 보면 이번 주에 미처 해결하지 못한 Spring Security 관련 문제들도 아마 마주하게 될 것이다.
