타임피커(TimePicker) : 시간 표시와 조절
데이트피커(DatePicker)와 캘린더뷰(CalendarView) : 날짜 표시와 조절
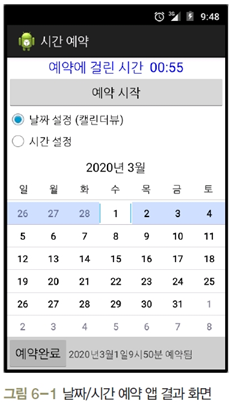
캘린더뷰의 XML 속성
showWeekNumber : 현재 몇 주 차인지를 각 주의 맨 앞에 출력함
디폴트는 true이지만 false로 하는 것이 더 깔끔하고 보기 좋음

xml


<?xml version="1.0" encoding="utf-8"?>
<LinearLayout
    xmlns:android="http://schemas.android.com/apk/res/android"
    xmlns:app="http://schemas.android.com/apk/res-auto"
    xmlns:tools="http://schemas.android.com/tools"
    android:layout_width="match_parent"
    android:layout_height="match_parent"
    tools:context=".MainActivity"
    android:orientation="vertical">

    <LinearLayout
        android:layout_width="match_parent"
        android:layout_height="wrap_content"
        android:orientation="vertical">

        <Chronometer
            android:id="@+id/chronometer1"
            android:layout_width="match_parent"
            android:layout_height="wrap_content"
            android:format="예약에 걸린시간 %s"
            android:gravity="center" />

        <Button
            android:id="@+id/btnStart"
            android:layout_width="match_parent"
            android:layout_height="wrap_content"
            android:text="예약시작" />
    </LinearLayout>

    <RadioGroup
        android:layout_width="match_parent"
        android:layout_height="wrap_content">

        <RadioButton
            android:id="@+id/rdoCal"
            android:layout_width="match_parent"
            android:layout_height="wrap_content"
            android:text="날짜설정(캘린더뷰)"/>

        <RadioButton
            android:id="@+id/rdoTime"
            android:layout_width="match_parent"
            android:layout_height="wrap_content"
            android:text="시간설정"/>

    </RadioGroup>

    <LinearLayout
        android:layout_width="match_parent"
        android:layout_height="match_parent"
        android:layout_weight="1"
        android:orientation="vertical">
        <FrameLayout
            android:layout_width="match_parent"
            android:layout_height="wrap_content">
        <CalendarView
            android:id="@+id/calendarView1"
            android:layout_width="match_parent"
            android:layout_height="wrap_content"
            android:showWeekNumber="false"/>
        <TimePicker
            android:id="@+id/timePicker1"
            android:timePickerMode="spinner"
            android:layout_width="match_parent"
            android:layout_height="wrap_content"
            android:gravity="center"/>
        </FrameLayout>
    </LinearLayout>

    <LinearLayout
        android:layout_width="match_parent"
        android:layout_height="wrap_content"
        android:orientation="horizontal">

        <Button
            android:id="@+id/btnEnd"
            android:layout_width="wrap_content"
            android:layout_height="wrap_content"
            android:text="예약완료"/>

        <TextView
            android:id="@+id/tvYear"
            android:layout_width="wrap_content"
            android:layout_height="wrap_content"
            android:text="0000"/>
        <TextView
            android:layout_width="wrap_content"
            android:layout_height="wrap_content"
            android:text="년"/>
        <TextView
            android:id="@+id/tvMonth"
            android:layout_width="wrap_content"
            android:layout_height="wrap_content"
            android:text="00"/>
        <TextView
            android:layout_width="wrap_content"
            android:layout_height="wrap_content"
            android:text="월"/>
        <TextView
            android:id="@+id/tvDay"
            android:layout_width="wrap_content"
            android:layout_height="wrap_content"
            android:text="00"/>
        <TextView
            android:layout_width="wrap_content"
            android:layout_height="wrap_content"
            android:text="일"/>
        <TextView
            android:id="@+id/tvHour"
            android:layout_width="wrap_content"
            android:layout_height="wrap_content"
            android:text="00"/>
        <TextView
            android:layout_width="wrap_content"
            android:layout_height="wrap_content"
            android:text="시"/>
        <TextView
            android:id="@+id/tvMinute"
            android:layout_width="wrap_content"
            android:layout_height="wrap_content"
            android:text="00"/>
        <TextView
            android:layout_width="wrap_content"
            android:layout_height="wrap_content"
            android:text="분"/>
        <TextView
            android:layout_width="wrap_content"
            android:layout_height="wrap_content"
            android:text="예약됨"/>

    </LinearLayout>

</LinearLayout>


main

1.코틀린객체 생성
        var chrono : Chronometer
        var btnStart : Button
        var rdocal : RadioButton
        var rdoTime : RadioButton
        var calView : CalendarView
        var tPicker : TimePicker
        var btnEnd : Button
        var tvYear : TextView
        var tvMonth : TextView
        var tvDay : TextView
        var tvHour : TextView
        var tvMinute : TextView

        var selectYear : Int =0
        var selectDay : Int=0
        var selectMonth : Int =0

2.xml객체를 코틀린객체에 연결(바인딩)
        chrono = findViewById(R.id.chronometer1)
        btnStart = findViewById(R.id.btnStart)
        btnEnd = findViewById(R.id.btnEnd)
        rdocal = findViewById(R.id.rdoCal)
        rdoTime = findViewById(R.id.rdoTime)
        calView = findViewById(R.id.calendarView1)
        tPicker = findViewById(R.id.timePicker1)

        tvYear = findViewById(R.id.tvYear)
        tvMonth = findViewById(R.id.tvMonth)
        tvDay = findViewById(R.id.tvDay)
        tvHour = findViewById(R.id.tvHour)
        tvMinute = findViewById(R.id.tvMinute)

//처음 캘린더와 타임피커 안보이게
        calView.visibility = View.INVISIBLE
        tPicker.visibility = View.INVISIBLE


//해당 라디오버튼을 누른경우 캘린더나 타임피커 보이게함
        rdocal.setOnClickListener {
            calView.visibility = View.VISIBLE
            tPicker.visibility = View.INVISIBLE
        }
        rdoTime.setOnClickListener {
            tPicker.visibility = View.VISIBLE
            calView.visibility = View.INVISIBLE
        }


        btnStart.setOnClickListener {
            chrono.base = SystemClock.elapsedRealtime() //초기화
            chrono.start()
            chrono.setTextColor(Color.RED)
        }


        btnEnd.setOnClickListener {
            chrono.stop()
            chrono.setTextColor(Color.BLUE)

             날짜 - 캘린더는 피커와 달리 바로사용 안됨
            tvYear.text = Integer.toString(selectYear)
            tvMonth.text = Integer.toString(selectMonth)
            tvDay.text = Integer.toString(selectDay)

            시간 - picker 에서 바로 들고옴
            tvHour.text = Integer.toString(tPicker.currentHour)
            tvMinute.text = Integer.toString(tPicker.currentMinute)
        }


        calView.setOnDateChangeListener { view, year, month, dayOfMonth ->
            멤버변수를 만들어 놓고 저장한다
            selectYear = year
            selectMonth = month +1 // 달은 +1 해줘야함 why?는 모름...
            selectDay = dayOfMonth
        }

        캘린더를 데이터피커로 바꿔 적용할땐 다 똑같지만
        날짜를 바로 적용해줌
           tvYear.text = Integer.toString(dPicker.year)
            tvMonth.text = Integer.toString(dPicker.month+1)
            tvDay.text = Integer.toString(dPicker.dayOfMonth)
``
