리니어레이아웃(LinearLayout)
레이아웃의 왼쪽 위부터 아래쪽 또는 오른쪽으로 차례로 배치
orientation 속성
- 리니어레이아웃의 기본적 속성
값으로 vertical과 horizontal 을 지정 - vertical : 레이아웃안에 위젯을 왼쪽위에서 부터 수직 방향으로 쌓음
- horizontal : 레이아웃안에 위젯을 왼쪽위에서 부터 수평 방향으로 쌓음
gravity와 layout_gravity 속성
-
gravity
-값으로 left, right, center, top, bottom 등을 사용
-2개를 조합하여 사용 가능 left|top -
layout_gravity
-gravity는 자신에게 포함된 자식을 어디에 위치시킬지를 결정하면,layout_gravity 은 자신의 위치를 부모의 어디에 위치시킬지를 결정함
< 내생각 >
gravity는 부모가 자식의 위치를 정해주는 느낌
layout_gravity 자식이 부모안에서 어디에 있을지 정하는 느낌

<?xml version="1.0" encoding="utf-8"?>
<LinearLayout
xmlns:android="http://schemas.android.com/apk/res/android"
xmlns:app="http://schemas.android.com/apk/res-auto"
xmlns:tools="http://schemas.android.com/tools"
android:layout_width="match_parent"
android:layout_height="match_parent"
tools:context=".MainActivity"
android:orientation="vertical"
>
<Button
android:layout_width="110dp"
android:layout_height="100dp"
android:gravity="top|right"
android:layout_gravity="center"
android:text="버튼1"/>
<Button
android:layout_width="110dp"
android:layout_height="100dp"
android:layout_gravity="left"
android:gravity="center|left"
android:text="버튼2"/>
<Button
android:layout_width="110dp"
android:layout_height="100dp"
android:layout_gravity="right"
android:gravity="bottom|right"
android:text="버튼3"/>
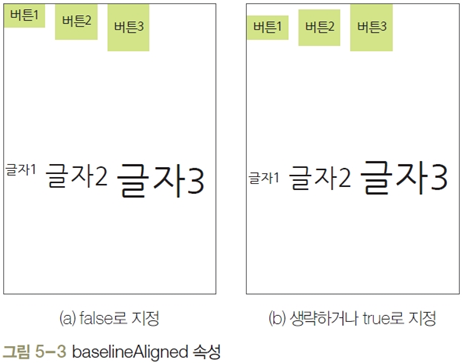
</LinearLayout>baselineAligned 속성
layout_weight 속성
리니어레이아웃을 여러 개 사용할 경우 각 레이아웃의 크기(비율)를 지정해야 함
코드적기< 참고 >
색상
RGB
r+g=yellow,g+b =cyan, r+b = magenta
xml을 사용하지 않고 kotlin코드로만 화면 만들기
비추천이지만 알아둘것
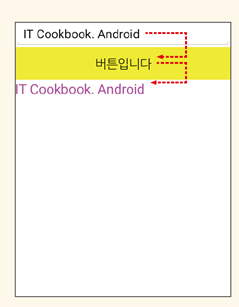
class MainActivity : AppCompatActivity() {
override fun onCreate(savedInstanceState: Bundle?) {
super.onCreate(savedInstanceState)
//1.레이아웃 객체를 만든다.only kotlin 객체로 ->
var params = LinearLayout.LayoutParams(
LinearLayout.LayoutParams.MATCH_PARENT,
LinearLayout.LayoutParams.MATCH_PARENT)
var baseLayout = LinearLayout(this)
baseLayout.orientation = LinearLayout.VERTICAL
setContentView(baseLayout,params)
var edit = EditText(this)
edit.hint = "입력하세요"
baseLayout.addView(edit)
var btn = Button(this)
btn.text = "버튼입니다"
btn.setBackgroundColor(YELLOW)
baseLayout.addView(btn)
var text = TextView(this)
text.setTextColor(RED)
//float형이기 때문에 숫자뒤에 F써줘야함
text.setTextSize(30F)
baseLayout.addView(text)
btn.setOnClickListener {
text.text = edit.text.toString()
//edit을 text형식으로 출력해서 밑줄있음
// text.setText(edit.text)
}
}
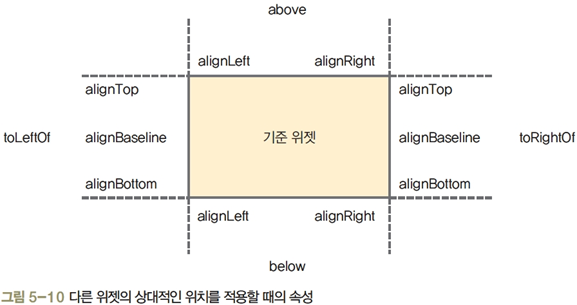
}럴러티브레이아웃(RelativeLayout)
위젯 자신이 속한 레이아웃의 상하좌우 위치를 지정하여 배치하거나 다른 위젯으로부터 상대적인 위치를 지정
-
나(위젯), 부모와의 관계

-
나(위젯),다른 위젯과의 관계
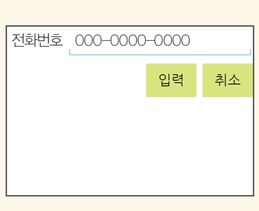
<?xml version="1.0" encoding="utf-8"?>
<RelativeLayout
    xmlns:android="http://schemas.android.com/apk/res/android"
    android:layout_width="match_parent"
    android:layout_height="match_parent"
    >

    <TextView
        android:id="@+id/tv1"
        android:layout_width="wrap_content"
        android:layout_height="wrap_content"
        android:layout_alignBaseline="@+id/ed1"
        android:textSize="20dp"
        android:layout_margin="10dp"
        android:text="전화번호"/>

    <EditText
        android:id="@+id/ed1"
        android:layout_width="300dp"
        android:layout_height="wrap_content"
        android:layout_toRightOf="@+id/tv1"
        android:hint="010-0000-0000"/>
    <Button
        android:id="@+id/btn1"
        android:layout_width="wrap_content"
        android:layout_height="wrap_content"
        android:text="취소"
        android:layout_below="@+id/ed1"
        android:layout_alignRight="@+id/ed1"
        />
    <Button
        android:layout_width="wrap_content"
        android:layout_height="wrap_content"
        android:text="입력"
        android:layout_below="@+id/ed1"
        android:layout_marginRight="5dp"
        android:layout_toLeftOf="@+id/btn1"/>


</RelativeLayout>